A slow-loading WordPress dashboard can be frustrating. It can affect your productivity and your website’s overall performance.
A slow dashboard might sound like a minor issue, but it can have significant effects, including reducing your website’s conversions. A fast dashboard makes managing content and your site much easier.
In this article, we will guide you through the steps to fix a slow WordPress dashboard. We’ll show you how to speed it up easily and efficiently.
By the end of this guide, you’ll have all the tools you need to improve the performance of your WordPress dashboard.
What Causes a Slow Loading WordPress Dashboard?
A slow-loading WordPress dashboard can be caused by a few things, but the most common one is limited server resources.
Most WordPress hosting providers offer a set number of resources for each hosting plan. These resources are enough to run most websites.
However, as your WordPress website grows, you may notice slight performance degradation or slower loading across the board. That’s because more people are now accessing your website and consuming server resources.
For the front-end section of your website, which is what your visitors see, you can easily install a WordPress caching plugin to overcome WordPress speed and performance issues.
However, the WordPress admin area is uncached, so it requires more resources to run at the optimal level.
If your WordPress dashboard has become annoyingly slow, then this means a WordPress plugin, a default setting, or something else on the site is consuming too many resources.
That being said, let’s take a look at how to troubleshoot and fix the slow loading WordPress admin dashboard.
Here is an overview of the steps we will cover in this article:
- How to Test Performance of WordPress Admin Area
- Install WordPress Updates
- Update the PHP Version Used by Your Hosting Company
- Increase PHP Memory Limit
- Monitor WordPress Plugins for Performance
- Install a WordPress Caching Plugin
- Tweak Admin Screens & Disable WordPress Dashboard Widgets
- Fix Slow WooCommerce Admin Dashboard
- Lock WordPress Admin Area and Login Pages
- Manage WordPress Autosave Intervals
- Upgrade or Switch to Better WordPress Hosting
1. How to Test The Performance of Your WordPress Admin Area
Before making any changes, it’s important to measure the speed of your WordPress admin area so you can get an objective measurement of any improvement.
Normally, you can use website speed test tools to check your website’s speed and performance.
However, the WordPress admin area is behind a login screen, so you cannot use the same tools to test it.
Luckily, many modern desktop browsers come with built-in tools to test the performance of any web page you want.
For example, if you are using Google Chrome, then you can simply go to the WordPress dashboard and open the Inspect tool by right-clicking anywhere on the page.

This will split your browser screen, and you will see the Inspect area in the other window, either at the bottom or side of your browser window.
Inside the Inspect tool, switch to the ‘Lighthouse’ tab and click on the ‘Generate Report’ button.
This will generate a report similar to the Web Vitals report generated by PageSpeed Insights.
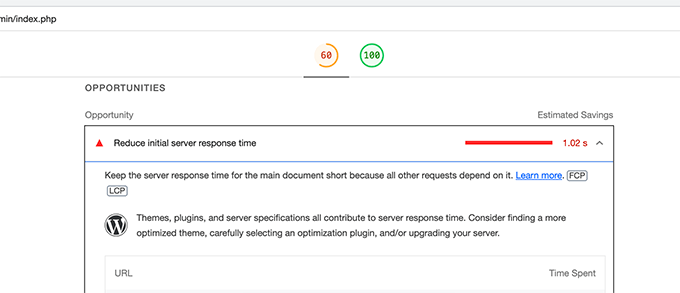
From here, you can see what’s slowing down your WordPress admin area. For instance, you can see which JavaScript files are taking up more resources and affecting your server’s initial response time.
Bonus Tip: Need help improving website speed? Take a look at WordPress Site Speed Optimization service. For a small fee, our engineers will improve your site speed to give you the maximum performance boost.
2. Install WordPress Updates
The core WordPress team works hard to improve performance with each WordPress release.
For instance, the block editor team tests and improves performance in each release. The performance team works on improving speed and performance across the board.
If you are not installing WordPress updates, then you are missing out on these performance improvements.
Similarly, all top WordPress themes and plugins release updates that not only fix bugs but also address performance issues.
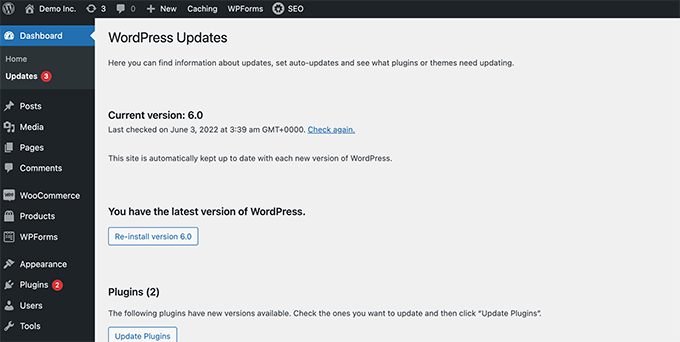
To install updates, simply go to the Dashboard » Updates page to install any available updates.
For more details, see our guide on how to properly update WordPress (infographic).
3. Update the PHP Version Used by Your Hosting Company
WordPress is developed using an open-source programming language called PHP. At the time of writing this article, WordPress requires at least PHP version 7.4 or greater. The current stable version available for PHP is 8.2.10.
Most WordPress hosting companies maintain the minimum requirements to run WordPress, which means they may not be using the latest PHP version out of the box.
Now, just like WordPress, PHP also releases new versions with significant performance improvements. By using an older version, you are missing that performance boost.
You can view which PHP version is used by your hosting provider by visiting the Tools » Site Health page from your WordPress dashboard and switching to the ‘Info’ tab.
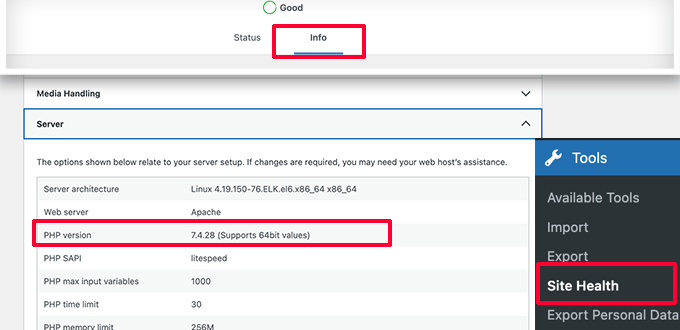
Luckily, all reliable WordPress hosting providers offer an easy way for customers to upgrade their PHP version.
For instance, if you are on Bluehost, then you can simply log in to your hosting account dashboard, switch to the ‘Websites’ tab and click on ‘Settings’ for the website you want to work on.
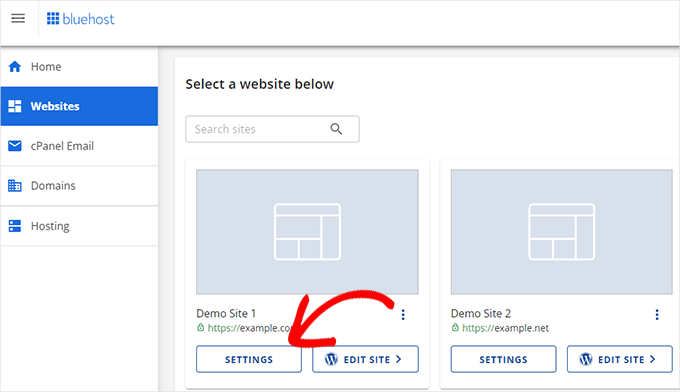
Next, switch to the ‘Advanced’ tab and scroll down to the cPanel section.
Click ‘Manage’ to launch the cPanel.
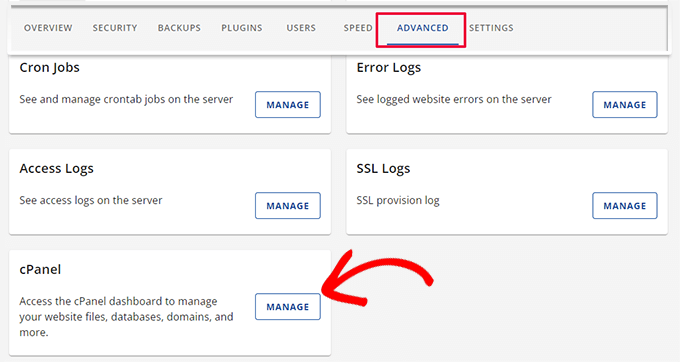
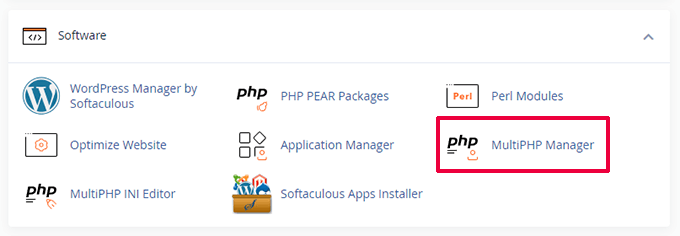
After that, you will see a number of apps and tools available under your cPanel dashboard.
Scroll down to the Software section and click ‘MultiPHP Manager’.
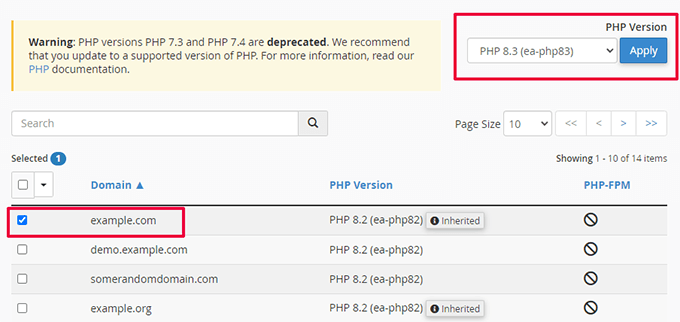
On the next page, you need to select your WordPress blog.
Then, select the PHP version that you want to use.
For other hosting companies, see our complete guide on how to update your PHP version in WordPress.
4. Increase PHP Memory Limit
Your web hosting server is like any other computer. It needs memory to efficiently run multiple applications at the same time.
If there is not enough memory available for PHP on your server, then it will slow down your website and may even cause it to crash.
You can check the PHP memory limit by visiting the Tools » Site Health page and switching to the ‘Info’ tab.
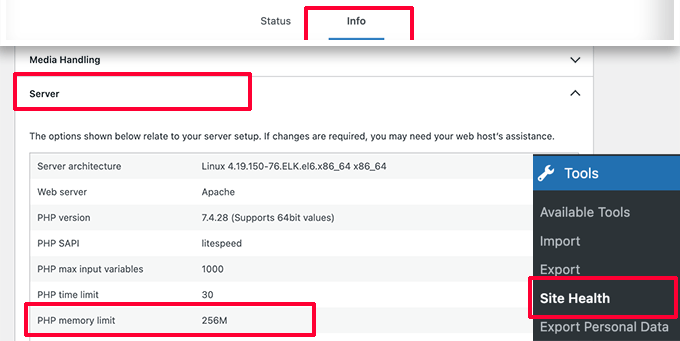
You’ll find the PHP memory limit under the Server section. If it is less than 500M, then you need to increase it.
You can increase the PHP memory limit by simply entering the following line in your wp-config.php file:
define( 'WP_MEMORY_LIMIT', '512M' );
For more details, see our article on increasing the PHP memory limit in WordPress.
5. Monitor WordPress Plugins for Performance
Some WordPress plugins may run inside the WordPress admin area. If plugin authors are not careful, their plugins can easily consume too many resources and slow down your WordPress admin area.
One way to find out about such plugins is by installing and activating the Query Monitor plugin. For more details, see our step-by-step guide on how to install a WordPress plugin.
Upon activation, the plugin will add a new menu item to your WordPress toolbar.
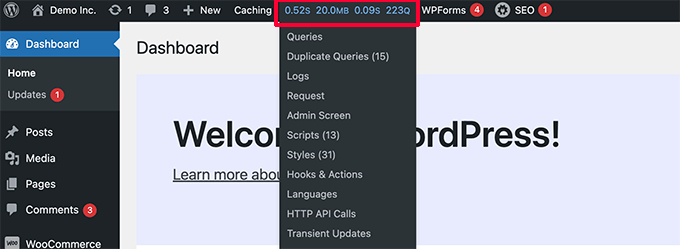
Clicking on it will show performance results for the page you are currently viewing on your website.
This will bring up the Query Monitor console.
Here, you need to switch to the ‘Queries by Component’ tab on the left side. From here, you can see the performance impact of plugins and find out which one is taking up too many resources.
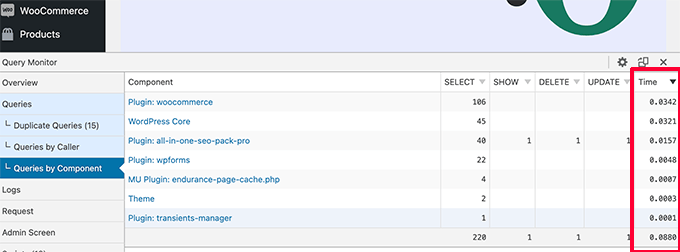
You can now temporarily disable the slow plugins and see if that improves performance.
If it does, then you can reach out to the plugin author and seek support or find an alternative plugin.
6. Install a WordPress Caching Plugin
WordPress caching plugins not only improve your website speed, but they can also help you fix a slow-loading admin dashboard.
A good WordPress caching plugin helps you optimize page load speed, CSS and JavaScript delivery, your WordPress database, and more.
This frees up resources on your WordPress hosting server that your WordPress admin area can utilize for improved performance.
We recommend using WP Rocket. It is the best WordPress caching plugin on the market. It works out of the box and makes it super easy to optimize your WordPress performance.
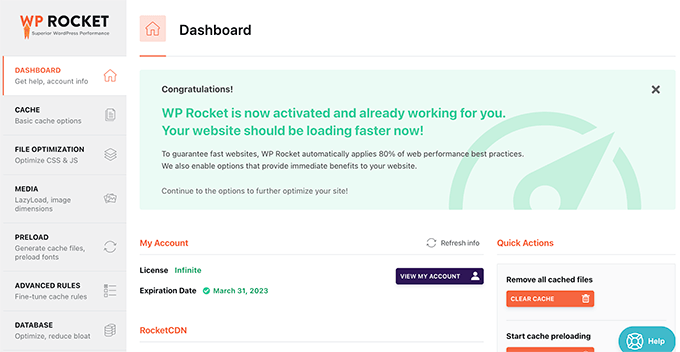
For more details, see our guide on how to properly install and set up WP Rocket in WordPress.
7. Tweak Admin Screens & Disable WordPress Dashboard Widgets
WordPress automatically loads some widgets on the dashboard screen. This includes Quick Draft, Events and News, Site Health, and more.
Some WordPress plugins add their widgets to the dashboard screen as well. If you have a lot of these widgets loading on your dashboard, it could slow things down.
You can turn off these widgets by simply clicking on the ‘Screen Options’ button and unchecking the box next to the widgets.
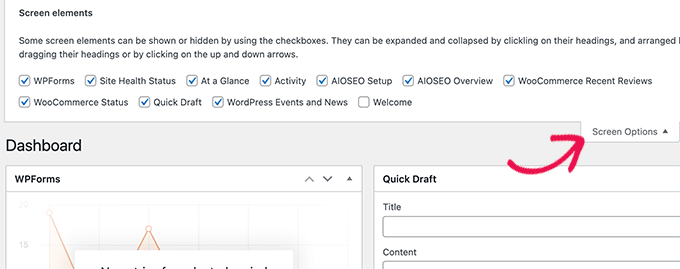
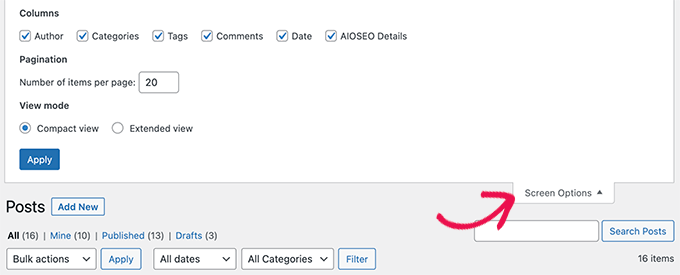
Similarly, you can use the Screen Options menu to show and hide sections on different admin screens.
For instance, you can choose the columns you want to see on the posts screen.
8. Fix Slow WooCommerce Admin Dashboard
If you run an online store using WooCommerce, then there are some specific WooCommerce features that can affect the performance of your WordPress admin area.
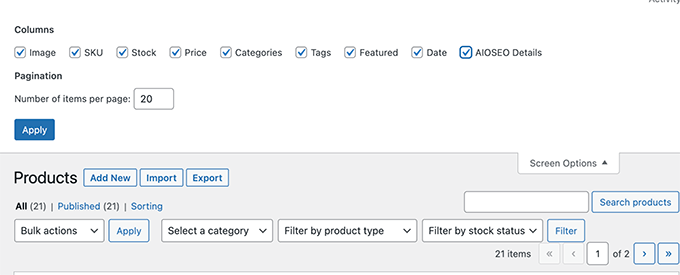
For instance, you can turn off the WooCommerce dashboard widget by clicking on the ‘Screen Options’ menu.
Similarly, you can change the information displayed on the Products page.
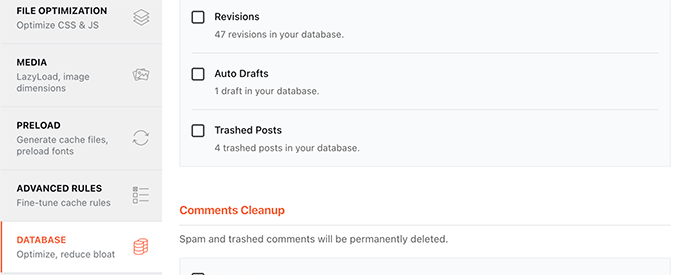
After a while, your WooCommerce store may add unnecessary data to your WordPress database.
If you are already using WP Rocket, then you can simply switch to the ‘Database’ tab in the plugin settings. From here, you can delete transients and optimize your WordPress database with a click.
9. Lock WordPress Admin Area and Login Pages
Random hackers and DDoS attacks are common internet nuisances that can affect WordPress websites.
These automated scripts access WordPress login pages and attempt to log in hundreds of times in a short amount of time.
They may not be able to gain access to your WordPress website, but they will still be able to slow it down.
One easy way to block these scripts is by locking your WordPress admin directory and login pages.
If you are on Bluehost, then you can simply go to your hosting account and click on ‘Settings’ under your website.

After that, switch to the ‘Advanced’ tab.
Now scroll down a little to the cPanel section and then click ‘Manage’.

This will launch the cPanel dashboard in a new tab.
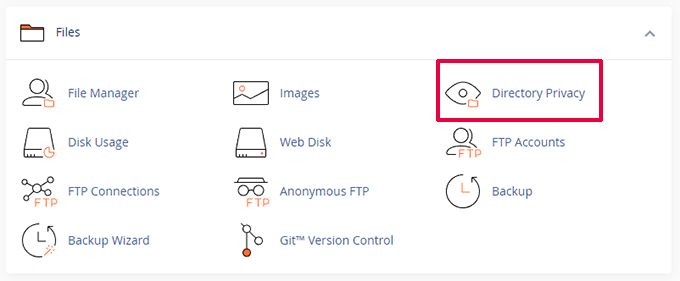
Now, you need to scroll down to the Files section and then click the ‘Directory Privacy’ option.
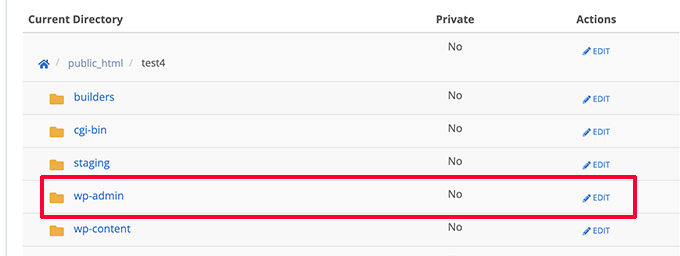
Next, you need to locate the wp-admin directory (usually found inside the public_html folder).
Then, simply click on the ‘Edit’ button next to it.
Next, you will be asked to provide a name for your protected directory.
Then, click on the ‘Save’ button to continue.

The control panel will save your options, and you’ll need to click on the ‘Go Back’ button to continue.
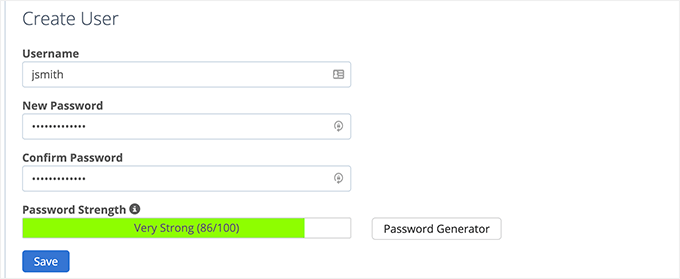
After that, you will need to create a username and password for the protected folder.
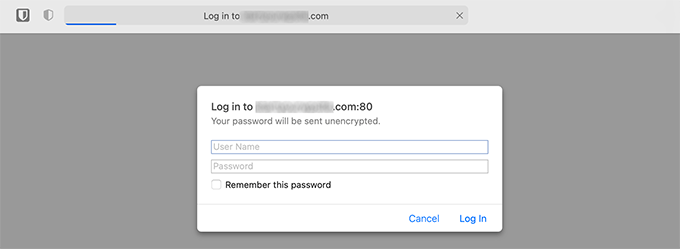
Now, when you visit your WordPress admin area, you will be prompted to enter your username and password.
For more details, see our tutorial on how to password-protect the WordPress admin directory.
Password Protect WordPress Login Page
Next, you will want to block access to the WordPress login page. For this, you’ll need to manually edit the .htaccess file on your website and generate a password file.
First, connect to your WordPress website using an FTP client or the File Manager app inside your hosting control panel.
After that, go to the root folder of your website (the root folder is where you can see the wp-admin, wp-includes, and wp-content folders).
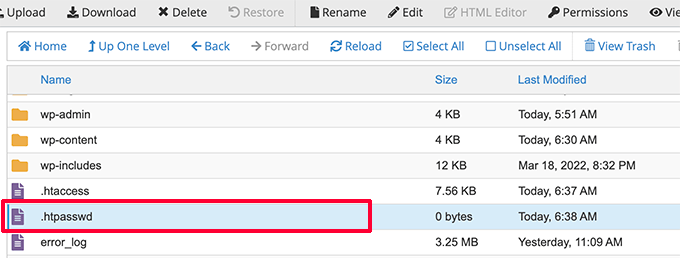
Here, you need to create a new file and name it .htpasswd.
Next, you need to visit this online tool to generate a .htpasswd string.
You need to use the same username and password that you used for the WordPress admin directory.
Then click on the ‘Generate’ button.
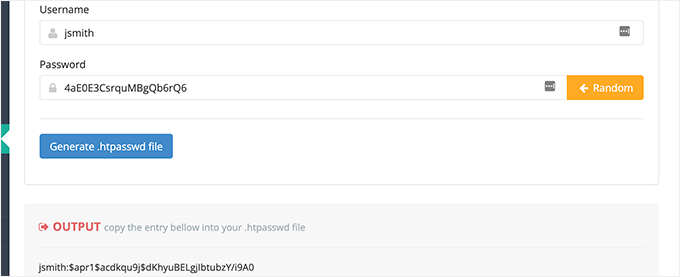
The tool will generate a username and password string under the output box.
You need to copy and paste this string inside the .htpasswd file you created earlier.
Next, you need to edit the .htaccess file and copy and paste the following code inside it:
### BEGIN BASIC BLOCK
<Files wp-login.php>
AuthType Basic
AuthName "Protected Folder"
AuthUserFile /home/username/public_html/yourwebsite/.htpasswd
Require user jsmith
Satisfy All
</Files>
### END BASIC BLOCK
Don’t forget to replace jsmith with your own username and change the AuthUserFile value with the path to your .htpasswd file. You can find it inside the File Manager app.
You can now visit your WordPress login page to see the password protection in action.
10. Manage WordPress Autosave Intervals
The WordPress block editor comes with a built-in autosave feature. It allows you to easily restore your content in case you close the editor without saving your changes.
However, if multiple users are working on your website during peak traffic, then all those autosave requests will slow down the WordPress admin area.
Now, autosave is a crucial feature, and we don’t recommend turning it off. However, you can slow it down to reduce the performance impact.
Simply add the following line to your wp-config.php file:
define( 'AUTOSAVE_INTERVAL', 120 )
This line simply tells WordPress to run autosave once every 2 minutes (120 seconds) instead of 1.
Reduce Heartbeat API Calls
WordPress uses something called the heartbeat API to send AJAX calls to a server without reloading a page. This allows WordPress to show other authors that a post is being edited by another user, and it enables plugin developers to show you notifications in real time.
By default, the API pings back every 60 seconds. If multiple authors are working on your website at the same time, then these server calls can become resource-intensive.
If you are already using WP Rocket, then it will automatically reduce heartbeat API activity to pingback every 120 seconds.
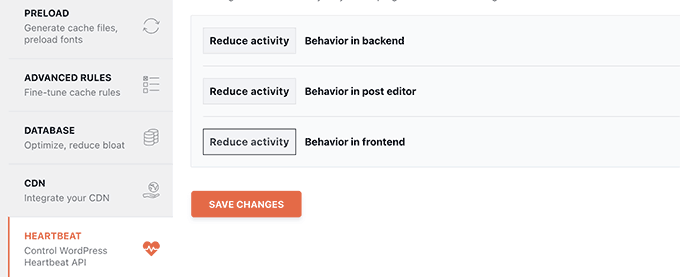
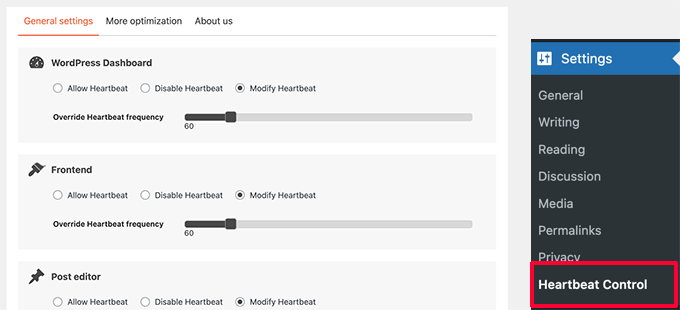
Alternatively, you can also use their standalone plugin called Heartbeat Control to reduce Heartbeat API calls.
We recommend reducing them to at least 120 seconds or more.
11. Upgrade or Switch to Better WordPress Hosting
All WordPress performance issues depend on the infrastructure provided by your WordPress hosting providers.
This limits your ability to improve performance to the resources offered by your hosting provider.
The above tips will certainly help you reduce the load on your WordPress server, but they may not be enough for your hosting environment.
To improve performance even more, you can move your WordPress site to a new host and sign up with a different hosting provider.
We recommend using Bluehost, as they are one of the top WordPress hosting companies. Their shared hosting plans come with built-in caching, which improves WordPress performance.

However, as your website grows, you may need to upgrade your hosting plan.
High-traffic sites can benefit from moving to a managed WordPress hosting platform like WP Engine or SiteGround.
At WPBeginner, we use SiteGround to host our website.
We hope this article helped you learn how to fix a slow loading WordPress dashboard. You may also want to see our complete WordPress security handbook or see our pick of the best WordPress plugins to grow your business.
If you liked this article, then please subscribe to our YouTube Channel for WordPress video tutorials. You can also find us on Twitter and Facebook.


Syed Balkhi says
Hey WPBeginner readers,
Did you know you can win exciting prizes by commenting on WPBeginner?
Every month, our top blog commenters will win HUGE rewards, including premium WordPress plugin licenses and cash prizes.
You can get more details about the contest from here.
Start sharing your thoughts below to stand a chance to win!
Jiří Vaněk says
The object cache has been the most helpful for speeding up my administration. Personally, I’ve installed a Redis server on my own server and use the Redis plugin for object caching. This cache significantly improves the speed of the administrative interface. Therefore, if someone has a website on a shared server, it’s a very good practice to check with the provider whether they support something for object caching—Redis or Memcache. This can truly accelerate the entire environment.
WPBeginner Support says
Thank you for sharing what worked for you
Admin