Are you looking to move WordPress from HTTP to HTTPS and install an SSL certificate on your website?
We have received a lot of requests on this topic because Google announced back in July 2018 that the Chrome browser would mark all websites without SSL as insecure.
In this article, we will show you how to properly move WordPress from HTTP to HTTPS by adding an SSL certificate.
Don’t worry, if you have no idea what SSL or HTTPS is. We’re going to explain that as well.
What Is HTTPS?
HTTPS or Secure HTTP is an encryption method that secures the connection between users’ browser and your server. This makes it harder for hackers to eavesdrop on the connection.
Every day, we share our personal information with different websites, whether making a purchase or simply logging in.
To protect the data transfer, a secure connection needs to be created.
That’s when SSL and HTTPS come in.
Each site is issued a unique SSL certificate for identification purposes. If a server is pretending to be on HTTPS, and its certificate doesn’t match, then most modern browsers will warn the user from connecting to the website.
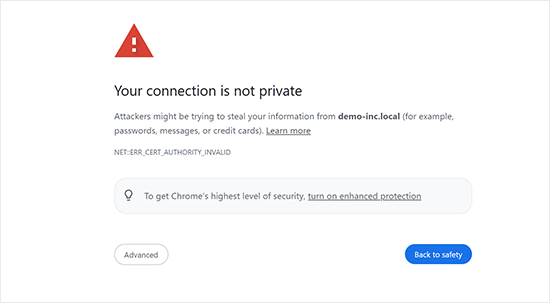
Now, you are probably wondering why I need to move my WordPress site from HTTP to HTTPS, especially if it’s a simple blog or small business website that doesn’t collect any payments.
Why Do You Need HTTPS and SSL?
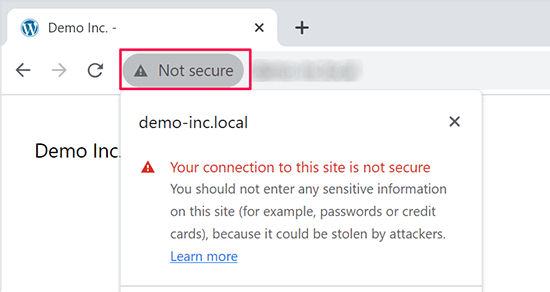
In 2018, Google announced a plan to improve overall web security by encouraging website owners to switch from HTTP to HTTPS. As part of this plan, their popular Chrome web browser would mark all websites without an SSL certificate as “Not Secure.”
Google also said that websites with SSL will also see SEO benefits and will get higher search rankings than insecure websites. Since then, a large number of websites have switched from HTTP to HTTPS.
After the announcement, Google started rolling out the “Not Secure” warning in Chrome. For example, if someone visits an HTTP website using the incognito window, it will be marked as Not Secure. If someone visits an HTTP website in regular mode and tries to fill out a contact form or another form, then the website will be marked as insecure.
When your readers and customers see this notice, it gives them a bad impression of your business.
This is why all websites need to move from HTTP to HTTPS and install SSL immediately.
Not to mention, if you want to accept payments online on your eCommerce website, you need SSL.
Most payment companies, like Stripe, PayPal Pro, Authorize.net, etc., will require a secure connection before accepting payments.
We use SSL for our websites, including WPBeginner, OptinMonster, WPForms, and MonsterInsights.
Requirements for Using HTTPS/SSL on a WordPress Site
The requirements for using SSL in WordPress are not very high. All you need to do is purchase an SSL certificate, and you might already have it for free.
The best WordPress hosting companies are offering free SSL certificates for all their users:
For more details, see our guide on how to get a free SSL certificate for your WordPress website.
If your hosting company does not offer a free SSL certificate, then you’ll need to purchase an SSL certificate.
We recommend using Domain.com because they offer the best SSL deal for both regular and wildcard SSL certificates.
By purchasing an SSL certificate from them, you also get a TrustLogo site seal for your website, and each SSL certificate comes with a minimum security warranty of $10,000. Pricing starts at $33 per year and SSL certificates are renewed automatically.
Once you have purchased an SSL certificate, you will need to ask your hosting provider to install it for you.
Setting Up WordPress to Use SSL and HTTPS
After enabling an SSL certificate for your domain name, you will need to set up WordPress to use SSL and HTTP protocols on your website.
We will show you two methods for doing that, and you can choose the one that best suits your needs.
Video Tutorial
If you’d prefer written instructions, just keep reading
Method 1: Setup SSL/HTTPS in WordPress Using a Plugin
This method is easier and is recommended for beginners.
First, you need to install and activate the Really Simple SSL plugin. For more details, see our step-by-step guide on how to install a WordPress plugin.
Upon activation, you need to visit the Settings » SSL page. The plugin will automatically detect your SSL certificate, and it will set up your WordPress site to use HTTPS.
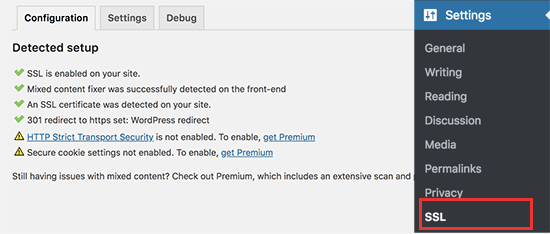
The plugin will take care of everything, including the mixed content errors. Here’s what the plugin does behind the scenes:
- Check SSL certificate
- Set WordPress to use https in URLs
- Set up redirects from HTTP to HTTPS
- Look for URLs in your content still loading from insecure HTTP sources and attempt to fix them.
Note: The plugin attempts to fix mixed content errors by using output buffering technique. It can have a negative performance impact because it’s replacing content on the site as the page is being loaded. This impact is only seen on first-page load, and it should be minimal if you are using a caching plugin.
While the plugin says you can keep SSL and safely deactivate the plugin, it’s not 100% true. You will have to leave the plugin active at all times because deactivating the plugin will bring back mixed content errors. See our Really Simple SSL review for more details.
Method 2: Set Up SSL/HTTPS in WordPress Manually
This method requires you to troubleshoot issues manually and edit WordPress files. However, it is a permanent and more performance-optimized solution, and we’re using it on WPBeginner.
If you find this method difficult, then you can hire a WordPress developer or use the first method instead.
As part of this method, you may need to edit the WordPress theme and code files. If you haven’t done this before, then see our guide on how to copy and paste code snippets in WordPress.
First, you need to visit the Settings » General page. From here, you need to update your WordPress and site URL address fields by replacing http with https.
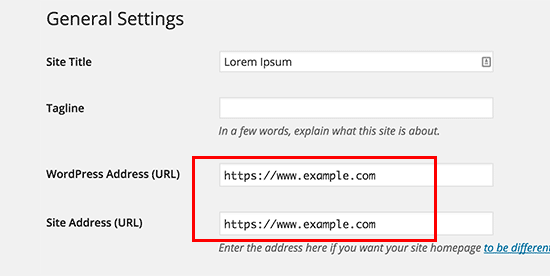
Don’t forget to click on the ‘Save changes’ button to store your settings.
Once the settings are saved, WordPress will log you out, and you will be asked to re-login.
Next, you need to set up WordPress redirects from HTTP to HTTPS by adding the following code to your .htaccess file:
<IfModule mod_rewrite.c>
RewriteEngine On
RewriteCond %{HTTPS} off
RewriteRule ^(.*)$ https://%{HTTP_HOST}%{REQUEST_URI} [L,R=301]
</IfModule>
If you are on NGINX servers, then you will need to add the following code to redirect from HTTP to HTTPS in your configuration file:
server {
listen 80;
server_name example.com www.example.com;
return 301 https://example.com$request_uri;
}
Don’t forget to replace example.com with your domain name.
By following these steps, you will avoid the WordPress HTTPS not working error because WordPress will now load your entire website using HTTPS.
If you want to force SSL and HTTPS on your WordPress admin area or login pages, you need to configure SSL in the wp-config.php file.
Add the following code above the “That’s all, stop editing!” line in your wp-config.php file:
define('FORCE_SSL_ADMIN', true);
This line allows WordPress to force SSL / HTTPs in the WordPress admin area. It also works on WordPress multisite networks.
Once you do this, your website is fully set up to use SSL / HTTPS, but you will still encounter mixed content errors.
These errors are caused by sources (images, scripts, or stylesheets) still loading using the insecure HTTP protocol in the URLs. If that is the case, then you will not be able to see a secure padlock icon in your website’s address bar.
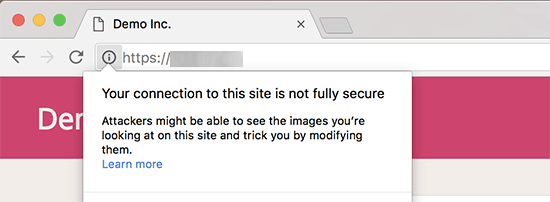
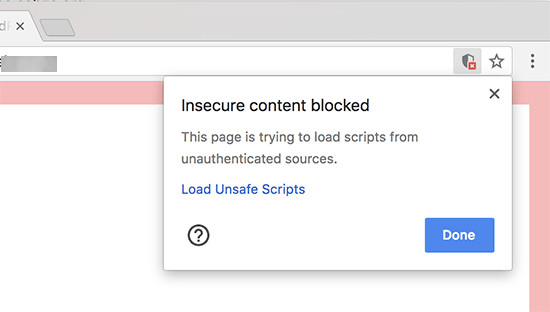
Many modern browsers will automatically block unsafe scripts and resources.
You may see a padlock icon but with a notification about it in your browser’s address bar.
You can find out which content is served through insecure protocol by using the Inspect tool.
The mixed content error will be displayed as a warning in the console with details for each mixed content item.
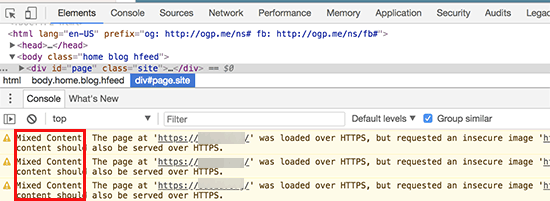
You will notice that most URLs are images, iframes, and image galleries, while some are scripts and stylesheets loaded by your WordPress plugins and themes.
Fixing Mixed Content in WordPress Database
The majority of the incorrect URLs will be images, files, embeds, and other data stored in your WordPress database. Let’s fix them first.
You need to find all mentions of your old website URL in the database that start with http and replace them with your new website URL that starts with https.
You can easily do this by installing and activating the Search & Replace Everything plugin. For more details, see our step-by-step guide on how to install a WordPress plugin.
Upon activation, you need to visit the Tools » WP Search & Replace page. Under the ‘Search’ field, you need to add your website URL with http. After that, add your website URL with https under the ‘Replace’ field.
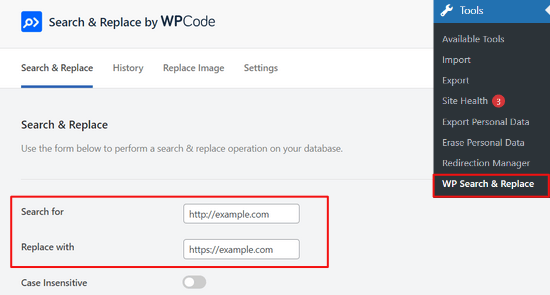
Below that, you will see all your WordPress database tables. You need to select all of them to run a thorough check.
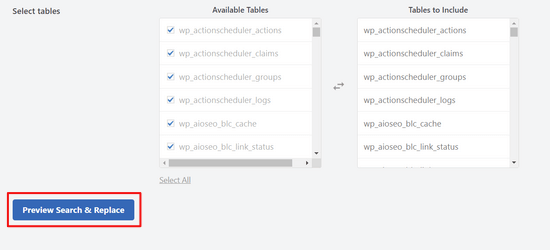
Then, click the ‘Preview Search & Replace’ button to see all of the changes the plugin will make. Lastly, click the ‘Replace All’ button.
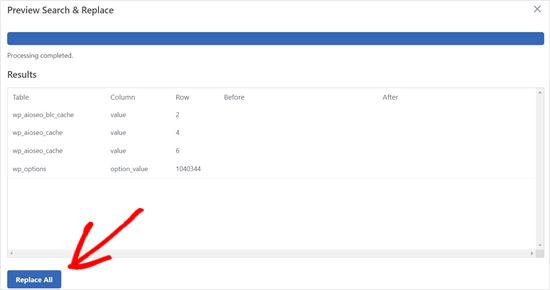
The plugin will now search your WordPress database for the URLs starting with http and replace them with secure https URLs. It may take a while, depending on your WordPress database size.
Fixing Mixed Content Errors in WordPress Theme
Another common culprit causing mixed content errors is your WordPress theme. Any decent WordPress theme following WordPress coding standards will not cause this issue.
First, you will need to use your browser’s Inspect tool to find the resources and where they are loading from.
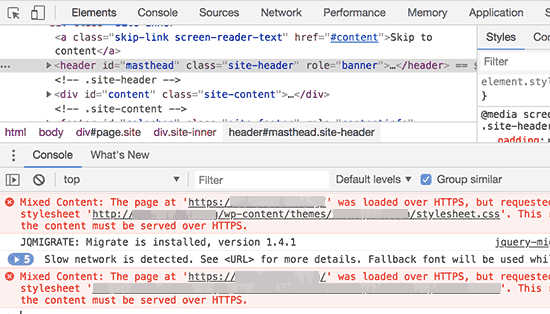
After that, you will need to find them in your WordPress theme and replace them with https. This will be a little difficult for most beginners, as you will not be able to see which theme files contain these URLs.
Fixing Mixed Content Errors Caused by Plugins
Some mixed content resources will be loaded by WordPress plugins. Any WordPress plugin following WordPress coding standards will not cause mixed content errors.
We don’t recommend editing WordPress plugin files. Instead, you should contact the plugin author and let them know. If they do not respond or are unable to fix it, you should find a suitable alternative.
Note: If, for some reason, you’re still encountering a mixed content error, we recommend temporarily using the Really Simple SSL plugin so your users are not impacted while you fix the issue on a staging website or hire a developer.
Submit Your HTTPS Site to Google Search Console
Search engines like Google consider https and http to be two different websites. To avoid any SEO issues, you will need to let Google know that your website has moved.
To do that, you just need to go to your Google Search Console account and click on the ‘Add a Property’ button.
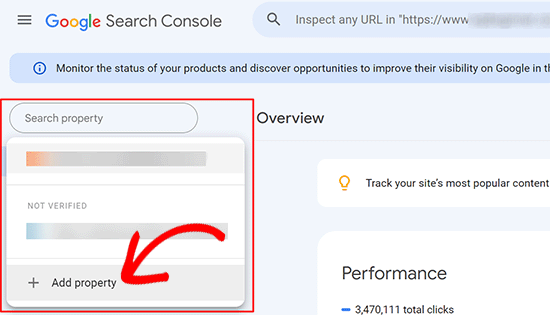
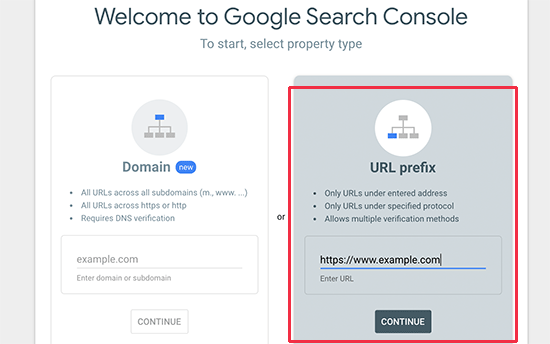
This will bring up a popup where you need to add your website’s new https address.
There are two methods for site verification: domain name or URL prefix. We recommend the URL prefix method because it is more flexible.
After that, Google will ask you to verify ownership of your website.
There are several ways to do that. Select any method, and you will get instructions to verify your site. We recommend using the HTML tag method.
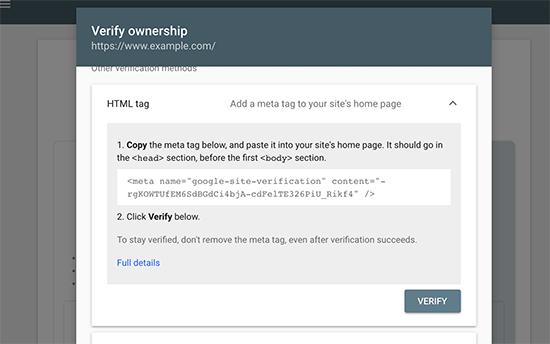
You will now see an HTML code snippet that you need to add to the head section of your WordPress website.
Add Search Console Verification Code using All in One SEO
First, install and activate the All in One SEO for WordPress plugin. For more details, see our tutorial on how to install a WordPress plugin.
Note: There is also a free version of All in One SEO that you can try.
Upon activation, go to the All in One SEO » General Settings page and click on Google Search Console.
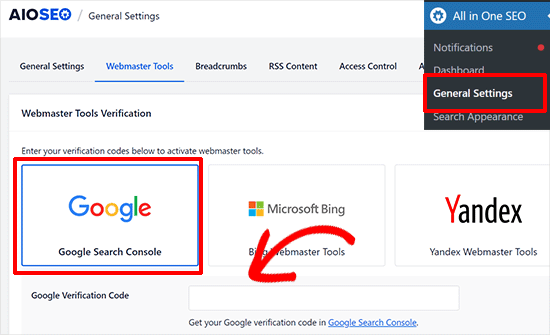
Below that, you need to add the verification code you copied earlier from the Google Search Console website.
Don’t forget to click on the ‘Save Changes’ button to store your settings.
Next, switch back to the Google Search Console tab and click the ‘Verify’ button.
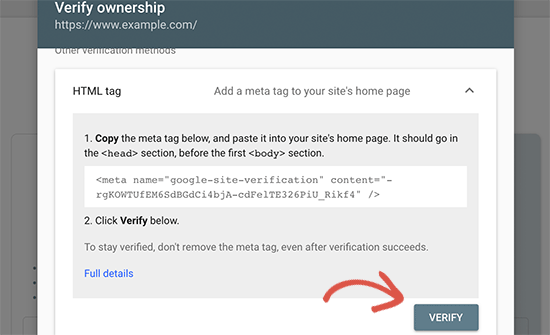
Once your site is verified, Google will show your search console reports here.
You also need to ensure that both the https and http versions are added to your Search Console.
This tells Google that you want the https version of your website to be treated as the primary version. Combined with the 301 redirects that you set up earlier, Google will transfer your search rankings to the https version of your website, and you will most likely see improvements in your search rankings.
We hope this article helped you add HTTPS and SSL in WordPress. You may also want to see our ultimate WordPress security guide with step-by-step instructions to keep your WordPress site secure or our expert picks of the best analytics solutions for WordPress.
If you liked this article, then please subscribe to our YouTube Channel for WordPress video tutorials. You can also find us on Twitter and Facebook.


Syed Balkhi says
Hey WPBeginner readers,
Did you know you can win exciting prizes by commenting on WPBeginner?
Every month, our top blog commenters will win HUGE rewards, including premium WordPress plugin licenses and cash prizes.
You can get more details about the contest from here.
Start sharing your thoughts below to stand a chance to win!
kzain says
This is a great point! An unsecured website, especially an e-commerce site that collects payments, can create a negative experience for visitors. It’s crucial to have an HTTPS website to build trust and ensure security. Many hosting providers, like Bluehost, offer free SSL certificates and even free domain names for the first year. With Bluehost, you don’t even need to install the SSL certificate manually – it’s a breeze! Thanks for sharing this important information. thanks for sharing this post with us
Mrteesurez says
This is really fantastic.
Notinhy is bad as a visitors seeing a website insecured especially an ecommerce that collect online payment from users, this is definitely a bad experience.
That’s why it’s always advisable to have https Website. Choosing one of the hostings you have listed like Bluehost and others gives free SSL and free domain for the first year.
With Bluehost, you don’t need to manually installed the SSL certificate on your website.
Thanks, sharing this.
Moinuddin Waheed says
one of my clients recently purchased a shared hosting from GoDaddy and then asked to make his website.
I started making one and realised that it doesn’t come with inbuilt one click SSL installation like that of hostinger, bluehost and other hosting services providers mentioned above.
The value of having good hosting was evident when I had to go through the painstaking process of getting SSL certificate installed.
it is very advisable that one must choose good hosting service.
Moinuddin Waheed says
Having https for websites is a must for securing the trust of the visitors on the website.
just curious if we have already enabled SSL for our websites, is it necessary to change everywhere from http to https?
or it will automatically take one.
WPBeginner Support says
It would depend on how you enabled SSL and your hosting provider as some will automatically update your site to https while others wont. You would want to check your site to see if it was updated and if not you would need to manually update the site address.
Admin
Jiří Vaněk says
It is usually necessary to manually change everything to https or use the really simple SSL plugin. If part of the site will be http and part will be https, it is called mixed content and will end up with error and problems.
THANKGOD JONATHAN says
If you are beginner and do not know much about coding I recommend you use the first method.
editing your WordPress code is very risky much especially for no coders. After all, the plugin is easier to use and it also have a free version.
Moinuddin Waheed says
Most of the hosting providers now a days give free ssl certificate to your site with a one click install as you have mentioned there.
having ssl certificate installed on website is of utmost importance as it gives a sense of security to the visitors and they can be sure about every thing they do on SSL certificate installed website is secure .
thank you for making a detailed description about http and https.
WPBeginner Support says
You’re welcome
Admin
Nimdaqiu says
I feel like I am no more a beginner now. Thank you for this beautifully detailed article.
WPBeginner Support says
Glad we could help make the process simpler!
Admin
Andrew Meador says
I followed Method 2. The only thing I modified was using the WordPress redirect method. My web host has a tool that creates a redirect (for Windows Server hosting) which adds redirect rules into the web.config – allowing the redirect to HTTPS to happen at the web server level vs at the WordPress level. Works good and is 1 level of abstraction higher. Thanks!
WPBeginner Support says
Thanks for sharing, not all hosting providers offer that but glad your host was able to help
Admin
Clinton Waller says
Thank you very much for this excellent tutorial.
I recently installed an SSL cert and was dreading the change-over with WordPress and Google. Not saying there wasn’t any pain, but your step-by-step instructions helped immensely!
Really appreciated the .htaccess code too, that’s just perfect. I was worried that Google would index both the insecure http and secure https variants of the old vs new website and give me a ranking penalty, but that trick completely avoids serving up insecure legacy http content — a real plus!
William says
I have a mix of domains (all HTTPS) on my WordPress site. Can this plugin go through my site and set them all to my current domain?
WPBeginner Support says
You would want to check with your hosting provider as some have tools for what it sounds like you are wanting to do.
Admin
Long says
There are just no ‘WordPress Address’ and ‘Site Address’ in ‘General Settings’.
Now I use wordpress multisite, one site is https and another is http. This wordpress installation is new, I have already set https at the previous wordpress installation in my sitegroud.
WPBeginner Support says
You would need to go to the network admin to change the URLs of your sites on a multisite installation.
Admin
NIKHIL says
I am Using the First Method So Is There Any Need to Make Changes in WordPress and Site Address URL ??
WPBeginner Support says
So long as there are no hiccups with the plugin you shouldn’t need to edit your address and URL as the plugin would handle that for you.
Admin
Stein says
I followed the steps in method 2, but once I reached the step “Once the settings are saved, WordPress will log you out, and you will be asked to re-login.” instead of just logging me out it also now says that “this site is not avalible” when I try to log in to wp-admin again, making the next steps impossible to do.
So how can I access the wp-admin site following the url change?
WPBeginner Support says
For that specific error, you would want to go through the troubleshooting steps in our article below:
https://www.wpbeginner.com/beginners-guide/beginners-guide-to-troubleshooting-wordpress-errors-step-by-step/
Admin
Jithin says
after adding this home page is redirecting but posts not redirecting to https.
http and https .. both are working .. please help.
WPBeginner Support says
Should you run into that issue, you would want to reach out to your hosting provider to ensure they do not have any redirects set up.
Admin
shantun says
It helps a lot thank you
WPBeginner Support says
Glad our guide was helpful
Admin
RichPat says
Thank you for the SSL upgrade instructions.
Using Really Simple SSL with my hosting provided certificate was a v simple upgrade process
WPBeginner Support says
Glad our guide was helpful
Admin
Michael says
Thanks for your valuable content.please I want to ask,if I can use the Really simple SSL plugin which is easier,why will I want to do it manually.
WPBeginner Support says
That would be mainly for personal preference, there shouldn’t be a major difference between using the plugin or manually changing it.
Admin
Jithin says
Thank you for the guide.
I going to install a fresh WordPress on hostgator. Do I need to do anything different for the HTTPS ? or follow the guide after installation ?
WPBeginner Support says
You can follow our guide after installing your site for enabling https.
Admin
nick Devine says
Hello, I went into settings and changes http to https and now I am locked out of wordpress completely. Do you have a solution to this as it is a clients website and I am concerned I have lost everything completely. Nick
WPBeginner Support says
You would want to enable an SSL certificate for the site or reach out to your hosting provider to assist you in setting the URLs back to HTTP
Admin
Oleksandr Piddubnyy says
First, you need to visit Settings » General page. From here you need to update your WordPress and site URL address fields by replacing http with https.
BUT! After that my page is totally disabled! I can’t backup. I can’t even enter to the admin panel. And I don’t know what’s going on. What should I do? Do you have any idea?
WPBeginner Support says
It sounds like you may have not enabled an SSL certificate on your site before changing the address. You would want to reach out to your hosting provider to enable an SSL certificate for your site or have them change your URLs back to HTTP
Admin
osama khan says
Good day, thank you for the guide. I installed a fresh wordpress on a VPS with an ip addresss. Now, I want to change it to a domain name – Do I need to do anything different for the HTTPS:// ?
WPBeginner Support says
You would want to check with your hosting provider for how their servers are set up for swapping to the domain.
Admin
Araceli says
Hi! So it looks like, after following the steps through “Fixing Mixed Content Errors in WordPress Theme,” I see that my images are causing mixed content issues. The error I am getting is, “This content should also be served over HTTPS.” How can I fix this?
WPBeginner Support says
For fixing the mixed content you would want to take a look at our article below:
https://www.wpbeginner.com/plugins/how-to-fix-the-mixed-content-error-in-wordpress-step-by-step/
Admin
Araceli says
Will do…thank you!
Putri says
would it be okay if I change website address and site address to https but didn’t do the rest of manual process, then install the plugin instead?
WPBeginner Support says
We would recommend if you are planning on using the plugin to start with the plugin method to prevent any hiccups during the process.
Admin
Amar says
Hello Sir,
I have wordpress site running on wordpress 3.5.1 . can I use really simple ssl plugin for it. The plugin says it needs wordpress 4.6 and higher.
Pls suggest me how can i do it
Thanks
WPBeginner Support says
For updating your WordPress site, you would want to follow our guide below:
https://www.wpbeginner.com/beginners-guide/ultimate-guide-to-upgrade-wordpress-for-beginners-infograph/
Admin
Shawn says
I am unable to access the admin login URL after updating the site URLs, it keep redirecting to https but I get a “This site can not be reached error” .. I also tried to update the .htaccess file but no luck. the original website is also not getting redirected to https.
Any ides what might I be missing here?
WPBeginner Support says
You would want to first reach out to your hosting provider for them to take a look and ensure your SSL certificate doesn’t have an issue.
Admin
Lola says
Thank you!
Thank you!
THANK YOU!!!
WPBeginner Support says
You’re welcome
Admin
Kevin says
Thank you, that Plug in Better Search and Replace made the trick!
WPBeginner Support says
You’re welcome, glad our recommendation was helpful
Admin
daniel says
where exactly should I place the code in the .htaccess file?
WPBeginner Support says
The normal location would be beneath the current code in your htaccess file
Admin
Jessica says
Inner pages and post pages are still opening with http also, which will impact on search engines. What should I do now ?
WPBeginner Support says
You would likely need to clear all caching on your site and you may want to check with your hosting provider that the SSL certificate was applied correctly.
Admin
Leos says
Why would you add define(‘FORCE_SSL_ADMIN’, true) to wp-config file if the .htaccess redirect rule already does the job?
When adding the line to wp-config file I got a syntax error right after and it was not possible to get to the admin area.
WPBeginner Support says
The FORCE_SSL_ADMIN is for your admin area to ensure it is using HTTPS. You would want to ensure you copied the entire code correctly. If you were missing the ; it would give a syntax error.
Admin
rohan says
Hello,
Thanks for the detailed guide. After switching from HTTP to HTTPS, I added the new property to Google Search Console.
Do I need to submit the sitemaps again as well on the HTTPS version in GSC?
Beginner query.
WPBeginner Support says
You would want to do that for safety, yes
Admin
Celena says
Thank you! Very helpful!
WPBeginner Support says
You’re welcome
Admin
Phil says
Better Search & replace is 1.3.3 and has not been updated for a year and is not tested on the current wordpress version. It is compatible only up to 5.2.6.
Is it safe to use, or can you recommend an alternative please?
WPBeginner Support says
For those warnings, you would want to take a look at our guide below.
https://www.wpbeginner.com/opinion/should-you-install-plugins-not-tested-with-your-wordpress-version/
Admin
RomRom says
Solution 2 wasn’t working for me, the website would be unavaible.
After a few attemps, I noticed my hosting provider already provides a force https option. Turn it on, and bingo.
WPBeginner Support says
Glad you were able to find a solution that worked for you
Admin
Feranmi says
What of if my hosting provider doesn’t support free SSL certificate can the plugin works also or how can I get it for free?
WPBeginner Support says
If your current host does not offer free SSL then you would want to reach out to them for what options are available.
Admin