


If your WordPress site uses display ads, YouTube embeds, or tracking pixels, it may be sharing visitors’ personal information with third parties without you realizing it. Under US privacy laws, some visitors have the right to opt out of this data sharing.
That’s where a “Do Not Sell or Share My Info” page comes in. It gives visitors a clear, easy way to tell your site not to sell or share their personal information.
In this guide, we’ll show you how to create this opt-out page in WordPress and enable Global Privacy Control (GPC).
Do You Need a ‘Do Not Sell or Share My Info’ Page?
Many website owners assume “selling” and “sharing” user data mean the same thing, but the California Consumer Privacy Act (CCPA) treats them differently.
Selling means transferring personal information to a third party for money or something of monetary value. Sharing means disclosing data for cross-context behavioral advertising, such as when an ad network or retargeting pixel tracks visitors across different websites. No money needs to change hands for data to count as “shared.”
The CCPA applies to for-profit businesses that meet specific thresholds, such as having more than $25 million in annual revenue or buying, selling, or sharing the data of 100,000 or more California residents or households each year. So, most personal blogs and small business websites don’t legally need a “Do Not Sell or Share My Info” link.
Even if you don’t meet the CCPA’s requirements, we still recommend adding one. It’s relatively easy to set up and gives visitors more control over their data. Just keep in mind that other states have their own privacy laws with different requirements, so publishing an opt-out page also means you’ll need to handle requests and maintain the necessary records.
How to Create a Do Not Sell My Info Page in WordPress
You’ll need a WordPress plugin to create this page and manage visitors’ opt-out requests. The plugin keeps a record of each request so you can review or export it later. We’ll be using WPConsent Pro throughout because it’s the consent plugin we use on our own websites.
While the free version of WPConsent lets you enable GPC, you’ll need a premium license to create a Do Not Sell page and accept the opt-out request.
Step 1: Set Up WPConsent
WPConsent is a privacy and compliance plugin that lets you manage cookie banners, script blocking, and consent records directly inside your WordPress dashboard.
To see how it performs in detail, check out our full WPConsent review.
If you need help getting started, see our step-by-step guide on how to install a WordPress plugin.
Once the plugin is activated, WPConsent launches a quick setup wizard that scans your site for third-party scripts and builds a cookie banner in about two minutes.
It’s important to run this scan because WPConsent shows you exactly which tracking scripts your website uses.
If you prefer to check these scripts manually, you can read our guide on how to know if your WordPress website uses cookies.
Turn On the Free Global Privacy Control Signal
We recommend turning on Global Privacy Control (GPC) so your site can automatically recognize visitors who have chosen to opt out of data sharing or selling. GPC is a browser setting that sends this opt-out signal to every website a user visits, so visitors don’t have to manually find and submit an opt-out form on each site.
Under the CCPA, a GPC signal carries the exact same legal weight as a form submission.
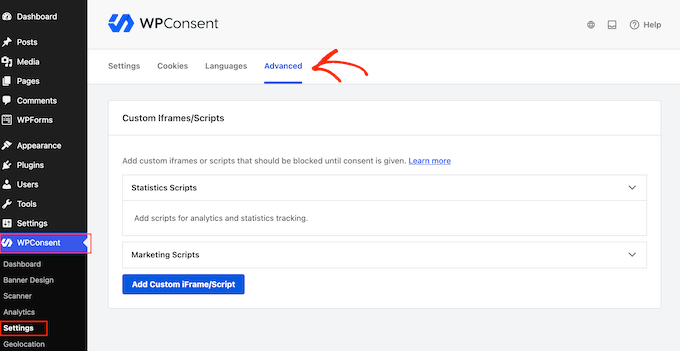
To honor GPC signals on your site, go to WPConsent » Settings in your WordPress dashboard and click the Advanced tab.
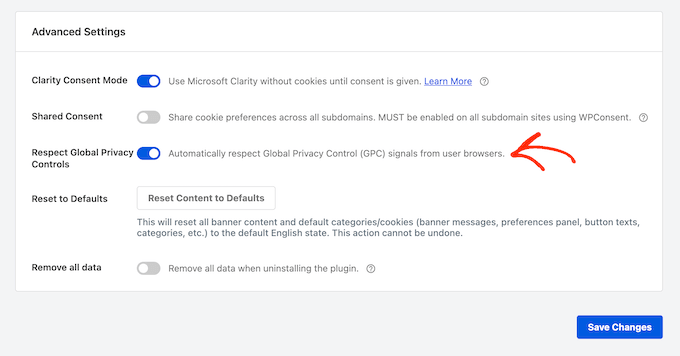
Scroll down to the Advanced Settings section and toggle on the Respect Global Privacy Controls option.
Don’t forget to click the Save Changes button at the bottom of the page to store your settings.
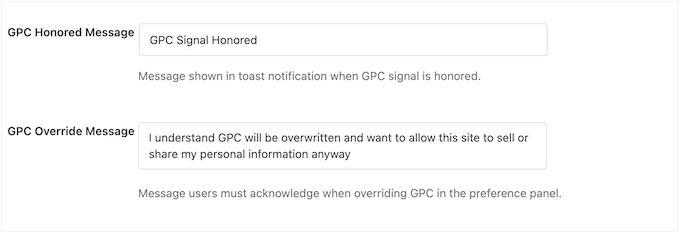
Once enabled, WPConsent automatically detects GPC signals, blocks non-essential cookies for that visitor, and suppresses the standard consent banner. Instead, visitors will see a brief notification that reads ‘GPC Signal Honored.’
Enabling this toggle also unlocks two additional text fields under the Banner Design » Content tab:
- GPC Honored Message – This controls the confirmation message visitors see when you detect their browser signal.
- GPC Override Message – This displays a statement in the preferences panel if a visitor explicitly chooses to allow data sales or sharing, despite having Global Privacy Control active in their browser.
Just be aware that GPC detection only works when your main consent banner is active, as the banner script loads WPConsent on the front end of your website.
If you skipped the initial setup wizard, check your WPConsent dashboard to make sure the ‘Consent banner enabled’ status is active. Otherwise, GPC signals will not be processed.
Add the CCPA Rule for California Visitors
WPConsent can also display a different banner configuration based on where a visitor is located. This is important because California requires a different consent model than Europe.
To set this up, go to WPConsent » Geolocation in your WordPress dashboard and click the Add CCPA Location Template button.
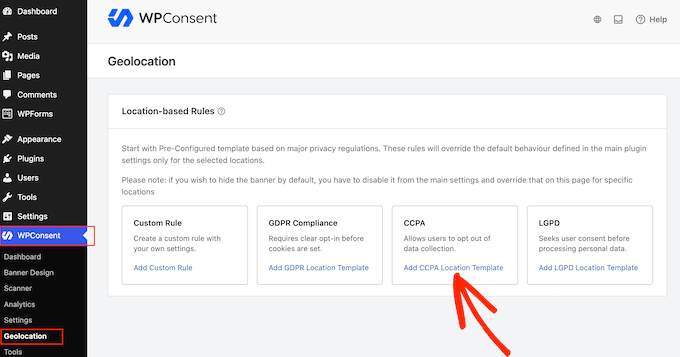
When you click this button, WPConsent creates a rule that targets the state of California specifically, rather than the United States as a whole. Visitors in California get an opt-out consent mode, script blocking, a consent banner, and a settings button.
Your new rule will appear in the table under the name CCPA Compliance.
By default, this rule turns content blocking off. This means embedded third-party media, like YouTube videos and Google Maps, will still load for California visitors until you manually enable content blocking in the rule’s settings.
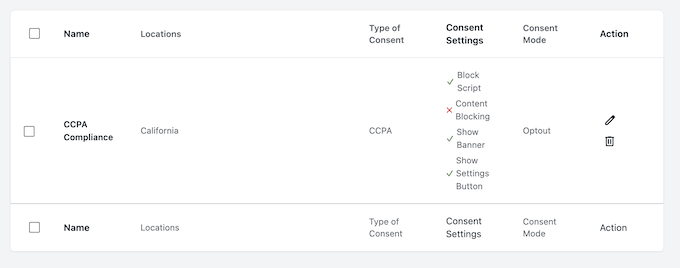
If you want to customize any of the default rules generated by the template, simply click the pencil icon and make your changes.
Step 2: Add the Do Not Sell or Share Page
After configuring your privacy signals, you need to create the actual opt-out page where visitors without GPC enabled can submit requests manually.
In your dashboard, go to WPConsent » Do Not Sell and then install and activate the ‘Do Not Sell’ addon.
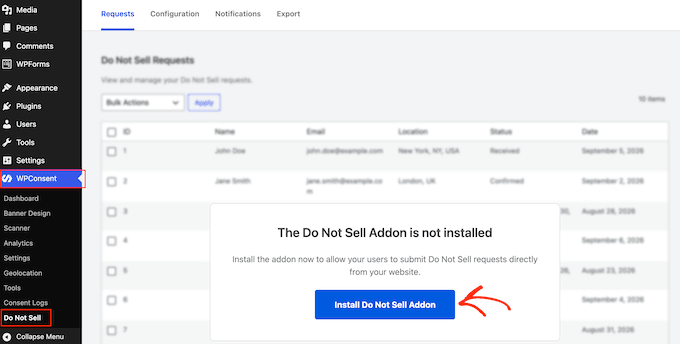
Next, open the Configuration tab and click ‘Generate Do Not Sell Page.’
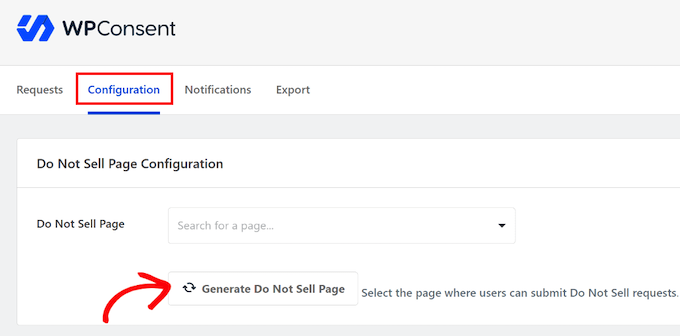
WPConsent will automatically create a new WordPress page titled ‘Do Not Sell My Personal Information’ with the opt-out form embedded.
If you already have a dedicated page, you can select it from the Do Not Sell Page dropdown menu instead.
The default form requires visitors to enter their first name, last name, and email address. WPConsent does not allow you to remove these core fields, but you can customize their field labels under the Form Fields section.
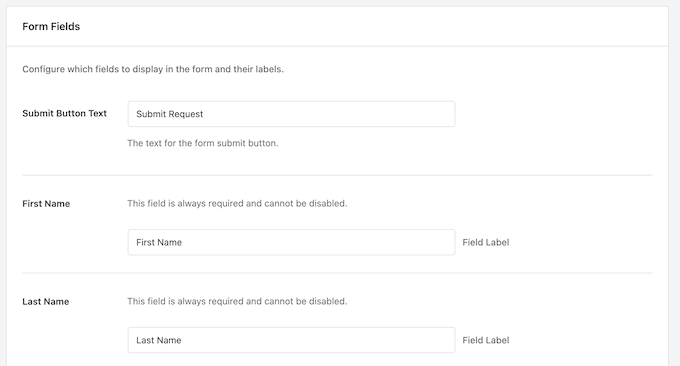
You can also enable optional fields for address, ZIP code, city, state, country, and phone number, or check the ‘Make this field required’ box underneath any field to make it mandatory.
Once your fields are configured, click Save Changes at the bottom of the page.
Because this page is public, it will attract spam submissions. WPConsent includes a hidden honeypot field to catch basic bots, but you can enable stronger protection under the Spam Protection section.
This section integrates seamlessly with WPForms to use whatever CAPTCHA service you have configured in the free version of WPForms.
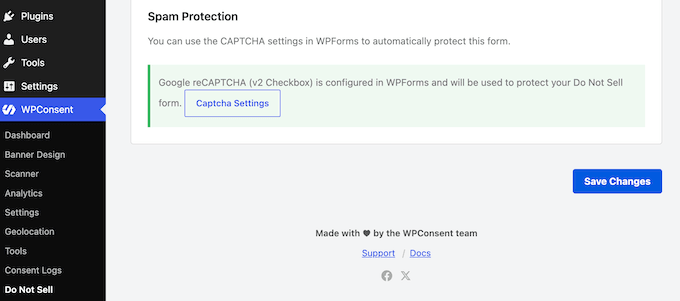
If you don’t have WPForms installed, you can click the Install WPForms button to set it up.
Step 3: Add the Opt-Out Link Sitewide
A request page that visitors cannot find will not protect your site, and the CCPA is very clear on this requirement. Any business that sells or shares personal data must provide a prominent ‘Do Not Sell or Share My Personal Information’ link.
You can easily satisfy this requirement using two key placements:
- Your Website Footer – Placing the link in your footer makes it visible on every single page automatically. This is the easiest way to ensure you’re following the law.
- Your Privacy Policy – Adding the link inside your main privacy policy ensures visitors can quickly exercise their privacy rights when reading your data guidelines.
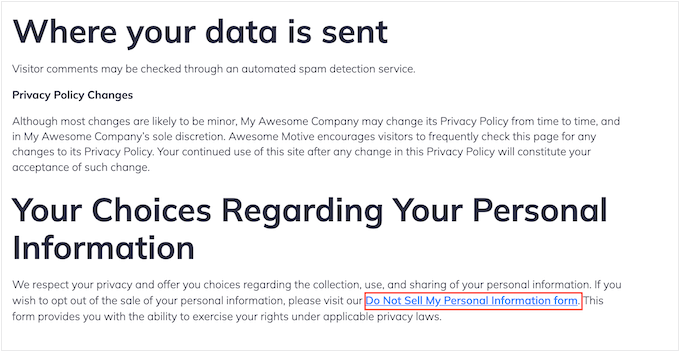
To add the link to your footer, you can edit your footer menu or use a widget, depending on how your WordPress theme is set up.
If you need help editing your footer menu, see our guide on how to add a navigation menu in WordPress.
Step 4: Process Requests and Keep the Records
WPConsent logs every submission directly to your site’s database. This means user data stays on your own server and is never sent to a third-party service.
To manage incoming submissions, go to WPConsent » Do Not Sell and click the Requests tab. Here, you can see all your incoming requests.
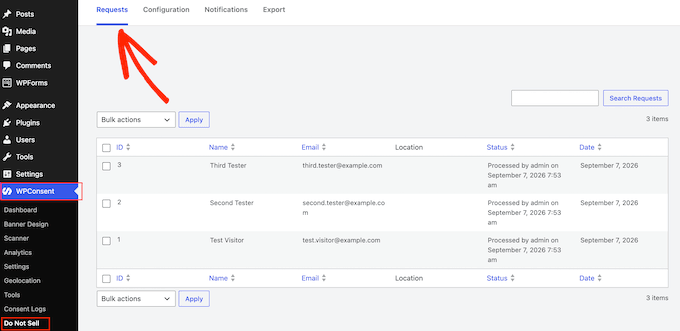
If you want, WPConsent event lets you notify you through emails as you get an opt-out request.
To do this, switch to the Notifications tab, enable Email Notifications, and enter your preferred address in the Send To field.
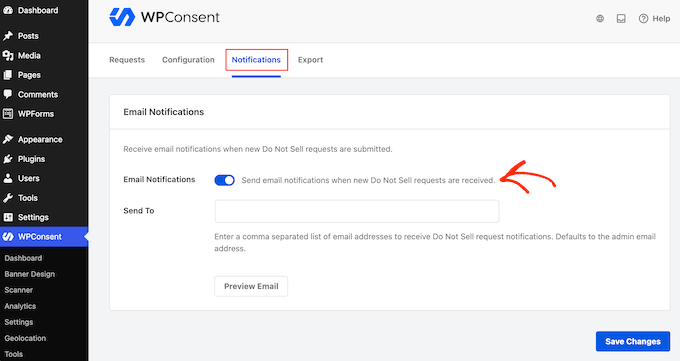
Keep in mind that default WordPress emails often fail to deliver. So we recommend using WP Mail SMTP to route your notification emails through a reliable mail provider.
For more information on this, see our guide on how to fix WordPress not sending emails.
Exporting and Managing Compliance Records
To generate proof for a compliance audit, open the Export tab.
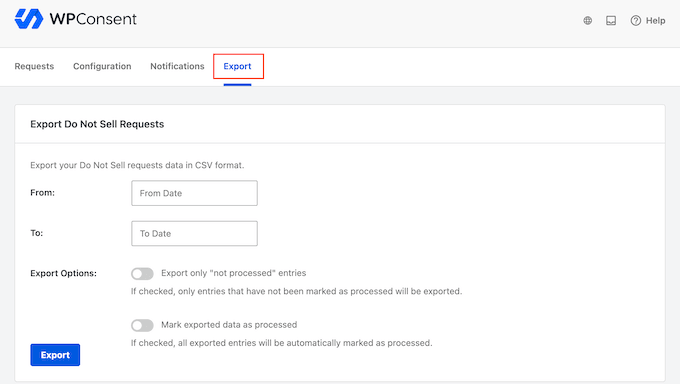
Select a start date in the From field and an end date in the To field.
There are two sliders that control how your compliance data gets handled:
- Export only “not processed” entries – Enabling this slider filters your file to show only open requests.
- Mark exported data as processed – Use caution here. Activating this slider updates the status of every request in the file to ‘processed’ while the export is generating. If you cancel the download, those entries remain marked as completed in your dashboard.
When you’re happy with your selection, click Export to generate the CSV file.
To close a request manually, click the Requests tab. In the main table, check the box next to each request you want to update.
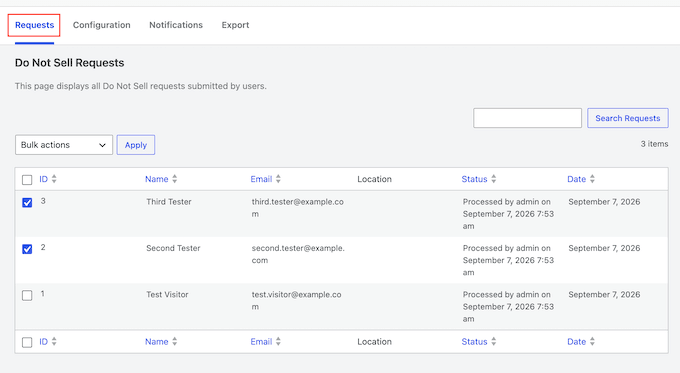
Next, click the ‘Bulk actions’ dropdown menu above the table, select ‘Mark as Processed,’ and click Apply.
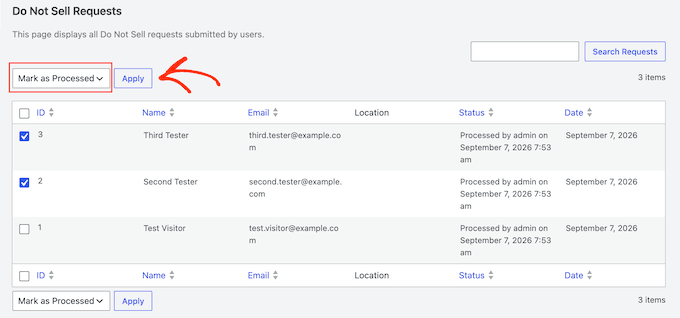
Logging requests inside WPConsent creates an audit trail that proves a request was submitted and addressed.
However, actually stopping data transfer across third-party networks requires managing your ad networks and analytics tools directly outside of WordPress, which is what we’ll cover in the next section.
What to Do When Someone Opts Out
The most common mistake website owners make is treating an opt-out request as a request for data deletion. These are two completely separate things, and a visitor asking you not to sell or share their information has not asked you to erase their details.
Erasing their record actually removes your own legal protection. That record serves as proof that the opt-out exists and you’re honoring it. Deleting it leaves you with no paper trail to demonstrate compliance if questioned.
When you get an opt-out request, you need to take three key actions:
- Confirm script blocking is on – Make sure Script Blocking and Content Blocking are both enabled under WPConsent » Settings. Those two toggles cover visitors whose browser sends a GPC signal. A form submission carries no browser signal, so the two actions below are how you honor a request that arrives through the page.
- Suppress users from custom ad audiences – Remove the user from any customer lists or custom audiences you upload to advertising platforms, as those lists continue targeting users even after they opt out.
- Exclude users from server-side conversion tracking – Remove their data from server-side conversion uploads (sales and signups sent directly to ad platforms from your server). Because server-side uploads bypass browser-level blocking entirely, you must filter them out manually.
After completing these steps, flag the contact record instead of deleting it. Adding a ‘do-not-sell’ tag to the contact in your customer relationship management (CRM) system keeps the suppression visible to anyone building ad or email lists later.
If managing analytics suppression sounds overwhelming, you may want to switch to a cookieless tracking solution instead. For a breakdown of options, see our guide on the best analytics solutions for WordPress
Do Not Sell or Share My Info: FAQs
How does a ‘Do Not Sell or Share My Info’ page differ from other privacy pages?
A Do Not Sell or Share My Info page is unique because it is an active compliance tool rather than an informational document.
Your privacy policy simply explains what personal data your website collects, why you collect it, and what rights your visitors have. Similarly, your cookie policy lists the specific tracking cookies your site sets and explains what each one does.
A Do Not Sell or Share My Info page is different because it gives visitors a place to take direct action and exercise their legal opt-out rights. Instead of just describing your data practices, it provides a form that visitors use to stop you from selling or sharing their information for targeted advertising.
Does honoring Global Privacy Control mean I can skip the page?
Almost certainly not, though a narrow exception does exist. The CCPA regulations let a business skip the opt-out link if it handles opt-out preference signals in what the rules call a ‘frictionless manner.’
To qualify for this exception, your site must handle these signals automatically without forcing visitors through pop-ups, extra forms, or login screens.
Since compliance plugins like WPConsent handle both the opt-out form and GPC detection, there is no real advantage to skipping the page.
Is ‘do not sell or share’ the same as ‘do not track’?
No, ‘Do Not Sell or Share’ and ‘Do Not Track’ are not the same thing, and the main difference is legal rather than technical.
Do Not Track (DNT) is an older browser setting that asked websites not to track a user’s browsing activity. However, websites were free to ignore DNT signals without facing legal consequences.
Does my cookie banner already cover ‘don’t sell or share’ request?
No, a cookie banner on its own does not satisfy the requirement, because a banner and an opt-out page serve completely different purposes.
A cookie banner controls what scripts and cookies load while a user is actively browsing your site. It stores that preference locally inside the user’s browser cookies. This means the choice is forgotten as soon as the visitor clears their browser cache.
A ‘Do Not Sell or Share My Info’ page creates an enduring compliance record linked to a specific person’s identity. This gives you the documentation you need to manually suppress that individual across your CRM, email marketing lists, and off-site advertising platforms.
We hope this guide has helped you add a ‘Do Not Sell or Share My Info’ page to your WordPress website. Next, you may want to see our guide on how to add a privacy policy in WordPress, or our expert picks for the best GDPR plugins for WordPress if you need to cover visitors in Europe as well.
If you liked this article, then please subscribe to our YouTube Channel for WordPress video tutorials. You can also find us on Twitter and Facebook.


Have a question or suggestion? Please leave a comment to start the discussion.