Self publishing your ideas on the web has become extremely easy. However, the biggest downside of self-publishing is that you are entirely responsible for your mistakes. There is no one checking, proof reading and editing what you publish except yourself. You might have built yourself a good editing workflow where you cross-check your facts, spell-check your articles, and polish your thoughts with revisions, but there is always a chance that you might make a mistake. A small typo, a broken link, or another minor error can happen because you are human. Though if not reported on time, your error can stay there for years. In this article, we will show you how to allow your users to notify you of error in WordPress post content using error notifications.
Why Catching Small Errors is Important?
First of all a careless typo or spelling mistake can leave a bad impression on your readers. They might think that you do not carefully craft your posts before publishing them.
You can use tools to auto-check grammar and spelling mistakes in WordPress, but there is still a chance that some mistakes may end up on your site. They can stay there for years without you noticing or correcting them.
If you are writing in a language that is not your first language, then your words can be mistaken by native speakers. Some of your users may want to help you out by pointing out those mistakes so that you can fix them.
Allowing Users to Notify You of Errors in WordPress
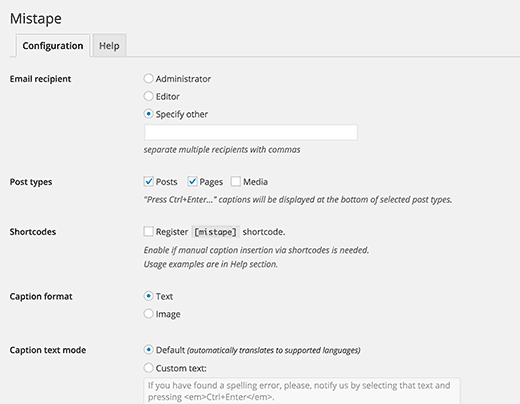
First thing you need to do is install and activate the Mistape plugin. Upon activation, you need to visit Settings » Mistape page to configure the plugin.
You can choose users with the administrator or editor user roles to receive notification email about errors. Alternately, you can manually enter email addresses where you want to send notifications.
You can choose the post types where this feature would appear. You must check posts if you want all your blog posts to have this feature.
The plugin can automatically add a caption below posts to inform users that they can notify you about errors. But if you don’t want to automatically display the caption, then you can enable the shortcode.
You can also customize caption shown to users about this feature. By default, the plugin will show a text message. This text will be automatically translated if you are using WordPress in languages other than English.
Don’t forget to click on the save changes button to store your settings.
You can now see the plugin in action on your website. Depending on your settings plugin will display the caption below your posts. Users can select mistakes and press CTRL+Enter (Control+Enter on Mac).
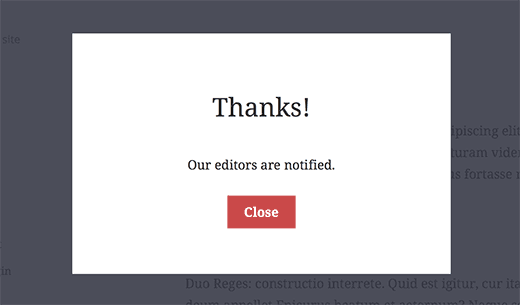
A popup will appear to inform users that their suggestion is forwarded to site admins.
We hope this article helped you allow users to notify you of errors in WordPress posts. You may also want to see our guide on how to create a blog post checklist in WordPress.
If you liked this article, then please subscribe to our YouTube Channel for WordPress video tutorials. You can also find us on Twitter and Facebook.


Syed Balkhi says
Hey WPBeginner readers,
Did you know you can win exciting prizes by commenting on WPBeginner?
Every month, our top blog commenters will win HUGE rewards, including premium WordPress plugin licenses and cash prizes.
You can get more details about the contest from here.
Start sharing your thoughts below to stand a chance to win!
Mladen says
It seems that this plugin does not exist anymore. Any other plugin you can recommend?
WPBeginner Support says
Hi Mladen,
It is available now. You can give it a try.
Admin
John Drinkwater says
such a great idea, where you don’t want full comments, but people still have the chance to point out small mistakes. I will be recommending this to a few customers.
tarun says
i want to new trainee core php developer. ok. yes sir
Leonard Rattini, CCP says
You didn’t explain how to accomplish the shortcode function.
Stephanie says
I don’t see the plugin active on this post. Seeing as as you recommend this plugin, why aren’t you using it yourselves?
Muhammad Imran says
That is really a great plugin for getting notifies by users. Going to try it, by the way thanks for sharing this plugin.
Ted Sherwood says
I installed this plugin. Before I had excerpts on my home page, now I don’t. And I can’t get them back. Any connection? If not, please help me to get them back!
Bohdan says
Hi. Thanks for trying our plugin.
Please leave a ticket regarding the excerpt breakage.on Mistape support page. It would be great if we could look into your issue and resolve it.
Bohdan says
The biggest update since launch will be released soon. The most notable change is the option to choose the dialog mode: either it is a simple success notification, which is the only option now; or a confirmation dialog, or the latter with an optional comment field. Also, there will be an option to send email to post author if the post ID is identified. And many, many improvements and fixes under the hood.
Stay tuned!
Jayne Bodell says
What a great idea! I presume that WP for Beginners will be installing this plug in soon. I promise to restrain myself. You guys do a great job though. I frequently add your posts to my Evernote file.
I wonder how many bloggers will be installing this plugin.