Do you want to add syntax highlighting in WordPress comments?
By default, WordPress does not come with any syntax highlighting for comments, posts, or pages. This can be a big problem if you write articles about coding or programming on your WordPress website.
In this article, we will show you how to easily add syntax highlighting in WordPress comments.

Why and When You Need Syntax Highlighting in WordPress Comments?
Syntax highlighting is a way to make code look better and easier to understand. It adds colors and line numbers to code snippets, making them more readable. Here’s an example:
<html>
    <head>
        <title>My Awesome Website</title>
    </head>
    <body>
        <h1>Welcome to My Homepage</h1>
    </body>
</html>
If you have a WordPress blog about web development or coding, enabling syntax highlighting in WordPress comments is important. With this, readers can easily write code in a readable way.
This will encourage them to leave more comments and share their own snippets. It not only makes the comments more interesting but also builds a sense of community engagement.
Plus, if your readers need help, they can easily insert the code in the comment in a way that’s visually appealing and easy to understand for their fellow commenters.
With that in mind, let’s see how you can add syntax highlighting in the comment form of your WordPress website.
Step 1: Install the Syntax Highlighter Evolved Plugin
The easiest way to add syntax highlighting in WordPress is with the Syntax Highlighter Evolved plugin. It is super easy to use and allows you to enable syntax highlighting in WordPress posts, pages, and comments.
At WPBeginner, we use this plugin to insert and display code snippets. You can read our article on why we use Syntax Highlighter Evolved for more details.
First, you need to install and activate the Syntax Highlighter Evolved plugin. For more information, see our step-by-step guide on how to install a WordPress plugin.
Once done, can now edit a post or page and add code using syntax highlighter. Here’s what it looks like in the block editor:
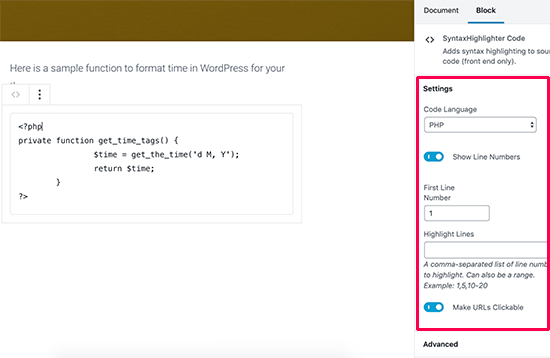
You can learn more about using the Syntax Highlighter Evolved plugin in our article about how to display code in WordPress.
By default, Syntax Highlighter Evolved allows visitors to add code in their comments, but that code needs to be wrapped in shortcodes.
These shortcodes are named after all the popular programming and scripting languages. This means the commenter simply needs to wrap their code in square brackets containing the language name.
For example, if you wanted to post a comment containing PHP code, then you’d use the following:
Hi everyone. I need help with this PHP code: [php]

<?PHP

private function get_time_tags() {

$time = get_the_time('d M, Y');

return $time;

}

?>

[/php]
Similarly, if you wanted to post some HTML code as a comment, then you would need to wrap it in the HTML shortcode:
Hey there! Could anyone check this code snippet? [html]<a href="https://example.com">Demo website>/a>[/html]Now, what makes this tricky is users won’t know that they can actually use syntax highlighting with these shortcodes. So, you have to let them know through a notice message.
Step 2: Add a Syntax Highlighting Notice in Comment Form
To inform commenters about the syntax highlighting feature, you need to add a notice message above your comment form, like so:
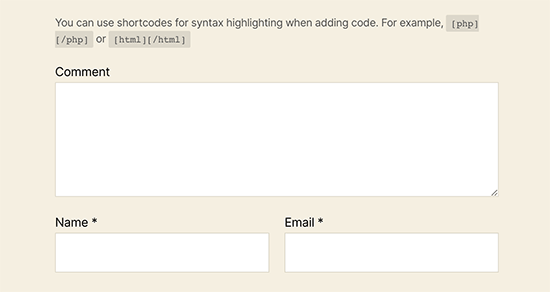
You can do this by adding a custom code snippet to your WordPress site.
If you are reading this tutorial because you have a coding blog, then most likely, you are pretty comfortable with coding.
Even so, it can still be difficult for the most advanced users to keep track of all of their code snippets. If not properly managed, you can experience some common WordPress errors or break your site completely.
That’s why we recommend using WPCode to insert custom code snippets. It is the easiest and safest way to add custom code in WordPress without having to edit any core WordPress files.
Note: While the free version of WPCode is available, we recommend using the Pro version of WPCode as it gives you access to smart conditional logic, access to a cloud library of code snippets, and more.
The first thing you need to do is install and activate the WPCode plugin. For more details, see our step-by-step guide on how to install a WordPress plugin.
Upon activation, head over to Code Snippets » Add Snippet.
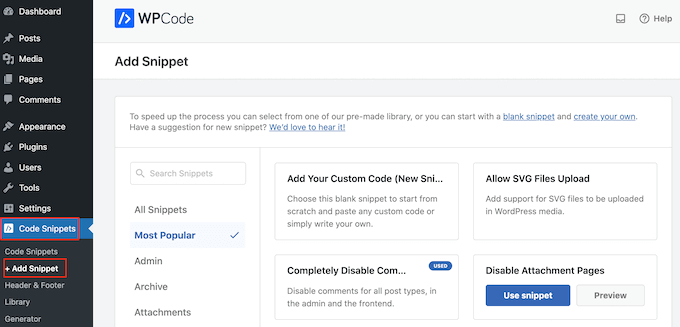
Here, you will see all of the ready-made snippets that you can add to your WordPress website.
Since we want to add our own snippet, hover over ‘Add Your Custom Code’ and then click ‘Use snippet.’
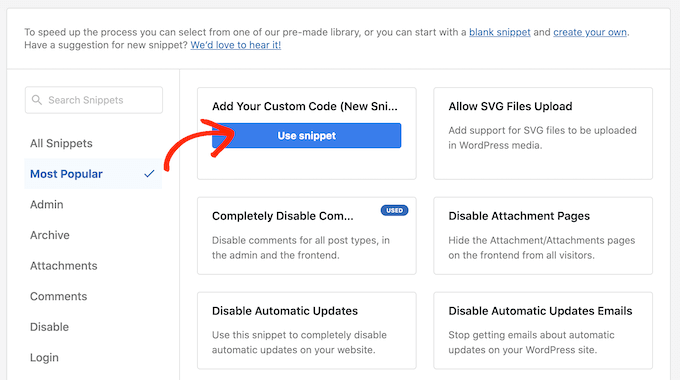
To start, enter a title for the custom code snippet. This can be anything that helps you identify the snippet.
After that, open the ‘Code Type’ dropdown and choose ‘PHP Snippet.’
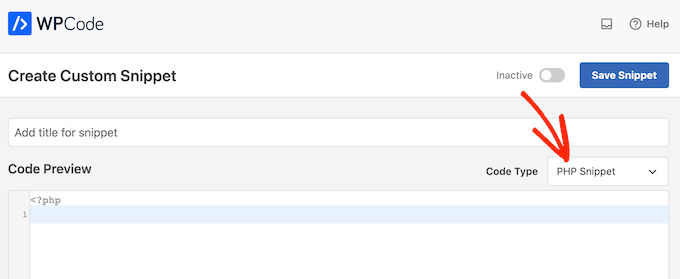
Now, simply paste the following snippet into the code editor:
function wpbeginner_comment_text_before($arg) {
    // Add a custom notice to inform users about using shortcodes for syntax highlighting
    $arg['comment_notes_before'] .= "<p class='comment-notice'>You can use shortcodes for syntax highlighting when adding code. For example,  or </p>";

    // Return the modified comment arguments
    return $arg;
}

// Add the filter to apply the custom comment modification function
add_filter('comment_form_defaults', 'wpbeginner_comment_text_before');
After that, open the ‘Location’ dropdown and click on ‘Run Everywhere.’
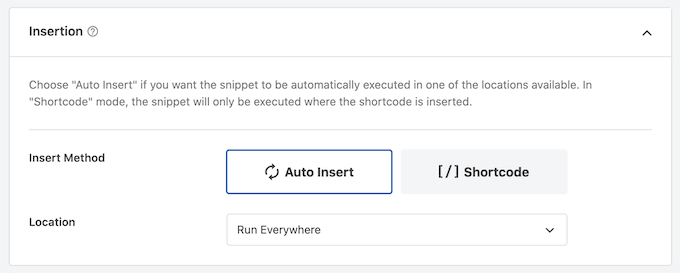
Then, you are ready to scroll to the top of the screen and click on the ‘Inactive’ toggle so that it changes to ‘Active.’
Finally, click on ‘Save Snippet’ to make the snippet live.
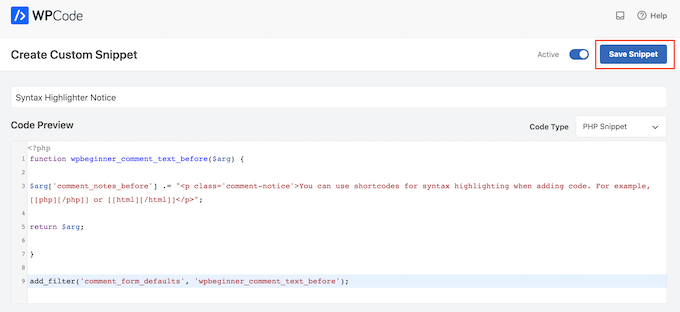
This code simply shows a notice above the comment field in the WordPress comment form. However, you won’t see this text while logged in to your account, so you will need to open a new browser window in incognito mode or log out of your account.
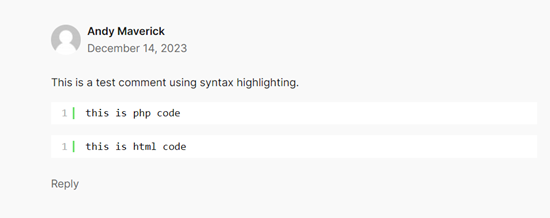
If you want to see if the shortcode actually works, just visit your website in incognito mode, comment on a blog post, and use the shortcode. When the comment has been moderated and approved, you should see something like this:
Learn More Ways to Boost Comment Engagement
Adding syntax highlighting capability isn’t just the only way to boost your comment engagement if you have a web development blog.
Another tip is to add likes and dislikes to your comments. This lets your readers easily express their opinions on specific comments. It can spark discussions and highlight valuable contributions from your community.
Also, you can notify users when they get replies to their comments. This ensures they stay engaged in the conversation and keeps them coming back for more.
Additionally, you may want to add custom fields to the comment form. You can do this if you want readers to provide specific information alongside their comments, like the programming language they’re using or the version of a framework.
Here are other tips you can implement to boost comment engagement:
- How to Display Most Commented Posts in WordPress
- How to Feature or Bury Comments in WordPress
- How to Redirect Your User’s Attention with Comment Redirect
We hope this article helped you add syntax highlighting in WordPress comments. You may also want to see our guide on how to add videos and more in WordPress comments and our expert picks for the best WordPress comment plugins.
If you liked this article, then please subscribe to our YouTube Channel for WordPress video tutorials. You can also find us on Twitter and Facebook.


Syed Balkhi says
Hey WPBeginner readers,
Did you know you can win exciting prizes by commenting on WPBeginner?
Every month, our top blog commenters will win HUGE rewards, including premium WordPress plugin licenses and cash prizes.
You can get more details about the contest from here.
Start sharing your thoughts below to stand a chance to win!
Jiří Vaněk says
Thank you for demonstrating the possibility using a snippet. I already have quite a lot of plugins on the site that I need to run it and at the same time, since I have a technology blog, I wanted to allow users to highlight codes in comments. I use WP Code for other snippets that have an important role on the website, so the possibility to do this with a snippet is very useful. Thank you once again, I will save the snippet to my code library for other sites as well.
Yves says
Last update 9 months ago. Non tested with last WordPress version.
WPBeginner Support says
For that not tested warning, we would recommend taking a look at our article below:
https://www.wpbeginner.com/opinion/should-you-install-plugins-not-tested-with-your-wordpress-version/
Admin
Seth says
Nice and very informative article. I just turned on update notifications. Good one guys.
WPBeginner Support says
Glad our article was helpful
Admin