WP-CLI or WordPress Command Line Interface, is a tool that helps you manage your WordPress website without accessing its backend dashboard.
You can perform different tasks like installing plugins and themes, managing users, changing settings, and more using the command line tool. It provides an alternative to using WordPress admin.
The best part is that WP-CLI makes the process of managing your site fast. You can simply enter commands instead of clicking on buttons or navigating through different pages.

What Are the Requirements for Setting Up WP-CLI?
One of the advantages of using WP-CLI is that you can access your site’s settings without using a web browser. However, before you can set up WP-CLI on your computer, there are some pre-requisites you will have to meet.
First, your WordPress hosting service should offer SSH (Secure Shell) access. SSH is a secure protocol that helps connect your computer to your WordPress website through a command line interface.
Besides that, here are some other requirements for using WP-CLI:
- PHP 5.6 version or higher
- WordPress running 3.7 or later
- An SSH software
How to Install WP-CLI on Your Computer and Hosting Provider
Most computers come with SSH software pre-installed these days. For instance, you can use Terminal on Mac or PowerShell on Windows with OpenSSH.
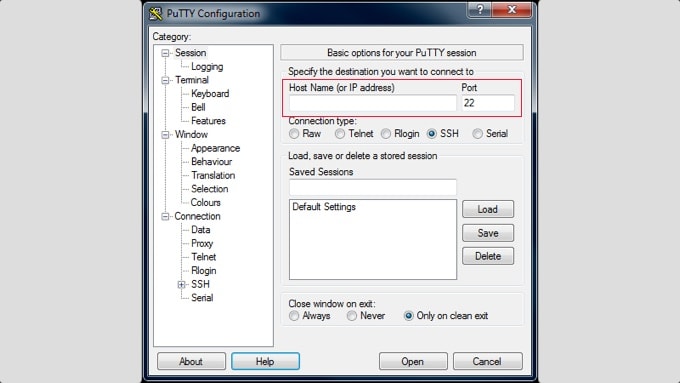
However, we recommend using an open-source and free software called PuTTY. To start, you can visit the PuTTY website and download the application.

Next, you can install the software on your computer and launch it.
From here, you will need to enter the Host Name (IP address) and port number. Once that’s done, click the ‘Open’ button.

After that, a terminal window will open, where you can enter the username and password to connect to your WordPress website.
You can find the username, password, IP address, and port number in the cPanel of your hosting provider. If you can’t find this information, then we suggest reaching out to customer support.
Aside from that, you will also need WP-CLI installed on your web hosting server. Most hosting services like Bluehost offer WP-CLI by default.
However, if you don’t have WP-CLI pre-installed, then you can download the wp-cli.phar file using this command:
curl -O https://raw.githubusercontent.com/wp-cli/builds/gh-pages/phar/wp-cli.phar
For more details, please see the installation guide provided by WordPress.org for setting up WP-CLI.
How Can You Use WP-CLI in WordPress?
After configuring WP-CLI on your computer and server, you can now start to use it for managing your website. For instance, you can install, activate, and deactivate WordPress plugins and themes.
WP-CLI also lets you update WordPress core files, manage comments, clear the cache, control language packages, create backups, change WordPress settings, and more.
The best part is that the command line helps you troubleshoot your website in case something goes wrong and you are unable to access the admin panel. For instance, you can disable conflicting plugins or edit settings using the command line to restore your website.
To use WP-CLI, here are some common commands you can enter to run your site:
- wp core download – You can use this command to download WordPress.
- wp core install – Enter this command to install WordPress.
- wp core version – Check the WordPress version and ensure WordPress was successfully installed.
- wp plugin install [plugin-name] – Run this command to install a plugin on your site (replace ‘plugin-name’ with the name of the WordPress plugin, like wpforms-lite).
- wp plugin activate [plugin-name] – After installing the plugin, simply use this command to activate the plugin.
- wp theme install [theme-name] – This command is for installing a WordPress theme (don’t forget to replace ‘theme-name’ with the theme you want to use).
- wp theme activate [theme-name] – Simply enter this command to activate a WordPress theme.
- wp user create – Create a new user with this command.
- wp user add-role user ID role – This command lets you add a role for a user (just enter the user ID and the role you want to assign).
- wp admin – For opening the WordPress admin panel in a browser.
We hope this article helped you learn more about WP-CLI in WordPress. You may also want to see our Additional Reading list below for related articles on useful WordPress tips, tricks, and ideas.
If you liked this article, then please subscribe to our YouTube Channel for WordPress video tutorials. You can also find us on Twitter and Facebook.


