¿Desea instalar y establecer W3 Total Cache en su sitio web WordPress?
W3 Total Cache es un popular plugin de caché para WordPress que te ayuda a mejorar la velocidad y el rendimiento de tu sitio web. Los plugins de caché pueden ayudar a retener a los usuarios y reducir las tasas de rebote, lo que puede ayudar al SEO y aumentar las conversiones.
En esta guía para principiantes, le mostraremos cómo instalar y establecer fácilmente W3 Total Cache en su sitio web de WordPress.
Nota del Editor: Ya no usamos W3 Total Cache en nuestro sitio web y hemos cambiado a WP Rocket que es un plugin de caché premium. W3 Total Cache sigue siendo una buena solución que funciona bien.
¿Qué es W3 Total Cache?
W3 Total Cache es uno de los mejores plugins de caché de WordPress que le permite mejorar fácilmente el rendimiento y la velocidad de WordPress.
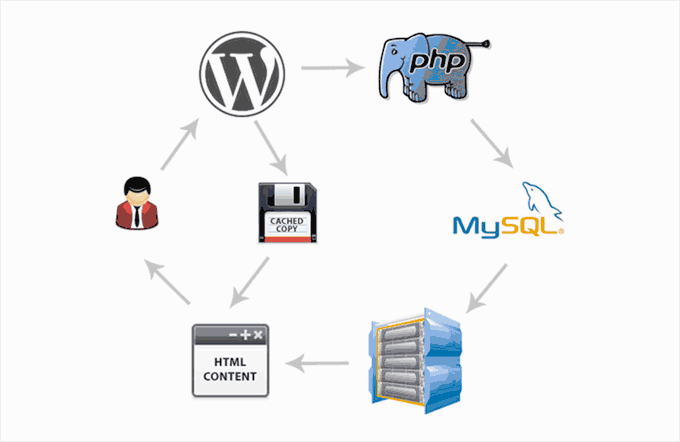
Por defecto, WordPress utiliza PHP para generar dinámicamente cada página de su sitio web cuando es solicitada por un usuario.
PHP es un idioma de programación del lado del servidor. Esto significa que cada petición de un usuario aumenta la carga de su servidor. Esto afecta al rendimiento de su sitio web, a la experiencia del usuario y al SEO.
Los plugins de caché de WordPress le ayudan a reducir este problema omitiendo PHP y sirviendo una copia en caché de su página web.
También le permite conectar fácilmente su sitio web a una CDN (red de distribución de contenidos) para mejorar aún más el rendimiento de su sitio web.
Instalación de W3 Total Cache en WordPress
Antes de instalar el plugin W3 Total Cache en WordPress, deberá asegurarse de desactivar cualquier otro plugin de caché de su sitio web. Esto te ayudará a guardar o ahorrar recursos del servidor y evitar conflictos entre plugins.
Una vez hecho esto, puede instalar y activar el plugin W3 Total Cache. Para más detalles, consulta nuestra guía paso a paso sobre cómo instalar un plugin de WordPress.
Una vez activado, W3 Total Cache añadirá un nuevo elemento / artículo de menú llamado Rendimiento a la barra lateral del administrador de WordPress. Al hacer clic en él, se iniciará el asistente de configuración del plugin.
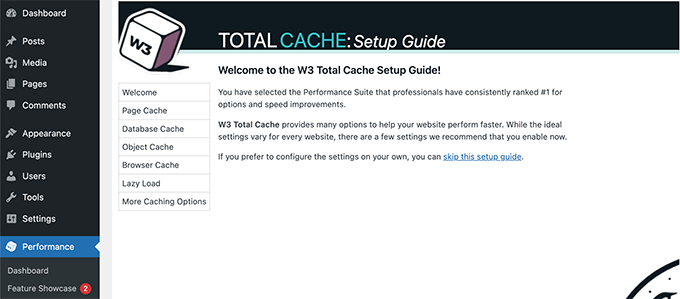
Basta con hacer clic en el botón Siguiente para continuar.
En primer lugar, se le pedirá que active la caché de página. Haga clic en el botón Probar caché de página para continuar.
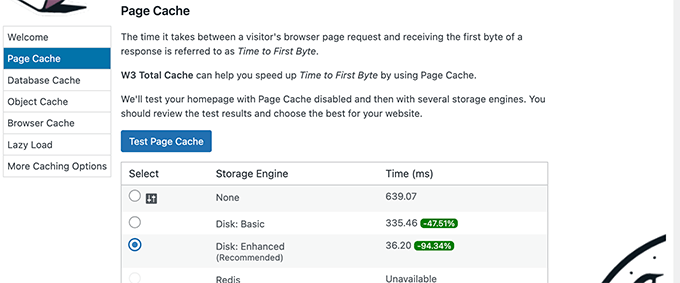
W3 Total Cache le mostrará diferentes opciones de motor de almacenamiento. Debe elegir la que le ahorre más tiempo. Normalmente, será la opción ‘Disk: Mejorado’ en la mayoría de las plataformas de alojamiento compartido.
Haga clic en el botón Siguiente para continuar.
Ahora, se le dará la opción de Probar Caché de Base de Datos. Le recomendamos que elija Ninguno. Para la mayoría de los sitios web pequeños y medianos, su servidor MySQL podrá obtener los datos más rápidamente que la caché de base de datos.
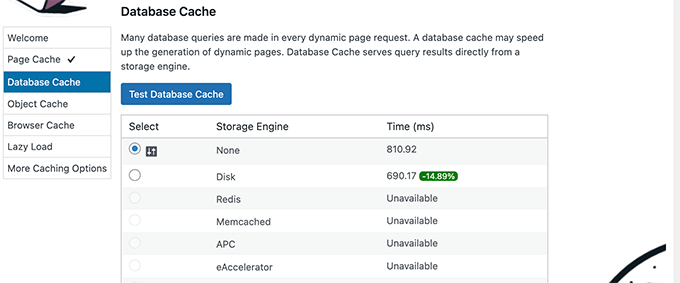
Haga clic en el botón Siguiente para pasar al paso siguiente.
Esto le llevará a la sección Caché de objetos. La caché de objetos permite a W3 Total Cache almacenar consultas de base de datos para páginas dinámicas y reutilizarlas para mejorar el rendimiento.
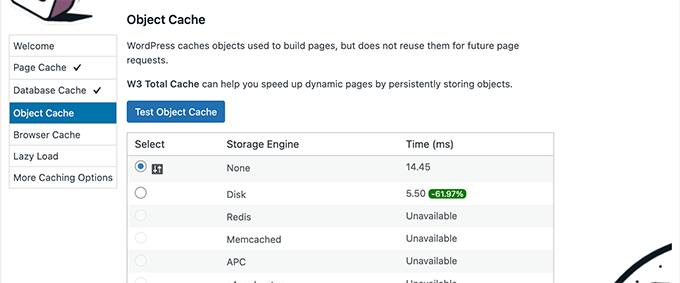
Si el resultado de la prueba muestra apenas unos milisegundos de diferencia, puede elegir Ninguno.
Haga clic en el botón siguiente para continuar.
A continuación, haga clic en el botón Probar caché del navegador y seleccione la opción “Activado” en los resultados de la prueba.
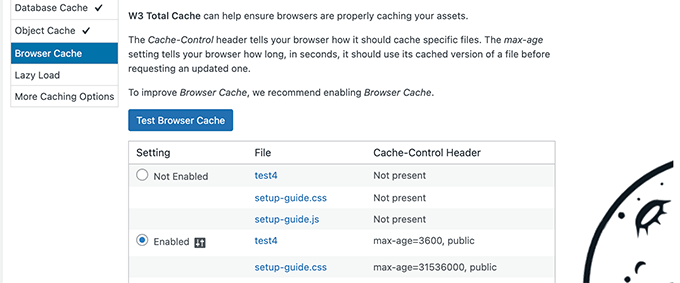
Esta opción solicita al navegador / explorador del usuario que almacene una copia de la página web durante un tiempo limitado. Cargar una página desde la caché de un navegador es mucho más rápido que cargarla desde la caché de su servidor web.
Haga clic en el botón siguiente para pasar al paso siguiente.
Por último, el asistente de configuración le pedirá que active la carga diferida para las imágenes.
Actualmente, WordPress incorpora la función de carga diferida de imágenes. Sin embargo, algunos navegadores antiguos pueden no ser compatibles con esta característica.
W3 Total Cache utiliza JavaScript para añadir carga diferida a las imágenes, lo que puede resultar aún más rápido y eficaz.
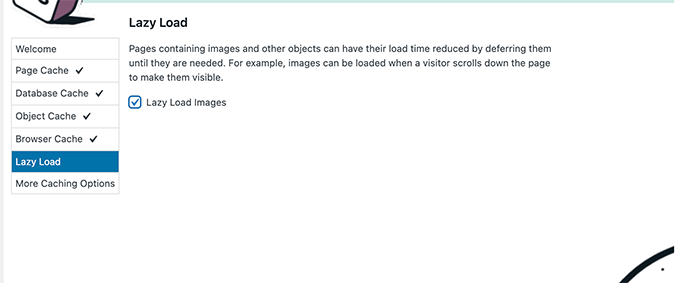
A continuación, haga clic en el botón Siguiente para finalizar el asistente de configuración y ver el Escritorio de W3 Total Cache.
Opciones avanzadas de caché en W3 Total Cache
Los ajustes básicos sirven para la mayoría de los sitios web. Sin embargo, hay muchas opciones avanzadas que puede configurar para mejorar aún más el rendimiento.
Veamos las más importantes.
Minimizar JavaScript y CSS en W3 Total Cache
El término “minimizar” se utiliza para describir un método que reduce el tamaño de los archivos de su sitio web. Para ello, quita espacios en blanco, líneas y caracteres innecesarios del código fuente.
Nota: Minimizar los archivos JS y CSS puede potencialmente romper su sitio web. Si la activa y su sitio web no se ve bien, simplemente desactive estas opciones.
W3 Total Cache también permite minimizar fácilmente el código fuente JavaScript, CSS y HTML. Sin embargo, recomendamos minimizar solo los archivos JavaScript y CSS.
Simplemente diríjase a la página Rendimiento ” Minimizar y desplácese hasta la sección JS.
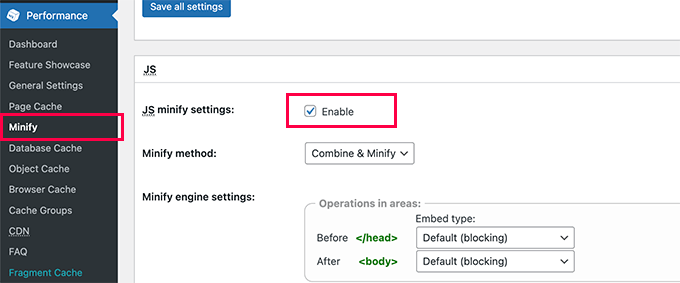
Marque la casilla siguiente a ‘JS minify settings’ para activarlo.
Ahora, desplácese hasta la sección CSS y active los ajustes de minimizar CSS de la misma manera.
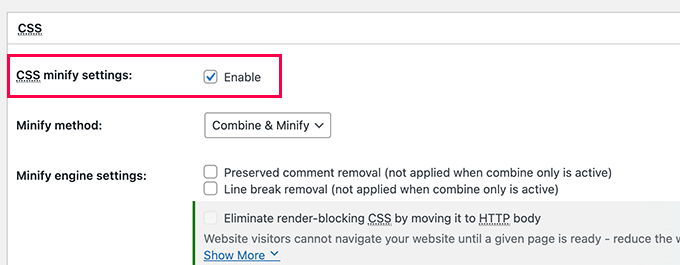
No olvides hacer clic en el botón Guardar todos los ajustes para guardar tus ajustes.
Para métodos alternativos, consulte nuestra guía sobre cómo minimizar archivos JavaScript y CSS en WordPress.
Activar soporte CDN en W3 Total Cache
Las CDN o redes de distribución de contenidos le ayudan a mejorar aún más el rendimiento de su sitio web sirviendo archivos estáticos como imágenes, CSS y JavaScript desde una red global de servidores.
Esto reduce la carga de su servidor de alojamiento de WordPress y mejora la velocidad de carga de la página.
W3 Total Cache es compatible con / da soporte a varias plataformas CDN.
Recomendamos usar Bunny. net que es la mejor solución CDN del mercado. Esto es lo que usamos para nuestro sitio web OptinMonster.
En primer lugar, debe registrarse para obtener una cuenta en Bunny.net. Después de registrarse, debe crear una Pull Zone para su sitio web.
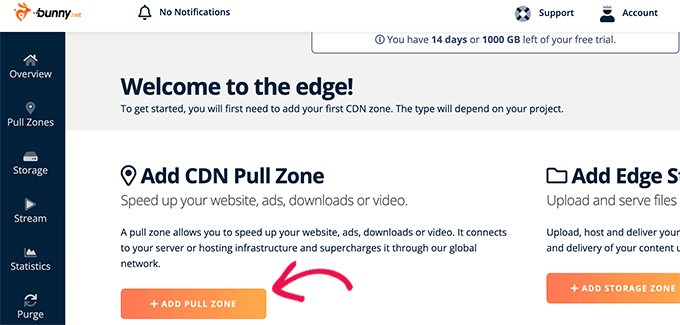
Una zona pull añade un hostname a Bunny.net CDN. Este hostname se utiliza para servir archivos estáticos para su sitio web.
Añada un nombre para su zona de extracción y, a continuación, indique el nombre de dominio de su sitio web.
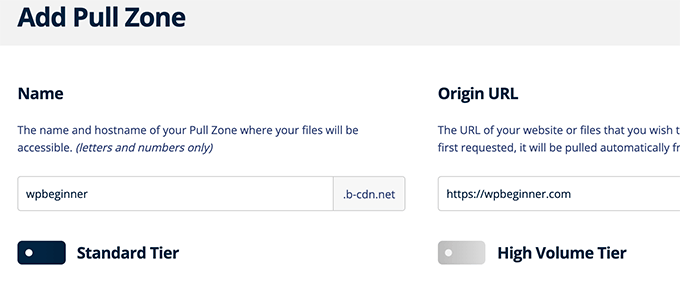
Después de añadir la pullzone, tienes que visitar la página Rendimiento ” Ajustes generales.
A continuación, desplácese hasta la sección CDN.
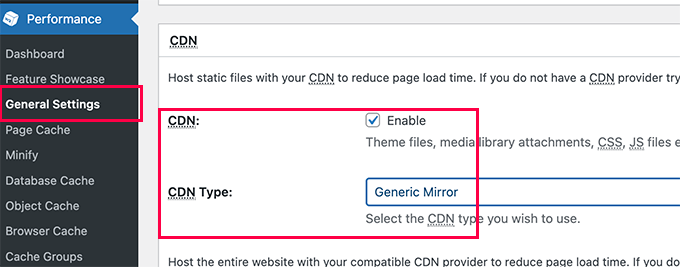
Marque la casilla Activar situada junto a la opción CDN y elija Espejo genérico junto a la opción Tipo de CDN.
No olvides hacer clic en el botón Guardar todos los cambios para establecer los ajustes.
A continuación, visite la página Rendimiento ” CDN y desplácese hasta la sección Configuración: Objetos.
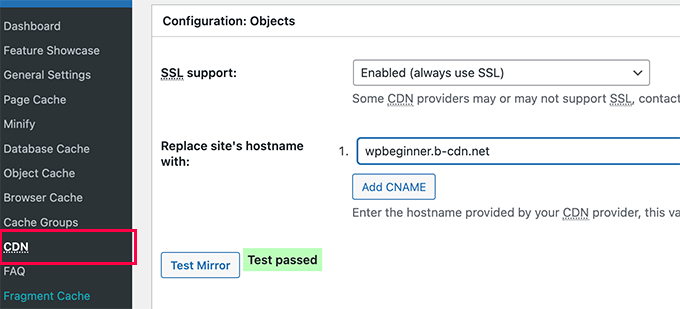
Desde aquí, tienes que añadir el hostname que creaste anteriormente para tu pullzone y hacer clic en el botón de test mirror.
W3 Total Cache comprobará la disponibilidad de su hostname y mostrará el mensaje Test Passed cuando sea correcto.
Ahora puede hacer clic en el botón Guardar todos los cambios para establecer los ajustes.
W3 Total Cache empezará a servir sus recursos estáticos desde el servidor CDN.
W3 Total Cache también funciona bien con Cloudflare CDN gratuito. Alternativamente, también puedes usarlo con Sucuri, que es el mejor servicio de cortafuegos de sitios web con servicio de CDN integrado.
Diagnosticar problemas con W3 Total Cache
Una vez que haya configurado W3 Total Cache correctamente, debería funcionar sin problemas en segundo plano para mejorar la velocidad de WordPress y aumentar el rendimiento.
Ocasionalmente, puede encontrarse con problemas por los que no vea inmediatamente los cambios realizados en su sitio web, o puede que un plugin no funcione correctamente.
La razón más común de estos problemas es que probablemente esté viendo una versión antigua en caché de su sitio web.
Esto se puede corregir fácilmente vaciando la caché en WordPress.
Simplemente haga clic en el menú Rendimiento en la parte superior y luego seleccione la opción Purgar todas las cachés. W3 Total Cache vaciará todo el contenido almacenado en caché de su sitio web.
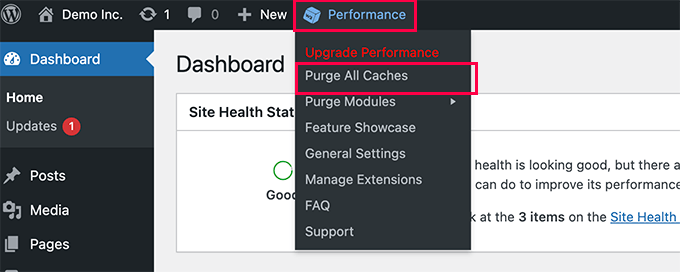
Si sigues viendo la versión antigua de tu sitio web, intenta vaciar también la caché de tu navegador.
Esperamos que este artículo te haya ayudado a establecer y configurar W3 Total Cache en WordPress. Puede que también quieras ver nuestra guía completa de seguridad de WordPress para principiantes para reforzar la seguridad de tu sitio web, o nuestras selecciones de expertos de los mejores servicios de alojamiento de WordPress para acelerar aún más tu sitio web.
If you liked this article, then please subscribe to our YouTube Channel for WordPress video tutorials. You can also find us on Twitter and Facebook.


Syed Balkhi says
Hey WPBeginner readers,
Did you know you can win exciting prizes by commenting on WPBeginner?
Every month, our top blog commenters will win HUGE rewards, including premium WordPress plugin licenses and cash prizes.
You can get more details about the contest from here.
Start sharing your thoughts below to stand a chance to win!
Rabia says
Thanks valuable information.
WPBeginner Support says
You’re welcome
Administrador
Jiří Vaněk says
I would recommend everyone to make a note of the changes you have made, especially. Issues on the website may not manifest immediately. For instance, it happened to me that after a week, WordPress started behaving strangely, and it was happening randomly. It took me quite a while to find the problem in the cache plugin and incorrect settings. If I had documented the changes I made, I would have found the problem more easily. It’s a recommendation for everyone.
Roin says
Hello,
I’ve a question:
Does a free version slow the website ? My opinion is that a free version of this plugin makes website slow.. how do you think?
WPBeginner Support says
The free version of plugins will not slow down your site, poorly coded plugins can slow down your site.
Administrador
Abu Allaah says
Thanks for the valuable tips,
I would like to ask if it’s possible to update the article with the latest version of the plugin.
Thanks in advance
WPBeginner Support says
We will look into updating the article as soon as we are able
Administrador
Balu says
I enabled Minify settings in W3 Total cache plugin and also installed cloudflare extension in w3 total cache plugin.
Should I enable minify settings in Cloudflare extension also?
WPBeginner Support says
You would want to only use one or the other, if your W3 Total cache minification is working well then stay with that for the moment
Administrador
Prajyot Kumbharjuvekar says
Do I still need to install a caching plugin if I use CLOUDFLARE CDN
WPBeginner Support says
It is not required but it is recommended to use a caching plugin with your CDN
Administrador
Duryab says
This post is much outdated now, please update this post to the latest W3 total cache plugin.
Thanks.
WPBeginner Support says
Thank you for letting us know about this post being outdated, we will update this article as we are able
Administrador
Tom Lloyd says
Thanks for the great article! I really benefitted from it and have a better performance now 1/4 load time. One thing you should mention is in the Browser Page under Performance tab there is a box at the bottom that says Rewrite URL. Don’t check that it ruined my pages. All links were alterred but I took it off and it’s ok.
Gavin says
Thanks for your very easy to follow tutorial (with screenshots) on W3 Total Cache. I noticed an immediate difference in load time of the site.
Bikramjit says
Hi, As per your recommendation, I have decided to go for MaxCDN, Is there any new update about CDN? Going to the MaxCDN site, there are different service including Content Delivery Network, Edge Delivery and other. Can your recommend me which service I have to select initially? I have new blog with no affiliate link till now and not planning for the next six month. And I am planning to apply Google adsense in the near future.Presently I installed WP Super Cache.
Do I need to switch W3 Total Cache to configure with MaxCDN? if I can configure MaxCDN with WP Super Cache, do you have any guideline?
HumbleHuman says
Hey:)
Thanks for those detailed instructions and I must say that you helped me much in setting up W3TC for my website..
I have a small issue with W3TC.. It is not purging my feed cache even though I have enabled this in the Purge Policy..
Will you help me how to solve this issue?
Thanks in Advance
Brandon says
After following this guide, I get the error: “Error: Empty hostname / CNAME list.” I have filled the “Replace site’s hostname with:” with all my cdn.* fields. Has anyone ran into this issue?
Vijay Prajapati says
I am Using W3 Total cache plugin for WordPress. My post has one table which updates every minute/hour. But as I do caching, the server does not serves latest version, instead it displays cached copy to the visitor. How can I purge cache every 30 minutes automatically so that it shows latest version of the post at after every 30 minutes?
I have already tried inserting this code in functions.php file but its not purging cache every 1h, instead it dies 2-3h later.
function w3_flush_cache( ) {
$w3_plugin_totalcache->flush_all();
}
// Schedule Cron Job Event
function w3tc_cache_flush() {
if ( ! wp_next_scheduled( ‘w3_flush_cache’ ) ) {
wp_schedule_event( current_time( ‘timestamp’ ), ‘hourly’, ‘w3_flush_cache’ );
}
}
Anna says
Thanks for such an easy to follow article. I broke my website yesterday using instructions from another blog. I should have come here first!!
I am a bit surprised by my results though. I did a Pingdom and GT Metrics test before I made all these changes and my page load time was:
Pingdom: 8.91 secs and GT Metrix: 5.3 secs
After I made all the changes I re-ran the tests:
Pingdom: 9.51 secs and GT Metrix: 9.9 secs
I thought my load times were meant to get much better – not worse!!?? What have I done wrong?
WPBeginner Support says
Hi Anna,
Allow the plugin to generate cache and recheck your scores. If that doesn’t help try to review your cache settings to make sure everything is setup properly. Alternately, you can try WP Super Cache and see if it helps.
Administrador
Roman says
Thank you for so great content.
Should I enable “Page cache” option in the process of development of site or only at when I launch it?
For me it is convenient to do this right now, but I think maybe during development it is not good as I visiting thousand times to check the progress.
WPBeginner Support says
Hi Roman,
Yes, you are right. You can set up the plugin later once your website is live.
Administrador
Jessica Braboy says
Hi! Trying to install the W3 Total Cache Plug In, and while it says it is compatible with my version of WordPress, it says that the plug in is unavailable and says “Not allowed on our system due to performance, security or compatibility concerns. Please contact support with any questions.”
First of all… do you know why this is no longer working? And, do you have an alternative cache plug in that you recommend? Thank you!
WPBeginner Support says
Hi Jessica,
This means that your WordPress hosting company doesn’t allow the plugin. Most probably because they have their own caching solution integrated into your hosting account which doesn’t work well with W3 total Cache. Please contact your hosting provider for more details.
Administrador
Andy Sellers says
Hi, I need some help please.
I’ve followed the instructions to serve my static files through CDN (and they’re very clear, thank you) and have found the process straightforward so far- but when I log in to my site the URL still starts with ‘www.’ and not ‘cdn’ so I guess cdn is not operational yet.
One thing I notice is that in the MAXcdn account page there is no option to ‘Update’ the Custom Domain settings as mentioned in the instructions – is this OK? I assume it now updates automatically?
But my main problem is that, assuming I now have to do this, I don’t know how to specify the static files in the custom files list in the custom setting of W3Total Cache. Help please. How should I fill in this Advanced panel – it’s now getting a bit too techie for me? Thank you.
WPBeginner Support says
Hi Andy,
You will login to your WordPress site using the normal URL. CDN only serves static files via their network not the whole website.
MaxCDN settings may have changed, but you would still need to setup your domain. Please contact their support and they will be able to guide you.
Administrador
sazia kazia says
Hi Very helpful and useful article. I set w3 total cache as per above instructions and could see it improved my website speed in good level. I ‘ll use MaxCDN instructions …Thank you so much
Amit Jain says
Hello Team! I am following your blog since long now and trust have learnt a lot. Thanks.
I need a little bit of help – Mine is a startup site, but have started with Cloud VPS Server with Data Centre located in Mumbai, India. 2.80*4 CPU and 8GB Ram is the part of Server Configuration. For better Site Security and Performance what should i use – Cloudflare (If cloudflare then free or paid plan) or Sucuri, W3Total Cache, WP Super Cache, Varnish Cache or Some other plugin/software.