Sie möchten einen sicheren Ort, an dem Sie mit Ihrer WordPress-Website experimentieren können, ohne Angst haben zu müssen, etwas auf Ihrer Live-Site kaputt zu machen?
Das Verschieben Ihrer WordPress-Site auf einen lokalen Server auf Ihrem Computer ist unserer Meinung nach die perfekte Lösung, insbesondere für Entwickler, Designer oder WordPress-Anfänger.
Die Installation von WordPress auf Ihrem Computer (lokaler Server) ermöglicht es Ihnen, WordPress einfach zu erlernen und Dinge zu testen. Wenn Sie eine Live-WordPress-Site auf einen lokalen Server verschieben, können Sie mit denselben Daten experimentieren wie mit Ihrer Live-Site.
In diesem Artikel zeigen wir Ihnen, wie Sie eine Live-WordPress-Site ganz einfach auf einen lokalen Server verschieben können.
Warum und für wen ist es sinnvoll, eine WordPress-Website auf einen lokalen Server zu verschieben?
Wenn Sie bereits seit einiger Zeit eine WordPress-Website betreiben, möchten Sie vielleicht neue Themes oder ein Plugin ausprobieren. Wenn Sie dies jedoch auf einer Live-Website tun, kann dies zu einer schlechten Benutzererfahrung für Ihre Benutzer führen.
Um dies zu vermeiden, erstellen viele Benutzer eine Kopie ihrer WordPress-Website auf einem lokalen Server, um neue Themes und Plugins zu testen oder Entwicklungstests durchzuführen.
So können Sie Ihr Thema mit all Ihren Inhalten einrichten und alle Funktionen testen, ohne sich Sorgen machen zu müssen, dass Ihre Website kaputt geht. Viele Benutzer kopieren ihre Website auf einen lokalen Server, um ihre WordPress- und Programmierkenntnisse mit echten Website-Daten zu üben.
Auch wenn Sie alle Tests mit Dummy-Inhalten in WordPress durchführen können, geben Ihnen die Daten einer echten Website eine bessere Vorstellung davon, wie diese Änderungen auf Ihrer Live-Site aussehen werden.
Vorbereiten der Verschiebung einer lokalen Site auf einen lokalen Server
Zunächst müssen Sie sicherstellen, dass Sie immer ein Backup Ihrer WordPress-Website erstellen. Es gibt mehrere großartige WordPress-Backup-Plugins, die Sie verwenden können.
Zweitens müssen Sie eine lokale Serverumgebung auf Ihrem Computer installieren. Sie können WAMP für Windows und MAMP für Mac verwenden. Sobald Sie die Umgebung eingerichtet haben, müssen Sie mit phpMyAdmin eine neue Datenbank erstellen.
Rufen Sie einfach die folgende URL in Ihrem Browser auf, um phpMyAdmin zu starten.
http://localhost/phpmyadmin/
http://localhost:8080/phpmyadmin/
Hier müssen Sie auf die Registerkarte „Datenbanken“ klicken und eine neue Datenbank erstellen. Diese Datenbank benötigen Sie später, um Ihre Live-Site-Daten zu entpacken.

Sie sind nun bereit, Ihre Live-WordPress-Site auf einen lokalen Server zu verschieben.
Methode 1. Verschieben einer Live-WordPress-Site auf einen lokalen Server mit einem Plugin
Diese Methode ist einfacher und wird für alle Benutzer empfohlen.
Als Erstes müssen Sie das Duplicator-Plugin installieren und aktivieren. Weitere Details finden Sie in unserer Schritt-für-Schritt-Anleitung für die Installation eines WordPress-Plugins.
Mit Duplicator können Sie ganz einfach ein Duplikatpaket Ihrer gesamten Website erstellen. Es kann verwendet werden, um Ihre WordPress-Website an einen neuen Standort zu verschieben, und kann auch als Backup-Plugin verwendet werden.
Hinweis: Es gibt eine kostenlose Version von Duplicator, mit der Sie loslegen können. Duplicator Pro bietet jedoch unbegrenzte Backups und erweiterte Funktionen.
Nach der Aktivierung gehen Sie in Ihrer WordPress-Admin-Seitenleiste auf Duplicator Pro “ Backups. Um ein neues Paket zu erstellen, müssen Sie auf die Schaltfläche „Neu hinzufügen“ klicken.
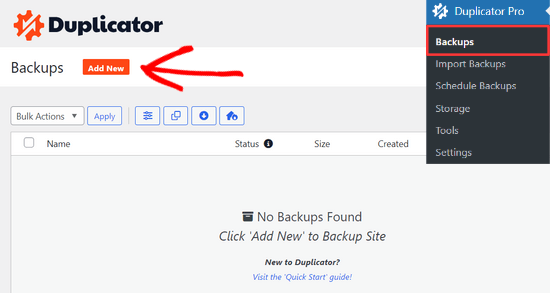
Duplicator startet dann den Sicherungsassistenten.
Zunächst müssen Sie einen Namen für Ihr Sicherungspaket eingeben. Sie können auch die dynamischen Tags verwenden, um automatisch ein Namensformat wie das Datum und den Titel Ihrer Website zu erstellen.

Erweitern Sie dann den Abschnitt „Speicher“ und wählen Sie einen Speicherort.
Für dieses Lernprogramm verwenden wir den Standardspeicherort. Sie können auf den Link „Speicher hinzufügen“ klicken, um einen neuen Speicherort hinzuzufügen, z. B. Dropbox oder Google Drive, wenn Sie möchten.
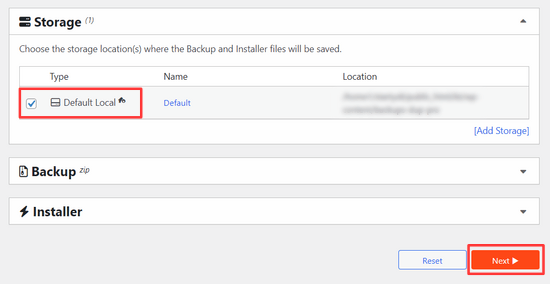
Klicken Sie auf die Schaltfläche „Weiter“, um fortzufahren.
Das Plugin scannt dann Ihre Website und führt einige Hintergrundprüfungen durch. Es zeigt Ihnen dann eine Zusammenfassung dieser Überprüfungen.
Wenn alles gut aussieht, klicken Sie auf die Schaltfläche„Sicherung erstellen„, um fortzufahren.
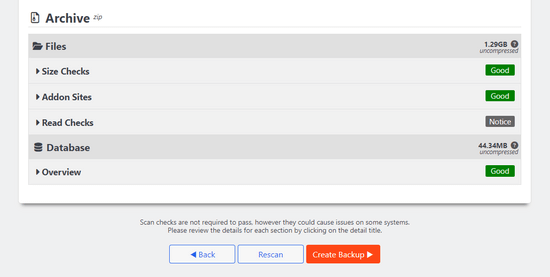
Duplicator wird nun Ihr Website-Paket erstellen.
Danach sehen Sie eine Zip-Datei, die alle Daten Ihrer Website enthält, und eine Installationsdatei. Sie müssen beide Dateien auf Ihren Computer herunterladen.
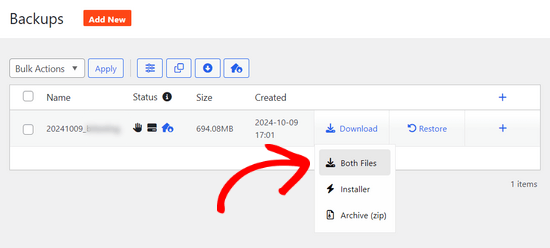
Jetzt können Sie diese Dateien entpacken und auf Ihrem lokalen Server installieren.
Zunächst müssen Sie einen neuen Ordner im Stammverzeichnis Ihres lokalen Servers erstellen. Dies ist der Ordner, in dem Ihr lokaler Server alle Websites speichert.
Wenn Sie zum Beispiel MAMP verwenden, ist es der Ordner /Applications/MAMP/htdocs/. Wenn Sie jedoch WAMP verwenden, ist es der Ordner C:\wamp\www\.
Innerhalb dieses Ordners können Sie für jede neue Website, die Sie importieren oder auf Ihrem lokalen Server erstellen möchten, neue Ordner anlegen.
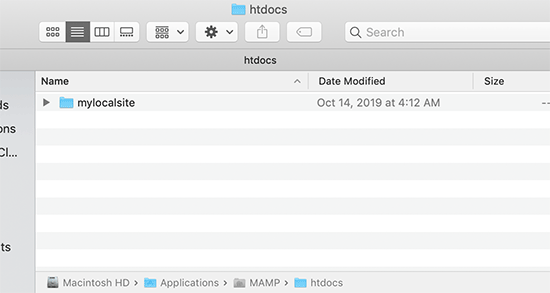
Danach müssen Sie den Ordner öffnen, den Sie für Ihre lokale Website erstellt haben, und dann sowohl die Archiv-Zip-Datei als auch das Installations-Skript, das Sie zuvor heruntergeladen haben, kopieren und einfügen.
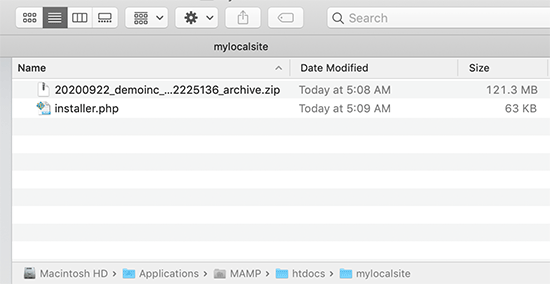
Um die Installation durchzuführen, müssen Sie das Skript installer.php in Ihrem Webbrowser öffnen.
Wenn Sie zum Beispiel beide Dateien in den Ordner /mylocalsite/ eingefügt haben, können Sie sie in Ihrem Browser unter http://localhost/mylocalsite/installer.php aufrufen .
Das Duplicator-Installationsskript sieht nun wie folgt aus:
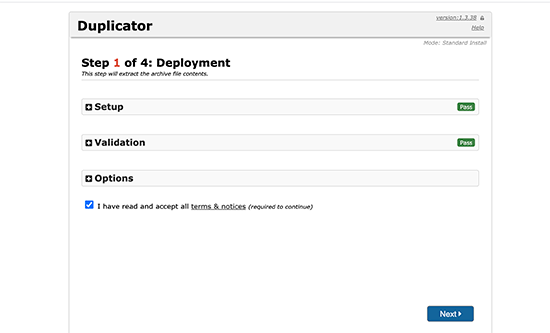
Klicken Sie auf die Schaltfläche „Weiter“, um fortzufahren.
Duplicator entpackt nun die Archiv-Zip-Datei und fordert Sie auf, die Datenbankinformationen Ihrer lokalen Website einzugeben. Dies ist die Datenbank, die Sie zuvor erstellt haben.
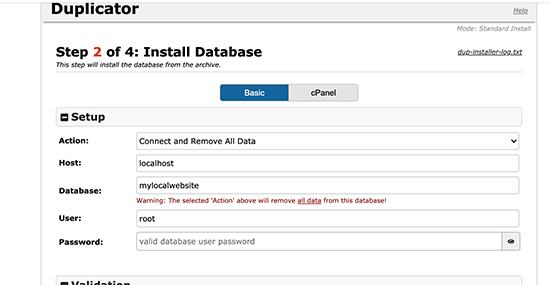
Der Servername ist fast immer localhost und der Benutzername ist root. In den meisten Fällen hat Ihre lokale Serverinstallation kein Passwort für root festgelegt, so dass Sie dieses leer lassen können.
Unten auf der Seite finden Sie eine Schaltfläche „Datenbank testen“, mit der Sie sicherstellen können, dass Ihre Datenbankinformationen korrekt sind.
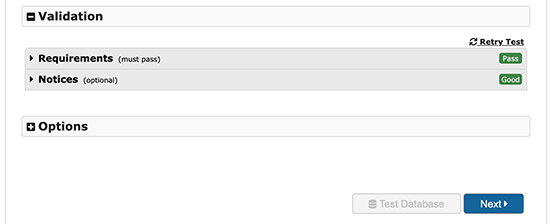
Wenn alles gut aussieht, klicken Sie auf die Schaltfläche „Weiter“, um fortzufahren.
Duplicator wird nun Ihre WordPress-Datenbank importieren. Danach werden Sie aufgefordert, die neuen Website-Informationen, die automatisch erkannt wurden, zu überprüfen.
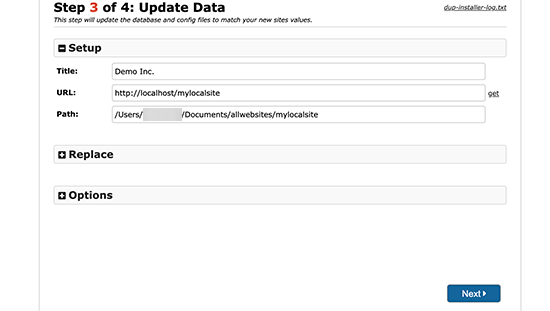
Klicken Sie auf die Schaltfläche „Weiter“, um fortzufahren.
Duplicator beendet nun die Einrichtung und zeigt Ihnen eine Schaltfläche an, mit der Sie sich bei Ihrer lokalen Website anmelden können. Sie verwenden denselben WordPress-Benutzernamen und dasselbe Passwort, das Sie auf Ihrer Live-Site verwenden.
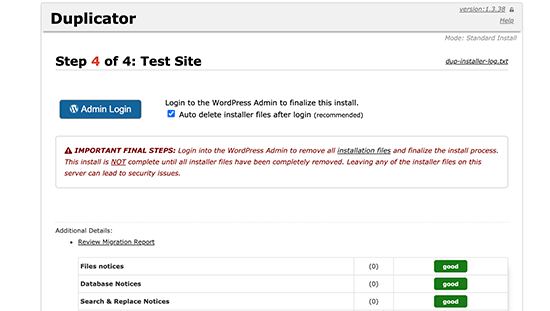
Das war’s. Sie haben Ihre Live-Site erfolgreich auf den lokalen Server verschoben.
Methode 2. Manuelles Verschieben einer Live-WordPress-Site auf einen lokalen Server
Sollte das Plugin bei Ihnen nicht funktionieren, können Sie Ihre Live-Site jederzeit manuell auf einen lokalen Server verschieben. Als Erstes müssen Sie Ihre Website manuell von Ihrem WordPress-Hosting-Konto aus sichern.
Schritt 1. Exportieren Sie die WordPress-Datenbank Ihrer Live-Site
Um die WordPress-Datenbank Ihrer Live-Site zu exportieren, müssen Sie sich in Ihrem cPanel-Dashboard anmelden und auf phpMyAdmin klicken.
Hinweis: Wir zeigen Screenshots vom Bluehost-Dashboard.
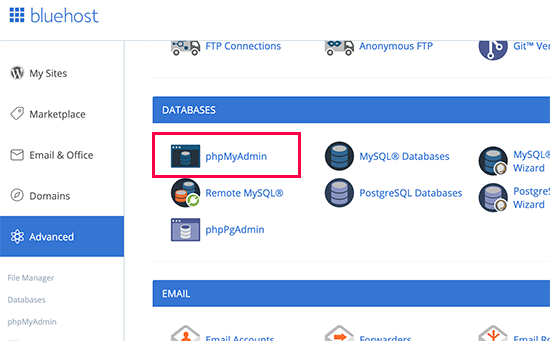
In phpMyAdmin müssen Sie die Datenbank auswählen, die Sie exportieren möchten, und dann oben auf die Registerkarte „Export“ klicken.
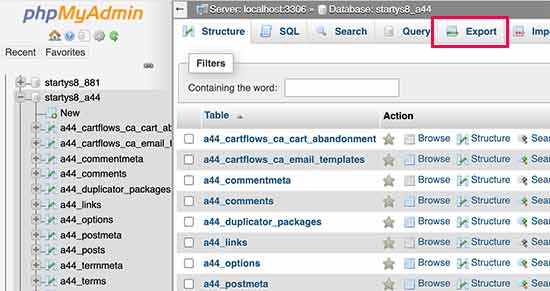
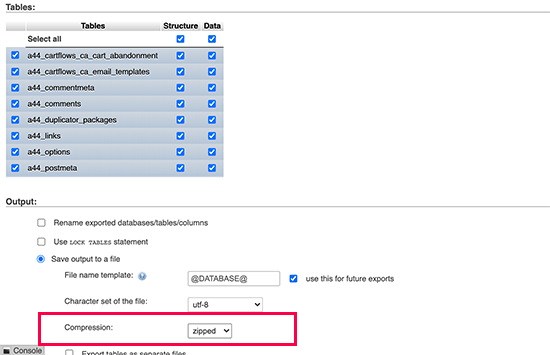
phpMyAdmin fordert Sie nun auf, entweder die schnelle oder die benutzerdefinierte Exportmethode zu wählen. Wir empfehlen, die benutzerdefinierte Methode zu verwenden und zip als Komprimierungsmethode zu wählen.
Manchmal können WordPress-Plugins ihre eigenen Tabellen in Ihrer WordPress-Datenbank erstellen. Wenn Sie dieses Plugin nicht mehr verwenden, können Sie mit der benutzerdefinierten Methode diese Tabellen ausschließen.
Lassen Sie die restlichen Optionen unverändert und klicken Sie auf die Schaltfläche „Go“, um Ihre Datenbanksicherung im Zip-Format herunterzuladen.
phpMyAdmin wird nun Ihre Datenbankdatei herunterladen. Weitere Details finden Sie in unserer Anleitung, wie Sie Ihre WordPress-Datenbank manuell sichern.
Schritt 2. Laden Sie alle Ihre WordPress-Dateien herunter
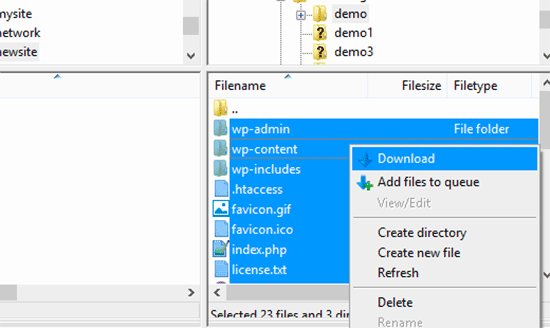
Der nächste Schritt besteht darin, Ihre WordPress-Dateien herunterzuladen. Dazu müssen Sie mit einem FTP-Client eine Verbindung zu Ihrer WordPress-Website herstellen.
Sobald die Verbindung hergestellt ist, wählen Sie alle Ihre WordPress-Dateien aus und laden Sie sie auf Ihren Computer herunter.
Schritt 3. Importieren Sie Ihre WordPress-Dateien und Datenbank auf den lokalen Server
Nachdem Sie Ihre WordPress-Dateien heruntergeladen haben, müssen Sie einen Ordner auf Ihrem lokalen Server erstellen, in den Sie die lokale Website importieren möchten.
Wenn Sie WAMP verwenden, sollten Sie einen Ordner im Ordner C:\wamp\www\ für Ihre lokale Website erstellen. MAMP-Benutzer müssen einen Ordner im Ordner /Applications/MAMP/htdocs/ erstellen.
Kopieren Sie anschließend einfach Ihre WordPress-Dateien und fügen Sie sie in den neuen Ordner ein.
Als nächstes müssen Sie Ihre WordPress-Datenbank importieren. Öffnen Sie einfach den phpMyAdmin auf Ihrem lokalen Server, indem Sie die folgende URL aufrufen:
http://localhost/phpmyadmin/
Da Sie die Datenbank bereits zuvor erstellt haben, müssen Sie sie nun auswählen und dann oben auf die Registerkarte „Importieren“ klicken.
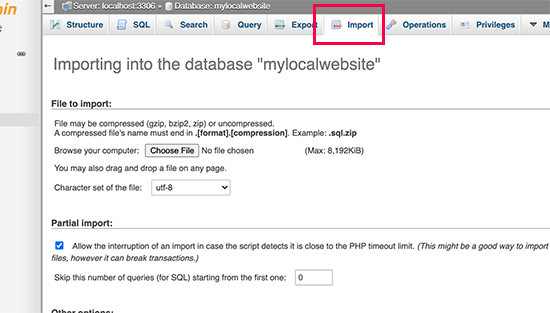
Klicken Sie auf die Schaltfläche „Datei auswählen“, um die im ersten Schritt heruntergeladene Datenbankexportdatei auszuwählen und hochzuladen. Klicken Sie anschließend auf die Schaltfläche „Go“ unten auf der Seite.
phpMyAdmin wird nun Ihre WordPress-Datenbank entpacken und importieren.
Nun, da Ihre Datenbank eingerichtet ist, müssen Sie die URLs innerhalb Ihrer WordPress-Datenbank aktualisieren, die auf Ihre Live-Site verweisen.
Sie können dies tun, indem Sie eine SQL-Abfrage in phpMyAdmin ausführen. Vergewissern Sie sich, dass Sie die Datenbank Ihrer lokalen Website ausgewählt haben, und klicken Sie dann auf SQL.
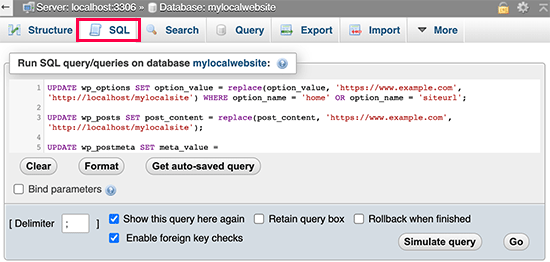
Kopieren Sie diesen Code in den SQL-Bildschirm von phpMyAdmin und fügen Sie ihn ein. Ersetzen Sie dabei example.com durch die URL Ihrer Live-Site und http://localhost/mylocalsite durch die lokale Server-URL Ihrer Site.
UPDATE wp_options SET option_value = replace(option_value, 'https://www.example.com', 'http://localhost/mylocalsite') WHERE option_name = 'home' OR option_name = 'siteurl'; UPDATE wp_posts SET post_content = replace(post_content, 'https://www.example.com', 'http://localhost/mylocalsite'); UPDATE wp_postmeta SET meta_value = replace(meta_value,'https://www.example.com','http://localhost/mylocalsite');
Diese Abfrage ersetzt Verweise auf die URL Ihrer Live-Site aus der Datenbank und ersetzt sie durch die URL des lokalen Hosts.
Schritt 4. Aktualisieren der Datei wp-config.php
Der letzte Schritt ist die Aktualisierung der Datei wp-config.php Ihrer lokalen Website. Diese Datei enthält WordPress-Einstellungen, einschließlich der Verbindung zu Ihrer WordPress-Datenbank.
Gehen Sie einfach zu dem Ordner, in dem Sie WordPress auf Ihrem lokalen Server installiert haben, und öffnen Sie die Datei wp-config.php in einem Texteditor wie Notepad.
Ersetzen Sie den Namen der Datenbank durch den Namen, den Sie in phpMyAdmin auf Ihrem localhost erstellt haben.
Danach ersetzen Sie den Datenbank-Benutzernamen durch Ihren lokalen MySQL-Benutzernamen, normalerweise ist das root. Wenn Sie ein Passwort für den MySQL-Benutzer root auf Ihrem localhost festgelegt haben, geben Sie dieses Passwort ein. Andernfalls lassen Sie es leer und speichern Sie Ihre Änderungen.
/** The name of the database for WordPress */
define('DB_NAME', 'database_name_here');
/** MySQL database username */
define('DB_USER', 'username_here');
/** MySQL database password */
define('DB_PASSWORD', 'password_here');
Sie können nun Ihre lokale Website in einem Browserfenster besuchen, indem Sie die URL wie folgt eingeben:
http://localhost/mylocalsite/
Ersetzen Sie „mylocalsite“ durch den Namen des Ordners, in den Sie Ihre WordPress-Dateien kopiert haben.
Das war’s. Ihre WordPress-Live-Site wird nun auf Ihren lokalen Server kopiert.
Wir hoffen, dass dieser Artikel Ihnen geholfen hat zu erfahren, wie Sie eine Live-WordPress-Site einfach auf einen lokalen Server verschieben können. Vielleicht interessiert Sie auch unsere Anleitung, wie Sie ganz einfach eine Staging-Site für WordPress zum Testen erstellen können, oder wie Sie eine WordPress-Site vom lokalen Server auf die Live-Site verschieben.
Wenn Ihnen dieser Artikel gefallen hat, dann abonnieren Sie bitte unseren YouTube-Kanal für WordPress-Videotutorials. Sie können uns auch auf Twitter und Facebook finden.


Aamir Khan
I have created a backup of my website manually and setup on local machine and run the above quires, but my website is redirecting to online version.
WPBeginner Support
It seems like you may have not updated the URL, you can do so using step 3 of the manual method of this article.
Admin
George
Thank you so much for this clear and useful article. I was able to follow it and migrate my WP site in less than 20 minutes – and I’m no expert. You’ve saved me a lot of pain – thank you.
WPBeginner Support
Glad our guide was helpful
Admin
Barry
Doesn’t work for me. I create the package, but it installs the basic WordPress files. So when I navigate to the folder it asks me to setup wordpress
WPBeginner Support
For the most common reason, you would want to ensure you are properly connected to the database, if you are not then it would show the option for creating a new site instead of showing the correct site.
Admin
Daniel
Nooo, its not working for me. pefrectly written tutorial and easy to follow (apart from it says hhttpps in the 3rd query)
i get this in my browser:
This site can’t be reachedlocalhost refused to connect.
Try:
Checking the connection
Checking the proxy and the firewall
ERR_CONNECTION_REFUSED
WPBeginner Support
Thanks for pointing out that typo, it should be fixed. For that error, you would want to ensure you updated your URL in step 3 correctly for the most common reason for that issue.
Admin
McKenzie
Thanks for your tutorial.
The front page is partially working but every other page is not working at all. Furthermore, it seems that front page is loading All the pages. What could be wrong?
WPBeginner Support
We would recommend starting by going through our troubleshooting guide below:
https://www.wpbeginner.com/beginners-guide/beginners-guide-to-troubleshooting-wordpress-errors-step-by-step/
Admin
Collins
Hi, Thank you for this super useful article.
I don’t know why mine doesn’t just work, I have done the exact same thing and gotten all the correct feedback. Whenever I try to open the home page localhost/site/ I get a page that doesn’t exist with the headers and footers and the rest of the pages still point to the live site.
WPBeginner Support
It sounds like you may have not set the URLs correctly. You would likely want to go to method 2 and try the SQL changes to update your URLs.
Admin
Murat
For those who are getting „wp_options doesn’t exist“ error, you may have changed your table_prefix before. Just open the wp_config.php file and check $table_prefix = ‚wp_‘
if the value isn’t „wp_“ you get that error so when pasting the code edit it accordingly, for instance:
UPDATE xx_options SET option_value………..
WPBeginner Support
Thanks for sharing this should someone be running into that error
Admin
Chinwe
Thank you so much for this. It worked.
WPBeginner Support
Glad our guide was helpful
Admin
Ivana Spasic
When I copy and paste the code you provided to phpMyAdmin’s SQL screen, I am getting message: #1146 – Table ‚xyz.wp_options‘ doesn’t exist.
How can this be fixed?
WPBeginner Support
You would want to ensure you have the correct database selected for the most common reason for that issue.
Admin
Jill
I used the Duplicator plugin to set up a copy of a website for a non-profit that I inherited. After reloading it so that all plugins are disabled I finally came to the conclusion that my site is attempting to use https:// to log in to the dashboard. To further confuse me, an empty site that I created on localhost does NOT use https:// for log in to the dashboard. I understand the value of https:// on the live site, but it appears there may be a way to disable it on localhost?
WPBeginner Support
For changing your local site’s URL you can follow our guide below and remove the s:
https://www.wpbeginner.com/wp-tutorials/how-to-change-your-wordpress-site-urls-step-by-step
Admin
Hazel beaver
Is there a plugin that allows you to download a zip file from the live site then upload into a fresh install of wordpress on the local host in a simpler way?
WPBeginner Support
For what it sounds like you’re wanting, the closest would be method 2 of this guide that you would want to take a look at.
Admin
Daniel
I successfully uploaded to localhost but when i try to use localhost/mysite_location/wp-admin, it redirects to the live site. Not the one on the localhost.
Need help
WPBeginner Support
You would want to go into your site’s database, go to the options table, and change your site url and address to localhost there. For how to modify your database you would want to take a look at our article here: https://www.wpbeginner.com/beginners-guide/beginners-guide-to-wordpress-database-management-with-phpmyadmin/
Admin
Bine
Great tutorial. It’s straight forward. Unfortunately I still get redirected to the dashboard as soon as I try to enter my URL. I followed all the steps but something must be missing. Does anyone has an idea what the problem might be? Cheers
WPBeginner Support
You may want to check your options table in your database to be sure that you didn’t set the site’s url to your wp-admin area
Admin
Niaz Muhammad
Great tutorial thanks for sharing your knowledge
WPBeginner Support
Glad you liked our article
Admin
alvaro hernandez
it works great!!! i love you!
WPBeginner Support
Glad our guide was helpful
Admin
T_WA
Hi, thanks for the tutorial, it’s was super helpful!!
However, after following all your steps, I have problems „establishing secure connection“ (I guess because of the SSL) and thus it doesn’t work . I even tried and changed a line ‚DB_HOST‘ to ‚localhost/localhost:8888‘ in the wp-config.php that wasn’t mentioned in the video but didn’t help.
Also, when changing links I tried many variations nothing worked. Has someone faced a similar issue and found a solutions to it?
WPBeginner Support
Did you attempt to clear all of your caching after updating the URLs and is there the option to continue anyway under advanced on that error page?
Admin
Said
First of all thank you for theses clear explanations that I followed to the letter. The result is that i can access to to my site homepage locally, but links in this homepage do not seem to work because when I click on a link, for example :
localhost.mysite.com/subject.html
it is the following page that is displayed fir all links :
localhost/dashboard
Can you help me to resolve this problem
Thanks in advance
WPBeginner Support
It is likely due to your localhost not accepting pretty permalinks: https://www.wpbeginner.com/wp-tutorials/how-to-enable-custom-permalinks-in-wordpress-wamp-installation/
Admin
Ifthikar Hussain
Great Working, am facing a new problem which is i can access the only home page of my word press side. how can i able to access other pages??
WPBeginner Support
It would depend on what error you are running into. To get started you could take a look at the troubleshooting steps in: https://www.wpbeginner.com/beginners-guide/beginners-guide-to-troubleshooting-wordpress-errors-step-by-step/
Admin
Hannah
Hi there,
this is really easy to follow and helpful so thank you for that.
I do have a very straightforward question though.
When updating the URLs, you say to replace http:// example.com with your live site, but what if my live site uses https?
WPBeginner Support
If you’re moving your site to a local server we recommend http to avoid local installation issues with not having an SSL, you would change to https if you’re moving the content back to a live site that is using SSL.
Admin
Philip
Thanks. You wrote this article over 5 years ago, and it’s still good. I managed to set everything up nicely without too much trouble by following your manual instructions. Thanks in particular for the SQL queries.
Philip
WPBeginner Support
Glad our guide could be helpful and still works
Admin
Basem
After finishing the installation I click Admin Login button. the browser open new window to the installation of wordpress again? and the login page is not there
I checked the folders. all files are copied.
Patrick
Somebody find a fix for the localhost site copy (from live https) administration wanting to use https ?
dowlass
I found your instructions for the manual move of my site (from live server to localhost) worked pretty well. I had to do the permalinks thing – just click on ’save‘ without changing anything – to make links work properly. But otherwise it’s mostly good.
However, I’ve encountered a problem when trying to use new themes. If I add a new theme, then sure the theme installs ok and shows up on the theme page. However, if I try to preview or activate the new theme I just get a totally blank page – even the admin goes blank. The only recourse is to use the browser back button to get back to the admin view where I can delete the theme.
Adding new themes and trying to use them just makes the whole thing fall over!
Any ideas?
(p.s. I’m using a very old version of WordPress – 2.9.2…!! Which is the reason for wanting to play with it on localhost and work out the best way to upgrade.)
Michael
Tutorial worked pretty good but I had „internal Server Error“. I was downloading an entire network installation. I recopied the wp-config.php file because it had become compressed, all spacing removed. Then replaced the .htaccess with a fresh network version and that „RewriteBase /sitename/“ was to the folder of the installation, instead of „RewriteBase /“
Emma
The instructions are clear and straightfoward but unfortunately I am having a total nightmare getting my site to work on the local server. After much trial and I’ve managed to get connect to the database and get some of the site content displayed but links aren’t working (they’re not found, apparently). I’m using MAMP Pro for Windows. Maybe I’ll try XAMMP – or using a Mac – instead. I think alot of the problem is to do with permissions but don’t really know where to start there seem to be so many fixes needed!
WPBeginner Support
Hi Emma,
If you can access the WordPress admin area, then try visiting Settings » Permalinks and then click on the save changes button without changing anything.
Admin
andy
I solve my problem. If you manually moved wordpress to localhost, and you install w3 total cache in your wordpress, you have to clear the browser cache after change database and wp-config. Or just open your localhost site with different browser.
andy
I have changed wp-config and all database url to localhost, but localhost still redirect me to live site. Why? I cannot install any plugin like duplicator anymore because the site already deleted
Suhana
Hi Andy
Have u tried changing the settings from wp dashboard?
Settings-> General->WordPress Address (URL),Site Address (URL)
Even if it shows the localhost address just save it and check. Hope it helps.
Patrick Pogi
Hi wpbeginner,
Thank you for the tutorial, it helps me a lot. I tried the manual install and but in the end it keeps redirecting me into wordpress installation page. Pls help me, i think i’m almost done. Im using xampp.
Thank you
Jason
Hi,
Im having issues while moving my site, it says LOCALHOST REFUSED TO CONNECT.
But my other local sites are okay.
Im moving it to local because something gone terribly wrong and my page woun’t load on the server’s.
Please any suggestion or advise is appriciated
John
In MAMP Preferences set your Ports to – Apache 80, Nginx 443 and MySQL 3306 and see if that fixes it
Steve
Thanks for this article, I found it very useful but would like to add to it if I may.
I used the manual method successfully with one exception, I could not navigate to any of the pages or posts from my sites menu. I would get a page not found error. I tried everything here, saving the premalinks, but nothing worked. I finally found a post elsewhere that gave me the solution. I had to modify a line in Apache’s httpd.conf file. Open the file and search for ‚AllowOverride‘. If it looks like this: ‚AllowOverride None‘, change it to ‚AllowOverride All‘. I could not get to every page and post and see all the content!. FYI, there are several ‚AllowOverride‘ options but the one you are looking for resides on a line by itself. I know this is a WordPress and not an Apache config forum but others may be experiencing the same issue. Hope this helps.
Braun Philippe
Hello Guys,
I’m running into a serious problem. When I click on my local site forler with servers ON on MAMP, it redirects to live site I’ve done everything this tutorial says, do you know where is the problem ?
Thanks for your help
Sara
Hi
I am also having blank screen like IDRIS D…any suggestion
Idris D
Unfortuntely when I follow this guide, all the links in my local site redirect to the live site.
Any suggestions?
Adrian Stangell
Hi,
after following the instructions for the manual migration I end up with a blank screen when I try to access my website on the localhost. Any ideas?
Joel M
After running the SQL Query to replace links I receive a 1064 error – it seems there is a problem with the code syntax. I’m guessing it’s the (:) in my localhost url : ‚http://localhost:888/localwebsite‘ – any ideas how I can work around this? I am using MAMP to run the local server.
Aaron L
try four ‚8’s instead of 3…. localhost:8888/localwebsite
Natalie Bell
Hi there!
I’ve had a successful migration to local site except for my Media Library, every picture is there (lots of files), url’s are correct, but when they don’t show up in the actual blog. When I go to media library it just shows the grid of the pics – all blank, but in description, url etc everything is correct.
Any idea what to do next?
Grant
Try going to your wordpress dashboard, click on the settings menu near the bottom of the sidebar on the left. Then click on the reading menu in the settings submenu, scroll down to the site visibility options and select the ‚allow search engines to index‘ option and click save changes at the bottom of the page. See if that works, if not you may have to go to your terminal and manually pull media files from your old site recursively – I had to go this route and can walk you through it if you have any questions. Hope this helps
Carolina
Hi there, Thanks for the post, it’s a huge success for me.
So far, I’ve been able to get to the wp-login page.
and I’m sorry if this is a very silly question. but I’m really newbie with wp
my problem is I can’t login :$
I’ve tried the same logins as the live details = don’t work
as I haven’t set up the dashboard and it’s a local. no email will work.
what should I do?
btw, it’s on a mac.
Many thanks in advanced. Help is appreciated!!
WPBeginner Support
Hi Carolina,
You can change password using PHPMyAdmin.
Admin
DavidA
Hi again,
My sincere apologies! Posted a comment yesterday (July 24) re difficulty running the Duplicator program from my browser. Went back to check today and realised that I had made a mistake with the placement of the „test-site“ folder which contained the installer.php and the zip archive database.
Once I truly placed this folder in the htdocs folder then everything worked fine and I was able to install the website data locally as per your instructions.
Thank you again for all your help!
DavidA
Hi — thank you again for another great article! All very helpful!
I am at the step of opening the Duplicator installer on my local computer. However when I put „http://localhost/test-site/installer.php“ into my browser I get a „404 error message“ saying „object not found“.
Interestingly if I use „localhost“ alone or „localhost/phpmyadmin“ they both work. I have moved the „test-site“ folder to the „htdocs“ folder but still does not work.
Any suggestions??
Thank you
Shun
Thanks for this guide, but what if you’re migrating from a live site with an SSL cert down to a dev site without SSL (https to http?)
I got the front-end working fine, however, HTTPS is still added to my wp-login URL, preventing me from accessing the login page into the admin.
Any additional steps required to eliminating https on a local/dev site’s WP login page?
simone
I am having a similar issue. I migrated a live site to MAMP using WP Migrate DB plug in and FTP. I get the following error – due to the live sites SSL Certificate. It has something to do with the database prefixes not matching. But – I cannot change the prefix on the live site, I called Go Daddy to see if I edited the live site prefix to match my local install database prefix if it would break the site, they said no guarantees, I tried it and it broke the site.
error message I get when entering localhost:8888 url.
An error occurred during a connection to localhost:8888. The client has encountered bad data from the server. Error code: SSL_ERROR_BAD_SERVER
The page you are trying to view cannot be shown because the authenticity of the received data could not be verified.
Please contact the website owners to inform them of this problem.
Thank you in advance for any help!
xasmatic
Well, i used SSL certificate and that is what I did:
At the step where you have to update the URLs inside your WordPress database referencing to your live site, you write the SQL query 4 times to change every URL that may exist.
First time write code like above „http://www.example.com“, then „http://example.com“, after that „https://www.example.com“ and finally „https://example.com“.
Make sure: 1) that you write all four times the URL
http://localhost/test-sitewhich will replace those URLs2) change wp_options, wp_posts and wp_postmeta to your right ones (mine for example were cagwp_options etc.)
And a last reminder: Finally (if you’re moving on localhost), on the last step you have also to change the host name to localhost (wp_config.php file)
/** MySQL hostname */
define(‚DB_HOST‘, ‚localhost‘);
Veer Abheek Singh Manhas
I am tried using this article but I am not sure at which point of time i am supposed to install wordpress. Can anyone help me here?
Thanks
AIAI
you don’t have to reinstall wordpress again. all files from the source wp installation is already backed up.
Alex
I have used these instruction before and they worked fine, however i now have an updated version of mamp and wordpress and i continually get errors. betwen playing around i get the white blank screen or the index.php file. as text.
Both similar problems to users below.
it might be time to update this.
I gave up on moving my site to local and decided to just have a dev url too however, when i run the sql query above i always end up with a token missmatch, despite making all the necessary changes.
Andi
Thank’S a lot for your work.
But it doesn’t work. If I run local installer.php I see blank screen.
Best regards
Andi
mc
hey
I did everything as it is described and when I get to the last phase and put the url: localhost/mysite it automatically downloads a file that has this information:
<?php
/**
* Front to the WordPress application. This file doesn't do anything, but loads
* wp-blog-header.php which does and tells WordPress to load the theme.
*
* @package WordPress
*/
/**
* Tells WordPress to load the WordPress theme and output it.
*
* @var bool
*/
define('WP_USE_THEMES', true);
/** Loads the WordPress Environment and Template */
require( dirname( __FILE__ ) . '/wp-blog-header.php' );
is it something wrong that i did in the process?
Albert Smit
I wasn’t successful with the Duplicator plugin but managed to get my site sort of working the manual way.
I now have another problem. My site opens up correctly but I am unable to do anything. I keep getting 404 Page not Found errors. This happens with my menu items, search bar, login button etc. I can go nowhere on my site. What do I do?
Albert
Matthew
404 means the page is not found, sounds like you haven’t updated your database urls, be sure to follow that step. all your anchors are pointing to links that arn’t available on your server.
Albert Smit
I have done the entire process from the zip file and install.php. In step 3, when I click on Save Permalinks, it takes me to the WP login screen. No matter what I type in, the result is always the same: Invalid Username. I have run this Duplicator twice now, still no luck. Please help.
Albert
Richard
Just wanted to say thanks for such a great and straightfoward description.
I’d tried this a couple of times before using the info on wordpress.org but it never worked.
Followed your article step by step (manual method, non-plugin) and it worked perfectly!!
Thanks
WPBeginner Support
Hey Richard,
Glad you found it useful Don’t forget to join us on Twitter for more WordPress tips and tutorials.
Admin
LS
Thank you very much for this tutorial!
I did the manual install, although it didn’t quite do the trick at first. I got a Database Connection Error. Maybe most of you already know this, but i only saw it upon later glance:
In my wp-config.php file, underneath the DB_NAME, DB_USER and DB_PASSWORD there was this line:
/** MySQL hostname */
define(‚DB_HOST‘, ‚host.example.de‘);
I had to replace ‚host.example.de‘ with ‚localhost‘ to fix the issue. Now it works like a charm.
Thank you again and i hope you have a fantastic day!
Regards LS
Abraham Quilca
Yes, same here. That should definitely be updated in the article to save future viewers some time.
RF
This website has saved my hide several times now. Keep it up!
Olivia
Thank you!!!