Versuchen Sie, /wordpress/ aus der URL Ihrer Website zu entfernen?
Manchmal installieren Anfänger WordPress in einem Unterverzeichnis, was dazu führt, dass /wordpress/ in der URL ihrer Website erscheint, z. B. http://example.com/wordpress/.
In diesem Artikel zeigen wir Ihnen, wie Sie /wordpress/ aus der URL Ihrer WordPress-Website entfernen können.
Hinweis: Die in diesem Lernprogramm gezeigte Methode funktioniert auch für andere Unterverzeichnisse.
Warum hat meine Website /wordpress/ in ihrer URL?
WordPress ist recht einfach zu installieren, und die meisten WordPress-Hosting-Unternehmen bieten schnelle WordPress-Installationsprogramme in ihren Hosting-Kontrollfeldern an.
Allerdings kann es vorkommen, dass Anfänger, die ihre WordPress-Website manuell installieren, sie versehentlich in einem Unterverzeichnis ablegen. Meistens heißt dieses Unterverzeichnis „wordpress“.
Dies geschieht in der Regel, weil die Benutzer den WordPress-Ordner hochladen, den sie im offiziellen WordPress.org-Download finden.
Schauen wir uns an, wie Sie dies leicht beheben und /wordpress/ aus der URL Ihrer Website loswerden können. Wir werden drei Methoden vorstellen, und Sie können diese Links verwenden, um zu der gewünschten Methode zu springen:
Methode 1: Einfach mit einer neuen WordPress-Installation neu beginnen
Wenn Sie WordPress gerade erst installiert haben und noch keine Inhalte auf Ihrer Website vorhanden sind, können Sie einfach von vorne beginnen.
Löschen Sie einfach die aktuelle Installation und folgen Sie den Anweisungen in unserem WordPress-Installationstutorial, um WordPress ordnungsgemäß neu zu installieren.
Wenn Sie bereits Inhalte zu Ihrer Website hinzugefügt haben, gibt es zwei einfache Möglichkeiten, das /wordpress/ aus der URL Ihrer Website zu entfernen. Wir werden sie in den Methoden 2 und 3 behandeln.
Methode 2: Ändern Sie die Adresse Ihrer WordPress-Website
Wenn Sie eine bestehende WordPress-Website haben, ist diese Methode einfacher und schneller. Der Nachteil dieser Methode ist, dass Ihre Mediendateien, wie z. B. Bilder, weiterhin /wordpress/ in ihrer URL verwenden.
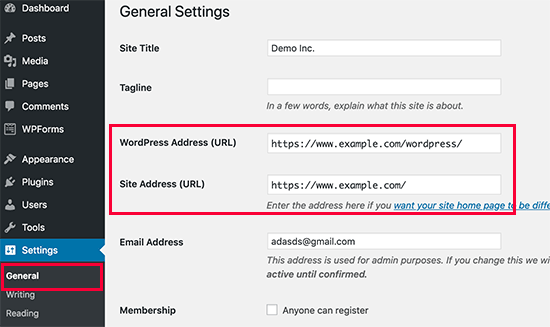
Melden Sie sich zunächst in Ihrem WordPress-Verwaltungsbereich an und gehen Sie zu Einstellungen “ Allgemein. Sie werden feststellen, dass die Felder „WordPress-Adresse“ und „Website-Adresse“ beide die gleiche URL haben.
Sie müssen die Option „Site Address“ ändern und auf Ihre Root-Domain verweisen, z. B. http://www.example.com, und die Option „WordPress Address“ so belassen, wie sie ist.
Klicken Sie anschließend auf die Schaltfläche „Änderungen speichern“, um Ihre Einstellungen zu speichern.
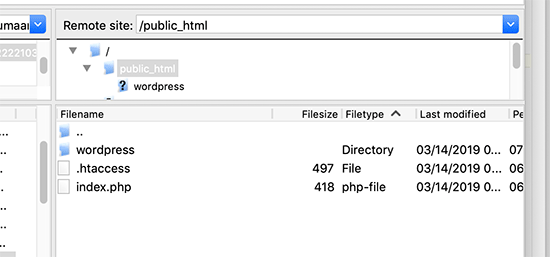
Als nächstes müssen Sie mit einem FTP-Client eine Verbindung zu Ihrer Website herstellen. Gehen Sie dann in das Verzeichnis /wordpress/ und laden Sie die Dateien .htaccess und index.php auf Ihren Computer herunter.
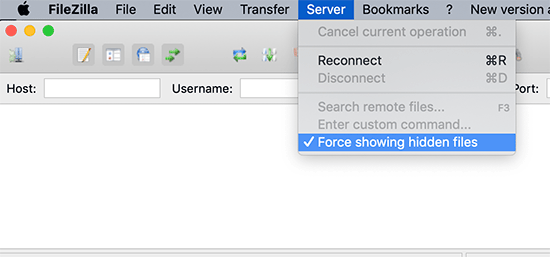
Wenn Sie die .htaccess-Datei nicht finden können, müssen Sie möglicherweise Ihren FTP-Client zwingen, versteckte Dateien anzuzeigen. Wenn Sie Filezilla verwenden, müssen Sie in der Menüleiste auf Server klicken und die Option „Anzeige versteckter Dateien erzwingen“ auswählen.
Sobald Sie beide Dateien auf Ihren Computer heruntergeladen haben, müssen Sie die Datei index.php in einem Texteditor wie Notepad öffnen. In dieser Datei finden Sie eine Zeile wie diese:
require( dirname( __FILE__ ) . '/wp-blog-header.php' );
Diese Zeile lädt die Datei wp-blog-header.php, die zum Laden Ihrer WordPress-Site erforderlich ist.
Nun müssen Sie den korrekten Speicherort der Datei eingeben, indem Sie die vorhandene Zeile durch diese ersetzen:
require( dirname( __FILE__ ) . '/wordpress/wp-blog-header.php' );
Speichern Sie Ihre Änderungen und laden Sie die Dateien index.php und .htaccess von Ihrem Desktop-Computer per FTP in das Stammverzeichnis Ihrer Domain hoch.
Der Stammordner ist der übergeordnete Ordner, in dem sich der Ordner „wordpress“ befindet, und er heißt normalerweise /www/ oder /public_html/.
Das war’s schon. Sie können nun Ihre Website mit der Stammdomäne besuchen, und alles wird gut funktionieren.
http://example.com
Wenn Sie sich jedoch bei Ihrem WordPress-Administrator anmelden müssen, müssen Sie immer noch zum wp-admin innerhalb des Verzeichnisses „wordpress“ wie folgt gehen:
http://www.example.com/wordpress/wp-admin
Methode 3: WordPress in das Stammverzeichnis verschieben
Diese Methode ist umfassender und verschiebt Ihre WordPress-Site dauerhaft aus dem Unterverzeichnis in den Stammordner Ihrer Website.
Schritt 1: Erstellen Sie ein Duplikatorpaket
Zunächst müssen Sie das Duplicator-Plugin auf Ihrer Website installieren und aktivieren. Weitere Einzelheiten finden Sie in unserer Schritt-für-Schritt-Anleitung für die Installation eines WordPress-Plugins.
Nach der Aktivierung müssen Sie die Seite Duplicator “ Einstellungen aufrufen und dann auf die Schaltfläche „Neu erstellen“ klicken.
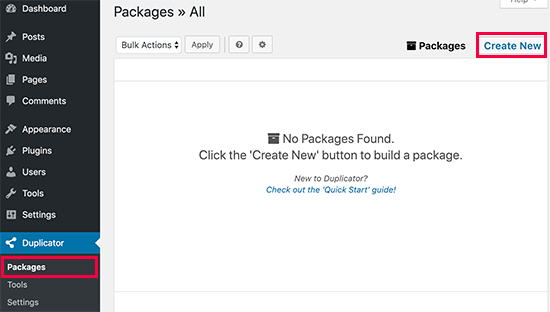
Dadurch wird der Duplicator-Assistent gestartet, der ein Installationspaket Ihrer kompletten Website erstellt. Klicken Sie auf die Schaltfläche „Weiter“, um fortzufahren.
Als nächstes führt das Plugin einige Scans durch. Wenn alles gut aussieht, können Sie unten auf die Schaltfläche „Erstellen“ klicken.
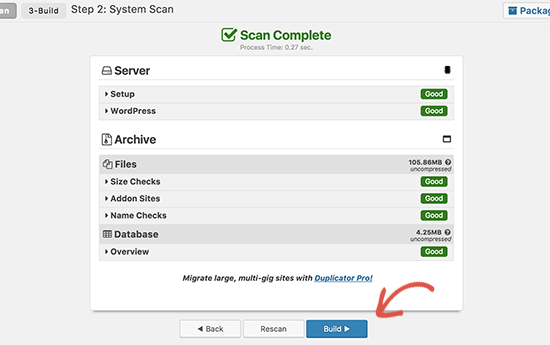
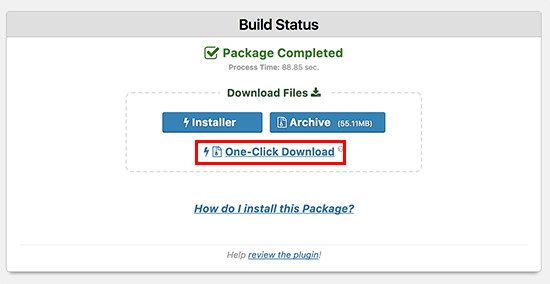
Duplicator erstellt nun ein Paket und fordert Sie auf, es zusammen mit dem Installationsskript herunterzuladen.
Laden Sie beide Dateien auf Ihren Computer herunter.
Schritt 2: Erstellen einer neuen Datenbank für eine neue WordPress-Installation
Sie können die vorhandene WordPress-Datenbank verwenden, aber es ist besser, eine neue Datenbank zu erstellen, damit Ihre alte Datenbank sicher und unverändert bleibt. Auf diese Weise können Sie ohne viel Aufhebens zu Ihrer Website zurückkehren, wenn etwas schiefgeht.
Rufen Sie das cPanel-Dashboard Ihres Hosting-Accounts auf, scrollen Sie zum Abschnitt „Datenbanken“ und klicken Sie dann auf das Symbol „MySQL-Datenbanken“.

Danach geben Sie einfach einen Namen für Ihre Datenbank an.
Als nächstes sollten Sie auf die Schaltfläche „Datenbank erstellen“ klicken.

cPanel wird nun eine neue Datenbank für Sie erstellen. Danach müssen Sie nach unten zum Abschnitt „MySQL-Benutzer“ scrollen.
Hier müssen Sie einen Benutzernamen und ein Passwort für Ihren neuen Datenbankbenutzer angeben und auf die Schaltfläche „Benutzer erstellen“ klicken.
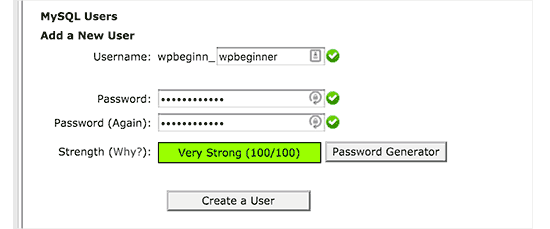
Nun müssen Sie dem neuen Benutzer Datenbankberechtigungen zuweisen.
Blättern Sie nach unten zum Abschnitt „Benutzer zur Datenbank hinzufügen“. Wählen Sie einfach den von Ihnen erstellten Datenbankbenutzer aus dem Dropdown-Menü neben dem Feld „Benutzer“ aus und wählen Sie dann die Datenbank. Klicken Sie schließlich auf die Schaltfläche „Hinzufügen“.

Ihre neue Datenbank ist nun bereit, für die neue WordPress-Installation verwendet zu werden.
Schritt 3: Führen Sie den Duplikator-Assistenten aus
Nun müssen Sie das Duplicator-Archivpaket und die Installationsdatei, die Sie zuvor heruntergeladen haben, in das Stammverzeichnis Ihrer Website hochladen.
Dies ist das Verzeichnis, das den Ordner/wordpress/ enthält.
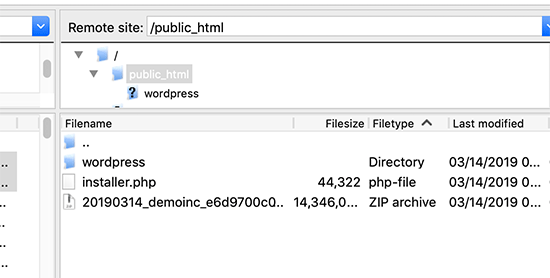
Nachdem Sie beide Dateien hochgeladen haben, öffnen Sie das Installationsskript in einem Browserfenster. Sie müssen die Stamm-URL Ihrer Website eingeben und ihr das Präfix /installer.php voranstellen.
https://example.com/installer.php
Dadurch wird der Duplicator-Installationsassistent geöffnet.
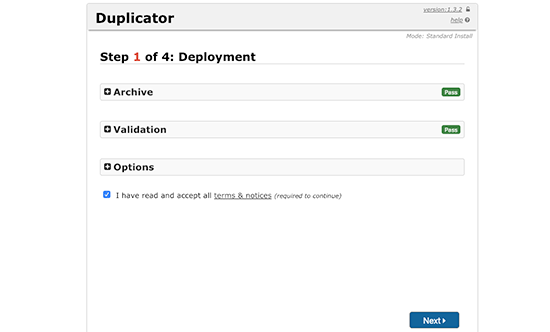
Aktivieren Sie das Kontrollkästchen für die Allgemeinen Geschäftsbedingungen und klicken Sie dann auf die Schaltfläche „Weiter“, um fortzufahren.
Als nächstes werden Sie aufgefordert, die Datenbankinformationen einzugeben. Geben Sie die Informationen für die Datenbank ein, die wir in Schritt 2 erstellt haben.
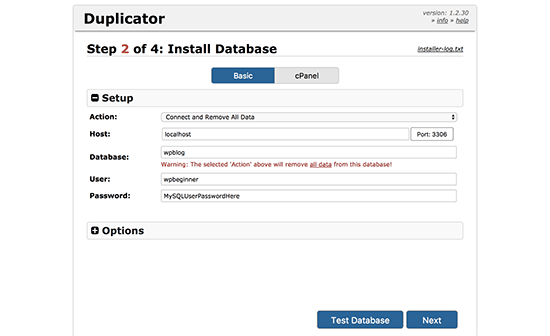
Nachdem Sie die Datenbankinformationen eingegeben haben, klicken Sie auf die Schaltfläche „Weiter“, um fortzufahren. Duplicator wird nun Ihre WordPress-Datenbank-Sicherung aus dem Archiv in Ihre neue Datenbank entpacken.
Als nächstes werden Sie aufgefordert, die URL und den Pfad der Website zu aktualisieren. Hier brauchen Sie nichts zu tun, da die neue URL und der neue Pfad automatisch erkannt werden. Wenn dies jedoch nicht der Fall ist, können Sie die Details hier manuell eingeben.
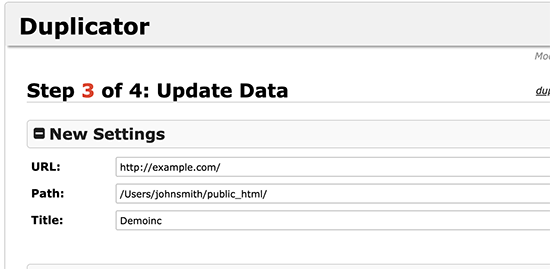
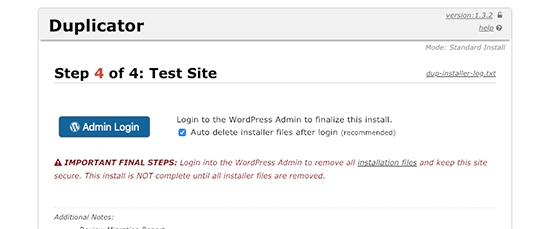
Duplicator schließt nun die Migration ab.
Sie können auf die Schaltfläche „Admin Login“ klicken, um auf Ihre Website am neuen Standort zuzugreifen.
Schritt 4: Einrichten von Umleitungen von Unterverzeichnissen zu Stammordnern
Herzlichen Glückwunsch, Sie haben Ihre WordPress-Site erfolgreich aus dem Unterverzeichnis in den Stammordner verschoben.
Jetzt ist es an der Zeit, Weiterleitungen einz urichten, damit Ihre Nutzer und Suchmaschinen den neuen Standort Ihrer Website finden können.
Zunächst müssen Sie sich mit einem FTP-Client mit Ihrer WordPress-Website verbinden und dann den alten Ordner /wordpress/ löschen.
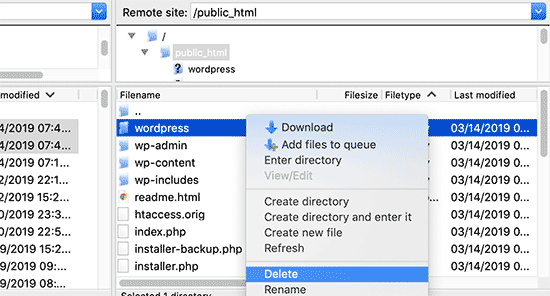
Wechseln Sie danach in den Verwaltungsbereich Ihrer WordPress-Website. Da Sie ihn in das Stammverzeichnis Ihrer Website verschoben haben, sieht Ihre WordPress-Admin-URL wie folgt aus:
https://example.com/wp-admin
Nun müssen Sie das Redirection-Plugin installieren und aktivieren. Weitere Details finden Sie in unserer Schritt-für-Schritt-Anleitung für die Installation eines WordPress-Plugins.
Nach der Aktivierung müssen Sie die Seite Tools “ Redirection aufrufen. Das Plugin zeigt Ihnen nun einen Einrichtungsassistenten. Klicken Sie einfach auf die Schaltflächen „Einrichtung fortsetzen“ und dann „Einrichtung beenden“.
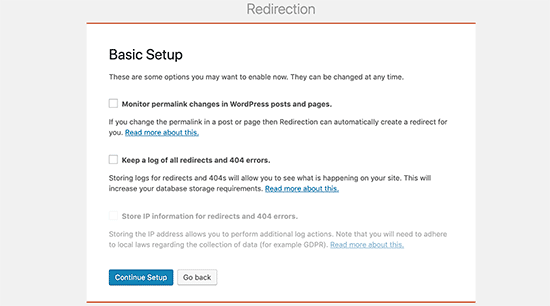
Als Nächstes müssen Sie auf die Registerkarte „Umleitungen“ wechseln und Ihre neue Umleitung hinzufügen.
Zunächst müssen Sie das Kästchen „Regex“ in der Ecke des ersten Feldes markieren.
Danach gehen Sie in das Feld „Quell-URL“ und fügen https://example.com/wordpress/ein . Als Nächstesgehen Sie in das Feld „Ziel-URL“ und fügen https://example.com/$1 ein.
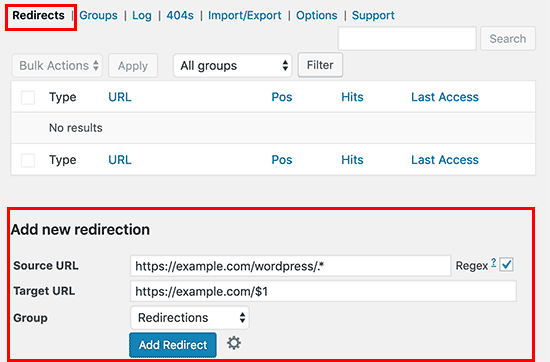
Vergessen Sie nicht, „example.com“ durch Ihren eigenen Domänennamen zu ersetzen. Klicken Sie anschließend auf die Schaltfläche „Weiterleitung hinzufügen“, um Ihre Änderungen zu speichern.
Ein weiteres Tool, das Sie für die Weiterleitung von Beiträgen und Seiten verwenden können, ist All in One SEO (AIOSEO). Wir zeigen Ihnen, wie Sie Besucher mit alten URLs, die /wordpress/ enthalten, auf Ihre neue Website umleiten können, und zwar in unserer Anleitung für Einsteiger, wie man vollständige Website-Umleitungen in WordPress durchführt.
Außerdem können Sie die 404-Fehlerverfolgung aktivieren, um fehlerhafte Links zu erkennen, damit Sie keine Keyword-Rankings verlieren.
Von nun an werden alle Benutzer, die versuchen, auf Ihre Website mit /wordpress/ in der URL zuzugreifen, automatisch zu den richtigen Beiträgen mit Ihrer neuen Stamm-URL umgeleitet.
Expertenanleitungen zum Ändern von URLs in WordPress
Da Sie nun wissen, wie Sie /wordpress/ aus der URL Ihrer Website entfernen können, möchten Sie vielleicht einige andere Anleitungen zum Ändern von URLs in WordPress lesen.
- So ändern Sie die URLs Ihrer WordPress-Website (Schritt für Schritt)
- Wie Sie URLs beim Umzug Ihrer WordPress-Site einfach aktualisieren können
- Wie man Zahlen aus WordPress-URLs entfernt
- Wie man das Datum aus WordPress-URLs entfernt
- Entfernen der Zeichenfolge v=XXXX aus WordPress-URLs
- Wie man Parent Slug von Child Page URL in WordPress entfernt
- Ändern des Standard-Such-URL-Slugs in WordPress
- Hinzufügen einer benutzerdefinierten Anmelde-URL in WordPress (Schritt für Schritt)
- Anleitung für Anfänger: Wie Sie Ihre WordPress-Login-URL finden
- Wie man WordPress richtig von HTTP auf HTTPS umstellt (Anleitung für Anfänger)
Wir hoffen, dass dieser Artikel Ihnen geholfen hat zu erfahren, wie Sie /wordpress/ aus der URL Ihrer WordPress-Website entfernen können. Vielleicht interessieren Sie sich auch für unseren Leitfaden zur Beschleunigung der WordPress-Performance oder unsere Expertenauswahl der besten WordPress-SEO-Plugins und -Tools.
Wenn Ihnen dieser Artikel gefallen hat, dann abonnieren Sie bitte unseren YouTube-Kanal für WordPress-Videotutorials. Sie können uns auch auf Twitter und Facebook finden.


Syed Balkhi says
Hey WPBeginner readers,
Did you know you can win exciting prizes by commenting on WPBeginner?
Every month, our top blog commenters will win HUGE rewards, including premium WordPress plugin licenses and cash prizes.
You can get more details about the contest from here.
Start sharing your thoughts below to stand a chance to win!
JO says
Thank you so much for this – it worked and as a total WP novice I can’t believe I did it myself! You’re awesome
WPBeginner Support says
Hey JO,
We are glad you found it helpful
You may also want to subscribe to our YouTube Channel for WordPress video tutorials.
Admin
Sandip says
Thanks so much for this. I did install WP into a subdirectory and then spent a week remaking the site so that it was installed in the root directory At least now I know better after reading your tutorial.
Temitope says
Hello, Thanks for the tutorial, I’m pretty new to WordPress, I did a one click install and it was a multisite installation too. The website URL and domain URL fields are’nt available under settings. Please how do I go about this on a multisite???
Rogue says
Wonderful tutorial, worked perfectly, thanks man
Tobi says
Hi, great article, the first one I found which explains this topic in a good matter.
I have a similar problem, but a little bit more tricky. I do not know how it happened, but certainly I have done something strange at the WP installation. If I check my homepage it is actually in another extra worpress folder, that means I have WP in another WP folder, so my homepage looks like this: „www.example.com/wordpress/wordpress“. in the filemanager in the frp client i can see in the public_html two folders of wordpress. I did not move yet the wordpress folder with the content one level up and actually eliminate the other folder, because I am worried that I will mass it up.
Has anybody have an idea what would be the best solution? So I actually get the homepage opened under: „www.example.com“ and not „www.example.com/wordpress/wordpress“?
thanks for any good hint/solution.
Brandi says
Thank you so much for this!! I did everything you said to do, and almost everything works. There’s just one page that stopped working and is returning a 404 error page. Can you help? Thanks!
Krista Hagman says
I tried, but the space that says Website Address and site address does not exist in my General area in Settings.
Is there another way to do it?
Carolina says
I see that several have the same problem as me, but I can not see any response to the issue.
That is that everything seems to work fine except for:
the home-page which is still directing to site.com/wordpress and therefore shows a 404 page.
I did try to delete the htaccess file from the root directory and update the url-structure. it created a new htaccess file but the problem still is the same..
Would really appreciate your response to this!
Thank you for a great post.
may says
My problem was from menu
Try to check your URL from WP-admin —>>> appearance —>>> menu —>>> home —>>> custom link URL
Anna Acenas says
hello
how can i remove my blog Im not a the owner of a site can i still remove my blog even im not the owner.please help me
John says
I have a question, is there something like this for Joomla? Because I couldn’t find anything on the internet.
Amardeep gupta says
Hello,
First of all thanks for this article. But there is one problem stand for me.
As I followed your step as you mention so i got Index.php but didn’t find .htaccess file.
But i did same mean
change ‚/wp-blog-header.php‘ to ‚/wordpress/wp-blog-header.php‘
but my home page only show without /wordpress and rest of pages will show 404- error.
please help me to slove this problem.
Avinash says
It is not working me
Ashok Kumar says
I have two domains in a single account. and so two wordpress installations in two subfolders. In this case, is it possible to move index.php and .htaccess of both sites to same root directory. If not what to do ?
Shady says
You can make use of vhost go in the conf of ur webhost and do something like:
This will make the subfolder the root for the domain you want to
Anna says
Gah! I followed the steps and it was fine. Then I went to permalinks, hit save changes and it broke! I’m getting a 500 error message! Please help me! I need to fix it! Thank you x
Shady says
Still have the same problem? I can help you
shamsher khan says
HI, everyone, i have an urgent query that
my client website a news website now we want to launch Hindi and Urdu version of news so
we decided to create a folder in
public_html/www.example.com/hi
public_html/www.example.com/ur
public_html/www.example.com/fr
and install wordpress
But we want our site url should be like this:
http://www.example.com/hindi/article-title-slug
http://www.example.com/urdu/article-title-slug
is this possible and if yes then how can i do it plz help
WPBeginner Support says
It is possible. There are multiple ways to do this. You can consider creating a multilingual WordPress site. This will eliminate maintaining separate WordPress installs.
You can also go installing multiple WordPress instances in separate directories for each language. You will have to setup redirects in .htaccess file.
Admin
Janaina Moraes says
You are great! Thanks so much for helping! =)
Janaina Moraes says
Hello! Thanks for the tutorial, that’s exactly what I needed.
However, when trying to follow the steps, I realised that I don’t have the index.php file in my /wordpress/ directory. Is that weird? I can see the .htaccess, but the index.php is not there!!!
Can you help me please?
Thank you so much!
Janaina Moraes says
Sorry, already found it! I’ll try the steps and get you update about the results! Thanks!!!!
John Woodcock says
This worked but now the admin bar is not visible when navigating the site. One of the perks of WordPress is the ability to easily navigate and edit pages. How can I add the admin bar back to the site?
Kerry says
This worked so well for me – thank you so much
Guy Riems says
Hi,
I executed al these steps and it works great except for my home-page.
When accessing my home-page the /wordpress is still appended to the url, but the page is no longer found. All other pages are working fine.
My first thought was to deactivate all plugins, but that didn’t help. No matter what I am doing, still getting that error.
Any advice would be great !
WPBeginner Support says
You can try these steps:
Connect to your website using an FTP client. In the root directory you will find a .htaccess file. Download it to your computer. Delete the original file from your website. Visit your site’s admin area and go to Settings » Permalinks. Do not change any settings on the page, just click on the save changes button. Check your website to see if the error has resolved.
Admin
Not working says
HI, I have followed these instrucs to the letter, too….. the home page url still loads as example.com/wordpress and I get a 404 error. Subpages work just fine, it is the home page. Tried the above suggestions but still receiving 404 error. Any other suggestions?
Guy Riems says
Well, I finally found the issue why wordpress was still appended to the URL of my homepage only. In the document root there was a index.html containing a permanent redirect to
mysite/wordpress. I am using Apache as webserver; the default search-order for Apache is index.html before index.php.
Karan says
Thank you so much for pointing out the Apache issue. I too have an index.html file. How did you fix your issue ?
Kevin says
Thanks a lot for that! You saved me a lot of hassle!
Margaret says
Thank you for all the great tutorials, they have been enormously helpful as a beginner to WP. On this one I have followed all the instructions to the letter but get a blank screen when making the changes. I have resorted to redirecting to /wordpress for the time being so that the site remains active. Any clues?
WPBeginner Support says
No clue, but you can try deactivating all plugins and switch to a default theme, then follow the instructions.
Admin
daniel says
Hi, Dear.
I installed wordpress using install.exe and the wordpress directory exist under the C:/xampp/apps/.
I uploaded the source to host server.
I uploaded my source under domainanme_dir/wordpress.
Now I want to enter my web site using „domainname/wordpress“.
So I followed your instructions to get rid of wordpress.
But When I did, I saw only blank page.
How can I solve this?
WPBeginner Support says
Please follow the steps mentioned in the article above.
Admin
Amanda says
Thanks so much for the thorough details. Worked well, but only the second time after some investigating of the problem. My root directory had /wp not /wordpress so I had to edit the index.php file with ….
require( dirname( __FILE__ ) . ‚/wp/wp-blog-header.php‘ ); instead of
require( dirname( __FILE__ ) . ‚/wordpress/wp-blog-header.php‘ );
Many thanks.
gemma says
thanks Amanda- went through the whole process like you did with no joy, until i saw your comment- all fixed!
Daisy says
Hi, how do i add subfolders for the menus in my site. i want my menus eg the menu SHOP to have example.com/Shop as its address
WPBeginner Support says
WordPress does not have subfolders. It does have parent and child pages. For example, your shop page can have address like example.com/shop and it can have a child page like example.com/shop/clothing. You can also add child items to any item in the navigation menu regardless of its content type. See our tutorial on how to add navigation menus in WordPress.
Admin
Sakariyau Bolaji Abass says
Thanks admin……but one more thing,and it’s that; i am a free wordpress user meaning that my url still has .wordpress.com but trying to remove it as thought could not be done as the boxes to change the url were not included. Help me out please.
NIGERIA
WPBeginner Support says
Please see our guide on the difference between WordPress.com and WordPress.org
Admin
Meghan says
Great tutorial! Saved me a lot of time. Thank you.
Fabio says
Em… I think I broke something by following this tutorial…
Last night I did th exact steps in this article and it worked – my WP page was no longer under /wordpress but in myname.com. However when I tried to login and access my dashboard this morning I got a database error saying „Error establishing a database connection“. Now I’m desperate.
What did I do? I’ve just downloaded the htcaccess and the index.php file and edited them as you showed. To fix the problem I also tried to re-download the files, roll them back as they were (I re-set the index file to wp-blog-header) and upload them but with no luck.
Anyone can help me understanding what I could have done?
noushin joudzadeh says
wow it was great. thanx a lot. you saved me
IT PETE says
For those of you still suffering problems when you do this, don’t forget after making the changes and uploading the files back to the web server, to log into the admin area, go to „Settings“ then „Permalinks“ and simply hit „Save Changes“ to update your Permalink Structure.
Cer3bel says
if i have a hosting acount and 5 folders with wordpress instalation inside and i have:
how i remove from all site the subfolder from url
Luciano says
Please, help me. I’m in trouble.
I did this procedure, step by step. I’m sure I did it as you suggest.
Everything works… but the home page still points to my /wp subfolder.. so I get 404 error.
I’m going mad. Two days trying to solve this.. but no success.
Vivek Padhye says
Hi, I dont want to redirect /blog/ to root. I want to access my static pages in root and use wordpress only as a blog. But I need xml sitemaps to show every pages from static pages in root to dynamic in /blog folder. Is there any way i can achieve this.?
LisaT says
my general settings only shows the site title and tagline. do not have the wordpress address or site address do I need to upgrade to see it??
Birgitta says
Great article, thank you. I have one question. I have done the above steps, but when I use 301-plugins they will add ‚wp‘ into the url. How can I prevent this?
Neil says
my settings general page has no boxes for web addresses?!
pumpkinpie says
I don’t know what I am doing wrong. This is so confusing.
pumpkinpie says
This didn’t work for me
Umer Iftikhar says
Good Tutorial! I am facing this step first time as I installed my client’s website in a sub directory. Followed method. Thanks.
WPBeginner Staff says
Deactivate all plugins on your site, and see if this solves your issue. Report back if it doesn’t and we can troubleshoot.
Monica says
Thanks so much for a great post. I hope there is still support for this even though it is about 2 months old!
I do have one question. On my main wordpress parallax page there is no /wordpress. However, I created a new page (for a form submission) and the menu nav bar changes the link location once that new page is open.
Normally since it is a one page parallax on the main home page it works fine, but once you go to the new page, all the buttons on the nav bar change and have a /wordpress/ gets added in between the address (and results in a 404 page error). For example http://www.texample.com/wordpres/blog. But on the main home page when you click on blog the address is http://www.example.com/blog. I made the changes mentioned above, but still can’t seem to solve the problem. What are your thoughts? Thank you in advance!
eoms says
So what am I supposed to change in the htaccess file?
leo says
Just nothing. You download index.php and .htaccess files from to WordPress installation folder. You make the correction only to the index.html file. Then you upload both files to the root folder of your site. Done.
Susanna Perkins says
For me this is just part of a normal WordPress install. I find it tidier to install wordpress in a subdirectory. I know others who do so as well. There’s nothing „accidental“ about it.
Mitch says
I agree Susanna! I purposefully always install WordPress to a subfolder. Keeps it cleaner that way. Especially when designing websites that are NOT WordPress driven, but WordPress is used for a only for a blog or some other specific purpose.
Agustin says
Thanks for the post it works Really good!!
I change it on my site http://filmarte.ec/wordpress/ to http://filmarte.ec/ it did work well, but i had problems with the translation pluguin that i installed WPML plugin to translate my site to english.
The problem is with the plungin becouse when i change my site to the root folder and click to the translation flag it goes to the url „http://filmarte.ec/en/“ but it doesnt load the translation, so i have to get back and when it loads to „http://filmarte.ec/wordpress/en/“ it loads the tranlated site well
Please if you could give me any guide or help?
Thanks
Best regards
WPBeginner Support says
Please contact the plugin authors and let them know that you have WordPress installed in a subdirectory. They will be able to tell you how to fix this.
Admin
Agustin says
Thanks a lot i will!! by the way thanks for the reply
ajit says
Does it work with WordPress Multi site setup ?
i have My WordPress installed in sub-directory, folder name „home“
http://www.example.com/home/
http://www.example.com/home/jobs/
http://www.example.com/home/store/
so this will be final path, after following above trick ?
http://www.example.com/
http://www.example.com/jobs/
http://www.example.com/store/
or there will be an issue doing this on WP Multi site setup ?
or is there any way around…
Rags Hopkins says
Thanks so much for this. I did install WP into a subdirectory and then spent a week remaking the site so that it was installed in the root directory At least now I know better after reading your tutorial.
Mehedi Hasan says
Very useful blog.Thanks for sharing.I like it!
Steven Boocock says
Thanks for the tutorial. I have tried to force the .HTACCESS file from filezilla but it will not show up.
It is a new installation. When I change the mysite.com/wordpress to mysite.com and view my site it takes me to my server home page.
do I have to change any of the permalink structures to create the HTACCESS file.
This issue has been a bug bear for some time now I only want people to search for stevenboocock.com
Ta Steven
WPBeginner Support says
If you just installed WordPress then it is possible that there is no .htaccess file to show. WordPress only generates .htaccess file when you are using pretty permalinks.
Admin
m07 says
If this is the case, then what other files do I need to transfer aside from the index.php?
Brett says
FYI- this worked great in terms of moving everything to the root, BUT it can cause many problems with plugins… as it did for me. I had to immediately switch back due to this.
WPBeginner Support says
Nope, it will not cause any problems with your plugins. Any issues you may have faced could have been unrelated to these settings.
Admin
Dan Carr says
Great article!
I have a question though… If people wanted to visit my blog index page then previously they would have had to go to http://www.mydomain.com/wordpress . If this change was made as described in the article, would people now have to visit http://www.mydomain.com to see the blogs same front page?
Would this change all the post URL from mydomain.com/wordpress/my_post to mydomain.com/my_post ?
WPBeginner Support says
Yes, people will be able to read your blog on the root of your domain. Yes, it will take care of Post URLs and will redirect users to correct posts on the root domain.
Admin
faith says
Hi there –
Thanks for the easy to understand article! My only problem is that though I no longer have /wordpress at the end of my domain name, all my links still go to http://www.domain.com/wordpress/link. How do I redirect all these links to get rid of the /wordpress?
Mindy says
Does this mean I do not have to buy the .com from some place like godaddy? I can have a .com just by removing the word, wordpress?
WPBeginner Support says
If your site is already on an address like this:
http://www.example.com/wordpress, then you do not need to register another domain name you can just get rid of the wordpress and your site will be available to your readers on the main domain. i.e.http://www.example.comAdmin
Ujjwal says
Greats this works. But the problem occurs when I am trying to install Yoast plugin. When I make the changes as described above, plugin does not get installed. Please suggest.