Do you want to make it easy for readers to subscribe to your WordPress blog?
Many businesses miss out on the benefits of having a direct connection with their audience through email. By having people subscribe to your email list, you can increase traffic, make more sales, and build a relationship with your audience.
In this article, we’ll show you how to add email subscriptions to your WordPress blog and start building your email list.
Why Should You Add Subscribe via Email Option to Your Site?
While social media is one way to connect with your audience, email is still the most reliable form of communication.
It gives you a direct connection to your readers because you can email subscribers whenever you want. Plus, you have control over email, whereas you have very little control over social media platforms.
For instance, you could post on Facebook or Instagram to thousands of followers, but only a portion of them may see your content due to algorithms that determine your reach.
For more on this topic, see our article on why you should start building your email list (right away).
You might think it’s difficult to add an email subscription option to your website, but it’s not.
With all of the email marketing software available today, it’s become quite easy, and you can get started in just a few clicks.
Since there are dozens of email software to choose from, we’re going to share with you a few solutions we believe work best.
How to Add Email Subscription to Your WordPress Site
First, you’re going to need an email marketing service.
We recommend using Constant Contact because it is the most beginner-friendly email marketing service for small businesses.
It comes with built-in tools to see your email performance, such as email opens and click rates. These tools can help you make decisions over time that improve your email campaigns and grow your business.
Their Standard plan comes with features such as:
- Marketing automations
- Subscriber list segmentation
- Surveys and polls
- Targeted landing pages
- A/B subject line testing
- SMS marketing
In addition, it comes with single and double opt-ins, online donations, eCommerce functionality, SEO recommendations, notifications for new subscribers and unsubscribes, and much more.
Constant Contact also works well with other tools like WordPress form plugins, so you can use it to grow your business. You’ll see a few of them, and how they can be used later in this article.
Some alternatives to Constant Contact are Brevo (formerly Sendinblue), ConvertKit, MailerLite, and Mailchimp. All work similarly and have slightly different features and pricing.
For now, we’ll show you how to add an email subscription option in WordPress using Constant Contact. You can still follow along even if you’re using another email service, as they all share similar concepts.
Creating Your Email Subscription List
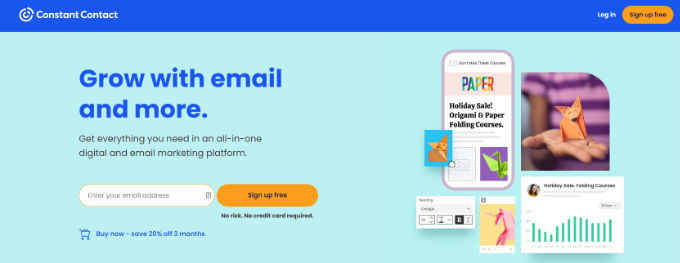
The first thing you need to do is sign up for Constant Contact.
Simply go to their home page, click on the ‘Sign up free’ button and fill out your information.
Once you’ve created your account, it’s time to set up your email list.
An email list is simply the list of email addresses that your users will provide when they sign up for your email subscription.
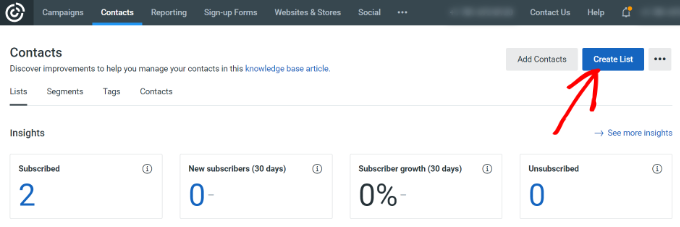
First, you need to click on the ‘Contacts’ button at the top of your Constant Contact dashboard.
This will take you to the contacts page. From there, you need to head to the ‘Lists’ tab and click on the blue ‘Create List’ button.
A popup window will now open.
You’ll be asked to provide a name for your email list. It can be whatever you want, but we’ll call it ‘My Newsletter’ for this example.
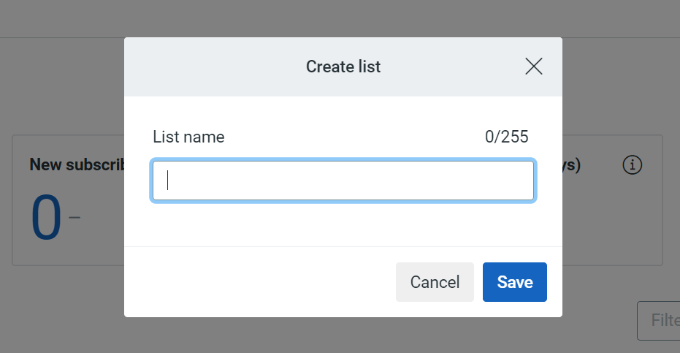
Don’t forget to click the ‘Save’ button when you’re done. Now you have a new list people can subscribe to.
The next step is to add an email subscription form to your WordPress website where your website visitors can sign up.
Adding Email Subscription Form in WordPress
Constant Contact comes with an email signup form builder, but the easiest way to get started is by using the WPForms plugin. It integrates seamlessly with Constant Contact to set up an optin form easily.
We’ll use the WPForms Pro version for this tutorial because it includes advanced integration with email marketing tools. WPForms also has a limited free version called WPForms Lite. It also allows you to connect your forms to Constant Contact.
First, you need to install and activate the WPForms plugin. If you need help, then follow our guide on how to install a plugin for detailed instructions.
Upon activation, you need to visit WPForms » Add New page from your WordPress dashboard.

This will open the WPForms drag and drop form builder, where you’ll see different form templates to choose from, including email subscription forms, contact forms, and more.
You can simply enter a name for your form and select the ‘Newsletter Signup Form’ template. There’s also an option to search for form templates in the form builder.
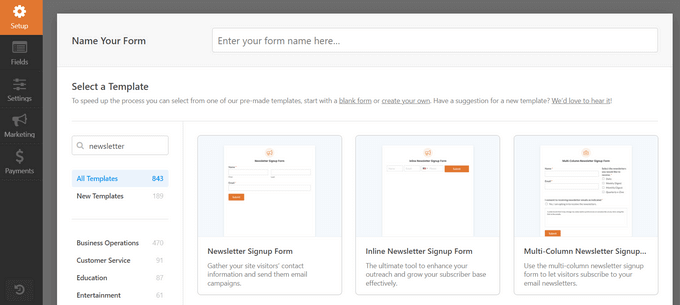
WPForms will now load a sample newsletter sign-up with the form builder interface.
It will include first and last name and email address fields in the form.
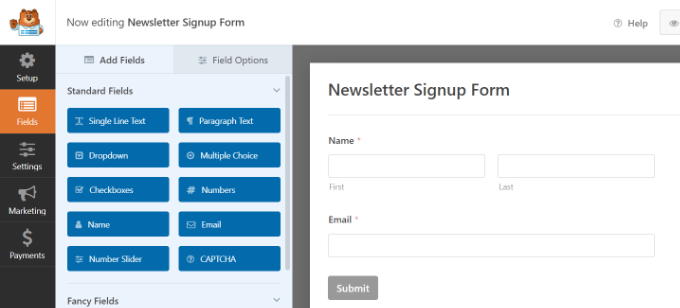
You can change the form fields if you want. For instance, you can add a full name and email address field or click on a form field to change its title or move them up and down.
Now, it’s time to set up your confirmation message. This is what your users will see when they submit the form.
Simply, switch to the ‘Settings’ tab and then click on the ‘Confirmation’ section.
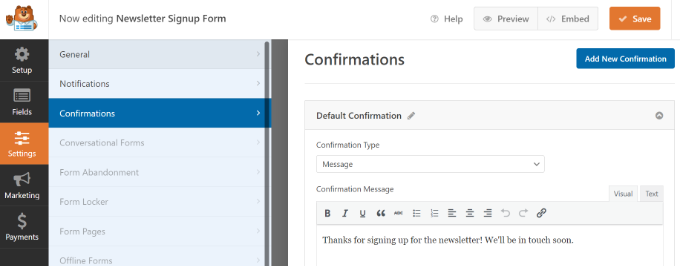
By default, WPForms will show a confirmation message which you can change to anything you want. You can also change the confirmation type and redirect users to any page or URL.
Don’t forget to click the ‘Save’ button at the top to store your changes.
Now that your newsletter sign-up form is ready. Let’s connect it to Constant Contact.
Simply click on the ‘Marketing’ tab and select ‘Constant Contact’.
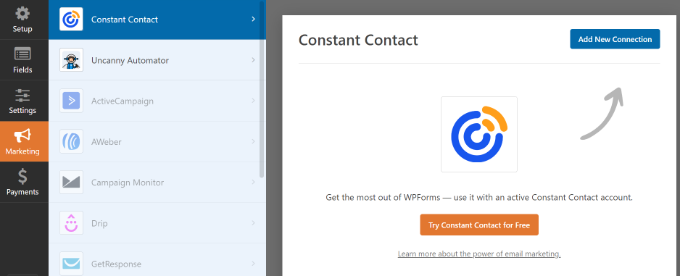
Next, click on the ‘Add New Connection’ button and you’ll see a popup that asks you to name your connection.
We called ours ‘My Newsletter Form’ but you can name it whatever you want. After entering a connection nickname, simply click the ‘Ok’ button.

Next, you’ll need to connect your Constant Contact account with WPForms.
To do that, simply click on the ‘Click here to register with Constant Contact’ link.
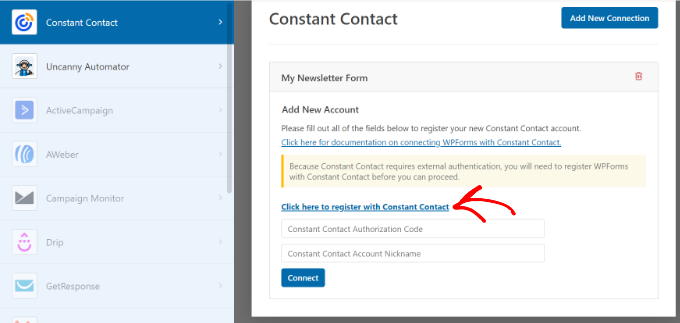
It will open a popup where you will be asked to allow WPForms to connect with your Constant Contact account.
Go ahead and sign in to your account. From here, click on the ‘Allow’ button to continue.
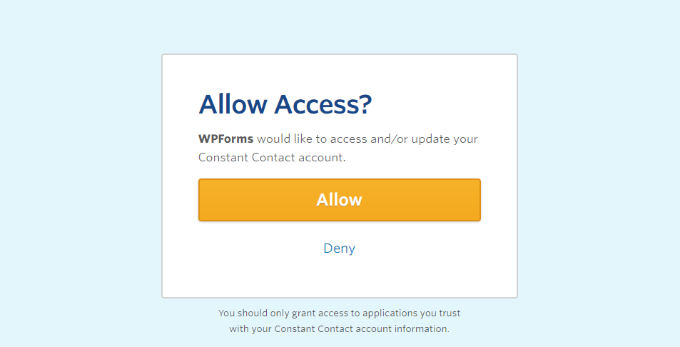
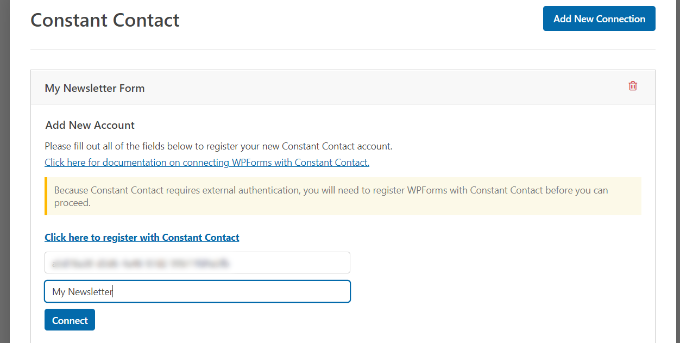
You’ll be given a long authorization code to register your form.
Go ahead and copy the code.

Next, you’ll need to paste the authorization code in WPForms settings and provide an account nickname. The ‘Account nickname’ could be anything you want.
Finally, click on the ‘Connect’ button to continue.
On the next screen, you’ll be able to select the fields you want to pass through from your form to Constant Contact.
We selected ‘email’ and ‘full name’ but you can select as many as you want. Just be sure that those two fields are included in your newsletter sign-up form fields.

When you’re done, don’t forget to save your changes.
Now that we have the form set up, we want to place it on our WordPress website. For this example, we’re going to place it in our sidebar. However, the form can go on any page you want.
First, go to the Appearance » Widgets page and click the ‘+’ button to add the WPForms widget block to your sidebar.
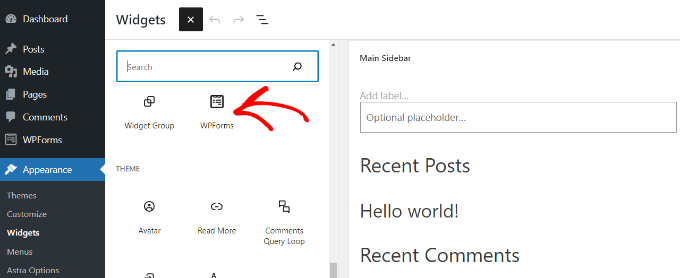
Next, you will need to select your newsletter form.
Simply click the dropdown menu in the WPForms block and choose your form.
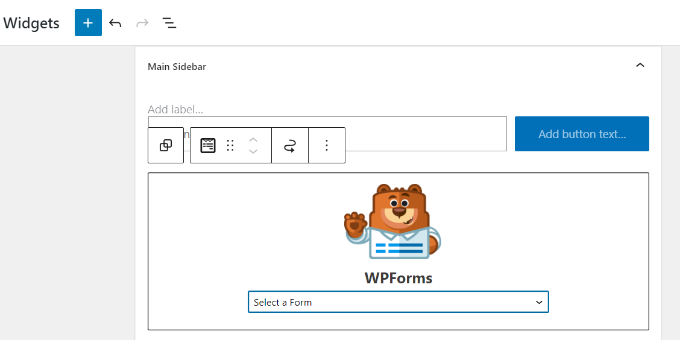
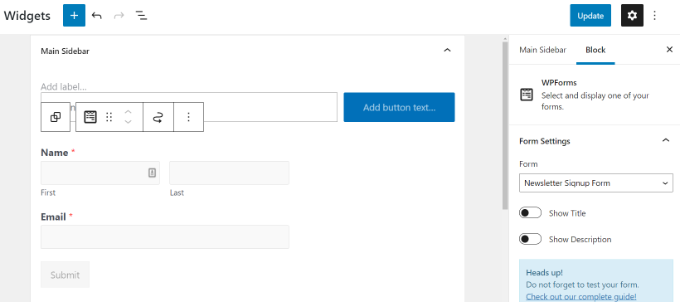
Once you select the form, you can see the preview in the widgets area.
Don’t forget to click the ‘Update’ button when you’re done.
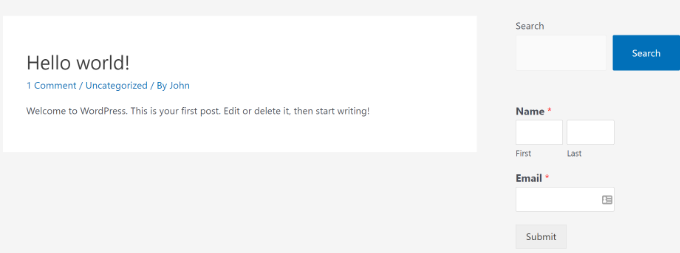
You can now visit your website to see your email subscription form in action.
Whenever someone fills out their name and email, and hits the Subscribe button, they’ll get subscribed to your newsletter.
Now that everything is set up, let’s take a look at how to send emails to your subscribers.
How to Write and Send Emails to Your Blog Subscribers
There are a few ways people can get your updates, and that’s through regular emails or an RSS feed.
The RSS feed method automatically sends users an email whenever you publish a new post in WordPress. However, it is less effective, has very low open rates, and users get annoyed when they receive too many emails.
We recommend writing your emails manually. This allows you to make your emails more personalized and conversational, add any content you want, and choose your own frequency.
Most popular bloggers send an email newsletter once a week. You can set your own frequency and schedule the emails ahead of time so that your users get them on the same day and time every week.
We’ll now walk you through writing your first email and sending it to your subscribers.
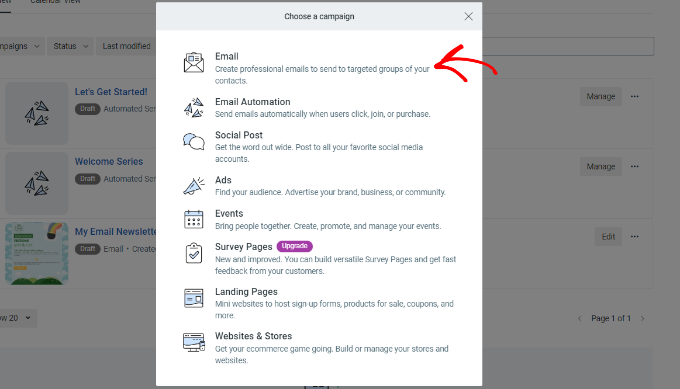
First, go to the ‘Campaigns’ page in your Constant Contact account dashboard and then click the ‘Create’ button.
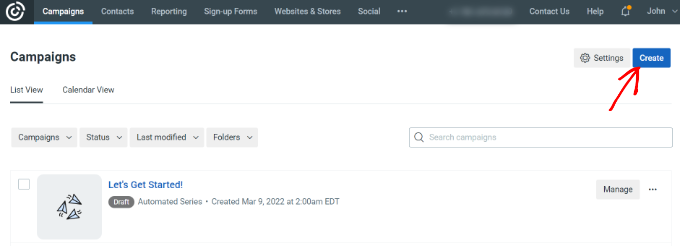
A popup window will now open with different campaign types to choose from.
You’ll then select ‘Email’ under ‘Choose a campaign.’
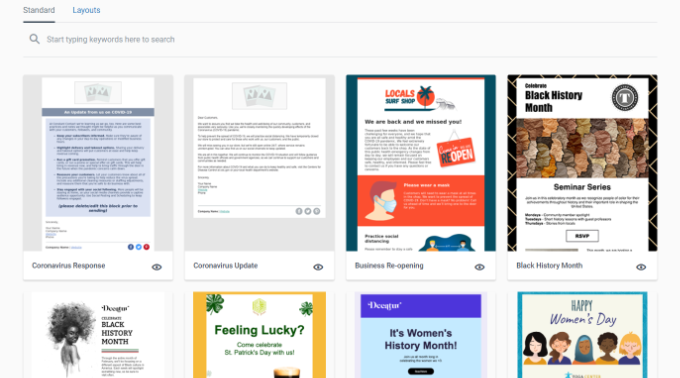
After that, Constant Contact will show multiple email templates.
Go ahead and select a template for your email newsletter.
Next, you’ll need to name your newsletter. This is for organization, and you can change it later if you want.
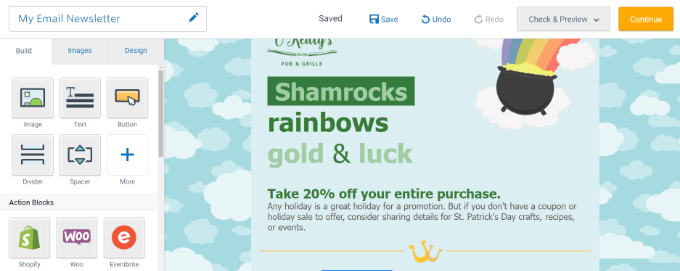
You can now use the email builder to edit, add to, or remove any of the elements you see in the template. Simply drag and drop the elements you want to add.
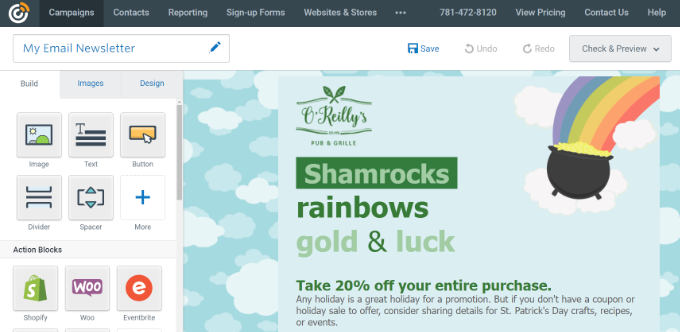
At the top, you’ll see the subject and preheader. To change this, you just click that area and add whatever you want.
On the left side, you’ll see a handful of options you can drag directly into your newsletter template. You can add text, buttons, images, and more.
In this example, we added a few photos, some text, and some links. To add a link to your newsletter, you can highlight any text you want.
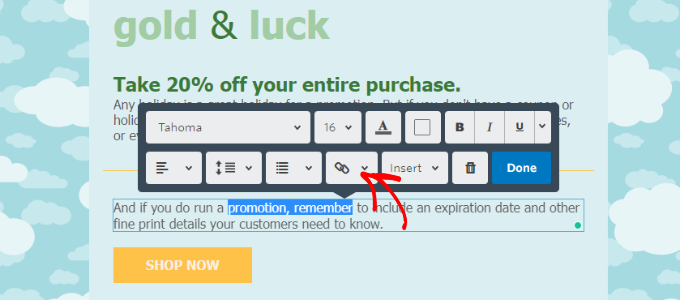
Click the chain-link icon and choose ‘Web Page’ from the dropdown options.
From here, paste the link to your blog post, like this:
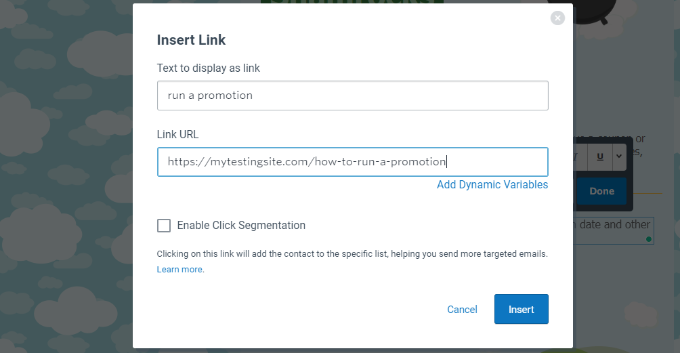
Then click the ‘Insert’ button, and you’re ready to go.
Now, for the last step, click ‘Continue’ in the upper right corner.
Next, you’ll need to select an email list before sending your newsletter. You can choose specific lists or all of your contacts, which is often called an email blast.
Make sure you check the box next to your list and then hit the ‘Send Now’ button at the top.
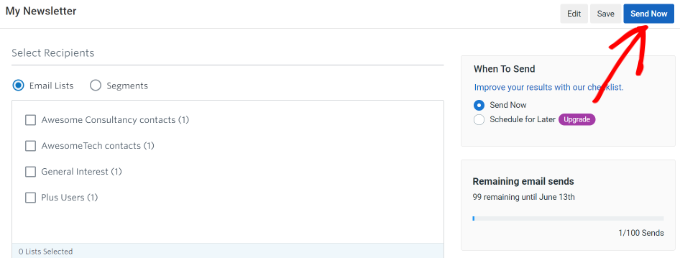
That’s how you send your very first email manually. If you want to schedule it for later, then you can choose that option and set a date for it to send.
You can repeat this process at any time you want to notify your subscribers about anything new on your WordPress blog.
How to Get More Email Subscribers
Did you know that more than 70% of people visiting your website will simply never see it again? This way, you have added an email subscription option to your blog so that you can notify users about new content, offers, and services.
However, adding just one sign-up form in your sidebar is not enough. You’ll need to find more ways to quickly get more email subscribers.
This is where OptinMonster comes in. It is the best conversion optimization and lead generation software in the world and helps you convert more website visitors into subscribers.
Instead of embedding a subscribe form in your sidebar that probably won’t get noticed, you can create opt-in forms that convert well and have been tested on thousands of sites. See our step-by-step guide on how to do lead generation in WordPress for more details.
With OptinMonster, you’ll get floating header and footer bars, slide-in boxes, welcome mats, inline forms, and lightbox popups. You can choose a campaign template that you can further customize to your liking.
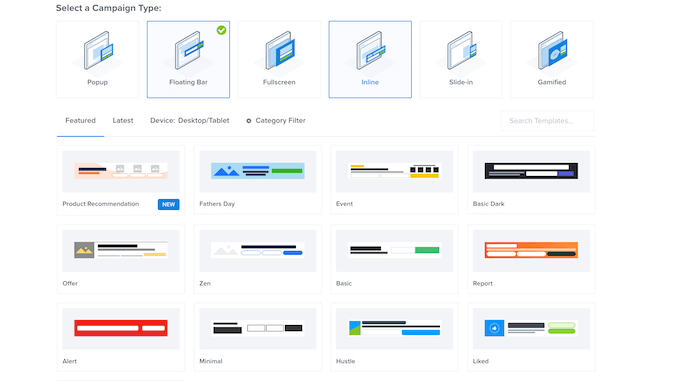
OptinMonster offers a beginner-friendly user interface and a drag-and-drop campaign builder.
You can add elements by dragging them to the template and rearranging the order of existing elements.
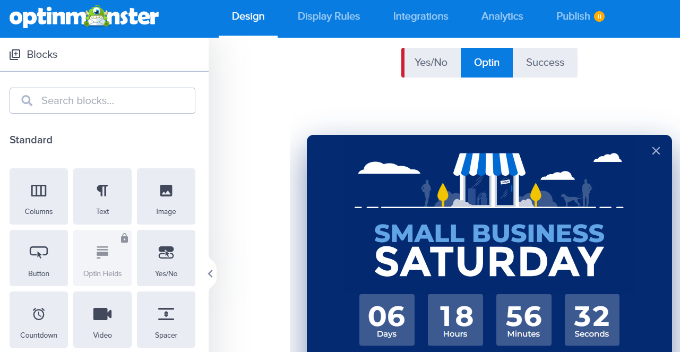
Besides that, the software offers different triggers and rules that you can set up for your campaign.
For instance, you can set up a popup on your site that triggers when someone is about to hit the back button in their browser. This is known as an exit-intent popup.
This means that right before someone leaves your site, they get a chance to subscribe, and many do because this has been tested on thousands of sites.
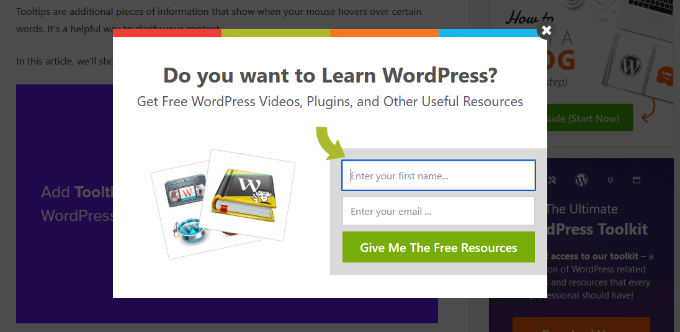
What’s great is that OptinMonster integrates perfectly with any email marketing software, many WordPress email subscription plugins, and all types of websites.
OptinMonster also offers lead verification as a paid addon. This powerful feature lets you filter out spambots and temporary email accounts to make sure your email list is filled with quality leads.
For more tips to get new subscribers, check out these tested and easy ways to grow your email list faster.
We hope this article shows you how to add email subscriptions to your WordPress blog. You may also want to read our guide on how to get a free virtual business phone number for your blog or our expert picks of the best SMTP WordPress plugins to improve email deliverability.
If you liked this article, then please subscribe to our YouTube Channel for WordPress video tutorials. You can also find us on Twitter and Facebook.


Syed Balkhi says
Hey WPBeginner readers,
Did you know you can win exciting prizes by commenting on WPBeginner?
Every month, our top blog commenters will win HUGE rewards, including premium WordPress plugin licenses and cash prizes.
You can get more details about the contest from here.
Start sharing your thoughts below to stand a chance to win!
Ahmed Omar says
subscription forms is crucial to maintain contact with the interested visitors and to keep them updated about the new posts. Also the integration between WP forms and Constant Contact made it easy and more convenient
thank you
WPBeginner Support says
You’re welcome, glad you found our recommendation helpful!
Admin
Neil says
In the example above, what is the email address that the newsletter is sent from? I would want a newsletter to come from my blog, and not from my personal email address.
WPBeginner Support says
In the settings for the newsletter, you can set the from email address to a different email.
Admin
David Tye says
Love this website,can you send me news letters please.
Regards David
WPBeginner Support says
You can start receiving our newsletter by clicking on the email icon in the top-right of the page
Admin
Godfrey says
Thanks for this article. Though I haven’t started on my first blog yet, this gives me the insight of what I need.
WPBeginner Support says
Glad our guide could help make the process less intimidating
Admin
Jill Cuthbert says
Thank you so much for this article. I’ve been struggling with RSS as what I really wanted was an email sign up for RSS. I’ve just started my first campaign with MailChimp and it was so easy and straightforward thanks to your great instructions.
WPBeginner Support says
Glad our guide was helpful
Admin
Joe says
I use Sendinblue for my SMTP – should I use this? I would prefer not to set up another account if possible, to keep things simple.
WPBeginner Support says
You can use that should you want
Admin
Mike D says
For the JetPack solution: “Appearance » Widgets. Drag and drop Blog Subscriptions (Jetpack) widget”. The widget does not seem to be a valid option any longer. JetPack v 7.7.1
WPBeginner Support says
Unless you’re using Jetpack on a local installation on your computer, the widget should still be available.
Admin
John Richardson says
I tried MailChimp and it was easy to set up. However, if you are a home based blogger and don’t have a PO Box, it publishes your home address. In these days and times, I just couldn’t risk it.
WPBeginner Support says
If you edit your footer for the messages they should have the option to remove the address.
Admin
Kaitlen D. says
Thank you so much for posting this! Do you know how to only send a short spurt of your blog post to your subscribers with Jetpack instead of sending the entire blog post?
WPBeginner Support says
You would go under Settings, Reading and for each item in feed you would want to select summary to only send sippets.
Admin
Colby says
love this
WPBeginner Support says
Thank you
Admin
Colby says
Please subscribe me to see this awesome content
WPBeginner Support says
We have our subscription in the top right of all of our posts and pages under the envelope icon
Admin
noah says
Can you show me how to successfully add youtube subscribe button on my wordpress site !
WPBeginner Support says
You can find our article on how to do that here: https://www.wpbeginner.com/wp-tutorials/how-to-add-youtube-subscribe-button-in-wordpress/
Admin
Sam says
pls send all update
WPBeginner Support says
We will certainly look into updating this article
Admin
Lorraine says
Hi
Great article for a newbie!!! Please could you help me with something. The website I’m building (migrating from Business Catalyst) has some custom templates which would be a nightmare to put into a theme. But is it possible to choose a WordPress theme which is only applied to the blog and the homepage which are much easier to change?
Any help really appreciated.
Lorraine
WPBeginner Support says
Themes would attempt to style your entire site. You may want to take a look into page builders to recreate the style of your pages: https://www.wpbeginner.com/beginners-guide/best-drag-and-drop-page-builders-for-wordpress/
Admin
Astuti says
Thanks for this article.
sanayache says
Hi, I like to have a plugin which sends notifications to subscriber when a new page (not post) is published. The subscribers list should remain with WordPress and not on email marketing sites. Please suggest a plugin.
Monazir Ansari says
Thanks for sharing……it really works…..!
Doug says
I appreciate your super helpful site!
I’m trying to add a signup for people to subscribe to my WP blog posts. Mailchimp shows my mailing address on a confirmation window.
For a simple RSS email signup, how do I avoid showing my mailing address? I’ve seen it done on other sites.
What service will do this (it seems Mailchimp won’t)?
Thank you!
Katie says
I am also having this problem. Not interested in broadcasting my mailing address to the world.
Scott Hayden says
Why does Mailchimp say my blog feed isn’t valid? Do I have to publish a post before it becomes valid? My blog isn’t ready yet and is in “coming soon” mode.
Natalie says
Hi there, I have just had a ‘new user’ subscribe to my blog which is on WordPress.org.
What does this mean? Can they now access the dashboard and all my posts?
Thanks in advance
Natalie
WPBeginner Support says
Hi Natalie,
You can go to your WordPress admin area and click on Users. On this page you can see all users who can log into your WordPress site. Next to each user you will be able to see their user role. If a user appears as a Subscriber and you didn’t add them, then you can delete that user.
You may also want to visit Settings » General page and look for the Membership option. If the box next to ‘Anyone can register’ is checked, then you can uncheck it and save your settings.
Admin
Muhammad Fahad ul Hassan says
Hi Guys,
On the main page of my website, i am seeing 55000 subscribers but where I can found this list?
WPBeginner Support says
Hi Muhammad Fahad ul Hassan,
Depends on which tool you are using to collect email addresses. If you are choosing an email marketing service, then you’ll find your list by signing into your account. If you are using a WordPress plugin, then check out plugin’s settings page.
Admin
Angie Mek says
Is there a way to have an email sent to a subscriber every time that single page is updated? Not to the whole site, but just a single page of the site?
This would give followers the option to only be notified when a specific portion of the site is updated.
Jennifer Bate says
I have the same question. I am running a genealogy blog and I know there are going to be people who will want to be notified when I am working in a particular category/surname. But until that time, they won’t be needing my feed…. and might stop reading or unsubscribe.
Ashley says
Are there any follow by email services for blogs that don’t require having a physical address? I got Mailchimp all set up only to find out my physical address has to be displayed with the messages and as a blogger I don’t require a PO box nor do I want readers to see a physical address.
Melanie Blackburn says
I’m at the part to click the “RSS Feed” for the campaign but they don’t list that as an option. I have the top 3 options but the fourth is “Automated”. Have they changed this? Do I need to do something different?
WPBeginner Support says
Hi Melanie,
Yes, it has changed a bit since then. We will update the article soon. Meanwhile, go to your MailChimp dashboard and click on the Add Campaign button. From the popup menu select ‘Let us Guide you’. In the next step, select ‘Connect with new contacts’, and then select Share Blog updates.
Admin
Trinity says
This was incredibly helpful!! I’m trying to add the “pop up” functionality.. but can’t seem to figure it out but everything else works perfectly! Thanks
WPBeginner Support says
Hey Trinity,
Glad you found the article helpful
For pop up functionality you may want to checkout OptinMonster. It is a lead generation software that helps you grow your email list using beautiful email signup forms including lightbox popups.
Admin
Jean Browman says
MailChimp works only about half the time for me. I post at the same time every day and have the notice go out two hours later. Sometimes it does, sometimes it doesn’t. Do you have any idea why?
Kabrina says
Very helpful still in 2017, thanks.
khadija Beauty says
Mails that are sent through via MailChimp campaign to my subscribers does not appear in their inbox, instead they are stored directly in the promotion section. Why does that happen? Is there any way to make them appear in the inbox?
Hector says
Hello. Can someone please reply this reader? I think she asked a valid question. Thank you.
WPBeginner Support says
Hi Khadija,
Gmail automatically sorts email and sends them to promotions or updates tabs. Users can decide whether they want to see an email into their primary tab. Many Gmail users actually turn off the tabbed email view to only view the primary inbox. A recent Study by ReturnPath showed that promotions tab does not affect your email’s deliverability or even its open rates.
But if you are still concerned, then you can ask your subscribers to move your email message from promotions to primary by showing them instructions on how to do that.
Admin
Mark says
Does anyone know how frequently Jetpack Subscriptions sends out notification emails when I post new content on my blog? Is there a way to configure how often/how quickly notifications get sent? Thanks.
Stephen Wells says
Hi Mark,
Use Better Notifications for WordPress plugin, it will allow you to configure your email notifications.
Regards
Stephen W.
Robin says
I am trying to switch to Mad Mini. I have a custom sign up button on my site, but don’t know how to connect Mad mini to my site. Help.
WPBeginner Support says
Please contact Mad Mimi for support.
Admin
Mehedi Hasan says
I have just started making my own blog, on WordPress. After few post, i am getting good no of users as well views but this views do not convert into subscription very well rather the result is zero. My only E-mail subscription widget is at footer widget area. Now after reading your article, i am going to place two more subscription widget. One will be at Top sidebar and another will be at the last of the content. So thanks for your great Article.
WPBeginner Support says
Glad you found it helpful. You may also want to follow us on Twitter for more useful WordPress tips and tutorials.
Admin
Hayley says
Ah! FINALLY the answer to getting the Subscribe widget on a self-hosted blog!
neha says
This is very helpful resource
Jim Keough says
What about zapier?
Nicole says
Thank you! I set up the RSS feed via MailChimp within an hour. You made this SO easy!
WPBeginner Support says
Glad you found it helpful
Admin
Dale Fletcher says
Would you not recommend Feed-burner by Google?
WPBeginner Support says
Please take a look at Stop Using FeedBurner – Move to FeedBurner Alternatives
Admin
Victor says
Is there a way i can make the Follow Blog Check box always checked?
Michele says
I went through all the steps using my Mail Chimp account but I can’t get the text widget in my wordpress.com site to accept the embedded code. Do I need wordpress.org site for this to work?
WPBeginner Support says
Please see our guide on the difference between self hosted WordPress.org vs free WordPress.com blog.
Admin
Ian says
Hello! I just activated Jetpack subscriptions on my website. I chose Jetpack just for the simplicity and I don’t really feel the need at this point to have access to the subscription list.
Thanks,
Ian
Sesan Oguntade says
Thanks for this article. God bless you. I am a subscriber to your newsletter. I must say i have enjoyed every bit of what you provide here. I am getting better with my wordpress blogs because of what i read on your blog. Thanks and God bless you again.
rogerpacker says
MailPoet is another great option. It’s free up to 2,000 subscribers and just $75 a year for a single site after that and has some great email templates.