Do you want to display WordPress posts in a grid layout?
A grid layout gives you more flexibility when displaying your posts in WordPress. This can be helpful when creating custom pages.
In this article, we’ll show you how to easily display your WordPress posts in a grid layout anywhere on your site.
When Do You Need a Grid Layout for WordPress?
Every WordPress theme supports the traditional vertical layout of blog posts, and this works well for most kinds of websites. However, this layout can take up a lot of space, especially if you have a lot of posts.
If you’re creating a custom homepage for your site, then you may want to use the grid layout to display your recent posts.
This will give you more space to add other elements to your home page.
Plus, your post grid will highlight your featured images, so it’s visually appealing and clickable. You can also use the post grid to show off your creative portfolio and other types of custom content.
Many magazine themes and photography themes already use the grid-based layout to display posts. However, if your theme doesn’t support this functionality, then you’ll need to add it.
With that said, let’s show you how to display your WordPress posts in a grid layout. Simply use the quick links below to jump straight to the method you want to use.
- Create a grid layout with WordPress block editor
- Create a grid layout with Post Grid plugin
- Create a grid layout using SeedProd page builder
- Create a grid layout by adding code to WordPress
Video Tutorial
If you’d prefer written instructions, just keep reading.
Method 1. Create a WordPress Post Grid Layout with Block Editor
This method lets you simply display your posts and thumbnails in a post grid layout using the WordPress block editor. There’s a built-in post grid block that lets you create your own grid.
To do this, open up the page you want to edit, then click the ‘Plus’ add block button and search for ‘Query Loop’, then click the block to add it.
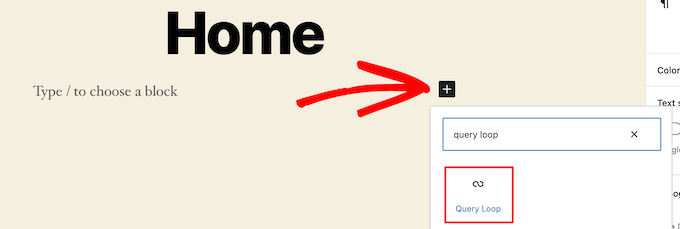
This block adds your post loop to your page.
Then, click the ‘Start Blank’ option at the top of the block to create a post grid.

This gives a few different choices depending on the type of information you want to display with your post grid.
We’ll select the ‘Image, Date, & Title’ option, but you can choose whatever you like.

After that, hover over the image and select the ‘Grid View’ option.
This turns your list into a post grid.

Next, you can customize the information you want to display.
First, we’re going to delete the pagination at the bottom of the block. To do this, simply click on it, and click the ‘Three Dots’ options menu.
Then, click on ‘Remove Pagination’.

This will automatically remove the element from the block.
You can delete the dates from the posts the same way or leave more post information for your visitors.
Next, we’ll add links to both the post thumbnail and post title.
Simply click on your post thumbnail and turn on the ‘Link to Post’ toggle in the right-hand options panel.

Then, do the same thing for your post title.
Once you’re finished, click the ‘Update’ or ‘Publish’ button to make your post grid live.
Now, you can visit your WordPress website to see your new WordPress post grid.

You can add this block to any page or post. If you’d like to use this as your blog archive page, then you can see our guide on how to create a separate page for blog posts in WordPress.
Method 2. Create a WordPress Post Grid Layout With the Post Grid Plugin
This method offers a simple way to add a customizable post grid that you can add anywhere on your website.
First thing you need to do is install and activate the Post Grid plugin. For more details, see our guide on how to install a WordPress plugin.
Upon activation, you need to visit Post Grid » Add New to create your first post grid.
Then, give your post grid a title. This won’t appear anywhere on your page it’s just to help you remember.

Below this, you’ll find the post grid settings divided into different sections with multiple tabs.
First, you need to click on the ‘Query Post’ tab. This is where you’ll define the post types that you want to display in the ‘Post types’ box.
By default, it will only display posts, but you can add pages and even custom post types.

After that, you need to click on the ‘Layouts’ tab.
Then, click the ‘Create layout’ button. This will open in a new window.

You need to name your layout. Then, click on the ‘General’ option, and it will open up a list of tags.
These tags are the information that will display in your post grid.

We’ll select the ‘Thumbnail with link’ option and the ‘Post title with link’ option.
Then, click ‘Publish’ or ‘Update’ to save your layout.

Now, go back to the original post grid editor in the previous tab, and there will be a new layout option available that you can select.
Simply click on the new layout in the ‘Item layouts’ section at the bottom of the screen.

Next, click the ‘Item style’ tab. Here you can set the size of your grid.
The default settings should work for most sites, but if not, then you can change them here.

Once you’re finished, click the ‘Publish’ button at the top of the page, and your grid will be ready to add to your WordPress blog.
Now, you need to click the ‘Shortcode’ tab and then copy the shortcode in the ‘Post Grid Shortcode’ box.

After that, open up the page where you want to display your post list and click the ‘Plus’ add block button.
Then, search for ‘Shortcode’ and select the ‘Shortcode’ block.

Next, paste the shortcode you copied earlier into the box.
Then, click the ‘Update’ or ‘Publish’ button.

Now, you can view your page to see your WordPress post grid layout live.

Method 3. Create a WordPress Post Grid Layout With the SeedProd Page Builder Plugin
Another way to create a post grid layout is using the SeedProd page builder plugin. It’s the best drag and drop WordPress page builder in the market used by over 1 million websites.
SeedProd helps you easily create custom pages and even completely custom WordPress themes without writing any code. You can use the plugin to create any kind of page you want, like 404 pages, coming soon pages, landing pages, and more.
To learn more, see our guide on how to create a custom page in WordPress.
In the SeedProd builder, as you’re customizing your page, simply click the plus ‘Add Section’ button anywhere on the page.
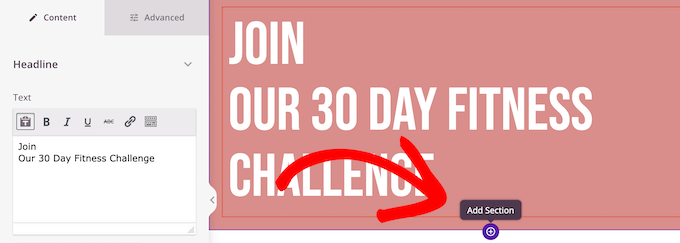
This will bring up an option to add a new block.
Next, drag the ‘Posts’ block over to your page, and it will automatically add a list of posts to your page.

Now, you can customize this block with the left-hand options panel.
First, scroll down to the ‘Layout’ section. Here you can set the number of columns for your blog post grid and turn on the ‘Show Feature Image’ and ‘Show Title’ toggles.
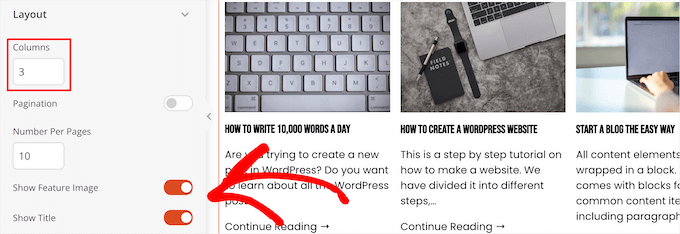
Next, scroll down to the ‘Show Excerpt’ toggle and the ‘Show Read More’ toggles and turn them off to create a simple blog post grid layout.

If you want to customize the color scheme, text, and more, then click the ‘Advanced’ tab at the top of the left-hand column.
Then, click the ‘Text’ drop down and make your changes.

You can continue customizing your page and blog post grid layout as much as you’d like.
Once you’re done, click the ‘Save’ button and select the ‘Publish’ drop down at the top of the page to make your changes live.
Now, you can view your new post grid on your website.

Method 4. Create a WordPress Post Grid Layout by Adding Code to WordPress
This method requires some basic understanding of how to add code to WordPress. If you haven’t done this before, then see our guide on how to copy and paste code in WordPress.
Before you add code, you need to create a new image size that you’ll be using for your post grid. To learn more, see our guide on how to create additional image sizes in WordPress.
Next, you’ll need to find the right WordPress theme file where you’ll be adding the code snippet. For example, you can add it to your single.php, so it appears at the bottom of all of your posts.
You can also create a custom page template and use it to display your blog post grid layout with thumbnails.
To learn more, see our WordPress template hierarchy cheat sheet to help find the right theme template file.
Once you’ve done that, you can start adding code to WordPress. Since the code snippet is quite long, we’ll break it down section by section.
First, add the following code snippet to your theme template file.
<?php
$counter = 1; //start counter

$grids = 2; //Grids per row

global $query_string; //Need this to make pagination work

/*Setting up our custom query (In here we are setting it to show 12 posts per page and eliminate all sticky posts*/
query_posts($query_string . '&caller_get_posts=1&posts_per_page=12');

if(have_posts()) :  while(have_posts()) :  the_post();
?>
This code snippet sets up the post loop query. You can change the ‘posts_per_page’ variable to display more posts per page if you’d like.
Then, add the following code snippet to your theme template file.
<?php
//Show the left hand side column
if($counter == 1) :
?>
            <div class="griditemleft">
                <div class="postimage">
                    <a href="<?php the_permalink(); ?>" title="<?php the_title_attribute(); ?>"><?php the_post_thumbnail('category-thumbnail'); ?></a>
                </div>
                <h2><a href="<?php the_permalink(); ?>" title="<?php the_title_attribute(); ?>"><?php the_title(); ?></a></h2>
            </div>
<?php
//Show the right hand side column
elseif($counter == $grids) :
?>
<div class="griditemright">
                <div class="postimage">
                    <a href="<?php the_permalink(); ?>" title="<?php the_title_attribute(); ?>"><?php the_post_thumbnail('category-thumbnail'); ?></a>
                </div>
                <h2><a href="<?php the_permalink(); ?>" title="<?php the_title_attribute(); ?>"><?php the_title(); ?></a></h2>
            </div>
<div class="clear"></div>
<?php
$counter = 0;
endif;
?>
This code snippet creates two columns for our posts and will display the title and post image. It also creates a CSS class that we’ll show you how to style later.
It also references ‘postimage’, so you’ll need to change this to the name of the image size you created earlier.
After that, add the following code snippet at the end.
<?php
$counter++;
endwhile;
//Post Navigation code goes here
endif;
?>
This code snippet simply closes the loop. It also gives the option to add post navigation, but most website owners use a different plugin for this, so we didn’t include it to avoid code conflicts.
Here’s how the final code snippet looks altogether.
<div id="gridcontainer">
<?php
$counter = 1; //start counter

$grids = 2; //Grids per row

global $query_string; //Need this to make pagination work


/*Setting up our custom query (In here we are setting it to show 12 posts per page and eliminate all sticky posts) */
query_posts($query_string . '&caller_get_posts=1&posts_per_page=12');


if(have_posts()) :  while(have_posts()) :  the_post();
?>
<?php
//Show the left hand side column
if($counter == 1) :
?>
            <div class="griditemleft">
                <div class="postimage">
                    <a href="<?php the_permalink(); ?>" title="<?php the_title_attribute(); ?>"><?php the_post_thumbnail('category-thumbnail'); ?></a>
                </div>
                <h2><a href="<?php the_permalink(); ?>" title="<?php the_title_attribute(); ?>"><?php the_title(); ?></a></h2>
            </div>
<?php
//Show the right hand side column
elseif($counter == $grids) :
?>
<div class="griditemright">
                <div class="postimage">
                    <a href="<?php the_permalink(); ?>" title="<?php the_title_attribute(); ?>"><?php the_post_thumbnail('category-thumbnail'); ?></a>
                </div>
                <h2><a href="<?php the_permalink(); ?>" title="<?php the_title_attribute(); ?>"><?php the_title(); ?></a></h2>
            </div>
<div class="clear"></div>
<?php
$counter = 0;
endif;
?>
<?php
$counter++;
endwhile;
//Pagination can go here if you want it.
endif;
?>
</div>
Now, you’ll need to add the following CSS to your site to make sure your post grid displays nicely.
If you haven’t done this before, then see our guide on how to easily add custom CSS to your WordPress site.
#gridcontainer{
     margin: 20px 0;
     width: 100%;
}
#gridcontainer h2 a{
     color: #77787a;
     font-size: 13px;
}
#gridcontainer .griditemleft{
     float: left;
     width: 278px;
     margin: 0 40px 40px 0;
}
#gridcontainer .griditemright{
     float: left;
     width: 278px;
}
#gridcontainer .postimage{
     margin: 0 0 10px 0;
}
You can modify the different CSS selectors to see how they change different elements of your post loop.
We hope this article helped you learn how to display your WordPress posts in a grid layout. You may also want to see our guide on how to choose the best web design software and our expert picks of the best live chat software for small businesses.
If you liked this article, then please subscribe to our YouTube Channel for WordPress video tutorials. You can also find us on Twitter and Facebook.


Syed Balkhi says
Hey WPBeginner readers,
Did you know you can win exciting prizes by commenting on WPBeginner?
Every month, our top blog commenters will win HUGE rewards, including premium WordPress plugin licenses and cash prizes.
You can get more details about the contest from here.
Start sharing your thoughts below to stand a chance to win!
Rachel says
I tried to do this under ‘posts’ for my blog that has already been created. It didn’t work.
WPBeginner Support says
You would want to ensure you have multiple blog posts published live on your site for them to be visible as the most common reason for that issue.
Admin
julie says
Hi
I have tried this on my static homepage but it is not working.
Do I just add the one shortcode or both ( ie the php code also?)
using make theme.
do i just add it to the page as a paragraph and shortcode?
thanks
julie
WPBeginner Support says
You should only need to add the shortcode to the page, if you reach out to the plugin’s support they should be able to let you know why it is not displaying properly
Admin
Paige says
Is there a way to customize the thumbnails? I have mine set to the featured image, however some are different sizes and are cut off in the wrong areas.
WPBeginner Support says
In the layout settings, you should be able to customize the display of the featured iamges
Admin
Lisa says
I’m following all the steps to set this grid up on my homepage but it’s not displaying. I created a page, added the short code, and under settings–>reading I set my homepage to static with that page. What am I doing wrong?
p.s. I purchased a child theme (Foodie Pro), could that be my issue? Thanks!
WPBeginner Support says
There may be a page template that could be causing a display issue, if you reach out to Post Grid’s support they should be able to help have it display properly
Admin
Jess says
This was GREAT!!! Thankyou! I was able to apply this for my main blog page however I also have navigation for the different categories within my blog. How can I make it so that each of these category pages also displays as a grid?
Lu says
I installed this plugin but my WordPress site have been automatically updated to Gutenberg and now a box appears in all my WordPress Post pages, covering the content so I can’t see it! The only way I can get rid of it is to de-install Post Grid. Anyone have any other ideas so I can use the Post Grid? Thanks for any help! L
Robert says
I have the page set up but I have 5 posts that I did before that are not showing up on the new Post Grid.
How do I get the posts to show up on the grid?
Travenjo says
Can anyone help me to have page grid and (not post grid) for my pages. How ro customize?
Hector says
I’m using the Twenty Fourteen theme and this only gave me one option for layout instead of what you are showing and the one they let me use is a double but it just doesn’t work even the pagination got stuck on me so I don’t know what to do,is there a better plugin for my theme?
Aurangzaib says
What a simple solution, i understand WP and PHP on a good level and this is the smartest and easiest solution to make a grid of posts and fetch them up from the DB, although the need is pretty rare if you are willing to make a different page for any purpose otherwise there are themes that have built-in support of many kinds of grids designs i customized and designed a bit on my web there at simspk.com, also keeping simple and clean content is the simplest way to achieve better ranks, Great post bro, keep them up!
Daniel Grove says
What about for blog category pages? They just get listed vertically in my theme and it looks lame and wastes so much space! I want it to grid them just like the home blog page does.
Jess says
Meeeee tooooo!!!!! Following to see if there is a response…..
WPBeginner Support says
Hey Daniel and Jess,
The plugin’s premium version claims to have the option to create post grid for category archive pages. We didn’t test the premium version for the article. Please check the plugin website to learn more before buying.
Admin
Lori says
I have the Dara theme with the Premium plan, and I am VERY NEW. Unfortunately, I just realized that plug-ins are only available with the Business plan, which I cannot afford to invest in at this time since it would triple my cost. Dara has a grid page option, but it only allows child pages to be displayed – I want POSTS to display from a specific category. Looks like I would have to create a static child page every time I want new content to appear in this Premium plan Dara grid page option, right??
WPBeginner Support says
Hi Lori,
You can start with a self-hosted WordPress.org website which allows you to install plugins out of the box.
Admin
Carl says
This is great but is this same process possible WITHOUT installing a plugin. How do you shows 10 different category separately? How select images for grid?
Brianna says
This is awesome! Is there a way to edit from two across ( 2 columns) to three or four? When I change the settings to 20 posts a page, I am getting 2 columns and 10 rows.
Dale Kevin says
Hi, I followed all the steps but it doesnt work. The page where I posted the shortcode of postgrid doesnt show up as my how page. Whats wrong? Maybe the Php code is needed?
I need you guidance. Thank you. I appreciate you response
Mr Thanh says
Hi, that’s great plugin.
But i can’t creat a grid with three colums, only two colums.
How can i?
Holly says
Hi,
I’ve used this plugin on all the sites i’ve created, i love it its so easy to use but im having a problem with the layout a little bit. Im using Layout 1 with 4 Columns and for some reason a row splits into two different rows, how do i stop this from happening?
Dee says
Hello there. This was very helpful thank you. It works fine on the front page of my blog but wouldn’t work in the categories. Whenever a category is clicked in the header, the page shows the theme grid and not the Post Grid. How do I go about this? What page do I copy the code into please?
Thank you
DEE says
Can anyone help with this please
Liah says
My current theme doesn’t have the grid layout for the blog section. I’ve download the plugin and it works great but when I upload a new blog post does it automatically update the grid to include the latest post? Thank you for the super helpful video!
WPBeginner Support says
Hi Liah,
Yes it will automatically update the grid.
Admin
Leanne says
I’m trying to make the blog section of my site look nicer here – is there a way to automatically style the current blog posts in a grid rather than creating a new page and adding shortcode or editing php files?
WPBeginner Support says
Hey Leanne,
You’d need to look for a WordPress theme that automatically displays your blog posts in a grid layout.
Admin
Joseph says
Hi Thank you for the nice Article. Is there any way to make the same without plugin. If so how could i ?
Thanks
leighton says
I want to use this but i am confused, I follow it but I dont see anything, I copy the shortcode but still nothing, do I have to upload images and text? can someone help?
Shahid says
Great Article, just wanted to know if we can add post excerpt length in this plugin?
mike says
This is cool for pages only. What if my posts belong under categories only. How do I add the shortcode to category archive. Thanks
Henry says
This is just fine for pages! Still can’t figure how it works for posts! Someone help pls.
Dave Parks says
I finally found “Taxonomy” setting on the plugin homepage – available if you buy the premium.
Which means the freebee is of zero value.
Dave Parks says
The only category setting I see is
“Exclude by post ID
you can exclude post by ID, comma(,) separated”
With all due respect to the creator of this plugin, there’s no way I’m going input all the IDs I do not want to appear. The list is too long, and it will grow as I develop this site.
So is there some place to put in the one ID that I want to appear?
Tina Davidson says
Hi – I finally have my blog up and running – yay! But want to add a store element to it. A “Shop Now” page. Do you think this its the best type of plug-in to use or is the one more efficient for a store set-up? Thanks so much! Tina
hasan says
thanks for good knowledge
my website has two kinds of contents : post and pages.
can i add my new pages on homepage automatically without using widgets?
thanks again
Karthik says
hi thanks for kind info,
please help me how to filter post by categories
hasan says
thank you for good knowledge
i use a theme support magazine template on my site but it includes only posts .
how can i use this template for pages also not only posts ?
thanks again
WPBeginner Support says
Please contact theme developer they will be able to help you better.
Admin
anil singh says
thanks who do not know php and how to cutomize homepage this article will be helpful. i have one question which i searched all the web but not find any article. quetion is how can custmize homepage with category list without showing post area in homepage please make article for it . you can see example on freejobalert.in
judit says
Will this pluggin work on wordpress.com?
WPBeginner Support says
Please see our guide on the difference between self hosted WordPress.org vs free WordPress.com blog.
Admin
Tonia says
Hi – i see an image in your blog article, does this support featured content image ?
natalie james says
Thank you so much for this article, it is as though you were reading my mind and my wish list for my blog. I was easily able to follow your step by step instructions until the very end. Im not sure how to put my query correctly, I think what Im trying to say is that I would like the grid page to be my landing page of my blog. At the moment it is inside a post with a post heading. You do mention at the end that I can past the code into my themes file but unfortunately I dont know where that is. Hope this makes sense and I look forward to your reply.
thanks
Natalie
Paul Wandason says
Hi Natalie,
I maybe wrong here – but I think you need to create a *page* with the grid on it, then if you go to “settings” then “reading” in the wordpress admin dashboard, you can set “Front page displays” to a static page, and select the page you’ve just created with the grid on it under the “front page” drop down menu.
Hope this helps, and good luck!
Paul