Do you want to add an affiliate program in WooCommerce?
Adding an affiliate program to your eCommerce store is a great way to encourage customers and other marketers to promote your products.
The challenge is that WooCommerce does not come with a built-in affiliate management system. Luckily, there are several affiliate plugins you can use.
In this article, we will show you how to easily add an affiliate program in WooCommerce.

Why You Should Add an Affiliate Program to WooCommerce
Adding an affiliate program to your WooCommerce store gives an incentive to your customers, fans, and other marketers to promote your products in return for a small commission per sale.
When a user signs up to be your affiliate, they get a special link to your store. This link has its affiliate tracking code within it.
When someone buys through that link, the affiliate earns a percentage of the sale price. For digital products, this is often 30%. For physical products, around 5% to 10% is normal.
This commission encourages your affiliates (or “brand ambassadors”) to promote your products, helping you make more money online without any extra work.
The challenge for new online store owners is that WooCommerce doesn’t have a built-in affiliate or referral tracking feature, so they often get confused about how to add it.
Luckily, there are several WooCommerce affiliate plugins that you can use to create your affiliate program. We’re going to take you through three different methods in this article.
1. AffiliateWP
AffiliateWP is a premium WordPress plugin. Once you’ve paid for the plugin, you simply download and install it.
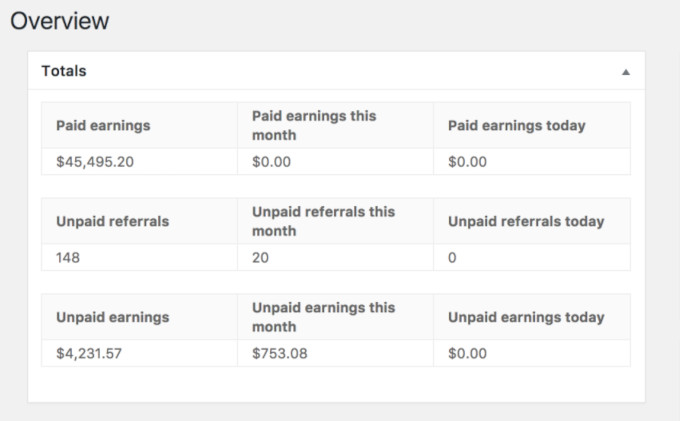
You can then go to the AffiliateWP » Overview tab in your dashboard to see an overview of your affiliate sales. This example is from an affiliate program that’s been running for a while already:
First, you’ll need to install and activate the AffiliateWP plugin. If you need help, then please see our beginner’s guide on how to install a WordPress plugin.
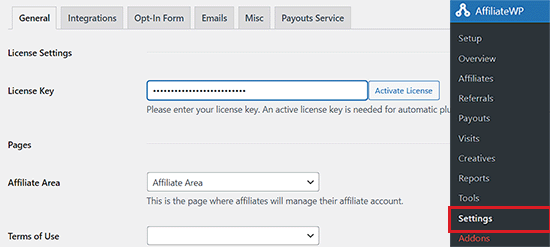
Upon activation, you can go to the AffiliateWP » Settings page to enter your license key. You can find this information in your account on the AffiliateWP website.
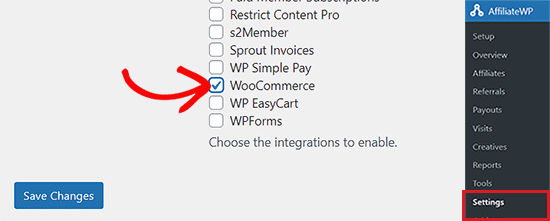
To integrate AffiliateWP with WooCommerce, go to the AffiliateWP » Settings page from the WordPress dashboard. Next, click the ‘Integrations’ tab at the top of the screen.
From here, simply check the box next to ‘WooCommerce’ and then click on the ‘Save Changes’ button at the bottom.
Now, AffiliateWP will automatically record affiliate referrals when anyone comes to your WooCommerce store through an affiliate link.
You can set a different commission rate for each affiliate, if you want, using AffiliateWP. Go to AffiliateWP » Affiliates in your WordPress dashboard, then search for a registered affiliate to set their commission rate.
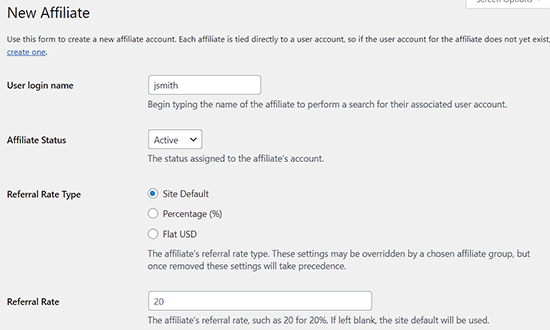
Affiliates without a specific commission rate will have the default commission rate. You can set this up or change it by going to AffiliateWP » Settings (set the ‘Referral Rate’ under the ‘General’ tab).
Plus, With AffiliateWP, you can also download the ‘Affiliate Portal‘ addon to use an ultimate dashboard where your affiliates can manage everything in a central place, including affiliate URLs, in-depth analytics, unlimited creatives, advanced settings, and more.
It comes with an elegant interface and also allows you and your affiliates to view referral traffic, generate unique links, and create custom landing pages to promote your products.
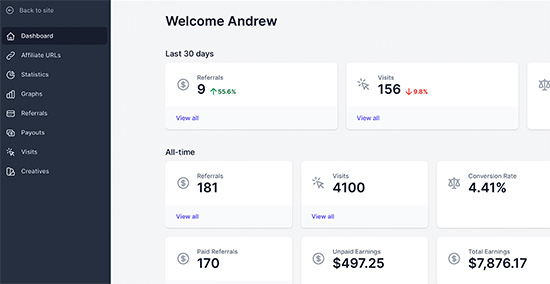
The portal even lets you view and manage all your creatives in a central space.
To do this, switch to the ‘Creatives’ tab in the left column. This will display all your creatives on the screen from where you can view, copy, and filter them.
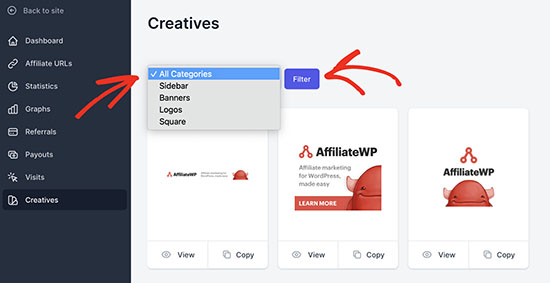
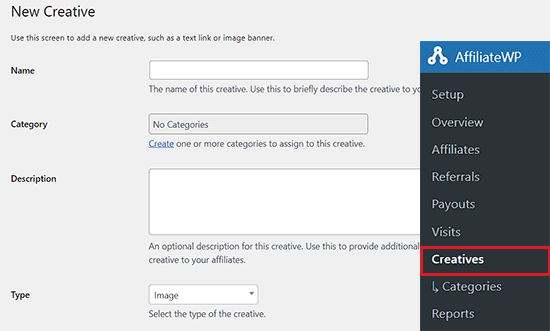
However, if you want to add a new creative, then you will have to visit the AffiliateWP » Creatives page from the WordPress dashboard and click the ‘Add New’ button.
This will direct you to a new page where you can add the name, category, description, image, URL, type, and status for the creative.
Once you are done, don’t forget to click the ‘Save Changes’ button.
Pros
- You can create specific coupon codes for different affiliates. For instance, you might want to partner up with an affiliate and offer a special deal just for their audience.
- Affiliates can generate their own referral links. You don’t have to set up all the link options manually.
- There are lots of free and premium addons available, allowing you to extend the core AffiliateWP functionality.
- The AffiliateWP interface is easy to use. It’s simple while also offering powerful options.
- The refund period is a full 30 days.
- AffiliateWP doesn’t charge you a fee on each sale. You just pay the annual fee for the plugin.
Cons
- As with Easy Affiliate, you can’t get a refund if you simply change your mind. There needs to be an actual issue with the plugin not working for you.
- Some of the features you might want, like tiered affiliate commission rates, are pro addons. You have to pay for these as part of one of the higher-tier packages.
Pricing
There are several different pricing tiers for AffiliateWP. The lowest you can pay is $149.50/year, which covers you for a single site.
If you pay $262/year, you get all the “pro” addons included and all the features the plugin has to offer.
2. Easy Affiliate
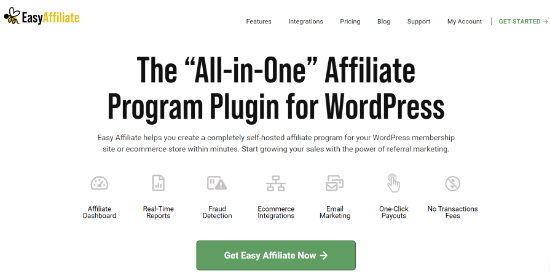
Easy Affiliate or Affiliate Royale as it was previously known, is one of the best affiliate plugins for WordPress.
It is very easy to use and seamlessly integrates with your WooCommerce store. You can create self-hosted affiliate marketing programs for your eCommerce store in just a few clicks.
First, you’ll need to install and activate the Easy Affiliate plugin on your website. For more details, you can refer to our step-by-step guide on how to install a WordPress plugin.
Once the plugin is active, you’ll be redirected to a new Easy Affiliate tab in your WordPress dashboard.
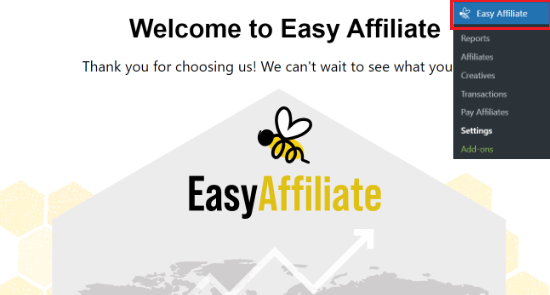
Next, you can scroll down and click the ‘Launch the Wizard’ button.
This will help set up Easy Affiliate on your website and connect your WooCommerce store.

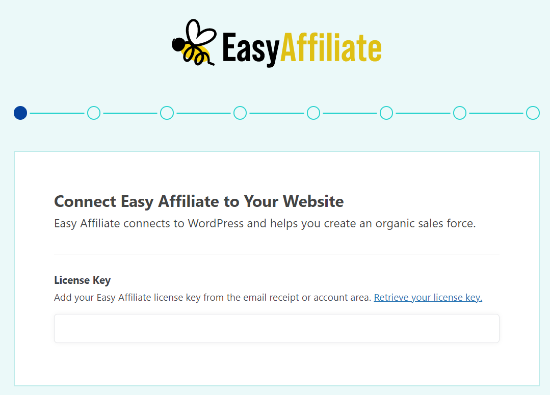
After that, you’ll need to enter your license key in the setup wizard.
You can find the key in your Easy Affiliate account area and the email receipt.
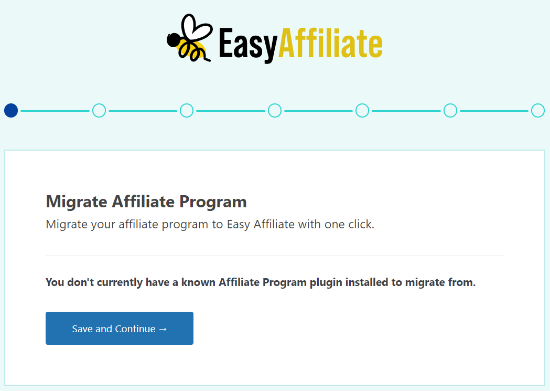
Next, Easy Affiliate will check for an affiliate program plugin and offer you an option to migrate your program.
You can simply go ahead and click the ‘Save and Continue’ button.
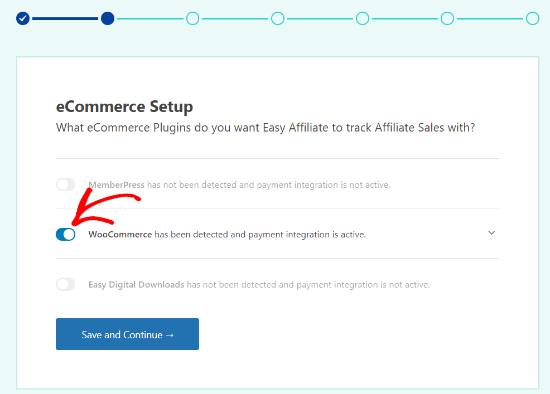
In the next step, the plugin will ask you which eCommerce plugin you’d like to use with Easy Affiliate.
Here you can simply enable the option for WooCommerce and then click the Save and Continue button.
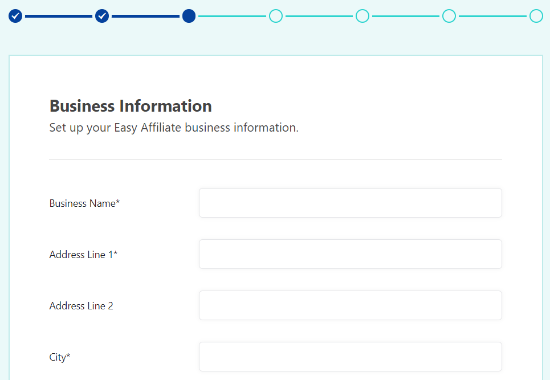
After that, you must enter your business information such as a name, address, city, state, etc.
Once you have added these details, go ahead and click the Save and Continue button.
Next, you can set up your affiliate program registration process. Easy Affiliate offers 3 options to choose from.
The ‘Application’ option allows your affiliates to apply for your affiliate program, and then you can approve users based on their applications.
Aside from that, you can select the ‘Public’ option where anyone can instantly become an affiliate without approval, or you can go for the ‘Private’ option to manually add affiliates.
We recommend using the Application process to get to know your affiliates before approving them to join the program.
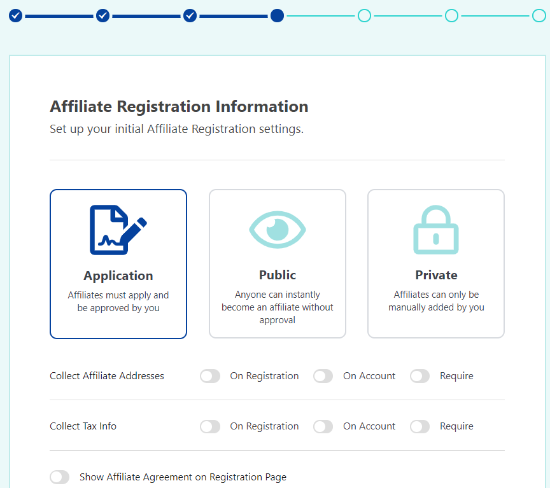
There are more options for customizing your affiliate registration process. For instance, you can collect affiliate addresses and tax information upon registration, or account, or make it a required field.
If you have an affiliate agreement, then you can also show it on your registration page by enabling the ‘Show Affiliate Agreement on Registration Page’ option. Once you’re done, go ahead and click the Save and Continue button.
Next, you’ll want to set up your affiliate commissions. You can select a fixed amount or percentage as your commission type.
After that, simply type in the percentage or amount for the commission, select whether to pay commission on the first sale only or on all sales, and choose a payment method.
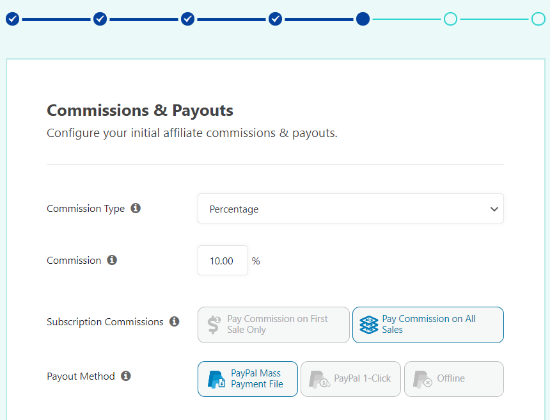
When you’re satisfied with the settings, you can click the Save and Continue button.
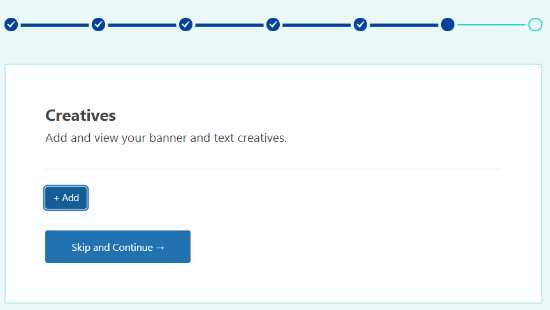
In the next step, Easy Affiliate will ask you to add a banner and text creatives for your program. Providing these resources for your affiliates makes it easier for them to promote you. You can click the ‘Add’ button to upload your creatives.
If you don’t have a banner or text creatives yet, then simply click the ‘Skip and Continue’ button.
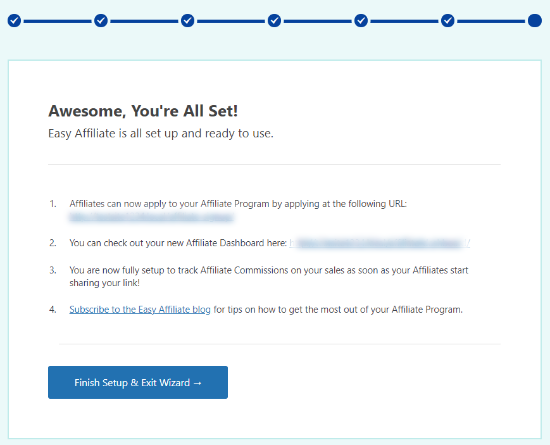
In the final step, you can review your affiliate program for the WooCommerce store and click the ‘Finish Setup & Exit Wizard’ button.
Now that you know how Easy Affiliate works, you might be wondering how it compares to the other affiliate plugins on our list.
Here are a few pros and cons to consider when making your decision:
Pros:
- Easy Affiliate is quick and straightforward to get started with. You can simply install the plugin, and it’s ready to go.
- You can integrate Easy Affiliate with WooCommerce in just a single click.
- As well as creating links for your affiliates, you can create advertising banners and text creatives for them to use.
- The plugin updates automatically once you’ve installed it. You don’t have to log in and download it again.
- Easy Affiliate’s fraud detection feature flags suspicious affiliate behavior before payout, helping to secure your commission payments.
- The affiliate application feature makes it very easy to shortlist affiliates and approve them for your program.
- You can use powerful addons to set up commission levels, and commission rules, and integrate Easy Affiliate with other tools like email marketing services.
- Easy Affiliate doesn’t charge any fees or commissions on your sales. You just pay the annual fee for the plugin itself.
Cons:
- Your affiliates can only link to pages you’ve specifically set up affiliate links for. This can end up being a lot of work for you or frustrating for them.
- The 14-day money-back guarantee is a bit restrictive. You can only get your money back if the plugin genuinely doesn’t work for what you want to do with it.
- There’s no free trial or lite version available.
Pricing:
Easy Affiliate pricing plans start from $99.50 per year, and it covers one website.
If you want to use the plugin on more than one website, then you can go for their Pro plan. It will cost you $199.50, and you get features like automatic fraud detection and set up advanced commission rules.
3. ShareASale

ShareaSale is a bit different from the other two options because it’s an affiliate network, not a WordPress plugin.
When you join ShareASale as a merchant, the automatic “wizard” will walk you through the process of setting up your account.
ShareASale can be used with WooCommerce if you install a plugin like ShareASale WooCommerce Tracker.
After installing and activating the plugin, go to the ‘ShareASale WC Tracker’ tab in your WordPress dashboard. This will show your ‘Tracking Settings’ where you’ll need to enter your ShareASale Merchant ID.
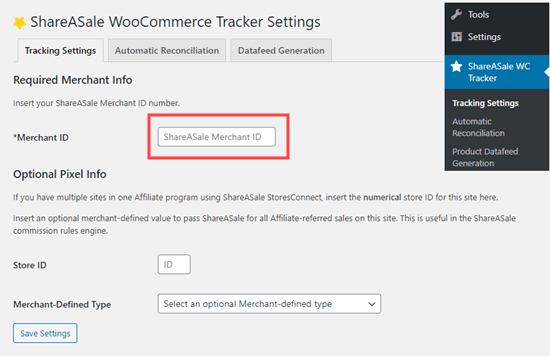
This is all you need to do to link ShareASale’s affiliate program with your WooCommerce store. However, you may also want to make sure that refunds are automatically deducted from affiliates’ earnings.
You can do this under the ‘Automatic Reconciliation’ tab of the plugin. Check the ‘Automate’ box:

You’ll also need to get the ‘API Token’ and ‘API Secret’ by logging into ShareASale and going to Tools » Merchant API. There’s a link in the plugin that will take you straight to the right place.
Make sure you click ‘Save Settings’ after making these changes.
Pros
- ShareASale is a huge affiliate network with loads of affiliates looking for new products to promote.
- All the software is hosted by ShareASale. You don’t need to install anything on your site, except the plugin to connect ShareASale with WooCommerce.
- There’s no monthly or annual fee for the software, just the upfront fee.
- ShareASale will automatically send out all the payments to your affiliates for you.
- Affiliates are screened by ShareASale, meaning that you don’t need to worry about approving them.
Cons
- ShareASale isn’t cheap to get started with. It costs $550 to get lifetime access plus a $100 refundable deposit.
- You need to pay a 20% fee on all affiliate commissions. For every $1 you payout, you’ll be paying an additional $0.20 to ShareASale.
- It takes a little more effort to set up ShareASale with WooCommerce than it does with Easy Affiliate or AffiliateWP.
Pricing
ShareASale has a lifetime cost of $550. They also charge a fee of 20% on all your affiliate payouts. When you join, you need to give them a $100 deposit, too.
If the 20% fee on your payouts doesn’t reach $25 in a given month, you have to pay the difference. There is an initial grace period, though.
We hope this article helped you find out how to easily add an affiliate program in WooCommerce. You may also want to see our list of the best WooCommerce plugins for your WordPress site and our comparison of the best WooCommerce hosting providers.
If you liked this article, then please subscribe to our YouTube Channel for WordPress video tutorials. You can also find us on Twitter and Facebook.


Syed Balkhi says
Hey WPBeginner readers,
Did you know you can win exciting prizes by commenting on WPBeginner?
Every month, our top blog commenters will win HUGE rewards, including premium WordPress plugin licenses and cash prizes.
You can get more details about the contest from here.
Start sharing your thoughts below to stand a chance to win!
Mrteesurez says
Welldone for this post, it is informative. I see it as a smart move adding affiliate program into websites that sell products or course, it’s is a great form of incentivising buyers to grow sales for you and automatically become your marketers.
I have been using AffiliateWP on my site since and it’s working fine making me integrate affiliate marketing program in to my easily. The best part of it, is that I can also track link on external website.
Eesa says
Share a Sale has NEVER been $550….it’s free!
WPBeginner Support says
You are thinking of joining as someone who promotes affiliates. If you want to join as a merchant so others can promote your product there is a fee.
Admin
Goodie says
How does a person who registers for your woocommerce affiliate program gets paid?
WPBeginner Support says
It would depend on the tool you use, there should be different payout options available.
Admin
lahorified says
Thankful to you for sharing this awesome article this is the blog that provides lots of good information thanks for providing such good information.
WPBeginner Support says
You’re welcome, glad you found our content helpful
Admin
Brian Kimble says
I notice that you don’t list the actual affiliate service you use which I believe is called Tasty Affiliate. Did you guys switch or why is that?
WPBeginner Support says
We use Thirsty Affiliates for links to other sites affiliate programs, this article is for creating an affiliate program for your site
Admin