¿Desea mostrar entradas populares en función de sus visitas en WordPress?
Al mostrar las entradas más populares de su blog de WordPress, puede ayudar a los lectores a encontrar su mejor y más valioso contenido. Además, puede animarles a permanecer más tiempo en tu sitio web.
En este artículo, le mostraremos cómo mostrar sus entradas populares por vistas en WordPress.

¿Por qué mostrar entradas populares por vistas en WordPress?
Cuando los usuarios ven las entradas más populares de su blog de WordPress, pueden descubrir qué contenido gusta más a sus compañeros lectores. De este modo, pueden marcar / comprobar esos artículos y unirse a la conversación.
Y lo que es más, mostrar tu contenido más popular en WordPress puede impulsar tu prueba social. Es como decir a los nuevos usuarios: “Oye, a otras personas les han resultado muy útiles estas entradas, ¡y a ti también te lo podrían parecer!”.
Por último, mostrar las entradas de tu blog que marcan tendencia puede hacer que la gente permanezca más tiempo en tu sitio web, aumentando las páginas vistas y reduciendo la tasa de rebote.
Cuanto mayor sea la participación de los usuarios, más considerará Google que su contenido es bueno e importante. A su vez, tu WordPress SEO mejora y tu sitio puede posicionarse mejor.
Desafortunadamente, WordPress no tiene una característica incorporada o un bloque para mostrar sus entradas más populares por páginas vistas. En esta guía, le mostraremos cómo hacer exactamente eso con un plugin y con código.
Sólo tiene que hacer clic en uno de los enlaces rápidos que aparecen a continuación para acceder directamente al método que prefiera:
Tutorial en vídeo
Si prefiere instrucciones escritas, siga leyendo.
Método 1: Mostrar entradas populares de WordPress por visitas con MonsterInsights
La forma más fácil de mostrar entradas populares por visitas en WordPress es con un plugin. En realidad hay muchos plugins de entradas populares de WordPress disponibles, pero en nuestra opinión, la mejor opción es MonsterInsights.

Utilizado por más de 3 millones de sitios web en todo el mundo, MonsterInsights es el mejor plugin de Google Analytics para WordPress. Aunque su funcionalidad principal es el análisis, también tiene una característica fácil de usar para mostrar sus entradas más populares.
Lo primero es lo primero, tendrás que instalar el plugin MonsterInsights y conectarlo a tu cuenta de Google Analytics. Para más detalles, consulte nuestra guía paso a paso sobre cómo instalar Google Analytics en WordPress para principiantes.
Nota: Aunque existe una versión gratuita de MonsterInsights, utilizaremos la versión Pro, ya que incluye la característica de entradas populares.
Elija un tema parael widget de entradas populares
Una vez que hayas activado y configurado el plugin, ve a Insights ” Popular Posts desde el escritorio de WordPress. A continuación, haz clic en el elemento / artículo del menú “Widget de entradas populares”.
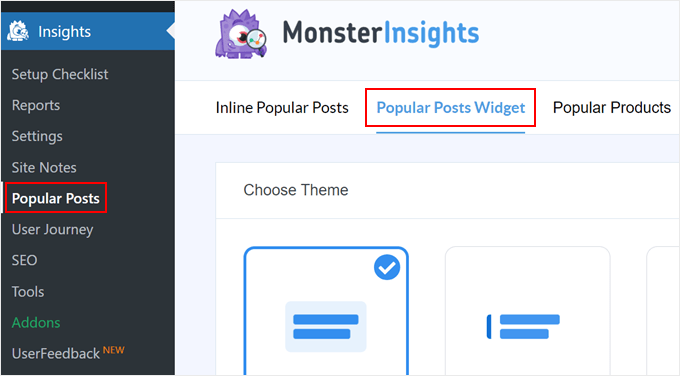
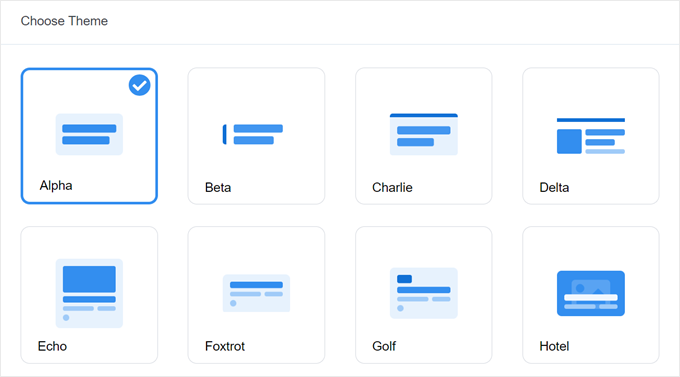
Desplazándose hacia abajo, tendrá que seleccionar un tema para mostrar el widget de entradas populares. Hay varias opciones.
Algunas incluyen una imagen destacada para la entrada, mientras que otras tienen un aspecto más minimalista.
Si quiere ver cómo es el tema antes de elegir, baje por la página hasta la sección Vista previa del tema.
También puedes obtener una vista previa del tema en formato Ancho o Estrecho. Con el formato Ancho, verás tus entradas listadas bajo el contenido de la página o entrada, mientras que el formato Estrecho muestra las entradas a la derecha de la misma, como una barra lateral.

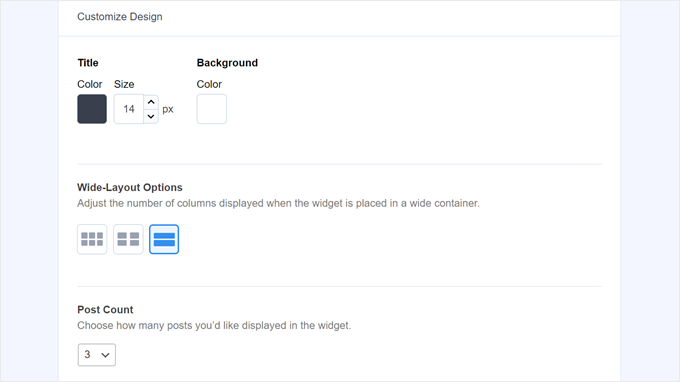
A continuación, desplázate hasta la sección “Personalizar diseño”. Aquí puedes modificar los colores del tema, el tamaño de la fuente, la disposición y el número de entradas que se mostrarán.
Las opciones de personalización pueden variar en función del tema que utilices. Por lo tanto, asegúrese de explorar los diferentes temas para ver cuál le conviene más.
Configurar el comportamiento del widget de entradas populares
Una vez que hayas configurado el diseño del tema, debes ir a la sección Comportamiento. Aquí es donde controlarás cómo aparecerá el widget de entradas populares en tu sitio web WordPress.
En los ajustes de estilo del widget, puede optar por utilizar el diseño que ha realizado anteriormente u optar por no aplicar ningún estilo al widget. Con la segunda opción, el widget seguirá el CSS del tema de tu sitio de WordPress.
A continuación, puedes elegir cómo debe elegir el widget tus entradas más populares. Para este tutorial, selecciona “Seleccionado”, pero también puedes mostrar las entradas más populares en función del número de comentarios.
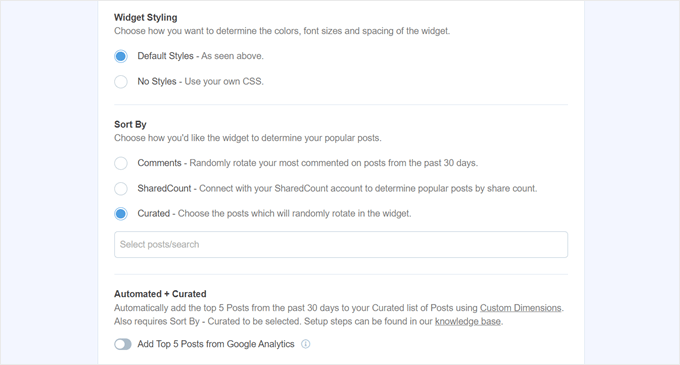
Lo que tienes que hacer a continuación es activar la opción ‘Añadir Top 5 Entradas de Google Analytics’. Pero antes de hacer eso, necesitarás el MonsterInsights Dimensions Add-On y añadir el tipo de contenido como una nueva dimensión personalizada.
Esto permitirá a MonsterInsights elegir las entradas más populares basándose en los datos de Google Analytics.
Para ello, debe descargar la extensión MonsterInsights Dimensions e instalarla como plugin en WordPress. Para obtener instrucciones paso a paso, marca / comprobar nuestra guía sobre cómo instalar un plugin de WordPress.
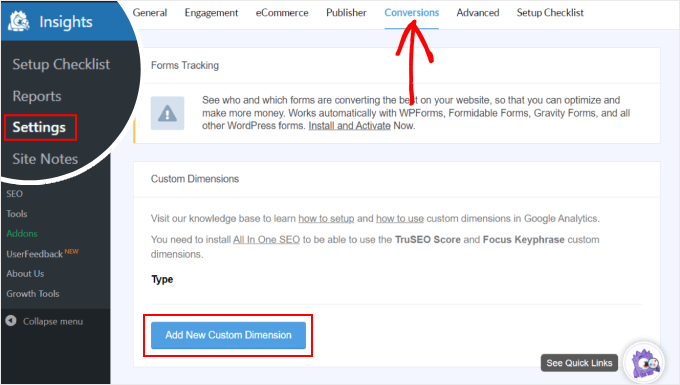
A continuación, vaya a Insights “ Ajustes y cambie a la pestaña ‘Conversiones’. A continuación, haz clic en “Añadir nueva dimensión personalizada”.
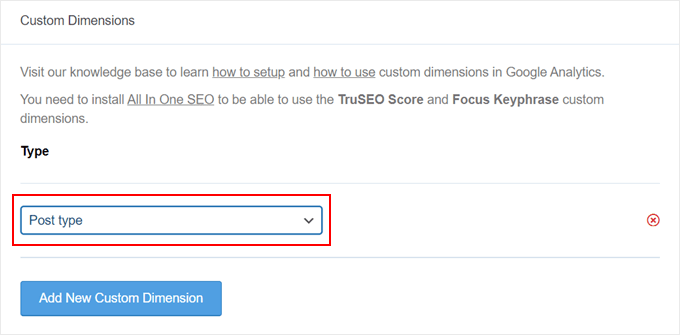
Una vez hecho esto, seleccione “Tipo de contenido” en el menú desplegable.
Esto activará MonsterInsights para realizar un seguimiento del rendimiento de las entradas de su blog y otros tipos de contenido personalizado.
Ahora, sólo regresa a Insights ” Entradas populares y ve a ‘Popular Posts Widget’.
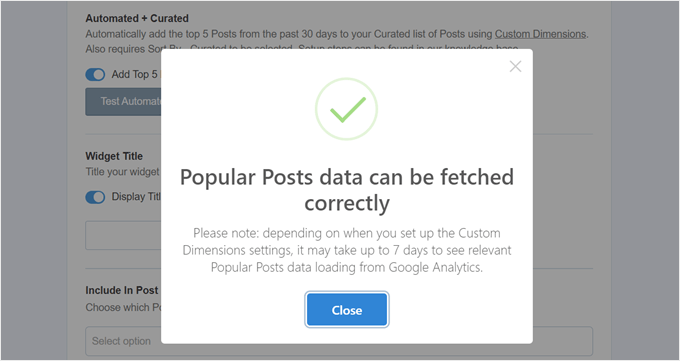
Simplemente activa el botón conmutador “Añadir las 5 entradas principales de Google Analytics”. A continuación, haz clic en “Probar entradas automatizadas” para ver si la configuración ha sido correcta.

En caso afirmativo, aparecerá un mensaje / ventana emergente correcto.
Debería decir: “Los datos de las entradas más populares pueden obtenerse correctamente. Ten en cuenta que, dependiendo de cuándo hayas establecido los ajustes de Dimensiones personalizadas, pueden transcurrir hasta 7 días antes de que se carguen los datos de Entradas populares relevantes desde Google Analytics”.
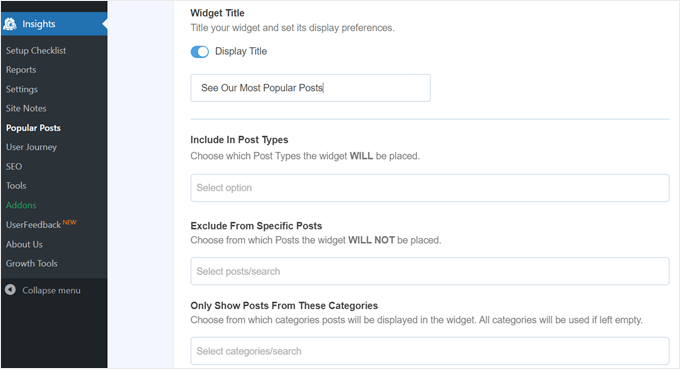
Pasando a los siguientes pasos, ahora puedes añadir un título que aparecerá encima del widget. Puede ser algo como “Comprueba nuestras entradas más populares” o algo similar.
A continuación, puede elegir si el widget debe mostrarse en todos los tipos de entradas, excluirse de entradas específicas y/o aparecer solo en determinadas categorías de entradas.
Estos ajustes son útiles si has creado tipos de contenido personalizados distintos de las entradas de blog y crees que el widget de entradas populares no será relevante en ellos.
Uno de los últimos pasos es incrustar el widget de entradas populares. Hay varias opciones: colocarlo automáticamente, usar un bloque de Gutenberg, añadirlo como widget de la barra lateral o usar un shortcode.
Veamos las opciones una por una.
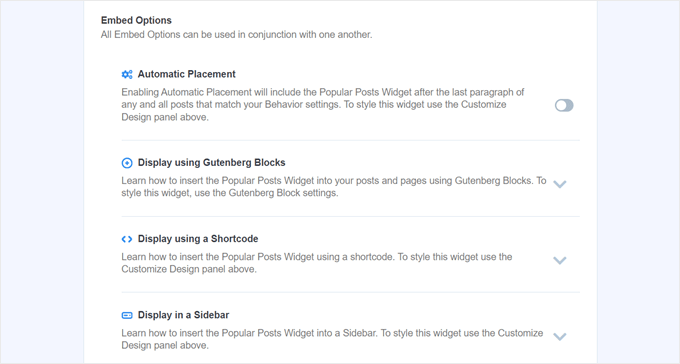
Incrustar automáticamente el widget de entradas populares
Se recomienda la Colocación automática si desea que el widget aparezca en todas las entradas que coincidan con los ajustes de Comportamiento que haya establecido anteriormente.
Para ello, basta con activar el botón Colocación automática.

El inconveniente de esta opción es que no puedes ajustar el diseño del widget en función de lo que mejor quede en la entrada o página. Si necesitas este tipo de funcionalidad, puedes probar el siguiente método.
Incrustar el bloque de entradas populares en una página o entrada
Si quieres tener más control sobre el aspecto del widget en una página o entrada, entonces este método es para ti.
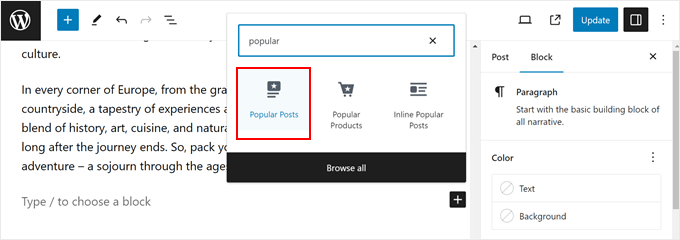
Primero, ve al editor de bloques de la entrada o página en la que quieres que esté el widget. Después, haz clic en el botón “+” para añadir bloques en cualquier parte del editor y busca el bloque Entradas populares.
En el panel de ajustes del bloque, verás que hay opciones para cambiar el tema del widget, el tamaño de la fuente, los colores, el título, la disposición y el recuento de entradas.
Estos ajustes son similares a los que hemos visto en el plugin MonsterInsights.
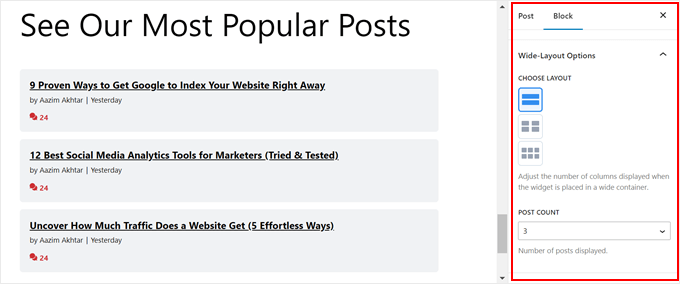
La unica diferencia es que no puedes cambiar las entradas que se eligen en el widget.
Dicho esto, en los Ajustes de comportamiento, es posible mostrar solo entradas de determinadas categorías. De esta forma, puedes hacer que las entradas más populares se adapten mejor a tus necesidades.
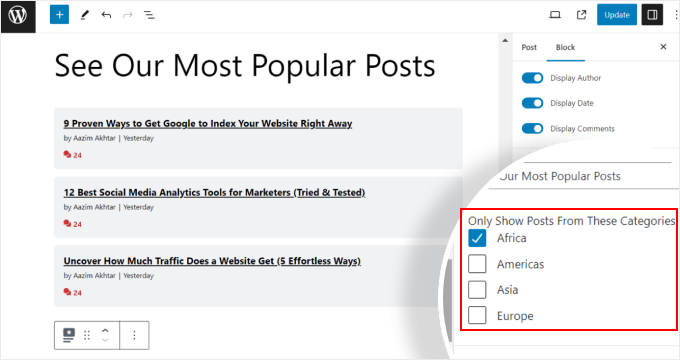
Una vez que esté satisfecho con los ajustes del bloque, sólo tiene que hacer clic en el botón “Actualizar” del editor de entradas y páginas.
Este es el aspecto del bloque Entradas populares en nuestro sitio web de prueba:

Incrustar el widget de entradas populares en una barra lateral
Si estás usando un tema de WordPress que no sea de bloque y que tenga un área de barra lateral preparada para widgets, entonces puedes añadirle el widget de entradas populares. Esto es lo que hicimos en nuestro artículo sobre cómo añadir entradas destacadas en la barra lateral de WordPress.
Todo lo que tienes que hacer es ir a Apariencia ” Widgets. Luego, haz clic en el botón ‘+’ para añadir widgets en el área de la barra lateral y busca el widget Entradas populares – MonsterInsights.
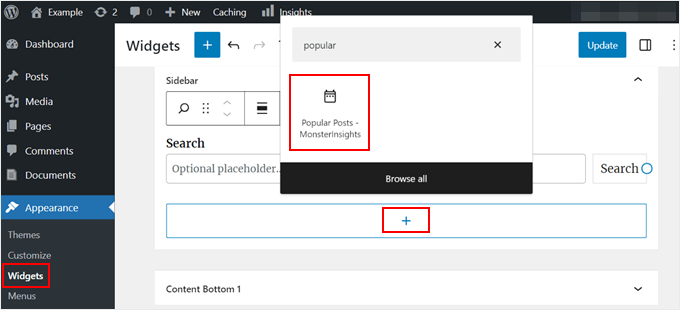
Al igual que en el método anterior, el widget incluye ajustes similares para personalizar la apariencia del tema.
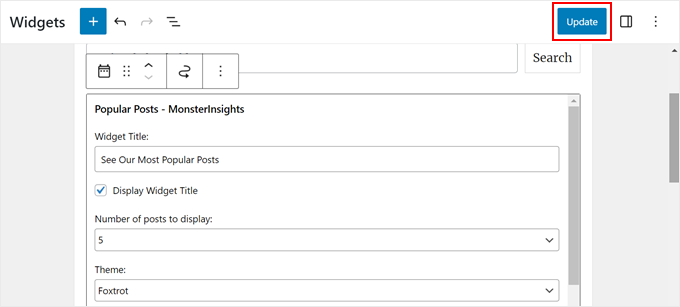
La diferencia es que la interfaz es un poco más difícil de usar. Al cambiar los ajustes, no puedes ver el aspecto real del widget. Tendrás que hacer clic en otro widget o en otra zona para obtener una vista previa.
Si estás satisfecho con el aspecto del widget, sólo tienes que hacer clic en “Actualizar” en la esquina superior derecha.
Asegúrese de ir a su sitio web para comprobar si la barra lateral se ve bien.
Este es el aspecto del nuestro:

Si quieres hacer que el widget de Entradas Populares aparezca solo en páginas específicas, entonces puedes leer nuestra guía sobre cómo mostrar u ocultar widgets en ciertas páginas de WordPress.
Incrustar el widget de entradas populares con un shortcode
La última opción es utilizar un shortcode. Este método se recomienda si las opciones anteriores no funcionan para su caso de uso específico.
En la pestaña del widget de entradas populares, desplázate hasta la sección “Opciones de incrustación”. A continuación, selecciona “Mostrar usando un shortcode” y haz clic en el botón “Copiar shortcode”.
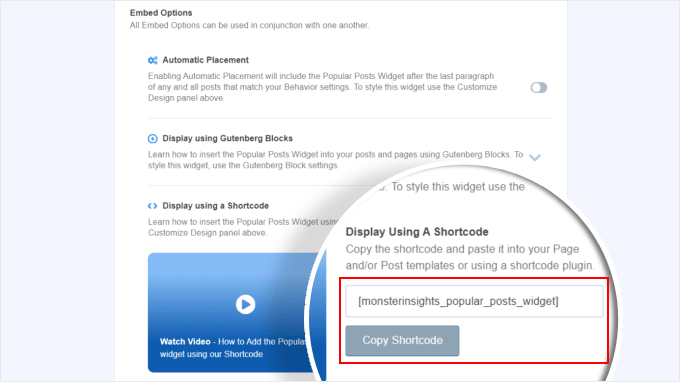
Después, simplemente coloca el shortcode donde quieras. Para más información, comprueba nuestra guía sobre cómo añadir shortcodes en WordPress.
Método 2: Mostrar entradas populares de WordPress por vistas con código
El método MonsterInsights es la forma más sencilla de mostrar su contenido más popular y mejor por vistas en WordPress. Pero si te sientes cómodo con la codificación, entonces también puedes usar código para mostrar tus entradas más populares en WordPress.
Para este método, recomendamos utilizar un plugin de fragmentos de código como WPCode, que es el que utilizaremos en esta guía.

WPCode permite insertar código personalizado sin interactuar directamente con los archivos de WordPress. Además, dado que este método requiere el uso de múltiples fragmentos de código, el plugin hará que la gestión y el seguimiento de todos ellos sea mucho más fácil.
Primero, necesitas instalar WPCode en WordPress. Existe una versión gratuita de W PCode, pero vamos a utilizar la versión Pro, ya que viene con las características que necesitamos para insertar el código en los lugares correctos.
Para obtener una guía de instalación paso a paso, lea nuestro artículo sobre cómo instalar un plugin de WordPress.
Añadir función de contador de entradas de WordPress
Una vez activado el plugin, debe ir a Fragmentos de código ” + Añadir frag mento desde el panel de control. A continuación, pase el cursor sobre “Añadir su código personalizado (nuevo fragmento)” y haga clic en “Usar fragmento”.
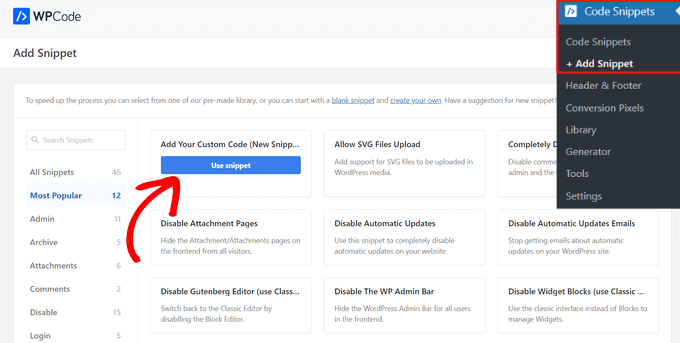
Ahora estás dentro del editor de fragmentos de código de WPCode. Antes de insertar cualquier código, añada un título al fragmento de código.
Para este primer código, puedes llamarlo algo así como ‘Función Contador de Entradas de WordPress’. Esto es porque el propósito de este primer código es crear una función para contar entradas vistas en WordPress.
A continuación, cambie el Tipo de código a ‘Fragmento de código PHP’. Tenga en cuenta que todos los fragmentos de código que tendrá que añadir de este artículo están en PHP.
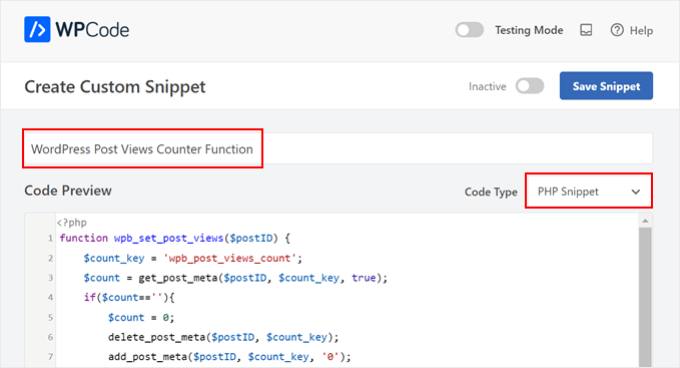
A continuación, copia y pega el siguiente código:
function wpb_set_post_views($postID) {
    $count_key = 'wpb_post_views_count';
    $count = get_post_meta($postID, $count_key, true);
    if($count==''){
        $count = 0;
        delete_post_meta($postID, $count_key);
        add_post_meta($postID, $count_key, '0');
    }else{
        $count++;
        update_post_meta($postID, $count_key, $count);
    }
}
//Get rid of prefetching to keep the count accurate
remove_action( 'wp_head', 'adjacent_posts_rel_link_wp_head', 10, 0);
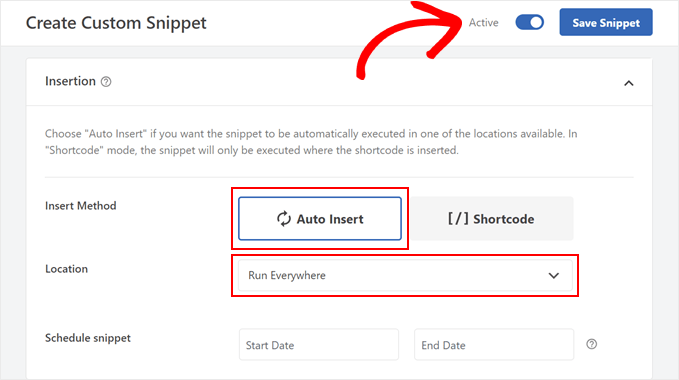
Ahora, desplácese hasta la sección “Inserción” y seleccione “Inserción automática” para el método de inserción y “Ejecutar en todas partes” para la ubicación. Esto funciona igual que insertar el código en el archivo functions.php de tu tema.
A continuación, vaya a la parte superior derecha de la página y active el código.
A continuación, haga clic en “Guardar fragmento de código”.
En esta etapa, necesita añadir otro nuevo fragmento de código personalizado. Puede llamarlo “Llamada a la función de seguimiento de entradas”.
Este código llamará a la función anterior y la activará en sus páginas de entradas individuales.
Una vez hecho esto, copia y pega el siguiente fragmento de código:
wpb_set_post_views(get_the_ID());
Lo que es diferente acerca de este fragmento de código es que usted elegirá la ubicación ‘Insertar después de la entrada’ porque se supone que se ejecuta en sus páginas de entradas individuales.
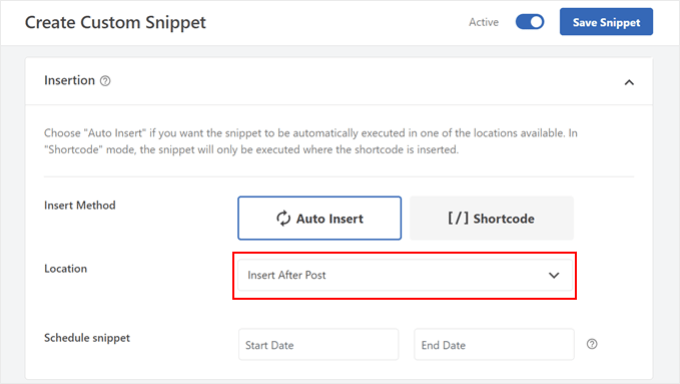
Cuando hayas terminado, activa el código y guárdalo.
Insertar WordPress Entradas Vistas Gancho de seguimiento
Ahora, necesita añadir un nuevo fragmento de código que compruebe si la página actual es una única entrada. Si es así, llamará a la función de contador de visitas de entradas de WordPress para realizar un seguimiento y actualizar el recuento de visitas de la entrada.
De este modo, cada vez que un usuario visite la entrada, se actualizará su recuento de visitas.
Llamemos a este fragmento de código ‘Gancho de seguimiento de entradas de WordPress’. A continuación, inserte las siguientes líneas de código:
function wpb_track_post_views ($post_id) {
    if ( !is_single() ) return;
    if ( empty ( $post_id) ) {
        global $post;
        $post_id = $post->ID;
    }
    wpb_set_post_views($post_id);
}
add_action( 'wp_head', 'wpb_track_post_views');
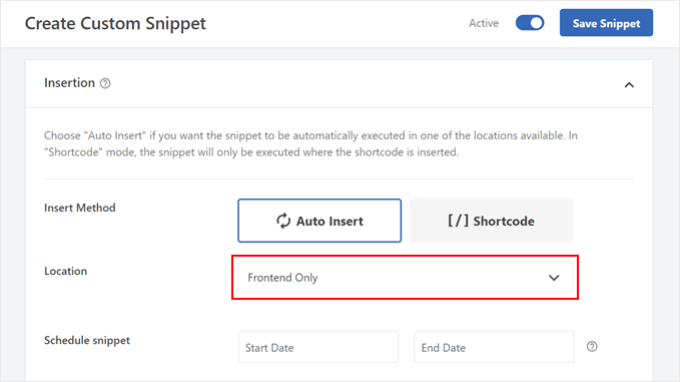
Puede elegir el método de inserción como ‘Auto Insertar’ y la ubicación como ‘Solo portada.’
Igual que en los pasos anteriores, sólo tienes que activar el código y guardar el fragmento.
Nota: Si utiliza un plugin de caché, es posible que esta técnica no funcione por defecto. Puede utilizar la característica de caché de fragmentos que ofrecen algunos plugins de caché como W3 Total Cache para que funcione.
Añadir funciones para recuperar el recuento de entradas vistas y mostrar las entradas más populares con el recuento de vistas.
Ahora estamos en los pasos finales de esta guía. Necesita añadir un fragmento de código que recupere y formatee el número de vistas de una entrada dada de WordPress. Esto será útil más adelante cuando se muestra la lista de entradas más vistas.
Puede nombrar este código como ‘Recuperar función de recuento de entradas’ y establecer la ubicación como ‘Ejecutar en todas partes’.
Este es el fragmento de código:
function wpb_get_post_views($postID){
    $count_key = 'wpb_post_views_count';
    $count = get_post_meta($postID, $count_key, true);
    if($count==''){
        delete_post_meta($postID, $count_key);
        add_post_meta($postID, $count_key, '0');
        return "0 View";
    }
    return $count.' Views';
}
De nuevo, asegúrate de activar el código en WPCode y guardarlo después.
Una vez hecho esto, vuelve a crear un nuevo fragmento de código y llámalo “Mostrar entradas más populares con recuentos de visitas”. Este es el código que mostrará tus entradas más populares en la parte inferior de las entradas de tu blog.
En el cuadro Vista previa del código, inserte el siguiente fragmento de código:
// Customize the query parameters as needed
$popularpost = new WP_Query( array(
    'posts_per_page' => 3,         // Feel free to adjust the number of posts to display
    'meta_key' => 'wpb_post_views_count',
    'orderby' => 'meta_value_num',
    'order' => 'DESC'
));
?>

<div class="popular-posts">
    <h2>See Our Most Popular Posts</h2> <!-- Feel free to customize the title -->
    <ul>

    <?php while ( $popularpost->have_posts() ) : $popularpost->the_post(); ?>
        <li>
            <a href="<?php the_permalink(); ?>"><?php the_title(); ?></a>
            - <?php echo wpb_get_post_views(get_the_ID()); ?>
        </li>
    <?php endwhile; ?>

    </ul>
</div>

<?php wp_reset_postdata();
Como se indica en el código, no dudes en ajustar el número de entradas a mostrar y personalizar el título de esta sección.
En la sección de Inserción de WPCode, asegúrate de seleccionar ‘Insertar después de la entrada’ para la Ubicación. A continuación, active el código y guarde el fragmento de código.
Todo lo que queda por hacer ahora es visitar una de las entradas de tu blog y ver si el código funciona. Este es el aspecto de las entradas más populares por sección de visitas en nuestro blog WordPress de prueba:

Consejo de experto: Para ver si tu código funciona sin cambiar permanentemente tu sitio, puedes probar el Modo de Pruebas de WPCode.
Esta característica le permite añadir sus códigos de forma normal y solo usted puede ver cómo se ven en el front-end. Por otro lado, tus usuarios interactuarán con tu sitio web de forma normal.
Esperamos que esta guía práctica de WordPress te haya ayudado a aprender cómo mostrar entradas populares por visitas. También puedes comprobar nuestra selección de los mejores plugins de entradas relacionadas para WordPress y nuestro artículo sobre cómo crear una página de destino de alta conversión.
If you liked this article, then please subscribe to our YouTube Channel for WordPress video tutorials. You can also find us on Twitter and Facebook.


Syed Balkhi says
Hey WPBeginner readers,
Did you know you can win exciting prizes by commenting on WPBeginner?
Every month, our top blog commenters will win HUGE rewards, including premium WordPress plugin licenses and cash prizes.
You can get more details about the contest from here.
Start sharing your thoughts below to stand a chance to win!
Bigdragon13th says
Hello,
I’ve using this code for months and it’s work greats! That’s until I start using W3 Total Cache and this code stop count views for me.
I’m struck at where do I need to put the mfunc to let the code work with cache. Can you point that out?
FYI, I put all the code in a site-specific plugin.
AJ says
Hell this is great! How would I display the view count outside of the post loop like in the sidebar?
leslie says
hello, I have some problem on how setting up like when the login user won’t include on the count while viewing any pages?? how to do that.. please need some help on these. thanks
Sarah says
Hey there, thanks for this. REALLY helpful!! Would you know how to apply a time range to this code? For example to show the most popular posts in the last day, week or month etc? I know there are plugins for this but I would like to do it without one
Dale Knight says
Great!
Denis says
Hello,
thanks for this nice tutorial. It works on my page!
– how can I exclude robots and spiders that hit my posts?
– May be I can set a timer of 10 seconds. after that the count should rise. So the people who only click thourgh the posts are not counted.
Cheers,
Denis
Sarah says
You have no idea how much time you saved me. Thank you, works perfectly!
Clay Hickman says
Thanks for the tip. Will use.
Jenni B says
Hello – thanks so much for this! I noticed the question regarding the W3TC workaround, but have a slightly different question: does that still apply if I’m hooking into wp_head from functions.php, and if so, how exactly do I implement it there? Thank you!
rafi says
this is really easy and very helpful! thanks man!
Kosmos says
Hello, thanks for this snippet.
I have a problem, the orderby don’t work. I have five posts :
– Post 1 : 85 views
– Post 2 : 35 views
– Post 3 : 165 views
– Post 4 : 1 view
– Post 5 : 1 view
When i displayed it the order was : 1, 2, 4, 5 and 3
Do you have an idea please ?
Raj says
It might be integer type issue ..
Iftekhar says
following your article I am using post view count in my site since 6 months. It was working fine, but recently I am having problem with this. If a visitor view a post the count is increasing by 1 but the problem is the count is increasing in all other posts. I have w3 total installed and I m using mfunc according to your article. Please help me if you have any idea about this issue… Thanks.
WPBeginner Support says
Iftekhar can you check what happens when you turn off w3 total cache?
Administrador
Iftekhar says
The problem seems to w3. Post view count is OK since deactivated. But I want to use both of them
ivan says
Hello,
I am wanting to switch from using the plugin because it doesn’t support the polylang language (the author’s not getting back to me and I don’t really know if it’s possible to filter functions for the plugin..)
Two questions:
– I examined the code a bit and I’m not sure if this code starts counting posts from when it’s implemented? Or does it somehow retrieve where the post counts are currently?
– The current code on this website uses the get_posts() function so it creates an args array instead of using WP_Query(). Is this the same thing? I’m guessing not. And if it isn’t is the code below correct to get the array? I tried implementing this but it didn’t seem to work.
$args = array( ‘meta_key’ => ‘wpb_post_views_count’, ‘orderby’ => ‘meta_value_num’, ‘order’ => ‘DESC’,’numberposts’ => 6, ‘post_status’=>”publish”,’post_type’=>”post”,’lang’ => ‘en’);
thanks!
Tomas says
This approach is very basic. If you want to count clicks from the same user (same IP) only every 5 minutes or 10 minutes etc. you need to have a separate table for that and before adding a new row in db you need to check the ip and time. If there is a record saved 3 minutes ago, the click is not added. Otherwise, it is added. Also this aproach allows you to create custom list of most viewed articles in 7 dyas, month, all time etc. Or even by category, user etc. (if you store appropriate values in appropriate table columns.
boson says
i am trying .. when you say put code wpb_set_post_views(get_the_ID()); inside of single post loop, does that mean use this code inside of the theme single.php anywhere?
thank you for your help
WPBeginner Support says
No it means paste the code inside the loop between
1-click Use in WordPress
and
<?php endwhile; else: ?> <p><?php _e('Sorry, no posts matched your criteria.'); ?></p> <?php endif; ?>1-click Use in WordPress
Administrador
Cory Dobson says
Is there a way of restricting when the post views are collected from? For example, I am looking to display the posts with the most views in the last 24 hours, how would you do something like that using this code?
Great post by the way, really helpful!
igor says
how can I paginate the results.
10 results by page lets say
Mark says
What if your single-xxxx.php doesn’t use the loop but custom fields. How can I use this code if I don’t use the loop?
WPBeginner Support says
single-xyz.php means that file is used for a single post with xyz slug. You can still add the last code snippet in your template just where you think that the template ends displaying content.
Administrador
quocminh86 says
comment policy,
Dusan says
I’m confused as to where to put the mfunc code?
WPBeginner Support says
If you are using W3 Total Cache then you can add this code just before wpb_get_post_views(get_the_ID()); in your templates where you want to display the popular posts. The purpose of this code is to allow W3 Total Cache to dynamically display popular posts and not cache it.
Administrador
Waqas Munir says
Dear, i am really confused about that… I am trying to add this to my blog, but I have no experience in all this.
WPBeginner Support says
Then perhaps you should try using WordPress Popular Posts plugin instead.
Administrador
Aleksander says
What about using update_post_meta function instead of delete_post_meta and add_post_meta ?
George says
Thanks for this post! Really really good.
I’ve two question:
1. Is there any possibility to count just one visit for each IP adress? How?.
2. Can i show the most popular posts by a specific period of time? For example, most visited posts this month, or the most popular posts from 1 of may to 1 of june…
Thank you!
Igor Gumush says
thanks , working great
shishir umrao says
Hi,
This code is working but whenever i reload the page , it is adding “2” to the total page count. For example if page count is 14 and after reloading total page count is 16 … can anyone guess where’s the problem ?
Shishir Umrao
Editorial Staff says
Its happening because the function is loading twice somehow.
Administrador
shishir umrao says
Yeah. I figured out this piece of code was responsible for this.
Nick says
Very useful post, I managed to make my Tag pages to order posts by a custom field value similar to post view count, however, I ave pagination on my tag pages and it keeps showing the same top ranking posts on all pages, even after I have removed this code:
‘posts_per_page’ => 4,
How do I fix the pagination so it show other posts on subsequent Tag pages?
Chris says
How did you manage to make your Tag pages order posts by a custom field value similar to post view count?
It looks like the popular posts plugin only takes categories as a parameter.
Mike says
Thanks for the very detailed instructions. Will using this to display the most popular posts cause a lot of additional server load if a site has significant traffic? Some of the WP plugins for this sort of thing tend to have this problem.
Editorial Staff says
How much is significant traffic? We’re using it on WPBeginner.
Administrador
Ryan Karpeles says
Uh, awesome! Just awesome. THANK YOU for this!!! Works perfectly!
Lowell says
I’m still learning this stuff so pardon my ignorance.
How do you allow the user to choose between queries like they do on codecanyon when they allow you to sort by price, sales, date etc.?
Thanks so much.
saeed says
How can I change number of popular posts that display?
Editorial Staff says
Change the posts_per_page to whatever number you like.
Administrador
Adam Davies says
Thank you so much for this. Life saver and a great tip that I definitely will be using more often.
Md. Ariful Islam says
Hey, Really , Many Many thanks for this useful tips. I am highly glad to you.
Ar Ya says
Hi , that’s great !
But ‘orderby’ => ‘wpb_post_views_count meta_value_num’ not working.
please use : ‘orderby’ => ‘meta_value_num’
thnx
nick says
Thanks, it works for me, just with one important exception – popular posts are not as links, just their titles. How can I fix this, please?
Preston says
I added this code in the manner described in the article and upon activation, I saw this….
The plugin generated 2 characters of unexpected output during activation. If you notice “headers already sent” messages, problems with syndication feeds or other issues, try deactivating or removing this plugin.
Preston says
Fixed. I did two things:
1. Switched my permalink structure to a custom structure /%category%/%postname%/
2. Check through all of my pages for extra spaces.
One of them worked.
…go figure
Preston
Jose Vega says
Hi, I think it´s necesary add – wp_reset_query(); – at the end of the query to destroys the previous query used on a custom Loop.
I hope It helps somebody.
Jon Edwards says
I have this working to 95% using a custom WP Query to display popular posts from each category.
The only bit not working for me is the order – mine won’t display in descending order of views.
Cameron says
Thanks for the post! This really helped.
I’m not sure if anyone else ran into this issue, but when you set up the arguments for WP_Query, you have orderby => ‘wpb_post_views_count’. This was a problem for me because I wasn’t sure how it was ordering my posts. In the codex it says that if your using numbers they will only sort by the first digit. To fix this, you can simply replace the ‘wpb_post_views_count’ with ‘meta_value_num’. This basically will tell the query to reach inside the post’s meta value and probably cast it to an integer before it sorts. Hope this helps anyone running into the same issues.
Overall, it works great! I have the 4 most popular posts in a slider on the home page. Thanks again!
Editorial Staff says
Good suggestion. Updated the article with this.
Administrador
efishinsea says
Hi. Your code sample up top is *not * updated.
Instead of this:
‘orderby’ => ‘wpb_post_views_count meta_value_num’
you should have this as suggested :
‘orderby’ => ‘meta_value_num’
if you want to sort by “Most to Least”
Minh says
Why it only shows posts which have count view < 100?
Editorial Staff says
If you are using a caching plugin, then it doesn’t always update.
Administrador
George says
Thanks for the tutorial. How do you exclude current posts from displaying?
Kris says
This looks great on my home page but it seem to want to display on my single.php or anywhere else on my site. I tried creating a sidebar-single.php and inserting the code but still no luck. Any idea why it wouldn’t work on other areas my theme?
Kris says
i got it working. Thanks for this.
Anderson says
Dont work, its show randomic posts :S and i use post_type = > ‘post-type-name’
Mody says
This usually happens when meta key wpb_post_views_count is not available for posts, make sure you add the function that tracks views within wp while loop, otherwise it will keep showing random posts.
– Mody
Bent says
Hello,
I’m using your code for track post view in the wordpress theme.
function wpb_get_post_views($postID){
$count_key = ‘wpb_post_views_count’;
$count = get_post_meta($postID, $count_key, true);
if($count==”){
delete_post_meta($postID, $count_key);
add_post_meta($postID, $count_key, ‘0’);
return “0 View”;
}
return $count.’ Views’;
}
The problem is that when I use W3 Total Cache the track view is not working right.
Is there a way in the W3 Total Cache’s Options to put ignore only on this function, but in the same time I want the code to work with W3 Total Cache?
Thank you!
Editorial Staff says
Read the article again. We have already covered this “Fragmented Caching”.
Vaibhav says
Hello
i followed your tutorials and have done exactly what u said.
i also added ur snippet
php query_posts(‘meta_key=post_views_count&orderby=meta_value_num&order=DESC’);
in index.php
i am facing a little error,
i am using infinite scrolling
when i put this snippet in index.php
the infinite scroll instead of loading next set of post
loads the same sets of post
For better Understanding u can check it live here
blog.newgags,com
Henry says
For some reason my post views are incrementing by 2 on each page refresh. What could be happening there?
Henry says
I do apologise. I had added the tracker to both the WP header and also to the single post body. Very stupid on my part :}
Nice tutorial, very easy to follow.
Brandon says
First of all thanks for this post. Second I have been using this script for a few days now and for some reason it started out fine and now it is not displaying the most viewed posts, I don’t see any rhyme or reason to what posts are now being displayed. The last I checked the post that it is displaying at the top has 8 page views. I know there are posts with 25+ recorded page views. I would like to figure this out. Can you possibly point me in the right direction. I followed this post word for word. The post views are being recorded properly.
Editorial Staff says
Not sure what could be going wrong. The WP_Query is suppose to list the posts with the highest counts first.
Administrador
Einar Ólafsson says
Hi. This works grade up until the view count gets over 999. All post with more view counts than 999 are not displayed, the query never post them. The latest post is the one with exactly 999 and the rest are under that. I have over 100 post that have more than thousand and are not being included.
Editorial Staff says
Interesting. We have posts with over 10k views and it seems to be working just fine.
Administrador
Martinbeasnunez says
Guys you rockkk
Quick question:
If i have add a custom post type in your code ?
(popular post from especific custom post type)
Regards (:
Editorial Staff says
This should work with CPTs as well.
Administrador
Artem Russakovskii says
This is a good basic tutorial, but be warned: it’s not going to work if you use caching strategies that bypass PHP (like wp-supercache, W3TC, nginx/varnish, etc). The only way to count those would be via Javascript or log parsing.
Editorial Staff says
Hey Artem, Thanks for dropping by. Actually using W3 Total Cache, you can use fragment caching and it works just fine. Going to update the article for those who are using the caching plugin.
Administrador
Artem Russakovskii says
Interesting. However, I run nginx in front of W3TC, and it does a whole lot of its own caching, so it’s always safer/more reliable to use an AJAX approach. Nice info on the fragment caching though, I had no idea W3TC had it.
Ramon Fincken says
Why use
//To keep the count accurate, lets get rid of prefetching
remove_action( ‘wp_head’, ‘adjacent_posts_rel_link_wp_head’, 10, 0); ?
if you can use the main loop or the footer ?
Editorial Staff says
Some browsers prefetch the rel links with the next value. So technically when a user views one post, it can act as if they had viewed both posts. This will cause inaccurate count. If you like inflated views, then don’t take it off.
Administrador
Nino Blasco says
Great article! Explanation useful and easy to understand.
Thank you.
Connor Crosby says
Yay! A tutorial that doesn’t require a plugin!
Editorial Staff says
Yeah we try to balance things out for our audience. This was requested by the users, and we were using it on our own site.
Administrador
Zach says
Please stop saying stuff like this. Plugins aren’t bad, it’s articles like this that make them look bad. Enough articles have come out over the past few weeks to fully explain this – it’s getting a little embarrassing.
Editorial Staff says
How would you suggest titling future posts instead? DIY prefix? These are different then just using a pre-made plugin. Also, if you read the article, there is no where in our article that we say “plugins are bad”. We clearly state that the only reason why coded this was to get more customization. It is up to a user to take either stance. Some can think that plugins are bad… whereas others like yourself can think that we are saying that plugins are bad…
Zach says
I don’t think any type of prefix is needed. It’s one of the great/scary things about WordPress. You COULD put this code in your theme, but then begs the argument about needing to either, 1) Loose those customizations when you change your theme, or 2) have the knowledge to properly pull those over to another theme.
A lot of the users here are beginners (hence the point of this site), so many will just copy/paste what you give them. WP Beginner is obviously a fantastic resource (reason why I follow you on Twitter), but you have a responsibility to not put a false notion about how plugins/themes work.
Correct, you don’t flat out say, “Plugins are bad, put this in your theme instead!”, but the original commenter to the thread I replied to, said, “Yay! A tutorial that doesn’t require a plugin!” – so even though you didn’t say it, that’s how it was taken.
I’d suggest doing was Pippin does for his plugins – he has a simple starter plugin he uses for all of his tutorials. Why not create a blank “Starter Plugin” download, with just the basics, so others can download and put their customizations in there instead? Reference it in each article you do and it takes out some of the confusion. Thanks.
Editorial Staff says
We have been following Otto’s advice on site-specific plugin for quite some time. It is probably similar to what Pippin does. If you read this article, site-specific plugin is hyperlinked. It is in most other articles as well. That article shows users the importance of site-specific plugin and advise users to not put everything in functions.php file. At the bottom of that article, the sample “starter plugin” is there for anyone to start with.
codekipple says
In fairness this tutorial helped me out. I wanted a simple solution for popular posts after trying some of the plugins and not being able to fully control the markup. This tutorial helped me quickly implement some popular posts functionality into my own plugin.
So i agree that using pre-built plugins is not a bad thing, but at times tutorials like this are useful to take control and build out a plugin that works the way you need it to instead of fighting against an already built plugin.
Pippin says
As Zach said, please stop using “without a plugin”. Sure, it’s cool to see how to code this yourself but there is literally no difference between this code and the code in a plugin. You could place this code into a plugin and it would function identically to placing it in your theme.
Ruben says
If you say there’s no difference, you have no idea what you’re talking about. Lets say your are working on a site and don’t have access to the plugins directory, making a solution that works “without using a plugin” would be a viable alternative.
As for the title, semantically the title should reflect the content of the post and could be “How to Display Popular Posts by Views in WordPress with or without a Plugin”.
However, taking SEO in to consideration, lets say he would like this post to reach a specific audience, for example, people who don’t want to or can’t use a plugin, the title would probably be best as is.
Gautam Doddamani says
i am using genesis child theme..can u tell me which all functions and codes to use..i am sorry i am a noob to genesis…
Editorial Staff says
For child theme users, the wp_head solution would work to track post views. Not sure what else you meant.
Administrador
Gautam Doddamani says
is it true? as artim told, does this code become unresponsive when we use a caching plugin?? for example i currently use W3 total cache and i want to use this method to build my custom popular post by views widget…i read this kind of post on wpsnipp.com and the users suggested it does not work when we enable caching plugins…reply soon…
Editorial Staff says
Read the comment reply to Artem. You can use fragment caching to make it work just fine.