¿Desea crear un sitio de prueba para WordPress pero no sabe por dónde empezar?
Un sitio de prueba de WordPress es un sitio de prueba que puede utilizar para realizar actualizaciones de plugins y otros cambios de forma “segura” antes de ponerlo en marcha.
En esta guía paso a paso, le mostraremos cómo crear fácilmente un entorno de ensayo para su sitio de WordPress. Cubriremos varios métodos diferentes y la mayoría de ellos solo requieren unos pocos clics.
¿Qué es un sitio de ensayo?
Un sitio web de prueba es un clon de su sitio web en vivo que se utiliza para probar los cambios antes de hacerlos en vivo. Los sitios web en fase de pruebas ayudan a detectar errores para no romper el sitio web activo.
En el pasado, solía ser muy difícil establecer un sitio de ensayo de WordPress, pero ahora eso ha cambiado, por lo que incluso una persona sin conocimientos técnicos puede hacerlo.
Muchos usuarios instalan WordPress localmente en sus ordenadores Windows o Mac para probar los cambios. Una vez que terminan con las actualizaciones, simplemente suben esos cambios desde localhost al servidor en vivo.
El mayor problema con este enfoque es ¿qué pasa si algo que funcionó en su localhost no funciona en el servidor en vivo?
A menudo, los sitios locales y los servidores de alojamiento de WordPress no se ejecutan en el mismo entorno.
Puesto que el sitio de ensayo vive en su servidor de alojamiento web, puede evitar fácilmente todos esos errores porque ejecuta la misma configuración de servidor que su sitio activo.
Dicho esto, veamos cómo establecer un sitio de prueba para WordPress.
Cómo crear fácilmente un sitio de pruebas de WordPress
Hay varias formas de crear un sitio de prueba para WordPress. La más sencilla es utilizar la característica de sitio de ensayo integrada en su proveedor de alojamiento.
Algunas de las mejores empresas de alojamiento de WordPress ya ofrecen sitios web de ensayo con 1 clic. Si su sitio web está alojado en una de ellas, podrá crear fácilmente un sitio web de prueba sin complicaciones.
Si usted no está con una de estas soluciones de alojamiento populares, entonces también tenemos una solución para ayudarle a crear un sitio de ensayo de WordPress utilizando un plugin (e incluso manualmente).
Para navegar más rápidamente, puede utilizar la navegación de abajo para saltar a la sección que más le interese:
Creación de un sitio de prueba en Bluehost
Bluehost es una de las mejores empresas de alojamiento de WordPress. Ofrecen una solución rápida de sitio de ensayo en 1 clic con todos sus planes.
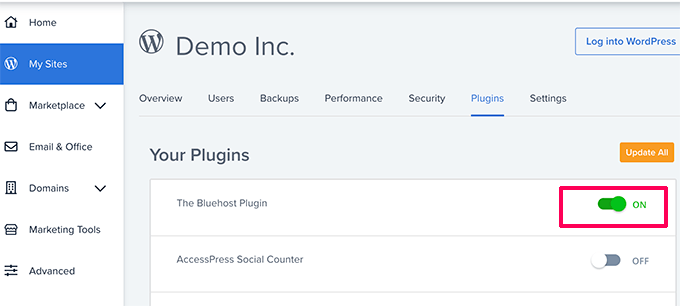
En primer lugar, debe dirigirse a su Escritorio Bluehost y visitar la sección “Mis sitios”.
A continuación, vaya a la pestaña “Plugins” y conmute el interruptor situado junto a la opción “Bluehost Plugin”.
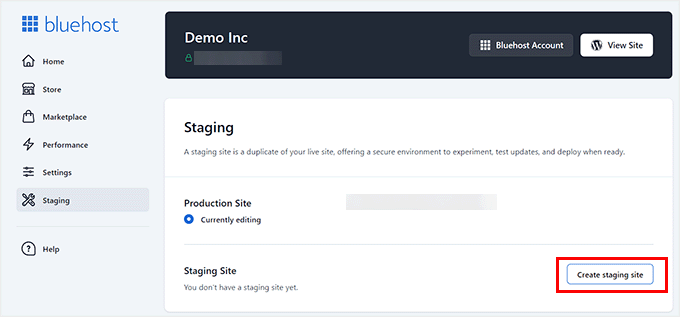
A continuación, diríjase al escritorio de WordPress y visite la página Bluehost ” Staging.
A continuación, haga clic en el botón “Crear sitio de ensayo”.
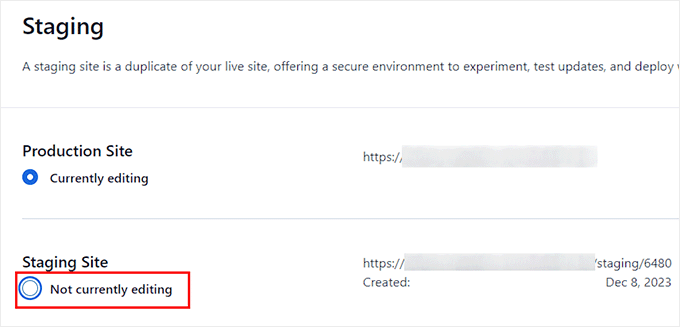
Bluehost preparará ahora el entorno de ensayo para su sitio web.
Una vez hecho esto, aparecerá la sección “Sitio de pruebas”, en la que deberá marcar la casilla “No editar actualmente”.
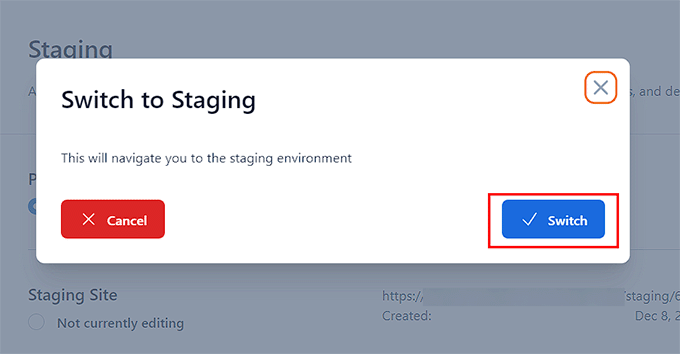
Se abrirá una indicación en su pantalla pidiéndole que cambie al sitio de preparación.
Desde aquí, haz clic en el botón “Cambiar”.
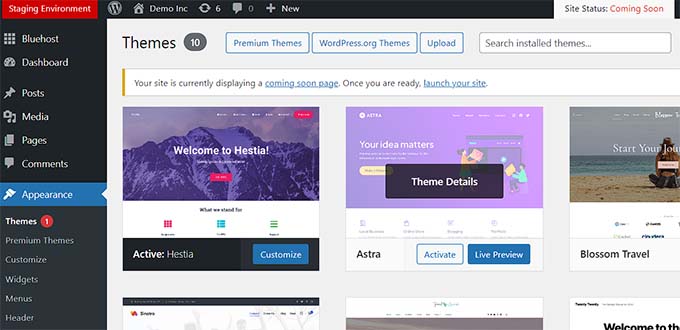
Una vez conectado, verá un botón en la pantalla que le indicará que está trabajando en el sitio web de ensayo.
Puede seguir trabajando en su sitio web sin preocuparse de que afecte a su sitio activo.
Implementación de cambios de Staging a Live Site en Bluehost
Una vez que esté listo para empujar los cambios de la puesta en escena para el sitio en vivo, sólo tiene que ir a la Bluehost ” Puesta en escena de la página de la barra lateral de administrador de WordPress.
Desde aquí, verás el menú desplegable de opciones de despliegue al lado de tu sitio web de ensayo. Puedes desplegar solo los archivos, solo la base de datos o desplegar todos los cambios.
Si no está seguro, haga clic en el botón “Desplegar todos los cambios” para continuar.
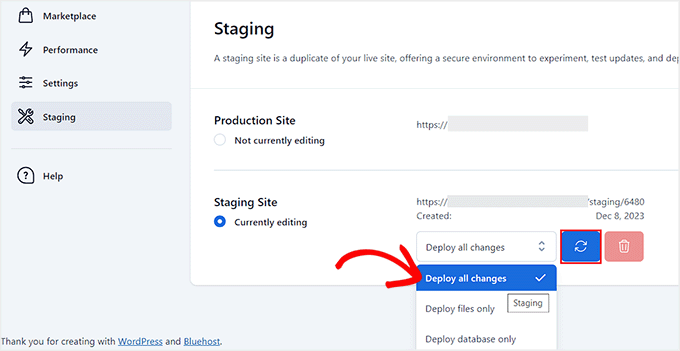
A continuación, haga clic en el botón “Desplegar sitio” situado junto al menú desplegable.
Aparecerá un mensaje / ventana emergente en el que se le pedirá que confirme que desea desplegar el sitio de ensayo en el sitio de producción. Haga clic en el botón “Desplegar” para continuar.
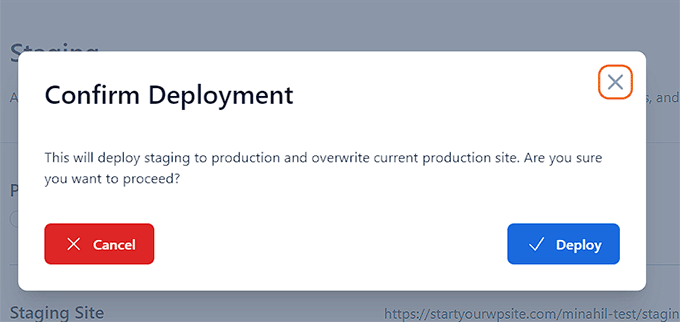
Bluehost comenzará a desplegar su sitio de ensayo en el sitio en vivo. Dependiendo del tamaño de su sitio web, esto puede tomar un tiempo.
Ahora puede volver a su sitio web para ver los cambios realizados, al hacer clic en el botón de radio situado bajo la opción Sitio de producción.
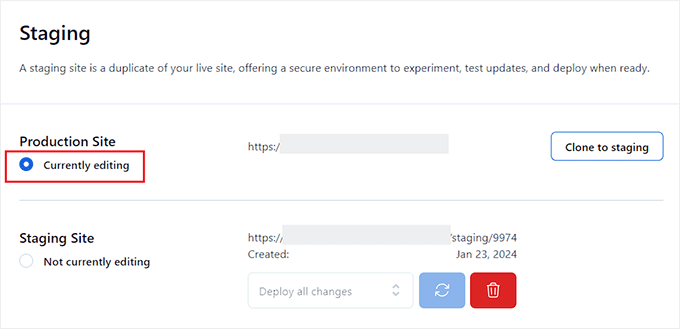
Clonación del sitio de producción a la puesta en escena
Ahora, al volver al sitio web de producción, los cambios que realice no se sincronizarán automáticamente con el sitio web de ensayo.
En el futuro, si quieres probar más cosas en tu sitio web de prueba, tendrás que duplicar tu sitio.
Para ello, debe visitar la página Bluehost ” Staging y hacer clic en el botón ‘Clone to staging’.
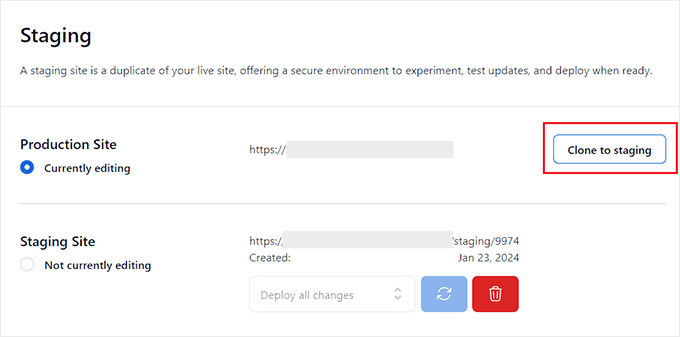
Bluehost clonará los últimos cambios de su sitio web en vivo a su sitio web de ensayo. Después de eso, puede cambiar al sitio web de ensayo para pruebas y desarrollo.
Creación de un sitio de prueba en SiteGround
SiteGround es otra de las mejores empresas de alojamiento de WordPress que ofrece una característica de puesta en escena en 1 clic con sus planes GrowBig y GoGeek.
Si tu sitio web está alojado en SiteGround, así es como debes establecer un sitio web de prueba.
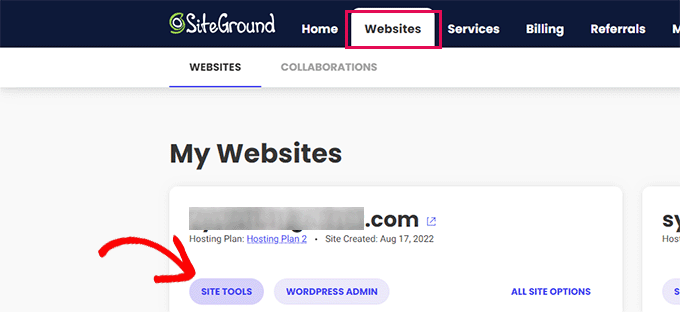
En primer lugar, debes acceder a tu Escritorio de SiteGround y cambiar a la pestaña Sitios web. Desde aquí tienes que elegir las Herramientas del sitio debajo de tu sitio web.
En la pantalla siguiente, debe hacer clic en el menú WordPress ” Staging de la columna de la izquierda.
Desde aquí, seleccione su sitio web y, a continuación, proporcione un nombre para su copia de presentación.
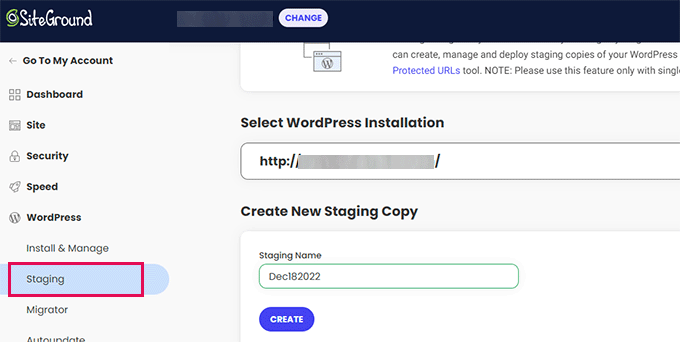
Haga clic en el botón “Crear” para continuar y Siteground creará una copia de prueba de su sitio web.
A continuación, haga clic en el botón “Ir a URL protegidas” para proteger su sitio web con una contraseña y mantenerlo privado.
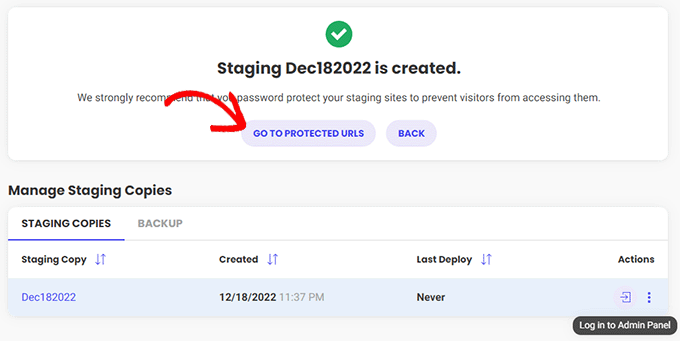
En la siguiente pantalla, Siteground rellenará automáticamente la URL y la ruta para su sitio web de ensayo.
Debe introducir el nombre de usuario y la contraseña que desea utilizar para proteger su sitio de ensayo.
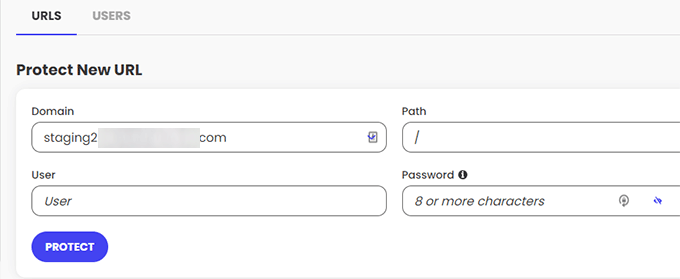
Haz clic en el botón “Proteger” para guardar tus ajustes.
Ahora puede volver a la página de WordPress ” Puesta en escena y hacer clic en el botón “Acceder al panel de administrador” situado al lado de su sitio web de puesta en escena.

SiteGround abrirá el área de administrador de WordPress de tu sitio web de prueba. Puedes probar tus cambios en este sitio web.
Implemente los cambios en su sitio web activo
Una vez que haya probado los cambios en el sitio web de prueba, es posible que desee fusionarlos con su sitio web activo.
SiteGround también lo hace fácil.
Simplemente haga clic en el menú WordPress ” Staging de la columna de la izquierda. A continuación, haga clic en el menú de tres puntos situado junto a su sitio de montaje en la sección “Gestionar copias de montaje”.

El menú le mostrará dos opciones de despliegue. Puede elegir la opción “Despliegue completo” o “Despliegue personalizado”.
La opción “Despliegue completo” fusiona todos los datos del sitio web de prueba con el sitio web activo. La opción “Despliegue personalizado” le permite seleccionar los archivos o datos que desea fusionar.
Si no está seguro, elija la opción “Despliegue completo”.
SiteGround copiará el sitio web de prueba a su sitio web activo.
Fusión en directo a su sitio web de puesta en escena
Los cambios realizados en el sitio web activo no se copian automáticamente en el sitio web de prueba.
Cada vez que necesite trabajar en su sitio web de prueba, repita el proceso anterior para crear un sitio web de prueba nuevo.
Creación de un sitio de ensayo en WP Engine
WP Engine es la mejor empresa de alojamiento gestionado de WordPress del mundo. El alojamiento gestionado de WordPress es un servicio de conserjería para su sitio de WordPress en el que el proveedor de alojamiento se encarga de las actualizaciones, copias de seguridad, seguridad y rendimiento.
WP Engine ofrece una solución de puesta en escena de un solo clic con todos sus planes. Si usted está utilizando WP Engine para alojar su sitio web, entonces así es como se establece un entorno de ensayo para su sitio.
Primero, necesitas acceder a tu Escritorio de WP Engine. A continuación, vaya a la página ‘Sitios’ y seleccione su sitio web al hacer clic en él.
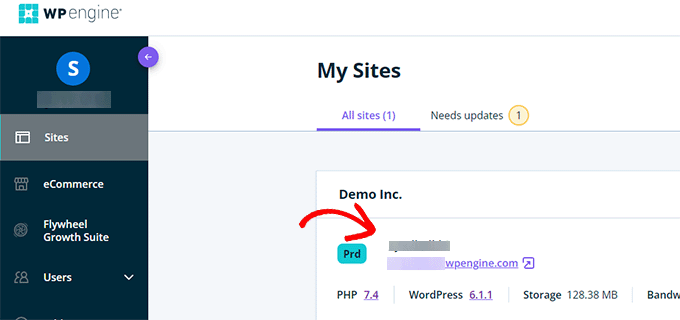
Accederá al Escritorio de su sitio web.
Ahora tiene que enlazar el enlace “Añadir puesta en escena” de la columna de la izquierda o seleccionarlo bajo el nombre de su sitio en la parte superior.
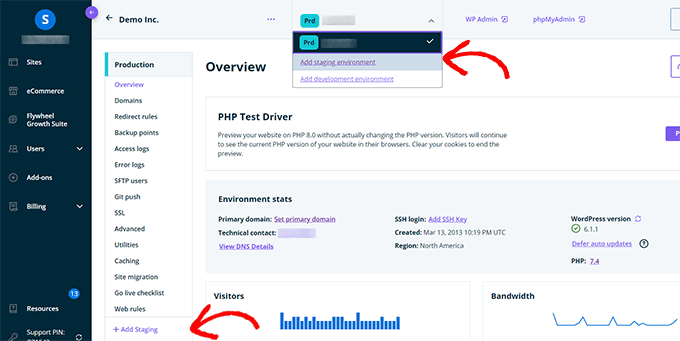
Accederá a la pantalla “Añadir entorno”.
Se le pedirá que elija cómo desea proceder con su entorno de puesta en escena.
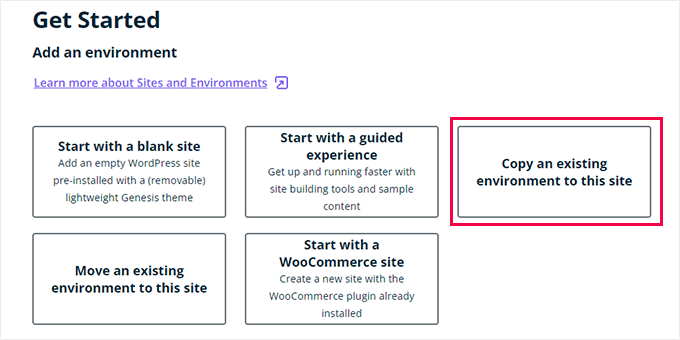
A continuación se explica cada una de estas opciones:
- Empezar con un nuevo sitio en blanco’ crea un nuevo sitio vacío.
- Empieza con una experiencia guiada” crea un nuevo sitio con una experiencia guiada y contenido de demostración.
- Copiar un entorno existente a este sitio’ copiará su entorno de producción o desarrollo a este sitio (por ejemplo, copiará su sitio activo a este entorno).
- Mover un entorno existente” mueve un entorno a este sitio (por ejemplo, mover el entorno de desarrollo a la puesta en escena).
- ‘Empezar con un sitio WooCommerce’ crea un nuevo sitio WordPress con WooCommerce preinstalado.
Dado que desea crear una copia de prueba de nuestro sitio web, deberá hacer clic en la opción “Copiar un entorno existente en este sitio”.
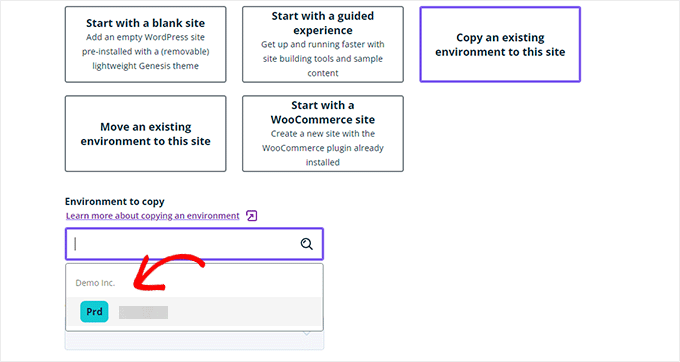
Después de elegir un entorno, elija la última copia de seguridad de la que desee realizar la copia y, a continuación, haga clic en el botón “Siguiente” para continuar.
Ahora, tendrá que proporcionar un nombre para su sitio de ensayo. Este nombre se utilizará en la URL del sitio de ensayo. A continuación, elige STG (staging) como tipo de entorno.
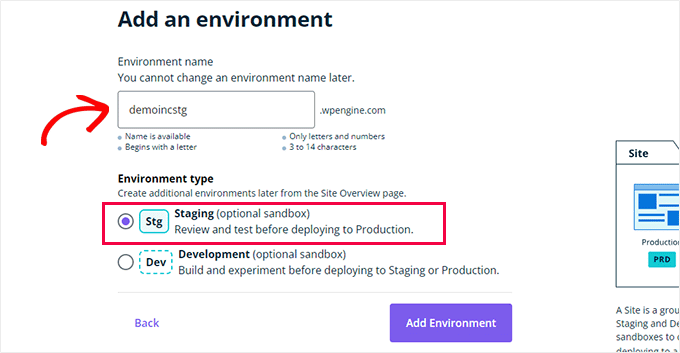
Haga clic en el botón “Crear entorno” para continuar.
WP Engine creará un sitio de prueba para usted. Después de eso, serás redirigido al Escritorio de tu entorno de Staging.
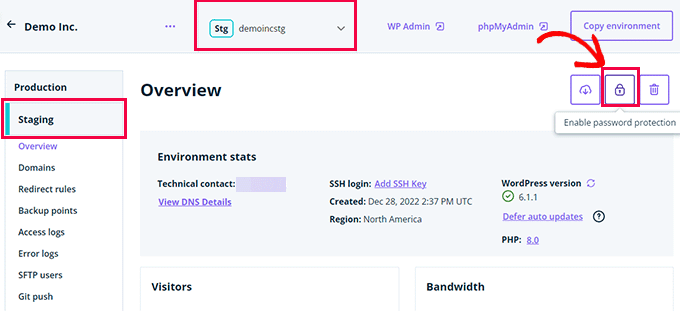
A continuación, debe hacer clic en el botón Candado para activar la protección por contraseña de su sitio de ensayo.
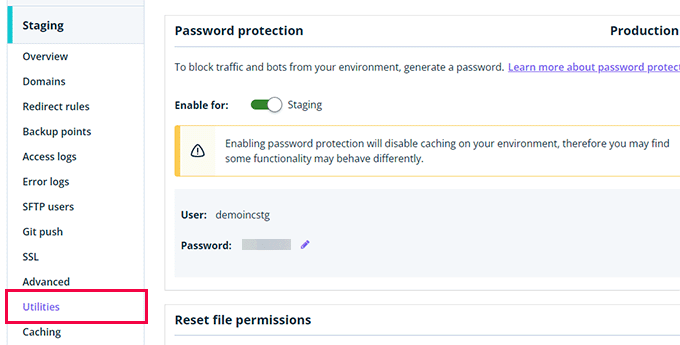
A continuación, debe ir a la pestaña “Utilidades” para copiar el nombre de usuario y la contraseña de su sitio de ensayo.
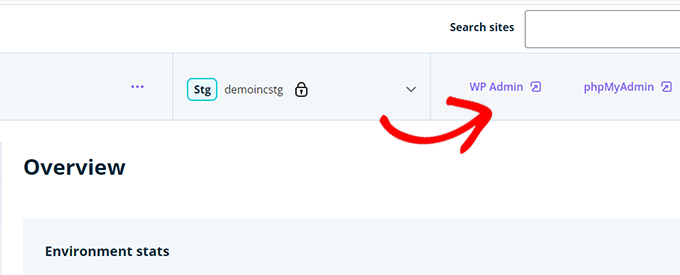
Ahora puede hacer clic en el botón “WP Admin” en la parte superior para acceder a su sitio web.
No dudes en hacer cambios y probar características en el sitio web de prueba como lo harías en un sitio WordPress típico que instalas en cualquier otro lugar.
Desplegar cambios de Staging a sitio web en WP Engine
¿Desea fusionar los cambios realizados en el sitio web de prueba con su sitio web activo?
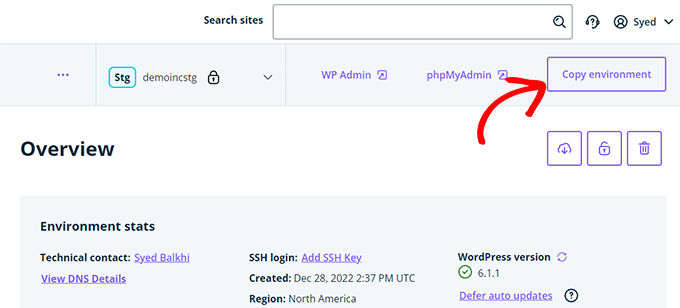
Basta con hacer clic en el botón “Copiar entorno” para iniciar la implantación.
Esto le llevará a la página de opciones. Desde aquí, tienes que elegir los entornos de origen y destino de la copia.
Aquí seleccionará su sitio web de ensayo como entorno de origen y su sitio web de producción o activo como entorno de destino.
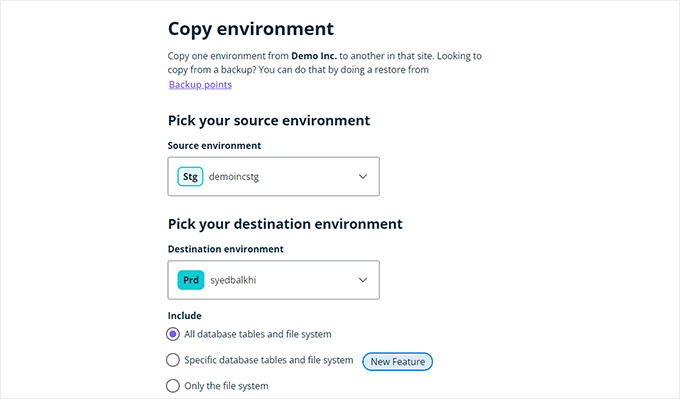
Puedes elegir lo que quieres copiar. Por ejemplo, puedes copiar todas las tablas y archivos de la base de datos, archivos específicos y tablas de la base de datos, o solo el sistema de archivos.
Nota: Si copia todo, perderá todos los datos almacenados en su sitio web activo después de utilizarlo para crear el entorno de ensayo. Esto puede incluir datos importantes como nuevas entradas, páginas, clientes y pedidos. Así que es una buena idea ejecutar una copia de seguridad de su sitio en vivo antes de desplegar desde la puesta en escena.
A continuación, haga clic en el botón “Revisar y confirmar” para iniciar la instalación. Tardará un rato en copiarse todo a su sitio web activo.
Recibirá un aviso por correo electrónico cuando finalice el proceso.
Creación de un sitio de ensayo utilizando plugins de WordPress
Si su empresa de alojamiento de WordPress no ofrece la característica de sitio web de prueba, puede crear un sitio web de prueba utilizando un plugin de WordPress.
Este método presenta algunas desventajas.
En primer lugar, un plugin tendrá un control limitado sobre su servidor de alojamiento. Por este motivo, puede que no siempre ofrezca los mejores resultados.
En segundo lugar, el plugin que utilizaremos almacenará su sitio de ensayo en sus propios servidores. Si usted está preocupado acerca de la privacidad y la protección de datos, esto puede no ser ideal para usted.
Por último, el plugin tiene varias incompatibilidades conocidas. Por favor, marca / comprueba su página de incompatibilidades para asegurarte de que tu sitio web es compatible.
Dicho esto, vamos a ver cómo crear un sitio de WordPress de ensayo utilizando un plugin de WordPress.
Lo primero que tienes que hacer es instalar y activar el plugin WP Stagecoach. Para más detalles, consulte nuestra guía paso a paso sobre cómo instalar un plugin de WordPress.
Al activarlo, el plugin añadirá un nuevo elemento / artículo de menú llamado WP Stagecoach a tu barra de administrador. Al hacer clic en él, accederás a la página de ajustes del plugin.
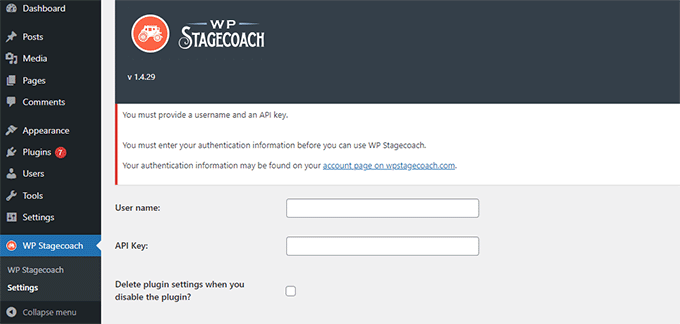
Deberá introducir su nombre de usuario de WP Stagecoach y la clave API, que encontrará en su cuenta en el sitio web del plugin.
Después de eso, usted necesita visitar la página de WP Stagecoach ” WP Stagecoach y elegir un nombre para su sitio de puesta en escena. Este nombre también se utilizará como subdominio de su sitio web de WordPress.
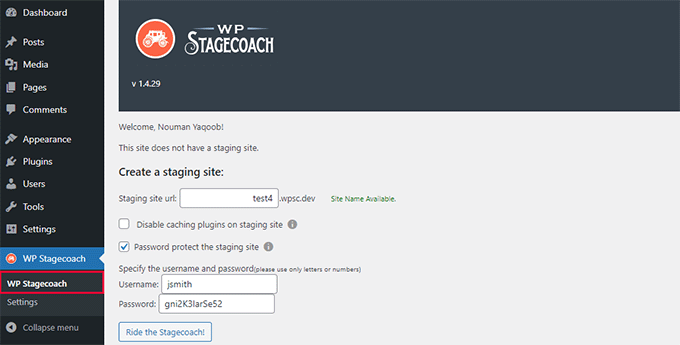
No olvide marcar / comprobar la casilla siguiente a la opción “Proteger el sitio con contraseña”. Protegerá su sitio web de la vista del público y de los motores de búsqueda.
Haz clic en el botón “Sube a la diligencia” para continuar.
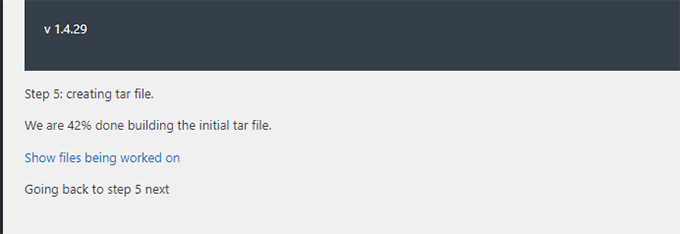
El plugin ahora creará una copia de seguridad de sus archivos de WordPress y base de datos para exportarlos a su sitio de ensayo.
Puede tardar un poco dependiendo del tamaño de su sitio web WordPress.
Una vez terminado, verá el enlace a su sitio de ensayo y su área de administrador.
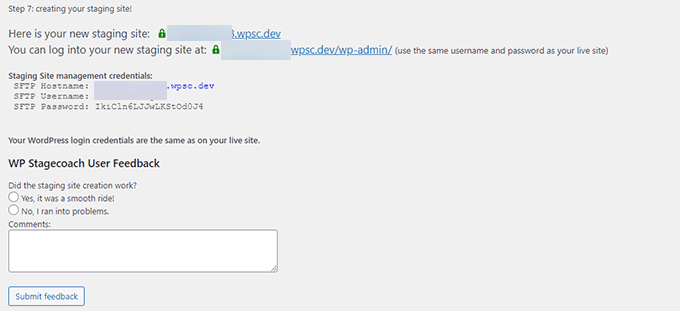
Puede hacer clic en el enlace para visitar su sitio de montaje y empezar a trabajar en él.
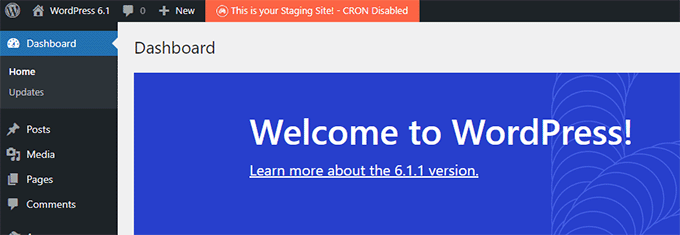
Notará un mensaje naranja brillante en la barra de administrador en la parte superior indicando que está trabajando en su sitio de ensayo.
Despliegue del sitio de ensayo a Live usando WP Stagecoach
Una vez que esté listo para importar los cambios a su sitio en vivo, diríjase a la página WP Stagecoach ” Importar cambios y haga clic en el botón comprobar cambios.
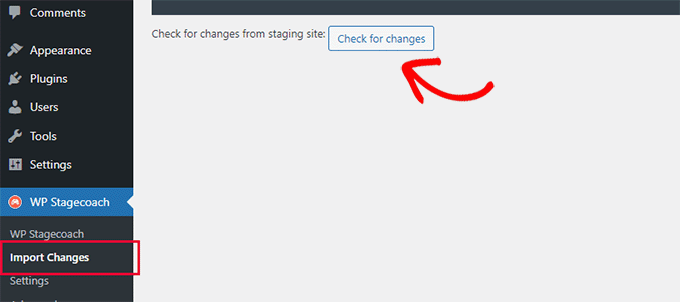
El plugin ahora marcar / comprobar los cambios en su sitio de ensayo y, a continuación, mostrar opciones para importarlos.
Puede elegir entre todos los cambios, cambios en los archivos o cambios en la base de datos.
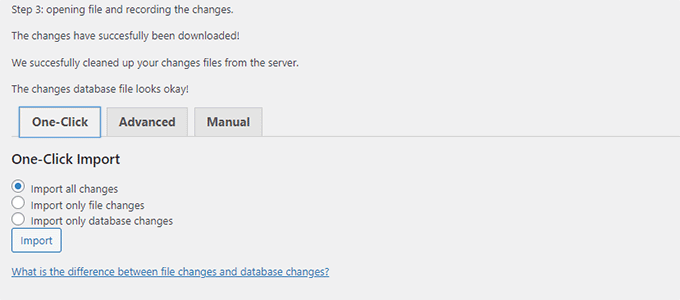
El plugin le mostrará el progreso de la importación y le avisará cuando haya terminado.
Ahora puede probar su sitio para ver si todos los cambios se han importado correctamente.
Crear manualmente un sitio de pruebas para WordPress
Este método le enseñará a crear manualmente un sitio de ensayo para su instalación de WordPress. Es para usuarios avanzados y requiere más trabajo que otros métodos descritos anteriormente.
Otra desventaja de este método es que su sitio web no estará disponible temporalmente cuando se desplieguen los cambios de nuevo desde la puesta en escena al servidor en vivo.
Dicho esto, vamos a ver cómo crear manualmente un entorno de ensayo para su sitio de WordPress.
En primer lugar, debe crear un subdominio para su sitio web. Si utiliza Bluehost, vaya al Escritorio de su cuenta de alojamiento y cambie a la pestaña “Avanzado”.
A continuación, haga clic en el botón “Gestionar” situado junto a la opción “cPanel”.
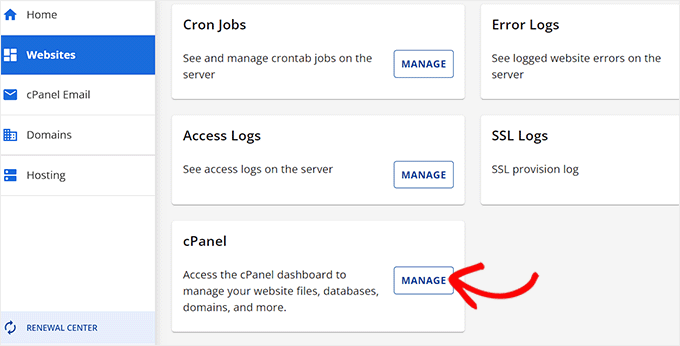
Esto abrirá el cPanel en una nueva pestaña donde deberá desplazarse hasta la sección ‘Dominio’.
Desde aquí, haga clic en la opción “Dominios”.
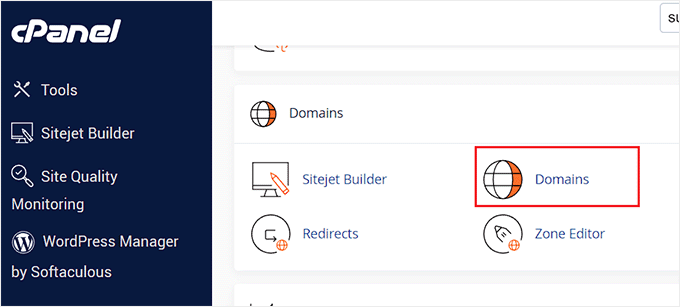
Se abrirá un anuncio / catálogo / ficha con todos los dominios de su cuenta de alojamiento. Aquí, debe hacer clic en el botón “Crear un nuevo dominio”.
Una vez hecho esto, se abrirá una nueva página en la pantalla en la que deberá escribir su subdominio seguido del nombre de dominio en el campo “Dominio”, de la siguiente manera:
subdominio.ejemplo.com
A continuación, basta con hacer clic en el botón “Enviar” para guardar los ajustes.
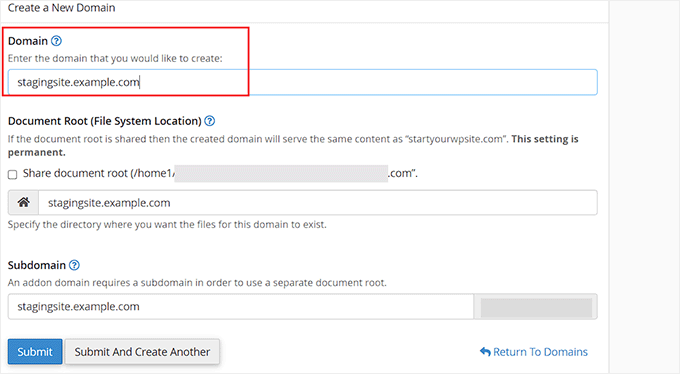
Nota: Estamos utilizando Bluehost en nuestras capturas de pantalla de ejemplo, por lo que su pantalla puede ser diferente.
Su panel de control de alojamiento añadirá ahora su subdominio, que podrá utilizar para importar su sitio WordPress activo.
A continuación, debe instalar y activar el plugin Duplicator en su sitio. Si necesita todas las características, puede obtener la versión premium de Duplicator aquí.
Una vez activado, debe hacer clic en el menú Duplicator de la barra lateral de administrador de WordPress y hacer clic en el botón “Crear nuevo” situado debajo de Paquetes.
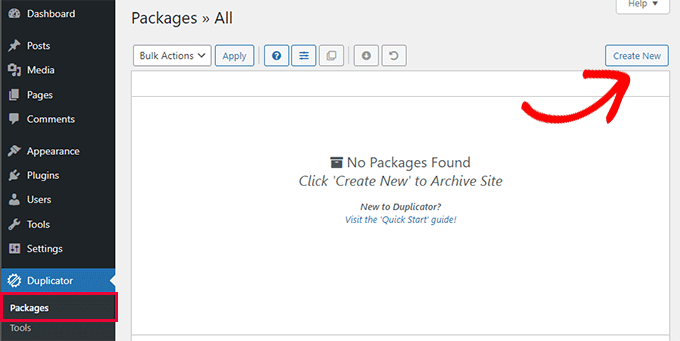
A continuación, se le pedirá que haga clic en el botón “Siguiente” para continuar. Duplicator ejecutará el asistente de duplicación de sitios web.
En primer lugar, realizará algunas pruebas para ver si todo está en orden. Si todos los elementos están marcados como ‘Bien’, entonces haga clic en el botón ‘Construir’.
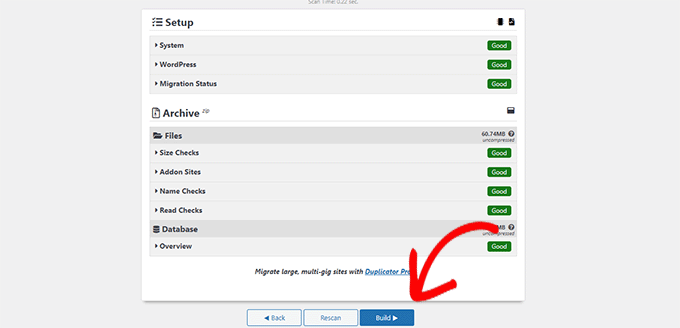
El plugin empezará a crear un paquete Duplicator para su sitio WordPress. Este proceso puede tardar unos minutos dependiendo del tamaño de su sitio web.
Una vez que haya terminado, verá opciones de descarga para el instalador y el paquete de archivo. Debe hacer clic en el botón “Descargar ambos archivos” para descargar ambos archivos en su ordenador.
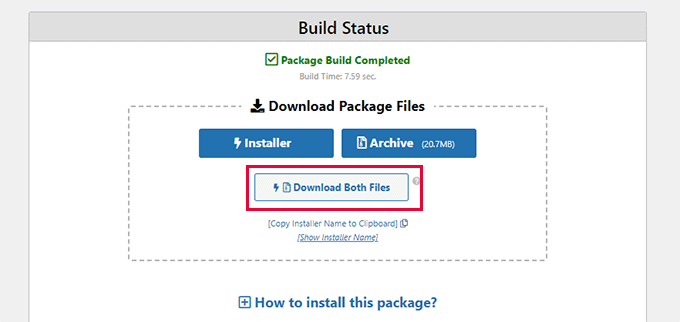
Tendrás que subir ambos archivos al directorio de archivos del subdominio que acabas de crear. Para más detalles, consulte nuestra guía sobre cómo utilizar FTP para subir archivos a su sitio web WordPress.
A continuación, su nuevo sitio WordPress necesitará una nueva base de datos. Vamos a crear una.
Vaya al panel de control de su cuenta de alojamiento de WordPress y cambie a la pestaña “Avanzado”.
A continuación, desplácese hasta la sección “Bases de datos” y haga clic en el botón “Gestionar” situado a su lado.
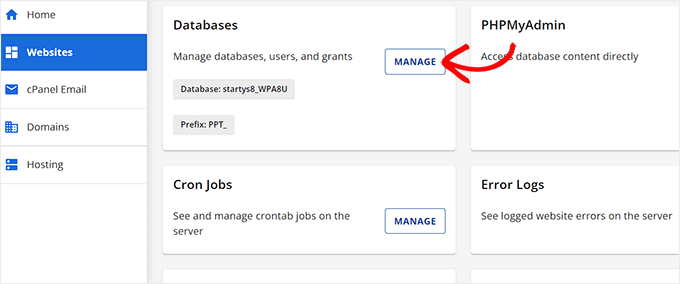
Si usted no está usando Bluehost, entonces su entorno de alojamiento de WordPress puede parecer un poco diferente. No se preocupe, y sólo tiene que buscar la sección Bases de datos.
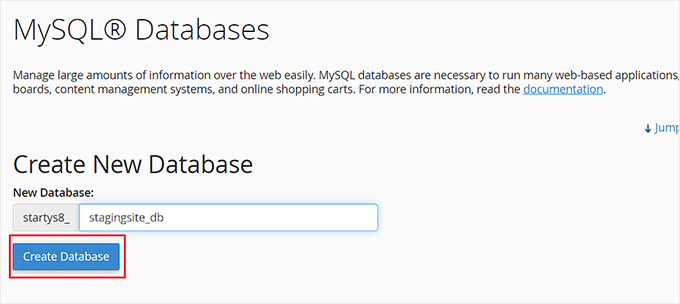
Esto le llevará a la página ‘Bases de datos MySQL’, donde puede empezar dando un nombre a su base de datos.
A continuación, haga clic en el botón “Crear base de datos”.
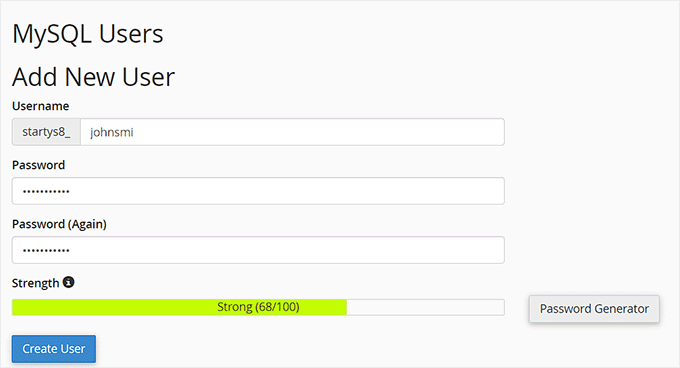
A continuación, debe crear un usuario MySQL para su base de datos.
Desplácese hacia abajo hasta la sección Usuarios de MySQL e introduzca un nombre de usuario y una contraseña para su nuevo usuario de base de datos.
Ahora debes dar permiso a este usuario para acceder y modificar la base de datos que creaste anteriormente.
Simplemente desplázate hasta la sección “Añadir usuario a la base de datos” y selecciona tu base de datos y el usuario que acabas de crear.
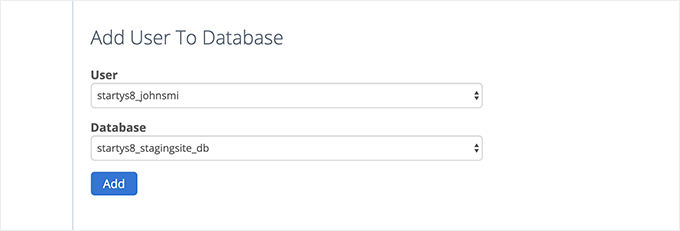
A continuación, haga clic en el botón “Añadir” para continuar.
Se le pedirá que seleccione privilegios para el usuario. Seleccione la casilla de verificación “Todos los privilegios” y haga clic en el botón “Realizar cambios”.
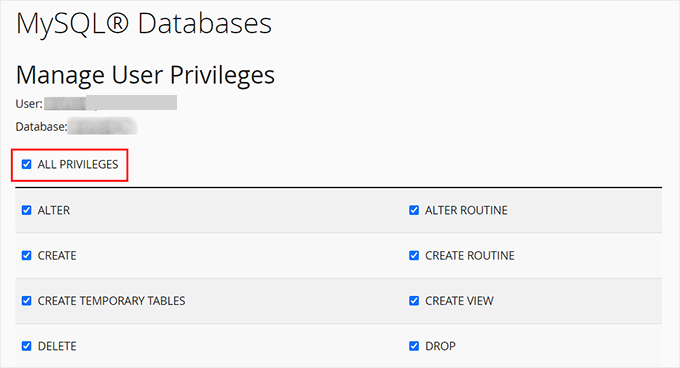
Ahora su base de datos está lista para ser utilizada en su sitio web.
A continuación, debe abrir una nueva pestaña del navegador e introducir el subdominio de su sitio de ensayo de la siguiente manera:
https://yoursubdomain.example.com/installer.php
No olvide sustituir sudominio por el subdominio real y ejemplo.com por su propio nombre de dominio.
Se iniciará el asistente de instalación de Duplicator.
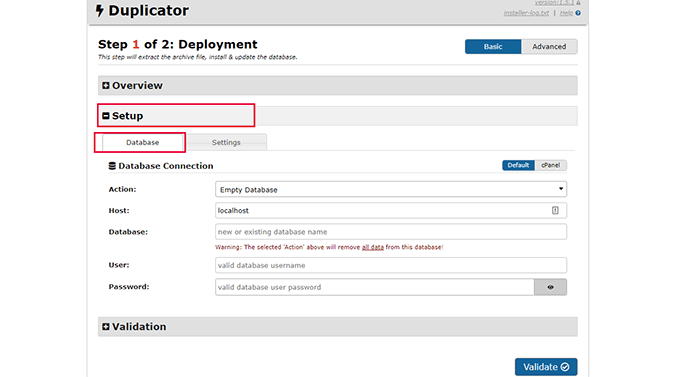
En la sección “Configuración”, el instalador le pedirá que introduzca la información de su base de datos de WordPress.
Su alojamiento será probablemente localhost. A continuación, introduzca los datos de la base de datos que creó para su nuevo nombre de dominio en el paso anterior.
Haga clic en el botón “Validar” para asegurarse de que Duplicator puede conectarse a su base de datos.
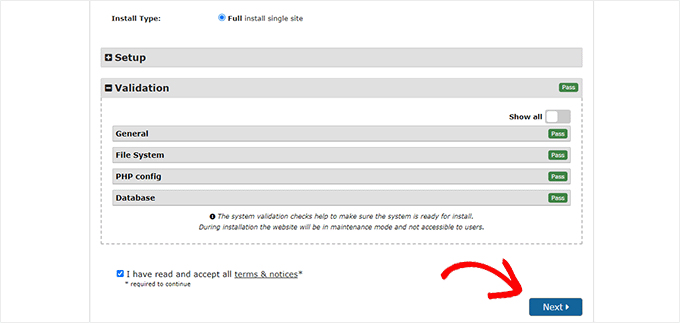
Una vez hecho esto, haga clic en el botón “Siguiente” para continuar.
Duplicator desempaquetará su base de datos y archivos de WordPress y los importará a su sitio de prueba.
Una vez terminado, verá un mensaje de correcto.
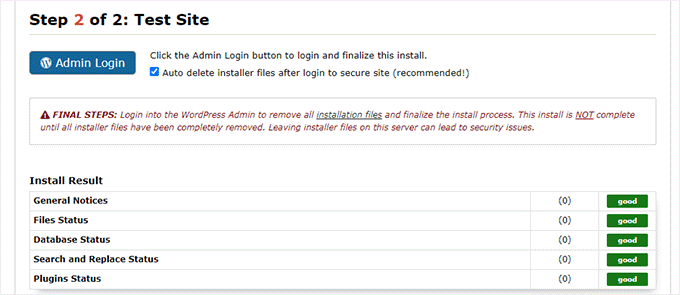
Puede hacer clic en el botón ‘Admin Login’ para acceder al área de administrador de WordPress de su sitio web en el nuevo sitio de ensayo.
Ahora ya tienes tu sitio de ensayo establecido. Puede protegerlo añadiendo una contraseña al subdominio.
Vaya al Escritorio de su cuenta de alojamiento y cambie a la pestaña “Avanzado”.
A continuación, desplácese hasta la sección “cPanel” y haga clic en el botón “Gestionar” situado al lado.
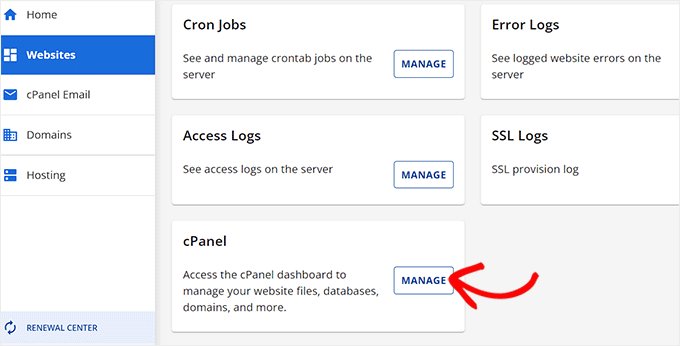
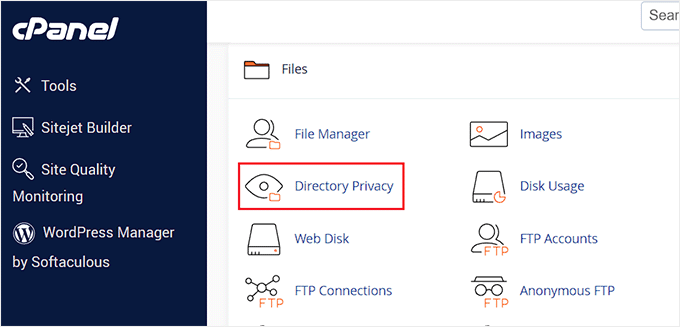
Esto abrirá el cPanel en una nueva ventana donde deberá desplazarse hasta la sección ‘Archivos’.
Desde aquí, haga clic en el icono “Privacidad del directorio”.
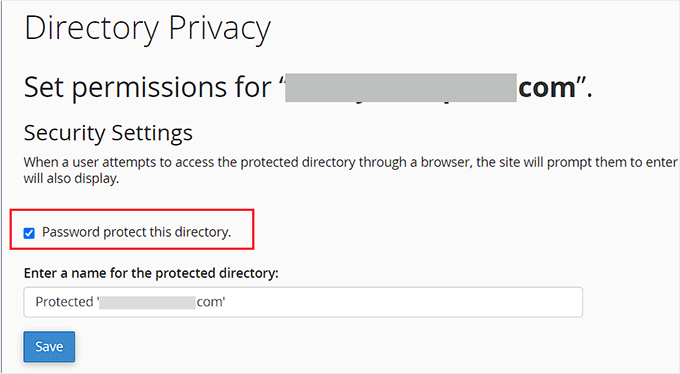
A continuación, debe seleccionar la carpeta de su subdominio y, a continuación, la casilla de verificación “Proteger este directorio con contraseña”.
Se le pedirá que dé un nombre a este ajuste y, a continuación, haga clic en el botón “Guardar”.
Su sitio web estará oculto tras una contraseña que lo mantendrá fuera del alcance de los motores de búsqueda y del público en general.
Ahora puede trabajar en su sitio de ensayo y realizar cualquier cambio en él.
Despliegue manual del sitio de ensayo en el sitio activo
Una vez que esté listo para implementar los cambios de su sitio de ensayo en el servidor activo, deberá seguir los mismos pasos descritos anteriormente.
Simplemente cree un nuevo paquete Duplicator en su sitio de ensayo y descargue los archivos de instalación y archivo en su ordenador (consulte las instrucciones anteriores).
A continuación, debe encabezado a su sitio en vivo y crear una copia de seguridad completa de WordPress (puede utilizar Duplicator para crear una copia de seguridad completa también).
Una vez que haya terminado, deberá borrar todos los archivos y carpetas de WordPress de su sitio web activo. Esto significa que su sitio de WordPress estará inactivo durante un tiempo.
Por último, siga las instrucciones anteriores para ejecutar el asistente de instalación de Duplicator e importar el sitio de prueba al servidor activo.
Como puede ver, el último método no es el mejor en absoluto. Hay muchas cosas durante el proceso que pueden dañar su sitio.
Le sugerimos evitar este método a toda costa a menos que no tenga otra opción. Recomendamos utilizar un proveedor de alojamiento fiable como Bluehost, SiteGround o WP Engine con características integradas de sitio de ensayo.
Esperamos que este artículo te haya ayudado a crear fácilmente un entorno de pruebas para tu sitio de WordPress. Si te encuentras con algún problema, comprueba nuestra guía definitiva para corregir los errores más comunes de WordPress. También puedes aprender a utilizar WordPress Playground en tu navegador / explorador para realizar pruebas.
If you liked this article, then please subscribe to our YouTube Channel for WordPress video tutorials. You can also find us on Twitter and Facebook.


Syed Balkhi says
Hey WPBeginner readers,
Did you know you can win exciting prizes by commenting on WPBeginner?
Every month, our top blog commenters will win HUGE rewards, including premium WordPress plugin licenses and cash prizes.
You can get more details about the contest from here.
Start sharing your thoughts below to stand a chance to win!
Lynda Joy says
Hi,
I just did the first five or so steps of this, and then got lost at “upload your WordPress content to. So now I have completely messed up my site and I would like to know how to undo what I have done.
Thanks.
– Lynda
Rachel says
Thanks so much for this – I am very much a beginner but trying to figure out how to do these things myself so I can launch a new design by first using a test site in order to get it right. I have managed to follow your instructions perfectly until this part:
“After copying your database, you need to copy your WordPress files, plugins, themes, and uploads. First download a fresh copy of WordPress from WordPress.org. Upload the contents of WordPress to your staging site. Note, do not run the WordPress install yet”
Can you please advise as to how this is done or direct me to another instruction article? I can’t seem to find out how to do it otherwise. Many many thanks in advance
Sanket D. says
So I’ve managed to create my staging environment successfully — I’ve all my media, themes, plugins, everything else properly transferred. However, I’d made some changes to my theme (not through any codes, but through the theme’s inbuilt settings — basic stuff like a custom logo (which I can see in my media library), theme color, homepage layout, etc. These changes are the only thing that for some reason are missing from my staging site. Anybody knows why this might be?
byberkan says
I’m hoping you can find the solution. Same problem exists for me.
Joe says
It seems we have to do the steps in here after we have our theme, plugin etc.
Mark Park says
Great article! Just one thing that isn’t clear to me.
If I have the current non-wordpress website on a domain name example.com and I want to build a new website using WordPress and develop it on a staging environment on a sub-domain dev.example.com – is this possible?
Can I make a sub-domain dev.example.com and install WP on the same server used by the current non-WP website?
Later when the website is finished I want to connect my WP developed site with the domain name example.com.
Thank you for your help.
WPBeginner Support says
Yes this is possible. Make sure you block search engines on your development subdomain.
Administrador
Maria says
Thanks for a Very helpful article! I am in a similar situation as Mark, however my current website is a WordPress site. Can I still develop the redesigned website on a staging site within a sub domain? And if so do I have to create a new database?
byberkan says
You really didn’t read the article, do you?
Benito says
Hello, great article, but what if I don’t want to use XAMPP, and I just want to use a subdomain as a staging site and then push changes to live? What would be the best way to deploy the changes?
Raj says
Will this process create a Database User and add it to the database we created while copying giving it all privileges by itself? or do we need to create a database user at some point?
Raj says
Okay I tried it.. both ways.
Once I created the database user before installing wordpress on the staging site and it worked. The other time around, I didn’t and got the issue “We were able to connect to the database server (which means your username and password is okay) but not able to select the a*******_ata_d2db database.”
That to me means that one has to create a user manually, only copying database won’t do. Right?
Sanny says
Raj, I see the same error (“Can’t select database”). How did you fix it ?
Scott says
Hopefully you guys figured this out, but just to leave this here for others to find, you do indeed need to create a database user (which is not clear in this article). While using Bluehost, I had to do about three steps. First step is to use the MySQL Database cPanel to get access to the list of MySQL databases. Once there, I could see that the new staging database that I had copied using phpMyAdmin per the article, did not have a privileged user assigned to it. So, I created a user, but then discovered that the user I created had too many characters (16 is the max). Once I got that straightened out, I then had to Add this user to a database using the same MySQL page. As part of this assignment step, I was able to select “ALL PRIVILEGES” to make this user a privileged user for this new staging database. Once that was all setup, I was able to configure WordPress to connect up to the staging database.
Gayle says
Terrific resource! Reached a WP staging breaking point and then found this. Lifesaver! Thank you! Only things I’d add would be some meta information for newbies like me. : )
LizP says
Yikes, too hard for me!
Deborah says
Thanks for the tutorial. I seem to be stuck on one of the very first steps. When clicking go after changing the URL’s in SQL, I get a message of ‘# MySQL returned an empty result set (i.e. zero rows)’
This is how I’ve entered the data:
UPDATE wp_options SET option_value = REPLACE(option_value, ‘http://www.example.co.za/wp’, ‘http://staging.example.co.za’);
UPDATE wp_postmeta SET meta_value = REPLACE(meta_value, ‘http://www.example.co.za/wp’, ‘http://staging.example.co.za’);
UPDATE wp_posts SET guid = REPLACE(guid, ‘http://www.example.co.za/wp’, ‘http://staging.example.co.za’);
UPDATE wp_posts SET post_content = REPLACE(post_content, ‘http://www.example.co.za/wp’, ‘http://staging.example.co.za’);
Can anyone please help me with this?
Thanks
Andreas Kofoed says
Hi,
First of all thanks for an amazing tut on this.
I’ve encountered one problem so far and that is when I try to enter my subdomain through
www.staging.example.com. I get this message: err_connection_timed_out ???Andreas Kofoed says
Hi,
I figured this out as I was due to some table prefix.
Now my staging.mysite.com is up and running, but the styling and layout is totally different.
How do I do, so my files in my child theme applies to the current theme???
It seems like it is missing a lot of pictures, css and some basic settings?…
Patrick says
Thanks for this great tutorial!
I’m finding that after setting everything up, comments on the live blog are now going to the sub-domain staging blog. I can’t find anything in the settings that explains this behavior. Do subdomains perhaps take precedence for some reason?
Any ideas?
Jennifer Filgate says
Perhaps when you ran the operation to update the URLs in your database you performed it on your live site’s database instead of the new staging site’s database? You have to select the staging site’s database after you create it before you run the operation. Maybe you missed that selecting step.
Arjun Singhal says
I got errors regarding SSL certificates. I am a newbie when it comes to using Git and the command prompt on my Mac. So I couldn’t get to syncing everything like I wanted.
Also, how it appears is that the steps are good to sync the local disks files to the server – changes in the theme folder etc.
However, there is no syncing mechanism highlighted for the MySQL server changes in the case of WordPress.
Evan says
I don’t know. This just seems really confusing.
So, a Git Bucket is like an intermediary between your local computer and the hosted dev server? For example, if I have website.com then I create dev.website.com then I create an account and empty repository in Git Bucket then I create an empty folder on my local computer, and I edit files locally and sync them to the Git Bucket repository and then how do I commit to the live site? Is there any connection and control to the live site? It seems like from here, you sync your Git Bucket repository to the dev.website.com
Then what? I wish this article had a diagram to understand how this all works. It might make sense to you guys because you do it all day, but for the first time, this is a dizzying experience. Especially since multiple points in this setup failed and I had to go about custom fixing each one. At this point, I have created dev.website.com, copied all files from the live site to it, copied the database, connected it in, logged into the dev.website.com wordpress site, made sure all is cool, but now … I am lost as to what I do next.
In your article, you ask us to INIT a local directory on our computer. Well, I’m trying out Git Bucket’s SOURCE TREE, which by the way looks great. But now what? Any help on what is the procedure from here? What’s the logic to all this?
I create a folder on my local drive, it syncs to a Git Bucket Repository so that people can develop collaboratively. But who uploads the changes to the dev.website.com server? Don’t users need to be able to do that to see live changes on the server? So how does that all connect?
And how do you update the final changes to the live website once you’re ready? Man I’m confused. I spent 3 days getting this setup and I can’t figure out this next step, because I don’t understand how that all works.
Any help?
Oscar says
Hi Evan, although I am sure you figured it out by now as its months later, I figured it may help others with the same question. After you have committed your code to version control, you would move your changes over to the server of your choice (dev/staging/production) using the deploy feature. This is described in the section above titled, “Deploying Changes From BitBucket to Staging Site”. Hope this helps clarify!
vjohnson says
I am truly a beginner at this, and I have read the article a couple of times. I think my environment is almost set up, the piece that appears to be missing is in the install step. The directions say copy the files but do not install “yet”, when in this process do I run an install of wp? I am unsure if some of the issues that i ran into are due to my host which is hostgator or something that I’ve done wrong. Any input would be great.
What is happening at this point is no errors but nothing is rendered on at the url for my staging area.
Martin says
Nice article. Although, the whole way, you’re talking about setting up a development site on the server as a subdomain. But at the end your using a local Xammp server.
How would you setup a test environment on the server where the doomain is hosted? Do you use bitbucket for it as well?
Thanks, cheers.
Alberto Serrano says
Hello , I made a staging site successfully but my live site already had a little problem with a plug in , I contacted the developer and he asked for my admin credentials , following your advice on other article I gave him log in credentials to my staging site and he fixed the issue , to make the changes on the live site he told me to import the database from the staging site to the live site , my concern is the sql changes I made to the staging database , if I copy the database isn’t my live site going to redirect to the staging site now ? I can’t find the SQL queries to delete them
Thanks
WPBeginner Support says
See our tutorial on how to update URLS when moving WordPress site.
Administrador
isagani says
hey,
nice article, i followed all instructions and gave me a clean view process on using git and staging environment. hope all experienced people do what you did so many can step forward from beginner to advance.
Thanks a lot.
Isagani
Kristof Bernaert says
Just a perfect article that helped me to setup the whole thing.
My staging environment is on the same shared linux hosting, just in another directory.
I used this also as the repo for git.
With Coda, I’m working online in that staging. As I save changed files (mainly css), I see instantly the updates.
So I don’t need the local files on my laptop.
But how to checkout those remote files under the staging folder, without fetching a local copy?
Thx!
Kristof
bcall says
Thanks for the article!
I have one problem, though: I have two databases and am not sure which one (or maybe both) is connected to my live site. I checked the wp-config.php file and it’s linking to a database with a different name, one that does not appear in my database list (in phpMyAdmin). Is it possible that the database was renamed?
Nick Jubrey says
Look in your wp-config.php file that’s where wp is directed to that particular database, the db your using will be listed there.
Tiffany Johnson says
I’m having some issues with the dev site recognizing my theme and content. I copied over the following files prior to running my installation of wordpress, however the pages and content are still not being recognized. I checked the files and my media is in the uploads file, my themes are present, as are my plugins, but none of them are recognized in the actual wordpress site.
/wp-content/uploads
/wp-content/themes
/wp-content/plugins
Any suggestions on what else I can try? Thanks!
Nicole says
I’m having this same problem. Any suggestions of what to try? I followed the instructions to copy those files from one folder to the other, and it is in the right place.
Brad Scott says
@WPBeginner,
For my case.
Create subdomain: staging.example.com
Create Document Root: public_html/staging
Need to run the following SQL queries:
The NEW_URL should be http://example.com/staging not http://staging.example.com
Login: http://example.com/staging/wp-login.php
Cheers & Thanks
byberkan says
Brad, so that means you are not using the subdomain. You are just using it as a subdirectory which you didn’t have to create a subdomain to use that..
Paula Lay says
Thank you so much for this tutorial! The step-by-step instructions are perfect for someone who hasn’t done this before. I encountered a snag where I was getting an error message after creating a subdomain (something like a problem configuring the DNS). For anyone that encounters this problem – clear your browser cache and cookies, and then you will see the correct screen. Took me days to figure this out (I gave it a few days because I thought it would take 24hrs or so for the domain to propogate).
Random Dev says
Whoa. Wouldn’t it be simpler, cutting down on quite a few steps and reducing the technical nature of this process, to just use a backup plugin with a migrator (search/replace the database) function… instead of copying the databases manually, *and* instead of using Git/Bitbucket? Or am I not understanding something?
Cannonpult says
For smaller sites, maybe. But plugins like Duplicator start to fail or have significant diminishing returns on larger sites. For example, if you were working on a site with a lot of media, Duplicator will never be able to transfer everything. You will get warning messages and have to leave media behind in the transfer.
Yes, this tutorial would be overkill for a small blog. But it’s absolutely the way you should go for say, a woocommerce site with 3,000 products (including images and custom data).
The other big consideration is frequency of changes. Some sites are fairly hands-off after they go live. Maybe you just update core + plugins and perform a few minor changes per year. Other sites might require weekly or even more frequent changes. If this were the case, it would become a pain to wait for backups and then drop a backup on the new site (crossing your fingers that it works each time). By using the method described in the tutorial, you can commit smaller changes at a time right after testing them.
mgiulio says
Excellent article.I was looking for info about best practices for wordpress staging sites. The additional section on the git-bitbucket workflow is very much appreciated.
nwesource says
Fantastic tutorial, thank you! I know WPEngine.com has a staging site built into their hosting options which seems fantastic although I haven’t tried it just yet. Are there any other easier options you know of to setup and operate a staging site, with more of a plugin functionality like WPEngine? They literally have a clone to staging button and a clone to live button that makes this seem like a process from the 80’s LOL…
Amazing tutorial, thank you for enterprise level content!
WPBeginner Staff says
No you first need to extract the zip folder and then upload the contents of wordpress directory to your staging site.
Tony Leary says
Can someone elaborate on this one step:
“First download a fresh copy of WordPress from WordPress.org. Upload the contents of WordPress to your staging site. Note, do not run the WordPress install yet.”
I read that as “1) download WordPress zip file from WordPress.org and 2) upload .zip file to /staging folder via File Manager.” However, I don’t think that’s correct.
bcall says
You can upload the .zip file and then extract the contents within file manager.
WPBeginner Staff says
Most probably your subdomain is not configured correctly.
Julius says
I actually found out the problem..and it’s been resolved…however, I am unable to add images to my library….anyone else experienced this challenge.
Hans Lindgren says
Is the wordpress install running on Windows?
(If so, you need to grant Modify NTFS permissions to IUSR on C:WindowsTemp)
Julius says
Awesome tutorial…however, after I attempt to log into the staging site I am taking to the “Opps! Google Chrome could not find http”. What am I doing wrong?
Julius says
This is really a great tutorial and something I been wanting to do for quite sometime. My problem is that when I visit the WP login screen it appears that the styling from my theme isn’t applied. Is this normal? Also, when I enter my credentials from the live site into the fields for the staging site, it doesn’t log me in. It’s taking me to the “Oops! Google Chrome could not find http”. Am I doing something wrong?
Sloan Stewart says
Very helpful article. Only issue I have is that when it begins discussing version control, it switches from focusing on the alternate wordpress installation on the server to a local installation on one’s machine.
I am assuming one would build your site locally (I am using WAMP) and then use Git/Bitbucket & Ftploy to update your dev/staging wordpress install? That would mean one would have three versions of the wordpress site at all times [Production, Dev/Staging, Local].
How does one ensure your local wordpress install remains compatible with the database and other configuration on the server? Or is there a way to utilize Git/Bitbucket/Ftploy on the server without having to involve a local copy of your wordpress site.
Karlis says
Do you need to create user for your freshly created phpmyadmin database?
WPBeginner Staff says
No this tutorial is not written for WordPress multisite.
Aathi says
Hi,
Will the above process works for wordpress multisite ?
Cheryl S. says
Because I typically develop in a staging area on my server and then move it to the clients server to go live, rolling back to previous versions is nearly impossible. This article has made me seriously consider implementing version control with Git and Bitbucket. Thank you so much for this tutorial.
WPBeginner Staff says
Yes this would be a better approach.
Mimi Bondi says
Thank you. Is it safe to simply copy all the files from the ”test” site and paste them over the current ”live” files via FTP? Or is there more to it?
Mimi Bondi says
Would this be the best way to duplicate a website, set it up with a new theme/content then copy it over to the current live website?
I want to change theme but it’s quite a big job so instead of activating it then frantically trying to fix things for days, I’m looking for a way to copy my current site, change it all ”in the background” then make the new one live. Please let me know if it’s even possible?
Mimi Bondi says
Once i have my site exacty how i want it in the staging environment,
is there a safeway to copy those files to the real live site?
My goal is to change themes but because this would involve quite a bit of
setting up, i am looking for a way to do this safely and only replace my
current content with the new content when it’s ready (without changing
permalinks and SEO hopefully). Is that possible?
Larry says
Excellent article….I was able to follow the instructions step-by-step and complete the creation of development site on my hosting server. Kudos to the writter.
Mike says
I’m having some issues when I try to run the SQL queries to change the references to the staging site. I am receiving the following error:
”
#1064 – You have an error in your SQL syntax; check the manual that corresponds to your MySQL server version for the right syntax to use near ‘1
UPDATE wp_options SET option_value = REPLACE(option_value, ‘http://example’ at line 1
”
My SQL query is as follows:
”
1
UPDATE wp_options SET option_value = REPLACE(option_value, ‘http://example.com’, ‘http://dev.example.com’);
2
UPDATE wp_postmeta SET meta_value = REPLACE(meta_value, ‘http://example.com’, ‘http://dev.example.com’);
3
UPDATE wp_posts SET guid = REPLACE(guid, ‘http://example.com’, ‘http://dev.example.com’);
4
UPDATE wp_posts SET post_content = REPLACE(post_content, ‘http://example.com’, ‘http://dev.example.com’);
”
As I missing a step or do I have something incorrect in query? Thanks for your help.
Mike says
Never mind, I figured out my issue. Feel free to delete this comment.
djramc says
i have the same problem. could i ask how did you solve this issue?
thanks by advance
#1064 – You have an error in your SQL syntax; check the manual that corresponds to your MySQL server version for the right syntax to use near ‘)’ at line 1
WPBeginner Support says
You need to remove numbers from lines, replace example.com with your live site url and dev.example.com with your development or staging site URL.
Administrador
Bevis Larsen says
This article is most useful for the user who want to make advance wordpress application
Brad E says
I followed the directions and am able to get the staging site to work. However, every link, page and even login revert to the live site not the staging site. How do I fix this?
WPBeginner Support says
you need to change site address and wordpress address. To do that you need to run this SQL query in phpmyadmin for the database of your staging site:
UPDATE wp_options SET option_value = REPLACE(option_value, ‘ORIGINAL_URL’, ‘NEW_URL’);
UPDATE wp_postmeta SET meta_value = REPLACE(meta_value, ‘ORIGINAL_URL’, ‘NEW_URL’);
UPDATE wp_posts SET guid = REPLACE(guid, ‘ORIGINAL_URL’, ‘NEW_URL’);
UPDATE wp_posts SET post_content = REPLACE(post_content, ‘ORIGINAL_URL’, ‘NEW_URL’);
Don’t forget to replace the original url with the url of your live site and new url with the URL of your staging site.
Administrador
Brad E says
OK – it works now. I had to run the query several times, but got it to work. The problem I am having now, is that all of the theme settings are missing. The header, widgets, background, etc. are set to the theme’s defaults. I am not sure how to update the settings to what the live site has. I copied the 3 files from the wp-content directory. Thanks for the outstanding article and support.
ROHIT says
Hi,
As usual, just read you well written article on staging. I’ve got only question in mind right now and is that if there is any changes made in database while working on any project then do I need to upload it seperately on server from local environment whereas files would automatically get deployed via ftploy.
Cheers and Thanks.
Keep your good work up.
Clive says
If I make changes on my local WP project, I understand files in my theme are changed, and those are uploaded to staging via BitBucket/Ftploy. What about the database/tables from my local project? I don’t understand why those aren’t also included? Or would the database/tables in staging be updated based on theme changes that are uploaded? Thanks!!
WPBeginner Support says
Clive, in your BitBucket repository you can only store your WordPress files. FTPloy simply syncs those files to your staging site.
Administrador
Paul Sweany says
What do you recommend for when database changes are made? Let’s say I create a new page; should I just re-import the database on the dev server after I make changes to it on my local copy? Also, moving it from dev to live, any recommendations other than manually importing it and running a search and replace to fix the URL?
Glen Clay says
As usual, great article and right when I need it. Keep up the great work! On another note, I am on my iPhone and that annoying floating black ‘Trending’ bar keeps getting in the way of me commenting. This article benefited me so much that I went through the several tries it took for me to comment.
WPBeginner Support says
Glen, thanks for your feedback. We will look into it.
Administrador
Eben says
I wasn’t really mentioned on what to do with the staging database and how to transfer the changes to the live database, especially if your client has been making changes to the live site while you’ve been making changes to the staging site and there are changes in both databases.
This is one area of staging environments with wordpress that I haven’t been able to get my head around.
WPBeginner Support says
Staging is basically for development, when working on themes or plugins. We imported the database only so that we have actual data to test with. It is not supposed to be a synchronized mirror of your live site.
Administrador
Juliana Maggioli says
I don’t know if is the same as Eben’s question, but everything is going fine till…: upload/transfer the staging content to the live site. supposing everything is perfect in the staging, how do i make all this perfect structure/content be the live site, without risks?
Damien Carbery says
I have started using WP Migrate DB (http://wordpress.org/plugins/wp-migrate-db/) to convert urls and paths in the DB. It will also convert urls and paths that are in serialised data.
So I copy the files to the staging server and create a database and then export the live db via WP Migrate DB and import it to the new database via phpMyAdmin.
The biggest issue is when the live site is updated before I bring the staging server db back.
Zimbrul says
If you have Softaculous is even easier to deploy a staging site to the live site: you can clone the site to a location within the same server.
It’s what I’m doing: I create the staging environment and when done I just go the the list of my WordPress installs in Softaculous control panel and “clone” the site to the live location. The live location must be empty by other files for this to work.
WPBeginner Support says
Thats another way to do it.
Administrador
Giacomo Ardesi says
Hey Zimbrul, can you give some more details about Softaculous and how you used it please?
Giacomo Ardesi says
Hey Zimbrul, could you please give some more details on how you use Softaculous to clone your WP staging site? Thank you!
M Asif Rahman says
Thanks Syed & The Team, that’s one of the most complete and understandable for normal readers Staging Guide for WP. Nicely done.