¿Estás buscando una forma de crear una barra de pie de página flotante y fija en WordPress?
Una barra de pie de página flotante y fija permanece visible en su sitio web incluso cuando los usuarios se desplazan hacia abajo en su página. Puede ayudarte a promocionar ofertas de descuento o contactos en medios sociales, lo que puede reducir la tasa de rebote y aumentar las conversiones.
En este artículo, le mostraremos cómo crear fácilmente una barra de pie de página flotante fija en WordPress, paso a paso.
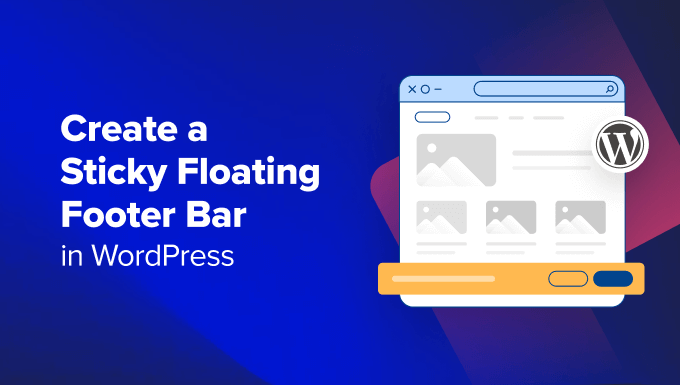
¿Qué es una barra de pie de página flotante en WordPress?
Una barra de pie de página fija y flotante permite mostrar de forma destacada contenidos y noticias importantes a los usuarios.
Esta barra permanece visible para los visitantes en todo momento, por lo que es más probable que hagan clic en ella y descubran más contenidos útiles.
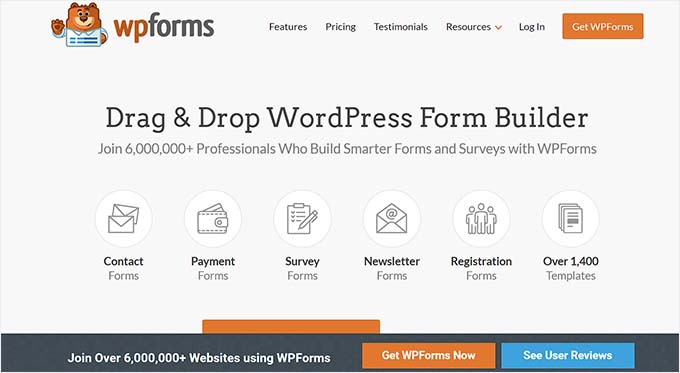
Puede utilizar la barra flotante de pie de página para:
- Dirija más clics a otras entradas del blog.
- Genere clientes potenciales y cree su lista de correo electrónico.
- Llame la atención sobre cupones especiales u ofertas/ventas con descuento.
- Promociona tus cuentas en los medios sociales.
- Crear reconocimiento de marca.
- Proporcione acceso a recursos importantes en su sitio web WordPress.
Dicho esto, veamos cómo crear fácilmente una barra de pie de página flotante y fija en WordPress. Le mostraremos dos métodos en este tutorial, y puede utilizar los enlaces de abajo para saltar al método de su elección:
Método 1: Crear una barra de pie de página flotante y fija con OptinMonster (Recomendado)
Puedes crear fácilmente una barra de pie de página flotante y fija con OptinMonster. Es la mejor herramienta de generación de clientes potenciales y optimización de conversiones del mercado que hace que sea súper fácil convertir a los visitantes de tu sitio web en suscriptores.
OptinMonster viene con un maquetador de arrastrar y soltar y plantillas prediseñadas que le permiten crear una barra de pie de página flotante, ventanas emergentes deslizantes y banners sin utilizar ningún código.
Recomendamos este método porque OptinMonster es súper fácil de usar y ofrece más opciones de personalización que el método del plugin gratuito.
Paso 1: Instale OptinMonster en su sitio web
En primer lugar, deberá acceder al sitio web de OptinMonster haciendo clic en el botón “Obtener OptinMonster ahora”.

A continuación, debe instalar y activar el plugin conector gratuito OptinMonster en su sitio web. Para obtener más instrucciones, consulte nuestra guía para principiantes sobre cómo instalar un plugin de WordPress.
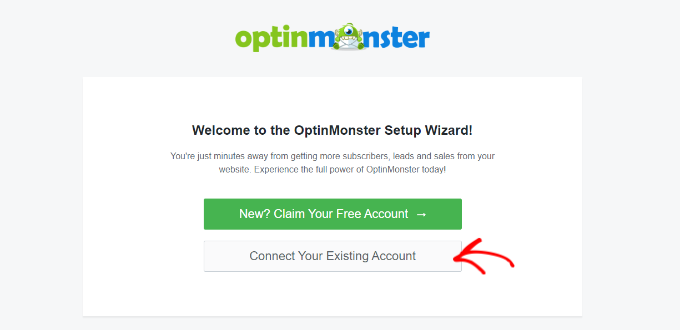
Tras la activación, el asistente de configuración de OptinMonster se abrirá en su pantalla, donde tendrá que hacer clic en el botón “Conectar su cuenta existente”. Esto conectará su sitio de WordPress con su cuenta de OptinMonster.
Una vez hecho esto, se abrirá una nueva ventana en tu pantalla.
Aquí, haga clic en el botón “Conectar con WordPress” para seguir adelante.

Paso 2: Crear y personalizar la barra de pie de página fija flotante
Ahora que ha conectado OptinMonster con su sitio web, es el momento de crear una barra de pie de página flotante y fija.
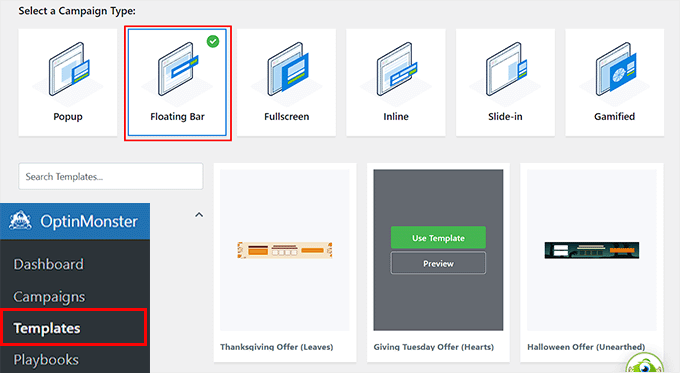
Para ello, debe visitar la página OptinMonster ” Plantillas desde la barra lateral del administrador de WordPress y seleccionar “Barra flotante” como tipo de campaña.
Una vez hecho esto, todas las plantillas prediseñadas para la barra flotante se cargarán en la pantalla. Desde aquí, puedes hacer clic en el botón ‘Usar plantilla’ sobre la que quieras utilizar.
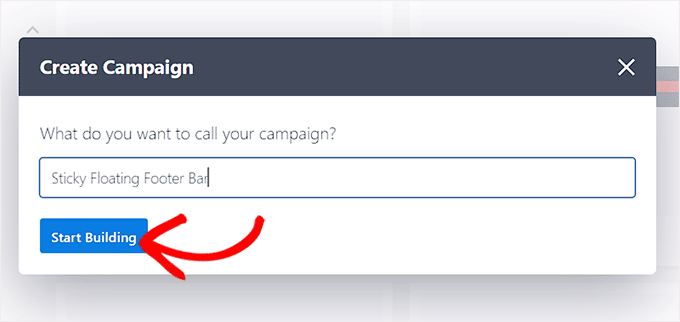
Se abrirá la indicación “Crear campaña” en la pantalla, donde podrá añadir un nombre para la barra flotante de pie de página que está a punto de crear. Puede ser cualquier cosa que desee, ya que el nombre no se mostrará a sus visitantes.
Después, basta con hacer clic en el botón “Empezar a construir”.
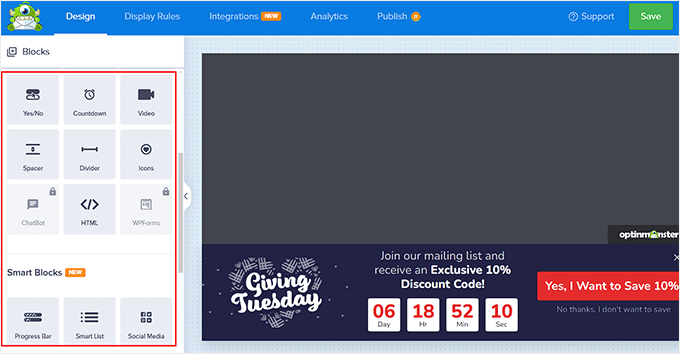
El maquetador de arrastrar y soltar de OptinMonster se lanzará ahora en su pantalla, donde podrá empezar a personalizar su barra flotante de pie de página. Aquí, usted notará una vista previa de la barra flotante a la derecha con bloques en la columna de la izquierda.
Por ejemplo, puede utilizar un bloque temporizador de cuenta atrás si su barra flotante de pie de página promociona una oferta de descuento. Esto ayudará a crear una sensación de urgencia entre los usuarios y les animará a pasar a la acción.
También puedes añadir un CTA, un vídeo o un bloque de medios sociales a la barra de pie de página. Para obtener instrucciones detalladas, puedes consultar nuestro tutorial sobre cómo crear una barra de alertas en WordPress.
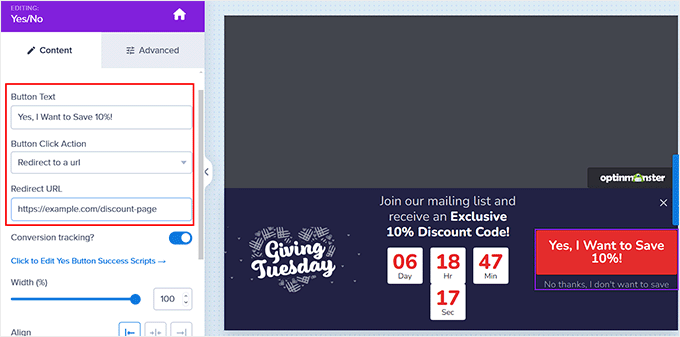
También puede editar el texto de la barra de pie de página al hacer clic en ella. Esto abrirá los ajustes del bloque en la columna de la izquierda, donde podrás ajustarlos a tu gusto.
Por ejemplo, si desea cambiar la oferta de descuento en la plantilla, puede cambiar el texto del botón. A continuación, puede seleccionar la opción “Redirigir a una URL” y añadir el enlace de la página a la que desea dirigir a los usuarios al hacer clic en el botón.
Paso 3: Configurar las reglas de visualización de la barra de pie de página flotante
Una vez que esté satisfecho con la personalización de su barra de pie de página, sólo tiene que cambiar a la pestaña “Reglas de visualización” de la parte superior.
Aquí puede configurar cuándo mostrar la barra en su página. Si desea mostrar la barra flotante a pie de página en todo momento, debe seleccionar la opción “tiempo en página” en el menú desplegable de la izquierda.
Después, elige la opción “es inmediato” en el menú desplegable de la derecha.
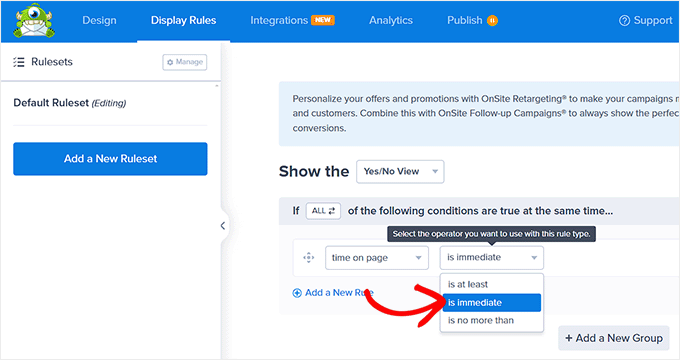
Sin embargo, para mostrar la barra de pie de página flotante en una página específica, debe seleccionar la opción “Orientación de página” del menú desplegable de la derecha.
A continuación, elija la opción “coincide exactamente” en el menú desplegable del centro y añada la URL de una página. Una vez hecho esto, la barra de pie de página flotante solo se mostrará en la página elegida.
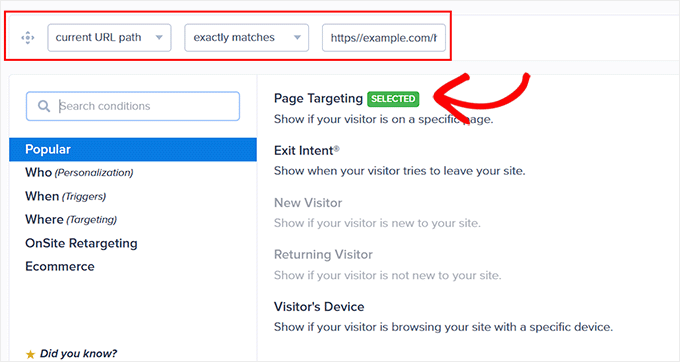
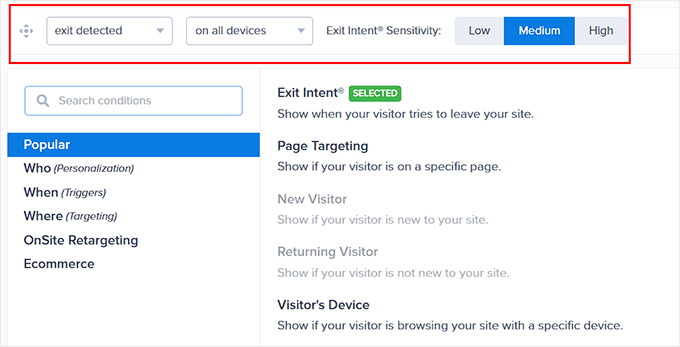
Además, puede seleccionar la opción “Intención de salida” para mostrar la barra de pie de página flotante y fija cuando el usuario esté a punto de abandonar su sitio. A continuación, puede configurar la sensibilidad de la intención de salida y elegir los dispositivos en los que se mostrará la barra de pie de página. Esto puede ser útil si desea reducir su tasa / tarifa de rebote.
Incluso puede seleccionar la opción “Dispositivo del visitante” si solo desea mostrar la barra flotante de pie de página a los visitantes de escritorio.
También puede configurar las reglas de visualización en función de la fecha, la hora o la distancia de desplazamiento seleccionando la opción “Cuándo” de la columna de la izquierda.
Para una explicación de más opciones de reglas de visualización, puede ver nuestra reseña / valoración completa de OptinMonster.
Paso 4: Publique su barra de pie de página flotante
Una vez que haya definido las condiciones de visualización de su barra de pie de página, pase a la pestaña “Publicar” de la parte superior.
Aquí, basta con hacer clic en el botón “Publicar”.
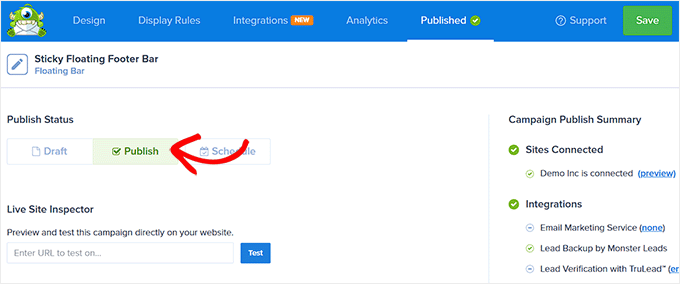
Después, no olvides hacer clic en “Guardar” para que los cambios se apliquen.
Ahora, puede visitar su blog de WordPress para ver la barra de pie de página flotante fija en acción.

Alternativa: También puede utilizar Thrive Ultimatum para mostrar una barra de pie de página flotante con temporizador de cuenta atrás en su sitio web. Para más detalles, consulte nuestra revisión de Thrive Themes Suite.
Método 2: Crear una barra de pie de página flotante fija con un plugin gratuito
Si está buscando una forma gratuita de crear una barra de pie de página flotante y fija, entonces este método es para usted. Sin embargo, tenga en cuenta que tendrá opciones de personalización limitadas en comparación con OptinMonster.
En primer lugar, debe instalar y activar el plugin Firebox Popup Builder. Para obtener instrucciones detalladas, consulte nuestro tutorial sobre cómo instalar un plugin de WordPress.
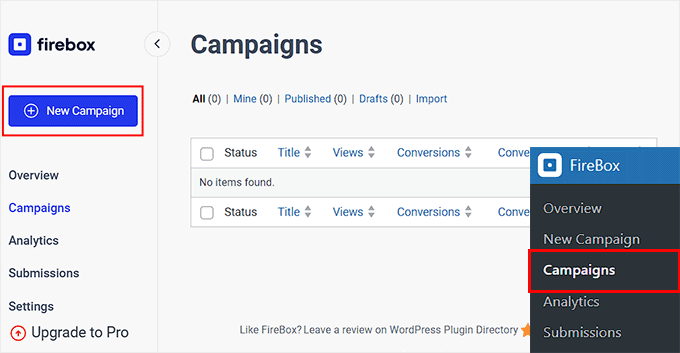
Tras la activación, visite la página “Campañas” de Firebox desde el escritorio de WordPress y haga clic en el botón “+ Nueva campaña”.
Esto abrirá la biblioteca de campañas de Firebox, donde puede buscar plantillas prefabricadas de barras fijas flotantes.
A continuación, sólo tiene que enlazar el enlace “Insertar” situado bajo la barra flotante de pie de página que desee. Ten en cuenta que si seleccionas una barra de cabecera, no podrás cambiar su posición. Debe asegurarse de que la plantilla que selecciona es para una barra de pie de página.
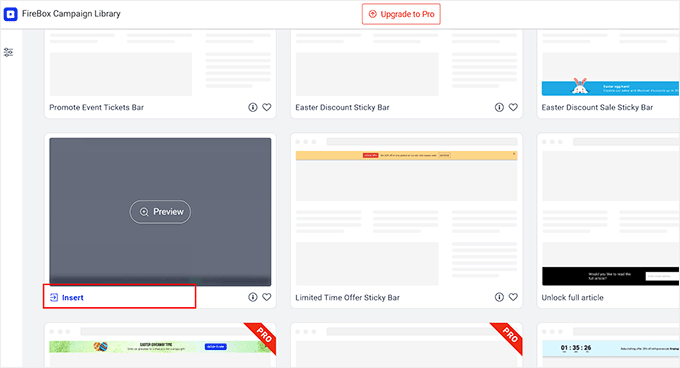
Ahora se abrirá en su pantalla el editor de bloques, donde podrá empezar por añadir un nombre a su barra flotante.
Después, puedes editar el texto del pie de página al hacer clic sobre él y añadir nuevos bloques al hacer clic en el botón “+”. Se abrirá el menú de bloques, donde podrás añadir imágenes, encabezados, párrafos, vídeos, citas o bloques de listas.
Por ejemplo, si quieres añadir cuentas de medios sociales, puedes elegir el bloque Iconos sociales. A continuación, puedes añadir cuentas y enlaces de medios sociales a través del panel de bloques.
Para más detalles, puede consultar nuestro tutorial sobre cómo añadir iconos de medios sociales en los menús de WordPress.
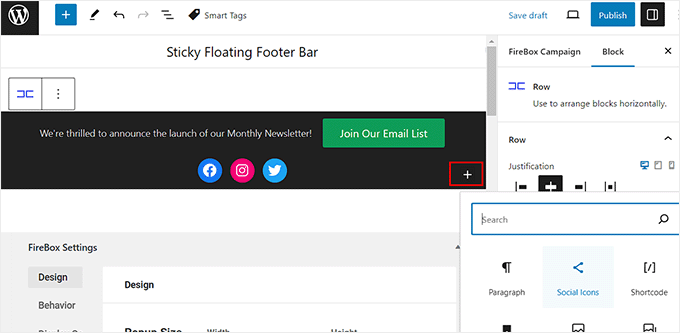
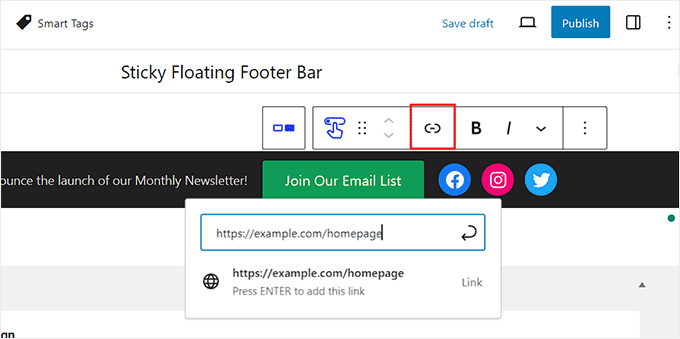
También puede cambiar el texto del bloque de botones y añadir un enlace a la página a la que desea dirigir a los usuarios, al hacer clic en el icono de enlace de la barra de herramientas del bloque.
A continuación, escriba la URL que desee y pulse “Intro”.
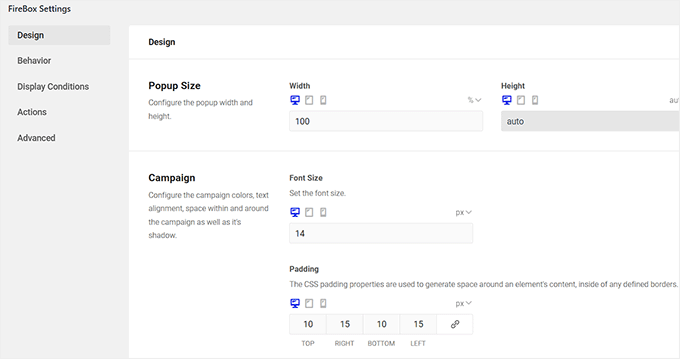
A continuación, puede desplazarse hasta la sección “Ajustes del Firebox”.
Aquí puede cambiar el color de fondo, el color del texto, la alineación, el tamaño, el relleno y el margen de la barra flotante de pie de página.
A continuación, cambie a la pestaña “Comportamiento” de la columna de la izquierda y seleccione “Carga de página” como punto de activación de la barra flotante.
A continuación, utilice el carrusel / control deslizante “Retraso” para elegir un tiempo de retraso para la barra flotante. Por ejemplo, si arrastra el carrusel / control deslizante hasta 15 segundos, la barra flotante de pie de página se mostrará cuando el usuario haya pasado 15 segundos en su sitio.
Si desea que la barra de pie de página flotante y fija se muestre inmediatamente, puede mantener el carrusel / control deslizante en 0.
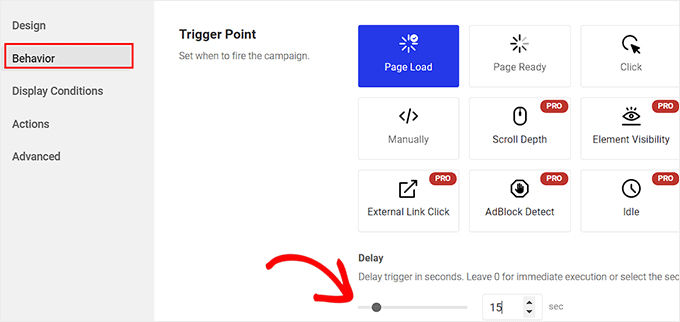
A continuación, puedes dejar otros ajustes como están o configurarlos a tu gusto.
Cuando hayas terminado, no olvides hacer clic en el botón “Publicar” de la parte superior.
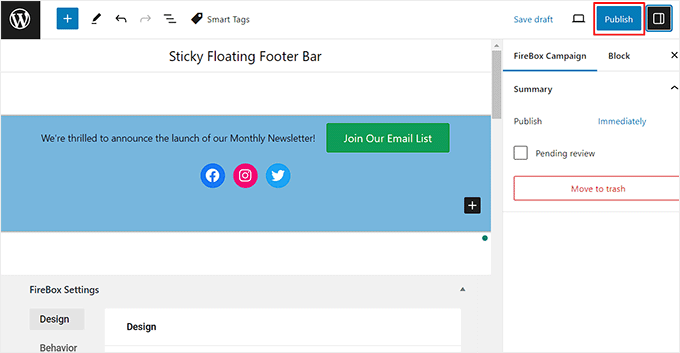
Ahora visite su sitio WordPress para ver la barra de pie de página flotante fija en acción.
Este es el aspecto que tenía en nuestro sitio de demostración.

Bonificación: Crear un menú de navegación flotante fijo en WordPress
Además de añadir una barra de pie de página fija, también puede crear un menú de navegación flotante fijo en su sitio de WordPress.
Un menú de navegación contiene enlaces a las páginas más importantes de su blog de WordPress y actúa como estructura organizativa de su sitio web.
Si hace que este menú sea fijo, permanecerá visible en su página en todo momento, incluso cuando el usuario se desplace hacia abajo en su pantalla. Esto puede aumentar la participación y facilitar la navegación por su sitio web.

Para crear un menú de navegación flotante y fijo, sólo tienes que instalar y activar el plugin Sticky Menu & Sticky Header. Para más detalles, consulta nuestro tutorial sobre cómo instalar un plugin de WordPress.
Una vez activado, visite la página Ajustes ” Menú fijo desde el escritorio de WordPress y escriba #main-navigation junto a la opción ‘Elemento fijo (obligatorio)’.
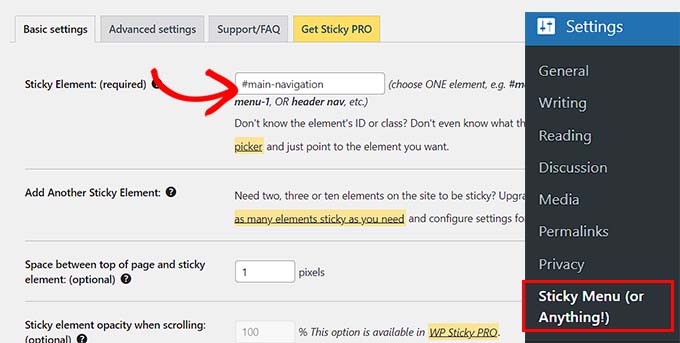
A continuación, haga clic en el botón “Guardar cambios” para establecer los ajustes. Ahora ha creado correctamente un menú de navegación flotante fijo.
Para obtener instrucciones detalladas, consulte nuestro tutorial sobre cómo crear un menú de navegación flotante fijo en WordPress.
Esperamos que este artículo te haya ayudado a aprender cómo crear fácilmente una barra de pie de página fija flotante en WordPress. Puede que también quieras ver nuestra guía para principiantes sobre cómo añadir código de cabecera y pie de página en WordPress y nuestra lista de cosas que añadir al pie de página en tu sitio WordPress.
If you liked this article, then please subscribe to our YouTube Channel for WordPress video tutorials. You can also find us on Twitter and Facebook.


Syed Balkhi says
Hey WPBeginner readers,
Did you know you can win exciting prizes by commenting on WPBeginner?
Every month, our top blog commenters will win HUGE rewards, including premium WordPress plugin licenses and cash prizes.
You can get more details about the contest from here.
Start sharing your thoughts below to stand a chance to win!
Ahmed Omar says
An excellent tutorial on creating a “sticky” floating footer bar in WordPress
Your step-by-step guide, especially the first method is clear and effective.
I use the first method for this floating footer
Thanks for this practical solution
WPBeginner Support says
You’re welcome!
Administrador
Steve Alvi says
Please I want a close button with this footer floating bar.
WPBeginner Support says
OptinMonster would be the method that allows you to have a close button the easiest.
Administrador
Trendy Avinash says
Worked Like a Charm,Without any Plugins.
Thanks
WPBeginner Support says
Glad our guide was helpful
Administrador
Alejandro Ferguson says
The floating footer code really works. Thank u
WPBeginner Support says
Glad our guide could help set it up
Administrador
John SMith says
How to add a FB sharing button in a floating bar in the only mobile, not for desktop.
WPBeginner Support says
You would want to take a look into option 2 in our social media plugins here: https://www.wpbeginner.com/plugins/best-social-media-plugins-for-wordpress/
Administrador
wlepcha says
How to add menus in the sticky footer instead of random ads.
WPBeginner Support says
You would want to take a look at our article here: https://www.wpbeginner.com/wp-themes/how-to-create-a-sticky-floating-navigation-menu-in-wordpress/
Administrador
Marius says
Very nice tutorial. I implemented the manual code and worked like a charm. Only one more feature I need… can we also have a X or close button to close the floatingbar and remain like this for the rest of the visit? I know, cookies are involved, but maybe you can give us a simple solution. Thank you!
Greg Guz says
Very clear and east to follow tutorial.
Floating bar seem to work absolutely fine, but I’m getting following error in chrome console:
Failed to load resource: the server responded with a status of 404 ()
Any ideas?
Ankush jain says
Very helpful your website
thank you very much
Mark Rowles says
Just a quick pointer CSS wont work for this.
You’ve got fixedBar in the html as a class name (capital B) and you’ve got fixedbar in the css (lowercase b) so the css doesn’t apply.
Can someone correct the code please to help others that discover this post?
WPBeginner Support says
Hey Mark,
Thanks for pointing this out. We have updated the code.
Administrador
Robi says
Dear WPBeginner, and Friends
If I have specific section that I’ve created using Elementor Page Builder, How I can use it as a custom sticky footer? (It contains more than one column, some buttons and text). I want this type of sticky footer, Instead of simple text as explained in this tutorial.
Thanks..
Daniel says
1) Added code just before the tag in the footer.php from my theme dir /wp-content/themes/mytheme/
2) Added code to my theme dir /wp-content/themes//mytheme/style.css not working deleted and then i try to added from the theme option to custom css menu same problem not working
3) Added floatingbar.js with the code inside in /wp-content/themes/mytheme/js
4) Added code to functions.php first not working.. tried with site-specific plugin also same thing
I tried on both website different theme same problem not working just sit there it`s not floating
Some help will be welcome… I really need this
WPBeginner Support says
Hey Daniel, try using Inspect tool to troubleshoot any issue with CSS.
Administrador
Daniel says
Thanks for the replay but for me messing with css and js it`s like building a space ship… i will give a try to figure out whats rong
Regards
Daniel
Daniel says
I used the inspector tools and i don`t see any read lines there….
Dueadla Framin says
I have the same issue! The code you posted isn’t even working on default twenty sixteen theme. It’s not floating it’s just stuck on the bottom of the webpage after you scroll all the way to the bottom.
Igor says
there is an error in the fixedBar reference in the css code (it is referencing as “.fixedbar” whereas it should be “.fixedBar”. Change that and see if it works.
henrykene says
WpBeginner please i will like to use it for displaying my Adsense ads on mobile views. How will i go about it and what are the code to make it show Adsense stick footer for mobile viewers?
Nawaf says
Awesome.
But there is a bug. When you open it in mobile. The ribbon gets cutted. And u can see only half of it
Tip says
In my new theme, I have the option of using an infinite scroll feature. This is great except that the reader would have to scroll a long time to reach my old footer, which is where I put the legal disclosures, etc.
With this floating footer bar, I was able to nicely put the links there and now I can use the infinite scroll feature without having to reposition a bunch of required links.
Thanks for this tutorial. I learned a little bit more PHP and CSS too!
Sarah Noah says
I have a client who wants to have a link to REQUEST A QUOTE on every page so when I saw this sticky footer it seemed perfect until I read that somer users are annoyed by it. Do you guys think REQUEST A QUOTE stuck on the bottom of every page is annoying? Of course it is the most important thing the company wants the user to do.
Roy E says
Footer bar shows fine in FireFox but is not sticky in IE11 where I had to scroll down to see “About WPBeginner”, “Site Links”, and “Sites We Like” ??
Roy E says
Of course, when I pressed Enter on the previous comment ( IE issue), the sticky footer bar appeared. Not sure what happened but the problem went away. Please disregard this comment and the previous one.
yugishtha says
do we also have a floating top bar menu plugin for WP?
Hutzel says
I tried all, but it does not Show me the fixed footer. Can somebody help or assist me please? thanks
Devendra Meena says
Is there any plug in, which can have some scripts on a floating box, and with a x button to close it.
Khushal Rao says
this can also be used to showing ads too..
Dick Sijtsma says
Lowering the opacity to, for example 0.60 gives the visitor a glimps of the underlying content. I think that would be a nice effect. But changing the opacity of the bar, changes the opacity of the text too. And that ‘dilutes’ the message. Any trick to prevent that?
Thanks.
Jan dB says
As mentioned earlier, this is a very easy tutorial and works like a charm on most computers.
However, I also have issues regarding the mobile browsers.
Have you already come up with a solution for that?
Thanks and keep up the good work!
Editorial Staff says
For mobile browsers if you have a responsive design, then you can simply use media queries and display: none the entire footer bar.
Administrador
Theresa @DearCreatives says
Nice. I am actually looking for a tutorial for adding script to top of post that is there every time I post for disclosure purposes. If you have one like that or know of a plugin can you send me an @DearCreatives on twitter or email me thanks!!
Dick Sijtsma says
Hi, looks good, but i do understand the reasons some people dislike these kinds of footers very much. Nevertheless i’m trying to accomplish this effect too.
In the source of this very page, i saw you externalized the javascript. You’ve put it in the main.js javascript file, and linked this main file to the page in the header.
So far so good, i can manage that. But, i can’t find the place where the ‘randomtip’ function is called.
In short my question is: how do i externalize the javascript? Hope to hear from you.
Matthew says
Great tutorial. One issue that other might also run into – I only have one footer link (as opposed to having several in rotation) and this footer bar shows even on the page that I link to in the footer. Do you know of a quick way to not show this footer on particular pages? Or to, perhaps, only show it on the homepage?
Editorial Staff says
Sure just wrap the text with the conditional statement is_front_page().
Administrador
Antonio says
Here a true beginner. How do I actually do that? I totally new to WP and PHP. As far as I understand I have to put somewhere in the footer.php but I really have no idea where. Great article though. It managed to add it to my blog as well
Caio says
I like it, but it is a bit too distracting. Maybe make it nice and light by turning down the opacity, and then adding a style statement on hover to turn the opacity back up to .9
Sopheak says
Wow! It was a great tutorial.
Pawan says
Great, I was looking for same.
Sai Kumar says
Hi, this sticky floating footer bar is really awesome! I am going to add it in my blog for sure. Thanks a lot for Sharing!!
Max Manroe says
Wow nice tutorial and think this is great, I will try it to my blog. Thanks
Zseller Istvan says
Guys, this is the only thing that I really hate about WpBeginner. When I read your articles on my tablet, with Opera this footer bar stays in the middle of the page for seconds when scrolling. It is a new tablet, and powerful enough. The footer bar covers the content, which is really annoying. After some time it moves to place.
Editorial Staff says
We are working on a mobile/tablet version. This won’t be an issue soon enough.
Administrador
Salman Ahmad says
Wow ! This is Awesome ,Thanks for sharing
Peter says
Thanks a lot for providing us this great tutorial. Definitely it will be helpful for me.
Amitabha Chakraborty says
Hi
Nice tutorial. Was thinking a “X” button to close it if it annoys someone would have been great.
Regards
Amitabha
David says
I like a footer bar. I think its a great place to put social sharing buttons. I made my own on a client’s site but it has the option of being able to close. It also holds the go to the top button. Pretty nifty. However, like the footer bar I made, on my HTC EVO 4G your footer bar doesn’t stick at the bottom as it should. It actually is stuck in the middle of an article and is really annoying because it covers up a bit of the text. The bar I made can be closed so it is only a quick annoyance. Your bar cannot so I can never read that text. Again this is on my phone. If you can figure out the workaround please let me know.
I came to this article through your newsletter which is great. Thanks for that.
Michael says
Like or hate these types of bars, there is great value in seeing how the code is written to implement such a thing, at least. I use Hello Bar and the Wibya bar on several of my sites and although I think some people have become blind to them, including myself, and some hate them, they still work to help convert and share content a lot of the time.
I appreciate what I view as a helpful little code lesson. Great site!
Taryn Fox says
I personally feel that the floating footer bar is an extremely user-hostile feature, especially one like yours which is a) unhideable, and b) expands to twice its intended size (or greater) when viewed while the font size is increased.
Speaking of which, even with nosquint magnifying the rest of the text on this site, the text in the comments field is tiny and hard to read if you have visual accessibility issues.
Speaking of other accessibility issues, asking for a person’s “Real Name” is hostile to anyone who uses a pseudonym. This includes trans women, people who are being stalked, people who are hiding their online activity from others who are capable of hurting them, and people who simply prefer and are better known by their pseudonyms than their legal or birth names (both of which are more inclusive and accurate terms for what you call a “real name”).
Also, you misspelled “meaningful” in the “Add a comment” notice.
I wasn’t going to leave a long rambling comment of criticism, but I feel most people have banner blindness to footer bars, and are ambivalent towards them at best and annoyed by them at worst. Most people who aren’t web designers, anyway. I thought maybe someone should speak up for the people who are actually affected by them. Then I ran into the other issues once I went to your site from Google Reader, and tried to leave a comment.
Thank you for your tutorials, and I hope things go well for you.
Editorial Staff says
Hey Taryn,
We really appreciate your invaluable feedback. There are definitely pros and cons to having a floating footer bar like this ones. The cons you have already pointed out. We thought about doing a cookie tracking option where regular users can close the bar and never have it shown again. But even the regular users sometime miss out on great deals because of that. Also if they clear their browser’s cache or use a different computer, the bar shows up again. Yet another downside of cookie tracking. We’ve given extensive thoughts of having user registration and offer personalization on the site.
As for comments, the real name text in the field is there to serve one purpose, stop spammers. If you read the comments policy, it says “We do not allow Keywords stuffed in the name field. You must use your name or nick name for commenting.” Often folks use their nicknames, and we are completely ok with it. But if your nickname is “best insurance company” or something like that… then we mark it as spam.
Thanks for pointing out the typo. We have fixed that.
Administrador
Partha Bhattacharya says
This is with respect to Taryn’s comment above:
“…I feel most people have banner blindness to footer bars, and are ambivalent towards them at best and annoyed by them at worst.”
Since you continue using them there is no doubt you get benefits from them, and people do click on them to remain updated just as I did just now…coming here from another page.
Would you mind sharing some stats / lookins as to how effective is the footer bar for you, and also how effective it is as against using a header bar!
staion says
Thanks for this easy and amazing small tutorials! I’ve already implemented it on my site, but without the jquery thing, just using it as announcements.
FreedomJackson says
Awesome thanks for sharing this dude I’m doing some updating and I was trying to find a good way to add this footer bar.
mucho grande gracias senior