En flytande sidfotsbalk förblir synlig på din webbplats även när användarna scrollar nedåt.
Det kan hjälpa dig att marknadsföra rabatterbjudanden, viktiga meddelanden eller sociala medier, vilket kan minska avvisningsfrekvensen och ge fler konverteringar.
Vi har använt flytande sidfotsbjälklag i våra e-handelsbutiker och på våra webbplatser för att marknadsföra rabatter och visa upp nyhetsbrev. Detta har hjälpt oss att generera fler leads och öka försäljningen.
I den här artikeln visar vi dig hur du enkelt skapar ett flytande sidfotsfält i WordPress, steg för steg. I denna handledning har vi använt nybörjarvänliga metoder som inte kräver någon kodning.
Vad är en flytande footer bar i WordPress?
A sticky floating footer bar allows you to prominently display important content and news to users.
Det här fältet är synligt för besökarna all tid, så det är mer troligt att de klickar på det och upptäcker mer användbart content.
Du kan använda den flytande footern för att:
- Få fler clicks till andra blogginlägg.
- Generera leads och bygg din email list.
- Uppmärksamma speciella coupons eller rabatterbjudanden/försäljningar.
- Främja dina konton i sociala media.
- Bygga upp varumärkesigenkänning.
- Ge tillgång till viktiga resurser på din WordPress website.
Med detta sagt, låt oss se hur du enkelt kan skapa en sticky flytande footer bar i WordPress. Vi kommer att visa dig två metoder i denna tutorial, och du kan använda länkarna under för att hoppa till den metod du väljer:
Metod 1: Skapa en sticky flytande footer bar med OptinMonster (rekommenderas)
Du kan enkelt skapa en klibbig flytande sidfotfält med OptinMonster. Det är det bästa blygenererings- och konverteringsoptimeringsverktyget på marknaden, och det gör det super enkelt att konvertera dina webbplatsbesökare till prenumeranter.
På WPBeginner har vi använt det för att skapa banners och popup-fönster som marknadsför våra proffstjänster eller nyhetsbrev. För att lära dig mer, se vår fullständiga OptinMonster-recension.
Pluginet levereras med en dra-och-släpp-byggare och färdiga mallar som gör att du kan skapa en flytande sidfot, slide-in popup-fönster och banners utan att använda någon kod.
Vi rekommenderar den här metoden eftersom OptinMonster är super lätt att använda och erbjuder fler alternativ för customize än metoden med gratis plugin.
Step 1: Installera OptinMonster på din website
Först måste du registrera dig på OptinMonster-webbplatsen genom att klicka på knappen ”Get OptinMonster Now”.

Därefter måste du installera och aktivera det gratis OptinMonster connector plugin på din website. För mer instruktioner, se vår guide för nybörjare om hur du installerar ett plugin för WordPress.
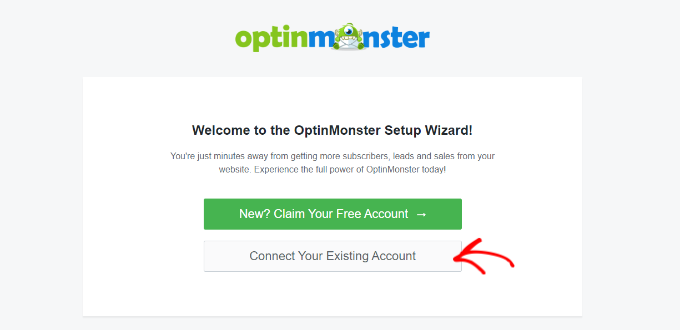
Vid aktivering öppnas OptinMonster Setup Wizard på din vy, där du måste klicka på knappen ”Anslut ditt befintliga konto”. Detta kommer att ansluta din WordPress-webbplats till ditt OptinMonster-konto.
När du har gjort det öppnas ett nytt fönster på din vy.
Klicka här på knappen ”Anslut till WordPress” för att gå vidare.

Steg 2: Skapa och Customize den flytande Sticky Footer Bar
Nu när du har anslutit OptinMonster till din website är det dags att skapa en sticky flytande footer bar.
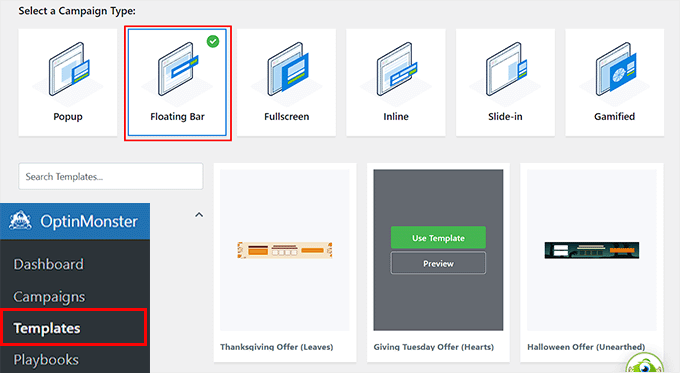
För att göra detta måste du besöka OptinMonster ” Templates page från WordPress admin sidebar och välja ’Floating Bar’ som kampanjtyp.
När du har gjort det kommer alla färdiga templates för den flytande baren att hämtas på vyn. Härifrån kan du klicka på knappen ”Use Template” på den du vill använda.
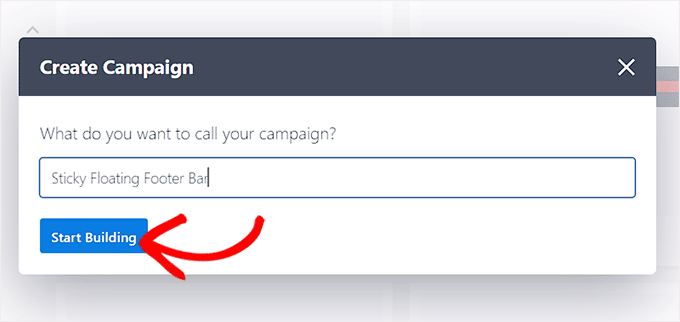
Detta kommer att öppna prompten ”Skapa kampanj” på vyn, där du kan add to ett namn för den flytande footer bar som du håller på att skapa. Det kan vara vad du gillar, eftersom namnet inte kommer att visas för dina besökare.
Efter det klickar du bara på knappen ”Starta byggandet”.
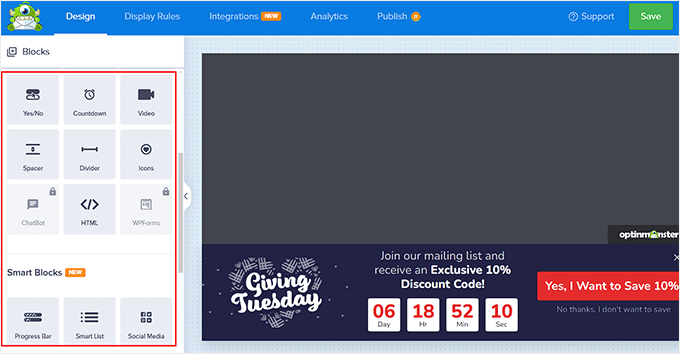
OptinMonsters drag and drop-byggare kommer nu att startas på din vy, där du kan börja customize din flytande footer bar. Här kommer du att notera en flytande bar preview till höger med block i den vänstra kolumnen.
Till exempel kan du använda ett block med en nedräkningstimer om din flytande footer främjar ett rabatterbjudande. Detta kommer att bidra till att skapa en känsla av brådska bland användarna och uppmuntra dem att vidta åtgärder.
Du kan också lägga till ett CTA-, video- eller sociala medier-block i sidfotsfältet. För detaljerade instruktioner kan du se vår handledning om hur du skapar ett varningsfält i WordPress.
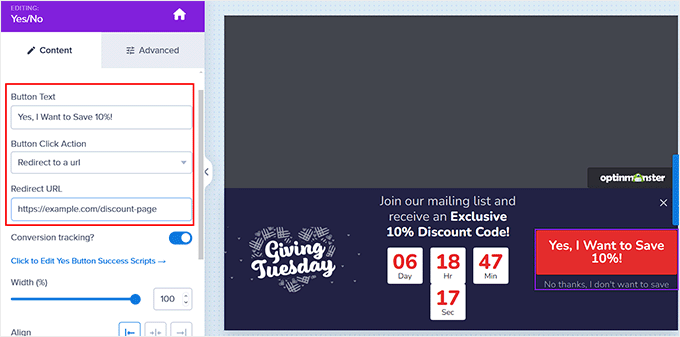
Du kan också editera text i footern genom att clicka på den. Detta öppnar blockinställningarna i den vänstra columnen, där du kan justera dem enligt vad du gillar.
Om du t.ex. vill ändra rabatterbjudandet i templaten kan du ändra texten på knappen. Därefter kan du välja alternativet ”Redirect to a URL” och add to den page-länk som du vill att användarna ska dirigeras till när de klickar på knappen.
Step 3: Konfigurera displayreglerna för din flytande footer
När du är nöjd med anpassningen av sidfotsfältet växlar du bara till fliken ”Display Rules” högst upp.
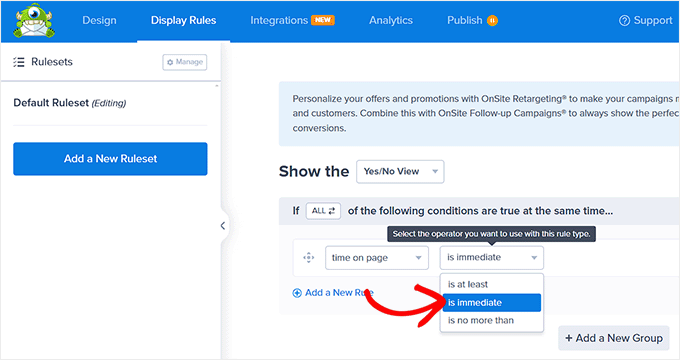
Här kan du konfigurera när fältet ska visas på din page. Om du vill att den flytande footern ska visas all tid måste du selecta alternativet ”time on page” i den vänstra dropdown-menyn.
Därefter väljer du alternativet ”is immediate” i dropdown-menyn till höger.
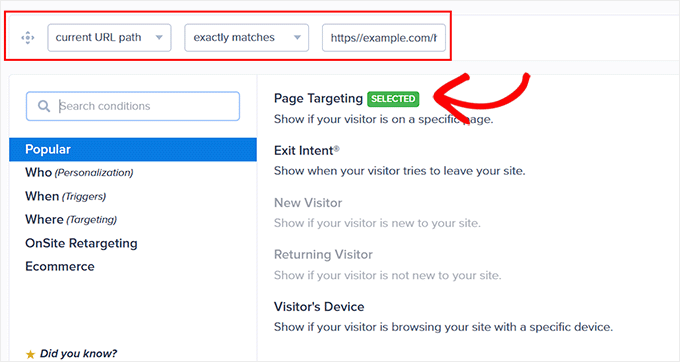
För att visa den flytande footern på en specifik page måste you dock select alternativet ”Page Targeting” från den högra dropdown-menyn.
Därefter väljer du alternativet ”exakt matchningar” från rullgardinsmenyn i mitten och lägger sedan till en sidadress. När du har gjort det kommer den flytande sidfoten bara att visas på den sida du valde.
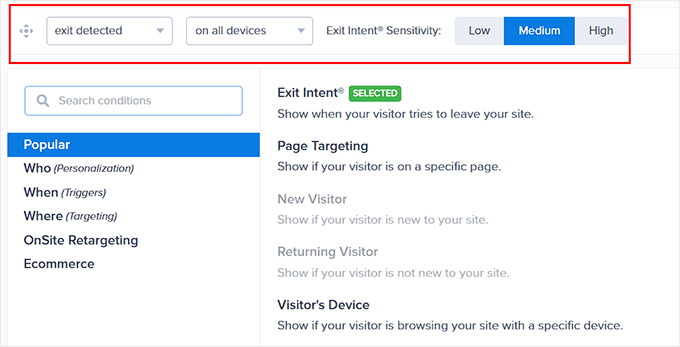
Dessutom kan du välja alternativet ”Exit Intent” för att visa den sticky flytande footern när användaren är på väg att lämna din site. Du kan sedan konfigurera känsligheten för exitavsikt och välja de enheter där footer-fältet ska visas. Detta kan vara praktiskt om du vill minska din avvisningsfrekvens.
Du kan även välja alternativet ”Visitor’s Device” om du bara vill visa den flytande footern för besökare på stationära datorer.
Du kan också konfigurera visningsreglerna enligt datum, tid eller rulla avstånd genom att välja alternativet ”When” i den vänstra colonnen.
För en förklaring av fler alternativ för visningsregler kan du se vår fullständiga OptinMonster review.
Step 4: Publicera din flytande footer
När du har definierat visningsvillkoren för din footer bar, växla till ”Publicera” tabs från toppen.
Här klickar du helt enkelt på knappen ”Publicera”.
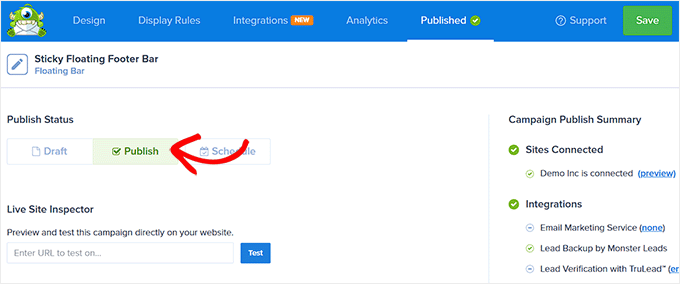
Efter det, glöm inte att clicka på ”Save” för att dina ändringar ska börja gälla.
Nu kan du besöka din WordPress blogg för att se den sticky flytande footern i action.

Alternativ: Du kan också använda Thrive Ultimatum för att visa en nedräkningstimer flytande sidfotfält på din webbplats. För mer information, se vår fullständiga Thrive Themes Suite-recension.
Metod 2: Skapa en sticky flytande flytande footer bar med ett gratis plugin
Om du letar efter ett gratis sätt att skapa en klibbig flytande sidfotfält, är den här metoden något för dig. Tänk dock på att du kommer att ha begränsade anpassningsalternativ jämfört med när du använder OptinMonster.
Först måste du installera och aktivera Firebox Popup Builder plugin. Detaljerade instruktioner finns i vår tutorial om hur du installerar ett plugin för WordPress.
Efter aktivering, besök Firebox ” Campaigns page från WordPress dashboard och klicka på knappen ’+ New Campaign’.
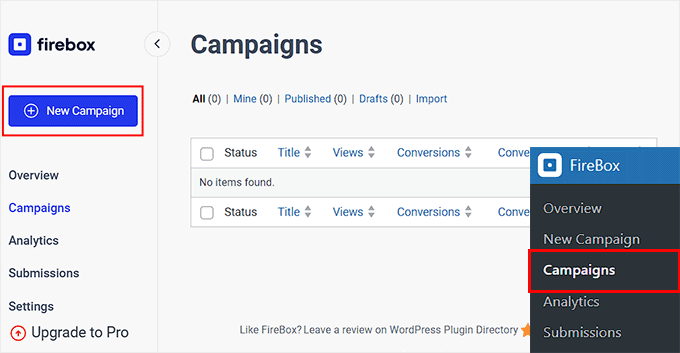
Detta öppnar Firebox kampanjbibliotek, där du kan searcha efter sticky floating bar premade templates.
Därefter klickar du bara på länken ”Insert” under den flytande footer bar som du gillar. Tänk på att om du väljer en header bar, kommer du inte att kunna ändra dess position. Du måste se till att den template du väljer är för en footer bar.
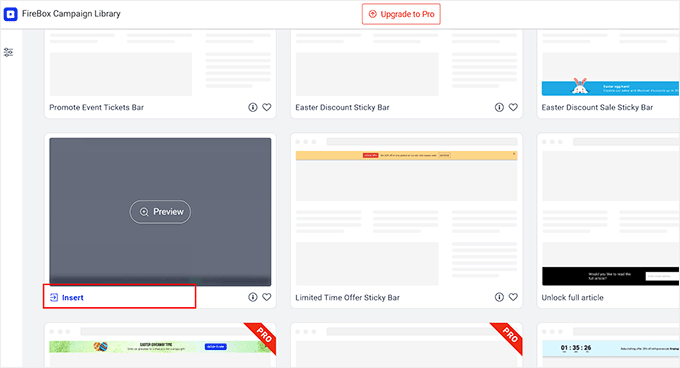
Block Editor kommer nu att öppnas på din vy, där du kan börja med att lägga till ett namn för din flytande bar.
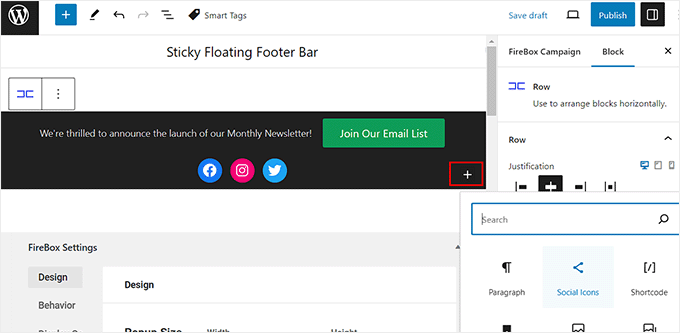
Därefter kan du editera texten i footern genom att klicka på den och lägga till nya block genom att klicka på knappen ”+”. Detta öppnar blockmenyn, där du kan add to images, headings, paragraphs, videos, quotes, or list blocks.
Om du till exempel vill add to handtag för sociala medier kan du välja blocket Social Icons. Efter det kan du add to social media accounts and links med hjälp av blockets panel.
För mer details kan du se vår tutorial om hur du lägger till social media icons i WordPress menyer.
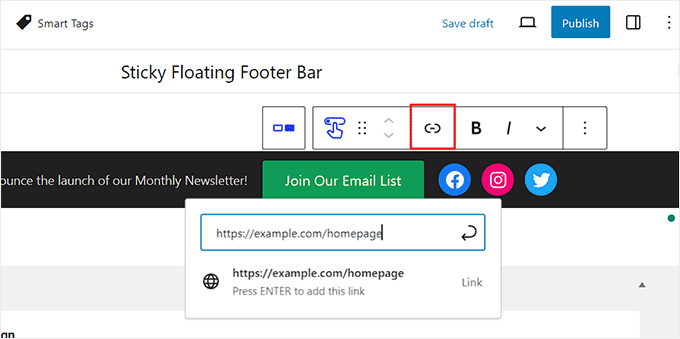
Du kan också ändra texten i blocket med knappar och lägga till en länk till den page där du vill hänvisa användare genom att clicka på link icon i blockets toolbar.
Därefter skriver du in den URL du vill ha och trycker på ”Enter”.
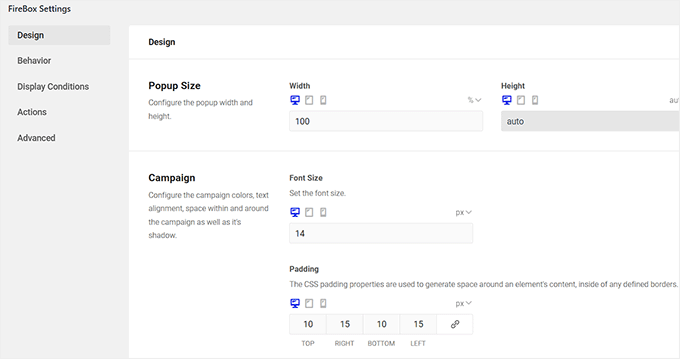
Därefter kan du rulla ner till ”Firebox Settings” section.
Här kan du ändra bakgrundsfärg, textfärg, justering, storlek, padding och marginal för den flytande footern.
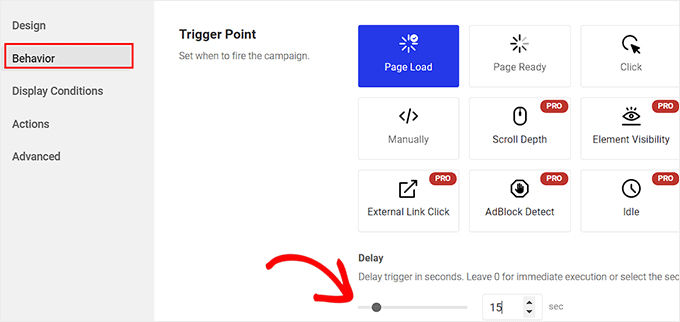
Därefter växlar du till fliken ”Behavior” i den vänstra kolumnen och väljer ”Page Load” som triggerpunkt för den flytande stapeln.
Använd sedan slidern ”Delay” för att välja en fördröjningstid för det flytande fältet. Om du till exempel drar slidern till 15 sekunder kommer den flytande footern att visas när användaren har tillbringat 15 sekunder på din site.
Om du vill att den sticky flytande footern ska visas omedelbart kan du låta slidern vara kvar på 0.
Därefter kan du låta andra Settings vara som de är eller konfigurera dem enligt your like.
När du är klar, glöm inte att klicka på knappen ”Publicera” högst upp.
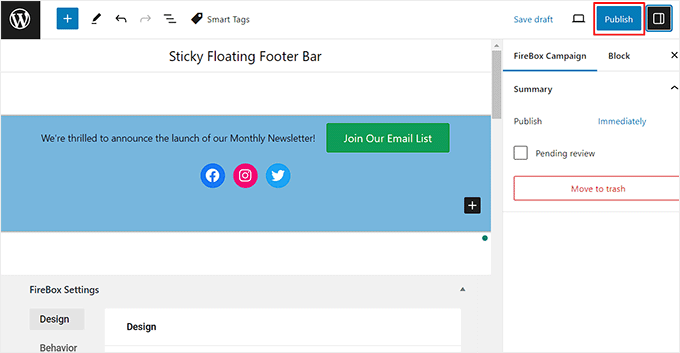
Besök nu din WordPress site för att view the sticky floating footer bar in action.
Så här gillade vi det på vår demo site.

Bonus: Skapa en sticky flytande navigation menu i WordPress
Förutom att lägga till en sticky footer bar, kanske du också gillar att skapa en sticky flytande navigation menu på din WordPress webbplats.
En navigation menu innehåller links till de viktigaste pages på din WordPress blogg och fungerar som en organisationsstruktur för din website.
Om du gör den här menyn sticky kommer den att vara synlig på din page all tid, även när användaren rullar ner på din vy. Detta kan öka engagemanget och göra din website lättare att navigera på.

För att skapa en sticky flytande navigation menu, bara installera och aktivera Sticky Menu & Sticky Header plugin. För detaljer, se vår tutorial om hur du installerar ett WordPress plugin.
Efter aktivering, besök Settings ” Sticky Menu page från WordPress dashboard och skriv #main-navigation bredvid alternativet ”Sticky Element (obligatorisk)”.
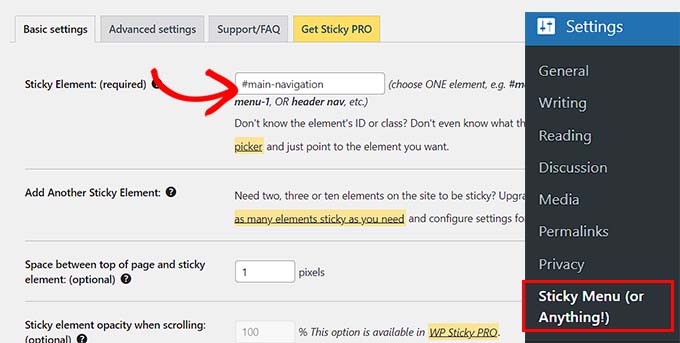
Efter det klickar du på knappen ”Save Changes” för att spara dina inställningar. Du har nu utan problem skapat en sticky flytande navigation menu.
Detaljerade instruktioner finns i vår tutorial om hur du skapar en sticky flytande navigation menu i WordPress.
Vi hoppas att den här artikeln hjälpte dig att lära dig hur du enkelt skapar en flytande sticky footer i WordPress. Du kanske också vill se vår guide för nybörjare om hur man lägger till header- och footer-kod i WordPress och vår checklista över saker att lägga till i footern på din WordPress-webbplats.
If you liked this article, then please subscribe to our YouTube Channel for WordPress video tutorials. You can also find us on Twitter and Facebook.


Moinuddin Waheed
Having a floating footer bar is very effective for marketing and lead generation.
It gives a constant temptation in the users mind about the ongoing promotions and offers.
I have made purchase in the past because of this constant reminder and a fomo that this offer would end up soon.
Thanks for step by step breakdown of steps of how can we make one for our websites.
WPBeginner Support
You’re welcome, glad our guide was helpful!
Admin
Hajjalah
I use the OptinMonster plugin to add a floating footer bar with my social links which has drastically increased my social media audience, courtesy of this detailed step by step article .
But if I may ask. Is it possible to add some code so that the OptinMonster plugin footer bar does not appear or appears after when a footer Ad like Google AdSense footer Ads is available?
WPBeginner Support
You would want to reach out to OptinMonster’s support and they can help you look into and/or set up something like that
Admin
Ahmed Omar
An excellent tutorial on creating a ”sticky” floating footer bar in WordPress
Your step-by-step guide, especially the first method is clear and effective.
I use the first method for this floating footer
Thanks for this practical solution
WPBeginner Support
You’re welcome!
Admin
Steve Alvi
Please I want a close button with this footer floating bar.
WPBeginner Support
OptinMonster would be the method that allows you to have a close button the easiest.
Admin
Jiří Vaněk
I use Optin Monster where I can configure the closing and even measure the closing. That way I know how many people used the floating bar and how many closed it because they weren’t interested.
Trendy Avinash
Worked Like a Charm,Without any Plugins.
Thanks
WPBeginner Support
Glad our guide was helpful
Admin
Alejandro Ferguson
The floating footer code really works. Thank u
WPBeginner Support
Glad our guide could help set it up
Admin
John SMith
How to add a FB sharing button in a floating bar in the only mobile, not for desktop.
WPBeginner Support
You would want to take a look into option 2 in our social media plugins here: https://www.wpbeginner.com/plugins/best-social-media-plugins-for-wordpress/
Admin
wlepcha
How to add menus in the sticky footer instead of random ads.
WPBeginner Support
You would want to take a look at our article here: https://www.wpbeginner.com/wp-themes/how-to-create-a-sticky-floating-navigation-menu-in-wordpress/
Admin
Marius
Very nice tutorial. I implemented the manual code and worked like a charm. Only one more feature I need… can we also have a X or close button to close the floatingbar and remain like this for the rest of the visit? I know, cookies are involved, but maybe you can give us a simple solution. Thank you!
Greg Guz
Very clear and east to follow tutorial.
Floating bar seem to work absolutely fine, but I’m getting following error in chrome console:
Failed to load resource: the server responded with a status of 404 ()
Any ideas?
Ankush jain
Very helpful your website
thank you very much
Mark Rowles
Just a quick pointer CSS wont work for this.
You’ve got fixedBar in the html as a class name (capital B) and you’ve got fixedbar in the css (lowercase b) so the css doesn’t apply.
Can someone correct the code please to help others that discover this post?
WPBeginner Support
Hey Mark,
Thanks for pointing this out. We have updated the code.
Admin
Robi
Dear WPBeginner, and Friends
If I have specific section that I’ve created using Elementor Page Builder, How I can use it as a custom sticky footer? (It contains more than one column, some buttons and text). I want this type of sticky footer, Instead of simple text as explained in this tutorial.
Thanks..
Daniel
1) Added code just before the tag in the footer.php from my theme dir /wp-content/themes/mytheme/
2) Added code to my theme dir /wp-content/themes//mytheme/style.css not working deleted and then i try to added from the theme option to custom css menu same problem not working
3) Added floatingbar.js with the code inside in /wp-content/themes/mytheme/js
4) Added code to functions.php first not working.. tried with site-specific plugin also same thing
I tried on both website different theme same problem not working just sit there it`s not floating
Some help will be welcome… I really need this
WPBeginner Support
Hey Daniel, try using Inspect tool to troubleshoot any issue with CSS.
Admin
Daniel
Thanks for the replay but for me messing with css and js it`s like building a space ship… i will give a try to figure out whats rong
Regards
Daniel
Daniel
I used the inspector tools and i don`t see any read lines there….
Dueadla Framin
I have the same issue! The code you posted isn’t even working on default twenty sixteen theme. It’s not floating it’s just stuck on the bottom of the webpage after you scroll all the way to the bottom.
Igor
there is an error in the fixedBar reference in the css code (it is referencing as ”.fixedbar” whereas it should be ”.fixedBar”. Change that and see if it works.
henrykene
WpBeginner please i will like to use it for displaying my Adsense ads on mobile views. How will i go about it and what are the code to make it show Adsense stick footer for mobile viewers?
Nawaf
Awesome.
But there is a bug. When you open it in mobile. The ribbon gets cutted. And u can see only half of it
Tip
In my new theme, I have the option of using an infinite scroll feature. This is great except that the reader would have to scroll a long time to reach my old footer, which is where I put the legal disclosures, etc.
With this floating footer bar, I was able to nicely put the links there and now I can use the infinite scroll feature without having to reposition a bunch of required links.
Thanks for this tutorial. I learned a little bit more PHP and CSS too!
Sarah Noah
I have a client who wants to have a link to REQUEST A QUOTE on every page so when I saw this sticky footer it seemed perfect until I read that somer users are annoyed by it. Do you guys think REQUEST A QUOTE stuck on the bottom of every page is annoying? Of course it is the most important thing the company wants the user to do.
Roy E
Footer bar shows fine in FireFox but is not sticky in IE11 where I had to scroll down to see ”About WPBeginner”, ”Site Links”, and ”Sites We Like” ??
Roy E
Of course, when I pressed Enter on the previous comment ( IE issue), the sticky footer bar appeared. Not sure what happened but the problem went away. Please disregard this comment and the previous one.
yugishtha
do we also have a floating top bar menu plugin for WP?
Hutzel
I tried all, but it does not Show me the fixed footer. Can somebody help or assist me please? thanks
Devendra Meena
Is there any plug in, which can have some scripts on a floating box, and with a x button to close it.
Khushal Rao
this can also be used to showing ads too..
Dick Sijtsma
Lowering the opacity to, for example 0.60 gives the visitor a glimps of the underlying content. I think that would be a nice effect. But changing the opacity of the bar, changes the opacity of the text too. And that ’dilutes’ the message. Any trick to prevent that?
Thanks.
Jan dB
As mentioned earlier, this is a very easy tutorial and works like a charm on most computers.
However, I also have issues regarding the mobile browsers.
Have you already come up with a solution for that?
Thanks and keep up the good work!
Editorial Staff
For mobile browsers if you have a responsive design, then you can simply use media queries and display: none the entire footer bar.
Admin
Theresa @DearCreatives
Nice. I am actually looking for a tutorial for adding script to top of post that is there every time I post for disclosure purposes. If you have one like that or know of a plugin can you send me an @DearCreatives on twitter or email me thanks!!
Dick Sijtsma
Hi, looks good, but i do understand the reasons some people dislike these kinds of footers very much. Nevertheless i’m trying to accomplish this effect too.
In the source of this very page, i saw you externalized the javascript. You’ve put it in the main.js javascript file, and linked this main file to the page in the header.
So far so good, i can manage that. But, i can’t find the place where the ’randomtip’ function is called.
In short my question is: how do i externalize the javascript? Hope to hear from you.
Matthew
Great tutorial. One issue that other might also run into – I only have one footer link (as opposed to having several in rotation) and this footer bar shows even on the page that I link to in the footer. Do you know of a quick way to not show this footer on particular pages? Or to, perhaps, only show it on the homepage?
Editorial Staff
Sure just wrap the text with the conditional statement is_front_page().
Admin
Antonio
Here a true beginner. How do I actually do that? I totally new to WP and PHP. As far as I understand I have to put somewhere in the footer.php but I really have no idea where. Great article though. It managed to add it to my blog as well
Caio
I like it, but it is a bit too distracting. Maybe make it nice and light by turning down the opacity, and then adding a style statement on hover to turn the opacity back up to .9
Sopheak
Wow! It was a great tutorial.
Pawan
Great, I was looking for same.
Sai Kumar
Hi, this sticky floating footer bar is really awesome! I am going to add it in my blog for sure. Thanks a lot for Sharing!!
Max Manroe
Wow nice tutorial and think this is great, I will try it to my blog. Thanks
Zseller Istvan
Guys, this is the only thing that I really hate about WpBeginner. When I read your articles on my tablet, with Opera this footer bar stays in the middle of the page for seconds when scrolling. It is a new tablet, and powerful enough. The footer bar covers the content, which is really annoying. After some time it moves to place.
Editorial Staff
We are working on a mobile/tablet version. This won’t be an issue soon enough.
Admin
Salman Ahmad
Wow ! This is Awesome ,Thanks for sharing
Peter
Thanks a lot for providing us this great tutorial. Definitely it will be helpful for me.
Amitabha Chakraborty
Hi
Nice tutorial. Was thinking a ”X” button to close it if it annoys someone would have been great.
Regards
Amitabha
David
I like a footer bar. I think its a great place to put social sharing buttons. I made my own on a client’s site but it has the option of being able to close. It also holds the go to the top button. Pretty nifty. However, like the footer bar I made, on my HTC EVO 4G your footer bar doesn’t stick at the bottom as it should. It actually is stuck in the middle of an article and is really annoying because it covers up a bit of the text. The bar I made can be closed so it is only a quick annoyance. Your bar cannot so I can never read that text. Again this is on my phone. If you can figure out the workaround please let me know.
I came to this article through your newsletter which is great. Thanks for that.
Michael
Like or hate these types of bars, there is great value in seeing how the code is written to implement such a thing, at least. I use Hello Bar and the Wibya bar on several of my sites and although I think some people have become blind to them, including myself, and some hate them, they still work to help convert and share content a lot of the time.
I appreciate what I view as a helpful little code lesson. Great site!
Taryn Fox
I personally feel that the floating footer bar is an extremely user-hostile feature, especially one like yours which is a) unhideable, and b) expands to twice its intended size (or greater) when viewed while the font size is increased.
Speaking of which, even with nosquint magnifying the rest of the text on this site, the text in the comments field is tiny and hard to read if you have visual accessibility issues.
Speaking of other accessibility issues, asking for a person’s ”Real Name” is hostile to anyone who uses a pseudonym. This includes trans women, people who are being stalked, people who are hiding their online activity from others who are capable of hurting them, and people who simply prefer and are better known by their pseudonyms than their legal or birth names (both of which are more inclusive and accurate terms for what you call a ”real name”).
Also, you misspelled ”meaningful” in the ”Add a comment” notice.
I wasn’t going to leave a long rambling comment of criticism, but I feel most people have banner blindness to footer bars, and are ambivalent towards them at best and annoyed by them at worst. Most people who aren’t web designers, anyway. I thought maybe someone should speak up for the people who are actually affected by them. Then I ran into the other issues once I went to your site from Google Reader, and tried to leave a comment.
Thank you for your tutorials, and I hope things go well for you.
Editorial Staff
Hey Taryn,
We really appreciate your invaluable feedback. There are definitely pros and cons to having a floating footer bar like this ones. The cons you have already pointed out. We thought about doing a cookie tracking option where regular users can close the bar and never have it shown again. But even the regular users sometime miss out on great deals because of that. Also if they clear their browser’s cache or use a different computer, the bar shows up again. Yet another downside of cookie tracking. We’ve given extensive thoughts of having user registration and offer personalization on the site.
As for comments, the real name text in the field is there to serve one purpose, stop spammers. If you read the comments policy, it says ”We do not allow Keywords stuffed in the name field. You must use your name or nick name for commenting.” Often folks use their nicknames, and we are completely ok with it. But if your nickname is ”best insurance company” or something like that… then we mark it as spam.
Thanks for pointing out the typo. We have fixed that.
Admin
Partha Bhattacharya
This is with respect to Taryn’s comment above:
”…I feel most people have banner blindness to footer bars, and are ambivalent towards them at best and annoyed by them at worst.”
Since you continue using them there is no doubt you get benefits from them, and people do click on them to remain updated just as I did just now…coming here from another page.
Would you mind sharing some stats / lookins as to how effective is the footer bar for you, and also how effective it is as against using a header bar!
staion
Thanks for this easy and amazing small tutorials! I’ve already implemented it on my site, but without the jquery thing, just using it as announcements.
FreedomJackson
Awesome thanks for sharing this dude I’m doing some updating and I was trying to find a good way to add this footer bar.
mucho grande gracias senior