Una barra footer fluttuante in evidenza rimane visibile sul sito web anche quando gli utenti scorrono giù la pagina. Può aiutarvi a promuovere offerte di sconto, annunci importanti o handle dei media, riducendo così la frequenza di rimbalzo e aumentando le conversioni.
Nel corso degli anni, abbiamo utilizzato una barra footer fluttuante sui nostri negozi di e-commerce e siti web per promuovere sconti o presentare newsletter. Questo ci ha aiutato a generare più contatti, a costruire mailing list e ad aumentare le vendite.
In questo articolo vi mostreremo come creare facilmente una barra footer flottante in evidenza in WordPress, passo dopo passo. Per questo tutorial abbiamo utilizzato metodi adatti ai principianti che non richiedono alcuna codifica.
Che cos’è una barra di piè di pagina fluttuante in WordPress?
Una barra flottante appiccicosa a piè di pagina consente di mostrare agli utenti contenuti e notizie importanti.
Questa barra rimane sempre visibile ai visitatori, che sono quindi più propensi a cliccarci sopra e a scoprire altri contenuti utili.
È possibile utilizzare la barra di piè di pagina fluttuante per:
- Aumentate i clic su altri post del blog.
- Generate lead e costruite la vostra lista di e-mail.
- Attirare l’attenzione su coupon speciali o offerte/vendite scontate.
- Promuovete i vostri account sui social media.
- Costruire il riconoscimento del marchio.
- Fornite l’accesso a risorse importanti sul vostro sito web WordPress.
Detto questo, vediamo come creare facilmente una barra flottante appiccicosa per il piè di pagina in WordPress. In questo tutorial vi mostreremo due metodi; potete usare i link sottostanti per passare al metodo che preferite:
Metodo 1: Creare una barra flottante appiccicosa con OptinMonster (consigliato)
Potete creare facilmente una barra footer fluttuante in evidenza con OptinMonster. È il miglior strumento per la generazione di lead e l’ottimizzazione delle conversioni presente sul mercato e rende super facile convertire i visitatori del sito web in abbonati.
OptinMonster è dotato di un costruttore drag-and-drop e di modelli predefiniti che consentono di creare una barra footer fluttuante, popup a scorrimento e banner senza utilizzare alcun codice.
Consigliamo questo metodo perché OptinMonster è facilissimo da usare e offre più opzioni di personalizzazione rispetto al metodo del plugin gratuito.
Passo 1: Installare OptinMonster sul vostro sito web
Per prima cosa, dovrete iscrivervi al sito web di OptinMonster cliccando sul pulsante “Get OptinMonster Now”.

Successivamente, è necessario installare e attivare il plugin gratuito OptinMonster connector sul proprio sito web. Per ulteriori istruzioni, consultate la nostra guida per principianti su come installare un plugin per WordPress.
Dopo l’attivazione, si aprirà sullo schermo la procedura di configurazione guidata di OptinMonster, dove dovrete fare clic sul pulsante “Connetti il tuo account esistente”. Questo collegherà il vostro sito WordPress con il vostro account OptinMonster.
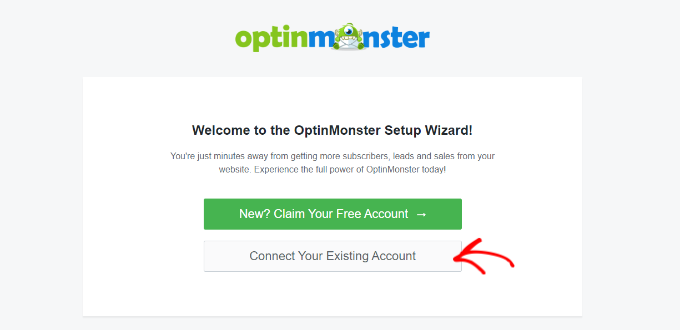
Una volta fatto ciò, si aprirà una nuova finestra sullo schermo.
Qui, fate clic sul pulsante “Connetti a WordPress” per andare avanti.

Passo 2: Creare e personalizzare la barra appiccicosa flottante del piè di pagina
Ora che avete collegato OptinMonster al vostro sito web, è il momento di creare una barra flottante appiccicosa a piè di pagina.
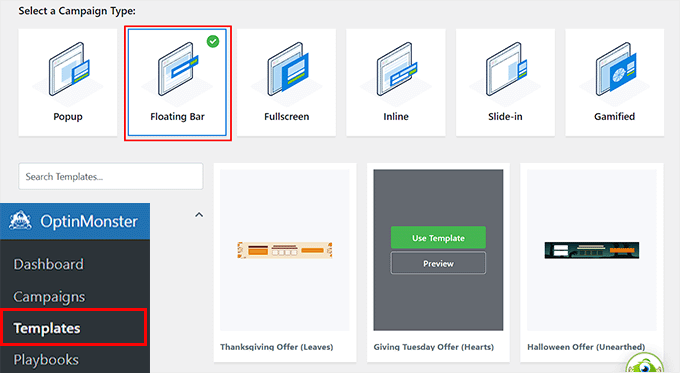
Per farlo, è necessario visitare la pagina OptinMonster ” Modelli dalla barra laterale dell’amministrazione di WordPress e selezionare ‘Floating Bar’ come tipo di campagna.
Una volta fatto ciò, sullo schermo verranno caricati tutti i modelli predefiniti per la barra fluttuante. Da qui, è possibile fare clic sul pulsante ‘Usa modello’ su quello che si desidera utilizzare.
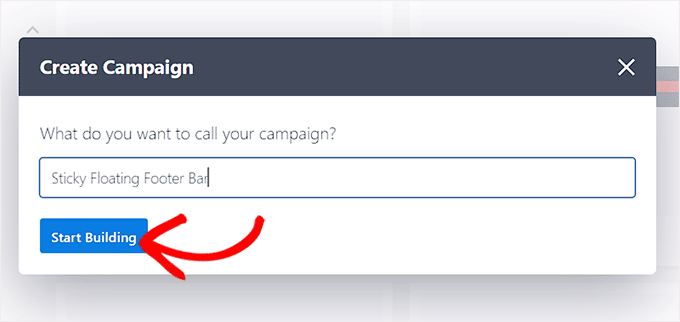
Si aprirà il prompt “Crea campagna” sullo schermo, dove si potrà aggiungere un nome per la barra a piè di pagina fluttuante che si sta per creare. Può essere qualsiasi cosa, poiché il nome non verrà visualizzato dai visitatori.
Dopodiché, basta fare clic sul pulsante “Avvia costruzione”.
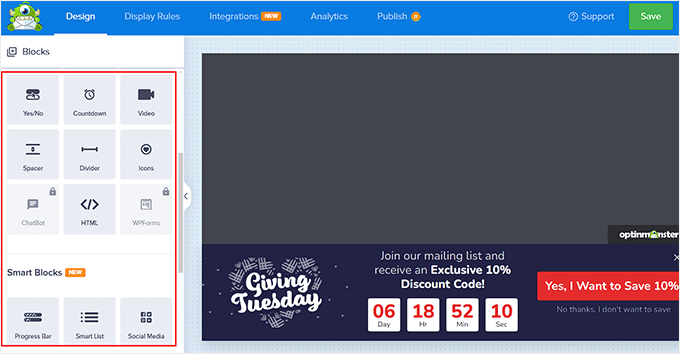
Il costruttore drag-and-drop di OptinMonster verrà lanciato sullo schermo, dove potrete iniziare a personalizzare la vostra barra di piè di pagina fluttuante. Qui, noterete un’anteprima della barra fluttuante sulla destra con i blocchi nella colonna di sinistra.
Ad esempio, è possibile utilizzare un blocco di timer per il conto alla rovescia se la barra flottante a piè di pagina promuove un’offerta di sconto. Questo contribuirà a creare un senso di urgenza tra gli utenti e li incoraggerà ad agire.
È anche possibile aggiungere un blocco CTA, video o social media alla barra a piè di pagina. Per istruzioni dettagliate, potete consultare il nostro tutorial su come creare una barra di avviso in WordPress.
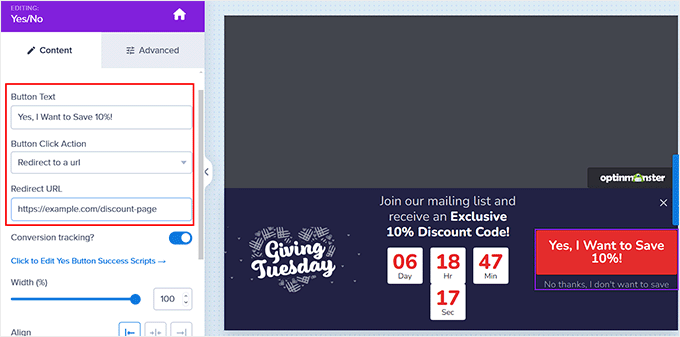
È inoltre possibile modificare il testo nella barra del piè di pagina facendo clic su di esso. In questo modo si apriranno le impostazioni del blocco nella colonna di sinistra, dove sarà possibile modificarle a proprio piacimento.
Ad esempio, se si desidera modificare l’offerta di sconto nel modello, è possibile modificare il testo del pulsante. Successivamente, è possibile selezionare l’opzione “Reindirizza a un URL” e aggiungere il link della pagina a cui si desidera indirizzare gli utenti dopo aver fatto clic sul pulsante.
Passo 3: Configurare le regole di visualizzazione per la barra a piè di pagina fluttuante
Una volta soddisfatti del personalizzato della barra footer, basta passare alla scheda “Regole di visualizzazione” in alto.
Qui è possibile configurare quando visualizzare la barra sulla pagina. Se si desidera visualizzare la barra fluttuante del piè di pagina in ogni momento, è necessario selezionare l’opzione “tempo sulla pagina” dal menu a discesa di sinistra.
Successivamente, scegliere l’opzione “è immediato” dal menu a discesa sulla destra.
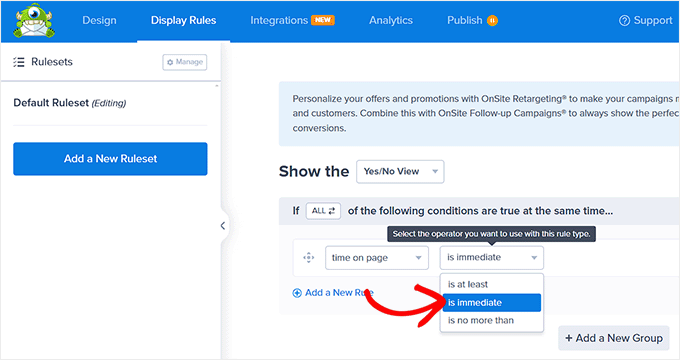
Tuttavia, per visualizzare la barra del piè di pagina fluttuante su una pagina specifica, è necessario selezionare l’opzione ‘Page Targeting’ dal menu a discesa di destra.
A questo punto, scegliere l’opzione “Corrispondenze esatte” dal menu a discesa al centro e aggiungere l’URL di una pagina. Una volta fatto ciò, la barra footer fluttuante verrà visualizzata solo sulla pagina scelta.
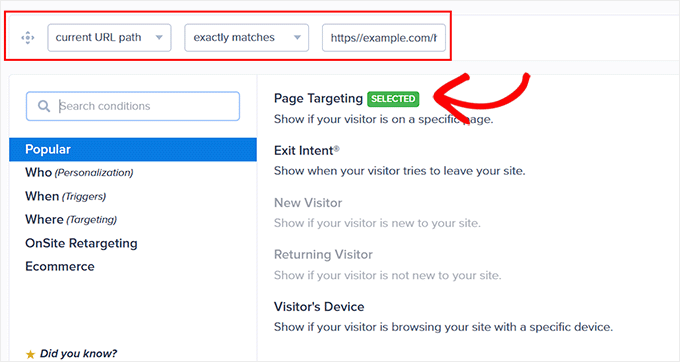
Inoltre, è possibile selezionare l’opzione “Intento di uscita” per mostrare la barra fluttuante appiccicosa del piè di pagina quando l’utente sta per lasciare il sito. È possibile configurare la sensibilità dell’intento di uscita e scegliere i dispositivi su cui visualizzare la barra a piè di pagina. Questo può essere utile se si vuole ridurre la frequenza di rimbalzo.
È anche possibile selezionare l’opzione “Dispositivo del visitatore” se si desidera visualizzare la barra a piè di pagina fluttuante solo ai visitatori desktop.
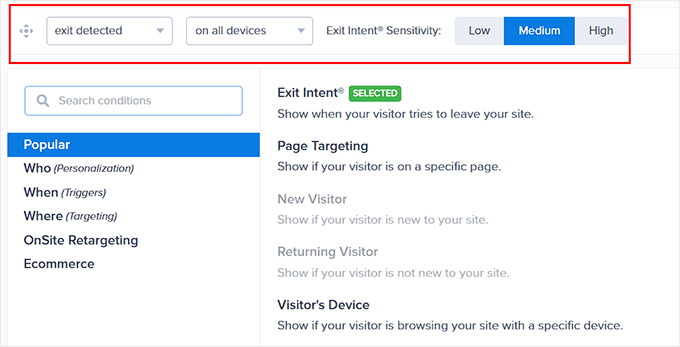
È inoltre possibile configurare le regole di visualizzazione in base alla data, all’ora o alla distanza di scorrimento selezionando l’opzione “Quando” dalla colonna di sinistra.
Per una spiegazione di altre opzioni di regole di visualizzazione, potete consultare la nostra recensione completa di OptinMonster.
Passo 4: Pubblicare la barra a piè di pagina fluttuante
Una volta definite le condizioni di visualizzazione della barra a piè di pagina, passare alla scheda “Pubblica” dall’alto.
Qui è sufficiente fare clic sul pulsante “Pubblica”.
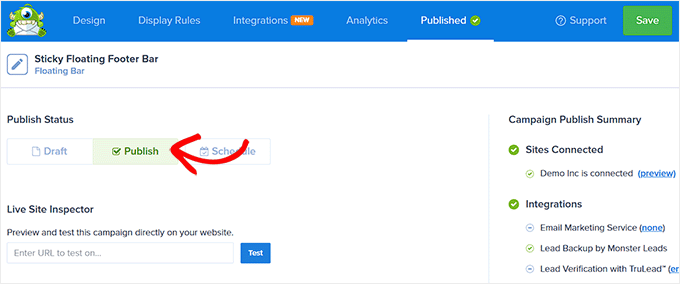
Quindi, non dimenticate di fare clic su “Salva” per rendere effettive le modifiche.
Ora potete visitare il vostro blog WordPress per vedere la barra fluttuante appiccicosa in azione.
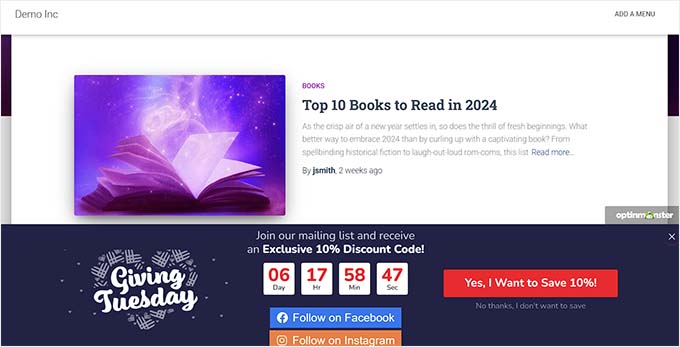
Alternativa: È anche possibile utilizzare Thrive Ultimatum per mostrare una barra a piè di pagina fluttuante con un timer per il conto alla rovescia sul proprio sito web. Per maggiori dettagli, consultate la nostra recensione di Thrive Themes Suite.
Metodo 2: Creare una barra fluttuante appiccicosa con un plugin gratuito
Se state cercando un modo gratuito per creare una barra footer fluttuante in evidenza, questo metodo fa al caso vostro. Tuttavia, tenete presente che le opzioni di personalizzazione saranno limitate rispetto all’utilizzo di OptinMonster.
Per prima cosa, è necessario installare e attivare il plugin Firebox Popup Builder. Per istruzioni dettagliate, consultate il nostro tutorial su come installare un plugin di WordPress.
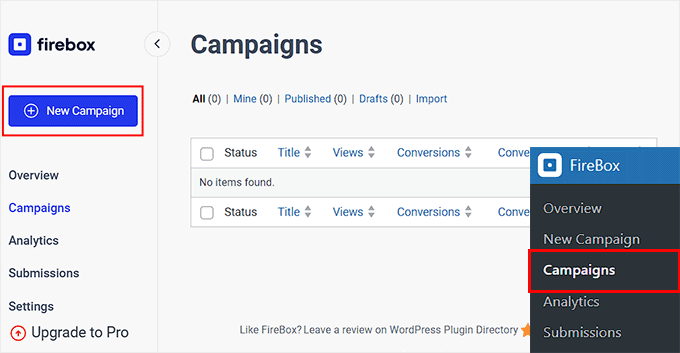
Dopo l’attivazione, visitate la pagina Firebox ” Campagne dalla dashboard di WordPress e fate clic sul pulsante “+ Nuova campagna”.
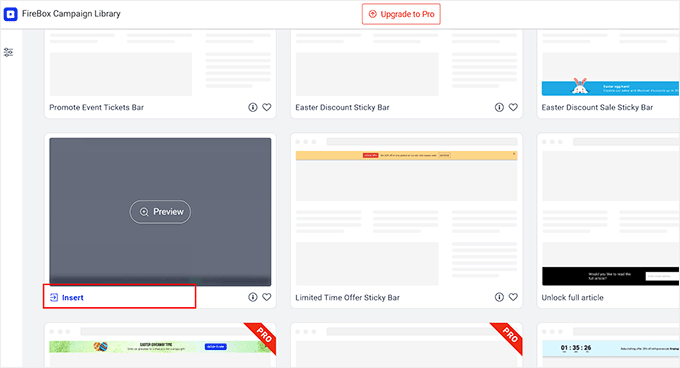
Si aprirà la libreria delle campagne di Firebox, dove è possibile cercare i modelli predefiniti di barra fluttuante adesiva.
Successivamente, è sufficiente fare clic sul collegamento “Inserisci” sotto la barra di piè di pagina fluttuante desiderata. Tenere presente che se si seleziona una barra di intestazione, non sarà possibile modificarne la posizione. È necessario assicurarsi che il modello selezionato sia per una barra di piè di pagina.
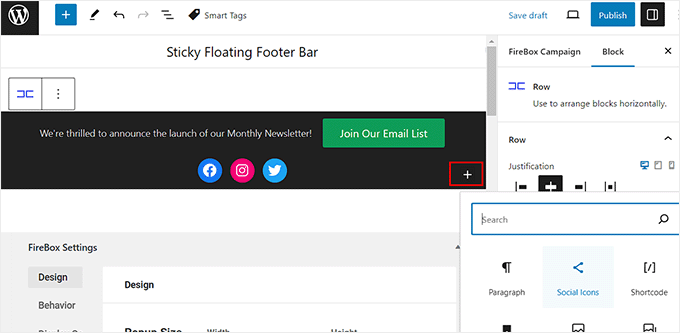
A questo punto si aprirà l’editor di blocchi, dove si potrà iniziare ad aggiungere un nome alla barra fluttuante.
Successivamente, è possibile modificare il testo nel piè di pagina facendo clic su di esso e aggiungere nuovi blocchi facendo clic sul pulsante ‘+’. Si aprirà il menu dei blocchi, dove è possibile aggiungere immagini, titoli, paragrafi, video, citazioni o elenchi.
Ad esempio, se si desidera aggiungere le maniglie dei social media, si può scegliere il blocco Icone sociali. Successivamente, è possibile aggiungere gli account e i link dei social media utilizzando il pannello dei blocchi.
Per maggiori dettagli, potete consultare il nostro tutorial su come aggiungere le icone dei social media nei menu di WordPress.
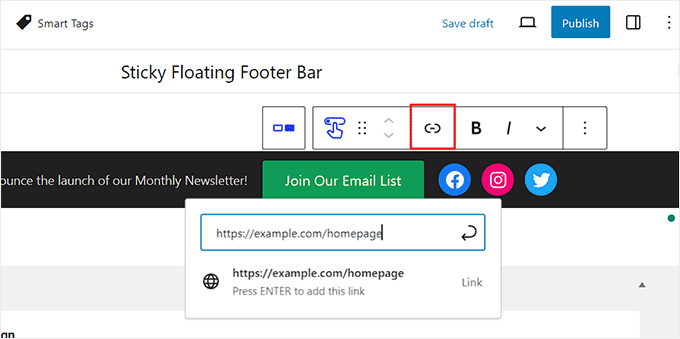
È inoltre possibile modificare il testo del blocco pulsante e aggiungere un collegamento alla pagina in cui si desidera indirizzare gli utenti, facendo clic sull’icona del collegamento nella barra degli strumenti del blocco.
Digitare quindi l’URL desiderato e premere “Inserisci”.
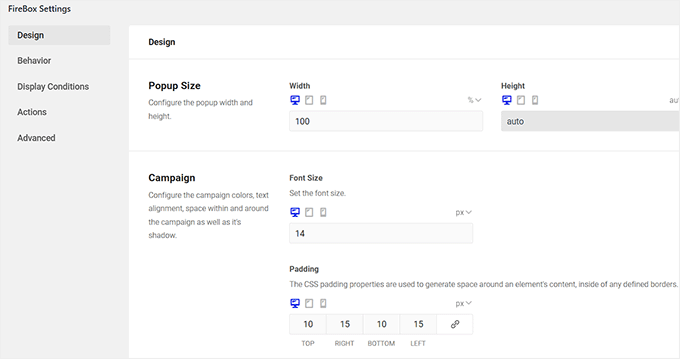
Successivamente, è possibile scorrere verso il basso fino alla sezione “Impostazioni Firebox”.
Qui è possibile modificare il colore di sfondo, il colore del testo, l’allineamento, la dimensione, il padding e il margine della barra di piè di pagina fluttuante.
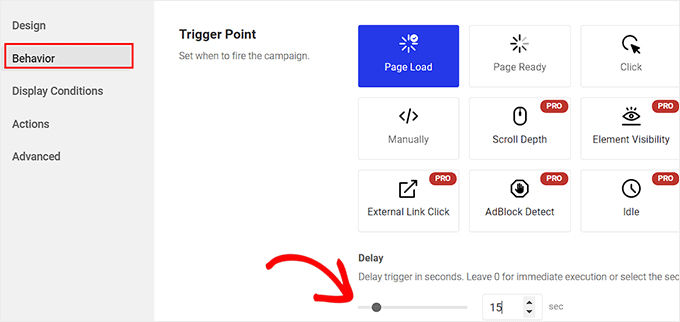
Quindi, passare alla scheda “Comportamento” dalla colonna di sinistra e selezionare “Caricamento pagina” come punto di trigger della barra mobile.
Quindi, utilizzare il cursore ‘Ritardo’ per scegliere un tempo di ritardo per la barra fluttuante. Ad esempio, se si trascina il cursore su 15 secondi, la barra fluttuante a piè di pagina verrà visualizzata dopo che l’utente avrà trascorso 15 secondi sul sito.
Se si desidera che la barra fluttuante appiccicosa del piè di pagina venga visualizzata immediatamente, si può mantenere il cursore a 0.
Successivamente, è possibile lasciare le altre impostazioni così come sono o configurarle a proprio piacimento.
Una volta terminato, non dimenticate di fare clic sul pulsante “Pubblica” in alto.
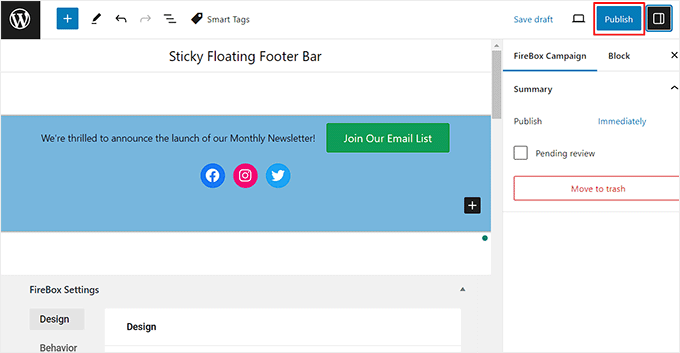
Ora visitate il vostro sito WordPress per vedere la barra flottante appiccicosa in azione.
Ecco come appariva sul nostro sito demo.

Bonus: Creare un menu di navigazione fluttuante e appiccicoso in WordPress
Oltre ad aggiungere una barra a piè di pagina adesiva, potreste anche creare un menu di navigazione fluttuante adesivo sul vostro sito WordPress.
Un menu di navigazione contiene i link alle pagine più importanti del vostro blog WordPress e funge da struttura organizzativa per il vostro sito web.
Se si rende questo menu appiccicoso, rimarrà sempre visibile sulla pagina, anche quando l’utente scorre verso il basso sullo schermo. Questo può aumentare il coinvolgimento e rendere il sito più facile da navigare.

Per creare un menu di navigazione flottante appiccicoso, è sufficiente installare e attivare il plugin Sticky Menu & Sticky Header. Per maggiori dettagli, consultate il nostro tutorial su come installare un plugin di WordPress.
Dopo l’attivazione, visitare la pagina Impostazioni ” Menu appiccicoso dalla dashboard di WordPress e digitare #main-navigation accanto all’opzione “Elemento appiccicoso (obbligatorio)”.
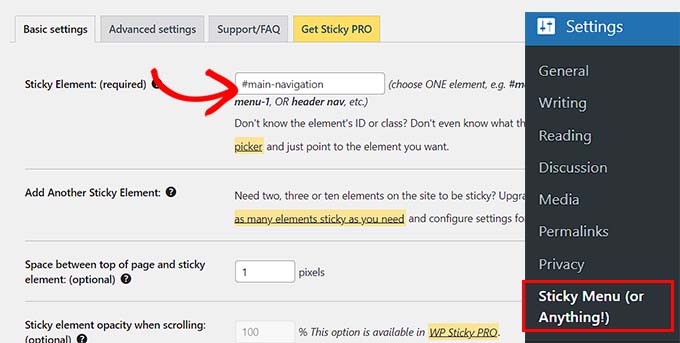
Quindi, fare clic sul pulsante “Salva modifiche” per memorizzare le impostazioni. Ora è stato creato con successo un menu di navigazione fluttuante appiccicoso.
Per istruzioni dettagliate, consultate il nostro tutorial su come creare un menu di navigazione flottante appiccicoso in WordPress.
Speriamo che questo articolo vi abbia aiutato a capire come creare facilmente una barra di piè di pagina fluttuante in WordPress. Potreste anche consultare la nostra guida per principianti su come aggiungere il codice dell’intestazione e del piè di pagina in WordPress e la nostra lista di controllo delle cose da aggiungere al piè di pagina del vostro sito WordPress.
Se questo articolo vi è piaciuto, iscrivetevi al nostro canale YouTube per le esercitazioni video su WordPress. Potete trovarci anche su Twitter e Facebook.


Ahmed Omar
An excellent tutorial on creating a “sticky” floating footer bar in WordPress
Your step-by-step guide, especially the first method is clear and effective.
I use the first method for this floating footer
Thanks for this practical solution
WPBeginner Support
You’re welcome!
Admin
Steve Alvi
Please I want a close button with this footer floating bar.
WPBeginner Support
OptinMonster would be the method that allows you to have a close button the easiest.
Admin
Jiří Vaněk
I use Optin Monster where I can configure the closing and even measure the closing. That way I know how many people used the floating bar and how many closed it because they weren’t interested.
Trendy Avinash
Worked Like a Charm,Without any Plugins.
Thanks
WPBeginner Support
Glad our guide was helpful
Admin
Alejandro Ferguson
The floating footer code really works. Thank u
WPBeginner Support
Glad our guide could help set it up
Admin
John SMith
How to add a FB sharing button in a floating bar in the only mobile, not for desktop.
WPBeginner Support
You would want to take a look into option 2 in our social media plugins here: https://www.wpbeginner.com/plugins/best-social-media-plugins-for-wordpress/
Admin
wlepcha
How to add menus in the sticky footer instead of random ads.
WPBeginner Support
You would want to take a look at our article here: https://www.wpbeginner.com/wp-themes/how-to-create-a-sticky-floating-navigation-menu-in-wordpress/
Admin
Marius
Very nice tutorial. I implemented the manual code and worked like a charm. Only one more feature I need… can we also have a X or close button to close the floatingbar and remain like this for the rest of the visit? I know, cookies are involved, but maybe you can give us a simple solution. Thank you!
Greg Guz
Very clear and east to follow tutorial.
Floating bar seem to work absolutely fine, but I’m getting following error in chrome console:
Failed to load resource: the server responded with a status of 404 ()
Any ideas?
Ankush jain
Very helpful your website
thank you very much
Mark Rowles
Just a quick pointer CSS wont work for this.
You’ve got fixedBar in the html as a class name (capital B) and you’ve got fixedbar in the css (lowercase b) so the css doesn’t apply.
Can someone correct the code please to help others that discover this post?
WPBeginner Support
Hey Mark,
Thanks for pointing this out. We have updated the code.
Admin
Robi
Dear WPBeginner, and Friends
If I have specific section that I’ve created using Elementor Page Builder, How I can use it as a custom sticky footer? (It contains more than one column, some buttons and text). I want this type of sticky footer, Instead of simple text as explained in this tutorial.
Thanks..
Daniel
1) Added code just before the tag in the footer.php from my theme dir /wp-content/themes/mytheme/
2) Added code to my theme dir /wp-content/themes//mytheme/style.css not working deleted and then i try to added from the theme option to custom css menu same problem not working
3) Added floatingbar.js with the code inside in /wp-content/themes/mytheme/js
4) Added code to functions.php first not working.. tried with site-specific plugin also same thing
I tried on both website different theme same problem not working just sit there it`s not floating
Some help will be welcome… I really need this
WPBeginner Support
Hey Daniel, try using Inspect tool to troubleshoot any issue with CSS.
Admin
Daniel
Thanks for the replay but for me messing with css and js it`s like building a space ship… i will give a try to figure out whats rong
Regards
Daniel
Daniel
I used the inspector tools and i don`t see any read lines there….
Dueadla Framin
I have the same issue! The code you posted isn’t even working on default twenty sixteen theme. It’s not floating it’s just stuck on the bottom of the webpage after you scroll all the way to the bottom.
Igor
there is an error in the fixedBar reference in the css code (it is referencing as “.fixedbar” whereas it should be “.fixedBar”. Change that and see if it works.
henrykene
WpBeginner please i will like to use it for displaying my Adsense ads on mobile views. How will i go about it and what are the code to make it show Adsense stick footer for mobile viewers?
Nawaf
Awesome.
But there is a bug. When you open it in mobile. The ribbon gets cutted. And u can see only half of it
Tip
In my new theme, I have the option of using an infinite scroll feature. This is great except that the reader would have to scroll a long time to reach my old footer, which is where I put the legal disclosures, etc.
With this floating footer bar, I was able to nicely put the links there and now I can use the infinite scroll feature without having to reposition a bunch of required links.
Thanks for this tutorial. I learned a little bit more PHP and CSS too!
Sarah Noah
I have a client who wants to have a link to REQUEST A QUOTE on every page so when I saw this sticky footer it seemed perfect until I read that somer users are annoyed by it. Do you guys think REQUEST A QUOTE stuck on the bottom of every page is annoying? Of course it is the most important thing the company wants the user to do.
Roy E
Footer bar shows fine in FireFox but is not sticky in IE11 where I had to scroll down to see “About WPBeginner”, “Site Links”, and “Sites We Like” ??
Roy E
Of course, when I pressed Enter on the previous comment ( IE issue), the sticky footer bar appeared. Not sure what happened but the problem went away. Please disregard this comment and the previous one.
yugishtha
do we also have a floating top bar menu plugin for WP?
Hutzel
I tried all, but it does not Show me the fixed footer. Can somebody help or assist me please? thanks
Devendra Meena
Is there any plug in, which can have some scripts on a floating box, and with a x button to close it.
Khushal Rao
this can also be used to showing ads too..
Dick Sijtsma
Lowering the opacity to, for example 0.60 gives the visitor a glimps of the underlying content. I think that would be a nice effect. But changing the opacity of the bar, changes the opacity of the text too. And that ‘dilutes’ the message. Any trick to prevent that?
Thanks.
Jan dB
As mentioned earlier, this is a very easy tutorial and works like a charm on most computers.
However, I also have issues regarding the mobile browsers.
Have you already come up with a solution for that?
Thanks and keep up the good work!
Editorial Staff
For mobile browsers if you have a responsive design, then you can simply use media queries and display: none the entire footer bar.
Admin
Theresa @DearCreatives
Nice. I am actually looking for a tutorial for adding script to top of post that is there every time I post for disclosure purposes. If you have one like that or know of a plugin can you send me an @DearCreatives on twitter or email me thanks!!
Dick Sijtsma
Hi, looks good, but i do understand the reasons some people dislike these kinds of footers very much. Nevertheless i’m trying to accomplish this effect too.
In the source of this very page, i saw you externalized the javascript. You’ve put it in the main.js javascript file, and linked this main file to the page in the header.
So far so good, i can manage that. But, i can’t find the place where the ‘randomtip’ function is called.
In short my question is: how do i externalize the javascript? Hope to hear from you.
Matthew
Great tutorial. One issue that other might also run into – I only have one footer link (as opposed to having several in rotation) and this footer bar shows even on the page that I link to in the footer. Do you know of a quick way to not show this footer on particular pages? Or to, perhaps, only show it on the homepage?
Editorial Staff
Sure just wrap the text with the conditional statement is_front_page().
Admin
Antonio
Here a true beginner. How do I actually do that? I totally new to WP and PHP. As far as I understand I have to put somewhere in the footer.php but I really have no idea where. Great article though. It managed to add it to my blog as well
Caio
I like it, but it is a bit too distracting. Maybe make it nice and light by turning down the opacity, and then adding a style statement on hover to turn the opacity back up to .9
Sopheak
Wow! It was a great tutorial.
Pawan
Great, I was looking for same.
Sai Kumar
Hi, this sticky floating footer bar is really awesome! I am going to add it in my blog for sure. Thanks a lot for Sharing!!
Max Manroe
Wow nice tutorial and think this is great, I will try it to my blog. Thanks
Zseller Istvan
Guys, this is the only thing that I really hate about WpBeginner. When I read your articles on my tablet, with Opera this footer bar stays in the middle of the page for seconds when scrolling. It is a new tablet, and powerful enough. The footer bar covers the content, which is really annoying. After some time it moves to place.
Editorial Staff
We are working on a mobile/tablet version. This won’t be an issue soon enough.
Admin
Salman Ahmad
Wow ! This is Awesome ,Thanks for sharing
Peter
Thanks a lot for providing us this great tutorial. Definitely it will be helpful for me.
Amitabha Chakraborty
Hi
Nice tutorial. Was thinking a “X” button to close it if it annoys someone would have been great.
Regards
Amitabha
David
I like a footer bar. I think its a great place to put social sharing buttons. I made my own on a client’s site but it has the option of being able to close. It also holds the go to the top button. Pretty nifty. However, like the footer bar I made, on my HTC EVO 4G your footer bar doesn’t stick at the bottom as it should. It actually is stuck in the middle of an article and is really annoying because it covers up a bit of the text. The bar I made can be closed so it is only a quick annoyance. Your bar cannot so I can never read that text. Again this is on my phone. If you can figure out the workaround please let me know.
I came to this article through your newsletter which is great. Thanks for that.
Michael
Like or hate these types of bars, there is great value in seeing how the code is written to implement such a thing, at least. I use Hello Bar and the Wibya bar on several of my sites and although I think some people have become blind to them, including myself, and some hate them, they still work to help convert and share content a lot of the time.
I appreciate what I view as a helpful little code lesson. Great site!
Taryn Fox
I personally feel that the floating footer bar is an extremely user-hostile feature, especially one like yours which is a) unhideable, and b) expands to twice its intended size (or greater) when viewed while the font size is increased.
Speaking of which, even with nosquint magnifying the rest of the text on this site, the text in the comments field is tiny and hard to read if you have visual accessibility issues.
Speaking of other accessibility issues, asking for a person’s “Real Name” is hostile to anyone who uses a pseudonym. This includes trans women, people who are being stalked, people who are hiding their online activity from others who are capable of hurting them, and people who simply prefer and are better known by their pseudonyms than their legal or birth names (both of which are more inclusive and accurate terms for what you call a “real name”).
Also, you misspelled “meaningful” in the “Add a comment” notice.
I wasn’t going to leave a long rambling comment of criticism, but I feel most people have banner blindness to footer bars, and are ambivalent towards them at best and annoyed by them at worst. Most people who aren’t web designers, anyway. I thought maybe someone should speak up for the people who are actually affected by them. Then I ran into the other issues once I went to your site from Google Reader, and tried to leave a comment.
Thank you for your tutorials, and I hope things go well for you.
Editorial Staff
Hey Taryn,
We really appreciate your invaluable feedback. There are definitely pros and cons to having a floating footer bar like this ones. The cons you have already pointed out. We thought about doing a cookie tracking option where regular users can close the bar and never have it shown again. But even the regular users sometime miss out on great deals because of that. Also if they clear their browser’s cache or use a different computer, the bar shows up again. Yet another downside of cookie tracking. We’ve given extensive thoughts of having user registration and offer personalization on the site.
As for comments, the real name text in the field is there to serve one purpose, stop spammers. If you read the comments policy, it says “We do not allow Keywords stuffed in the name field. You must use your name or nick name for commenting.” Often folks use their nicknames, and we are completely ok with it. But if your nickname is “best insurance company” or something like that… then we mark it as spam.
Thanks for pointing out the typo. We have fixed that.
Admin
Partha Bhattacharya
This is with respect to Taryn’s comment above:
“…I feel most people have banner blindness to footer bars, and are ambivalent towards them at best and annoyed by them at worst.”
Since you continue using them there is no doubt you get benefits from them, and people do click on them to remain updated just as I did just now…coming here from another page.
Would you mind sharing some stats / lookins as to how effective is the footer bar for you, and also how effective it is as against using a header bar!
staion
Thanks for this easy and amazing small tutorials! I’ve already implemented it on my site, but without the jquery thing, just using it as announcements.
FreedomJackson
Awesome thanks for sharing this dude I’m doing some updating and I was trying to find a good way to add this footer bar.
mucho grande gracias senior