Möchten Sie eigene Taxonomien in WordPress erstellen?
Standardmäßig können Sie in WordPress Ihre Inhalte mit Kategorien und Tags organisieren. Aber mit benutzerdefinierten Taxonomien können Sie die Art und Weise, wie Sie Ihre Inhalte sortieren, weiter anpassen.
In diesem Artikel zeigen wir Ihnen, wie Sie ganz einfach benutzerdefinierte Taxonomien in WordPress mit oder ohne Plugin erstellen können.
Was ist eine WordPress-Taxonomie?
Eine WordPress-Taxonomie ist eine Möglichkeit, Gruppen von Beiträgen und benutzerdefinierten Beitragstypen zu organisieren.
WordPress verfügt standardmäßig über zwei Taxonomien, die Kategorien und Tags genannt werden. Sie können sie verwenden, um Ihre Blogbeiträge zu organisieren.
Wenn Sie jedoch einen benutzerdefinierten Beitragstyp verwenden, sehen Kategorien und Tags möglicherweise nicht für alle Inhalte geeignet aus.
Sie können zum Beispiel einen benutzerdefinierten Beitragstyp namens „Bücher“ erstellen und diesen anhand einer benutzerdefinierten Taxonomie namens „Themen“ sortieren.
Sie können Themenbegriffe wie Abenteuer, Romantik, Horror und andere Buchthemen hinzufügen, die Sie möchten. So können Sie und Ihre Leser die Bücher leicht nach den einzelnen Themen sortieren und filtern.
Taxonomien können auch hierarchisch aufgebaut sein, d. h. Sie können Haupt- oder übergeordnete Themen wie Belletristik und Sachbücher haben. Unter jeder Kategorie gibt es dann Unterthemen bzw. Unterkategorien.
Die übergeordnete Kategorie Belletristik könnte zum Beispiel Abenteuer, Romantik und Horror als Kinder haben.
Nun, da Sie wissen, was eine benutzerdefinierte Taxonomie ist, lernen wir, wie man benutzerdefinierte Taxonomien in WordPress erstellt.
Die Erstellung benutzerdefinierter Taxonomien ist zwar sehr leistungsfähig, aber es gibt auch viel zu beachten. Um Ihnen bei der Einrichtung zu helfen, haben wir unten eine einfache Inhaltsübersicht erstellt:
Benutzerdefinierte Taxonomien in WordPress erstellen (Video-Tutorial)
Wenn Sie eine schriftliche Anleitung bevorzugen, lesen Sie bitte weiter.
Benutzerdefinierte Taxonomien mit einem Plugin erstellen (der einfache Weg)
Als Erstes müssen Sie das Custom Post Type UI-Plugin installieren und aktivieren. Einzelheiten finden Sie in unserer Anleitung zur Installation eines WordPress-Plugins.
In diesem Lernprogramm haben wir bereits einen benutzerdefinierten Beitragstyp erstellt und ihn „Bücher“ genannt. Stellen Sie also sicher, dass Sie einen benutzerdefinierten Beitragstyp erstellt haben, bevor Sie mit der Erstellung Ihrer Taxonomien beginnen.
Als Nächstes gehen Sie im WordPress-Adminbereich auf den Menüpunkt CPT UI “ Add/Edit Taxonomies, um Ihre erste Taxonomie zu erstellen.
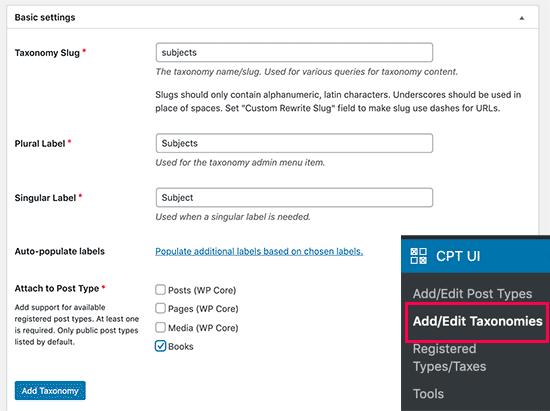
Auf diesem Bildschirm müssen Sie Folgendes tun:
- Erstellen Sie Ihren Taxonomie-Slug (dieser wird in Ihrer URL erscheinen)
- Erstellen Sie die Pluralbezeichnung
- Erstellen Sie das singuläre Etikett
- Automatisches Ausfüllen von Etiketten
Der erste Schritt besteht darin, einen Slug für die Taxonomie zu erstellen. Dieser Slug wird in der URL und in WordPress-Suchanfragen verwendet.
Dieser kann nur Buchstaben und Zahlen enthalten und wird automatisch in Kleinbuchstaben umgewandelt.
Als nächstes geben Sie die Plural- und Singularnamen für Ihre benutzerdefinierte Taxonomie ein.
Dort haben Sie die Möglichkeit, auf den Link „Zusätzliche Beschriftungen basierend auf den gewählten Beschriftungen ausfüllen“ zu klicken. Wenn Sie dies tun, füllt das Plugin den Rest der Beschriftungsfelder automatisch für Sie aus.
Blättern Sie nun nach unten zum Abschnitt „Zusätzliche Beschriftungen“. In diesem Bereich können Sie eine Beschreibung für Ihren Beitragstyp eingeben.
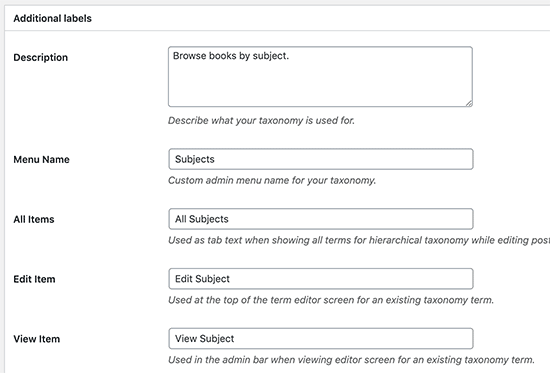
Diese Bezeichnungen werden in Ihrem WordPress-Dashboard verwendet, wenn Sie Inhalte für diese bestimmte benutzerdefinierte Taxonomie bearbeiten und verwalten.
Als Nächstes folgt die Option „Einstellungen“. In diesem Bereich können Sie für jede Taxonomie, die Sie erstellen, verschiedene Attribute einrichten. Zu jeder Option gibt es eine Beschreibung, in der die Funktion beschrieben wird.
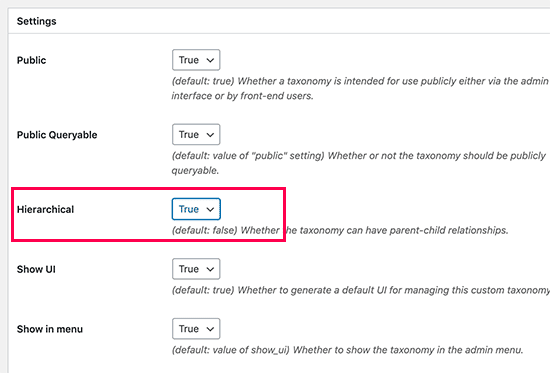
In der obigen Abbildung sehen Sie, dass wir uns entschieden haben, diese Taxonomie hierarchisch zu gestalten. Das bedeutet, dass unsere Taxonomie „Themen“ Unterthemen haben kann. Zum Beispiel kann ein Thema namens „Belletristik“ Unterthemen wie „Fantasy“, „Thriller“, „Mystery“ und andere haben.
Es gibt noch viele andere Einstellungen weiter unten auf dem Bildschirm in Ihrem WordPress-Dashboard, aber für dieses Tutorial können Sie sie so lassen, wie sie sind.
Sie können nun auf die Schaltfläche „Taxonomie hinzufügen“ am unteren Rand klicken, um Ihre benutzerdefinierte Taxonomie zu speichern.
Danach bearbeiten Sie den mit dieser Taxonomie verbundenen Beitragstyp im WordPress-Inhaltseditor, um ihn zu verwenden.
Manuelles Erstellen von benutzerdefinierten Taxonomien (mit Code)
Bei dieser Methode müssen Sie Code zu Ihrer WordPress-Website hinzufügen. Wenn Sie dies noch nicht getan haben, empfehlen wir Ihnen, unsere Anleitung zum einfachen Hinzufügen von Code-Snippets in WordPress zu lesen.
Wir raten davon ab, Ihre WordPress-Dateien direkt zu bearbeiten, denn jeder kleine Fehler kann Ihre gesamte Website zerstören. Deshalb empfehlen wir jedem, WPCode zu verwenden, das einfachste und sicherste Code-Snippet-Plugin auf dem Markt.
Zu Beginn müssen Sie das kostenlose WPCode-Plugin installieren und aktivieren. Eine detaillierte Anleitung finden Sie in unserer Schritt-für-Schritt-Anleitung zur Installation eines WordPress-Plugins.
1. Erstellen einer hierarchischen Taxonomie
Beginnen wir mit einer hierarchischen Taxonomie, die wie Kategorien funktioniert und übergeordnete und untergeordnete Begriffe haben kann.
Sobald Sie WPCode installiert und aktiviert haben, können Sie in Ihrem WordPress-Dashboard zu Code Snippets “ Snippet hinzufügen navigieren.
Bewegen Sie den Mauszeiger über „Fügen Sie Ihren eigenen Code hinzu (neues Snippet)“ und klicken Sie auf „Snippet verwenden“.
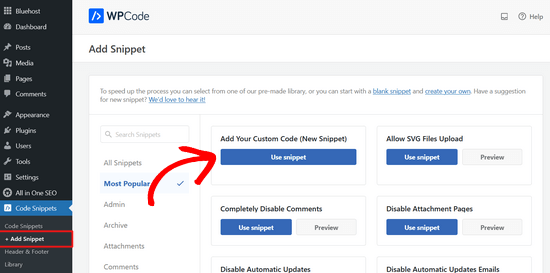
Als nächstes werden Sie zur Seite „Benutzerdefiniertes Snippet erstellen“ weitergeleitet. Benennen Sie einfach Ihr neues Code-Snippet und fügen Sie den folgenden Code in den Textbereich ein.
//hook into the init action and call create_book_taxonomies when it fires

add_action( 'init', 'create_subjects_hierarchical_taxonomy', 0 );

//create a custom taxonomy name it subjects for your posts

function create_subjects_hierarchical_taxonomy() {

// Add new taxonomy, make it hierarchical like categories
//first do the translations part for GUI

  $labels = array(
    'name' => _x( 'Subjects', 'taxonomy general name' ),
    'singular_name' => _x( 'Subject', 'taxonomy singular name' ),
    'search_items' =>  __( 'Search Subjects' ),
    'all_items' => __( 'All Subjects' ),
    'parent_item' => __( 'Parent Subject' ),
    'parent_item_colon' => __( 'Parent Subject:' ),
    'edit_item' => __( 'Edit Subject' ),
    'update_item' => __( 'Update Subject' ),
    'add_new_item' => __( 'Add New Subject' ),
    'new_item_name' => __( 'New Subject Name' ),
    'menu_name' => __( 'Subjects' ),
  );

// Now register the taxonomy
  register_taxonomy('subjects',array('books'), array(
    'hierarchical' => true,
    'labels' => $labels,
    'show_ui' => true,
    'show_in_rest' => true,
    'show_admin_column' => true,
    'query_var' => true,
    'rewrite' => array( 'slug' => 'subject' ),
  ));

}
Stellen Sie sicher, dass Sie den Code-Typ auf „PHP Snippet“ ändern und den Schalter auf „Aktiv“ umlegen.
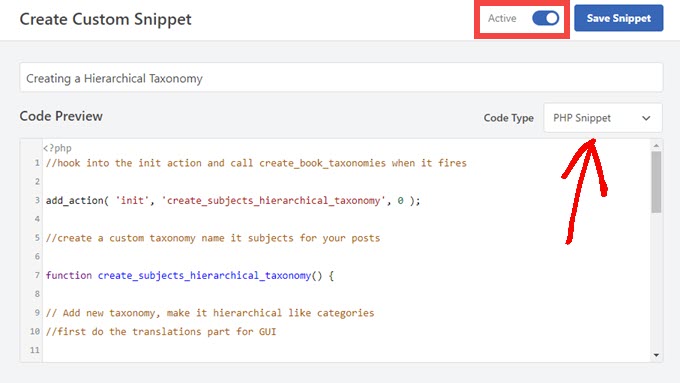
Vergessen Sie nicht, den Taxonomienamen und die Bezeichnungen im Snippet durch Ihre eigenen Taxonomienamen zu ersetzen. Sie werden auch feststellen, dass diese Taxonomie mit dem Post-Typ „Bücher“ verknüpft ist. Sie müssen dies in den Post-Typ ändern, mit dem Sie sie verwenden möchten.
Blättern Sie dann nach unten und vergewissern Sie sich, dass die Optionen „Automatisch einfügen“ und „Überall ausführen“ im Feld „Einfügen“ ausgewählt sind.
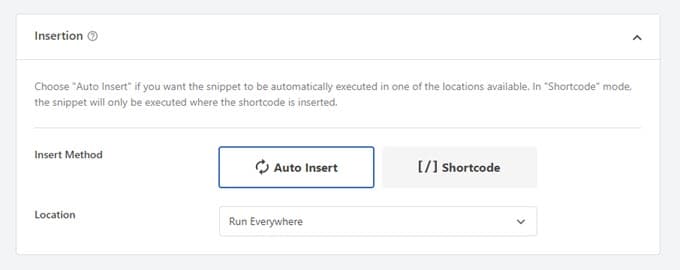
Danach können Sie wieder nach oben scrollen und auf die Schaltfläche „Aktualisieren“ klicken, um die Änderungen zu übernehmen.
2. Erstellen einer nicht-hierarchischen Taxonomie
Um eine nicht-hierarchische benutzerdefinierte Taxonomie wie Tags zu erstellen, verwenden Sie WPCode und befolgen genau die gleichen Schritte wie oben, nur dass Sie stattdessen diesen Code verwenden:
//hook into the init action and call create_topics_nonhierarchical_taxonomy when it fires

add_action( 'init', 'create_topics_nonhierarchical_taxonomy', 0 );

function create_topics_nonhierarchical_taxonomy() {

// Labels part for the GUI

  $labels = array(
    'name' => _x( 'Topics', 'taxonomy general name' ),
    'singular_name' => _x( 'Topic', 'taxonomy singular name' ),
    'search_items' =>  __( 'Search Topics' ),
    'popular_items' => __( 'Popular Topics' ),
    'all_items' => __( 'All Topics' ),
    'parent_item' => null,
    'parent_item_colon' => null,
    'edit_item' => __( 'Edit Topic' ),
    'update_item' => __( 'Update Topic' ),
    'add_new_item' => __( 'Add New Topic' ),
    'new_item_name' => __( 'New Topic Name' ),
    'separate_items_with_commas' => __( 'Separate topics with commas' ),
    'add_or_remove_items' => __( 'Add or remove topics' ),
    'choose_from_most_used' => __( 'Choose from the most used topics' ),
    'menu_name' => __( 'Topics' ),
  );

// Now register the non-hierarchical taxonomy like tag

  register_taxonomy('topics','books',array(
    'hierarchical' => false,
    'labels' => $labels,
    'show_ui' => true,
    'show_in_rest' => true,
    'show_admin_column' => true,
    'update_count_callback' => '_update_post_term_count',
    'query_var' => true,
    'rewrite' => array( 'slug' => 'topic' ),
  ));
}
Beachten Sie den Unterschied zwischen den beiden Codeschnipseln. In der Funktion register_taxonomy() wird der Wert für das hierarchische Argument für kategorieähnliche Taxonomien auf true und für tagähnliche Taxonomien auf false gesetzt.
Außerdem haben wir im Array labels für nicht-hierarchische Taxonomien null für die Argumente parent_item und parent_item_colon hinzugefügt, was bedeutet, dass in der Benutzeroberfläche nichts angezeigt wird, um ein übergeordnetes Element oder eine Taxonomie zu erstellen, die Unterthemen haben kann.
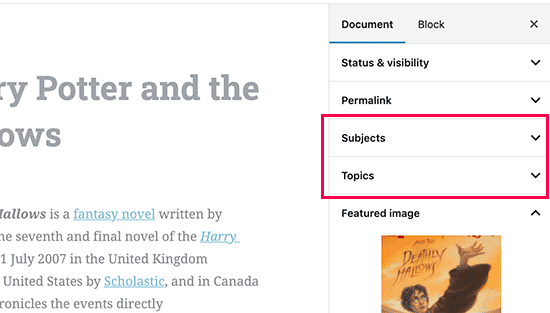
Auch hier müssen Sie den Code so bearbeiten, dass er Ihre eigenen benutzerdefinierten Taxonomiebezeichnungen enthält.
Benutzerdefinierte Taxonomien anzeigen
Nachdem wir nun benutzerdefinierte Taxonomien erstellt und einige Begriffe hinzugefügt haben, werden diese in Ihrem WordPress-Theme immer noch nicht angezeigt.
Um sie anzuzeigen, müssen Sie Ihrem WordPress-Theme oder Child-Theme etwas Code hinzufügen.
Dieser Code muss zu den Vorlagendateien hinzugefügt werden, in denen Sie die Begriffe anzeigen möchten.
Sie können dieses Snippet manuell zu Ihren Themadateien hinzufügen, z. B. single.php, content.php, archive.php oder index.php. Um herauszufinden, welche Datei Sie bearbeiten müssen, lesen Sie unseren Leitfaden zur WordPress-Vorlagenhierarchie.
Das kann jedoch Ihre Website zerstören, wenn es nicht richtig gemacht wird. Daher empfehlen wir erneut die Verwendung des kostenlosen WPCode-Plugins.
Sie müssen den folgenden Code an der Stelle einfügen, an der Sie die Begriffe anzeigen möchten.
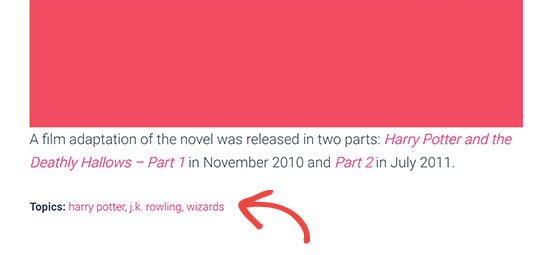
<?php the_terms( $post->ID, 'topics', 'Topics: ', ', ', ' ' ); ?>
Folgen Sie den obigen Schritten, um das Snippet in WPCode einzufügen.
Unter „Einfügen“ klicken Sie auf das Dropdown-Menü neben „Position“ und wählen aus, wo die Taxonomie angezeigt werden soll, z. B. vor dem Beitrag, nach dem Beitrag oder sogar zwischen Absätzen.
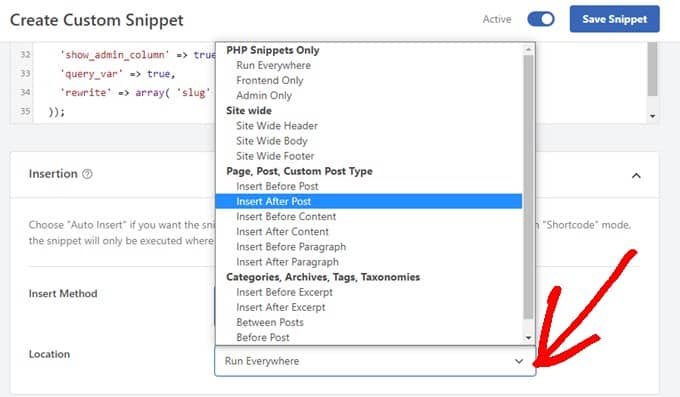
Für dieses Tutorial wählen wir „Nach dem Beitrag einfügen“.
In der Abbildung unten sehen Sie, wie es auf Ihrer Live-Site aussehen wird.
Hinzufügen von Taxonomien für benutzerdefinierte Beiträge
Nachdem Sie nun wissen, wie Sie benutzerdefinierte Taxonomien erstellen können, lassen Sie uns diese anhand eines Beispiels anwenden.
Wir werden eine Taxonomie erstellen und sie „Sachbuch“ nennen.
Da wir einen benutzerdefinierten Beitragstyp mit dem Namen „Bücher“ haben, ist es ähnlich, wie wenn Sie einen normalen Blogbeitrag erstellen würden.
Gehen Sie in Ihrem WordPress-Dashboard auf Bücher “ Themen, um einen Begriff oder ein Thema hinzuzufügen.
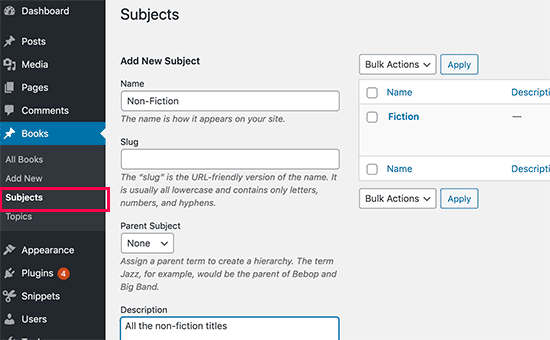
Auf diesem Bildschirm sehen Sie 4 Bereiche:
- Name
- Schnecke
- Elternteil
- Beschreibung
In den Namen schreiben Sie den Begriff, den Sie hinzufügen möchten. Sie können den Slug-Teil weglassen und eine Beschreibung für diesen speziellen Begriff angeben (optional).
Klicken Sie abschließend auf die Schaltfläche „Neues Thema hinzufügen“, um Ihre neue Taxonomie zu erstellen.
Ihr neu hinzugefügter Begriff wird nun in der rechten Spalte angezeigt.
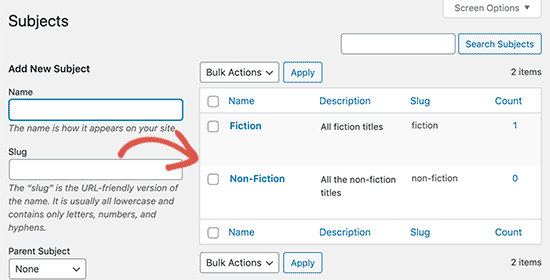
Jetzt haben Sie einen neuen Begriff, den Sie in Ihren Blogbeiträgen verwenden können.
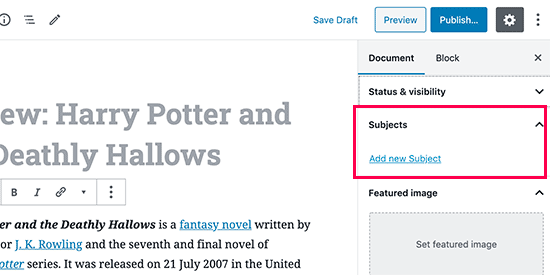
Sie können Begriffe auch direkt beim Bearbeiten oder Schreiben von Inhalten unter diesem bestimmten Beitragstyp hinzufügen.
Gehen Sie einfach auf die Seite Bücher “ Neu hinzufügen, um einen Beitrag zu erstellen. Im Beitragseditor finden Sie in der rechten Spalte die Möglichkeit, neue Begriffe auszuwählen oder zu erstellen.
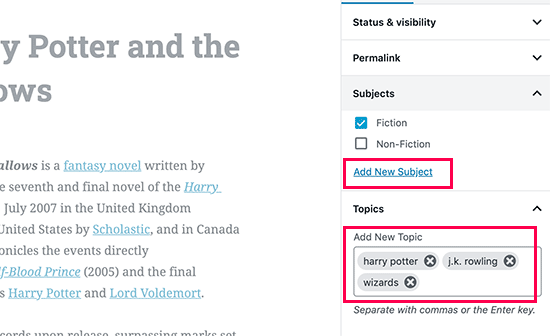
Nachdem Sie Begriffe hinzugefügt haben, können Sie den Inhalt veröffentlichen.
Alle Ihre Beiträge, die unter diesem Begriff abgelegt werden, sind auf Ihrer Website unter einer eigenen URL zu finden. Zum Beispiel würden Beiträge, die unter dem Thema „Fiktion“ abgelegt sind, unter der folgenden URL erscheinen:
https://example.com/subject/fiction/

Hinzufügen von benutzerdefinierten Taxonomien zum Navigationsmenü
Nachdem Sie nun benutzerdefinierte Taxonomien erstellt haben, möchten Sie diese vielleicht im Navigationsmenü Ihrer Website anzeigen.
Gehen Sie zu Erscheinungsbild “ Menüs und wählen Sie die Begriffe aus, die Sie unter Ihrer benutzerdefinierten Taxonomie-Registerkarte hinzufügen möchten, die auf der linken Seite des Bildschirms erscheint.
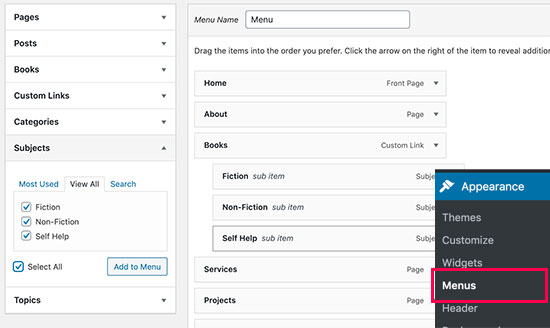
Vergessen Sie nicht, auf die Schaltfläche „Menü speichern“ zu klicken, um Ihre Einstellungen zu speichern.
Sie können nun Ihre Website besuchen, um Ihr Menü in Aktion zu sehen.

Weitere Details finden Sie in unserer Schritt-für-Schritt-Anleitung zum Erstellen eines Dropdown-Menüs in WordPress.
WordPress-Taxonomien weiterentwickeln
Mit benutzerdefinierten Taxonomien können Sie eine ganze Reihe von Dingen tun. Zum Beispiel können Sie sie in einem Seitenleisten-Widget anzeigen oder Bildsymbole für jeden Begriff hinzufügen.
Sie können auch einen RSS-Feed für benutzerdefinierte Taxonomien in WordPress einrichten und den Benutzern erlauben, einzelne Begriffe zu abonnieren. Auf diese Weise erhalten Ihre Leser nur Aktualisierungen über die spezifischen Inhalte, die für sie von Bedeutung sind.
Wenn Sie das Layout Ihrer benutzerdefinierten Taxonomieseiten anpassen möchten, können Sie SeedProd ausprobieren. Es ist ein Drag-and-Drop-WordPress-Seiten-Builder und Theme-Builder, mit dem Sie benutzerdefinierte Layouts ohne jegliche Programmierung erstellen können.
Wir hoffen, dass dieser Artikel Ihnen geholfen hat, zu lernen, wie man benutzerdefinierte Taxonomien in WordPress erstellt. Vielleicht interessieren Sie sich auch für unseren Leitfaden zur Verfolgung von Website-Besuchern und wie Sie ein benutzerdefiniertes WordPress-Theme erstellen können, ohne Code zu schreiben.
Wenn Ihnen dieser Artikel gefallen hat, dann abonnieren Sie bitte unseren YouTube-Kanal für WordPress-Videotutorials. Sie können uns auch auf Twitter und Facebook finden.


Syed Balkhi says
Hey WPBeginner readers,
Did you know you can win exciting prizes by commenting on WPBeginner?
Every month, our top blog commenters will win HUGE rewards, including premium WordPress plugin licenses and cash prizes.
You can get more details about the contest from here.
Start sharing your thoughts below to stand a chance to win!
joe barrett says
Don’t forget to add ’show_in_rest‘ => true,
if you want to use your custom items in rest api to $args
WPBeginner Support says
Thanks for sharing this for those wanting to add this functionality.
Admin
Michael Morad-McCoy says
I tried putting this in a site-specfic plug-in and get the following in a box at the top:
y() expects parameter 1 to be a valid callback, function ‚create_topics_hierarchical_taxonomy‘ not found or invalid function name in /home2/kaibabpr/public_html/wp-includes/class-wp-hook.php on line 286
Warning: Cannot modify header information – headers already sent by (output started at /home2/kaibabpr/public_html/wp-includes/class-wp-hook.php:286) in /home2/kaibabpr/public_html/wp-admin/includes/misc.php on line 1198
as this is the first time I tried this, I’m at a loss.
WPBeginner Support says
You may want to ensure your site-specific plugin is a php file after you added the code as sometimes your operating system can try to edit the file type.
Admin
Naji Boutros says
Do you have a different plugin to recommend?
Ajeet singh says
this is very helpful tutorial …..thnks a lot.
Suresh says
Thanks for sharing this code. I used non-hierarchy code, and admin part is working fine. I have created a separate template as well like taxonomy-[taxoName]-.php But while trying to access the URL, giving HTTP error 500. I have tried multiple things, like new cache starts, permalink re-save, new .htaccess and memory increase. even then page is not working. kindly help
Rabby says
WOW, Amazing and helpful details. I’ve created my custom taxonomy using manual rules. Thanks
Joseph Peter says
Hi,
than you for this useful information, iam new to wordpress and i wanted to know the meaning thats i landed here, it was actually helpful.
Best Regards
Joseph Peter
Cindi Gay says
I used the code for adding a tag to a custom post type. Luckily Topics is exactly the label I needed so all I needed to change was post to lesson (I am modifying the LifterLMS lesson post type).
Now I want to display the tags. I tried using the default WordPress Tag Cloud but it does not change to the newly added tag. It continues to show all my post tags even when I choose Topics
Is there a step I am missing? How do I display the new tag: Topics?
Ero says
Taxonomies don’t behave exactly like default posts‘ categories. They don’t appear in the URL (especially for nested taxonomies). Is there any way to set a custom taxonomy associated to a custom post type to behave like posts‘ categories ?
Rangan Roy says
I have used this code in my gallery custom post type for category support. It shows the name of the category but when i click on the category name it shows 404:error not found. Please help me to solve it. I want the category posts to show on my archive.php page.
Utshab Roy says
I got this same problem that you are facing. The way I solved it is very easy. Go to your permalink settings and click the save button. Refresh the page. This simple step will save the issue.
Carol says
This worked! Thank you so much.
Russell says
Hi, I created custom meta box with new category. I can also show it to the post page. But when I click to the newly created category item it gives a 404 page. I wan it to work like tags, default category or author. So that If I click it shows all the post under that category.
Olivier says
Hello,
I am new to WordPress and coding in general. This tutorial is very well explained, thank you.
However I don’t understand how to display the terms of my taxonomy on my pages.
Where do I have to go to „Add this single line of code in your single.php file within the loop“ ?
Thank you for your help
Best,
Olivier
Azamat says
Thank you so much for this great tutorial!
I created custom taxanomy on my website dedicated to books and now I’m able to filter books by authors!
James Angel says
The trouble with some plugins is that they may not be compatible with all themes. I have found that it pays to have a qualified developer do his/her part and test and troubleshoot any Web site alteration after adding a plugin or updating WordPress to a newer version to ensure everything works as it should.
paul says
Man you are a legend,
i struggled 3 days to get this, which i found in many websites, but not as clear as this.
Thanks!
WPBeginner Support says
Hey Paul, glad you found it helpful. Don’t forget to follow us on Facebook for more WordPress tips and tutorials.
Admin
Rangan Roy says
I have used this code in my gallery custom post type for category support. It shows the name of the category but when i click on the category name it shows 404.php page. Please help me to solve it. I want the category posts to show on my archive.php page.
Ayla says
I’ve created a custom post type and a taxonomy to go with it, but when I create a custom post and add tags to it they don’t show up like normal tags do on normal posts. How do I get them to display at the bottom of the post like normal so people can click on them and find more like it?
Thank you!
-Ayla
WPBeginner Support says
You will need to create a new template to display your custom post type and edit that template to show your custom taxonomy.
Admin
Giulia says
Hi everybody! First of all thank you for this article!
I’ve found that „Simple Taxonomies“ plugin is kind of out of date, since it hasn’t been updated since 2 years…. do you have any other plugin to suggest to create custom taxonomies?
thanks
Giulia
Mario says
I’m not the author of this post, but I use „Custom Post Type UI“ to create custom taxonomies. With 300k installs, I’m pretty sure this plugin is as close as you can get to industry standard.
Hope this helps!
Ryan Hall says
Amazing. thank you!
Ryan says
How do you disassociate the posts with the „regular“ categories?
WPBeginner Support says
Please see our guide on how to merge and bulk edit categories and tags in WordPress.
Admin
Sunny says
Hello,
The description is not prominent by default; however, some themes may show it. But still show on front.
How to hide taxonomy description from front ?
I want to add description on taxonomy but i don’t want they show on front .
Please tell me about what i can do.
Thank You
ajax says
How do one automate the population of the taxonomy value with the value in a custom field.
Charles Hall says
The article is OK, but the video is very poor. The sound quality is bad, she talks way too fast, obvious things are elaborated on but the explanation of what you’re doing and why is missing, as is the other content in the lower portion of the article.
Jennifer says
I am working on a WordPress website. I created categories using a plugin called „Categories Images“. One of the categories is named „Videos“ so there is one folder/category that is supposed to show videos but images. The problem is, because the plugin is designed to upload images only, the YouTube videos do not show up. How can I edit the PHP files (create a custom taxonomy, edit single.php, edit taxonomy-{taxonomy-slug}.php, etc.) so that the post can show and play YouTube videos??
Jamie Wallace says
If you want more control over how things are pulled from the backend to the frontend look into using the Advanced Custom Fields plugin. This is a plugin for developers (so some code is involved) but its very powerful for things like what you ask
Muhammad says
Hi I have followed the manual way of creating custom taxonomy and i just used Ads/Ad instead of Topics/Topic . But i don’t see any custom taxonomy in post editor though i checked the custom taxonomy form Screen Options.
though the custom taxonomy(Ads) is showing in admin submenu under Posts.
Muhammad says
Here is my code snipped in functions.php file
_x( ‚Ads‘, ‚taxonomy general name‘ ),
’singular_name‘ => _x( ‚Ad‘, ‚taxonomy singular name‘ ),
’search_items‘ => __( ‚Search Ads‘ ),
‚all_items‘ => __( ‚All Ads‘ ),
‚parent_item‘ => __( ‚Parent Ad‘ ),
‚parent_item_colon‘ => __( ‚Parent Ad:‘ ),
‚edit_item‘ => __( ‚Edit Ad‘ ),
‚update_item‘ => __( ‚Update Ad‘ ),
‚add_new_item‘ => __( ‚Add New Ad‘ ),
’new_item_name‘ => __( ‚New Ad Name‘ ),
‚menu_name‘ => __( ‚Ads‘ ),
);
// Now register the taxonomy
register_taxonomy(‚ads‘,array(‚post‘), array(
‚hierarchical‘ => true,
‚labels‘ => $labels,
’show_ui‘ => true,
’show_admin_column‘ => true,
‚query_var‘ => true,
‚rewrite‘ => array( ’slug‘ => ‚ad‘ ),
));
}
?>
Robert Herold says
How to show the number of posts on taxonomy-{taxonomy-slug}.php?
Robert Herold says
How can I display my custom taxonomies list like the category list
WPBeginner Support says
Please see our guide How to display custom taxonomy terms in WordPress sidebar widgets.
Admin
Robert Herold says
Wow! Thanx! Superb!!!!!! :))
Abdul Rauf Bhatti says
Hy Dear WPBEGINNER SUPPORT,
I have learned many things in this tutorial next time will you please elaborate functions parameter which you have used some time i got in trouble or confused with parameters.
Thanks a lot Nice tutorial 5 rating
WPBeginner Support says
Thanks for the feedback, we will try to improve our code explanation in the future.
Admin
lee says
Is there a way to get multiple custom taxonomy to use the same slug or same url? Please show us how if you or anyone knows.
pdepmcp says
It may sound obvious, but…remember to refresh the permalink cache or you can waste some hours trying to figure out why archive pages don’t work…
Ilya says
Thank you very much!!!
I wasted hours in debug mode, but cannot determine why my permalink redirects to 404 page! But after flushing „permalink cache“ all works fine.
Thank you again!
winson says
Hello.
How can I get a different Posts Link? I mean I want to get 2 different links after I published a New Post.
E.G:
Category Name – > Facebook (theme template A)
Topic Name – > Twitter (theme template B)
Then I submit a post to these 2 Categories. I want get 1 link for „Facebook“ and 1 Link for „Twitter“.
Best Regards
foolish coder says
how to create single pages / templates for taxonomies?
I mean like single.php not like category.php
Alex says
Try taxonomy.php ()
WPBeginner Staff says
Yes, you can do that.
fatima says
what if we want to create more than 2 taxonomies, categories style (hierarchy true)
Aalaap Ghag says
I’m building a site which has multiple item thumbnails, each of which leads to a page with multiple images for that item (i.e. product). Are taxonomies the way to go or should I be looking at something else?
leona says
Hi This is a great tutorial. But what if I want to display a custom taxonomies as posts in my menu? for instance I have a custom post type called ‚poems‘ and custom taxomies classic, modern, new wave. each poem post is assigned one of these taxonomies. In the menu I want to see a menu entitled poems with 3 subheadings (classic, modrn, new wave). Each will display only the poems tagged with one taxonomy. Is this possible?
angel1 says
This is great! How do I create „related posts“ for the custom taxonomy?
I’m assuming I need to put a conditional php code to display related posts for the new custom taxonomy to appear only when it’s a new taxonomy post and to hide when it is a basic category/tag post since they are both sharing the same content.php file.
Any suggestions would be greatly appreciated.
SteveMTNO says
I used the code above to create the custom taxonomy – everything worked great. The field was added to all of my posts, and I populated it accordingly.
I’m using the „Taxonomy Dropdown Widget“ plugin – that works too.. sort of.
The dropdown is populated correctly, but when you click on one of the items to display those posts, I get a 404. However the plugin works for displaying tags.
Any ideas? I’ll be happy to post my code, just wasn’t sure if I paste it in here or somewhere and link to it here instead.
Let me know.. thanks!
SteveMTNO
Ruben says
Go to Setting > Permalinks > Save Changes
(don’t need to make any changes, this just rewrites your .htaccess file so the link works)
This step should be included in the post?
David says
Bad tutorial. You just expect people to copy/paste the code and don’t explain how it works.
WPBeginner Support says
No, we don’t want people to just copy paste the code, we want them to study it and modify if they want.
Admin
Cletus says
Hi, can you recommend a different taxonomy plugin that works?
Even a premium version, the one you’ve posted hasn’t been updated in months and the author seems to have done one.
WPBeginner Support says
The plugin works great, and the author has 19 other plugins. It also has great reviews and we have personally tested and used it. However, if you would still like to try some other plugin, then you can look at GenerateWP which will allow you to generate the code for your custom taxonomy. You can then paste this code in your theme’s functions.php file or a site-specific plugin.
Admin
Dineshkumar says
I am beginner using classifieds wordpress theme my taxonomy list is not working correctly
when i select country it shows correct bt when i select state it shows state list with city list when i select city i doesnot show below the parent how can i solve it without using plugin please help me
Joe says
This is probably a newbie question, but I can’t find the answer anywhere. I want to display the hierarchical path of each page at the top of the page. This page for example has „WPBEGINNER» BLOG» TUTORIALS» HOW TO CREATE CUSTOM TAXONOMI…“ at the top and each item is a link. I lack the web vocabulary to know what this is called. If anyone can tell me what terms to search for to figure out how to do this that would be excellent.
WPBeginner Support says
Joe these are called breadcrumbs. You can add breadcrumbs to your site using Yoast’s WordPress SEO Plugin. You can also search for breadcrumbs on WordPress plugin directory to find other plugins.
Admin
Mark says
I was getting 404 after manually setting up a custom taxonomy with your instructions and code. For anybody else who does, below is the solution I found on Codex.
„If your site uses custom permalinks, you will need to flush your permalink structure after making changes to your taxonomies, or else you may see a „Page Not Found“ error. Your permalink structure is automatically flushed when you visit Settings > Permalinks in your WordPress dashboard. „
SteveMTNO says
I was getting the same 404 issue after making the taxonomy change. Flushing the permalinks worked perfectly.. thanks!
Pepper says
Hi,
thank you so much for your awesome tutorials!
Jordan says
Hello, thank you for the great article.
Is there anyway to create a page for a custom taxonomy?
Right now my custom taxonomy is called „issue“ and I want to display all issue 1 posts on the home page. The problem is, the link looks like this example.com/issue/1 which is fine. Except that there is no way to make wordpress register this as the home page
Thanks
WPBeginner Support says
You can replace your default index template with home.php inside home.php add this line just before the loop
$query = new WP_Query( array( ‚issues‘ => ‚issue 1‘ ) );
Admin
Keisa says
How can I display each taxonomy on separate pages?
For example//
PSDS (page)
—Vampire Diaries
——–Elena Gilberts
——–Stephen
——–Damon
——–Klaus
—Teen Wolf
——–Derek Hale
——–Scott McCall
——–Stiles Stilinski
——–Lydia Martin
How could I display each character on their own page using taxonomies?
I used „psd_categories“ for the taxonomy, then I added „Teen Wolf“ as a category.
I found a way to display links to the show’s page, but I have no idea on how to display all posts under each characters name…
I’m extremely new to this so please bare with me lol.
Can I send an email perhaps? >.<
WPBeginner Support says
If you are using permalinks then you should automatically have separate pages for each term in a taxonomy.
For example if you create a taxonomy called characters, and mark some posts with term Stephen, then those posts will appear on
http://example.com/characters/stephen/
Admin
JNorell says
The archive-{taxonomy-slug}.php template did not work for me in WordPress 3.6 .. it needs to be taxonomy-{taxonomy-slug}.php instead (see http://codex.wordpress.org/Template_Hierarchy).
Thanks for the tutorial, it was helpful!
Editorial Staff says
Fixed it Thanks
Admin
Kiki says
Is there a way to make the categories not hyperlinks? I just want them listed. I don’t want them to link anywhere.
Photoreview says
Then consider creating custom fields instead of custom taxonomies.
Azis says
thanks for the easy-to-understand tutorial
and could you help me to insert those custom taxonomies into the post class? like, for example… when we put a category named ‚tutorial‘ into the post, the category would normally get inserted in the post class as ‚category-tutorial‘, right? but it seems the example from this article doesn’t do that.
Once again, thanks for this great article.
P.S: I choose the manual way to create the custom taxonomies, since I prefer not to use additional plugins for my site if possible.
Robby Barnes says
Hello and thanks for this information.
I am using the Responsive Child Theme on WP 3.5.1 on DreamHost.
I am building a WordPress site for a small print publication. I am trying to get my WordPress pages (not posts) to display the names of authors of articles that are on the pages. I installed the Simple Taxonomy plugin and created a custom taxonomy. I set it to work on pages and media, but not on posts. Using the widget for Simple Taxonomies I was able to have the author names show up on the right sidebar.
The custom taxonomy shows up on the Edit Page admin panel and seems to permit me to select authors to associate with a page… But, after updating the page the authors don’t appear on the HTML page.
I followed your suggestion and pasted some code into what I believe is the Loop (not sure if pages have the loop) and it didn’t change anything.
I would appreciate any suggestions for dealing with this. / Robby, Seattle, USA
Editorial Staff says
The pages do have loop, and yes you would have to paste the code to make sure the taxonomy appears on the HTML page. Email us the page.php file or where you added the code. Use our contact form.
Admin
Mattia says
Hi, in the code example, I am missing how you link the „topic“ custom taxonomy to the „books“ custom post type… Should I replace „post“ with „books“?
Editorial Staff says
Yes that is correct.
Admin
Arpit says
How can i target categories of taxonomy?
Just like i want to execute a function when products of only Books > Fiction category is shown…