Lange Artikel können schwierig zu navigieren sein. Aus diesem Grund fügen wir vielen unserer Anleitungen auf WPBeginner ein Inhaltsverzeichnis hinzu. Es bietet eine Übersicht über den Artikel, die es den Besuchern leicht macht, zu den Abschnitten zu springen, die sie am meisten interessieren.
Das Hinzufügen eines Inhaltsverzeichnisses zu Ihren WordPress-Beiträgen und -Seiten erleichtert nicht nur die Navigation, sondern kann auch der SEO Ihrer Website einen kleinen Schub geben. Suchmaschinen lieben organisierte Inhalte, und ein Inhaltsverzeichnis zeigt ihnen genau, worum es in Ihrem Artikel geht.
Das Erstellen eines Inhaltsverzeichnisses mag sich zunächst kompliziert anhören, aber es ist viel einfacher, als Sie denken. Wir führen Sie durch einige einfache Methoden, die auch Anfänger beherrschen können.
Wenn Sie also bereit sind, Ihre WordPress-Inhalte übersichtlicher, benutzer- und suchmaschinenfreundlicher zu gestalten, lesen Sie weiter. Wir erstellen im Handumdrehen tolle Inhaltsverzeichnisse.
Warum ein Inhaltsverzeichnis zu Posts und Seiten in WordPress hinzufügen?
Vielleicht kennen Sie die Inhaltsverzeichnisse von Websites wie Wikipedia. Wir verwenden sie auch auf WPBeginner für unsere langen Artikel, wie zum Beispiel unseren ultimativen Leitfaden zur Steigerung der Geschwindigkeit und Leistung von WordPress.
Sie können den Beiträgen auf Ihrer WordPress-Website ein Inhaltsverzeichnis hinzufügen, um das Springen zwischen den einzelnen Abschnitten eines langen Artikels zu erleichtern.
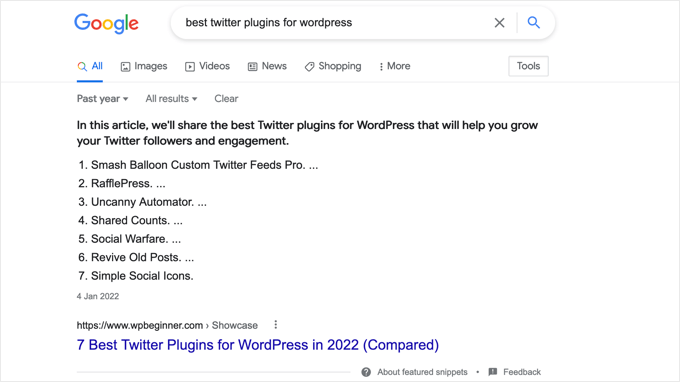
Sie verbessern nicht nur die Benutzerfreundlichkeit, sondern helfen auch Ihrer WordPress-SEO. Denn Google kann das Inhaltsverzeichnis nutzen, um in den Suchergebnissen automatisch Links zum „Springen zum Abschnitt“ hinzuzufügen.

Ein Inhaltsverzeichnis kann auch dazu beitragen, dass Ihr Beitrag als „Featured Snippet“ oben auf der Ergebnisseite der Suchmaschine aufgeführt wird.
Auf diese Weise erhalten Sie den maximalen SEO-Traffic.
Schauen wir uns also an, wie man ein einfaches Inhaltsverzeichnis in WordPress-Beiträgen und -Seiten erstellt. Wir zeigen Ihnen, wie Sie es automatisch mit einem Plugin, manuell mit Anker-Links und mit Code erstellen können:
Methode 1: Automatisches Hinzufügen eines Inhaltsverzeichnisses in WordPress
AIOSEO, auch bekannt als All in One SEO, ist das beste WordPress-SEO-Plugin, und es kommt mit einem eingebauten Inhaltsverzeichnis-Block für WordPress.
Wir empfehlen diese Methode, weil sie Ihnen Zeit spart, indem sie das Inhaltsverzeichnis automatisch auf der Grundlage Ihrer Zwischenüberschriften erstellt und es gleichzeitig mit editierbaren Links vollständig anpassbar macht.
Weitere Informationen finden Sie in unserem vollständigen AIOSEO-Test.
Als Erstes müssen Sie das kostenlose All in One SEO Lite-Plugin installieren. Weitere Einzelheiten finden Sie in unserer Schritt-für-Schritt-Anleitung für die Installation eines WordPress-Plugins.
Die kostenlose Version reicht aus, um ein Inhaltsverzeichnis hinzuzufügen, aber AIOSEO Pro bietet noch mehr Funktionen, die Ihnen helfen, besser in den Suchmaschinenergebnissen zu ranken.
Nach der Aktivierung müssen Sie das Plugin mithilfe des AIOSEO-Einrichtungsassistenten konfigurieren. Detaillierte Anweisungen finden Sie in unserem Leitfaden zur korrekten Einrichtung von All in One SEO für WordPress.
Hinzufügen eines Inhaltsverzeichnisses mit All in One SEO
Sie müssen den Beitrag oder die Seite, auf der Sie das Inhaltsverzeichnis hinzufügen möchten, erstellen oder bearbeiten. Danach klicken Sie im Block-Editor auf das blaue „+“-Symbol und suchen den Block „AIOSEO – Inhaltsverzeichnis“.
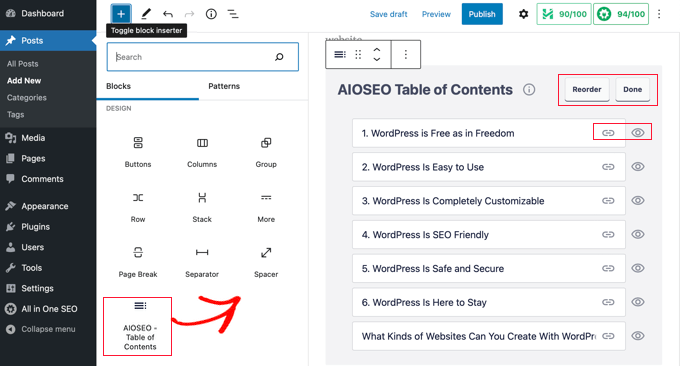
Ziehen Sie den Block einfach auf den Beitrag oder die Seite, auf der das Inhaltsverzeichnis erscheinen soll.
Hinweis: Sobald Sie ein Inhaltsverzeichnis hinzugefügt haben, werden Sie feststellen, dass der Block „AIOSEO – Inhaltsverzeichnis“ ausgegraut ist. Das liegt daran, dass Sie nur ein Inhaltsverzeichnis pro Beitrag oder Seite haben können.
Das Plugin erkennt automatisch die Überschriften auf der Seite und fügt sie zu Ihrem Inhaltsverzeichnis hinzu. Wenn Sie verschiedene Überschriftenebenen verwenden (z. B. H2 und H3), werden die Überschriften der unteren Ebenen eingerückt, um die Struktur Ihres Inhalts zu verdeutlichen.
Wenn Sie noch dabei sind, den Inhalt Ihres Beitrags oder Ihrer Seite zu schreiben, werden alle Überschriften, die Sie dem Dokument hinzufügen, automatisch dem Inhaltsverzeichnis hinzugefügt.
Anpassen des Inhaltsverzeichnisses mit All in One SEO
Es gibt einige Möglichkeiten, das Inhaltsverzeichnis an Ihre Bedürfnisse anzupassen. Sie können zum Beispiel auf eine Überschrift klicken, um sie umzubenennen. Dadurch wird die Überschrift im Inhaltsverzeichnis umbenannt, nicht aber der Artikel.

AIOSEO erstellt automatisch Ankerlinks für jede Überschrift. Sie können auf das Link-Symbol klicken, um den Ankertext zu bearbeiten, und dieser wird sowohl im Inhaltsverzeichnis als auch in der Überschrift im Beitragsinhalt geändert.
Sie können auch auf das Augensymbol neben einer der Überschriften klicken, um sie auszublenden. AIOSEO Pro-Nutzer können die Überschriften im Inhaltsverzeichnisblock neu anordnen. Dabei werden die Überschriften im Inhaltsverzeichnis neu angeordnet, nicht aber im Artikel.
In der Seitenleiste finden Sie auch eine Einstellung für den Block. Hier können Sie einen Aufzählungsstil oder eine nummerierte Liste für Ihr Inhaltsverzeichnis wählen.
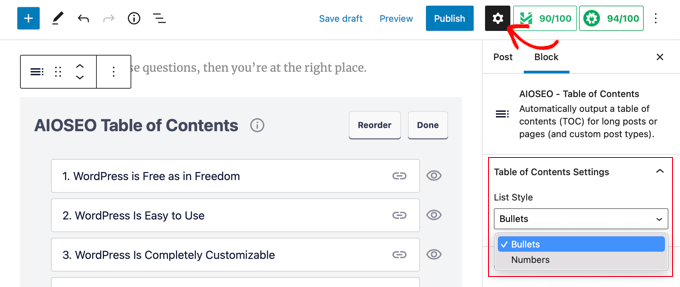
Wenn Sie die Anpassung Ihres WordPress-Inhaltsverzeichnisses abgeschlossen haben, müssen Sie auf die Schaltfläche „Fertig“ klicken, um Ihre Änderungen zu speichern.
Jetzt können Sie sehen, wie das Inhaltsverzeichnis für Ihre Besucher aussehen wird.
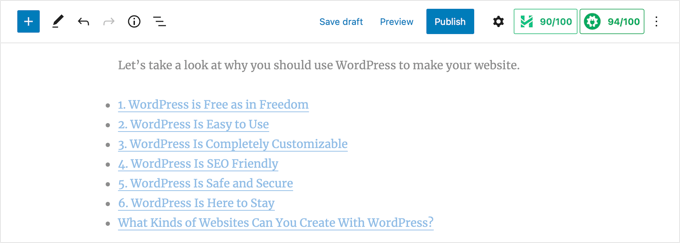
Es ist eine gute Idee, eine Überschrift oder einen Absatz über dem Inhaltsverzeichnis einzufügen. Dadurch wird den Leserinnen und Lesern deutlich gemacht, dass es sich um ein Inhaltsverzeichnis handelt.
Wenn Ihre Besucher auf einen Link im Inhaltsverzeichnis klicken, werden sie sofort zu dieser Überschrift im Artikel weitergeleitet. So können die Nutzer zu dem Abschnitt springen, der sie am meisten interessiert.
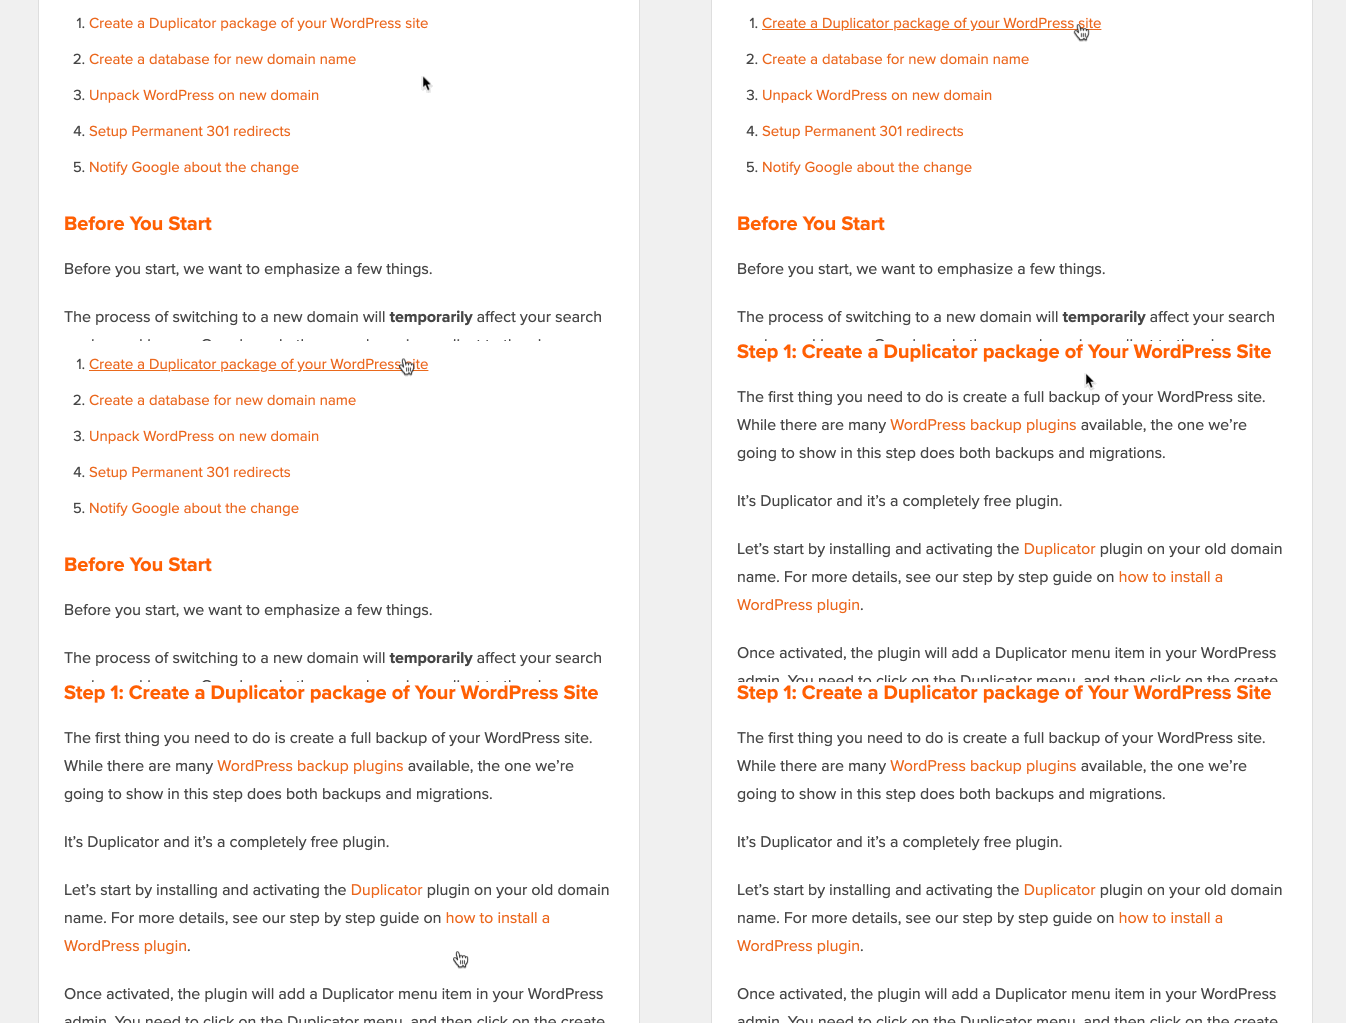
Der Grund, warum wir AIOSEOs Inhaltsverzeichnis so schätzen, ist, dass Sie die Überschriften individuell anpassen und Überschriften bei Bedarf ausblenden können.
Dies ist eine wichtige Funktion, die die meisten anderen Plugins für Inhaltsverzeichnisse einfach nicht haben.
Methode 2: Manuelles Hinzufügen eines Inhaltsverzeichnisses in WordPress
Sie können ein Inhaltsverzeichnis auch manuell mit Hilfe von Ankerlinks erstellen, ohne dass Sie ein Plugin benötigen. Dies erfordert jedoch mehr Zeit und Aufwand.
Mehr über Ankerlinks erfahren Sie in unserer Anleitung zum Hinzufügen von Ankerlinks in WordPress.
Eingeben des Inhaltsverzeichnisses
Zunächst müssen Sie einen Block „Liste“ hinzufügen, in den Sie die Überschriften für das Inhaltsverzeichnis einfügen können. Sie können die Überschriften entweder in die Liste eingeben oder sie einzeln aus Ihrem Artikelinhalt kopieren und einfügen.

Wie man Ankertext zu Überschriftenblöcken hinzufügt
Als nächstes müssen Sie jeder Überschrift, auf die Sie im Inhaltsverzeichnis verweisen möchten, ein Ankerattribut hinzufügen. Dadurch weiß WordPress, wohin es springen soll, wenn ein Besucher auf die Überschrift im Inhaltsverzeichnis klickt.
Klicken Sie zunächst auf die Überschrift, z. B. H2 oder H3. Dann müssen Sie auf den Pfeil „Erweitert“ im Bereich der Blockeinstellungen klicken, um die erweiterten Einstellungen anzuzeigen.
Danach geben Sie ein eindeutiges Wort oder einen Satz ohne Leerzeichen in das Feld „HTML-Anker“ ein. Wenn Sie möchten, können Sie jedes Wort mit Bindestrichen trennen.
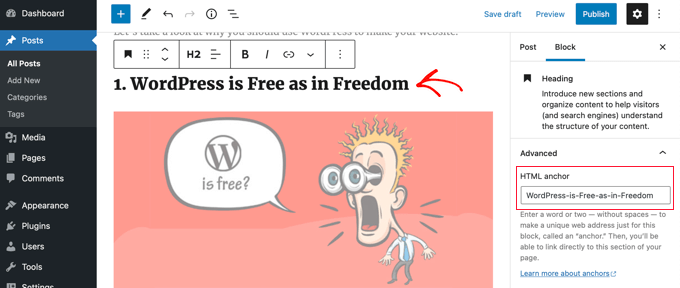
Wiederholen Sie dies anschließend für alle anderen Überschriften, die in das Inhaltsverzeichnis aufgenommen werden sollen.
Tipp: Wenn Sie die Überschrift in dieses Feld einfügen, werden automatisch Bindestriche hinzugefügt. Auf diese Weise können Sie auf einfache Weise eine eindeutige ID erstellen, die auch die Überschrift eindeutig darstellt.
Hinzufügen von Ankerlinks zum Inhaltsverzeichnis
Der letzte Schritt besteht darin, die Überschriften des Inhaltsverzeichnisses mit den von Ihnen erstellten HTML-Ankern zu verknüpfen.
Markieren Sie den ersten Eintrag in Ihrem Listenblock und klicken Sie dann auf das Symbol „Link“ in der Symbolleiste.

Als Nächstes sollten Sie ein Hashtag (#) und dann den Ankertext für diese Überschrift eingeben oder einfügen.
Mit dem # wird WordPress angewiesen, zu diesem Abschnitt des aktuellen Beitrags zu springen. Sie fügen weder den Domänennamen noch andere URL-Parameter hinzu.

Sobald dies geschehen ist, müssen Sie die Eingabetaste drücken oder auf das Symbol „Absenden“ klicken, um den Link zu erstellen.
Der Anker-Link wird zu Ihrer Inhaltsliste hinzugefügt. Wenn Ihre Besucher auf diesen Link klicken, werden sie sofort zu dieser Überschrift im Beitrag oder Seiteninhalt weitergeleitet.

Sie können diese Schritte wiederholen, um Ankerlinks zu den anderen Überschriften des Inhaltsverzeichnisses hinzuzufügen.
Methode 3: Hinzufügen eines Inhaltsverzeichnisses in WordPress mit Code
Sie können ein Inhaltsverzeichnis in WordPress auch über einen Codeschnipsel mit dem WPCode Plugin hinzufügen.
Mit WPCode können Sie ganz einfach individuellen Code in WordPress hinzufügen, ohne Ihre Theme-Dateien bearbeiten zu müssen. Außerdem enthält es eine Bibliothek mit vorgefertigten Codeschnipseln, darunter einen, der automatisch ein Inhaltsverzeichnis basierend auf den Überschriften in Ihrem Beitrag hinzufügt.
Er ist nicht so flexibel wie die anderen Methoden und eignet sich möglicherweise nicht für alle Websites, aber er ist eine gute Option für Benutzer, die mit der Verwendung von Code zur individuellen Anpassung von WordPress vertraut sind.
Zunächst müssen Sie das kostenlose WPCode Plugin installieren und aktivieren. Wenn Sie Hilfe benötigen, finden Sie in unserer Anleitung zur Installation eines WordPress Plugins eine Schritt-für-Schritt-Anleitung.
Gehen Sie nach der Aktivierung vom WordPress-Dashboard aus auf Code Snippets “ Bibliothek.
Suchen Sie dort nach dem Snippet „Einfaches Inhaltsverzeichnis“. Sobald Sie es gefunden haben, bewegen Sie den Mauszeigerkontakt darüber und klicken Sie auf den Button „Snippet verwenden“.
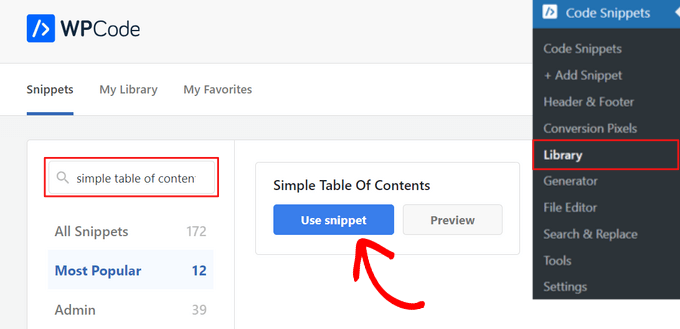
Anschließend fügt WPCode automatisch den Code für Sie ein und wählt die richtige Einfügemethode für die Anzeige des Inhaltsverzeichnisses.
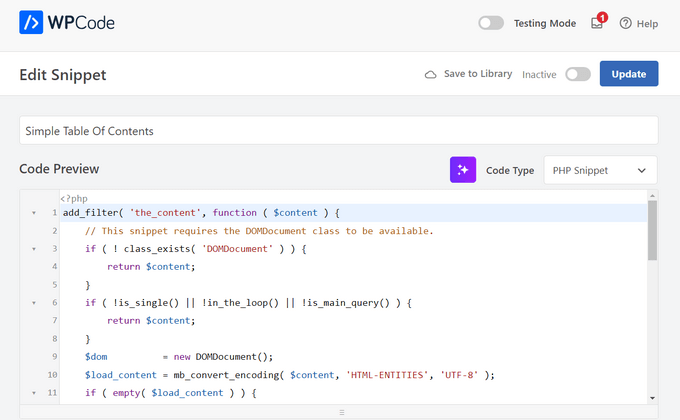
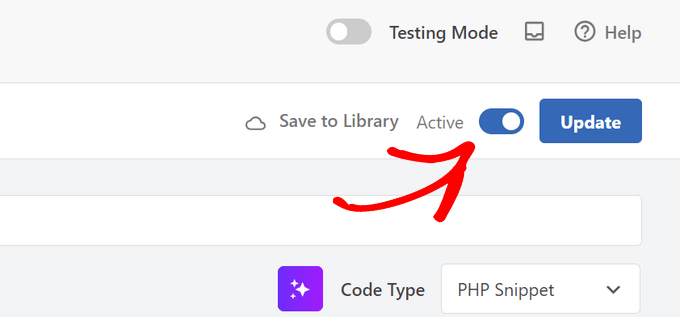
Danach schalten Sie einfach den Schalter von „Inaktiv“ auf „Aktiv“ um und klicken auf den Button „Aktualisieren“ oben auf der Seite.
Das war’s. Jetzt können Sie Ihre Beiträge besuchen und sehen, dass ein grundlegendes Inhaltsverzeichnis hinzugefügt wurde.
Benutzer können auf die Links klicken, um direkt zu einem bestimmten Abschnitt des Artikels zu springen.

Wir hoffen, dass dieses Tutorial Ihnen geholfen hat zu lernen, wie man ein Inhaltsverzeichnis in WordPress Beiträgen und Seiten erstellt. Vielleicht interessiert Sie auch unser Leitfaden zur Steigerung der Besucherzahlen in Ihrem Blog oder unsere Expertenauswahl der besten FAQ Plugins für WordPress.
Wenn Ihnen dieser Artikel gefallen hat, dann abonnieren Sie bitte unseren YouTube-Kanal für WordPress-Videotutorials. Sie können uns auch auf Twitter und Facebook finden.


Sam Smith
I am in word press post editor and I do not see the blue plus button or the advanced block. How do I see those features?
WPBeginner Support
If you re using the block editor then you may want to try disabling distraction free editing in the top-right and that should allow you to see the plus again.
Admin
Ahmed Omar
I am already using the first method, and it help my site to appear first in some search results and of course bringing more visitors
Thank you
WPBeginner Support
You’re welcome!
Admin
Thank you so much
Can you please tell how to change the font color in TOC?
WPBeginner Support
For that, you would need to use CSS to change the color of the text. You can see how to change the text color in our article below!
https://www.wpbeginner.com/wp-tutorials/how-to-change-the-text-color-in-wordpress-easy-methods/
Admin
ario
I tried to create table of content manually like the way you taught us and it worked well, until I added page break and separated the points into different parts or pages. Is there a solution for this?
WPBeginner Support
If you separate the page then you would need to include the entire URL before the # as well as the anchor to link correctly.
Admin
Mark
Back in the day, when websites were new, we used to call this a Site Map. But yeah, it was kind of expected for the search engines to find a site map on your website.
Thanks for the reminder and the info.
WPBeginner Support
Sitemaps are slightly different, we have our guide below for sitemaps specifically. The Table of contents is to allow your visitors to jump to a specific section of a post
https://www.wpbeginner.com/beginners-guide/what-is-a-wordpress-sitemap-how-to-create-a-sitemap-in-wordpress/
Admin
samarth
Which one is better for SEO? Adding TOC manually by HTML or using a Plugin?
WPBeginner Support
If the information added is the same, then there is no difference. The plugin is there to help make the process easier and help ensure any markup is properly added.
Admin
Tay
How can I manually place the TOC on specific pages? It seems I can only disable auto-insertion but I can’t then decide where I want to put the table on the page. Is this possible?
WPBeginner Support
The table of contents would need to be enabled for pages and then there should be an option when editing the specific page you want to add it to.
Admin
Muhammad Arslan Sharif
What a tutorial and very helpful for me and other who want to add new features in their websites and in blogs. In very short words you explain exceptionally.
WPBeginner Support
Glad you found our guide helpful
Admin
Rianne
Brilliant! What I thought would take me hours took me 20 minutes instead
WPBeginner Support
Glad our guide was helpful
Admin
Claudia
Thank you for all your helpful articles!
WPBeginner Support
You’re welcome
Admin
Kim Balchios
My developer created a Table of Contents on a really long blog I wrote. I edited one of the entries and the link fell off.
When I try to create a new entry it says „Paste URL or type to search.“ If I add the URL, it will take the reader to the top of the blog not the exact place inside the blog.
WPBeginner Support
You would want to create an anchor link following our guide below:
https://www.wpbeginner.com/beginners-guide/how-to-easily-add-anchor-links-in-wordpress-step-by-step/
Admin
David Ellin
this video shows me how to create a table of contents within a post. I want to create a table of contents for my entire blog so that the title of each article appears in the TOC. How do I do that?
WPBeginner Support
You would want to take a look at our article below for how to create a blog page as a ToC would get far too long for what you’re wanting to do.
https://www.wpbeginner.com/wp-tutorials/how-to-create-a-separate-page-for-blog-posts-in-wordpress/
Admin
jean
Hi thank you for this informative post!
Only a small question, what is „override the global settings for this specific post / page.“
I chose to insert the table of content manually, and when i check only for h2 & h3, the table of content just doesn’t show up at all.
Thank you!
WPBeginner Support
That would mean you are telling it to ignore your default settings for the plugin for that specific post/page. If you have no H2 or H3s on the page then there wouldn’t be anything for the plugin to add to the table.
Admin
Ahmad Zeeshan
In setting there is no „Table of Content“. Where to find it?
WPBeginner Support
You would want to ensure you activated the plugin after installing it.
Admin
Dheeraj soni
Thanks for sharing an informative article, your content always helps me to go next level.
WPBeginner Support
You’re welcome, glad you found our content helpful
Admin
Asthen
Why wpbeginner don’t recommend using TOC unless it’s really long ?
How long is too long ?
WPBeginner Support
If the page is too short to scroll then there wouldn’t be a reason to have a table of contents. It is a personal preference for the length of a post.
Admin
SAHIL DHIMAAN
Hi, very helpful article
But….
Table of content isn’t showing in Mobile, what to do…
i use AMP plugin also…
WPBeginner Support
Your AMP plugin would be removing the plugin’s additions. If you reach out to the table of contents plugin’s support they can let you know if they have AMP support.
Admin
Bee Lian Low
Thank you, I have waited so long before I decided to install this Table Of ontent!
WPBeginner Support
You’re welcome
Admin
Cecilia
Thanks. Easy to use.
WPBeginner Support
You’re welcome
Admin
Lucimar
Good afternoon!
Congratulations on the article, it helped me a lot
However, it just didn’t work on amp pages.
Note: I use the „Accelerated Mobile Pages“ plugin.
How can I solve?
Thank you!
WPBeginner Support
You would want to reach out to the plugin’s support for if there is a recommendation for AMP.
Admin
Džangir Kolar
Hi!
How those this plugin affect the speed of the page itself?
WPBeginner Support
It shouldn’t affect your page’s speed.
Admin
Luke Richardson
Using easy table of contents, is there an option to create hyperlinks to jump to that particular section when you click on one of the headings in the table.
Not sure if I’m missing something with the plugin, but when I click on the headings it doesn’t jump to that section at all.
thanks
WPBeginner Support
The plugin should be allowing that, you may want to ensure there is enough room between your content and you don’t have any browser addons that would prevent scrolling to a certain section of your page.
Admin
Tosh Lubek
I’ve checked „Initially hide the table of contents“ but the TOC shows every time I open a post with a TOC. Is there something else I need to do?
WPBeginner Support
You would want to reach out to the plugin’s support to ensure this is not a conflict between the plugin and your theme
Admin
Oulimata
As usual, amazingly detailed and helpful. You guys have definitely become my go-to resource for anything blogging related.
WPBeginner Support
Thank you, glad we can continue to be helpful
Admin
Raaz shrestha
The plugin is really great. Thanks for sharing wpbeginner team.
WPBeginner Support
Glad you liked our recommendation
Admin
Akamps
Hey is there a way i can put this table of contents in my sidebar
WPBeginner Support
The plugin does have a widget you can use
Admin
Nic
Is there anyway to centre the table?
WPBeginner Support
You would need to enable custom CSS and depending on your theme would determine the CSS needed
Admin
KM
How use the plugin “manually” just one lost at a time? Instructions not clear
WPBeginner Support
You would enable support for the post type you want to have the table of contents in and when you edit one of the types where it is activated, it will have the option at the bottom of the editor to add the table of contents
Admin
Kelvin
NO it’s POSTS again – not pages!
How do I get a table into a page?
WPBeginner Support
In the plugin’s settings you would enable support for pages and you should be able to follow the same procedure for pages that you do for posts.
Admin
Rishi
nice
WPBeginner Support
Glad you like our article
Admin
Abhishek
Hi, is this possible to show/hide individual headings, just by clicking on it, like on Wikipedia?
I have too many subheadings under each h3 so I want it to be easier to navigate.
WPBeginner Support
Hi Abhishek,
Please see our article on how to show hide text in WordPress using toggle effect.
Admin
Alex
Thanks for article!
Prince Gabriel Okocha
I have installed this plugin on my blog following the guideline in this post. But it’s not showing up on my posts. Is there anything I’m doing wrong? I really need this to ASAP
WPBeginner Support
Hello,
Please review plugin settings, you need to enable support for the posts and pages. After that edit the post and page and below the post editor you will find TOC settings. From here, you need to check the box ‚Insert table of contents‘ to add it in that particular post.
Admin
Srinu
Thanks for the article it’s working for me, But I am getting with bullets and numbers, in TOC_Box how to change it. I already numbered with h2 tags.
so its repeated the numbers twice.
Mae
Thank you so much! I used this for my Exclusives Library and I love it! Now my subscribers won’t have a difficult time looking for their printables.
XOXO,
Mae
Jan Peter Aursnes
A fine plugin, but is there any way I can exclude pages? Writing in headings and using * and ⎮ does not work, for me anyway. I am not a tech guy so it could be I just need a bit of explanation.
Thanks in advance.
Raushan
This is best plugin but when i created table of content from this plugin then showing multiple H1 tag which is not good at seo point of view.
How to solve this ?
Thanks
Sunil Suresh
Thanks. Your article came at the right time for me! I was just now looking for something like this for a client of mine.