Volete aggiungere un indice ai vostri post o pagine di WordPress?
Un indice (TOC) può facilitare la navigazione di un lungo articolo e migliorare la SEO del vostro sito WordPress. Tuttavia, possono essere difficili da creare per i principianti.
In questo articolo vi mostreremo come creare un indice nei post e nelle pagine di WordPress.
Perché aggiungere un indice ai post e alle pagine di WordPress?
Potreste aver visto l’indice su siti web come Wikipedia. Anche noi li usiamo su WPBeginner per i nostri articoli lunghi, come la nostra guida definitiva per aumentare la velocità e le prestazioni di WordPress.
Potete aggiungere un indice ai post del vostro sito WordPress per facilitare il salto tra le sezioni di un lungo articolo.
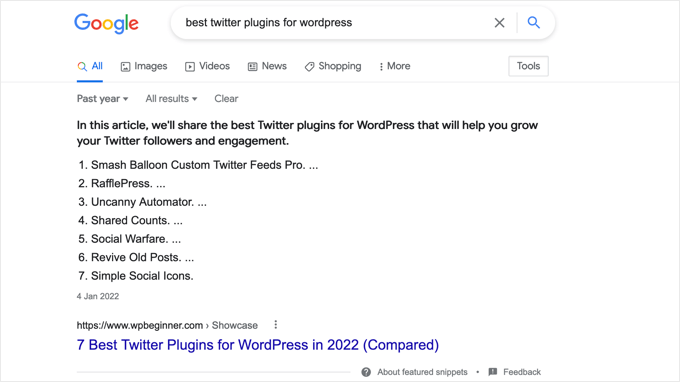
Non solo migliorano l’esperienza dell’utente, ma aiutano anche la SEO di WordPress. Infatti, Google può utilizzare l’indice per aggiungere automaticamente i link “salta alla sezione” nei risultati di ricerca.

Un indice dei contenuti può anche aiutare il vostro post a comparire come featured snippet nella parte superiore della pagina dei risultati dei motori di ricerca.
Questo vi aiuterà a ottenere il massimo traffico SEO.
Detto questo, vediamo come creare facilmente un indice nei post e nelle pagine di WordPress. Vi mostreremo come farlo automaticamente con un plugin e manualmente utilizzando i link di ancoraggio:
Metodo 1: Aggiunta automatica di un indice in WordPress
AIOSEO, noto anche come All in One SEO, è il miglior plugin SEO per WordPress ed è dotato di un blocco di indice integrato per WordPress.
Consigliamo questo metodo perché consente di risparmiare tempo generando automaticamente l’indice in base ai sottotitoli e rendendolo completamente personalizzabile con collegamenti modificabili.
Per ulteriori informazioni, consultate la nostra recensione completa di AIOSEO.
La prima cosa da fare è installare il plugin gratuito All in One SEO Lite. Per maggiori dettagli, consultate la nostra guida passo passo su come installare un plugin di WordPress.
La versione gratuita è sufficiente per aggiungere facilmente un indice, ma AIOSEO Pro offre ancora più funzioni per aiutarvi a posizionarvi meglio nelle pagine dei risultati dei motori di ricerca.
Dopo l’attivazione, è necessario configurare il plugin utilizzando la configurazione guidata di AIOSEO. Per istruzioni dettagliate, consultate la nostra guida su come configurare correttamente All in One SEO per WordPress.
Aggiunta di un sommario con All in One SEO
È necessario creare o modificare il post o la pagina in cui si desidera aggiungere l’indice. Dopodiché, fare clic sull’icona blu “+” nell’editor dei blocchi e trovare il blocco “AIOSEO – Indice dei contenuti”.
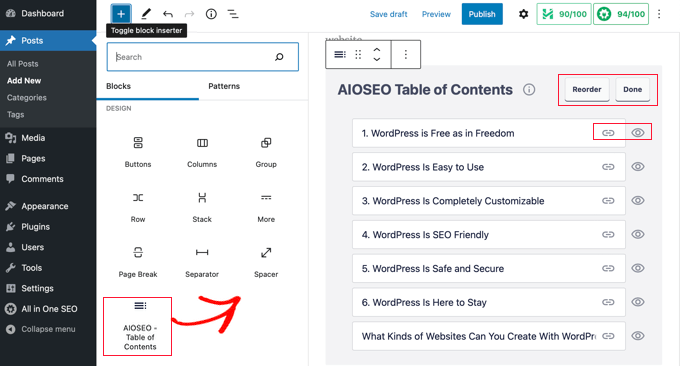
È sufficiente trascinare il blocco sul post o sulla pagina in cui si desidera che appaia l’indice.
Nota: una volta aggiunto un indice, si può notare che il blocco “AIOSEO – Indice” sarà grigio. Questo perché è possibile avere un solo indice per ogni post o pagina.
Il plugin identifica automaticamente i titoli della pagina e li aggiunge all’indice. Se si utilizzano diversi livelli di intestazione (ad esempio H2 e H3), le intestazioni di livello inferiore saranno rientrate per mostrare la struttura del contenuto.
Se si sta ancora scrivendo il contenuto del post o della pagina, i titoli aggiunti al documento verranno automaticamente aggiunti all’indice.
Personalizzazione dell’indice con All in One SEO
Esistono alcuni modi per personalizzare l’indice in base alle proprie esigenze. Ad esempio, è possibile fare clic su un titolo per rinominarlo. Questo rinominerà il titolo nell’indice, ma non l’articolo.

AIOSEO crea automaticamente dei link di ancoraggio per ogni titolo. È possibile fare clic sull’icona Link per modificare il testo di ancoraggio, che viene modificato sia nell’indice che nell’intestazione del contenuto del post.
È anche possibile fare clic sull’icona dell’occhio accanto a una qualsiasi delle rubriche per nasconderla. Gli utenti di AIOSEO Pro possono riordinare i titoli nel blocco dell’indice. Questo riordina i titoli nell’indice, ma non nell’articolo.
È presente anche un’impostazione per il blocco nella barra laterale. Qui è possibile scegliere uno stile di elenco puntato o numerato per l’indice.
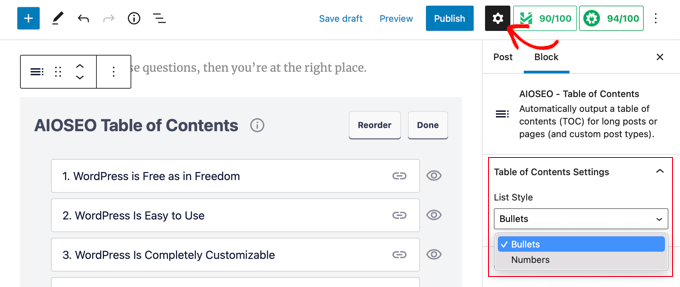
Infine, una volta terminata la personalizzazione dell’indice di WordPress, è necessario fare clic sul pulsante “Fine” per salvare le modifiche.
Ora potrete vedere come apparirà l’indice ai vostri visitatori.
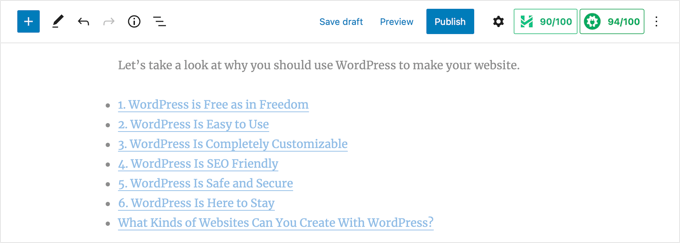
È una buona idea aggiungere un titolo o un paragrafo sopra l’indice. In questo modo i lettori capiranno che si tratta di un indice.
Quando i visitatori fanno clic su un link nell’indice, vengono portati immediatamente a quel titolo dell’articolo. In questo modo gli utenti possono saltare alla sezione che più interessa loro.
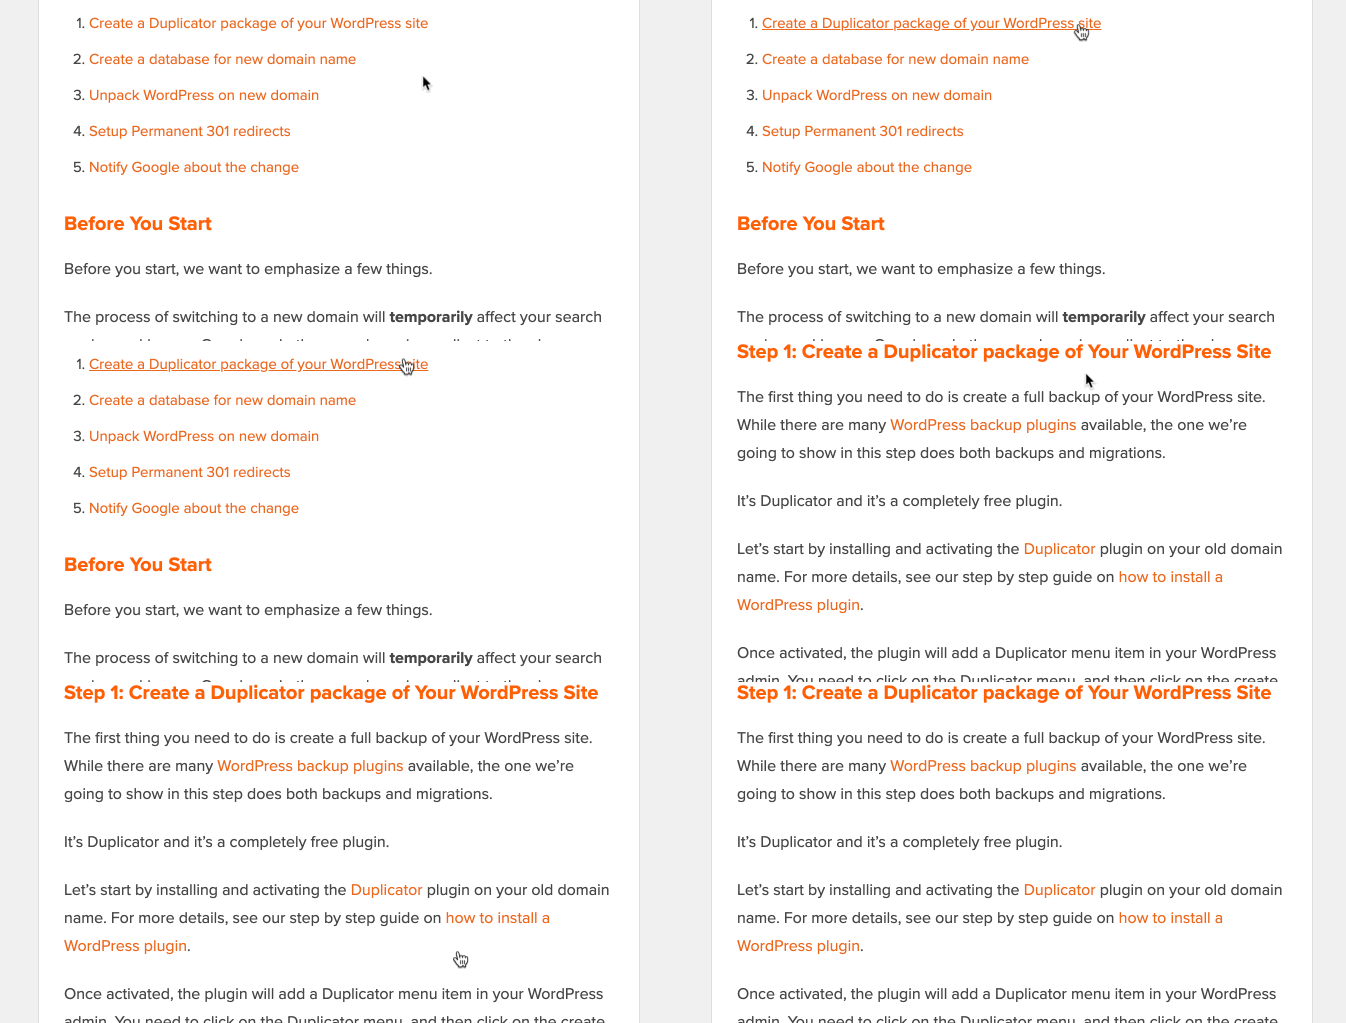
Il motivo per cui ci piace la funzione di indice di AIOSEO è che consente di personalizzare i titoli e di nasconderli selettivamente secondo le necessità.
Si tratta di una caratteristica fondamentale che la maggior parte degli altri plugin di indice non ha.
Metodo 2: Aggiungere manualmente un indice in WordPress
È anche possibile creare un indice manualmente utilizzando i link di ancoraggio senza bisogno di un plugin. Tuttavia, questa operazione richiede più tempo e impegno.
Per saperne di più sui link di ancoraggio, consultate la nostra guida su come aggiungere link di ancoraggio in WordPress.
Digitare l’indice
Per prima cosa, è necessario aggiungere un blocco “Elenco” in cui aggiungere i titoli per l’indice. È possibile digitare i titoli nell’elenco o copiarli e incollarli uno per uno dal contenuto dell’articolo.

Come aggiungere il testo di ancoraggio ai blocchi di intestazione
Successivamente, è necessario aggiungere un attributo di ancoraggio a ogni titolo a cui si vuole fare riferimento nell’indice. In questo modo WordPress saprà dove saltare quando un visitatore fa clic sul titolo nell’indice.
Si deve innanzitutto fare clic sull’intestazione, ad esempio H2 o H3. Quindi, è necessario fare clic sulla freccia “Avanzate” nel riquadro delle impostazioni del blocco per visualizzare le impostazioni avanzate.
Quindi, inserire una parola o una frase unica senza spazi nel campo “HTML anchor”. Se si vuole, si possono usare i trattini per separare ogni parola.
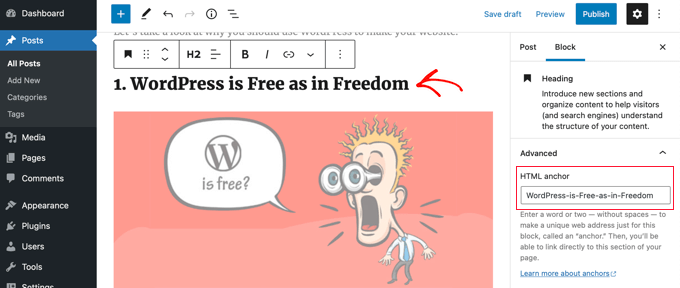
Quindi, ripetete l’operazione per tutte le altre voci che saranno incluse nell’indice.
Suggerimento: se si incolla il titolo in questo campo, i trattini verranno aggiunti automaticamente. Questo è un modo semplice per creare un ID unico che rappresenti chiaramente l’intestazione.
Aggiunta di link di ancoraggio al sommario
L’ultimo passo consiste nel collegare i titoli dell’indice agli ancoraggi HTML creati.
Evidenziare la prima voce del blocco Elenco e fare clic sull’icona “Collegamento” nella barra degli strumenti.

Successivamente, si deve digitare un hashtag (#) e poi digitare o incollare il testo di ancoraggio per quel titolo.
Il # indica a WordPress di saltare a quella sezione del post corrente. Non si aggiunge il nome del dominio o altri parametri dell’URL.

Una volta fatto ciò, è necessario premere “Invio” o fare clic sull’icona “Invia” per creare il link.
Il link di ancoraggio verrà aggiunto all’elenco dei contenuti. Quando i visitatori faranno clic su questo link, saranno immediatamente portati a quel titolo nel contenuto del post o della pagina.

È possibile ripetere questi passaggi per aggiungere collegamenti di ancoraggio alle altre voci dell’indice.
Speriamo che questo tutorial vi abbia aiutato a imparare come creare un indice nei post e nelle pagine di WordPress. Potreste anche voler consultare la nostra guida su come aumentare il traffico del vostro blog o la nostra scelta di esperti dei plugin WordPress indispensabili per far crescere il vostro sito.
Se questo articolo vi è piaciuto, iscrivetevi al nostro canale YouTube per le esercitazioni video su WordPress. Potete trovarci anche su Twitter e Facebook.


Syed Balkhi says
Hey WPBeginner readers,
Did you know you can win exciting prizes by commenting on WPBeginner?
Every month, our top blog commenters will win HUGE rewards, including premium WordPress plugin licenses and cash prizes.
You can get more details about the contest from here.
Start sharing your thoughts below to stand a chance to win!
Sam Smith says
I am in word press post editor and I do not see the blue plus button or the advanced block. How do I see those features?
WPBeginner Support says
If you re using the block editor then you may want to try disabling distraction free editing in the top-right and that should allow you to see the plus again.
Admin
Ahmed Omar says
I am already using the first method, and it help my site to appear first in some search results and of course bringing more visitors
Thank you
WPBeginner Support says
You’re welcome!
Admin
Thank you so much says
Can you please tell how to change the font color in TOC?
WPBeginner Support says
For that, you would need to use CSS to change the color of the text. You can see how to change the text color in our article below!
https://www.wpbeginner.com/wp-tutorials/how-to-change-the-text-color-in-wordpress-easy-methods/
Admin
ario says
I tried to create table of content manually like the way you taught us and it worked well, until I added page break and separated the points into different parts or pages. Is there a solution for this?
WPBeginner Support says
If you separate the page then you would need to include the entire URL before the # as well as the anchor to link correctly.
Admin
Mark says
Back in the day, when websites were new, we used to call this a Site Map. But yeah, it was kind of expected for the search engines to find a site map on your website.
Thanks for the reminder and the info.
WPBeginner Support says
Sitemaps are slightly different, we have our guide below for sitemaps specifically. The Table of contents is to allow your visitors to jump to a specific section of a post
https://www.wpbeginner.com/beginners-guide/what-is-a-wordpress-sitemap-how-to-create-a-sitemap-in-wordpress/
Admin
samarth says
Which one is better for SEO? Adding TOC manually by HTML or using a Plugin?
WPBeginner Support says
If the information added is the same, then there is no difference. The plugin is there to help make the process easier and help ensure any markup is properly added.
Admin
Tay says
How can I manually place the TOC on specific pages? It seems I can only disable auto-insertion but I can’t then decide where I want to put the table on the page. Is this possible?
WPBeginner Support says
The table of contents would need to be enabled for pages and then there should be an option when editing the specific page you want to add it to.
Admin
Muhammad Arslan Sharif says
What a tutorial and very helpful for me and other who want to add new features in their websites and in blogs. In very short words you explain exceptionally.
WPBeginner Support says
Glad you found our guide helpful
Admin
Rianne says
Brilliant! What I thought would take me hours took me 20 minutes instead
WPBeginner Support says
Glad our guide was helpful
Admin
Claudia says
Thank you for all your helpful articles!
WPBeginner Support says
You’re welcome
Admin
Kim Balchios says
My developer created a Table of Contents on a really long blog I wrote. I edited one of the entries and the link fell off.
When I try to create a new entry it says “Paste URL or type to search.” If I add the URL, it will take the reader to the top of the blog not the exact place inside the blog.
WPBeginner Support says
You would want to create an anchor link following our guide below:
https://www.wpbeginner.com/beginners-guide/how-to-easily-add-anchor-links-in-wordpress-step-by-step/
Admin
David Ellin says
this video shows me how to create a table of contents within a post. I want to create a table of contents for my entire blog so that the title of each article appears in the TOC. How do I do that?
WPBeginner Support says
You would want to take a look at our article below for how to create a blog page as a ToC would get far too long for what you’re wanting to do.
https://www.wpbeginner.com/wp-tutorials/how-to-create-a-separate-page-for-blog-posts-in-wordpress/
Admin
jean says
Hi thank you for this informative post!
Only a small question, what is “override the global settings for this specific post / page.”
I chose to insert the table of content manually, and when i check only for h2 & h3, the table of content just doesn’t show up at all.
Thank you!
WPBeginner Support says
That would mean you are telling it to ignore your default settings for the plugin for that specific post/page. If you have no H2 or H3s on the page then there wouldn’t be anything for the plugin to add to the table.
Admin
Ahmad Zeeshan says
In setting there is no “Table of Content”. Where to find it?
WPBeginner Support says
You would want to ensure you activated the plugin after installing it.
Admin
Dheeraj soni says
Thanks for sharing an informative article, your content always helps me to go next level.
WPBeginner Support says
You’re welcome, glad you found our content helpful
Admin
Asthen says
Why wpbeginner don’t recommend using TOC unless it’s really long ?
How long is too long ?
WPBeginner Support says
If the page is too short to scroll then there wouldn’t be a reason to have a table of contents. It is a personal preference for the length of a post.
Admin
SAHIL DHIMAAN says
Hi, very helpful article
But….
Table of content isn’t showing in Mobile, what to do…
i use AMP plugin also…
WPBeginner Support says
Your AMP plugin would be removing the plugin’s additions. If you reach out to the table of contents plugin’s support they can let you know if they have AMP support.
Admin
Bee Lian Low says
Thank you, I have waited so long before I decided to install this Table Of ontent!
WPBeginner Support says
You’re welcome
Admin
Cecilia says
Thanks. Easy to use.
WPBeginner Support says
You’re welcome
Admin
Lucimar says
Good afternoon!
Congratulations on the article, it helped me a lot
However, it just didn’t work on amp pages.
Note: I use the “Accelerated Mobile Pages” plugin.
How can I solve?
Thank you!
WPBeginner Support says
You would want to reach out to the plugin’s support for if there is a recommendation for AMP.
Admin
Džangir Kolar says
Hi!
How those this plugin affect the speed of the page itself?
WPBeginner Support says
It shouldn’t affect your page’s speed.
Admin
Luke Richardson says
Using easy table of contents, is there an option to create hyperlinks to jump to that particular section when you click on one of the headings in the table.
Not sure if I’m missing something with the plugin, but when I click on the headings it doesn’t jump to that section at all.
thanks
WPBeginner Support says
The plugin should be allowing that, you may want to ensure there is enough room between your content and you don’t have any browser addons that would prevent scrolling to a certain section of your page.
Admin
Tosh Lubek says
I’ve checked “Initially hide the table of contents” but the TOC shows every time I open a post with a TOC. Is there something else I need to do?
WPBeginner Support says
You would want to reach out to the plugin’s support to ensure this is not a conflict between the plugin and your theme
Admin
Oulimata says
As usual, amazingly detailed and helpful. You guys have definitely become my go-to resource for anything blogging related.
WPBeginner Support says
Thank you, glad we can continue to be helpful
Admin
Raaz shrestha says
The plugin is really great. Thanks for sharing wpbeginner team.
WPBeginner Support says
Glad you liked our recommendation
Admin
Akamps says
Hey is there a way i can put this table of contents in my sidebar
WPBeginner Support says
The plugin does have a widget you can use
Admin
Nic says
Is there anyway to centre the table?
WPBeginner Support says
You would need to enable custom CSS and depending on your theme would determine the CSS needed
Admin
KM says
How use the plugin “manually” just one lost at a time? Instructions not clear
WPBeginner Support says
You would enable support for the post type you want to have the table of contents in and when you edit one of the types where it is activated, it will have the option at the bottom of the editor to add the table of contents
Admin
Kelvin says
NO it’s POSTS again – not pages!
How do I get a table into a page?
WPBeginner Support says
In the plugin’s settings you would enable support for pages and you should be able to follow the same procedure for pages that you do for posts.
Admin
Rishi says
nice
WPBeginner Support says
Glad you like our article
Admin
Abhishek says
Hi, is this possible to show/hide individual headings, just by clicking on it, like on Wikipedia?
I have too many subheadings under each h3 so I want it to be easier to navigate.
WPBeginner Support says
Hi Abhishek,
Please see our article on how to show hide text in WordPress using toggle effect.
Admin
Alex says
Thanks for article!
Prince Gabriel Okocha says
I have installed this plugin on my blog following the guideline in this post. But it’s not showing up on my posts. Is there anything I’m doing wrong? I really need this to ASAP
WPBeginner Support says
Hello,
Please review plugin settings, you need to enable support for the posts and pages. After that edit the post and page and below the post editor you will find TOC settings. From here, you need to check the box ‘Insert table of contents’ to add it in that particular post.
Admin
Srinu says
Thanks for the article it’s working for me, But I am getting with bullets and numbers, in TOC_Box how to change it. I already numbered with h2 tags.
so its repeated the numbers twice.
Mae says
Thank you so much! I used this for my Exclusives Library and I love it! Now my subscribers won’t have a difficult time looking for their printables.
XOXO,
Mae
Jan Peter Aursnes says
A fine plugin, but is there any way I can exclude pages? Writing in headings and using * and ⎮ does not work, for me anyway. I am not a tech guy so it could be I just need a bit of explanation.
Thanks in advance.
Raushan says
This is best plugin but when i created table of content from this plugin then showing multiple H1 tag which is not good at seo point of view.
How to solve this ?
Thanks
Sunil Suresh says
Thanks. Your article came at the right time for me! I was just now looking for something like this for a client of mine.