Do you have a GoDaddy site built with the Website Builder and want to move to WordPress?
GoDaddy offers a basic website builder tool that allows users to create simple websites. However, users will quickly realize its many limitations and want to move their website to a more flexible and powerful platform like WordPress.
In this article, we will show you how to move a GoDaddy website builder site to WordPress by manually transferring your data to your new site.

Note: This article has a lot of manual steps, which can be time-consuming depending on the size of your website. There is no export tool to move your site from GoDaddy Website Builder, so just be aware that the process can be pretty complicated.
Step 0: Getting Started
The success of your WordPress site depends on the WordPress hosting you choose. If you already have GoDaddy’s hosting service, you can use it for your WordPress site.
If you want to move to a new host, then we recommend Bluehost. They are one of the largest hosting companies in the world, and they are an official WordPress hosting partner.
For WPBeginner users, they’re offering a generous discount, a free SSL certificate, and a free domain name, which comes in handy if you also want to move your GoDaddy website to a new URL.
Basically, you can start with $1.99 per month.
That being said, let’s start moving your site from GoDaddy Website Builder to WordPress.
Here is an overview of the steps you’ll take to switch from GoDaddy Website Builder to WordPress.
- Step 1: Preparing to Move From GoDaddy Website Builder to WordPress
- Step 2: Moving Website Builder Site to GoDaddy Shared Hosting
- Step 3: Pointing Domain to Other WordPress Hosting Services
- Step 4: Installing WordPress
- Step 5: Importing Website Builder Content in WordPress
- Step 6: Setting up Redirects
- Step 7: Customizing Your WordPress Site
Step 1: Preparing to Move From GoDaddy Website Builder to WordPress
WordPress has import tools for many services and tools like Blogger, Tumblr, LiveJournal, etc. There are also third-party tools for platforms, such as moving from Weebly to WordPress or Shopify to WooCommerce.
However, there is no such import tool for GoDaddy Website Builder.
This is why you’ll need to back up your Website Builder site manually. It can be a little time-consuming, depending on how much content you have on your website.
Backing up GoDaddy Website Builder Content
Due to a lack of export tools, you’ll need to download your data to your computer manually.
Option 1. Download Images and Content Manually
If you have just a few pages, then you can back up by simply saving images and copying text into text files on your computer.
To save images, simply right-click on an image and select ‘Save image as…’ option.

This will download the image to your computer, and you can then upload it to your WordPress site.
Repeat the process to download all your images and photos.
Similarly, you can also copy the text content of your pages bit by bit. Simply select the text and then right-click to select Copy. Alternatively, you can use keyboard keys (CTRL+C on Windows or Command+C on Mac).

Another quicker way to do this is by visiting each page on your website in your browser and pressing CTRL+S (Command+S on Mac) on your keyboard.
This will bring up the save dialog box. Make sure that you select ‘Webpage, Complete’ in the ‘format’ or ‘save as type’ field.
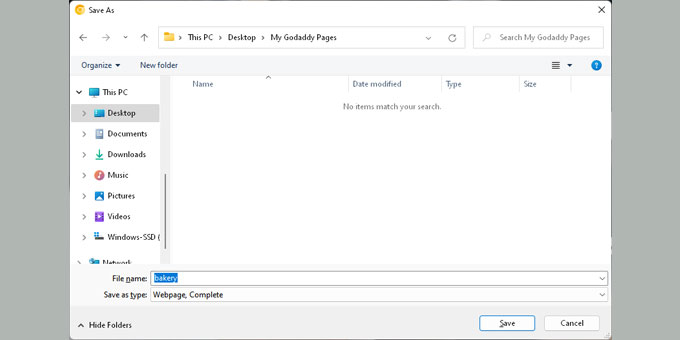
Repeat the process for all pages on your website.
Make sure that you have downloaded all your images and text.
After that, disconnect the internet on your computer and then open the files you have downloaded to double-check.
Option 2. Download All Pages on Your Website Using HTTrack
Alternatively, you can use the free HTTrack tool to copy the website on your computer.
HTTrack is a website copier app for Windows.
However, the problem with this method is that GoDaddy uses different CDN mirrors to host images, which makes it difficult to download them using HTTrack.
If your website mostly contains text content and you are not concerned about losing images, then this method is the fastest way to copy your website.
If you don’t have a Windows PC, consider borrowing a friend’s PC to copy your website. Once it is copied, you can transfer all your website files to your Mac computer using a USB drive or cloud storage.
Once you have installed HTTrack, first, you need to create a project. Simply give your project a name and choose where you want to copy the files on your computer.
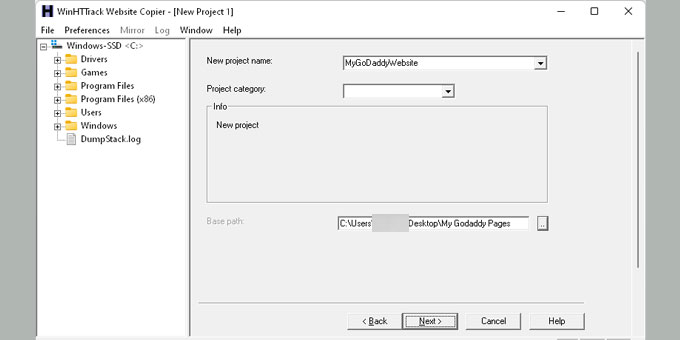
After that, click on the ‘Next’ button to continue.
On the next step, you need to click on the ‘Add URL’ button and then enter your full GoDaddy website address (e.g. https://yourdomain.com).
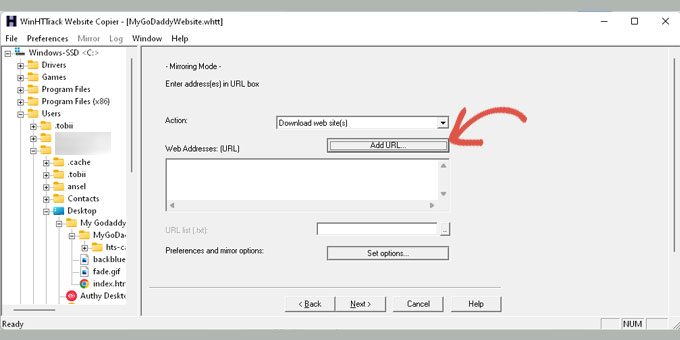
Click on the ‘Next’ button to continue.
HTTrack will now run export process and will show you a success message when finished.
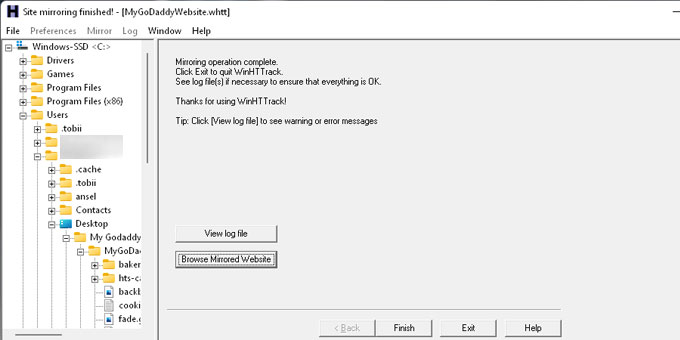
You can now click on ‘Browse Mirrored Websites’ to preview your copied website.
Note: It is important to carefully copy all your website content carefully. Once you disable the GoDaddy Website Builder, you will not be able to get back to your website.
Take the time to ensure you have a backup of all your website data.
At this time, you’re probably wondering why there isn’t an easier way.
That’s probably because GoDaddy doesn’t want you to switch hosting providers.
That’s why choosing the right platform is an important decision, but we’re glad that you have made the right choice to go with a WordPress site.
Backing up Your Link Structure
Another element that you need to copy is your website’s link structure. This will allow you to redirect users visiting old URLs of your website to the new pages in WordPress.
To do that, you need to have a list of all URLs on your website.
If you have just a few pages, you can simply copy and paste the URL of each page on your site in a plain text file.
Alternatively, you can use online tools to extract URLs from your site. You can use Klipper, a Google Chrome extension to save URLs in a TXT file.
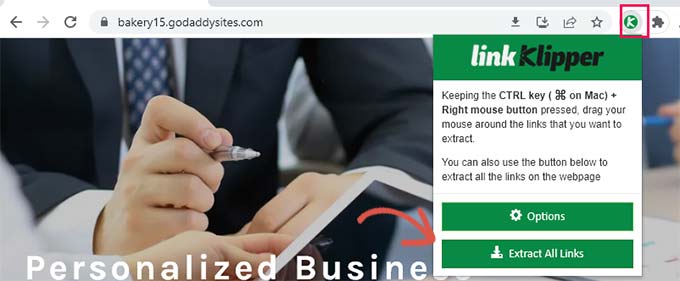
Don’t worry if you miss out on a page. We will also show you how to automatically set up alerts for 404 errors in WordPress and redirect users in WordPress.
Step 2: Moving Website Builder Site to GoDaddy Shared Hosting
This step is only for users who will be using GoDaddy’s hosting service to run their WordPress site.
If you are using some other WordPress hosting provider like Bluehost, SiteGround, Hostgator, etc., then skip this and jump to the next step.
Disable GoDaddy Website Builder
If you want to use GoDaddy’s hosting service for your WordPress website, you cannot install WordPress on that domain until you deactivate the Website Builder service.
Simply log in to your GoDaddy account and click on ‘My Products’ menu located under your username at the top.
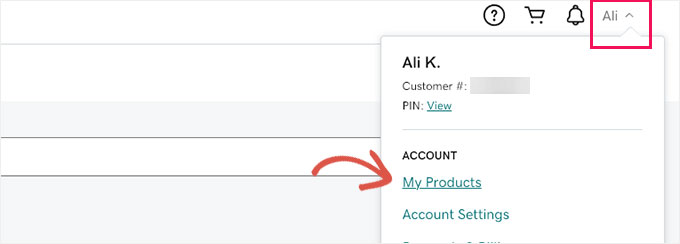
You’ll see your website listed under the products page.
Click on the three dot menu next to your website and then select ‘Edit Plan.’

It will bring up the Website Builder options popup. Under the ‘Overview’ tab, you will find a link to cancel your account.
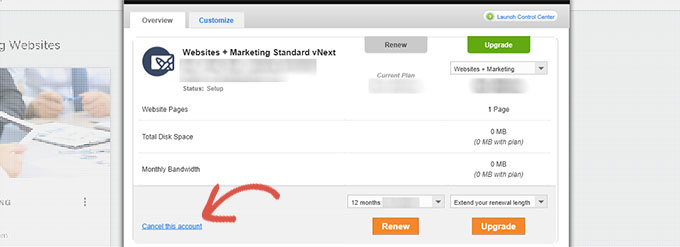
Your GoDaddy Website Builder account will now be deactivated, and your domain should become available to host your WordPress website.
It will take nearly an hour before your GoDaddy account is fully deactivated.
Adding Hosting to Your Domain
Now that your domain is free from the GoDaddy website builder. You still need to add a hosting service to that domain.
Click on web hosting under account manager and then click on the Manage button next to your account.
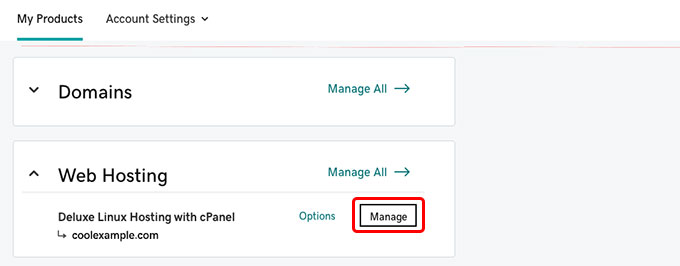
This will bring you to the cPanel dashboard of your hosting account.
You need to scroll down to the domains section and then click on Addon domains.
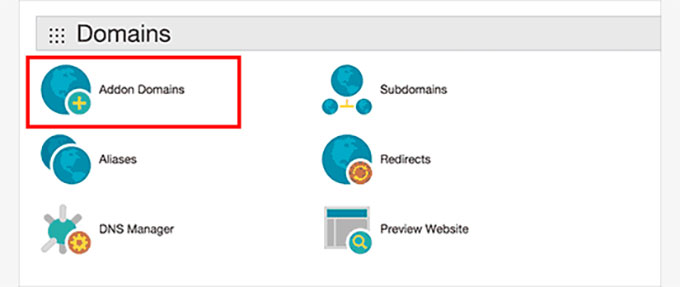
Now you can enter your domain name.
The subdomain and document root fields will be automatically filled.
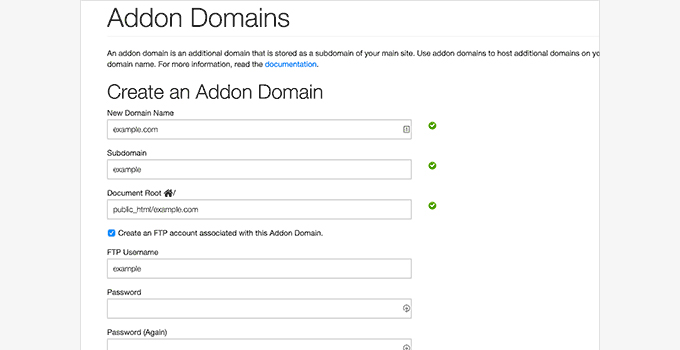
You also need to check the box to create an FTP account. Simply select a username and password for your FTP account. Finally, click on the add domain button.
That’s all you have successfully freed up your domain from Website Builder and added web hosting for your domain.
You can now jump to Step 4, to learn how to install WordPress and continue moving your website.
Step 3: Pointing Domain to Other WordPress Hosting Services
This step is for users who have their domain registered with GoDaddy and want to use it with some other WordPress hosting providers like BlueHost or SiteGround.
Log in to your GoDaddy account and select ‘My Products’ by clicking on your username at the top right corner of the screen.

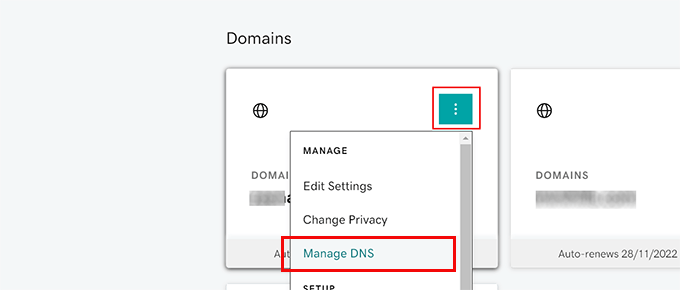
On the next screen, click on the three dot menu next to your domain name.
Then, you can click on ‘Manage DNS.’
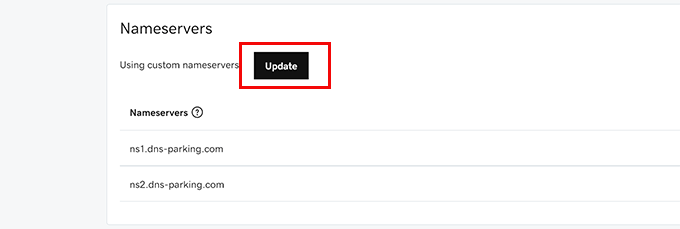
On the next screen click on the ‘Update’ button next to the ‘Nameservers’ option.
This is where you will point your domain to your hosting account.
Now, you will see a popup labeled ‘Edit nameservers.’
You need to click on ‘Enter my own nameservers’ link.
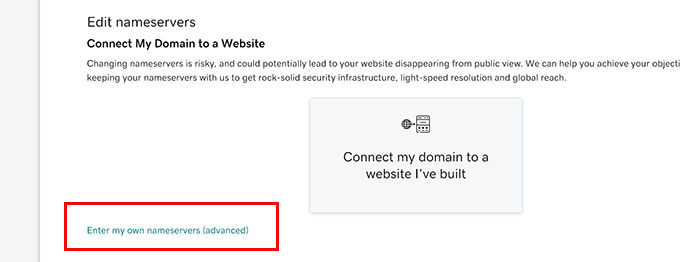
On the next screen, you will be able to enter the nameservers provided by your hosting company.
They will be in a format similar to ns1.bluehost.com and there will be two of them.
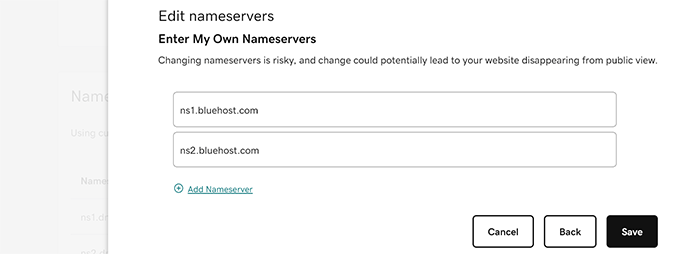
Click on the ‘Save’ button to store your settings.
Remember that DNS changes may take upto 24 hours to propagate throughout the internet. Although it usually only takes a few hours.
Once your domain starts pointing to your new WordPress host, you can proceed to the next step.
Step 4: Installing WordPress
By now, your domain should be pointing to your hosting service, and you are ready to install WordPress.
Whether you are using GoDaddy or any other hosting service, the process is the same.
WordPress is famous for its 5-minute install. Most hosting companies offer installers for new websites that allow you to install WordPress on your website with just a few clicks.
For more details, see our step-by-step WordPress installation tutorial for beginners.
Step 5: Importing Website Builder Content in WordPress
As we mentioned earlier, you will have to manually backup your GoDaddy Website Builder content. It is not possible to automatically import content from the GoDaddy Website Builder.
By default, WordPress comes with two built-in content types called posts and pages. See our guide on the difference between posts and pages.
You need to create new pages or posts on your website and copy/paste the content from your previous site on GoDaddy.
Creating posts and pages in WordPress is really simple. See our detailed tutorial on how to add a new post in WordPress to utilize all the features.
Step 6: Setting up Redirects
If you have the list of links from the old website builder site, then you can go right ahead and set up redirects.
We’ll show you two methods to set up redirects, and you can choose one that suits you.
Method 1. Set up Redirects Using All in One SEO (Recommended)
This method is recommended as it is more flexible and user-friendly.
For this method, we’ll be using All in One SEO for WordPress.
It is the best WordPress SEO plugin on the market and allows you to easily improve your website SEO to get more traffic from search engines.
First, install and activate the All in One SEO for WordPress plugin. For more details, see our step-by-step guide on how to install a WordPress plugin.
Note: There is a free All in One SEO plugin, but you will need at least the Pro plan to unlock the redirects manager feature.
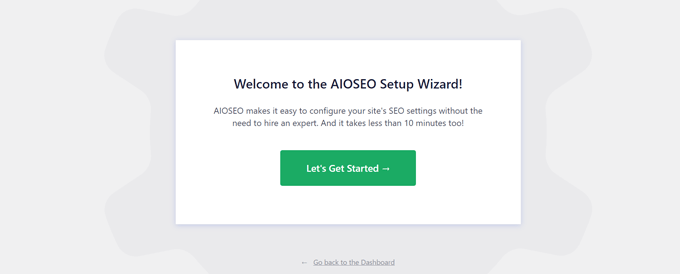
Upon activation, you will see the setup wizard, which will walk you through the initial setup. Simply follow the on-screen instructions to continue.
Next, you need to visit All in One SEO » Redirects page to set up redirects.
Simply enter the old URL under the ‘Source URL’ field and the new URL of that page in the ‘Target URL’ field.
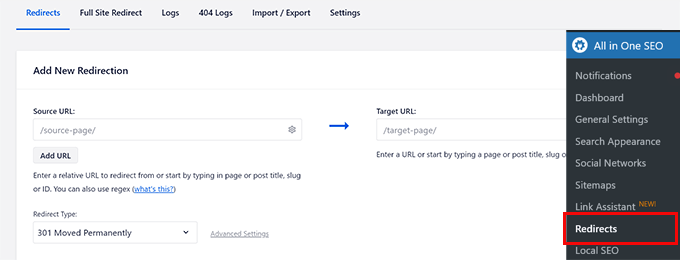
Click on the ‘Save’ button to add this redirect.
Repeat the process to add redirects for all other links, and then visit the old URLs to make sure that they are redirecting properly to the new URL on your WordPress website.
AIOSEO’s ‘Redirect Manager’ also lets you track how many times your old link is redirected to your new one so you can keep track of your traffic sources.
Method 2. Set up Redirects Using Simple 301 Redirects
For this method, we’ll be using a free WordPress plugin with fewer features, but it will get the job done.
The first thing you need to do is install and activate the Simple 301 Redirects plugin. For more details, see our step-by-step guide on how to install a WordPress plugin.
Upon activation, you need to visit the Settings » 301 Redirects page. Enter your old URL under the ‘Request’ field and enter the new WordPress URL for that page in the ‘Destination’ field.
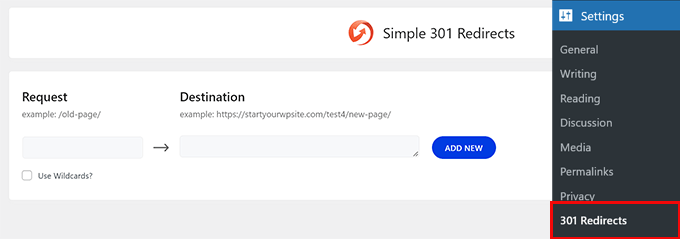
Click on the ‘Save changes’ button to store this redirect. Repeat the process for all other URLs.
For more detailed instructions and other ways to set up redirects, take a look at our beginner’s guide to creating redirects in WordPress.
Step 7: Customizing Your WordPress Site
WordPress comes with thousands of beautiful themes both paid and free. Take a look at our guide on selecting the perfect theme for WordPress.
However, the most powerful feature of WordPress is its extensibility, which comes from plugins. There are thousands of WordPress plugins that allow you to do almost anything imaginable.
Take a look at all the plugins we are using on this site in WPBeginner’s Blueprint, or see our expert pick of must-have WordPress plugins for business websites
We hope this article helped you move your GoDaddy Website Builder site to WordPress. You may also want to see our comparison of the best drag-and-drop page builders for WordPress or our guide on how to create an email newsletter the right way.
If you liked this article, then please subscribe to our YouTube Channel for WordPress video tutorials. You can also find us on Twitter and Facebook.


Syed Balkhi says
Hey WPBeginner readers,
Did you know you can win exciting prizes by commenting on WPBeginner?
Every month, our top blog commenters will win HUGE rewards, including premium WordPress plugin licenses and cash prizes.
You can get more details about the contest from here.
Start sharing your thoughts below to stand a chance to win!
Lori Schubert says
I have my website built on go daddy and have my domain and email through them. I want to switch to wordpress. II am also redesigning my website. Is it better to transfer my existing site to wordpress and then modify it or just build a new site on wordpress and then transfer the domain if I can even do that? I’m looking for the easiest way to do this. Thanks!
WPBeginner Support says
From what it sounds like you are wanting to do, you would want to create a new site and transfer the domain when you’re ready.
Admin
sandhiya says
Hi,
Thank you for this great article! But I want to know is it possible to move the current Godaddy website builder to WordPress with a new own domain?
WPBeginner Support says
You certainly could use this article for doing that.
Admin
Md. Kamrul Hasan says
If I register with godaddy then can I use wordpress plugins for free? or I have to Buy business plan from wordpress?
WPBeginner Support says
If you are hosted on a host other than WordPress.com then you do not need to pay for a plugin. You would want to take a look at our article here: https://www.wpbeginner.com/beginners-guide/self-hosted-wordpress-org-vs-free-wordpress-com-infograph/
Admin
Tony says
Hi, but what if you have email hosted with them and ONLY wish to move website hosting to not use their website builder?
So basically, keep their nameservers, just point website to another server.
Can you include that in your article or have another article?
Jerry says
Is it possible to move a wix website to wordpress?
WPBeginner Support says
You can, we have an article that shows you how to do just that here: https://www.wpbeginner.com/wp-tutorials/how-to-properly-switch-from-wix-to-wordpress-step-by-step/
Admin
Papii says
I’ve been contemplating taking action while reading your write-up over and over and over for over a month now. I know this is the move I want to make, I just don’t want to completely loose my company’s current website in the process. Now that I am done procrastinating and ready to make the change, I do have a question if you can answer it…
On Step 2, when canceling GoDaddy Website Builder to switch to GoDaddy Shared Hosting, do I need to be prepared to make a new payment for the hosting service?
If so, while steering clear of GoDaddy’s promoted WordPress Managed Hosting, do you have a suggestion on what I should choose? This is for a business with very little web traffic now, but, plans of heavy daily web traffic in the future.
WPBeginner Support says
Hello,
If your GoDaddy plan includes hosting, then you wouldn’t need to pay for it. You can also move to another WordPress hosting provider.
Admin
Lindy says
I’m really happy to read this article because I got stuck (even though I just signed up today). I wanted to have the domain name of my choice and signed up for godaddy.
You must know I am a complete beginner. I want to start a blog with wordpress. Now I’ve understood so far that WordPress could be my host. I would prefer using WordPress as a host, rather than setting up a different host with again paying money and not knowing what I am exactly doing.
My main question is, how do I keep my domain name, but change everything to WordPress and get totally rid of godaddy? Any tips, advice, how-to’s? Your article is great, I just don’t know how to do the same steps if my host is WordPress.
Many many thanks in advance.
Lindy
WPBeginner Support says
Hi Lindy,
You can sign up with another WordPress hosting provider. You own the domain name, so you can use it with your new hosting without leaving GoDaddy. You can also move your domain to another hosting.
Admin
Koreen says
Help! I bought a 2 year domain that was on sale and added a 1 month free trile of the website builder thing. I just tried the website builder and like it but found too limited for what I want to do, so I want to create my website in wordpress with the domain I already purchased from godaddy.
So then I found you! I followed step 2 exactly like you wrote and the screenshots, but for some reason my domain doesn’t appear in my account anymore! I can’t manage my domain because it doesnt appear… And yet when I look for it in the domain search it says it’s already used (yeah by me!) But why don’t I see it? You mentioned it would take like an hour for the website builder thing to completely disactivate… So I’m waiting… I even went to my email and clicked on the link from godaddy showing me where to manage my domain and when I clic it it says error…. What happened??? Did I delete my domain along with the website builder?? Doesn’t make sense… HELP!
WPBeginner Support says
Hi Koreen,
Please contact GoDaddy support, they will be able to guide you better about the error you are seeing when clicking on manage domains.
Admin
Benita says
I’m kind of confused, I used GoDaddy and bought their “Basic Managed WordPress Website” package. Is this article referencing that?
WPBeginner Support says
Hi Benita,
No, this article is about GoDaddy customers who use GoDaddy’s website builder to make their websites instead of WordPress.
Admin
Sheena Cunning says
I am hosted with GoDaddy, but have my website through WordPress.com. I’d like to switch to WordPress.org so I have more capabilities… Is this the procedure I would be followingto make the switch? Do I have to backup my content to switch from wordpress.com to wordpress.org?
I want to add plugins for Facebook pixels and various other things as well as copy code into the body of my website. I’m not able to add plugins with a free WordPress account I know, but can I copy code into my site without switching?
WPBeginner Support says
Hi Sheena,
Please see our guide on how to move your blog from WordPress.com to WordPress.org.
Admin
Casey Halstead says
I need to do it this way too. The linked article says it assumes you have wordpress on the old site. I do not.
I have a website builder page in godaddy that has been active 10 years (example1.com). I also have another domain hosted at godaddy with wordpress already installed on it (example2.com). Example2.com has no content and no traffic. Can I build a new wordpress page for example1.com in the hosted wordpress and then use it to replace the current example1.com? Is it the same as in the linked document about moving a wordpress site?
Teresa says
Hi:
Is this the same procedure for moving a GoDaddy online store? I have to move my store. the store is so oppressive… I have a years worth of products (work)..UGH! I hope I don’t have to start over. as it stands right now, I am not updating it anymore. No point. I can’t even use my merchant account…
Andy Callan says
Will this affect my GoDaddy email address?
Donna Marie Merritt says
For those of us not tech-savvy, is it possible to hire you (or can you recommend someone) to move my GoDaddy site to WordPress?
WPBeginner Support says
Hi Donna,
We don’t do client work anymore. However, you can hire talented experts from freelancing websites like Upwork, Freelancer, Fiverr, etc.
Admin
Donna Marie Merritt says
Thanks!
Sobuj says
Thank you so much.
Hostile B says
Wow what a huge pain! This is exactly why you don’t use a website builder. I just took a look at the GoDaddy Website Builder a few days ago and recommended the same.
Reshma says
This was helpful. Just one question; will i have to make any payments while this procedure? I bought a godaddy domain and website builder two days back, so now if I switch to wordpress is it going to cost me any additional fee?
WPBeginner Support says
No it will not cost you additional fee, contact GoDaddy support just to be safe.
Admin
sarvesh says
Thanks for this step by step guide about moving website builder to WordPress
But I want to know is it possible to move current Godaddy website builder to WordPress with new own domain?
Thanks again.
WPBeginner Support says
Yes it is possible.
Admin
Susan says
Thank you for this great article! Is it possible prebuild a WordPress site first in cPanel, )for example with a .net domain) do all the steps above, and then just change the .net domain to .com through the cPanel before cancelling the website builder hosting? Also, could customers be redirected temporarily to a “maintenance” page during the “transfer”? Thank you for your insight!!
WPBeginner Support says
If you own both domains, then yes you can easily build your website on one domain and then move it to another domain.
Admin
Rob says
LOVE your editors note.
Arjun Sharma says
thanks, bro its really great post I’m also a blogger but one of my clients asks me for this how to How to Move GoDaddy Website Builder Site to WordPress but I don’t know the real method which helps him but now I suggest this article thanks again