Do you want to add a custom dashboard logo in WordPress?
Often, people replace the WordPress logo with a custom dashboard logo for branding purposes.
In this article, we will show you how to add a custom dashboard logo in WordPress for branding.
What Is a Custom Dashboard Logo and Why Add One?
A custom dashboard logo appears on the WordPress admin dashboard with your own custom logo or branding.
While adding one may seem like a minor detail, it’s a vital part of your website’s brand and important for several reasons:
- Branding: It reinforces your brand identity and makes the WordPress admin area feel more like a part of your business.
- Professionalism: A custom dashboard logo gives your WordPress site a more professional and polished look.
- White Labeling: If you are building websites for clients or running a multisite network, you can use custom dashboard logos to white-label the WordPress admin area. This means you can remove WordPress branding entirely and replace it with your own to create a custom experience for your clients.
Whether you own a small business, online store, or blog, it’s important to have a custom dashboard logo to help personalize the backend experience and establish a strong internal brand identity.
Method 1: Adding a Custom Dashboard Logo in WordPress Using a Plugin
This method is super easy and recommended for most beginners.
The first thing you need to do is install and activate the White Label CMS plugin. For more details, see our step-by-step guide on how to install a WordPress plugin.
Upon activation, you need to visit the Settings » White Label CMS page.
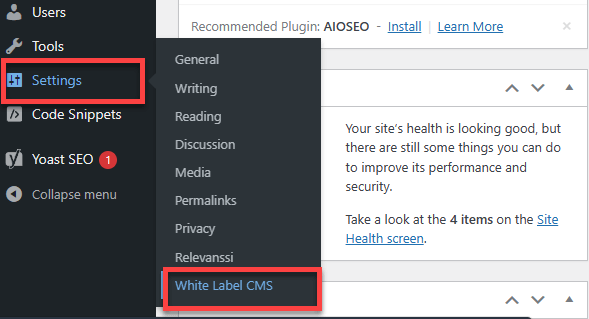
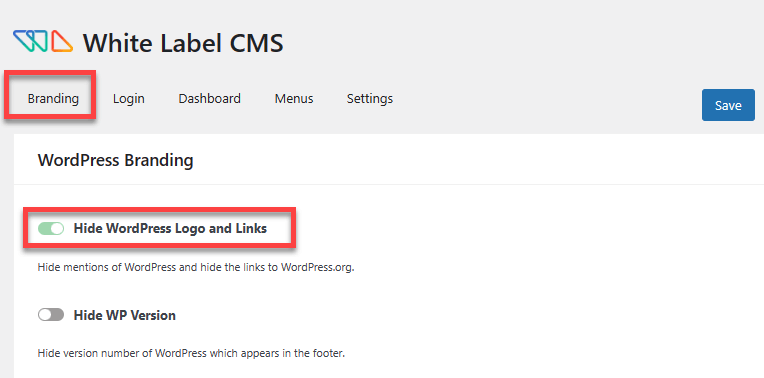
Then, simply select the ‘Branding’ tab.
Toggle the switch from left to right to ‘Hide WordPress Logo and Links.’
Next, you want to go to the ‘Dashboard’ tab.
Here, you will upload a custom logo where it says ‘Dashboard Icon.’
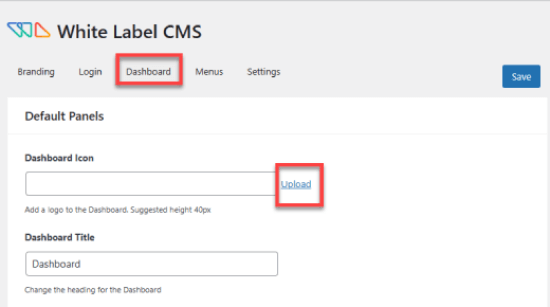
The custom logo should be exactly 40 x 40 pixels in dimensions.
Don’t forget to click on the ‘Save’ button at the top right-hand corner to store your settings.

Now, head back to the WordPress admin area.
You should see the logo in your dashboard. Here’s what it would look like:
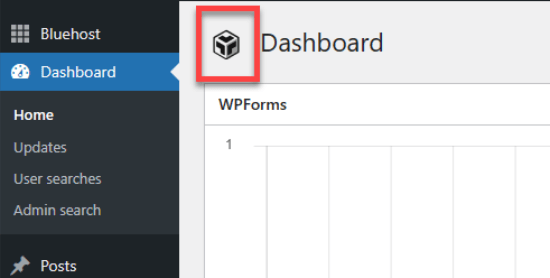
Aside from the custom dashboard logo, White Label CMS also offers other features to rebrand your WordPress installation.
See our guide on how to white-label the WordPress admin dashboard for detailed instructions.
Method 2: Manually Adding Custom Dashboard Logo in WordPress
This method is for users who are comfortable pasting code snippets in WordPress. The easiest and safest way to add custom code to your WordPress is with a plugin like WPCode.
Most tutorials teaching you how to add shortcodes to your WordPress site will have you add the code to your theme’s functions.php file. While it can work, there’s a lot that can go wrong.
Even a tiny mistake in the code or how you add it can break your WordPress site and make it inaccessible. So we only recommend that for advanced users.
Even for advanced users, WPCode is the safest way to do this, so to begin with, you’ll need to install and activate the free WPCode plugin. For more detailed instructions, follow our guide on how to install a WordPress plugin.
Next, make sure to save your custom logo as a custom-logo.png file on your computer. It needs to be exactly 40 x 40 px in dimensions.
Once you have your custom logo ready, you need to upload it to /wp-content/themes/your-theme/images folder using FTP. If your theme does not have an images folder, then you need to create it.
From there, head over to Code Snippets >> +Add Snippet.
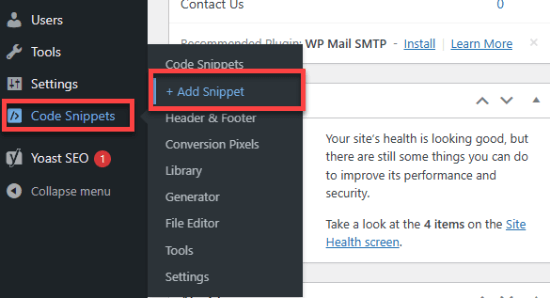
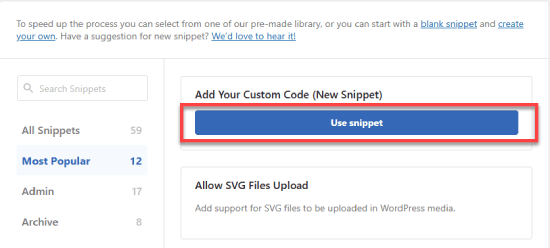
You’ll land in the WPCode library, where there are dozens of code snippets to choose from.
In this case, you’ll select ‘Add Your Custom Code’ and click on the ‘Use snippet’ button.
Include a title like ‘Custom logo dashboard.’
Then change the ‘Code Type’ to ‘PHP Snippet.’
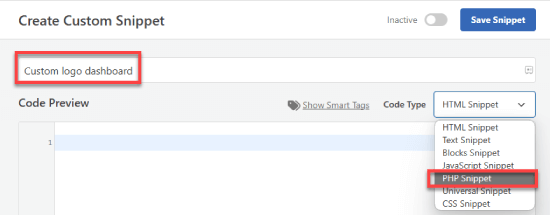
After that, simply add this code in the ‘Code Preview’ box:
function wpb_custom_logo() {
echo '
<style type="text/css">
#wpadminbar #wp-admin-bar-wp-logo > .ab-item .ab-icon:before {
background-image: url(' . get_bloginfo('stylesheet_directory') . '/images/custom-logo.png) !important;
background-position: 0 0;
color:rgba(0, 0, 0, 0);
}
#wpadminbar #wp-admin-bar-wp-logo.hover > .ab-item .ab-icon {
background-position: 0 0;
}
</style>
';
}

//hook into the administrative header output
add_action('wp_before_admin_bar_render', 'wpb_custom_logo');
It should look something like this.
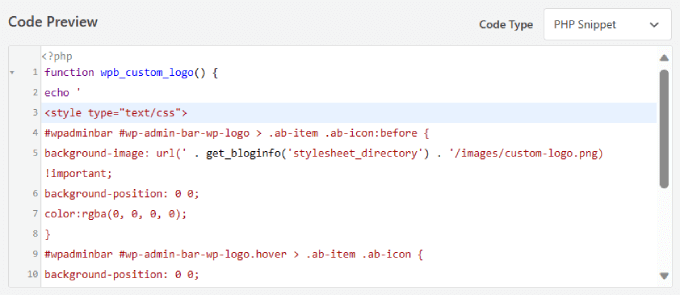
Make sure all of the text and formatting are exactly the same as shown above.
Scroll down to ‘Insert Method’ and select ‘Auto Insert.’
To ensure your custom logo displays in the dashboard, expand the Location dropdown menu and choose ‘Admin Only.’
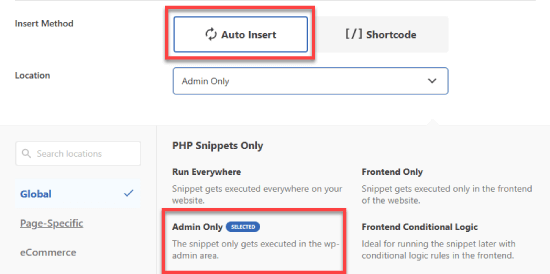
Lastly, toggle the switch from Inactive to Active and click the ‘Save’ button.
This code simply adds the CSS required to display your custom logo in the WordPress admin bar.

That’s all we hope this article helped you learn how to add a custom dashboard logo in WordPress. You may also want to see our guide on how to hide unnecessary items from WordPress with Adminimize or read our blog post on the best WordPress tips, tricks, and hacks to better customize your website.
If you liked this article, then please subscribe to our YouTube Channel for WordPress video tutorials. You can also find us on Twitter and Facebook.


Syed Balkhi says
Hey WPBeginner readers,
Did you know you can win exciting prizes by commenting on WPBeginner?
Every month, our top blog commenters will win HUGE rewards, including premium WordPress plugin licenses and cash prizes.
You can get more details about the contest from here.
Start sharing your thoughts below to stand a chance to win!
Dennis Muthomi says
this is why I love WordPress opens source nature,the freedom to change/customize it to my liking
I really appreciated the clear step-by-step instructions for both the plugin method and manual code. I’ll go with the plugin method…it seems easier
Great post!
Dwight says
Thank you! This worked.
WPBeginner Support says
Glad our recommendation worked for you!
Admin
Justin says
Does this code also apply to plugins?
WPBeginner Support says
If you wanted to override a plugin’s logo then you would want to reach out to the support for that specific plugin and they may have an option.
Admin
Hanif says
thank you very much, it works very well
WPBeginner Support says
Glad our article was helpful
Admin
mazhar says
i change the wordpress custom logo with the help of white label CMS plugin but i dont know how to find this code to your theme’s functions.php file or a site-specific plugin. where it is please help me
thank you
Bjornen says
Where is the file located?
I mean, the logo itself must be a png (transparent picture) of the WP-logo, placed somewhere in WP.
So, would it not be better to just switch that with another file with the same name?
james says
Nope, the icon is part of the WordPress custom font face, it is added to with CSS content
chad says
This does’nt wok for me. I made the 16×16 png and put it in my themes images folder and pasted the function to my functions.php file.
Sanjeev Beekeeper says
change the file path to your image path.
David Cornish says
A great article information with some great tips sharing that I will be implementing on my own website as well as clients.