Are you planning to move your WordPress site to a new hosting company or a different server?
The biggest risk when switching web hosting or migrating a website to a new server is data loss and downtime.
In this step-by-step tutorial, we will show you how to safely migrate your WordPress site to a new host without any downtime. We will also answer commonly asked questions about moving a WordPress site to a new hosting provider.
Important: Before we start, we want you to know that a lot of WordPress hosting companies offer a free migration service. It might not be listed on their website, so all you have to do is ask. Usually, it’s free, but some may charge a small fee.
Having that said, let’s look at the steps we will cover to move WordPress to a new hosting server (without any downtime):
Ready? Let’s get started.
Step 1: Choose Your New WordPress Host
If you are stuck with a slow web host even after optimizing WordPress speed and performance, then it’s time to move your WordPress site to a new host that can handle your growing traffic.
When looking for a new WordPress hosting provider, it’s important to choose carefully so you don’t have to move again any time soon.
Here’s who we recommend:
- For reliable shared hosting, we recommend going with Bluehost. They are officially recommended by WordPress.org. Using our Bluehost coupon, WPBeginner users get up to 61% off and a free domain name.
- For faster shared hosting, we recommend Hostinger. They are among the top WordPress hosting companies and offer faster servers with outstanding customer support.
- If you are looking for cloud hosting or location-specific providers, then we recommend you check out SiteGround. They have data centers across three different continents.
- If you are looking for managed WordPress hosting, then we recommend you check out WP Engine. They are the best and most well-known provider in the industry.
After buying your new hosting, do NOT install WordPress. We will do that in a later step.
For now, your new web hosting account should be empty, with no files or folders in your main directory.
Step 2: Set Up Duplicator for Easy Migration
The first thing you need to do is install and activate the Duplicator plugin on the website that you want to move. For more details, see our step-by-step guide on how to install a WordPress plugin.
Duplicator is the best WordPress migration plugin on the market. It also comes with automated scheduled backups, cloud storage support, 1-click restore, and smart migrations.
Note: Duplicator also has a free version called Duplicator Lite. It can be used to move your website but has limited features compared to the pro version.
Once you have installed and activated Duplicator, go to the Duplicator » Packages page in your WordPress admin area.
Next, you need to click the ‘Create New’ button in the top right corner.
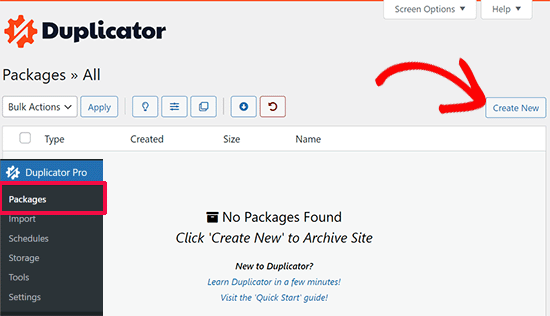
This will launch the Duplicator’s backup wizard.
On the next screen, you can optionally provide a name for your backup or simply click on the ‘Next’ button to continue.
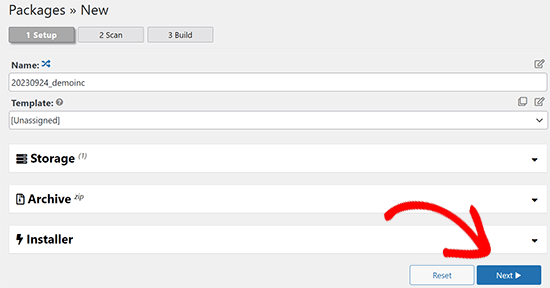
Next, Duplicator will scan your system to make sure that everything is in order to prepare the package.
Make sure that your scan results check out (everything should say “Good”), and then click the ‘Build’ button.
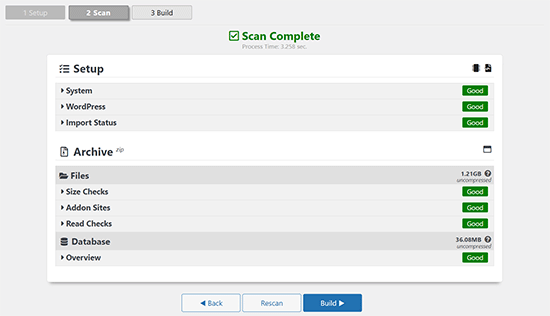
The process may take several minutes to complete, so leave the tab open as the plugin does its job.
Once the process is complete, you’ll see download options for Installer and the Archive package. You need to click on the ‘Download’ button and then select ‘Both Files’.
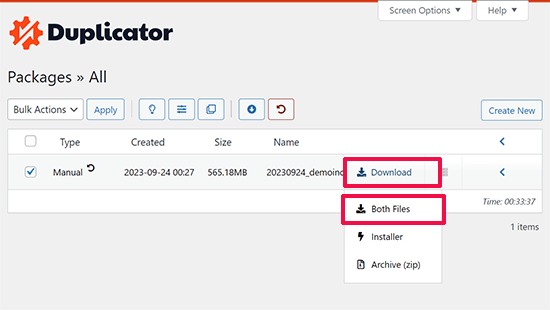
The archive file is a copy of your complete website, and the installer file will automate the installation process for you.
Step 3: Import Your WordPress Site to the New Host
Now that you have downloaded both the archive and installer files, the next step is to upload them to your new web host.
You can do this by connecting to your new web host using FTP.
If you’ve never done this before, check out our beginner’s guide to uploading files via FTP to WordPress.
Normally, you would enter your website’s domain name as host when connecting your FTP client.
However, since your domain name still points to your old host, you’ll need to connect by entering your server’s IP address or server hostname.
You can find this information in your new hosting account’s control panel dashboard.
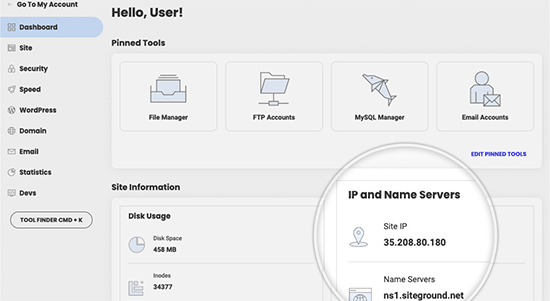
If you are unable to find this information, then you can ask for support from your new web hosting company, and they will help you out.
Using the FTP client, you need to upload both the installer.php file and your archive .zip file to the root directory of your website.
This is usually the /username/public_html/ folder.
Again, if you are not sure, then ask your web hosting company.
Make sure that your root directory is completely empty. Some web hosting companies automatically install WordPress when you sign up.
If you have WordPress installed in your root directory, then you need to delete WordPress first.
Once that’s done, you need to upload both the archive zip file and the installer.php file to your site’s root directory.
Step 4: Change the Hosts File to Prevent Downtime
Once you’ve uploaded both files to your new host, you need to access the installer.php file in a browser.
Normally, this file can be accessed using a URL like this:
http://www.example.com/installer.php
However, this URL will take you to your old web host, and you will get a 404 error. This is because your domain name still points to your old web host.
Normally, other tutorials might tell you to change your domain nameservers and point it to your new hosting company, but that’s wrong.
If you do this now, then your visitors will see a broken website as you migrate it.
We will show you how you can temporarily access your new site on your computer without affecting your old site.
This is done with the hosts file on your computer.
The hosts file can be used to map domain names to specific IP addresses. In other words, it lets you trick your computer into thinking that the website is moved even though it’s not.
Let’s take a look at how to add an entry for your domain name in the hosts file so that it points to your new hosting company.
Making these changes will allow you to access the files on your new host using your own domain name while the rest of the world will still be accessing your site from the old host. This ensures 100% uptime.
The first thing you need to do is find the IP address of your new web hosting server.
To find this, you need to log into your cPanel dashboard and click on the expand stats link in the left-hand sidebar. Your server’s address will be listed as ‘Shared IP Address’.
For instance, on Hostinger, you’ll find your server IP address under your hosting plan details.
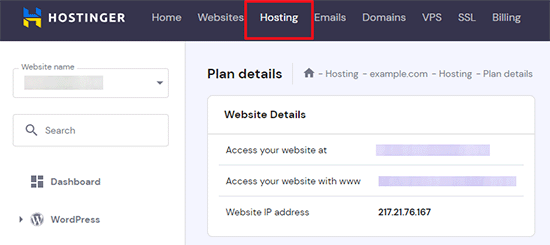
If you are using a Windows PC, then you need to open the Notepad app with administrator privileges.
Simply click on the ‘Start; button and then look for the Notepad app. Right-click on the Notepad app icon and then select ‘Run as administrator’.
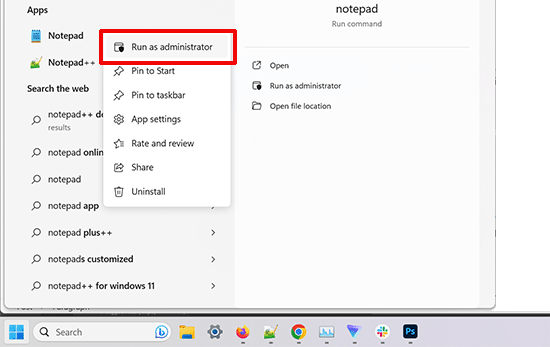
A Windows UAC prompt will appear, and you need to click on ‘Yes’ to launch Notepad with administrator privileges.
On the Notepad screen, go to File » Open and then navigate to the C:\Windows\System32\drivers\etc folder. From this folder, select the hosts file and open it.
If you are using a Mac, then you need to open the Terminal app and enter this command to edit hosts file:
sudo nano /private/etc/hosts
For both Windows and Mac users, at the bottom of the hosts file, you need to enter the IP address you copied and then enter your domain name. Like this:
192.168.1.22 www.example.com
Make sure that you replace the IP address with the one you copied from cPanel and example.com with your own domain name.
Once you are done, save your changes.
You can now access your files on the new host using your domain name on your computer.
Important: Don’t forget to undo the changes you made to the hosts file after you have finished the migration (step 6).
Step 5: Creating MySQL Database on Your New Host
Before we run the installer on the new host, you will need to create a MySQL database on your new hosting account. If you have already created a MySQL database, then you can jump to the next step.
Creating a Database in cPanel
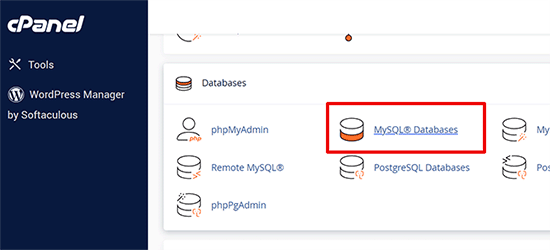
Go to your new hosting account’s cPanel dashboard, scroll down to the Databases section, and click on the ‘MySQL Databases’ icon.
You will see a field for creating a new database.
Enter a name for your database, and click the ‘Create Database’ button.

After creating the MySQL database, you need to scroll down to the MySQL Users section.
Next, provide a username and password for your new user and click on the ‘Create User’ button.
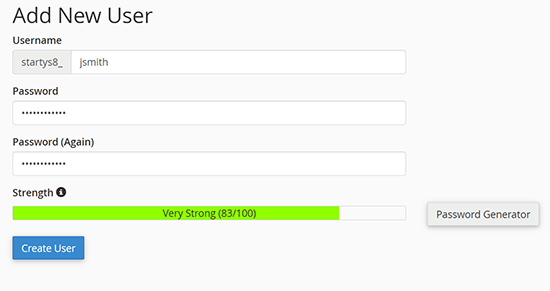
After that, you need to add this user to your database. This will give the username you just created all the permissions to work on that database.
You can do this by scrolling down to the ‘Add User to a Database’ section. Simply select the database user you created from the dropdown menu next to the user, then select the database and click on the ‘Add’ button.
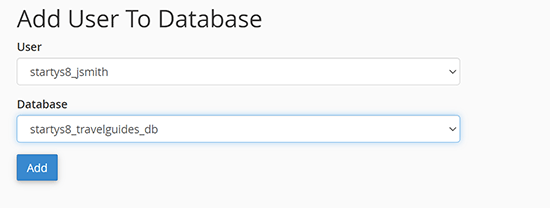
Your database is now ready to be used with WordPress. Be sure to make a note of the database name, username, and password. You’ll need that information in the next step.
Step 6: Begin the Duplicator Migration Process
Now, we are ready to run the installer. Navigate to the following address in your browser window, replacing example.com with your domain name:
http://www.example.com/installer.php
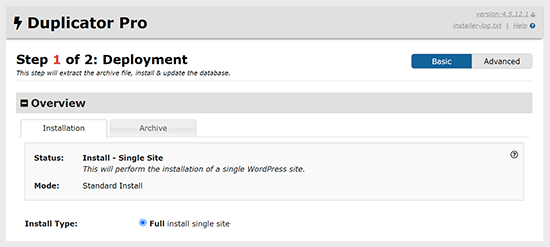
The installer will run a few tests and will show you ‘Pass’ next to the archive and validation tests.
You need to check the terms & conditions checkbox and continue by clicking on the ‘Next’ button.
Now, you will be asked to enter your MySQL host, database name, username, and password.
Your host will likely be localhost. After that, you will enter the details of the database you created in the previous step.
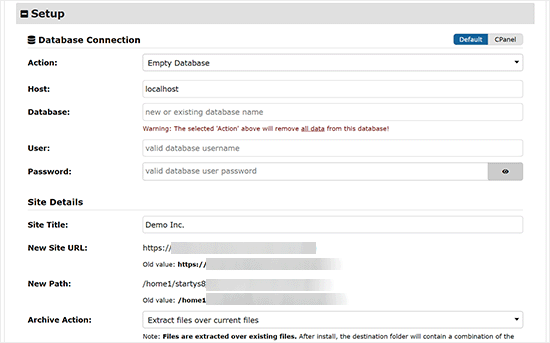
Next, the Duplicator needs to check that it can connect to the database and is able to run the installation.
Click on the ‘Validate’ button at the bottom to continue.

If Duplicator is able to connect, then you will see test results as Pass.
You can now check the terms and notices checkbox and click on the ‘Next’ button.
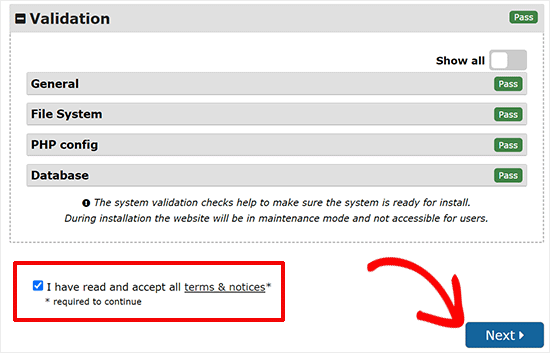
Click on the ‘Next’ button to continue.
Duplicator will now import your WordPress database from the archive zip into your new database.
Next, it will ask you to update the site URL or Path. Since you are not changing domain names, you DON’T need to change anything here.
Simply click on the ‘Next’ button to continue.
Duplicator will run the final steps and show you the login button.
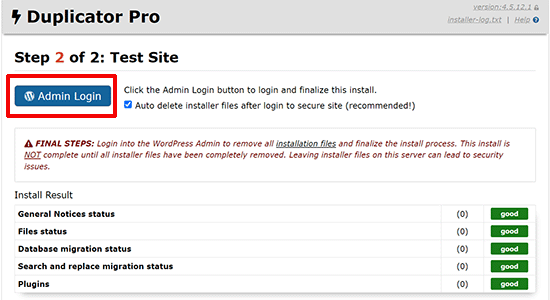
You can now log in to your WordPress site on the new host to make sure that everything is working as expected.
Step 7: Update Your Domain Name Servers (DNS)
At this point, you’ve created a complete copy of your WordPress database and files on your new hosting server, but your domain still points to your old web hosting account.
To update your domain, you need to switch your DNS nameservers. This ensures that your users are taken to the new location of your website when they type your domain into their browsers.
If you registered your domain with your hosting provider, then it’s best to transfer the domain to a new host.
On the other hand, if you use a domain registrar like Domain.com, GoDaddy, or Network Solutions, then you need to update your nameservers.
You will need the DNS nameserver information from your new web host. This is usually a couple of URLs that look like this:
ns1.hostname.comns2.hostname.com
For the sake of this guide, we will be showing you how to change DNS nameservers with GoDaddy.
For other hosting providers, take a look at our guide on changing domain nameservers.
Depending on your domain registrar or web host, the screenshots may look different. However, the basic concept is the same.
You need to look for the domain management area and then look for nameservers. If you need assistance updating your nameservers, you can ask your web hosting company.
For GoDaddy, you need to log in to your GoDaddy account and then click on ‘Domains’.
After that, you need to click on the ‘Manage’ button next to the domain name you want to change.

Go to the ‘Additional Settings’ section.
Then, you will need to click on ‘Manage DNS’ to continue.
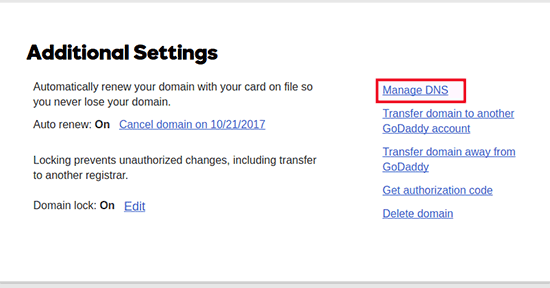
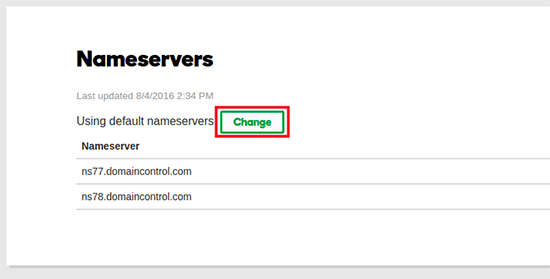
Next, you need to scroll down to the ‘Nameservers’ section.
Here, click on the ‘Change’ button.
First, you will need to switch the nameserver type dropdown from ‘Default’ to ‘Custom’.
After that, you can fill in your new hosting provider’s information under Nameservers.
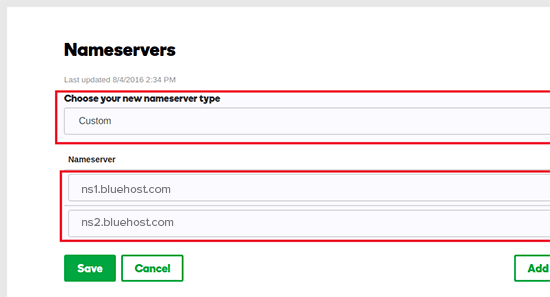
Don’t forget to click on the ‘Save’ button to store your changes.
You have successfully changed the nameservers on your domain. DNS changes can take 4 – 48 hours to propagate for all users.
Since you have the same content on your old host and the new host, your users wouldn’t see any difference. Your WordPress migration will be seamless with absolutely no downtime.
To be on the safe side, we recommend that you wait to cancel your old hosting account until 7 days after your migration.
Frequently Asked Questions
Here are a few questions many of our users ask while moving WordPress from one host to another.
1. How do I migrate my WordPress website to another host?
You can migrate your WordPress website by moving your WordPress files and database from your old host to the new hosting provider.
Some hosting companies offer free website transfer services as well, but you’ll need to ask them. Alternatively, you can do it yourself by transferring files using an FTP client and importing the database via phpMyAdmin.
2. Can I migrate my WordPress site to another hosting provider?
Yes, you are free to migrate your WordPress site to another hosting provider.
3. Can I sign up for the new hosting account without registering a domain name?
Yes, you can absolutely sign up for a hosting account without registering a domain name.
Domain name and hosting are two different services, and you don’t necessarily need to register a domain name when signing up for a new host. For more details, see our guide on the difference between domain name and web hosting.
Some hosting providers will ask you to select a domain name as the first step when purchasing hosting. They will also allow you to enter a domain name if you already have one.
4. Do I need to transfer my domain name to the new host?
No, you don’t need to transfer your domain name to the new host. However, transferring your domain name to your new hosting will make it easier to renew and manage under the same dashboard as your new hosting account.
For more on this topic, see our ultimate guide on domain names and how they work.
5. How do I fix the error establishing database connection error in Duplicator?
If you are seeing an error connecting to the database or the database connection error in Duplicator, then you likely entered incorrect information for your database connection.
Make sure that your database name, MySQL username, and password are correct. Some web hosting companies do not use localhost as the host for their MySQL servers. If this is the case, then you will need to ask your web host’s support staff to provide you with the correct information.
6. How do I check if my website is loading from the new host?
There are several online tools that allow you to see who is hosting a website. After you have transferred your website to the new host, you can use any of these tools, and they will show you the name of the web hosting company hosting your website.
If it hasn’t been long since you migrated your website and made changes to your domain name server (DNS), then chances are that your site may still load from your old host. Domain name changes can take up to 48 hours to fully propagate.
7. Do I need to delete any files or data from the old host?
When switching hosting companies, we recommend that you keep your old website for at least a week. After that, you can delete files from your old web host. If you are canceling your account, then your web hosting provider will delete all your data according to their policy.
8. How long should I keep my account active on the old host?
Once you have migrated your website to the new host, and if you don’t have any other websites hosted with your old web host, then you can cancel your old web hosting account.
However, in some cases, you may have already paid them for yearly hosting. You should check their refund policy to see if you are eligible for any refund upon cancellation.
9. How do I move a WordPress site with SSL/HTTPS?
You will need to install an SSL certificate on your new hosting provider. After that, you can follow the same steps mentioned above. Just make sure that you use HTTPS in the URLs, like https://example.com
10. Bonus: Free Site Migration by Your New Host
If you are looking to switch your web hosting, but the steps above sound too complicated, then you can choose the following providers, and they will migrate your website for you.
SiteGround, Hostinger, and WP Engine offer free website migration for WPBeginner users.
We hope that this step-by-step guide helped you move WordPress to your new host with no downtime whatsoever. If you come across any issues with your WordPress migration, then check out our guide on the most common WordPress errors and how to fix them.
If you liked this article, then please subscribe to our YouTube Channel for WordPress video tutorials. You can also find us on Twitter and Facebook.


Syed Balkhi says
Hey WPBeginner readers,
Did you know you can win exciting prizes by commenting on WPBeginner?
Every month, our top blog commenters will win HUGE rewards, including premium WordPress plugin licenses and cash prizes.
You can get more details about the contest from here.
Start sharing your thoughts below to stand a chance to win!
Alex S says
Awesome, I did it perfectly. Thanks
Gimel says
Good day,
Does this also work for moving from localhost to an online hosting service?
WPBeginner Support says
For moving your site to a hosting provider from your local computer, you would want to follow our guide below:
https://www.wpbeginner.com/wp-tutorials/how-to-move-wordpress-from-local-server-to-live-site/
Admin
Francis Caysip says
Do I need to change nameservers if the “new” web host is also the domain host?
WPBeginner Support says
If your domain already points to the new host then you would not need to change it, if the domain is pointing toward your old host it would need to be changed.
Admin
Bryce says
Thank you for this very well-written tutorial! It helped me move from a hosting service that upped their prices so that I can get the newcomer discount with a new host. Thanks!
WPBeginner Support says
Glad our guide was helpful
Admin
Jon says
Your article states that the new host folder must be empty before continuing on with the migration. How does this work for someone where I am migrating sites to a host that has other sites already on it?
WPBeginner Support says
your hosting provider would normally have a folder for each specific site and you would add your site to the empty folder.
Admin
Andrea Crenshaw says
Real Lifesaving (Sitesaving) article! Thank you soo much!!
WPBeginner Support says
Glad you found our guide helpful
Admin
Rousseau says
Thank you very much for this article! I just used it to switch hosting providers after getting tired of downtime with my old provider. Appreciate the great documentation.
WPBeginner Support says
Glad our guide was helpful
Admin
Jacob says
Hi, I successfully transferred my website using the Duplicator plugin. Everything works, but now the website is running rather slowly. Is this a common side effect? Any suggestions for fixing this?
WPBeginner Support says
It is hard to say why your site may have slowed down, for a starting point we would recommend going through our guide below for speeding up your site first:
https://www.wpbeginner.com/wordpress-performance-speed/
Admin
Binh says
Hello, Thanks for your guide.
1. I managed to the last steps but there are several issues in Database section, e.g. “DATABASE ERROR: database error write” -> is it common to get this error?
WPBeginner Support says
That sounds like you may have had an issue during the transfer process. You would want to reach out to your hosting provider to ensure they don’t see an error on their end.
Admin
Rasif says
white transferring the site enter the database credentials screen an error showing.
“Error Processing Request an error occurred while testing the data base connection! Please try Again.”
WPBeginner Support says
You would want to ensure your database information is correct for one of the more common causes.
Admin
Thomas says
Bluehost charges to migrate a website. Is that for the service or can I migrate it myself as above and not have to pay the fee??
WPBeginner Support says
The fee would be if you want them to do it for you. If you follow our guide above then it does not have a cost.
Admin
Robert says
I will share my experience: for one case, I had to switch off the plugin responsible for SSL. Than it was possible to migrate the website correctly. Anyway, thank you for this tool! It is awesome!!
WPBeginner Support says
Glad it was helpful and thanks for sharing the workaround you used if someone else runs into that issue
Admin
Ranjit Singh says
Stuck in step 6 after trying to open the installer.php getting privacy error message in chrome
“Your connection is not private
Attackers might be trying to steal your information from site (for example, passwords, messages, or credit cards). Learn more
NET::ERR_CERT_COMMON_NAME_INVALID”
WPBeginner Support says
Reach out to your hosting provider to ensure you have your SSL certificate set up correctly.
Admin
Gordon says
This was a great step to step and helped me migrate a site when another plug-in failed on me. Thanks for your guidance!
WPBeginner Support says
Glad our guide was helpful
Admin
Ryan says
stuck on step 4 I updated the notepad etc host doc but now how do I access the installer.php file? I tried typing in example.com/installer.php with my domain name into browser with no luck. I have saved the duplicator installer.php file into the www folder in the new hosting files.
WPBeginner Support says
You may want to check with your hosting provider to ensure there isn’t an issue with the location of the folder or if the folder was set under a different domain.
Admin
Grace says
Hi! I’m stuck at Step 6/ I really need help. I uploaded the installer and .daf file in the correct root folder but still experiencing the 404 Not Found Error. I don’t know what to do next.
WPBeginner Support says
You would want to reach out to your hosting provider to ensure you’ve placed the file in the correct location.
Admin
Nic says
I get an error on Step 1: Deployment:
Service Unavailable
The server is temporarily unable to service your request due to maintenance downtime or capacity problems. Please try again later.
WPBeginner Support says
You would want to reach out to your hosting provider for assistance. We have an article covering the different reasons for that error that you can take a look at below:
https://www.wpbeginner.com/wp-tutorials/how-to-fix-503-service-unavailable-error-in-wordpress/
Admin
Chris says
Hi, thank you for this guide.
I was thinking you might need to add on the “nameserver” part that when migrating to a new web host is complete it is not necessary to change the but you need to change the A records to point the IP address of your new web host from your domain registration account settings. thank you and more power!
WPBeginner Support says
While that is an option it is not the most beginner-friendly and can cause confusion later for some users which is why we recommend the nameserver change at the moment.
Admin
Jossif G says
Great write up and direction. I had couple from web, but yours is by far the best.
You provided a lot of details that no one does, like prepare cpanel files before installing. It help me a lot, thank you very much
WPBeginner Support says
Glad our guide was helpful
Admin
Jumadi says
This guide is really helpful, you save me a lot buddy.. Thank you so much..
WPBeginner Support says
Glad our guide was helpful
Admin
Vineesh says
Awesome post.
Worked out Well.
thanks guys….
WPBeginner Support says
You’re welcome, glad you found our content helpful
Admin
Sebastian says
Thanks, simple and easy
WPBeginner Support says
You’re welcome
Admin
Peace Ronny says
Can you transfer your project via USB
WPBeginner Support says
You would need physical access to your hosting provider’s service to do that.
Admin
Dileepa K. says
Nice Article and very helpful
WPBeginner Support says
Glad you found our guide helpful
Admin
Jack says
Thanks for this but im still confused, I am using a CDN and the DNS are pointing to the it, should i first pause the CDN or can still do the process ignoring it then i wont have to update the NS? How should i do it right with no downtime?
WPBeginner Support says
You can still follow this guide. When changing where your namservers are pointing you would update where your CDN is pointing rather than your nameservers.
Admin
Abdulkarim says
Thank you, it helps me a lot,
Best regards,
WPBeginner Support says
You’re welcome
Admin
Jeff Cole says
Lovely clear instructions, moved site over easily. My old host site I could access with or without the WWW , after the change over and before changing the nameserver I could access new site in host file with WWW and the old site without WWW. Thanks
WPBeginner Support says
You would want to reach out to your hosting provider to ensure your nameserver change was set up and that you don’t still have your hosts file changed.
Admin
Zaeem Khan says
I want to change both the domain name and the hosting without losing site data and visitors
WPBeginner Support says
You would want to take a look at our guide below:
https://www.wpbeginner.com/wp-tutorials/how-to-properly-move-wordpress-to-a-new-domain-without-losing-seo/
Admin
Faisal says
What if I have a website already on my new web host? If I upload the backup files (installer.php and the zip file) to a new folder in the root directory, how can I run the php file?
WPBeginner Support says
It would depend on the specific host, most you should be able to update your hosts file to be able to visit the page while others you can also set the new site on a temporary address.
Admin
Charles says
Got to step 6 and typed in a browser the website address, got the no results found page come up on my website. Don’t know if I completed the Note pad step correctly for directing the page with the I.P address.
WPBeginner Support says
You may want to reach out to your hosting provider’s support to ensure you are using the correct IP for the site and the site is not on a temporary address.
Admin
Akhtar says
Please reply, I’ve successfully moved to new hosting. But I’m confused about – How I’ll log in to my WordPress when old hosting is expired?
Because there is no WP is installed, and no login is created on new hosting. Please explain,
WPBeginner Support says
When moving your site to a new hosting provider, your login information for the site should be the same as it was and this method should add the WordPress files for you.
Admin
Nahid says
All Done but when I Click a new domain link then loading and enter previous domain link. All pages show previous links in the URL. So how can I fix it pls?
WPBeginner Support says
For a new domain, you would want to take a look at our article below, especially step 4 and beyond.
https://www.wpbeginner.com/wp-tutorials/how-to-properly-move-wordpress-to-a-new-domain-without-losing-seo/
Admin
Dario says
Migration worked (no errors / warnings) however error when going wp-admin :
There has been a critical error on your website. Please check your site admin email inbox for instructions.
Learn more about debugging in WordPress.
WPBeginner Support says
That error is a general error message, for resolving it you would want to take a look at our guide below.
https://www.wpbeginner.com/wp-tutorials/how-to-fix-the-wordpress-white-screen-of-death/
Admin
Rich says
This guide works perfectly, I’ve used it many times. Thanks!
WPBeginner Support says
Glad we could be helpful
Admin
pasan says
should i remove al files from new hosting ?
WPBeginner Support says
It would depend on the files and hosting provider. If you reach out to your hosting provider they should be able to let you know.
Admin
Angel Fernández says
Hello, I would like to see if the procedure you specify in this post would also help me if I want to duplicate my website in a subdomain of the same website.
If possible, could you give me more information on additional steps that I should take?
WPBeginner Support says
If you mean for a staging site, you would want to take a look at our article below:
https://www.wpbeginner.com/wp-tutorials/how-to-create-staging-environment-for-a-wordpress-site/
Admin
Matt says
Hi, great article, i’ve transferred the website and this is set up on the tempoary domain pending transfer of the one i’m going to use. One issue i’m having is opening the wordpress interface after logining in successfully on the new website. I get a 404 error, is that because it won’t work until the Domain has been updated?
WPBeginner Support says
It depends on your hosting provider, some have this issue with the temporary domain, others you would want to follow the recommendations in our guide below:
https://www.wpbeginner.com/wp-tutorials/how-to-fix-wordpress-posts-returning-404-error/
Admin
Valentine Nnaemeka says
I get this error each time i try building it
Host Build Interrupt
This server cannot complete the build due to host setup constraints.
To get past this hosts limitation consider the options below by clicking each section.
I’ve tried a lot but it still says the same thing while file size is little. Is there anything i can do please?
WPBeginner Support says
The plugin should list options that you should be able to try or you can reach out to your hosting provider and they should be able to assist.
Admin
Priya Ravi says
Hi,
I am a first time web site creator. I have created a domain in WordPress how do I add hosting now? I assume WordPress is hosting my domain.
I tried cancelling the subscription, however I may lose part of the money. Please advice.
WPBeginner Support says
It sounds like you may be confused about hosting vs domain, you would want to take a look at our guide here:
https://www.wpbeginner.com/beginners-guide/whats-the-difference-between-domain-name-and-web-hosting-explained/
Admin
Jude Lake says
I have just moved my website successfully using the backup and upload method, but immediately I changed DNS to new host, site traffic drop by 90% and continued even after 3 days of migration. Please is there any mistake I’ve made. Meanwhile, site works very well.
WPBeginner Support says
You would want to ensure any caching on your host’s end has been cleared and ensure there are no DNS issues that your host can see when you updated your information.
Admin
Kwabean Afrane says
Under Step 6, you wrote “Next, it will ask you to update site URL or Path. Since you are not changing domain names, you DON’T need to change anything here.”
My question is, what if I am changing domain names, what do I change there”.
WPBeginner Support says
For moving to a new domain you would want to take a look at our article here:
https://www.wpbeginner.com/wp-tutorials/how-to-properly-move-wordpress-to-a-new-domain-without-losing-seo/
Admin
Alex P says
Thanks, worked a treat : )
WPBeginner Support says
You’re welcome, glad our guide could help
Admin
Samirah says
Hello, thank you for this.
Is it possible to use these steps to move my website to my Bluehost server which has a website hosted already?
WPBeginner Support says
It would depend on your specific goals but yes you can certainly do that
Admin
joe says
Hi,
How do you mean by this?
Important: Don’t forget to undo the changes you made to hosts file after you have finished the migration (step 6).
Thank you
WPBeginner Support says
Once the migration is complete you would want to edit your hosts file to remove the IP address you added for your domain, otherwise, you would always see your site through there without knowing what your visitors would see.
Admin
Christopher says
Very well thought out and complete tutorial. Very much appreciated. Thank you.
WPBeginner Support says
You’re welcome, glad you liked out guide
Admin
Derek says
I want to move my WP website to a new host with a new domain name. Do many of the steps change?
WPBeginner Support says
If it is a new domain name then you shouldn’t need to worry about changing your hosts file would be the only difference
Admin
Hazel beaver says
I’m am just about to transfer my live business site to bluehost. Is there a simpler way to move the site? Such as installing a back up of the old site to the new hosting with a temp domain name, then changing the temp name when getting the domain name to point to the new server? I’m a bit nervous to carry out all the steps above!
WPBeginner Support says
While you could do that if you wanted, it would work out to a very similar process as the process above and depending on the backup tool you could be missing a few things on your site
Admin
malchaz says
Great article worked perfectly
WPBeginner Support says
Glad our guide was able to help
Admin
Avery Davis says
Would there be any benefit to buying the Pro version of Duplicator?
WPBeginner Support says
If you take a look at the plugin’s page they list the features that their pro version offers
Admin
claude says
It seems that after I add the IP and website name on the HOST file, then I see the website under construction only from my pc. I got scared for a sec.
WPBeginner Support says
This should allow you to make changes without worrying what visitors to your domain see
Admin