Are you wondering how to add web push notifications to your WordPress site?
Push notifications let you send messages to users even when they are not on your website. This helps you bring back users to your website, increase traffic, and make more money.
In this article, we will show you how to easily add web push notifications to your WordPress site.
We will cover everything you need to know about sending push notifications in our tutorial, and you can use the quick links below to jump to different sections:
- What Are Push Notifications?
- Why Add Web Push Notifications to Your WordPress Site?
- Setting Up Web Push Notifications in WordPress With PushEngage
- Create a Subscribers List With PushEngage
- Send Push Notifications to Subscribers Every Time You Publish a New Post on WordPress
- Bonus: Set Up Automated Drip Notifications With PushEngage
What Are Push Notifications?
Push notifications are short, clickable notification messages that appear as a popup on users’ desktop or mobile devices.
They display on top of the desktop or in the notification area on a mobile device. The best thing is that they can be shown even when the user’s browser is not open.
Here’s an example of a push notification.
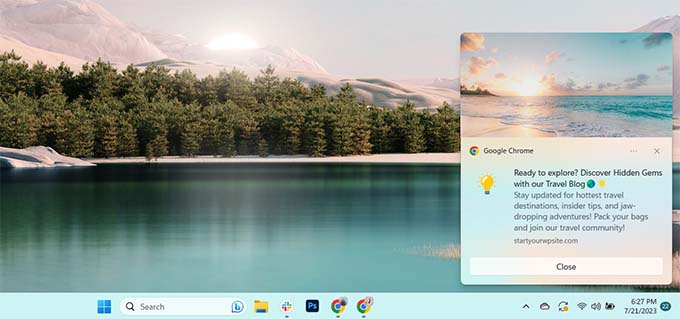
Push notifications let you reach users across devices with your latest updates and offers, making them an effective way to convert website visitors into loyal followers and customers.
Why Add Web Push Notifications to Your WordPress Site?
Did you know that 70% of people who leave your website will never come back? This is why you need to convert those WordPress website visitors into subscribers and customers.
You can do this by using multiple channels at once. These can include email marketing, social media, mobile or SMS marketing, and web push notifications.
Email lists are still the most powerful marketing tools available, with 51% of consumers preferring to be contacted by businesses via email. However, we are finding that push notifications are also very effective.
On the WPBeginner site, push notifications are consistently one of the top 5 traffic sources.
Here are just some of the reasons that make push notifications a great marketing tool:
- Users need to give explicit permission to receive push notifications. This means they are already interested in what you have to offer and are more likely to engage with notifications.
- Push notifications are shorter and demand less attention than email or social media updates.
- There is no algorithm like on social media to limit your reach. Nearly 100% of messages are delivered.
- Users can control how their devices display notifications. They can snooze them or turn them off entirely.
- Not as many companies are using push notifications.
Popular sites, including Facebook, Pinterest, LinkedIn, and many others, understand the importance and are already using web push notifications as a marketing strategy.
Push notifications have a 10X higher open rate than email and a 14X higher click rate. They are more engaging than SMS, email marketing, and social media platforms.
Having said that, let’s take a look at how to easily add web push notifications to a WordPress website.
Setting Up Web Push Notifications in WordPress With PushEngage
PushEngage is the best push notification service on the market that allows you to easily add push notifications to your WordPress site.
This lets you connect with visitors even after they leave your site with targeted push messages.
Step 1: Creating Your PushEngage Account
First, you need to go to the PushEngage website and click the ‘Get Started For Free Now’ button.
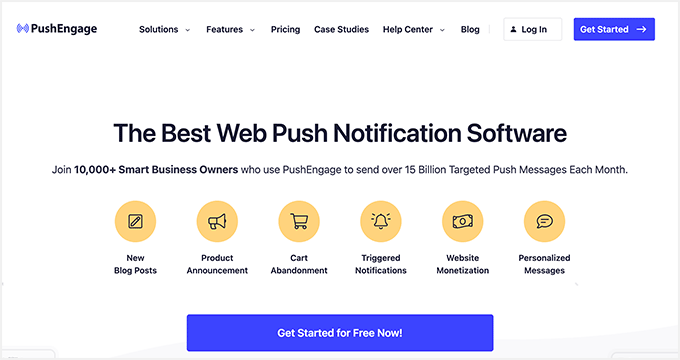
The free plan covers you for up to 200 subscribers and 30 notification campaigns each month. You will have to upgrade as you get more subscribers and need to send more campaigns.
After selecting a pricing plan, you must create a PushEngage account. You can use your existing Google account to register or create a new account.
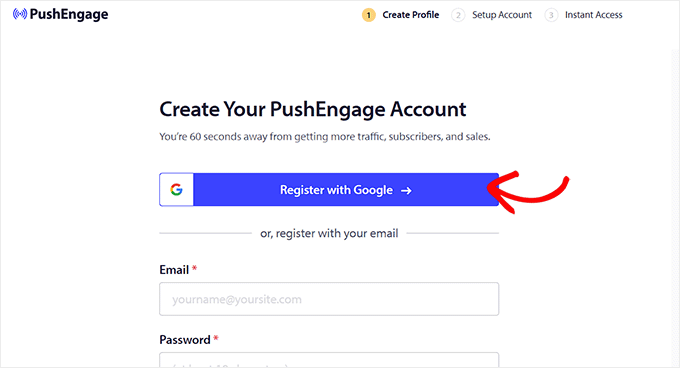
Once you do that, you will be taken to the ‘Setup Your Account’ page, where you have to add your website domain, industry, and company size.
Your subdomain will automatically be generated according to this information. After that, you will also need to provide your credit card details here.
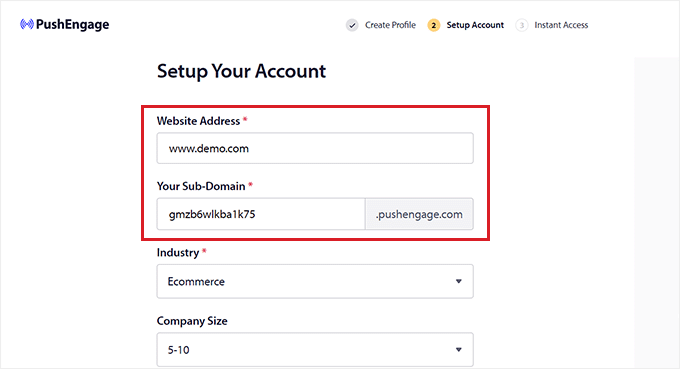
Upon signing up, you will be taken to your PushEngage dashboard.
Keep in mind that if you signed up using your Google account, then this is where you will need to provide your website details.
Once you have done that, just visit the Site Settings » Site Details page from the left column in the PushEngage dashboard.
From here, you can edit your site name and URL if you want. After that, you must upload an image that will be used as a site icon for your web push notifications.
To do this, click the ‘Choose Image’ button.
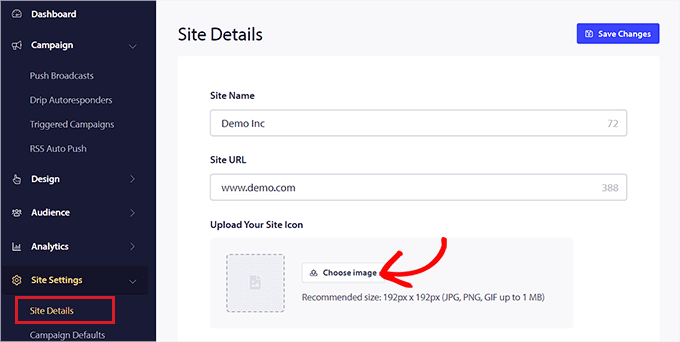
This will open up a prompt on your screen where you can upload an image from your computer.
You can also add an image using its URL. Once you have selected an image, just click the ‘Use’ button.
After that, don’t forget to click the ‘Save Changes’ button to store your settings.
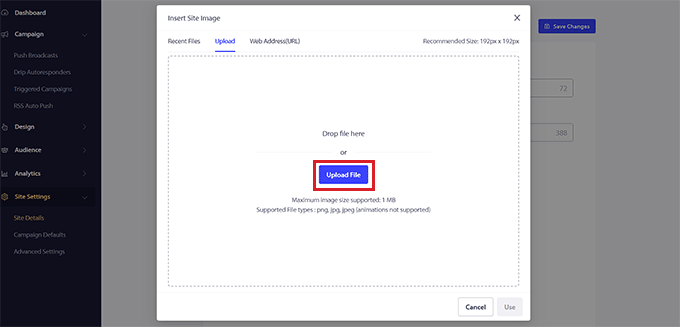
Remember that your image needs to be in PNG or JPG file format, and the recommended size is 192×192.
You have now completed the key information for your PushEngage account.
Step 2: Connecting Your WordPress Site With PushEngage
The next step is to connect your WordPress website to PushEngage.
To do this, you have to install and activate the PushEngage WordPress plugin. For more details, you can see our step-by-step guide on how to install a WordPress plugin.
Upon activation, the ‘Welcome to PushEngage Setup Wizard!’ prompt will open up on your screen, where you have to click the ‘Connect Your Existing Account’ button.
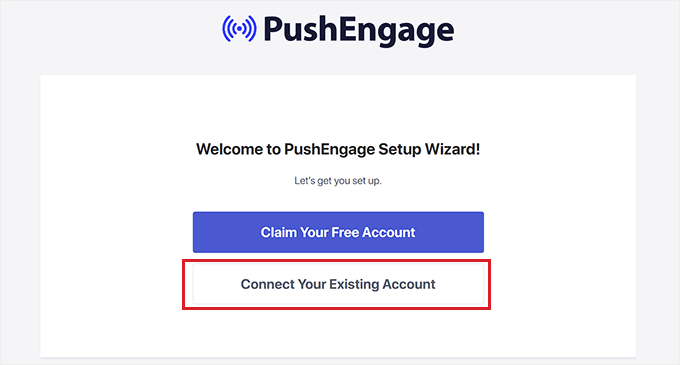
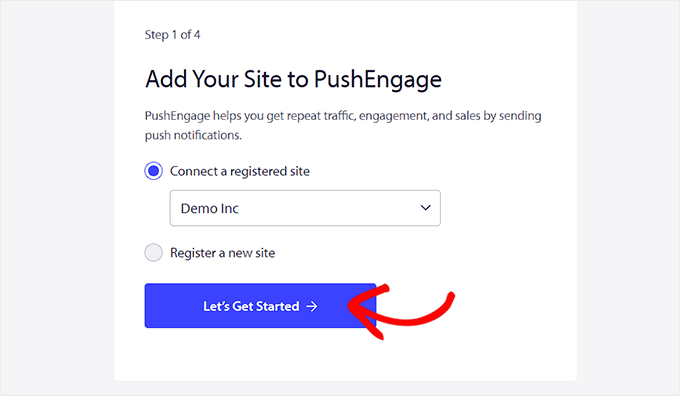
This will open the ‘Add Your Site to PushEngage’ prompt in a new window. Here, you have to make sure that the site registered with PushEngage is the same one that you are using now.
After that, just click the ‘Let’s Get Started’ button.
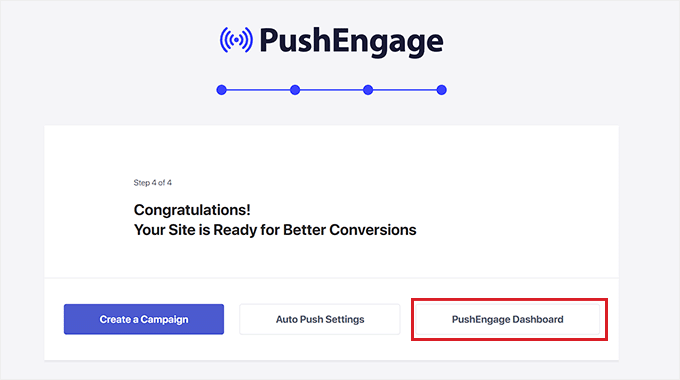
Once your PushEngage account is connected with WordPress, a setup wizard will be launched on your screen that you can configure according to your liking.
After you are done, just click the ‘PushEngage Dashboard’ button to be redirected to your WordPress dashboard.
Now it’s time for you to start creating a web push notification for your WordPress blog or website.
Step 3: Setting Up Your Push Notification Messages
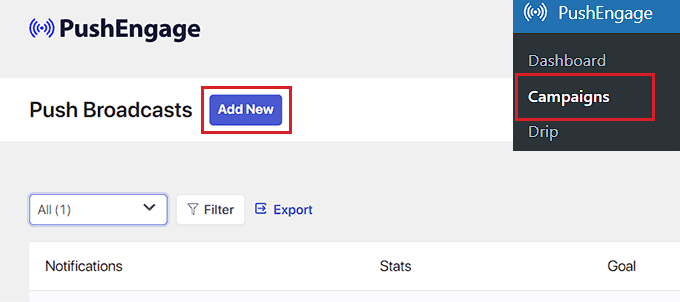
To create a push notification, head over to the PushEngage » Campaigns page and click the ‘Add New’ button.
This will direct you to the ‘Create New Push Broadcast’ screen in your WordPress dashboard.
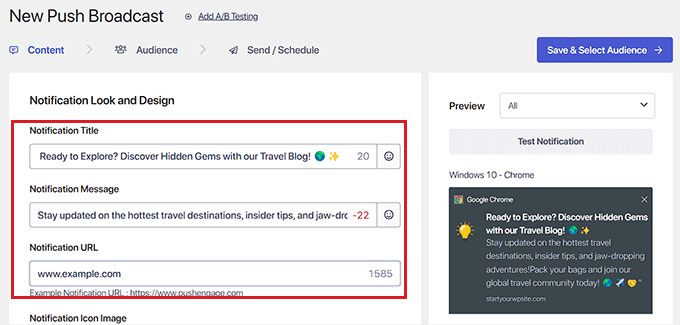
From here, you can start by typing a name for your push notification in the ‘Notification Title’ field. Then, type the message that you want to display in the push notification in the ‘Message’ field.
Next, you need to add your website URL to the ‘Notification URL’ field.
Upon adding the title and message, you will be able to see the preview of your push notification in the right corner of the screen.
Next, scroll down to the ‘Show Large Image’ section and toggle the switch to active if you want to add an image to your push notification.
This image will be displayed at the top of your notification and will not disturb the alignment of the notification title and message.

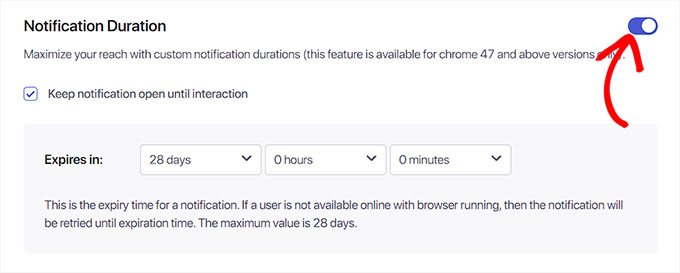
Next, scroll down to the ‘Notification Duration’ section and toggle the switch to active.
Once you do that, you can now check the ‘Keep notification open until interaction’ option. This means that the notification will be constantly displayed unless the user interacts with it.
You can also customize your push notification duration from the dropdown menus. This setting controls how long the push notification will be displayed.
Keep in mind that these features only work for Chrome 47 and above versions and not other browsers.
After configuring the settings, just click the ‘Save & Select Audience’ button at the top.
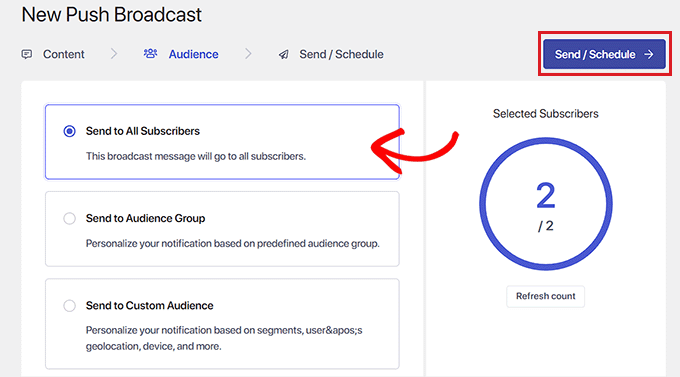
This will direct you to the next step, where you must select the audience to whom you want to send push notifications.
Here, we will be choosing the ‘Send to All Subscribers’ option so that our push notification will be displayed to all our subscribers.
Next, click the ‘Send/Schedule’ button at the top to move forward.
In the next step, you must schedule your web push notification timing.
For example, if you want to start sending your push notifications immediately, then you can select the ‘Begin sending immediately’ option. However, you can also schedule your notification to be sent at a particular time or be turned into a recurring push notification.
However, keep in mind that you will need a paid plan from PushEngage to access these two features.
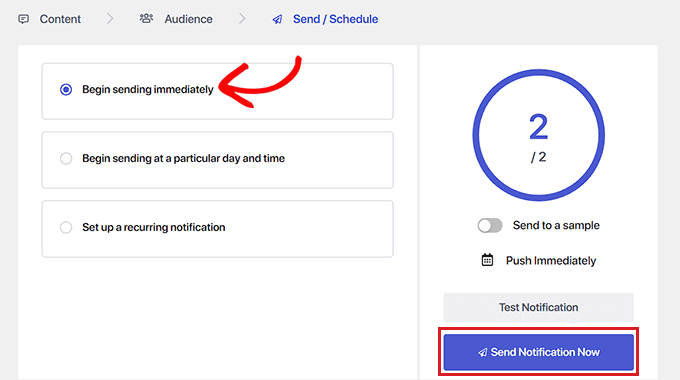
Finally, click the ‘Send Notification Now’ button to save your campaign and start sending your web push notifications.
Once you have set up push notifications, it’s best practice to check that they are working as you expected.
To test your push notifications, open your website on your computer or phone. Here, you should immediately see the web push notification that you just created.
Here’s ours on a desktop computer:
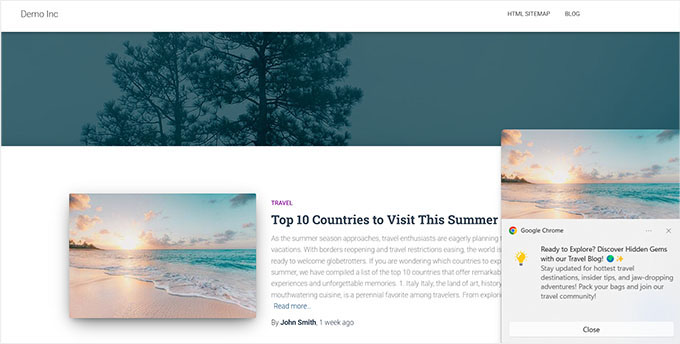
However, keep in mind that this web push notification will only be displayed to users who are part of your PushEngage subscriber list.
Create a Subscribers List With PushEngage
If you don’t already have a subscribers list with PushEngage, then you must visit the PushEngage » Design page from the WordPress admin sidebar.
Once you are there, simply toggle the switch to active for a popup template that you like. Then, click the ‘Edit Popup’ button.
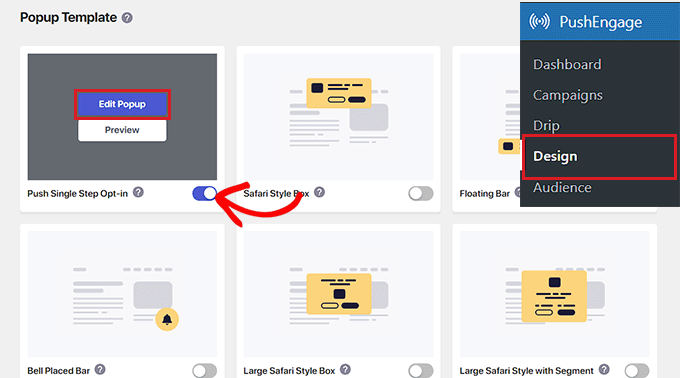
This will open the PushEngage website dashboard on a new page.
From here, you can configure the layout, message, and subscription rules for your popup.
Once you are done, don’t forget to click the ‘Save & Choose Display Options’ button at the top.
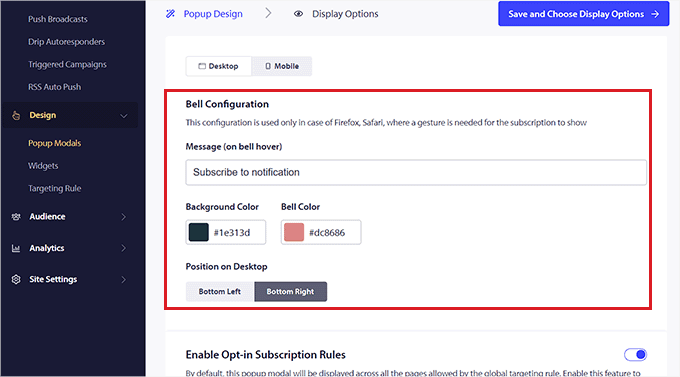
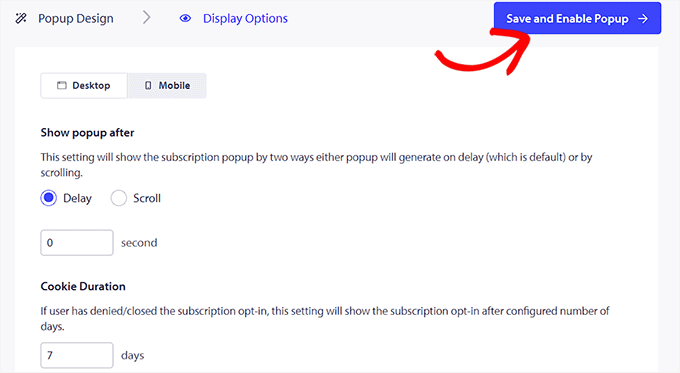
This will now show you the display options, where you can choose the cookie duration, enable the subscription trigger, and more.
Finally, click the ‘Save and Enable Popup’ button to store your settings and activate the popup.
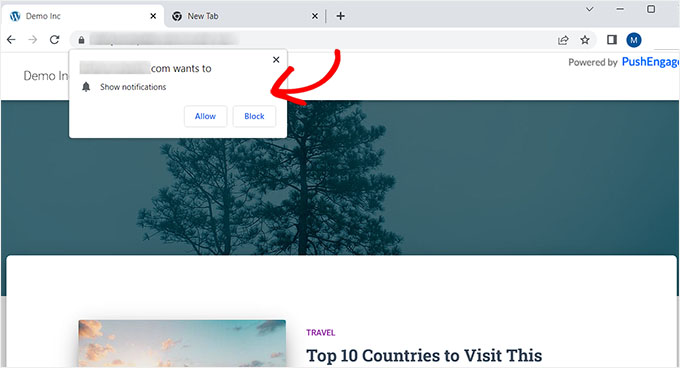
Now, you need to visit your website using another Google account. Here, you will see a popup at the top of your website asking users to allow it to show notifications.
Now once the users click the ‘Allow’ button, they will automatically become a part of your PushEngage subscribers’ list.
Send Push Notifications to Subscribers Every Time You Publish a New Post on WordPress
With PushEngage, you can also send push notifications to subscribers every time you publish a blog post in WordPress.
To do this, visit the PushEngage » Settings page from the WordPress dashboard and switch to the ‘Auto Push Settings’ tab. From here, toggle the ‘Auto Push’ switch to active.
After that, you need to choose if you want to display the post’s featured image in the push notification and enable multi-action buttons.
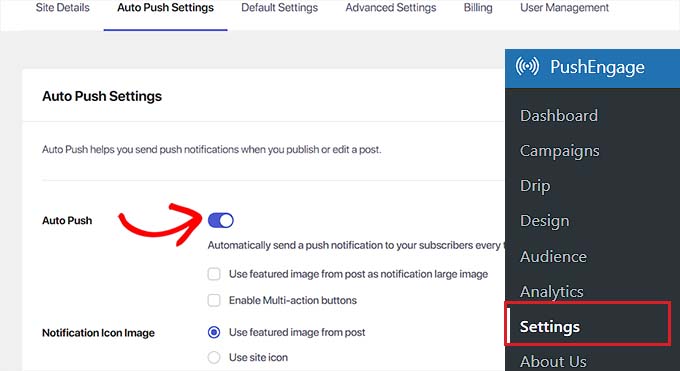
With multi-action buttons, you can allow users to interact with your push notifications in multiple ways, like visiting your blog post, subscribing to your YouTube channel, and signing up for your email newsletter.
You can also use the blog post’s featured image or the site icon as the notification icon image.
Finally, click the ‘Save Changes’ button to store your settings.
Now create a new post in the WordPress block editor and scroll down to the ‘PushEngage Push Notifications Settings’ section.
From here, you can add a title and message for your web push notification and even select an audience for it.
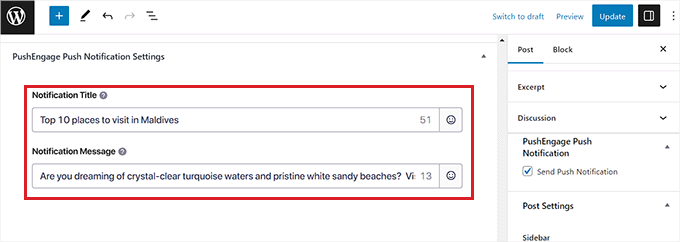
Once you are done, simply click the ‘Publish’ button to save your changes and make your post live.
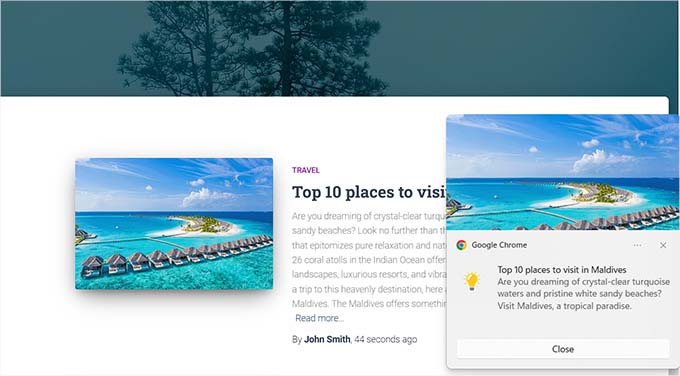
Now your subscribers will receive a notification for the new blog post on your website.
Bonus: Set Up Automated Drip Notifications With PushEngage
If you want, you can also set up automated drip notifications with PushEngage. Drip campaigns are automated messages that are usually sent to subscribers to welcome them to your website, announce a sale, or offer discount coupons.
This can help boost user engagement and generate more leads.
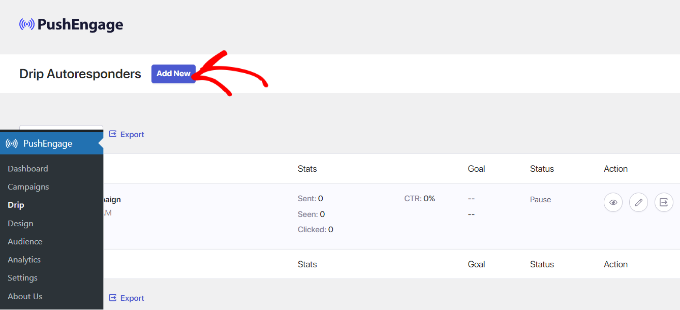
To set up a drip campaign, visit the PushEngage » Drip page from the WordPress dashboard and click the ‘Add New’ button.
After that, you can design different push notifications according to your liking. You can add a title, message, URL, or icon image by expanding each notification.
Once you do that, PushEngage will allow you to choose when to send each notification from the campaign. For instance, you can send the first push notification when the user joins your subscriber list.
To do this, simply click the ‘Send notification’ dropdown menu.
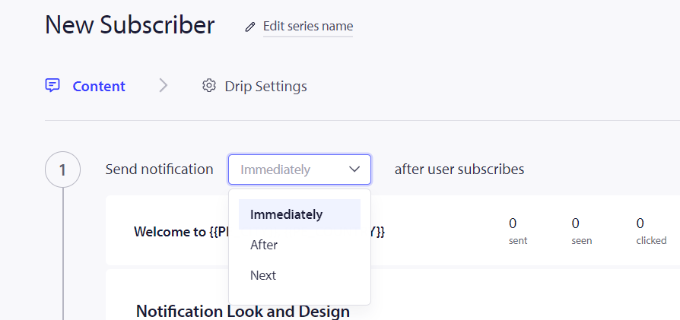
After that, you can set different timings for each notification in your campaign. You can also send specific notifications to a select group of audience from your subscribers.
Once you are done, don’t forget to click the ‘Activate Autoresponder’ button to enable automated push notifications. For more detailed instructions, you can see our tutorial on how to set up automated drip notifications in WordPress.
We hope this article helped you learn how to add web push notifications to your WordPress site. You may also want to see our beginner’s guide on how to build an email list and our expert picks for the best email marketing services for small businesses.
If you liked this article, then please subscribe to our YouTube Channel for WordPress video tutorials. You can also find us on Twitter and Facebook.


Syed Balkhi says
Hey WPBeginner readers,
Did you know you can win exciting prizes by commenting on WPBeginner?
Every month, our top blog commenters will win HUGE rewards, including premium WordPress plugin licenses and cash prizes.
You can get more details about the contest from here.
Start sharing your thoughts below to stand a chance to win!
Mrteesurez says
I really like this feature of the plugin, I used to see in many website, one signup by users, the notification features alerts visitors even without needing to login.
WPBeginner Support says
Glad to hear you like the notifications
Admin
mohadese esmaeeli says
Is Push Notification still practical? I have heard a lot that it can be intrusive or weary users. In your opinion, is it recommended to use it?
WPBeginner Support says
If done poorly they can cause problems for your users but if you keep your push notifications helpful then they are still a good tool to use.
Admin
Ralph says
I was alywas thinking about implementing push notifications on my website but I consider them to be spamy myself. I always block them as soon I see them and think people do the same, but maybe I am wrong?
Is it really so much better than email marketing? In my country it is reported that 50-55% of web users are using adblockers so I don’t know if I should try it.
WPBeginner Support says
It depends on your product and how you use them. If used poorly any method can be considered spam but there are also plenty of ways to make a tool useful for your users.
Admin
Moinuddin Waheed says
I was looking for a way to use push notifications on my website and I found this article by push notification. This post includes all that is required to send a push notification and keep the post engaging and to keep the website traffic intact.
I want to know if we can build an email list through this push notification and if we can send our posts or articles to that subscribers list. if so, then do we need other email building lists or this push engage will suffice.
I am new to WordPress , so may be my question may seem weird to you.
once again,Thank you for this amazing post.
WPBeginner Support says
You can include a call to action to join your newsletter in a push notification
Admin
Mic says
Thanks for this post. I guess I may agree with you regarding OneSignal’s support. I’m also switching to PushEngage.
WPBeginner Support says
We hope you enjoy using PushEngage
Admin
jasen hudson says
I am seriously looking for a blog like this So wonderfully you have explained easily to set up the push notification to the website.
WPBeginner Support says
Glad you found our guide helpful
Admin
Nympha says
Hi does this work for both android and iOS?
Luca says
Is it possibile to activate push notification in a non-online website?
Rubb says
Can I use this to send reminder for people registered to webinar a day before the webinar?
WPBeginner Support says
It would depend on the tools you are using, if you reach out to the plugin’s support with your specific setup they may be able to assist.
Admin
EdidiongAni says
thanks for these. it really help
WPBeginner Support says
Glad our guide was helpful
Admin
James says
Why doesn’t your site have push notifications?
WPBeginner Support says
You may be using a blocker or other tool that is preventing you from seeing our notification request.
Admin
Mahamudul Hassan says
Thanks, brother it’s very helpful for me.
WPBeginner Support says
Glad our guide was helpful
Admin
KHALID MEHMOOD says
Thank you, very detailed and informative step by step tutorial.
WPBeginner Support says
You’re welcome
Admin
Sea says
Thank for very helpfull and detail post.
WPBeginner Support says
You’re welcome
Admin
Tasleem says
Nice post. And thanks for this helpful article
WPBeginner Support says
Thank you and glad our guide can be helpful
Admin
Naveen Reddy says
Thanks for this very detailed and helpful article.
WPBeginner Support says
You’re welcome
Admin
Odins says
Please which software are they using to blur out private information of certain parts of images and the red circle stuff they are using to emphasize certain stuffs
WPBeginner Support says
You can do those edits with different image editors such as Photoshop or GIMP
Admin
kovin says
hello guys
i have a social network and i would like whenever someone like or comments or sent a message to one of his friends that friend will receive a push notification
is that possible with this plugin
please guys need your assistance thank you.
WPBeginner Support says
You would need to reach out to the support for the plugin you are using for creating the friends list to see if they have the ability to work with push notifications.
Admin
Deepak Baghel says
Thank You for share valueable notes it really help me to send push notification to my users. Thank You
WPBeginner Support says
You’re welcome
Admin
Scottio says
Excellent tutorial. Thank you.
WPBeginner Support says
You’re welcome
Admin
Sasha Lizaveta says
Hi,
Is there a way to exclude the notification prompt from certain pages in our WordPress site such as from the opt-in email pages?
Regards,
Sasha
WPBeginner Support says
If you reach out to the plugin’s support they will let you know how to set that up
Admin
Marcus Tibesar says
I wish these things were outlawed…
WPBeginner Support says
We can certainly understand disliking them but some users have found these alerts useful and when used properly they can be used for good
Admin
Alekciss says
Hi, nice work !
I would like to know if using a web push notification is against Adsense Policy.
Thank you in advance !
WPBeginner Support says
It would depend on how you implemented your Adsense, you would want to reach out to Adsense’s support for this type of question: https://support.google.com/adsense
Admin
Muhammad Junaid says
I am using it on my Adsense enabled website. Also, they told that starting from January 2019 we will be able to send web push to 30000 subscribers. Anything beyond that will require an upgrade to the paid plan. For mobile app subscribers, we will be able to send unlimited messages.
krishnakant Raj says
It was nice. But can you provide me some details for moving notifications on homepage?
Vandana says
Hello Sir,
I am doing everything correctly but there is no button to enable google messaging service
Ca you plz help me
Ashley Bailey says
Under Step 1, the setting fields have changed under the Configuration tab.
It’s not called Sender ID anymore. Where do I put the sender ID?
Jitender Singh says
Thanks for Great Article Admin
Venugopal says
Excellent article. It will be very useful to increase the website traffic.
Thank you _/\_
Suhel Dhuldhule says
This Will Work on Android Chrome Also ?
I mean It is Not Working For My Android Chrome
Saurabh says
Hi, How can I setup Push notification on my subfolder website? I have followed the above-mentioned steps but it is not working. Although I have successfully implemented it on my other website but I am not able to implement it on subfolder website
subramanyam says
I didn’t whatever you said, but nothing works to me, I didn’t get push notification image. Please kindly suggest me.
Note: I didn’t add any image while it ask me.
Mihai says
great tutorial.
I see that Amazon have also a push notification offer with a great price.
A tutorial with amazon integration would be great for your subscribers (and for me) because there are not many plugins yet for this
Abi says
Nice shots. While executing these kinds of sites, some of the pushes is must need. Thank you
Tim Boehm says
This was a good article. I am a little confused though as to how this compares to ‘Notifications’ that is already a tool with the Jetpack plugin?
Love the site and find it enormously helpful.
thx
Tim
Loupio says
Thabk you for this awesome tutorial. Is it working with Microsoft Edge.
Dragam says
Tried it and is working about fine, but after a while Firefox users just stop receiving updates. Chrome users do not have the same issue. Even if you apply again to receive notifications, it doesn’t work for Firefox users. Well at least on my site.
Giorgio says
Sam to me: Firefox users (e.g version 57) don’t receive any notification, while chrome users do.