Do you want to add a signature or ad after your blog post content in WordPress?
By default, WordPress does not come with an easy way to display advertisements or a personal signature after the content of each post.
In this article, we will show you how to add a signature or ads after post content in WordPress.

Why Add Signature or Ads After Post Content in WordPress?
When you first create a WordPress website, there is no way to automatically add content to the end of each post. That makes it hard to add a signature or display advertisements after your blog posts. Luckily, there are a few ways you can add this feature to WordPress.
When adding a signature, you can use an image of your actual signature, your name formatted in a handwriting font, or simply a friendly closing greeting with your name.
If you have multiple authors, then you won’t want the same signature shown on each post. Instead, you should follow our guide on how to add an author info box in WordPress posts.
Also, this tutorial lets you display ads after every post on your website. To display ads only on some of your posts, see our guide on how to display ad blocks in specific posts in WordPress.
With that being said, let’s take a look at how to add a signature or ads after post content in WordPress. We’ll cover three methods, and the first is recommended for most users:
Method 1: Adding Signature or Ads After Post Content with WPCode (Automatically)
The easiest way to add a signature or ads after your post content is by using the free WPCode plugin.
WPCode is the best code snippets plugin for WordPress. It makes it easy to insert code to display ads on any page, post, or widget area in WordPress. You can also use it to add any custom code, images, or text to display a signature after your post content.
To get started, you’ll need to install and activate the free WPCode plugin. If you need help, you can follow our tutorial on how to install a WordPress plugin.
Note: There’s also a premium version of WPCode that comes with advanced features like scheduled snippets, conversion pixels, eCommerce tracking, and more.
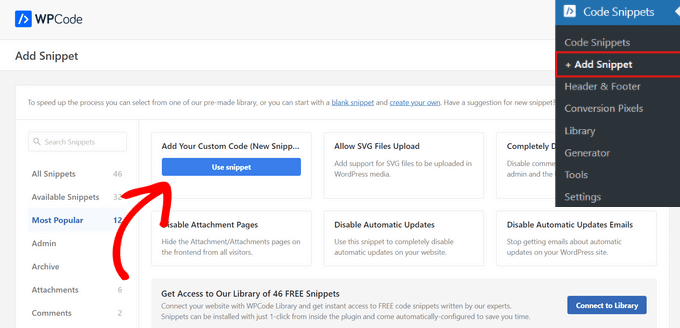
Once the plugin is activated, go to Code Snippets » + Add Snippet from the WordPress dashboard.
This will bring you to the built-in code snippets library. From here, hover over the ‘Add Your Custom Code (New Snippet)’ option, and click the ‘Use snippet’ button to select it.
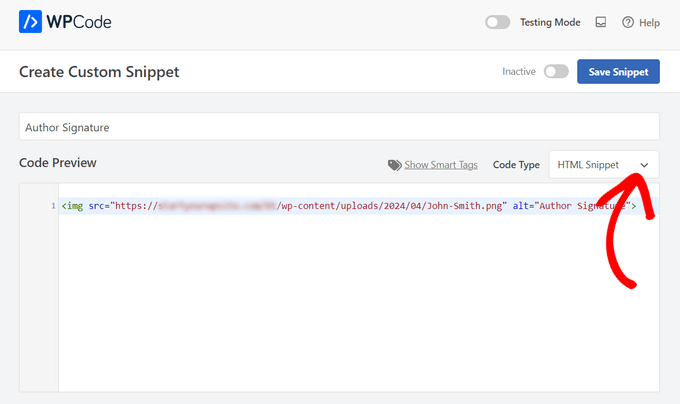
On the ‘Create Custom Snippet’ page, you need to add a title for your snippet, which can be anything to help you remember what the code is for. It’s only for your reference.
Then, simply copy and paste the code you want to display in the ‘Code Preview’ box.
If you’re displaying an ad, then you should paste the code you received from your advertising service, such as Google AdSense.
If you’re adding a signature, then you can simply type a text signature, such as “Thanks for reading, Johnny”. Alternatively, you could enter the code to include an image of your actual signature, such as <img src="link-to-image">.
You’ll also need to select ‘HTML Snippet’ as the ‘Code Type’ from the dropdown list on the right side of the screen.
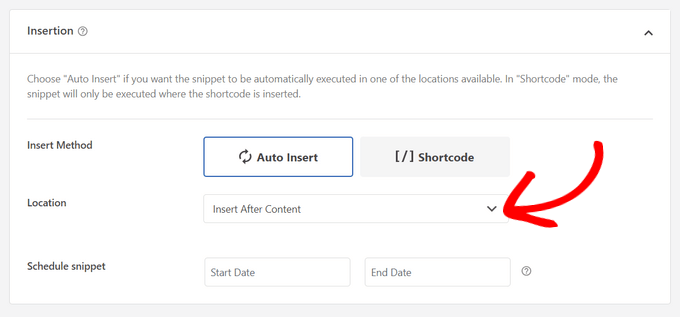
After pasting your code, you need to scroll down to the ‘Insertion’ section. There are two main insertion options you can choose from:
- Auto-Insert – Your signature or ad code will be automatically inserted and executed on your website in the location that you select.
- Shortcode – Your signature or ad code will not be automatically inserted. Instead, you’ll get a shortcode that you can manually insert anywhere on your site.
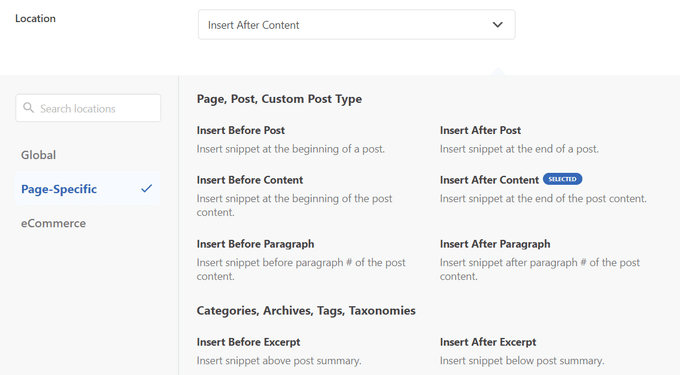
For this tutorial, click on the ‘Auto-Insert’ method and choose the ‘Insert After Content’ option from the dropdown list next to the ‘Location’ field.
Aside from after post content, WPCode allows you to insert signatures or ads in many other locations like at the beginning of post content, after a paragraph, between posts, and more.
To publish your signature or ad, simply go back to the top of the page and toggle the switch from ‘Inactive’ to ‘Active.’
Lastly, click on the ‘Save Snippet’ button.
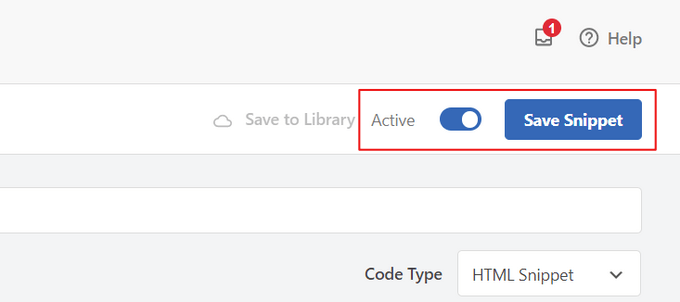
That’s it! Your signature or ad will now be automatically inserted after your post content.
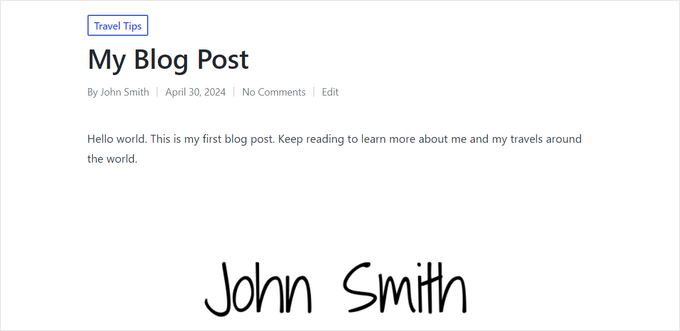
You can visit a post on your website to see the signature or ad after the post content. Here’s how it looked on our demo site:
Method 2: Adding Signature or Ads After Post Content with Ad Inserter
For this method, the first thing you need to do is install and activate the Ad Inserter – Ad Manager & AdSense Ads plugin. For more details, see our step by step guide on how to install a WordPress plugin.
This plugin supports Google AdSense, Amazon Ads, and other ad platforms. However, it is not limited to displaying ads. You can use it to add any code, images, or text to your posts.
Upon activation, you need to visit the Settings » Ad Inserter page to configure plugin settings. At the top of the page, you will see tabs where you can add multiple ads or signatures to your site. For this tutorial, we’ll stay on tab 1.
Below the tabs, you’ll find a text editor where you can enter the content you wish to display, whether it’s ad code or a signature.
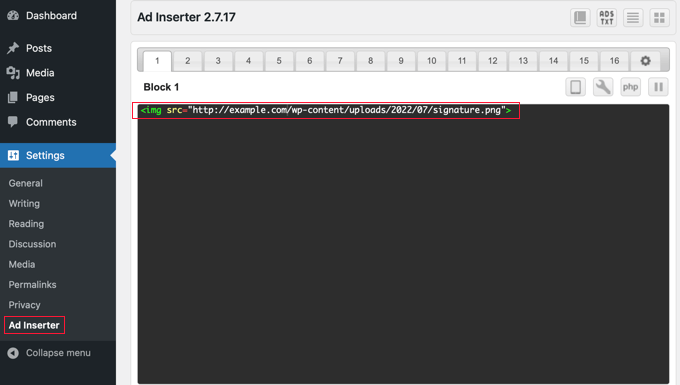
Next, you need to scroll down below the text editor and select where you want to display the ad or signature. The ‘Posts’ box is checked by default, and there are also options for static pages, the homepage, search pages, category pages, and tag archive pages.

Next, you can choose the insertion point from the drop down menu. To display the ad or signature after every post, you should select ‘After content’.
You can also choose which paragraph to display the ad after. For example, if you choose ‘After paragraph’ and enter ‘2’ in the next field, then the ad will be displayed a little after the fold.
When you’ve finished, make sure you click the ‘Save Settings 1 – 16’ button. This will store the settings for the ads in the first 16 tabs.
Now you can visit your website and view a post to see the ad or signature. Here is how it looks on our demo website.

Method 3: Adding Signature or Ads After Post Content Using Code (Advanced)
This method requires you to add code to your WordPress files. If you haven’t done this before, then please take a look at our beginner’s guide on pasting code snippets in WordPress.
First, you need to add this code to your theme’s functions.php file, a site-specific plugin, or a code snippets plugin.
Again, we recommend using the free WPCode plugin to add this code in WordPress. That way, you don’t have to edit your theme’s functions.php file or worry about breaking your site.
// Add signature or ad after post content

function wpb_after_post_content($content){
if (is_single()) {
    $content .= 'Your signature or ad code goes here';
}
    return $content;
}
add_filter( "the_content", "wpb_after_post_content" );
Don’t forget to replace ‘Your signature or ad code goes here’ on line 5 with the ad code, image, or signature you want to display. Make sure you place it between single quote marks.
You can now visit your website to see your signature or ad in action.
We hope this tutorial helped you learn how to add a signature or ad after the post content in WordPress. You may also want to learn how to create a free business email address, or check out our list of must have plugins to grow your site.
If you liked this article, then please subscribe to our YouTube Channel for WordPress video tutorials. You can also find us on Twitter and Facebook.


Syed Balkhi says
Hey WPBeginner readers,
Did you know you can win exciting prizes by commenting on WPBeginner?
Every month, our top blog commenters will win HUGE rewards, including premium WordPress plugin licenses and cash prizes.
You can get more details about the contest from here.
Start sharing your thoughts below to stand a chance to win!
Kelly says
I added this code to my site specific plugin and it isn’t showing up in my posts. Do I add the text content I want to appear in place of every $comment?
WPBeginner Support says
You would want to ensure you are closing the content in single quotes and after the = in line 5 of the code method.
Admin
Melissa Hoyle says
I am trying to use this to add a signature to my posts. I uploaded my image to my media library then grabbed the image source code and pasted that into the box “Advert Code”. However, just the code displays on my posts and no image. How do I correctly generate a code so that my image displays? Thanks!
WPBeginner Support says
You would want to add the code in an img tag similar to the manual display of an image in a widget we cover here: https://www.wpbeginner.com/beginners-guide/how-to-add-an-image-in-wordpress-sidebar-widget/
Admin
joseph Tersoo says
Thanks for the post It worked for me, how ever how can i add a title to it? i am using the second method on my site to display ads, i want to add a title to it like, “others are reading this” how can i achieve this?
WPBeginner Support says
You would need to add the html for what you are using on your theme for titles in terms of h tags to add a title using that manual method.
Admin
Rodrigo Zuluaga says
Thanks you 2019 Still Working!!
WPBeginner Support says
Thanks for sharing, glad our method is still working
Admin
Fruitfulife says
Thank you for your article. The plugin still works well.
WPBeginner Support says
You’re welcome, glad you went with our recommendation
Admin
James says
Hi,
What if I would like to add ads before post (in the beginning) content and tittle?
Thanks
WPBeginner Support says
The most common way to do that would be to add a header widget using the method in our article here: https://www.wpbeginner.com/wp-themes/how-to-add-a-wordpress-widget-to-your-website-header/
Admin
Clive says
Hi,
Thanks that is really interesting but it does just add the text to the screen output, can that signature be automatically added to the contents that is written to the table.
Molly says
I’m using code snippet and inserting the signature code into the snippet editor but when I add the image url into the content – it just shows as a link written out into text. How do I add image link into content block so it shows as an image?
Burak Bilgin says
Thank you for the information. Used the second method. Works perfect.
Catherine Kelleher says
Hello, trying to get this to work on images i have uploaded to us as ads?? can anyone help please
Bhat Muzamil says
Thank You for this Article. I was finding this , finally here i got this. thanks a lot
Miryam says
Hi
Thanks ! Can we do that for a particular category?
abu bakar says
i have this website link is
i want to stop the ajax loading but i dont know how to do that can any one help me with that
i really appreciate it..
Thnakx
Barry says
Question: Insert Post Ads, according to the WordPress plugin page says it hasn’t been updated in two years and is only compatible up to WordPress 4.3.8.– so will you be updating it so can be used?
Editorial Staff says
The plugin still works just fine that’s why we haven’t updated it. It has no bugs or issues.
We will push out an update soon.
Admin
Rezza Indra says
Hy WPBeginner thanks for sharing, I like this website that’s a help me for building blog with WordPress CMS. I want to ask for tutorial make menu accordion as above (BEGINNER’S GUIDE FOR WORDPRESS / Start your WordPress Blog in minutes)
please tell how to make, thanks guys