Deseja adicionar fontes personalizadas no WordPress? As fontes personalizadas permitem que você use uma bela combinação de fontes diferentes em seu site para melhorar a tipografia e a experiência do usuário.
Além da boa aparência, as fontes personalizadas também podem ajudá-lo a melhorar a legibilidade, criar uma imagem de marca e aumentar o tempo que os usuários passam no seu site WordPress.
Neste artigo, mostraremos como adicionar fontes personalizadas no WordPress usando o Google Fonts, o TypeKit e o método CSS3 @Font-Face.
Observação: carregar muitas fontes pode tornar seu site mais lento. Recomendamos escolher duas fontes e usá-las em seu site. Também mostraremos como carregá-las corretamente sem deixar o site lento.
Antes de vermos como adicionar fontes personalizadas no WordPress, vamos dar uma olhada em como encontrar fontes personalizadas que você pode usar.
Como encontrar fontes personalizadas para usar no WordPress
As fontes costumavam ser caras, mas não são mais. Há muitos lugares para encontrar ótimas fontes gratuitas para a Web, como Google Fonts, Adobe Fonts (antigo Typekit), FontSquirrel e fonts.com.
Se você não sabe como misturar e combinar fontes, experimente o Font Pair. Ele ajuda os designers a combinar belas fontes do Google.
Ao escolher as fontes, lembre-se de que o uso de muitas fontes personalizadas deixará o site mais lento. É por isso que você deve selecionar duas fontes e usá-las em todo o seu design. Isso também trará consistência ao seu design.
Dito isso, vamos dar uma olhada em como adicionar fontes personalizadas no WordPress. É sobre isso que trataremos neste tutorial:
Como adicionar fontes personalizadas no WordPress a partir do Google Fonts
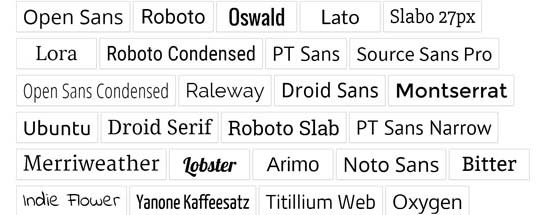
O Google Fonts é a maior biblioteca de fontes, gratuita e mais comumente usada pelos desenvolvedores de sites. Há várias maneiras de adicionar e usar o Google Fonts no WordPress.
Método 1: Adicionar o Google Fonts usando um plug-in do WordPress
Se você quiser adicionar e usar o Google Fonts em seu site, esse método é, de longe, o mais fácil e recomendado para iniciantes.
A primeira coisa que você precisa fazer é instalar e ativar o plug-in Google Fonts Typography. Para obter mais detalhes, consulte nosso guia passo a passo sobre como instalar um plug-in do WordPress.
Oferta: Se você quiser obter a versão premium do plug-in, use nosso cupom do Google Fonts for WordPress para obter um desconto de 20%. Isso permitirá que você altere a cor e o tamanho da fonte em seu tema do WordPress e muito mais.
Após a ativação, você terá a oportunidade de inserir seu endereço de e-mail para receber o guia oficial de início rápido.
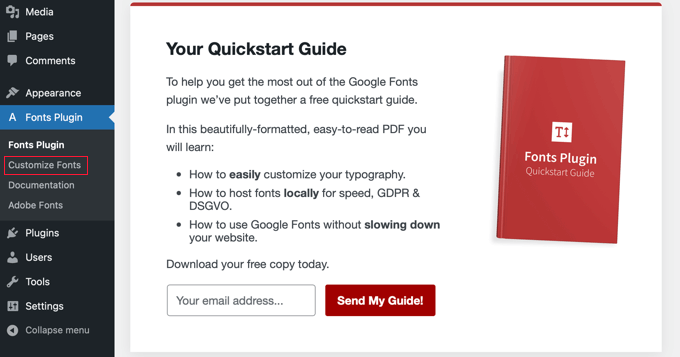
Em seguida, você precisará clicar em Fonts Plugin ” Customize Fonts na barra lateral do administrador.
Isso o levará automaticamente ao cliente do tema do WordPress e abrirá automaticamente a nova seção “Fonts Plugin” (Plug-in de fontes).
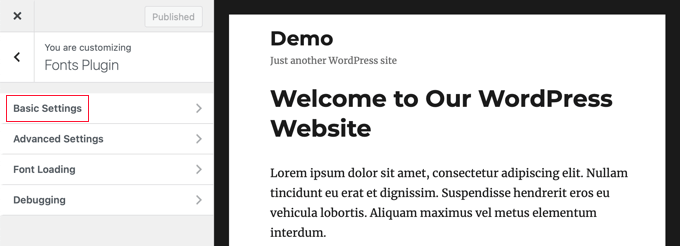
Aqui você pode escolher as fontes padrão para o seu site na seção “Basic Settings” (Configurações básicas) e as fontes para partes específicas do site em “Advanced Settings” (Configurações avançadas).
Vamos começar clicando em “Basic Settings” (Configurações básicas). Aqui você pode selecionar as fontes para seu conteúdo, títulos, botões e campos.
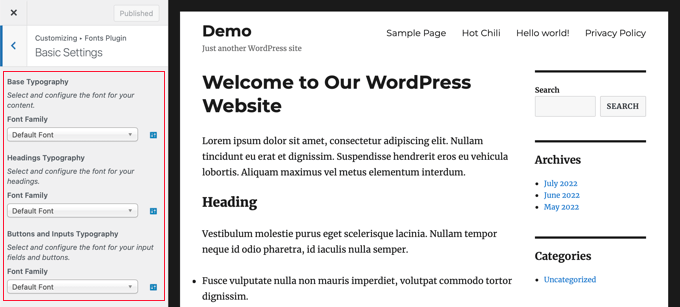
Os menus suspensos “Font Family” permitem que você escolha uma nova fonte. Você encontrará a fonte padrão na parte superior, depois as fontes do sistema e, por fim, uma enorme lista de mais de 1.400 fontes do Google.
Quando você escolher uma nova fonte, a visualização mudará automaticamente para mostrar a aparência dela.
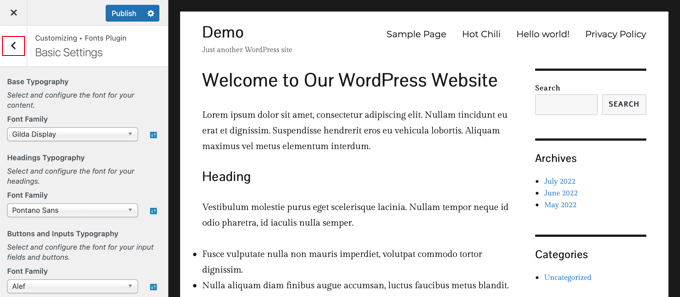
Agora você pode usar as configurações avançadas do plug-in para ajustar suas seleções de fontes.
Você precisará clicar no botão de seta para trás ‘<‘ na parte superior esquerda da página e, em seguida, clicar na seção ‘Configurações avançadas’.
Aqui você encontrará configurações para as diferentes seções do seu site, como o título do site, o menu de navegação, a área de conteúdo, a barra lateral e o rodapé.

Por exemplo, a seção “Content” (Conteúdo) lhe dará opções para alterar a fonte dos diferentes níveis de títulos e citações.
Você pode selecionar as fontes personalizadas que gostaria de usar nos menus suspensos.
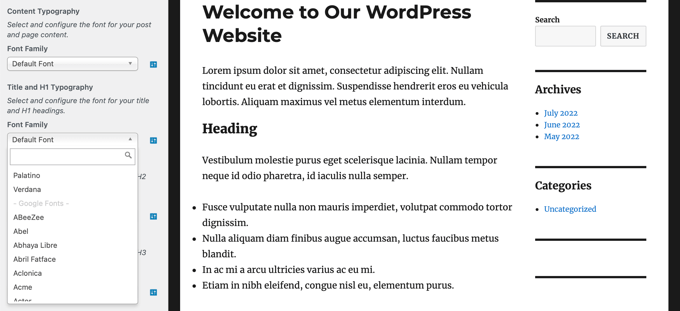
Você pode escolher fontes personalizadas para a área da barra lateral de maneira semelhante.
Basta clicar no botão Voltar e acessar as configurações da “Barra lateral”. Lá você encontrará menus suspensos para selecionar fontes para os cabeçalhos e o conteúdo da barra lateral.

Quando estiver satisfeito com suas seleções de fontes personalizadas, não se esqueça de clicar no botão “Publish” (Publicar) para armazenar suas alterações.
Método 2: Adicionar fontes do Google manualmente no WordPress
Esse método exige que você adicione código aos arquivos de tema do WordPress. Se você nunca fez isso antes, consulte nosso guia sobre como copiar e colar código no WordPress.
Primeiro, visite a biblioteca do Google Fonts e selecione a fonte que você deseja usar. Na página da fonte, você verá os estilos disponíveis para essa fonte.
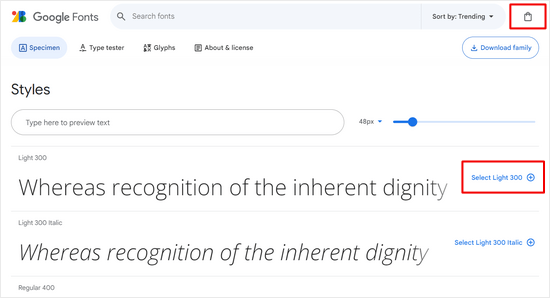
Selecione os estilos que deseja usar em seu projeto e clique no botão “View selected families” (Exibir famílias selecionadas) na parte superior.
Isso abrirá uma barra lateral na qual você poderá copiar o código de incorporação.
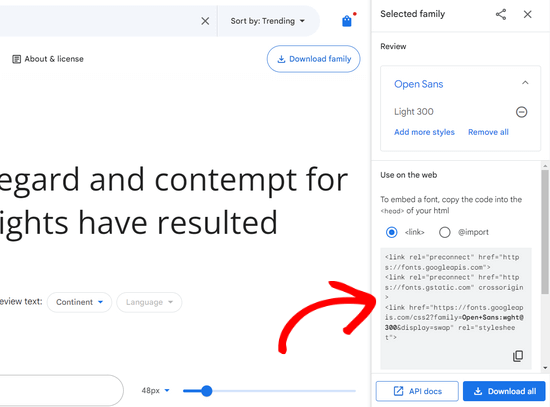
Há duas maneiras de adicionar esse código ao seu site WordPress.
Primeiro, você pode editar o arquivo header.php do seu tema e colar o código antes da tag <body>.
No entanto, se você não estiver familiarizado com a edição de código no WordPress, poderá usar um plug-in para adicionar esse código.
Basta instalar e ativar o plug-in WPCode. Para obter mais detalhes, consulte nosso guia passo a passo sobre como instalar um plug-in do WordPress.
Após a ativação, vá para a página Code Snippets ” Header & Footer (Cabeçalho e rodapé ) e cole o código de incorporação na caixa “Header” (Cabeçalho).
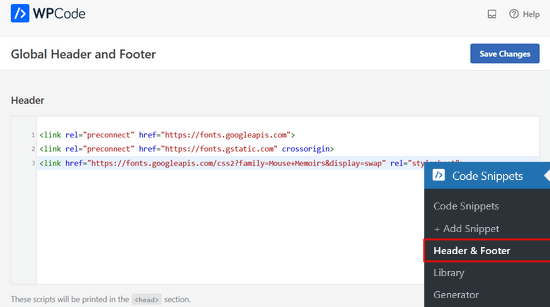
Não se esqueça de clicar no botão “Save Changes” (Salvar alterações) para armazenar suas alterações. Agora, o plug-in começará a carregar o código de incorporação do Google Font em todas as páginas do seu site.
Você pode usar essa fonte na folha de estilo do seu tema da seguinte forma:
.h1 site-title {
font-family: 'Open Sans', Arial, sans-serif;
}
Para saber mais, consulte nosso guia sobre como adicionar o Google Fonts em temas do WordPress.
Adição de fontes personalizadas no WordPress usando o Adobe Fonts
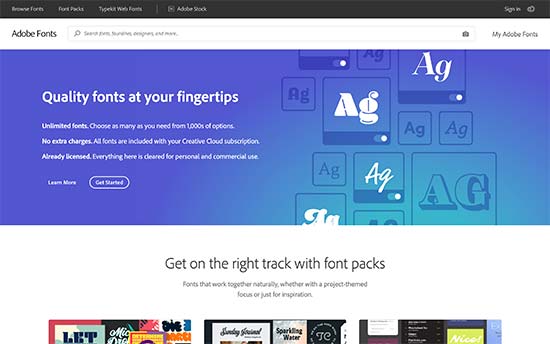
OAdobe Fonts, anteriormente conhecido como Typekit, é outro recurso gratuito e premium para fontes incríveis que você pode usar em seus projetos de design. Eles têm uma assinatura paga, bem como um plano gratuito limitado que você pode usar.
Basta inscrever-se em uma conta do Adobe Fonts e visitar a seção “Browse Fonts”. A partir daí, você precisa clicar no botão </> para selecionar uma fonte e criar um projeto.
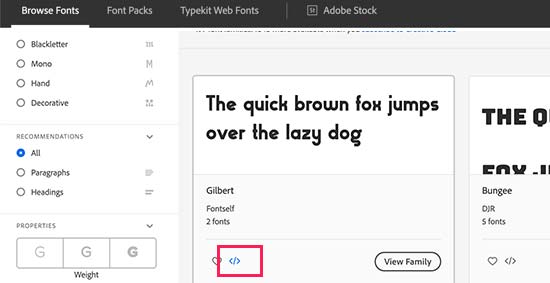
Em seguida, você verá o código de incorporação com o ID do seu projeto. Ele também mostrará como usar a fonte no CSS do seu tema.
Você precisa copiar esse código e colá-lo na seção <head> do seu site.
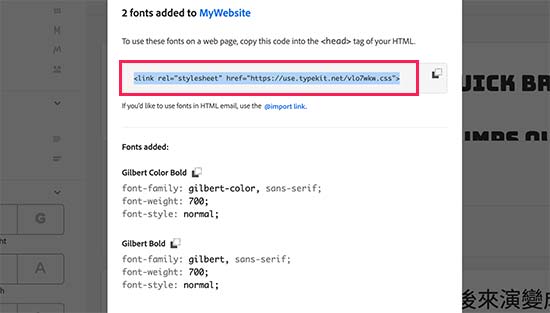
Há duas maneiras de adicionar esse código ao seu site WordPress.
Primeiro, você pode editar o arquivo header.php do seu tema e colar o código antes da tag <body>.
No entanto, se você não estiver familiarizado com a edição de código no WordPress, poderá usar um plug-in para adicionar esse código. Basta instalar e ativar o plug-in WPCode.
Após a ativação, vá para a página Code Snippets ” Header & Footer (Cabeçalho e rodapé ) e cole o código de incorporação na caixa “Header” (Cabeçalho). Em seguida, clique no botão “Save Changes” (Salvar alterações).
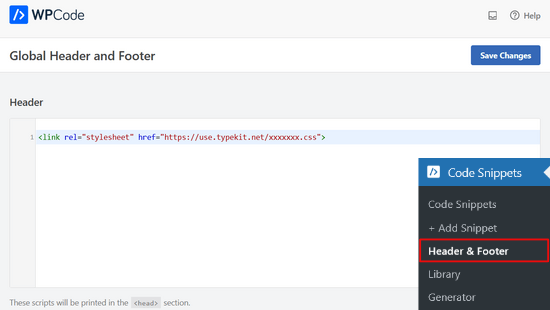
É isso aí. Agora você pode usar a fonte Typekit selecionada na folha de estilo do seu tema do WordPress desta forma:
h1 .site-title {
font-family: gilbert, sans-serif;
}
Para obter instruções mais detalhadas, confira nosso tutorial sobre como adicionar uma tipografia incrível no WordPress usando o Adobe Font (Typekit).
Adição de fontes personalizadas no WordPress usando CSS3 @font-face
A maneira mais direta de adicionar fontes personalizadas no WordPress é adicionar as fontes usando o método CSS3 @font-face. Esse método permite que você use qualquer fonte que desejar em seu site.
Primeiro, você precisa fazer o download da fonte de que gosta em um formato da Web. Se você não tiver o formato da Web para sua fonte, poderá convertê-la usando o gerador FontSquirrel Webfont.
Depois de obter os arquivos de fontes da Web, você precisará carregá-los no servidor de hospedagem do WordPress. O melhor lugar para carregar as fontes é dentro de uma nova pasta “fonts” no diretório do seu tema ou tema filho.
Você pode usar o FTP ou o Gerenciador de arquivos do seu cPanel para carregar a fonte.
Depois de fazer o upload da fonte, você precisa carregá-la na folha de estilo do seu tema usando a regra CSS3 @font-face da seguinte forma:
@font-face {
    font-family: Arvo;
    src: url(http://www.example.com/wp-content/themes/your-theme/fonts/Arvo-Regular.ttf);
    font-weight: normal;
}
Não se esqueça de substituir a família da fonte e o URL por seus próprios.
Depois disso, você pode usar essa fonte em qualquer lugar da folha de estilo do seu tema, assim:
.h1 site-title {
font-family: "Arvo", Arial, sans-serif;
}
Carregar fontes diretamente usando CSS3 @font-face nem sempre é a melhor solução. Por exemplo, se você estiver usando uma fonte do Google Fonts ou do Typekit, é melhor servir a fonte diretamente do servidor deles para obter o melhor desempenho.
Esperamos que este tutorial tenha ajudado você a aprender como adicionar fontes personalizadas no WordPress. Você também pode querer saber como incorporar um vídeo do Facebook ou conferir nossa lista dos melhores plug-ins do Instagram para WordPress.
Se você gostou deste artigo, inscreva-se em nosso canal do YouTube para receber tutoriais em vídeo sobre o WordPress. Você também pode nos encontrar no Twitter e no Facebook.


Syed Balkhi says
Hey WPBeginner readers,
Did you know you can win exciting prizes by commenting on WPBeginner?
Every month, our top blog commenters will win HUGE rewards, including premium WordPress plugin licenses and cash prizes.
You can get more details about the contest from here.
Start sharing your thoughts below to stand a chance to win!
Kushal Phalak says
I cannot do without custom fonts. It is as if something feels incomplete if I do not use custom font. As a designer and developer, I want my brands to be meticulously crafted as it is the most important step, and if I use any font, it does not feel good. I know that some default fonts are good, but I do not find enough variety in them. In wordpress, I guess this feature should be inbuilt, as it will save the extra hassle to add custom fonts.
WPBeginner Support says
It would depend on the theme but maybe in the future there will be an easier way
Administrador
Jiří Vaněk says
Thanks for the useful article. Our language has certain specificities and features. The Czech language uses letters like ěščřž. Sometimes it is very problematic to find a font that takes these characters into account and does not display them differently. That’s why I thank you for this guide, which will finally help me solve the eternal problem of writing in the Czech language.
Jozef Fekete says
As a Slovak I know exactly what you are talking about In cases like this, it is advisable to use a filter to make searching for a suitable font easier. For example, look for fonts in the “Latin extended” category that support Czech and Slovak language.
Jiří Vaněk says
That’s good advice. Thank you for it. I have already tracked some of the letters. However, some customers are not satisfied with them and want a decorative one. I will try your search advice.
Moinuddin Waheed says
There are many Google fonts which are very good and are used by many top developers.
I have been fan of poppins and robot for a while and have used on my static sites and also on WordPress sites.
I have seen people saying that use Google fonts from local library,
I don’t know what does it mean?
They argue that fetching from server may slow down the speed of the website.
if it is so, how can we add these fonts from our own local library given the fact that these are Google fonts?
WPBeginner Support says
The plugin from our guide has an option to host the font file locally. When you do not host the file locally it means that your users would need to wait for the font to be pulled in from Google to see that font on your site.
Administrador
Moinuddin Waheed says
Thanks for the guide for keeping the fonts locally.
Having to fetch from Google isn’t that good idea for speed purposes. I will keep in mind while using Google fonts to keep it locally.
Jiří Vaněk says
If a font is used locally, it means it is stored on the web. That is, on FTP just like WordPress. This is because otherwise wordpress has to go to Google servers for fonts and this slows down the site’s response. In addition, it may happen that Google’s servers are currently slow and this will affect the speed. If you put your website on some measuring tool like pagespeed insight or gtmetrix, you will see how much time it can take to load fonts from google servers. Therefore, it is a common practice to upload fonts locally to the site, improving both site responsiveness and metrics. I have it done that way too.
Ahmed Omar says
Thank you once again for a useful article.
Would you know why my font is displaying correctly on laptop but not on mobile phone?
WPBeginner Support says
The most likely reason would be if your theme overrides styling for mobile devices. If you check with your theme’s support they should be able to assist.
Administrador
Brayden Fraser says
You should’ve said you needed to be a business WordPress member to do this. Misleading.
WPBeginner Support says
All of our content is for WordPress.org sites, you are on WordPress.com, you can see our comparison between the two in our article below:
https://www.wpbeginner.com/beginners-guide/self-hosted-wordpress-org-vs-free-wordpress-com-infograph/
Administrador
Tarun Kashyap says
Which font are you using on this site ? It looks very attractive
WPBeginner Support says
We’re currently using Proxima Nova
Administrador
Joshua says
Can you pleaseee tell me how do you make such beautiful animated photos for you blog? Which software do you use?
WPBeginner Support says
There are multiple tools, for the moment you may want to take a look at Recordit for an option for creating a GIF
Administrador
Manuel says
Thanks a lot, I was trying @font-face on WordPress but the font was not displaying, so I followed the recommendations to place the fonts inside the theme directory and voila!
WPBeginner Support says
Glad our recommendation could help
Administrador
Roshni Kanchan says
Thank you once again for a useful article.
Would you know why my font is displaying correctly on laptop but not on mobile phone?
WPBeginner Support says
Your specific theme may have device-specific CSS that is overwriting the font you added. If you check with your theme’s support they should be able to let you know.
Administrador
Vlad says
Thank you very much!
WPBeginner Support says
You’re welcome
Administrador
Katherine says
Thank you for making this simple video. Fixed my font in minutes with the second method. You saved me a lot of time messing with my theme code. Much appreciated!
WPBeginner Support says
Hey Katherine,
You are welcome. We are glad you found it helpful.
Administrador
Or says
Hey, my font is not a Google font. I uploaded it using font face, but I don’t see it on my theme’s customizer. Any advice?
giri says
Hi, i absolutely got tons of value from your post. Please i have 2 quick questions.
1. What is the number of plugins every blogger shouldn’t exceed? I currently have about 18 installed, would you consider that number outrageous. Please could you also check out my site and offer me a
2. Your font is really beautiful. would you suggest plugins that would give me beautiful fonts just like yours?
Finally, would you spare a few seco
WPBeginner Support says
Hi Giri,
1. Please see our article on how many WordPress plugins should you install on your site.
2. For fonts, pleasesee best typography plugins for WordPress.
Administrador
Roshani says
I have uploaded custom fonts url in font-face but its showing error of 404 on developer tools. Prior of loading the web page it shows normal fonts.
Please help me with this
Chamnan says
I’m having issue with for Khmer font while using Google Font. The problem is that some of the texts are showing symbol.
ahmed aboubakr says
thanks for your tutorials , really it helps , and thanks for your kind effort
Fadl says
Okay, never mind… I could figure it out by removing the @font-face code from the custom css field
Amy says
This is truly the best guide to adding fonts that I’ve found. All methods are in one place and each method is easy to follow. I’ve spent the past couple of days searching the internet trying to figure out how to add a custom font that was not from Google or Typekit, and finally I found a guide that was easy to follow. Thank you!
Amber says
Okay, so I used Font Squirrel and got the @font-face kits. I uploaded to my theme in Siteground. Then I made sure to change the URL in WP Editor -> Fonts. Here’s an example of what I did:
@font-face {
font-family: ‘walpurgis_nightregular’;
src: url(‘www.example.com/public_html/wp-content/themes/pique/fonts/walpurgisnight-regular-webfont.woff2’) format(‘woff2’),
url(‘www.wanderlustconqueror.com/public_html/wp-content/themes/pique/fonts/walpurgisnight-regular-webfont.woff’) format(‘woff’);
font-weight: normal;
font-style: normal;
}
Despite doing this, the font will not come up in the “Typography” section of the customization options. I thought perhaps I was also supposed to add it to the “Additional CSS Editor” so I put it there too. That didn’t seem to work either.
I just want to be able to use my font for my Headers. What am I doing wrong here? For this tutorial to be for beginners, it’s making me feel really stupid. Am I missing a step? Is there a better, more in-depth tutorial on just using the Font Face option? Help!
WPBeginner Support says
Hi Amber,
We are not sure. Please try following the steps mentioned above once again.
Administrador
Dan says
I am having a similar problem as Amber. Despite following the step by step instructions, my fonts still are not loading.
I am using a custom theme based off of the twenty seventeen theme. My css file is located at wp-content/themes/twentyseventeen-child. This is also where I have placed my fonts. In the css file I have the following:
However, my site is still not showing this font! What am I doing wrong?
Syed Abbas Ali Shah says
I have a question too. I have uploaded the .ttf files in my
publichtml/folder-name-of-web/wp-content/theme/font
and I have added the name of the font in stylesheet css of theme in wordpress editor. But it is not picking the font.
Kindly give me the solution
Raghava says
Thanks for the valuable information. I tried and it’s working good. I used two fonts from google, when using google fonts website performance is bit slow.
if you can post in detailed how to upload fonts directly into the word press it would be appreciated.
Thanks,
Raghava
Allix says
If I am viewing a “glyph” through Photoshop that is a special character in a font I had purchased – how can I transfer this glyph into Photoshop?
Thank you!
dsb says
silly questions im sure! But, in the url- where it reads ‘your theme’ this is to be replaced with the title of our theme, correct? Or do we leave that part as is?
Also, for fonts that have long names, do you just need to leave spaces in between or add + signs or anything?
for example:
@font-face { font-family: Arvo example one; src: url(http://www.example.com/wp-content/themes/your-theme/fonts/Arvo example one-Regular.ttf); font-weight: normal; }1-click Use in WordPress
Thank you so much
WPBeginner Support says
Hi dsb,
Yes you will need to replace your-theme with the actual name of your theme folder. If you uploaded your font to your current theme’s fonts directory, then you can see what the font file is called. or Copy the file name and just paste it in CSS.
Administrador
Vincent says
“The best place to upload the fonts is inside a new “fonts” folder in your theme or child theme‘s directory.”
Why is this the best place, exactly? Creating a child theme for a single font is a little annoying, but uploading it inside the theme itself means it could disappear when the theme has an update, right? Or will it still be safe from that as it’s technically an unrelated file?
Andrew says
I would probably say it’s silly to not have a child theme in general, regardless of what you’re using it for.
And no, it wouldn’t be safe if your theme gets an update. It would be overwritten by the update.
DaVince says
> I would probably say it’s silly to not have a child theme in general, regardless of what you’re using it for.
Why do you think so? Consider the case where someone is not changing the theme in any way, shape or form whatsoever. It would be entirely pointless to run a child theme, and adds just another layer of code on top of everything in this case.
> And no, it wouldn’t be safe if your theme gets an update. It would be overwritten by the update.
I kinda figured. I feel like this should be highlighted in the article or it’s going to make some people unhappy.
Shah says
Hi,
I don’t have any problem with adding custom fonts anywhere in m theme, just when I was going to change the font in wp-embed-template.php my custom fonts don’t work. I mean it’s like they are not @font-faced at all.
Would you please help me to change the fonts in the wordpress embed part? Should I add @font-face again in the php? It is already added though!
Many thanks in advance,
Robin says
Thank you for your help!
Once I’ve upload the font to my fonts folder, do I add this to my CSS? Do I leave the font family that is there? Because I’m using that mostly. This is a specialized font only used for specific occasions.
I’m so confused.
Alice says
Really great! Been struggling a while (I’m quite new to all this) but now it works Thanks a lot!
Nicole says
Hi. Thanks for this. How do I find the licensing information for a font? Some fonts are all over the web, and I want to use one but it’s hard to find the EULA info
Vincent says
It’s usually included in the font’s own metadata. In Windows, you can right-click and view the properties of a font. If that’s not enough, you might want to download a full-featured font viewer that supports showing font metadata.
Andrea says
Hello, which extension should has the font to be installed on wordpress?
Cause i am having issue to install mine
Mike says
Hi guys I used the last technique (@fontface), it has added the font to wordpress but it has made it the default font. I only wanted it to be an option on my fonts list. Can you help?
ep says
Used CSS @font-face method. Works like a charm. Thanks.
Abdul Manan Abbasi says
Assalam o Alaikum!
I am a beginner in wordpress. I want to add Noori Nastaleeq font to my website. How could i done so. I need your help.
Ildiko says
Can you provide performance comparison between these methods?
Asiyah says
Hi,
I’m completely new to wordpress so I hope you can help me. I have just literally bought a custom domain from bluehost, then installed wordpress and lastly installed and activated the so simple theme. So what I want to know is will my font changes be lost if I update my theme in the future, if so how do I prevent that?
It’s just I’ve noticed a lot of other sites advise adding a custom css plugin first and I have no idea how to do that.
Kind regards
WPBeginner Support says
Please take a look at our guide on how to easily add custom CSS to your WordPress site.
Administrador
Vikram says
Thanks a lot.It helped
Hashim Naushahi says
This was truly helpful! Thank you very much!!!
Just a quick question…
How would I adjust the code if I have a font with different weights?
I’ve got a regular and bold version of the font I’d like to use installed on my laptop. I used FontSquirrel to convert those in webfonts. And I uploaded those webfonts to a folder in my child theme like you explained. I just don’t know how to use @font-face to use both weights.
I’m really looking forward to your reply. The way you explained this is great!
Thank you in advance!
Sincerely,
Hashim
WPBeginner Support says
You will use font-weight in CSS. Like this:
h1 { font-family: 'Open Sans', Arial, serif; font-weight: 400; }1-click Use in WordPress
Administrador
Christina says
I don’t see the “editor” button in my wordpress under appearance. I used font squirrel to upload my font but when I went to add it in the theme editor that wasn’t an option. Maybe I have a different version of wordpress. Please help. Thank you.
Michelle says
Can you give a sample of the URL source for the @fontface example? I’m doing g something wrong and feel like pulling all my hair out :/
Mr.T says
Isn’t the correct way of adding custom google fonts is by using enqueue_script function?
WPBeginner Support says
It is ideal but not necessary. This method is correct too, and easier for beginners.
Administrador
James says
Hi guys
I always read your posts and love the site, great work you always help me out. I’ve been stuck on moving a site for a customer and needed to change the font. I thought I had done everything , copies the css files etc, but it was reading this that made me realise I hadn’t changed the code in the header.
Been stuck on this for a week!
Anyway just wanted to say thanks