Do you want to set up delivery time slots for your online store?
Creating delivery time slots allows you to keep up with customer demand for more convenient delivery and create a more manageable schedule to match your delivery capacity.
In this guide, we will share our step-by-step process on how to easily set up delivery time slots in WooCommerce.
What are Delivery Slots and Why Set Them Up in WooCommerce?
You can add eCommerce delivery slots to your WordPress website to allow customers to select a specific time for their purchase to be delivered.
This convenient delivery model allows customers to know exactly when they’re going to receive their goods, which in turn increases customer satisfaction and confidence in your brand.
For store owners, offering specific delivery time slots for customers can drastically reduce failed deliveries. As a result, you can save money on delivery costs and make your online store more profitable.
On a smaller scale, offering specific delivery times for customers to choose from allows store owners to manage their schedules and optimize efficiency. They can complete more orders quickly and deliver them on time.
Plus, the customers won’t be left wondering when their package will arrive or whether they will miss its delivery.
With that in mind, let’s take a look at how to easily add delivery or collection time slots in WooCommerce.
Creating Delivery Time Slots in WooCommerce
For this tutorial, we will be using the WooCommerce Delivery Slots plugin. It is a powerful plugin that adds essential date and time-based features to the default WooCommerce delivery functionality.
First, you need to install and activate the WooCommerce Delivery Slots plugin. For more details, see our step-by-step guide on how to install a WordPress plugin.
Upon activation, you need to visit the WooCommerce » Delivery Slots page in your WordPress dashboard.

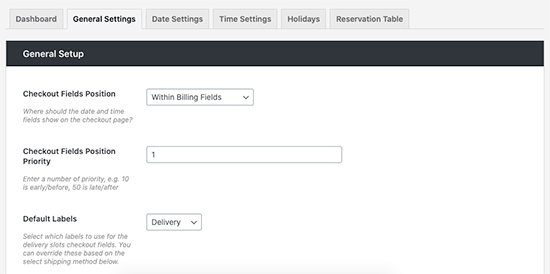
Next, you need to select the General Settings tab.
From here, you can choose where on your site to display the delivery options to customers.
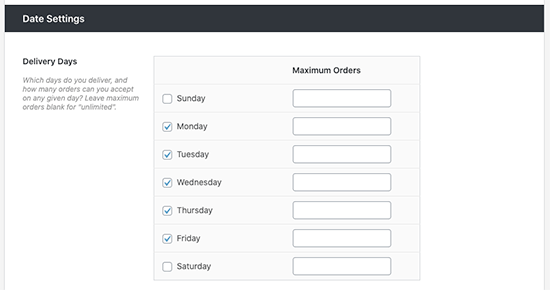
After that, switch to the ‘Date Settings’ tab.
On this screen, you can select the number of days of the week you’ll be offering delivery slots and the maximum number of deliveries you can accept for that day.
You can set additional delivery fees for options like same-day or next-day delivery and more.
Now, you can switch to the ‘Time Settings’ tab to create your delivery time slots.
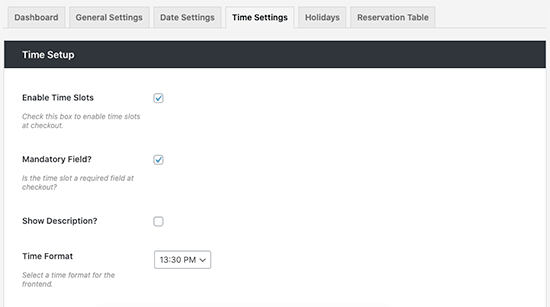
Make sure that ‘Enable Time Slots’ is checked, and scroll down to the ‘Time Slot Configuration’ section to customize.
Here, you’ll be able to fill the ‘Slot Duration’ and ‘Slot Frequency’ fields to dynamically generate slots. You can also leave them empty to create a single time slot.
For this tutorial, we are creating time slots every 30 minutes from 6 a.m. – 10 a.m. every day of the week. You will also have the option of creating Premium time slots, which the customers can choose for an extra fee.
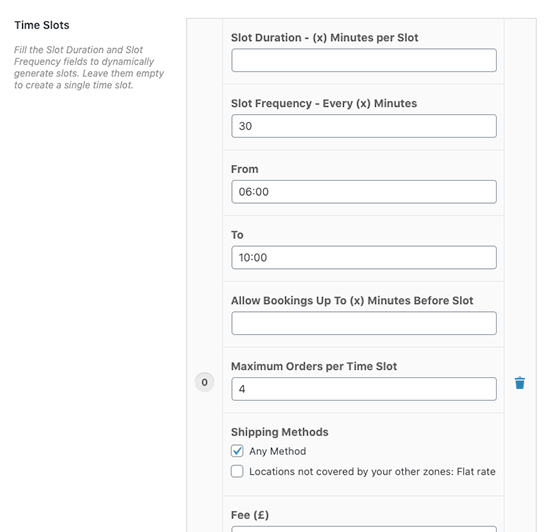
WooCommerce Delivery Slots allows you to fully customize your time slots, so you can add additional fees for certain slots, offer only specific shipping methods for specific times, and set the maximum number of orders per time slot.
Once you are done creating your delivery time slots, go ahead and click ‘Save Changes.’
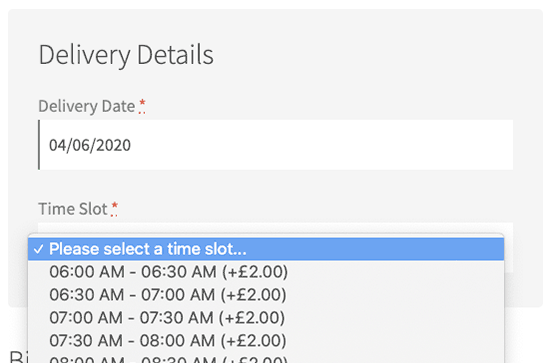
On the checkout page, your customers will now be able to select a delivery date and time slot to suit them. The additional cost of Premium slots will be listed in the dropdown menu.
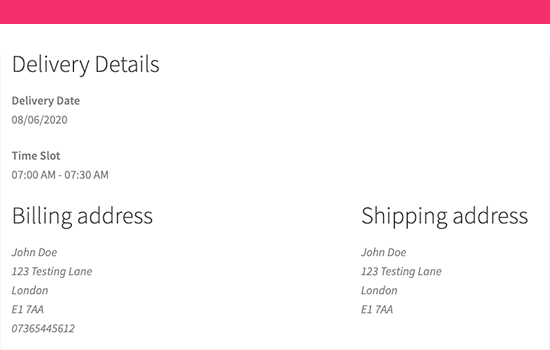
Once the customer has selected their time slot and purchased their items, they’ll be presented with an ‘Order received’ page after checkout.
This page contains a confirmation of their order and the time slot they selected, which will also be confirmed in their order email. The email should be included even if you have customized your WooCommerce emails.
Note: It’s very important to make sure your email notifications are sent upon purchase. We recommend using WP Mail SMTP to ensure your important emails are delivered correctly. You may want to see our guide on how to fix the WordPress not sending emails issue to set up and test your email notifications.
As the store owner, you will be able to see the selected delivery date in the orders overview and details. You can also go to the WooCommerce » Delivery Slots » Deliveries page to see all deliveries.

Creating a Reservation Table in WooCommerce
The WooCommerce Delivery Slots plugin also allows you to enable delivery reservations. This allows customers to temporarily reserve a delivery slot while they shop instead of on the checkout page.
Simply go to the WooCommerce » Delivery Slots page and switch to the ‘Reservation Table’ tab.
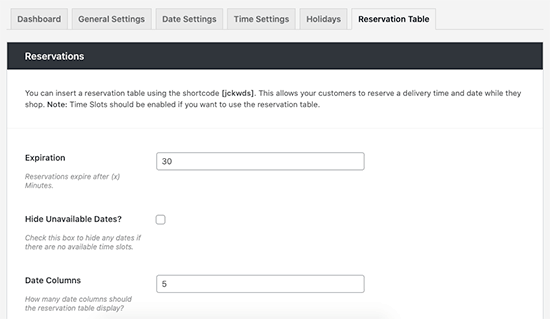
From here, you’ll be able to adjust the settings for your table, including setting limits on how long a reservation will be held before a purchase is made, as well as changing its style to suit your store’s design.
Once happy, click ‘Save Changes’ and copy the shortcode [jckwds] at the top of this settings page.
You can now add this shortcode to any page on your site to allow customers to reserve their delivery time slot before purchase.
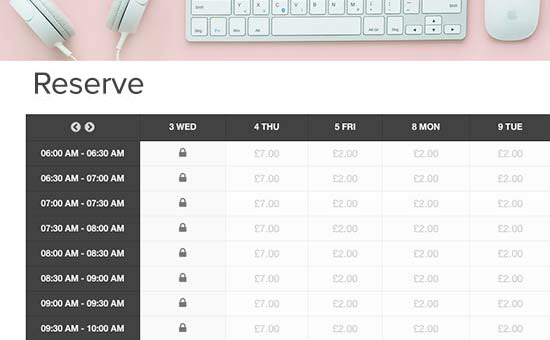
There you have it! You’re now able to add time and date slots to your WooCommerce store’s front end. Your customers will know the specific delivery date and time frame for their orders.
Bonus: Offering Shipment Tracking in WooCommerce
Sometimes, your customers don’t need a specific delivery window. But they just need to have a tracking number to see the progress of the delivery. For all e-commerce orders, you should be sending email notifications regarding when the shipment has been sent and when it arrives.
In that case, all you need to do is install the Advanced Shipment Tracking Pro app.
In the app settings, you can select the types of order statuses to display on your WooCommerce order page and email.
Here’s what the email notification will look like once it’s all set up.
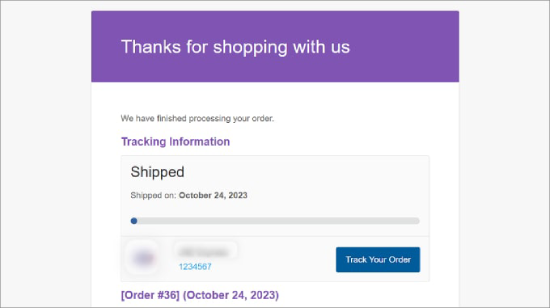
For more details, check out our complete tutorial on how to offer shipment tracking in WooCommerce.
We hope this article helped you learn how to easily set up delivery time slots in WooCommerce. You might also like our list of the best WooCommerce plugins for your store and the best email marketing services to grow your sales.
If you liked this article, then please subscribe to our YouTube Channel for WordPress video tutorials. You can also find us on Twitter and Facebook.


Syed Balkhi says
Hey WPBeginner readers,
Did you know you can win exciting prizes by commenting on WPBeginner?
Every month, our top blog commenters will win HUGE rewards, including premium WordPress plugin licenses and cash prizes.
You can get more details about the contest from here.
Start sharing your thoughts below to stand a chance to win!
kzain says
I have one question about the customization options for different types of products.
For example, if I have perishable and non-perishable items, can I set different delivery time slot rules for each category within WooCommerce? Thanks for the helpful content though!
WPBeginner Support says
You would want to reach out to the support for the plugin for the specific method but they offer the ability to disable delivery spots for categories that you could use to achieve that.
Admin
Dennis Muthomi says
On my experience, the delivery time slots is best only if you have customers within the area or country – local client.
BUT, for the international customer, it will be a bit tricky because of unpredictable circumstances.