Are you looking for an easy way to bulk install plugins in WordPress?
If you frequently create new WordPress sites, then you likely have a list of must-have plugins which you install on every website that you create.
In this article, we will show you how to easily bulk install your favorite plugins in WordPress step by step.
Why Bulk Install WordPress Plugins?
There are more than 59,000 plugins available in the free WordPress.org directory alone. However, most users stick to a set of must-have WordPress plugins that they install on each new website.
By default, WordPress allows you to install one plugin at a time from the admin dashboard. Manually installing multiple plugins, one by one, can take a few extra minutes. This can become annoying if you do it quite often or have more than a couple of plugins to install.
Wouldn’t it be nice if you could quickly install all your favorite plugins at once?
Well, lucky for you, actually can bulk install a set of plugins on any WordPress blog with ease. It helps save time, and you won’t have to perform the tediously repetitive task of installing and activating each plugin one by one.
That said, we’re going to show you two ways that you can bulk install all your favorite plugins in one go.
- Method 1: Bulk Install WordPress Plugins with a Plugin (recommended)
- Method 2: Bulk Install WordPress Plugins with FTP (advanced)
Method 1: Bulk Install WordPress Plugins with a Plugin
The easiest way to bulk upload and install WordPress plugins is using the WPCore Plugin Manager plugin. It is a free tool that lets you create a collection of your favorite WordPress plugins and quickly install them on a new site.
Note: The free version of the WPCore Plugin Manager lets you add only free plugins from WordPress.org. If you want to bulk install custom plugins and premium WordPress plugins from other third-party sites, then we recommend using the FTP method below.
The first thing you need to do is install and activate the WPCore Plugin Manager plugin. For more details, see our step-by-step guide on how to install a WordPress plugin.
Creating a Bulk WordPress Plugin Collection
Before you bulk install WordPress plugins on your new site, you’ll first need to create a collection of plugins. Basically, you’ll be taking a ‘snapshot’ of all the plugins already installed, so that you can recreate the same exact setup on any website.
Upon activation, the plugin will add a new menu labeled WPCore in your WordPress admin panel. You need to click on it to configure settings.
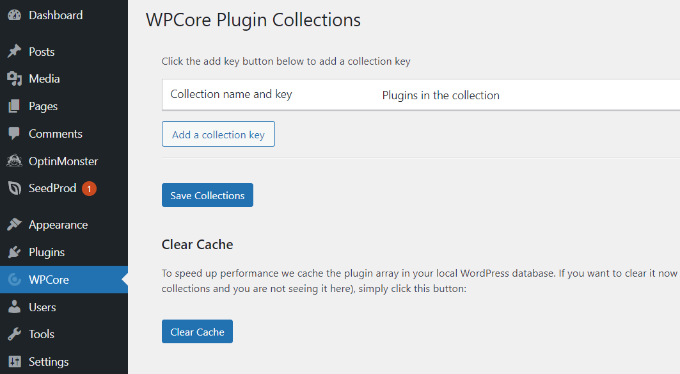
On the WPCore plugin collections page, you will be prompted to add a collection name and key to import plugins.
To do this, you’ll need to create a plugin collection with your selected plugins and get the key on the WPCore website.
To begin, click on the ‘Create your FREE account’ button.
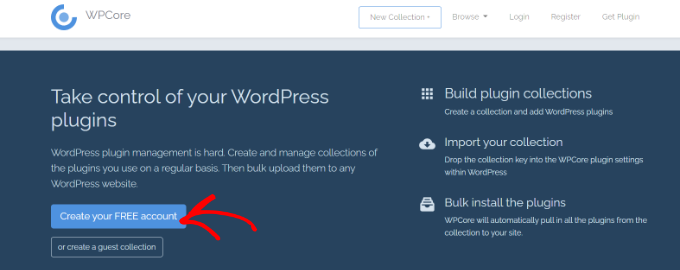
Next, you will see the registration page. Go ahead and create your account.
Once you’re registered, WPCore will allow you to create your new plugin collection.
You can then simply add a collection title and description, as well as choose whether the collection will Public or Private. Then click on the ‘Continue’ button.
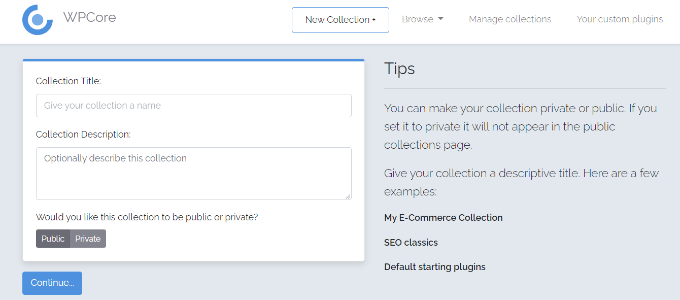
After that, it will create a collection where you can add your favorite plugins in it.
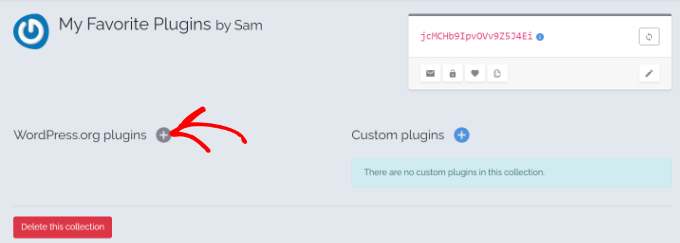
Simply click on the plus icon next to ‘WordPress.org plugins’ to add plugins from the official WordPress plugin repository.
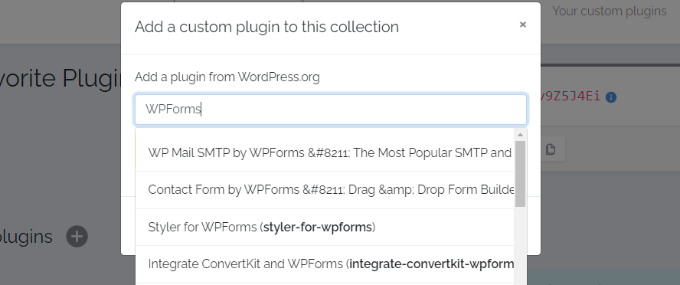
After that, a new popup window will appear where you can search for a WordPress plugin by its name. For example, we will search ‘WPForms.’
Now WPCore will search the plugin repository and show all the results related to the search term. Once the results appear, you need to choose the right option and click on it.
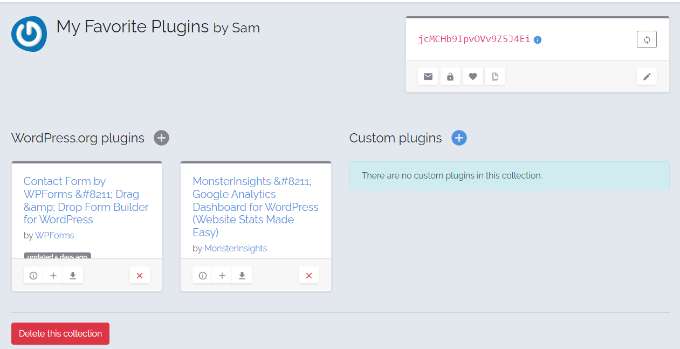
Doing so will add the plugin to the collection.
Simply repeat the same step to add more plugins.
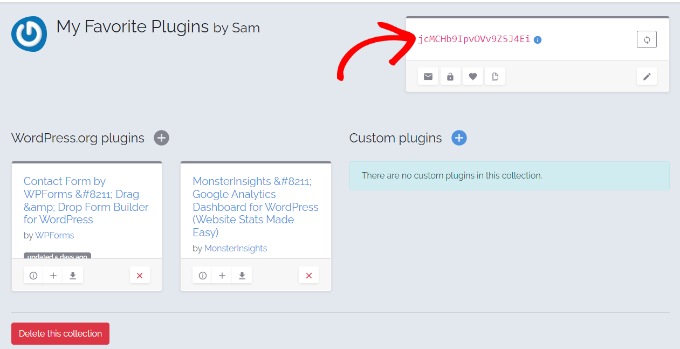
Once you have added all of your must-have WordPress plugins, navigate to a small box at the top right side of your screen.
The code in the red text inside the box is your plugin collection key. Go ahead and copy the code. You will need it in the next steps.
Installing Bulk WordPress Plugins with WPCore
Next, you have to add that collection key to the WordPress site where you installed the WPCore plugin earlier.
Go ahead and open the WPCore plugin from your admin panel and click on the ‘Add a collection key’ button.
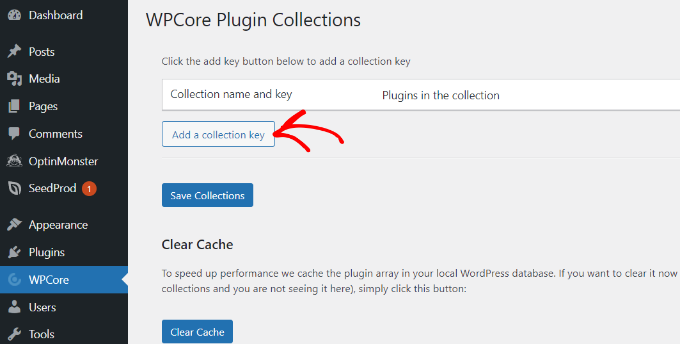
After that, you will see a field titled ‘Collection name and key.’
Simply paste the key that you copied earlier and click on the ‘Save Collections’ button.
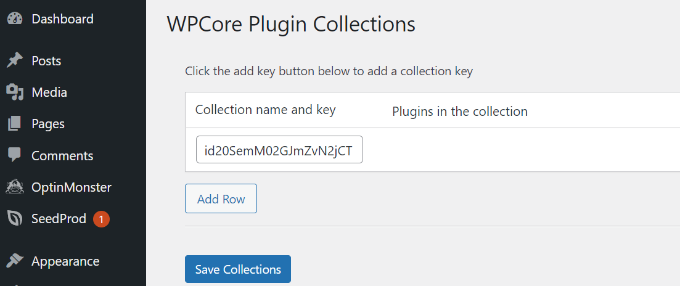
WPCore will now load your plugin collection and prepare for installation. It will add a notification at the top of the screen that reads ‘WPCore recommends the following plugins.”
You just need to click on the ‘Begin installing plugins’ option, and WPCore will start installing the plugins in your collection.
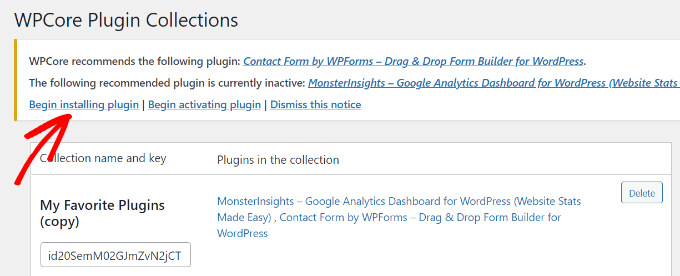
On the next screen, you will be taken to the Plugins » Install Plugins page that shows a list of your collection.
To install the plugins in bulk, select all by clicking on the checkbox next to ‘Plugin’ option at the top.
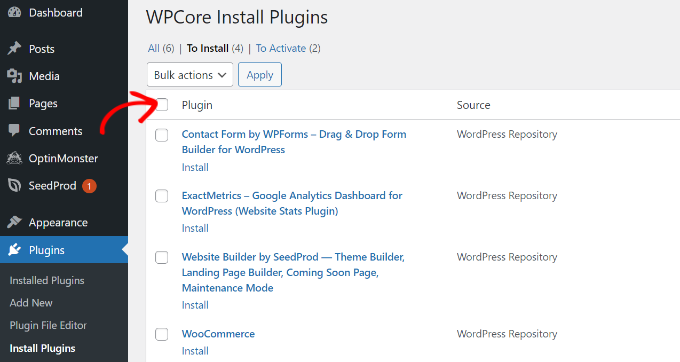
Once all the plugins are selected, click on the dropdown menu and choose the ‘Install’ option.
Next, you can click on the ‘Apply’ button.
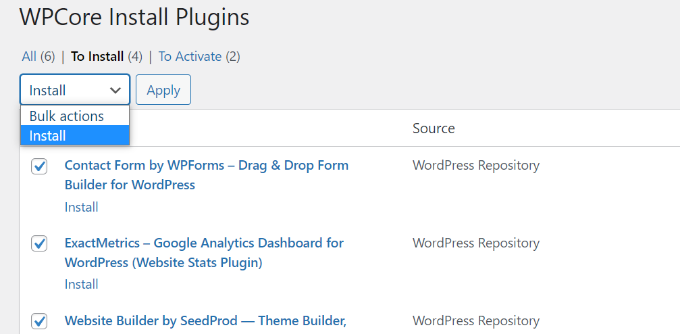
After that, WordPress will install the plugins one by one.
Once done, it will notify you with ‘All installations have been completed’ message.
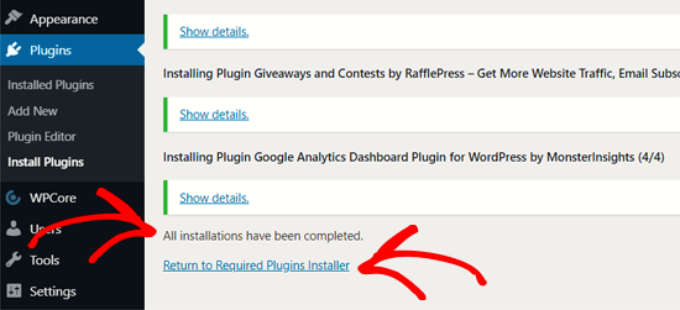
Then, simply click on the ‘Return to Required Plugins Installer.’
On the next screen, you will see the list of plugins that you just installed. Now you just have to activate these plugins by clicking on the checkbox next to ‘Plugins’ once again and choosing the ‘Activate’ option from the dropdown.
After that, click on the ‘Apply’ button.
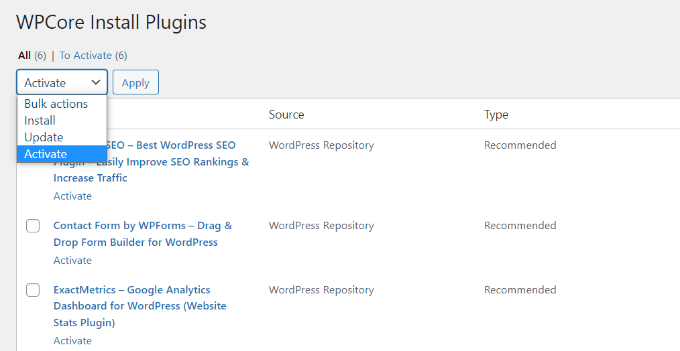
Now WordPress will activate all the plugins one by one.
Once done, it will display a notification message to inform you that all plugins are active.

After that, you can see your installed plugins by going to the Plugins » Installed Plugins page from your dashboard.
They should all show as active plugins in the list.
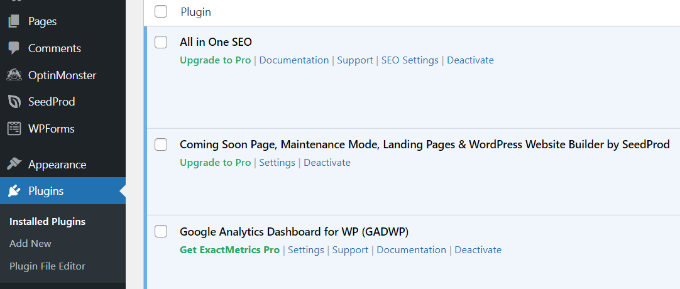
Now you can start configuring your plugin settings and other configurations on your website.
Method 2: Bulk Install WordPress Plugins with FTP
Another way you can bulk install WordPress plugins is by using a file transfer protocol (FTP). It helps you upload files from your personal computer to your server.
Since WPCore only lets you install plugins from WordPress.org, FTP is a good way to upload all of the premium plugins you’ve purchased at once.
First, you’ll need a username and password to connect to your WordPress website by FTP. You can easily find the FTP login credentials in the email sent by your WordPress hosting service or in your hosting account’s cPanel dashboard.
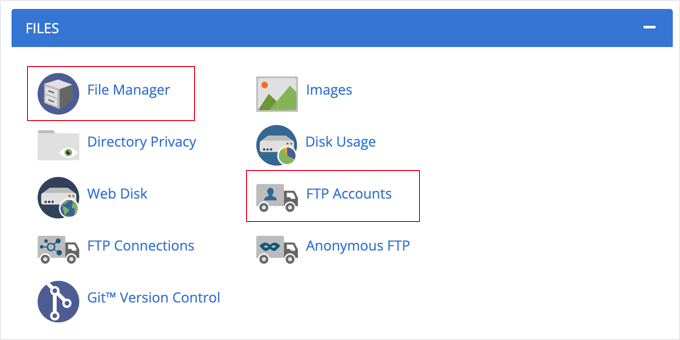
Next, you’ll need to select an FTP client. There are many FTP clients you can use for Windows and Mac, but we’ll use FileZilla for this tutorial.
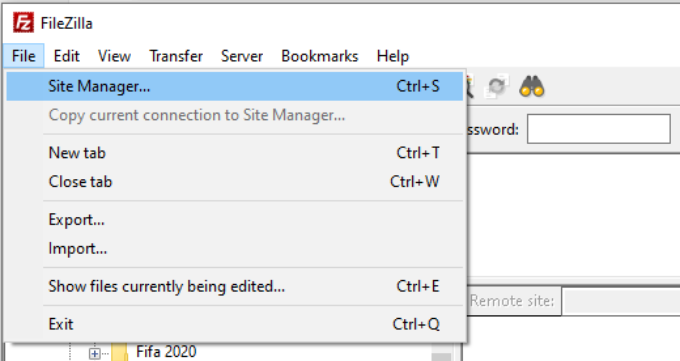
Once you’ve downloaded and installed FileZilla, go ahead and open the software. Then, head to File » Site Manager from the menu at the top.
After that, you can click the ‘New site’ button in the bottom left corner and then enter the FTP login credentials you found earlier.
You’ll first need to add a host, which is the site’s domain name but has ‘ftp.’ at the beginning and no HTTP:// or HTTPS://. For example, ftp.example.com and not https://ftp.example.com.
From here, you can keep the ‘Logon Type’ dropdown set to ‘Normal’ and enter your FTP username and password.
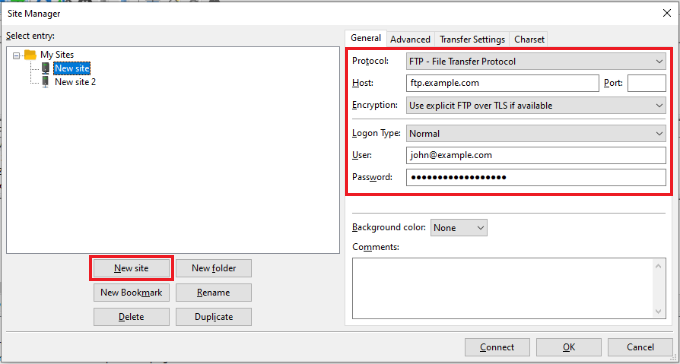
After entering the FTP login details, simply click the ‘Connect’ button.
Once you’re connected, you will see your computer files on the left side under the ‘Local site’ section and your website site files on the right side under the ‘Remote site’ section.

Before uploading your plugins, just ensure that you’ve extracted the plugin files on your machine, as we don’t want to upload the zip folder. That’s because the FTP client doesn’t automatically unzip the plugin files.
Next, navigate to the extracted plugin files on your computer on the left side of the FTP client. On the right side, open the plugin directory by going to /wp-content/plugins.

After that, you’ll need to select the plugin folders you wish to upload to your website. To do that, first press and hold the ‘Ctrl’ or ‘Command’ key and click on the plugin folders.
Next, you can right-click the plugin folders and click Upload.
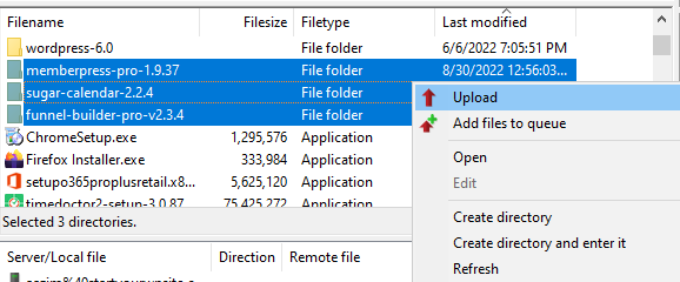
You should now see the plugin folders added to the /wp-content/plugins directory in the FTP client on the right-hand side.
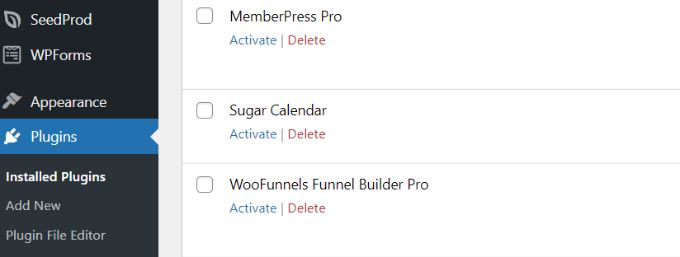
For example, we uploaded the MemberPress, Sugar Calendar, and WooFunnels plugin folders from our own machine. The plugin files can now be seen under the /wp-content/plugins/ directory.

Next, you can head back to your WordPress admin dashboard and go to the Plugins » Installed Plugins page.
You should now see the newly uploaded plugins in the list. Next, just navigate to the uploaded plugins and simply click the ‘Activate’ button.
For more details, you can also see our guide on how to use FTP to upload files to WordPress.
We hope this article helped you learn how to bulk install plugins in WordPress. You may also want to see our guide on how to speed up WordPress and improve your WordPress security.
If you liked this article, then please subscribe to our YouTube Channel for WordPress video tutorials. You can also find us on Twitter and Facebook.


Syed Balkhi says
Hey WPBeginner readers,
Did you know you can win exciting prizes by commenting on WPBeginner?
Every month, our top blog commenters will win HUGE rewards, including premium WordPress plugin licenses and cash prizes.
You can get more details about the contest from here.
Start sharing your thoughts below to stand a chance to win!
Jiří Vaněk says
Thank you for the article. I currently use FTP to automate the installation of plugins, through which I also install WordPress. I have a folder with plugins on my PC as a default list of what should not be missing on the website and I just copy it to wp-content/plugins. The downside is that of course I have to mass activate and update afterwards. But it’s just a few clicks away. Thanks for the plugin recommendation. I assume that once the bulk install of the plugins is done, I can then remove the plugin as I won’t be using it on the site anymore?
WPBeginner Support says
Correct you would be able to remove the plugin afterward if you wanted to
Admin
Akanja says
Nice article
WPBeginner Support says
Thank you
Admin
Juan Furlan says
What a shame. The plugin seems to be abandoned.
Editorial Staff says
We updated the article with a new solution
Admin
Juan Furlan says
Thanks for this article.
I was looking for this solution for a long time.
Julian M. says
I prefer to use the command line and wp tool. For instance:
> wp plugin install akismet –activate
This will install and activate the add-in. Very handy to install plugins in bulk via SSH. You can prepare the list of plugins in a text file and then process all at once.
Kurt says
Unless you are just wanting to let us know that you know of a different way, would you mind giving more details? What is wp tool, and is the command run in root? It would be great to be able to install plugins on all domains on a sever at once.
thanks
Yao Daniel says
Hi bro!
Many thanks for this great idea.
Is it possible to bulk install premium plugins as well?
If yes, how can I get it.
Thanks again and stay blessed.
Editorial Staff says
Yes with the new plugin that we mentioned above, it lets you install premium and custom plugins
Admin
Hardeep Asrani says
That’s be a great idea for client websites.
Hardeep Asrani says
There should be an option to edit comments within 5 minutes, lol.
** That would be
Barbara says
I’ve been using Plugin Central to do this for a few years. It doesn’t have the option to save a profile like this plugin does, but I just keep a list of my favorites in a text document and copy the list whenever I do an install. It does, however, have the option to activate all the plugins after installation.
* And, yes, Floating Social Bar is on my list of favorite plugins to install!
Naser says
Thank you so much for the alternative Barbara. The Bulk Install Profiles plugin was giving me a hard time now and then. Plugin Central works like a charm.
Zimbrul says
That’s brilliant! I can say I’ve got core plugins I install on every site such as Yoast’s WordPress SEO or SEO Images, database management plugins, sitemap plugin, etc.
I think this WP Install Profiles plugin comes handy.
Nuno says
Hello!
Great post and very helpful.
Could one desable the plugin after install the plugins?
Thanks!
Regards,
Nuno
WPBeginner Support says
Nuno, this plugin will only help you install the plugins, it will not auto activate them. You will have to go to Plugins screen and check all plugins and then use Activate from Bulk Actions and apply. To disable plugins you can deactivate them one by one, or bulk deactivate them.
Admin