Are you wondering how to add social media icons to your WordPress sidebar?
Adding social icons to your website is an easy way to let your audience know about your social media presence. That way, they can easily visit your social profiles and follow you online.
In this article, we will show you how to add social media icons to your WordPress sidebar.
Why Add Social Media Icons to Your WordPress Sidebar?
A WordPress sidebar is an area on your website that is not a part of your main content. It’s where you can display additional information that readers may be interested in, such as your most recent blog posts and links to your social profiles.
Adding social links to your WordPress sidebar is a good idea because it tells users about your social media accounts. As a result, they can check them out, follow you, and help you grow your social media following.
What’s more, displaying your social media accounts can build a sense of credibility and serve as social proof. When visitors see that you have an active social media presence, this shows that your business is responsive and trustworthy.
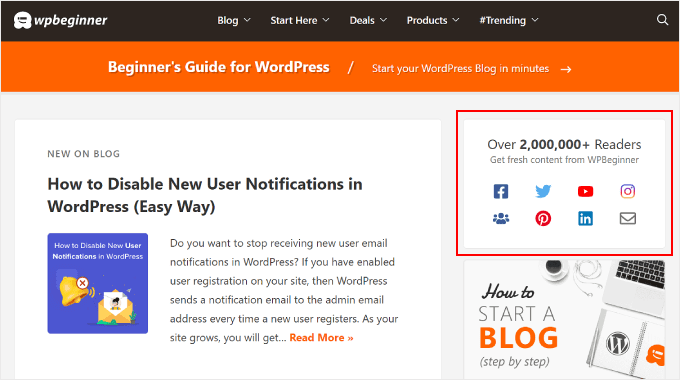
Many popular WordPress blogs display social media icons in their sidebars, like WPBeginner:
Note: Social media icons are different from social share buttons on WordPress posts. If you are looking to add share buttons, then you can see our beginner’s guide on how to add social sharing icons in WordPress.
With that being said, let’s take a look at how to add social media follow icons to your WordPress sidebar. The method you should use depends on the WordPress theme and editor you are using. If you want to skip to a certain section, then you can use these quick links:
Method 1: Adding Social Icons With Full Site Editor (Block Themes)
If you are a block theme user, then you can add social media buttons to your WordPress sidebar using the Social Icons block.
Note that the process varies by the theme you use. Some block themes may include a sidebar by default, which you can then add the Social Icons block to. Some might also have a header pattern that functions like a sidebar, and some may not have a sidebar at all.
In this example, we will use a default WordPress block theme and show you how to create a sidebar for all your pages or posts where you can add the Social Icons block.
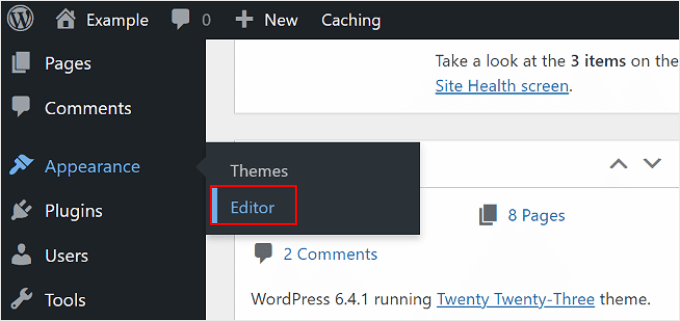
First, go to Appearance » Editor in your WordPress admin panel.
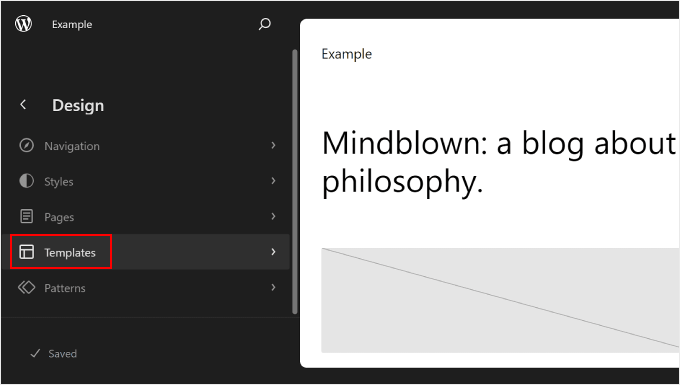
Next, you need to select ‘Templates.’
This will bring you to a page where you can edit the template of your pages and posts.
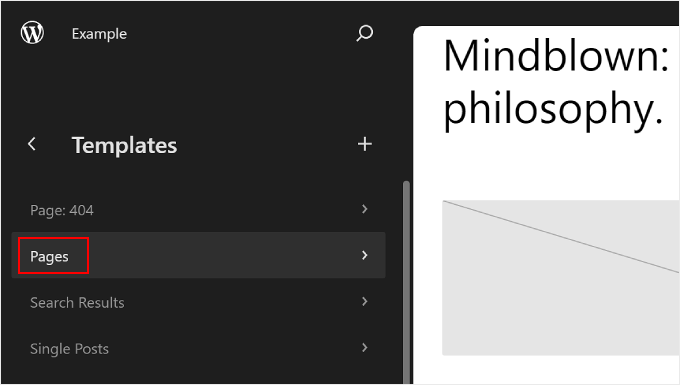
Here, you can choose one of the page templates. It may be either ‘Pages’ or ‘Single Posts,’ depending on where you want the sidebar to be.
If you want the sidebar to show on both your static pages and posts, then you can edit both of them later. You can also customize the homepage template in case you need the sidebar to appear there, too.
In this case, we will select ‘Pages.’
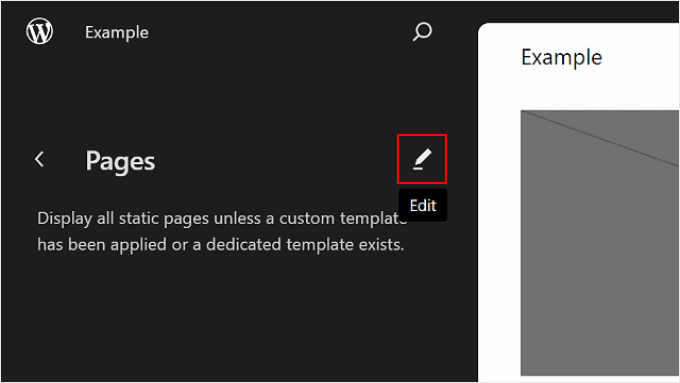
After that, click the pencil button in the left panel next to the three-dot button.
This will open up the WordPress editor.
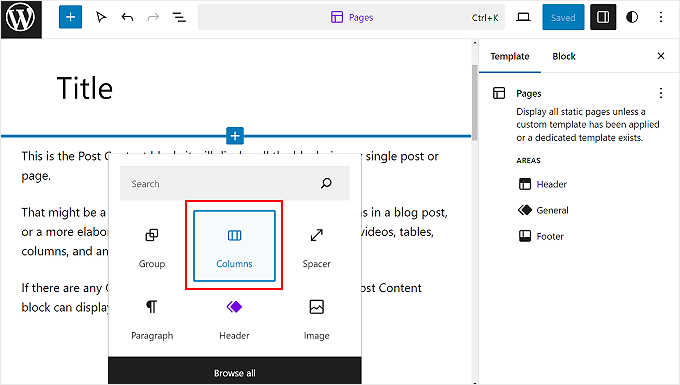
As you can see, the default theme doesn’t have a sidebar in the Pages template yet, so we need to create one for it.
To do this, you can hover over where you want to add the sidebar and click the add block ‘+’ button when it appears. Then, find and select ‘Columns.’
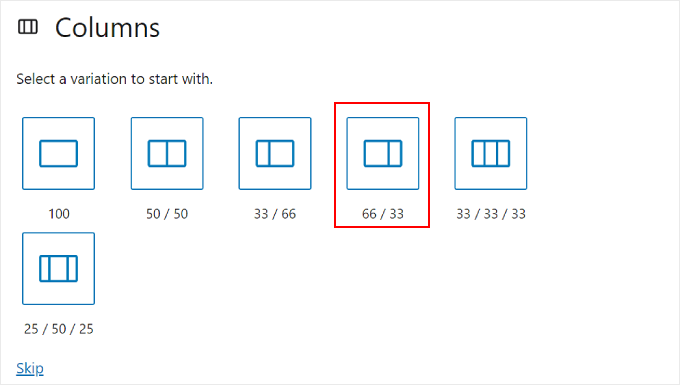
There will be some variations to choose from.
In this example, we will use the ‘66 / 33’ option to imitate the standard look of a right sidebar.
Once done, you can drag and drop the Post Content block to the left of the Columns block.
Your Pages template should look something like the image below, with the right column empty.
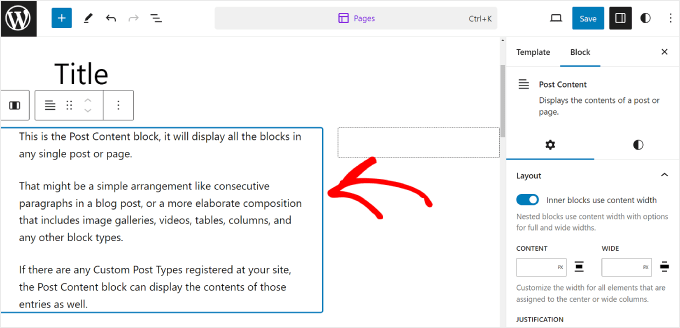
Now, click on the right column and select the add block ‘+’ button.
Then, search for the Social Icons block.
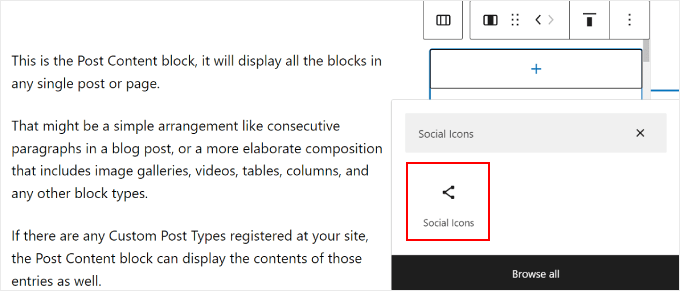
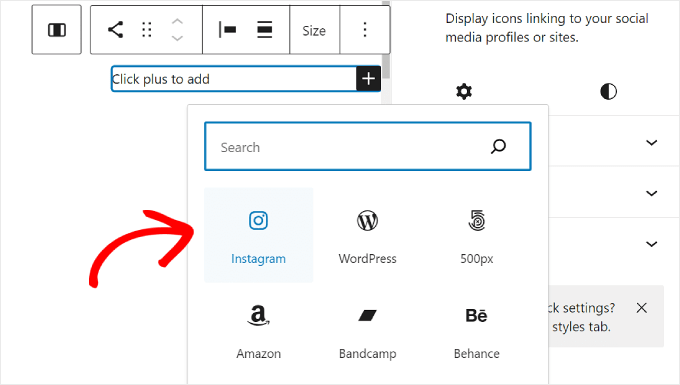
You can now start adding your social media platforms to the block. Simply click the ‘+’ button again and add your social media buttons one by one.
Feel free to use the search feature to browse all of the social network options.
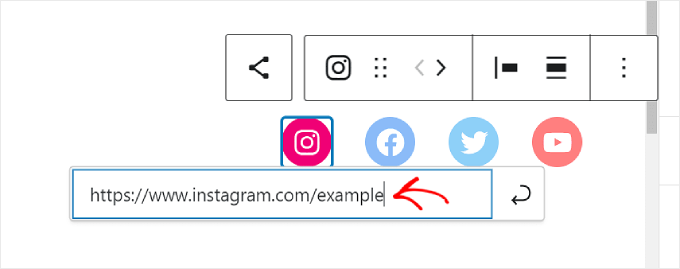
Once you’ve added all of the buttons, you can start adding links to your social profiles.
All you need to do is click on a social icon and enter your profile URL.
At this stage, you can customize how the icons look.
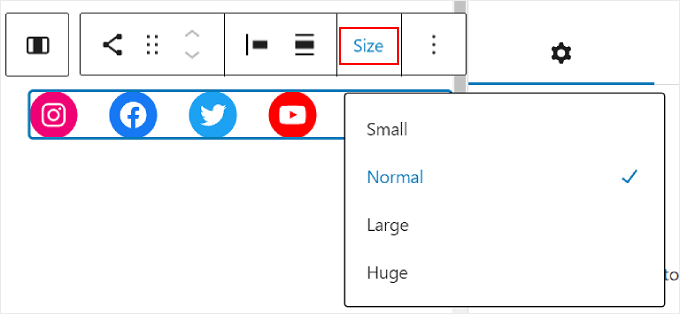
If the size of the buttons isn’t big or small enough, then you can use the ‘Size’ option in the block toolbar.
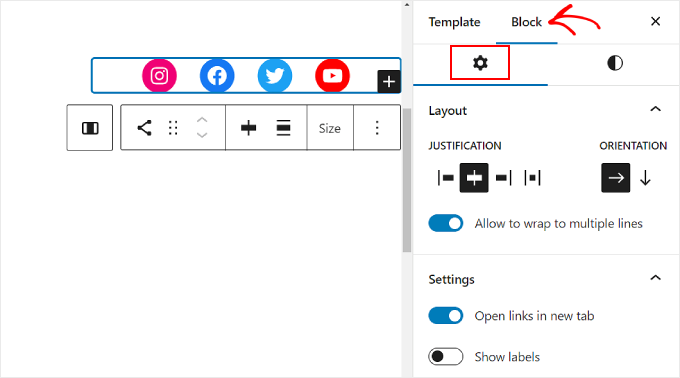
In the Block Settings on the left, you can customize the icons’ justification, orientation, link settings, and labels.
We recommend making the links open in a new tab so that users won’t need to leave your website to visit your social profiles.
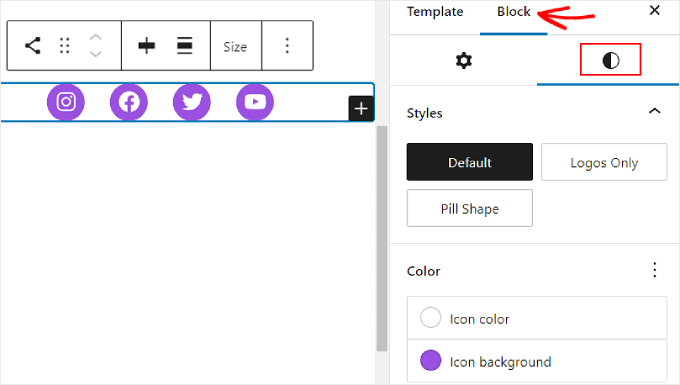
If you switch to the Block Styles tab, then you can change the icons’ styles and colors to suit your WordPress website design.
Depending on your preference, you can make all the icons have different colors or the same one, like below.
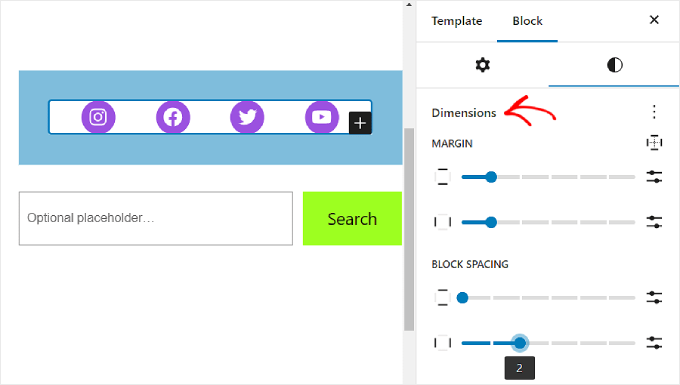
Scrolling down the same tab, you’ll find the Dimensions settings to customize the block margin and spacing.
These settings can be helpful if you want to adjust the spacing between the Social Icons block and other blocks in the sidebar.
It’s also a good idea to add a call-to-action text on top of the Social Icons block to highlight where the buttons are and draw website visitors’ attention.
To do this, go ahead and add a Paragraph block using the ‘+’ button. Make sure it’s above the social icons.
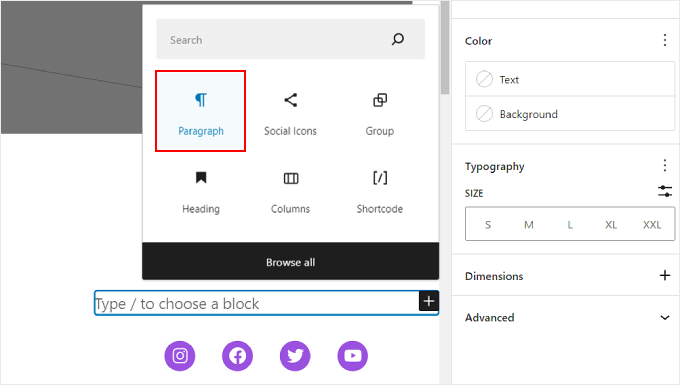
Some call-to-action examples you might use are ‘Follow Us, ‘Join Over X Readers,’ or ‘Get the Latest Updates.’
If you haven’t already, then you can also add more elements to the sidebar, like your featured posts and recent comments.
Now, simply click the ‘Save’ button in the top right corner of the page.
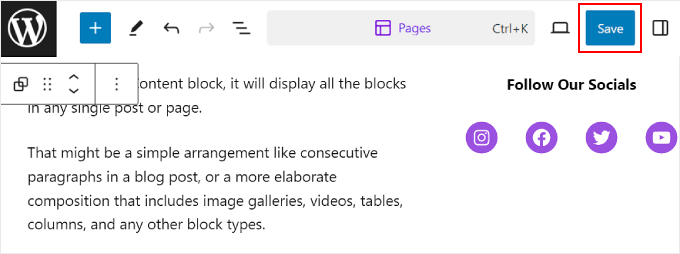
And that’s it!
When you go to your WordPress website, you should now see a sidebar with some social links.
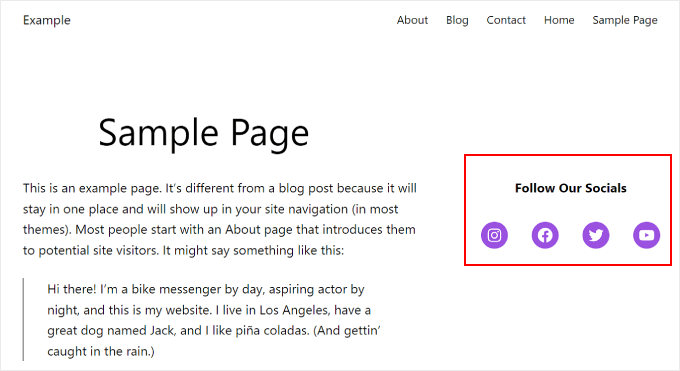
If you want to create unique sidebars for different pages or posts, all of which include a Social Icons block, then we recommend creating a WordPress pattern or reusable block for your sidebar.
To learn more, you can check out our beginner’s guides on how to use WordPress block patterns and how to add reusable blocks.
Method 2: Adding Social Media Icons With WordPress Widgets (Classic Themes)
This next method is for people using a classic WordPress theme with widget-ready sidebar areas.
To add social media buttons to your sidebar, simply head to Appearance » Widgets from your WordPress dashboard.
Then, navigate to the WordPress widget area where you want to add the Social Icons widget. In our example, we will select ‘Sidebar,’ but the name may be different depending on the theme you are using.
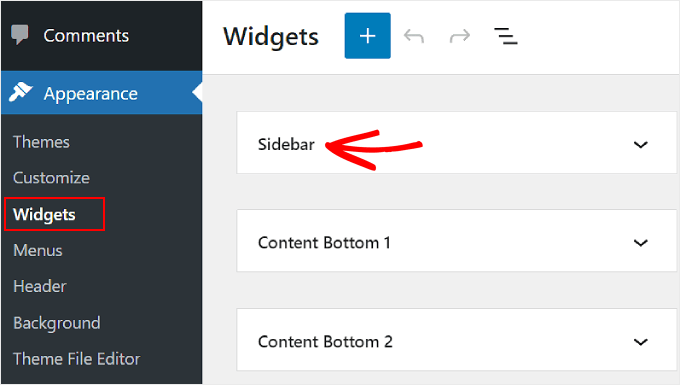
Now, click the add block ‘+’ button at the top left, next to ‘Widgets.’
Here, you can look for the Social Icons block.
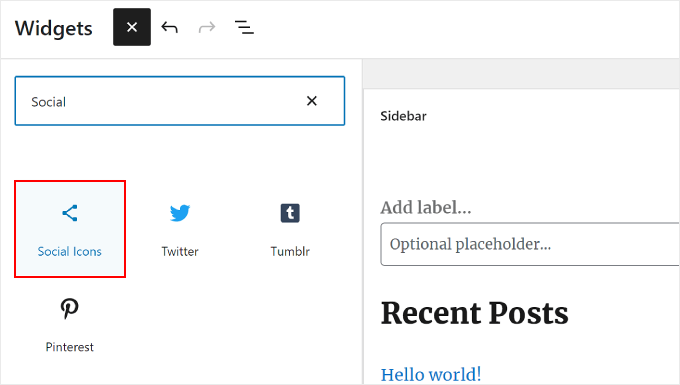
After that, you need to click on this sidebar widget or drag and drop it anywhere in the editing area.
In general, it’s best to add your social network icons close to the top of the widget area. This way, they can catch your visitors’ attention right from the moment they land on the page.
Then, similar to the previous method, you can click the ‘+’ button to add new social media buttons one by one to the widget.
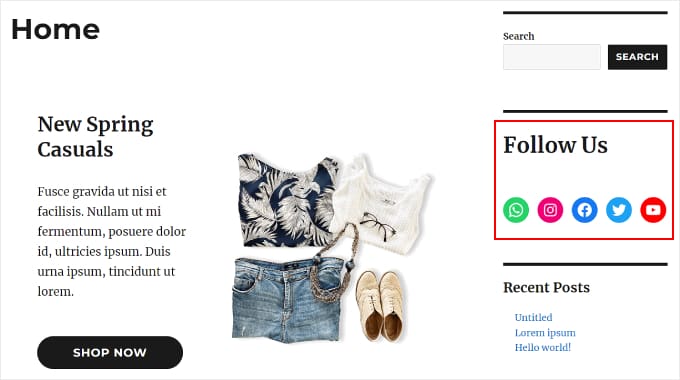
In the example below, we have placed the Social Icons block below the Search block. We are also adding a WhatsApp icon.
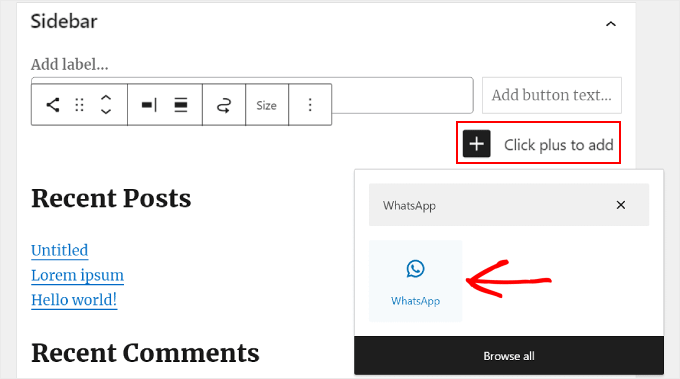
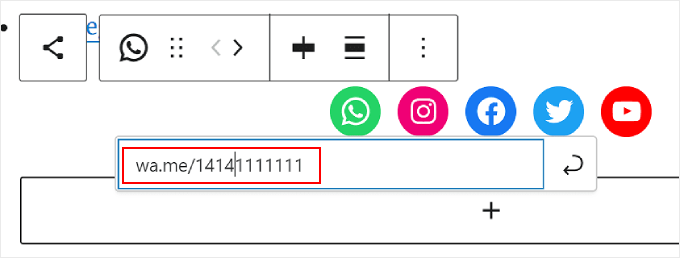
At this point, you can start adding your social links.
For WhatsApp, you can type ‘wa.me/’ and write your WhatsApp number next to it. There is no need to use the + symbol, but make sure to add your country calling code, like in this screenshot.
You also have access to the Block Settings and Styles options in the right panel.
To open these options, you can click the ‘Settings’ icon in the top right corner.

Additionally, feel free to add a Paragraph block on top of the social media widget for your call-to-action text.
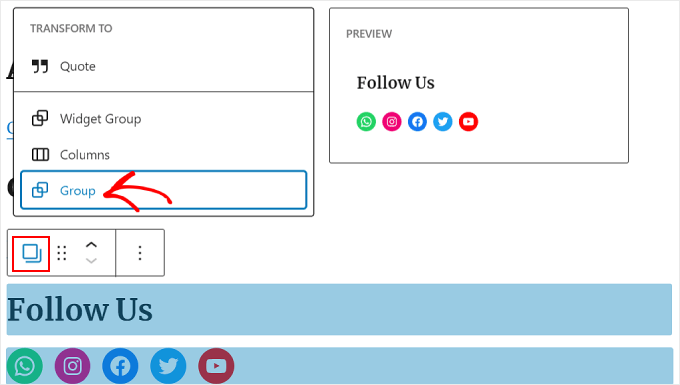
We recommend making the Paragraph and Social Icons blocks a Group so that they don’t look separated in the sidebar.
To do this, just select the Paragraph and Social Icons together. After that, click the ‘Transform’ icon in the block toolbar and select ‘Group.’
Once finished, go ahead and click the ‘Update’ button to make the changes official on all of your sidebars.
Here’s what the end result should look like:
Method 3: Adding Custom Social Media Icons With SeedProd (Custom Themes)
If you use SeedProd, then you will have more control over how your social media buttons look in your sidebar. For example, if you use a social media platform that WordPress doesn’t have an icon for, then you can create a button for it yourself.
Additionally, you can adjust the icon spacing specifically for mobile devices.
If you are new to SeedProd and want to use it, then you need to install and activate the plugin first. You will need the Pro version to be able to access the Social Profiles feature.
For more information on how to install a plugin, check out our guide on how to install a WordPress plugin.
Then, you can follow this tutorial to set up your theme with SeedProd.
Now, to add the social icons to the sidebar, you will need to go to SeedProd » Theme Builder. Then, hover over the ‘Sidebar’ template and click ‘Edit Design.’
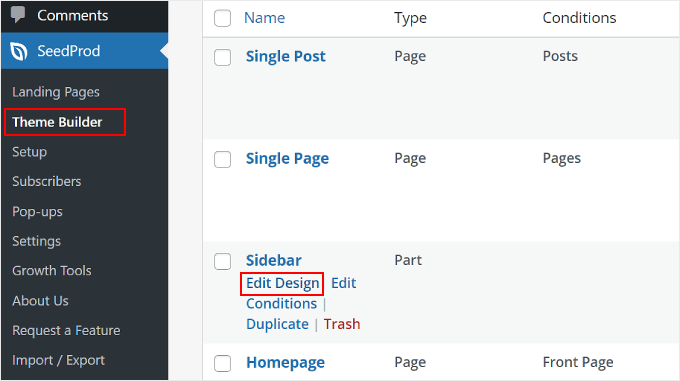
You are now inside the SeedProd page builder. The Social Profiles block should have been added by default to the theme template.
If it hasn’t, however, you can use the search bar in the left panel and type in ‘Social Profiles.’ After that, simply drag and drop the block to wherever is suitable for you.

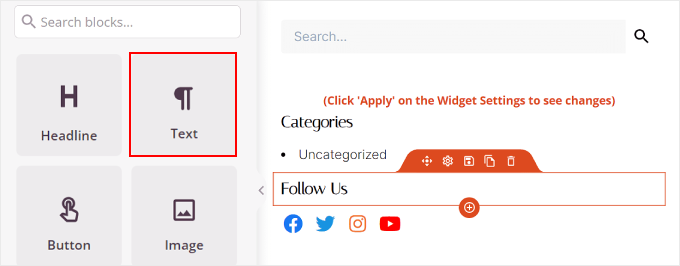
Don’t forget to add a Text block on top of the buttons and write some call-to-action text.
This way, you are directing visitors’ attention to the social media buttons in the sidebar.
To customize how the social media profile icons look, just click on the ‘Social Profiles’ element. Here, you will see different tabs to customize the buttons.
In the ‘Content’ tab, you can add more icons and change the icon style, icon size, and alignment.
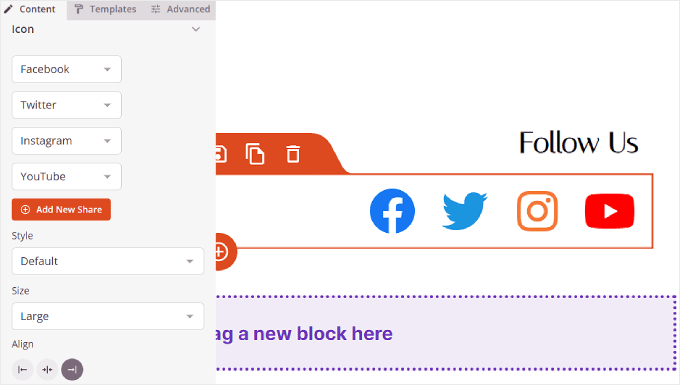
Besides the standard options like Instagram and Facebook, SeedProd also has buttons for Slack, Telegram, Github, and more.
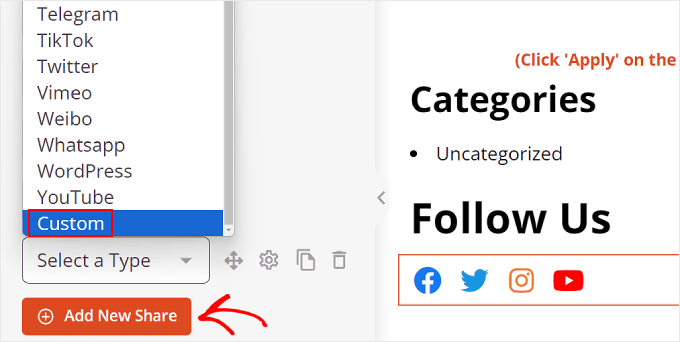
To add a new social media icon that SeedProd doesn’t have by default, you need to click the ‘+ Add New Share’ button.
After that, select ‘Custom’ from the dropdown menu.
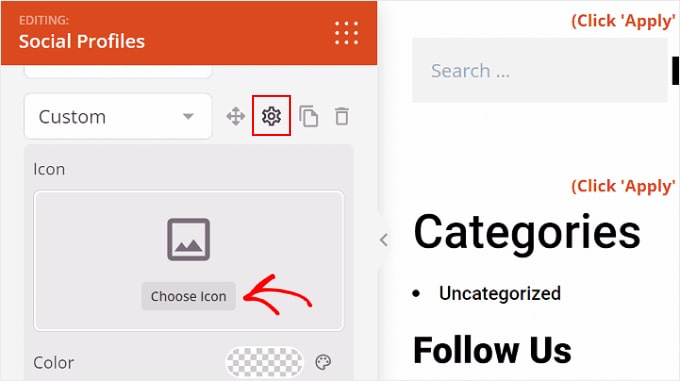
To edit the button, go ahead and click the gear settings symbol next to the arrow button.
Once you’ve done that, just select ‘Choose Icon.’
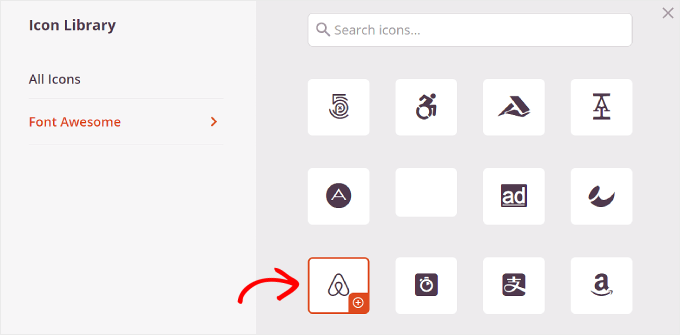
Now, you will be redirected to the Icon Library, where there are hundreds of brand icons to choose from, courtesy of Font Awesome icons.
In this example, we will use Airbnb.
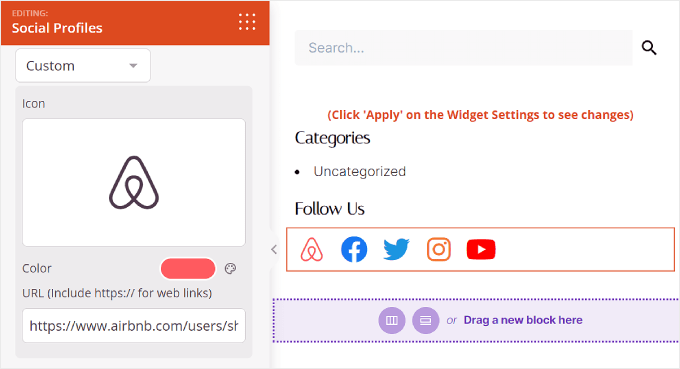
Once you have selected an icon, you can adjust the color and add the link to the social media page.
Here, we’ve decided to stick with Airbnb’s brand color. When inserting the social account link, make sure to include the ‘https://’ as well.
Next is the ‘Templates’ tab.
If you switch to this tab, you can adjust the design of the icon. You can make it more square, circular, and/or monochromatic, depending on your preferences.
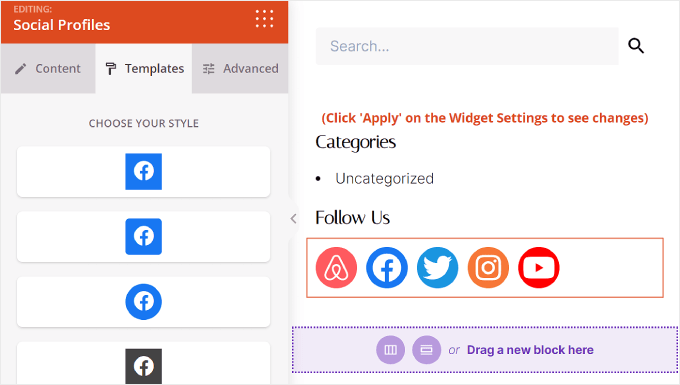
Lastly, the ‘Advanced’ tab offers more ways to customize your social media buttons.
The Styles section is where you can change the icons’ style, color, size, space in between, and shadow effect.
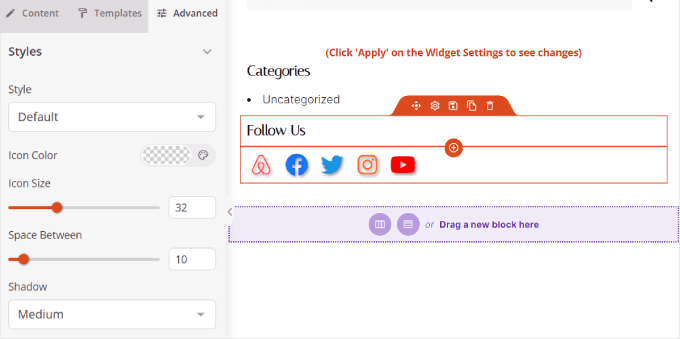
In Spacing, you can edit the block’s margin and padding. What’s great about SeedProd is it allows you to make the margin and padding different for desktop and mobile devices.
To edit the margin and padding, just choose one of the device icons and insert your margin and padding measurements like so:

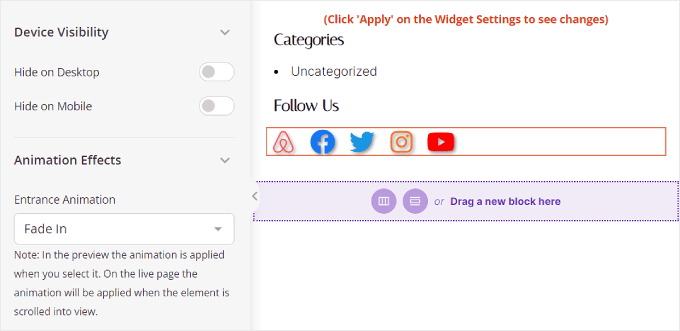
Scrolling down, you will find Device Visibility and Animation Effects.
In the first setting, you can opt to hide the block on desktop or mobile. This may be necessary if you have chosen to use the Social Profiles block in another part of your website and don’t want duplicate social profile icons.
With Animation Effects, you can select an animation style for the block when the icons are loaded on the web page. This effect is not necessary if you don’t want to distract the visitor too much from the main content.
Once you have configured the Social Profiles block to your liking, simply click the ‘Save’ button in the top right corner.
Or, click the ‘Preview’ button to see how the sidebar looks first.
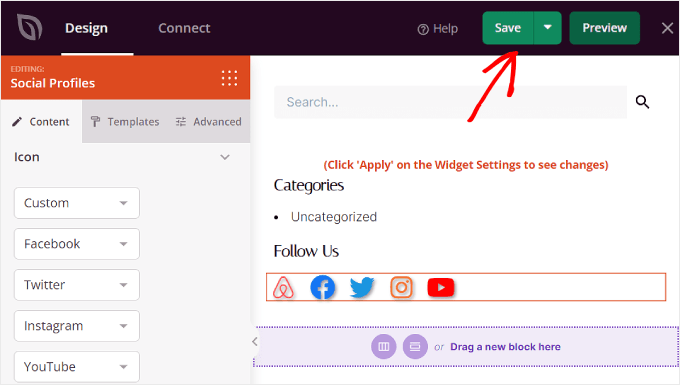
And that’s it! You have successfully added the social profiles block using SeedProd.
Here’s what the end result may look like:
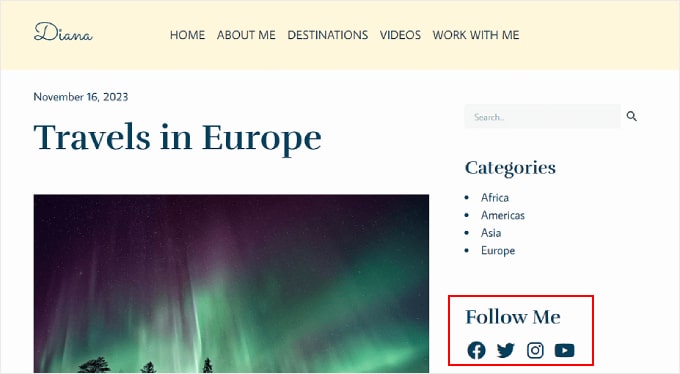
We hope this step-by-step guide has helped you learn how to add social media icons to your WordPress sidebar. You may also want to check out how to display different sidebars for each post and page in WordPress and our list of the must-have WordPress plugins for business sites.
If you liked this article, then please subscribe to our YouTube Channel for WordPress video tutorials. You can also find us on Twitter and Facebook.


Syed Balkhi says
Hey WPBeginner readers,
Did you know you can win exciting prizes by commenting on WPBeginner?
Every month, our top blog commenters will win HUGE rewards, including premium WordPress plugin licenses and cash prizes.
You can get more details about the contest from here.
Start sharing your thoughts below to stand a chance to win!
THANKGOD JONATHAN says
Can I also use this WordPress Editor with Free themes? As they come with limited customizations for free users.
WPBeginner Support says
It depends on the specific theme for what editor it has available.
Admin
Moinuddin Waheed says
I have used social sharing plugin for adding social media link to my blog posts and pages.
At times it becomes necessity to have one. This leads to increased traffic to our blog posts and lets the user to share with different platforms.
This is something that every blog or businesses would need to have.
Seedprod has very easy and smooth way to have social plugins to our blogs and sidebar widgets.
Thanks wpbeginner for this guide.
WPBeginner Support says
You’re welcome, glad you found our guide and SeedProd helpful
Admin
Jiří Vaněk says
This was one of the first things I dealt with on the side panel: the availability of social media. I had links to social networks set up this way for quite a while. However, I found it graphically more appealing to use a floating bar on the other side. So, on the right, I had the classic right menu, and on the left side, which was unnecessarily empty (on the blog), I ended up using a plugin. There, I have floating bars with links to social networks, email, and a popup comment.
Ahmed Omar says
it looks a long process that needs attention
Although I have my social media pages, but I did not add any icons on my site before.
I will give it a try today as it worth the work, and with your detailed step by step explanation, it would be easy
WPBeginner Support says
We hope our guide simplifies the process for you
Admin
Ralph says
I always like to read your tutorial guys. Straight to the point and multiple options. Having ability to customize icons is very nice and I will definitely use it to make my site looks better and more professional.
WPBeginner Support says
Happy to hear you enjoy our content
Admin
koor united says
this was very helpfull
WPBeginner Support says
Glad our article was helpful
Admin
The Venetian Box says
I ABSOLTELY love your videos, I am learning SO much and it´s SO straight forward! Thank you!
WPBeginner Support says
Thank you, glad you like our videos
Admin
PAMELA says
coding is one of my weakness and this is a great plugin for me Thank you
WPBeginner Support says
Glad we could let you know about the plugin
Admin
Karen Footloose says
This worked like a charm. Until–don’t laugh–I realized I had beautiful FOLLOW buttons while I was looking for SHARING buttons. How do I get those just as simple and customizable to go in a widget in the sidebar. I’ve looked, but haven’t found simple ones.
Mathukutty P.V. says
What is difference between jetpack social media icon and wp social media profile? jetpack have youtube provision wherea wp social media profile do not have youtube.
Kunj Bihari says
Nice post thank you for sharing this article
Patrick Tuthill says
Added a few social widgets to my current theme and it’s both do not render correctly? I am using the theme “Nisarg” which is a basic free blog theme, adn I have heard these plugins adapt differently to various themes. It’s frustrating when these widgets are for ease of use but they haven’t saved me any time. Any feedback from anyone would help. I do plan to upgrade to Genesis framework, not sure if that matters.
tess says
thank you this was very helpful. keep up the good work
sneakers3205 says
Great and easy instructions. Thank you.
Ru says
perfect. just what i needed. thanks.
Lora says
The icons are not appearing in the boxes when I installed this plugin. I just see tiny letters and numbers inside the squares. Help?
WPBeginner Support says
This seems like a theme related issue, sorry we can’t help you much in this regard.
Admin
Amol Ghuge says
This is great. Love to have the these options in one place. Very helpful!
Maggie says
Thank you for the article.
I am a new blogger and I have been using your website since the beginning.
I have to admit, if there’s any problem I come across or I need some help, I could find the answer here.
Good job!
Editorial Staff says
Thanks for the kind words Maggie. Glad we are able to help
Admin
Lindsay says
Thank you for this advice, but how do you get it to show the Facebook, LInkedIn, Twitter icons??? All I have is grey…….
Thank you!!
Ahmed says
You are Awsome dude….
Helpful Article… thanks
Andre Costa says
Beautiful! Thank you.
jerralyn says
Nice post, thank you for sharing this useful tutorial on how to add social media on WordPress side bar. Can I use DigDig plug-in instead of Simple Social Icons plugin?
Ankit says
Great piece of information for beginners. A good read.
Adam says
Thanks so much.
Shahnawaz says
Dear Syed Balkhi, Sir I would like to thanks you very much and you are my best and favorite personality in WordPress world. Dear sir I will pray for you that always you will write for us. I am using your this plugin and I am daily visit you site and got updates and I will try these updates on my blog. Thanks
Keith Davis says
Great plugin – use it on all my sites.
Another winner from Genesis.