Are you looking for the easiest way to fix the ‘this site can’t be reached’ error in WordPress?
This error can stop you from accessing your own site, which makes it impossible to test your WordPress blog. It can also make the WordPress dashboard inaccessible, so you can’t install any updates, publish new content, or perform other important admin tasks.
In this article, we will show you how to easily fix the ‘this site can’t be reached’ error.
What Is the ‘This Site Can’t Be Reached’ Error in WordPress?
There are lots of common WordPress errors, but ‘this site can’t be reached’ is especially frustrating because the message is vague, and it doesn’t tell you what to do next.
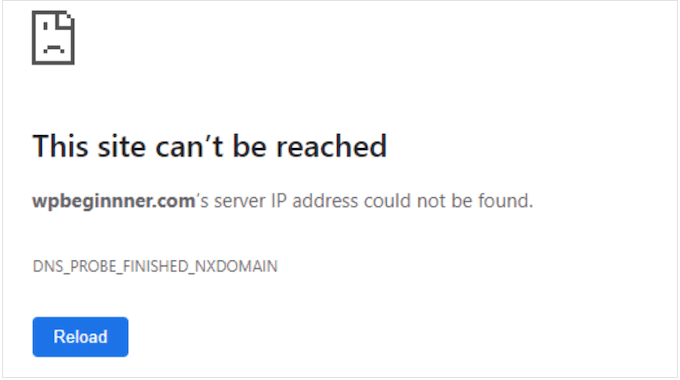
In the worst-case scenario, this error can make your website completely inaccessible. That will make it difficult to test your WordPress site, add new content, install security updates, and make other important changes.
Usually, the error means that something is stopping the browser from accessing the destination website. This can be anything from a poor internet connection to a network that’s set up incorrectly, or even an issue with your DNS settings.
In this guide, we’ll take a closer look at how to troubleshoot this WordPress error and solve the ‘this site can’t be reached’ issue.
This is a serious error, so you’ll want to solve it as quickly as possible. If you’re unsure what’s causing the issue, then we recommend starting with step one since it’s the easiest, and working your way through our guide.
Alternatively, you can use the links below to jump straight to the method you want to use.
1. Check Your Internet Connection
When troubleshooting an error, it’s smart to try the simplest fix first, so check that you’re currently connected to the internet.
If there is no obvious problem with the connection, then you can try restarting your internet connection. Similar to switching a computer off and on, this can often fix all kinds of small problems and get you back on track.
For the best results, we recommend disconnecting your router from its power supply and then waiting at least 1 minute before reconnecting it.
2. Clear the Browser Cache
Downloading files from a WordPress hosting server can take a long time.
To solve this problem, most modern web browsers store files, data, and other content from the websites you visit. The browser can then load this cached content from the local computer rather than re-downloading it from a remote server.
This helps websites to load faster, but it can sometimes cause problems. For example, cached content can become outdated or corrupted over time.
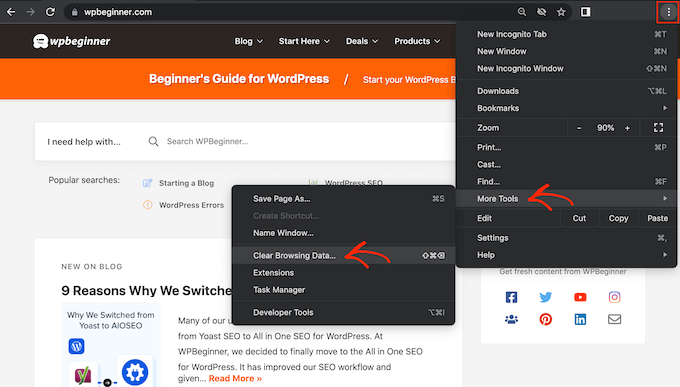
Thankfully, it’s easy to clear the browser cache. If you’re using Google Chrome, then simply click on the three-dotted icon in the upper-right corner.
Then, select ‘More Tools,’ followed by ‘Clear Browsing Data….’
In the popup that appears, check the box next to ‘Cached images and files.’
Google Chrome will clear the entire cache by default.
With that in mind, you may want to open the ‘Time Range’ dropdown and tell Chrome to only clear content that was cached during a particular time period.
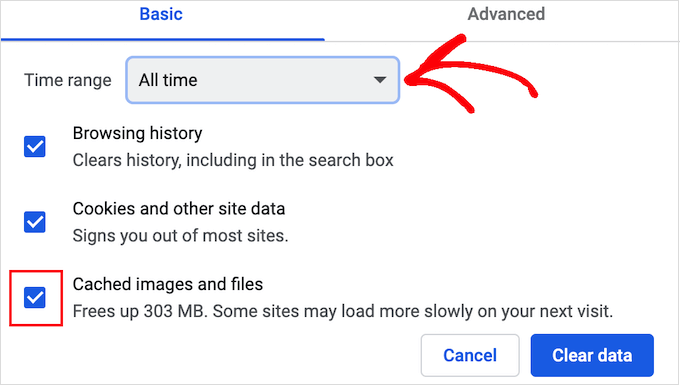
You may also want to check or uncheck some of the other options.
For example, the ‘Browsing History’ checkbox is selected by default, but you can uncheck this box if you want to keep your browsing history.
When you’re ready, click on ‘Clear data.’
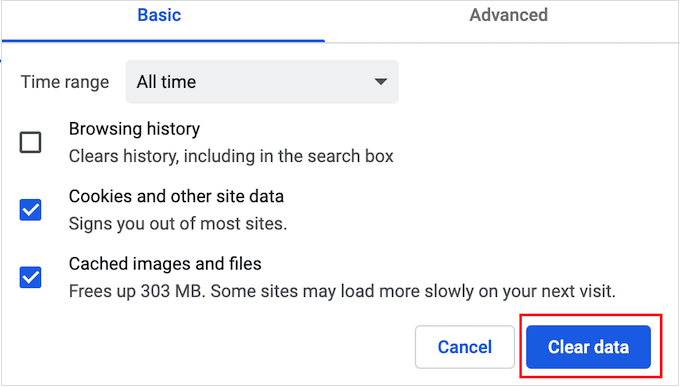
Google Chrome will now empty the browser cache. Once it’s finished, try revisiting the website to see whether you’re still getting the ‘this site can’t be reached’ error.
If you’re using a different browser, then please see our beginner’s guide on how to clear the browser cache in any browser.
3. Disable Your Firewall or Antivirus Software
Antivirus and firewall plugins can keep you safe, but they can also block websites that are perfectly trustworthy.
This often happens when your security plugins and software are too strict or the website is set up in a way that triggers your security settings.
For example, if you’re still building your WordPress website, then you might not have an SSL certificate yet. Many firewalls will stop you from visiting a site that doesn’t have a valid certificate, so this may be causing the error.
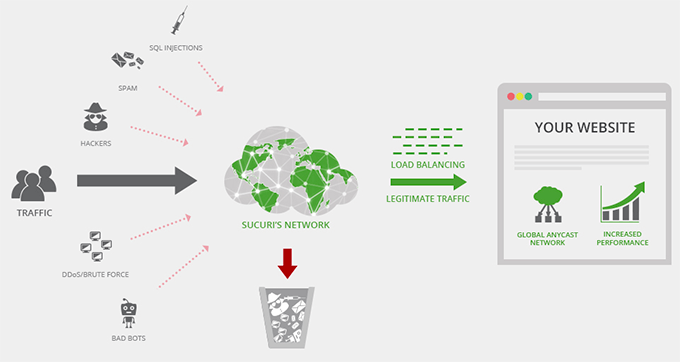
To test whether a firewall or antivirus program is blocking the connection, simply disable that software. If the website now loads without a problem, then you’ll know that the antivirus program or firewall was to blame.
If this is the case, then we don’t recommend disabling your security software completely.
Instead, it’s smart to check the software’s settings to see whether you can whitelist a particular website. In this way, you can remove the error while continuing to protect yourself against hackers, viruses, and other digital threats.
If you’re not sure where to find these settings, then try checking the software’s official documentation, forums, or social media pages for more information. Depending on your software license, you may also be able to contact customer support or the developer for help.
For more on this topic, please see our guide on how to properly ask for support and get it.
For more tips on protecting yourself against hackers without triggering the ‘this site can’t be reached’ error, please see our ultimate WordPress security guide.
4. Reset Your Virtual Private Network
A Virtual Private Network (VPN) can protect your privacy, keep your information secure, and allow you to visit sites that are blocked or censored in your location.
However, if you’re using a VPN, then your connection may drop, or the VPN may not recognize the IP address that you’re using. Some VPNs will reconnect automatically if they encounter a problem, but sometimes, you may have to reconnect manually.
If you get the ‘site can’t be reached’ error when using a VPN, then we recommend checking your provider’s website or documentation for instructions on how to reset your VPN.
5. Disable Your Proxy Server
A proxy server sits between you and the websites you’re trying to visit. Many people use these ‘middle-man’ servers as an extra layer of security or to cache data.
If your proxy server can’t connect to a website, then you’ll see the ‘site can’t be reached’ error. You may also get this error if you can’t connect to the proxy server in the first place.
In this case, you can simply disable the proxy server. If you’re on a Mac, then go ahead and click the ‘Apple’ icon in the toolbar.
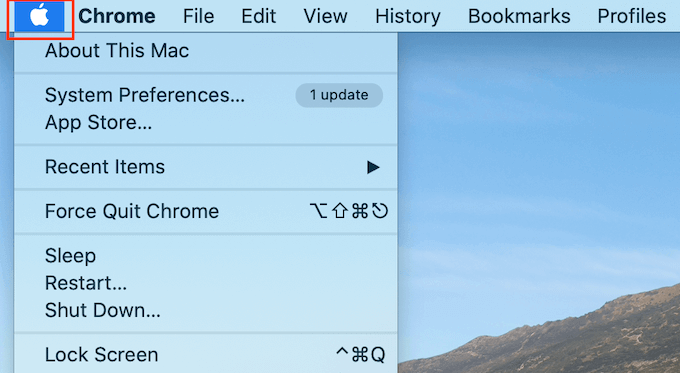
Then, select ‘System Preferences…’
In the popup that appears, click on ‘Network.’
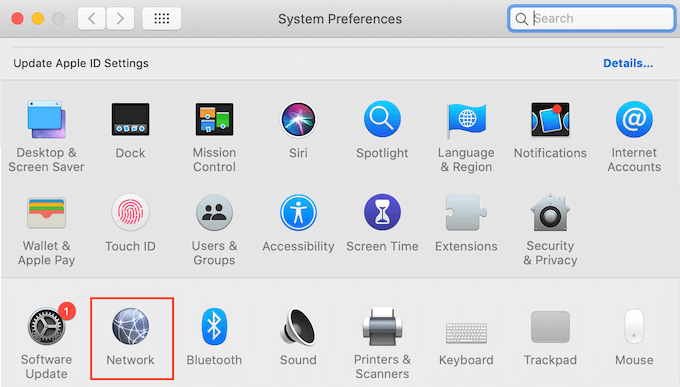
In the left-hand menu, select the network where you want to disable the proxy settings.
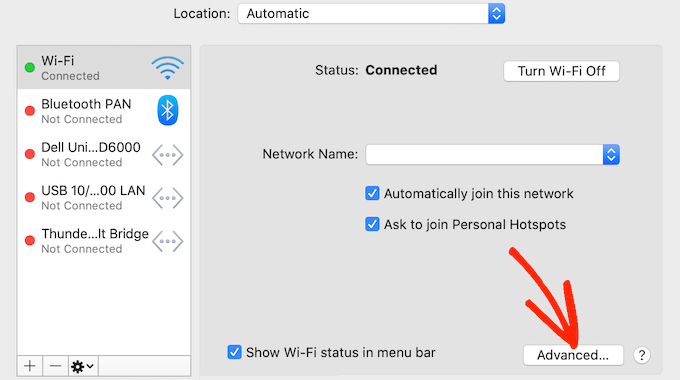
Once you’ve done that, click on the ‘Advanced…’ button.
In the popup, simply select the ‘Proxies’ tab.
You can now uncheck all the protocols listed under ‘Select a protocol to configure.’
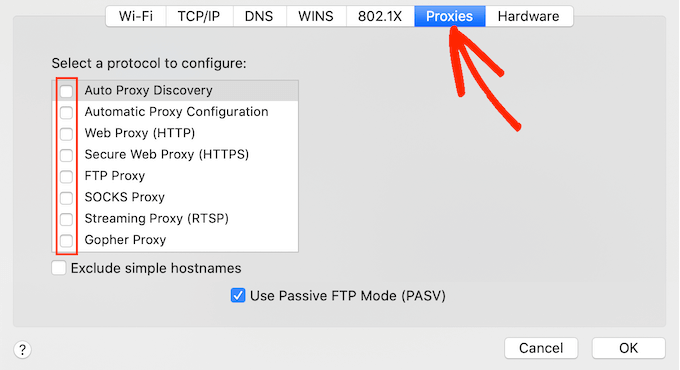
Finally, click on the ‘OK’ button to save your changes. You can now try visiting the website to see whether you’re still getting the error.
6. Flush Your DNS cache
Similar to the browser cache, your computer stores the IP addresses of all the websites you visit. This helps websites to load faster since the browser doesn’t have to look up the same IP address multiple times.
However, the cached DNS information can get outdated. This may trigger a ‘site can’t be reached’ error, particularly if the site has moved to a new domain name or you’ve moved WordPress to a new host.
By flushing your DNS cache, you’ll get the very latest information about a website, including its new domain name or address.
To help you out, we’ve created a complete guide on how to clear your DNS cache for Mac, Windows, and Google Chrome.
7. Change Your DNS Server
DNS is like the internet’s phone book. Instead of listing people’s names and phone numbers, the DNS lists domain names and their corresponding IP addresses.
Your internet service provider assigns you a DNS server automatically. However, sometimes, this server may be unavailable, or it might have the wrong information.
If your browser doesn’t have a site’s correct address, then you’ll get a ‘this site can’t be reached’ error.
You can solve this problem by switching to a different public DNS server, such as Google Public DNS. You can use any public server you want, but just be aware that the DNS provider can see all the websites you visit.
Many providers also collect personal information, such as your business email address, name, and phone number.
With that being said, it’s smart to research your DNS provider carefully.
Once you’ve found a DNS server that you want to use, it’s time to switch to that server. On Mac, this means selecting the ‘Apple’ icon in the toolbar and then clicking on the ‘System Preferences…’ option.
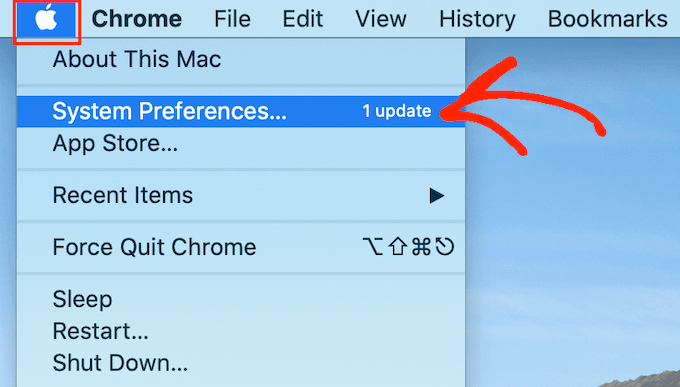
In the popup that appears, select ‘Network’ and then click on the ‘Advanced…’ button.
Once you’ve done that, open the ‘DNS’ tab.
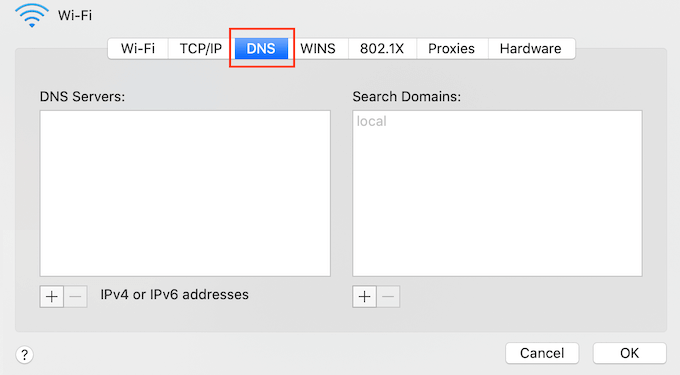
In the bottom-left corner, click on the ‘+’ button.
This adds a new DNS server with the address 0.0.0.0.
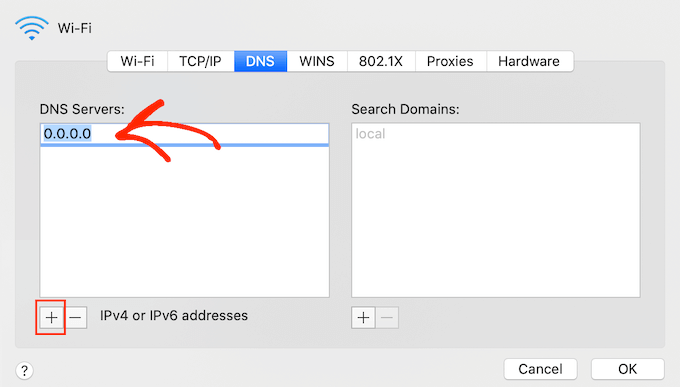
You can now go ahead and type in the numbers for the public server that you want to use.
After that, simply click on the ‘OK’ button to save your changes.
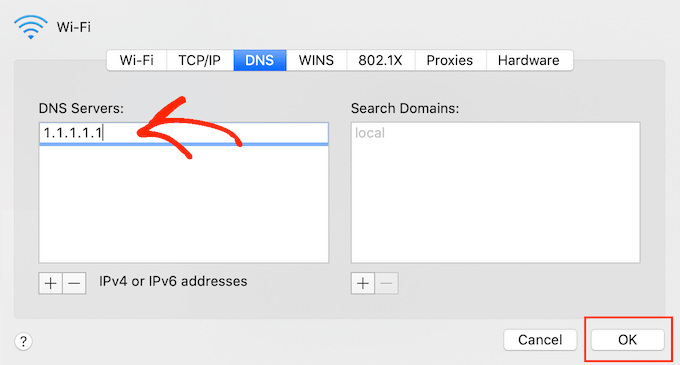
This takes you back to the previous popup.
To start using your new DNS server, click on the ‘Apply’ button.
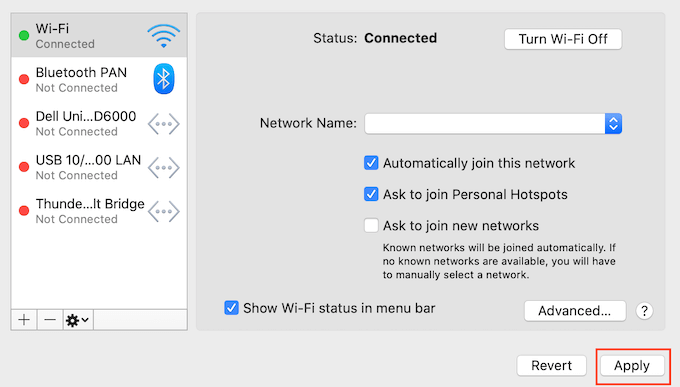
Finally, you’re ready to visit the website to see whether this has removed the error message.
8. Reset the TCP/IP Settings
Transmission Control Protocol/Internet Protocol (TCP/IP) is a set of protocols that control how data is sent and received over the internet.
If there’s a problem with how your internet connection is configured, then renewing your TCP and IP protocol will return the connection to its default settings, which may solve the problem.
To reset the TCP/IP settings on Mac, select the ‘Apple’ icon in the toolbar and then click on ‘System Preferences…’
In the popup that appears, select ‘Network’ and then click on the ‘Advanced…’ button. Once you’ve done that, open the ‘TCP/IP’ tab.
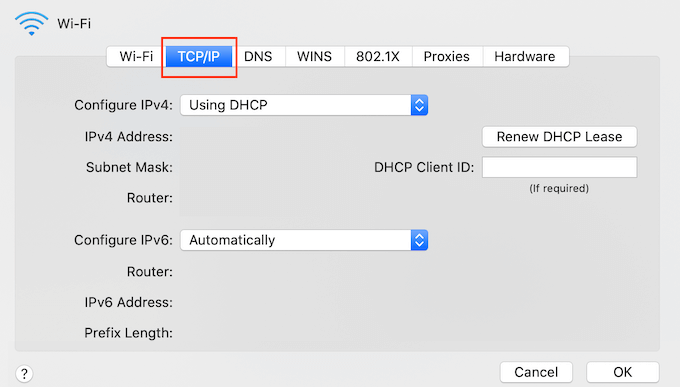
On this screen, go ahead and click on the ‘Renew DHCP Lease’ button.
That’s it. You can now try visiting the website or blog to check whether you still get the same ‘site can’t be reached’ error.
FAQs: How to Easily Fix This Site Can’t Be Reached Error in WordPress
In this guide, we explored all the different ways to fix the ‘this site can’t be reached’ error in WordPress. If you still have questions, then in this section, we’re answering all the top FAQs about the ‘site can’t be reached’ error.
Why Is My Site Saying This Site Can’t Be Reached?
There are a few different reasons why you may get this error message, but the code that appears next to the message can help you pinpoint the cause.
Let’s take a closer look at these codes and what they mean for your WordPress blog.
1. ERR_CONNECTION_RESET
Sometimes, you’ll see an ERR_CONNECTION_RESET code next to the ‘site can’t be reached’ error. Most of the time, this means there’s a problem with your internet connection.
The most obvious problem is an internet outage, but there are also software and settings that can interfere with the connection and trigger an ERR_CONNECTION_RESET. For example, VPNs and proxy servers can sometimes cause this error code.
2. DNS_PROBE_FINISHED_NXDOMAIN
Domain Name System (DNS) lets you connect to websites by matching a user-friendly domain name such as www.wpbeginner.com, with the ID of the server where this website is stored.
You’ll get this error code if Google Chrome can’t resolve the domain name or address for the website that you’re trying to access.
Since it can’t connect, the browser assumes that the domain name doesn’t exist. It then shows a DNS_PROBE_FINISHED_NXDOMAIN error code, where the NXDOMAIN part of the error stands for ‘non-existent domain. ‘
If you see this error code next to the ‘site can’t be reached’ message, then it usually means there’s a problem with how your DNS settings are configured.
To learn more about this error code, please see our guide on how to easily fix the DNS_PROBE_FINISHED_NXDOMAIN error.
3. How Do I Fix This Site Can’t Be Reached in WordPress?
We recommend starting with quick and easy fixes, including restarting your internet connection and clearing the browser and DNS cache.
If you’re using a firewall or antivirus software, VPN, or proxy server, then it’s a good idea to check their settings as these can all trigger the error. You can also disable the software or service, to see whether it resolves the error.
Finally, some users have got positive results by changing their DNS server and resetting the TCP/IP settings.
We hope this article helped you learn how to easily fix ‘this site can’t be reached’ error in WordPress. You can also go through our guide on the difference between domain name and web hosting and the best email marketing for small businesses.
If you liked this article, then please subscribe to our YouTube Channel for WordPress video tutorials. You can also find us on Twitter and Facebook.


Syed Balkhi says
Hey WPBeginner readers,
Did you know you can win exciting prizes by commenting on WPBeginner?
Every month, our top blog commenters will win HUGE rewards, including premium WordPress plugin licenses and cash prizes.
You can get more details about the contest from here.
Start sharing your thoughts below to stand a chance to win!
Dennis Muthomi says
Sometimes the main culprit is always antivirus software.
I’ve personally experienced cases where antivirus programs flagged a website and refused to establish a connection, resulting in this error message.
karma tsheten says
I tried everything
still No hope any advice?
WPBeginner Support says
If nothing in our guide was able to help you, we would recommend reaching out to your hosting provider to ensure there are no issues on your host’s end.
Admin