Do you want to create AMP-friendly forms on your WordPress site?
Accelerated Mobile Pages (AMP) help speed up websites. However, AMP removes WordPress forms to improve the performance of your site.
In this article, we will show you how to create AMP forms in WordPress using WPForms (the easy way).
Why Create an AMP Form in WordPress?
Accelerated Mobile Pages or AMP is a Google project that makes websites load faster on mobile devices.
While AMP offers a great mobile browsing experience by making your web pages load faster, it disables many useful features on your WordPress website.
One of them is contact forms. Since AMP uses a limited set of HTML and JavaScript, it can’t load your WordPress forms properly on AMP pages.
Alternatively, you could use one of the many responsive WordPress themes that offer excellent performance on desktop and mobile. This way, you don’t have to compromise on your website styling to deliver a superior experience on mobile.
However, if you are using AMP on your WordPress site, then you can use a plugin to show forms. Let’s see how to add an AMP form to your site.
Adding AMP Forms in WordPress (Step by Step)
The best way to create an AMP form is by using WPForms. It is the most beginner-friendly WordPress form plugin that helps you create AMP-ready WordPress forms.
Their team recently worked with Google to make AMP forms easy for WordPress.
Step 1: Install and Activate the WPForms Plugin
For this tutorial, we will use the WPForms Pro version because it offers more features, form templates, addons, and customization options. There is also a WPForms Lite version that you can use to get started for free.
Both the lite and pro version of WPForms allows you to create a basic AMP-ready contact form.
First, you will need to install and activate the WPForms plugin. If you need help, then please see our guide on how to install a WordPress plugin.
Step 2: Add AMP to Your WordPress Site
Before we create a form, it’s important that you have AMP set up on your WordPress site.
In order to use AMP with WordPress, you need to install and activate the official AMP plugin for WordPress. For more details, see our step-by-step guide on how to install a WordPress plugin.
Once activated, the plugin will automatically add Google AMP support for your WordPress site.
However, you can change AMP settings for your website by going to AMP » Settings from your dashboard.
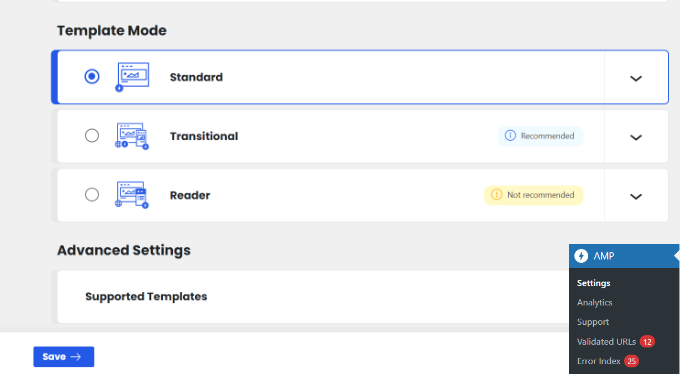
From the AMP settings page, you can enable or disable AMP on your website, choose a website mode for AMP, and choose supported templates.
For more details, please see our guide on how to properly set up Google AMP on your WordPress site.
Once you have configured AMP, the next step is to create an AMP-compatible contact form on your WordPress site.
Step 3: Create a New AMP Form in WPForms
Simply head over to WPForms » Add New page to create a new WordPress form. WPForms is compatible with AMP by default, so you won’t need to turn on any special settings.
On the form setup screen, you can choose a form template and enter a name at the top. You can select the Blank Form if you want to start from scratch or use a prebuilt template to quickly edit it according to your needs.
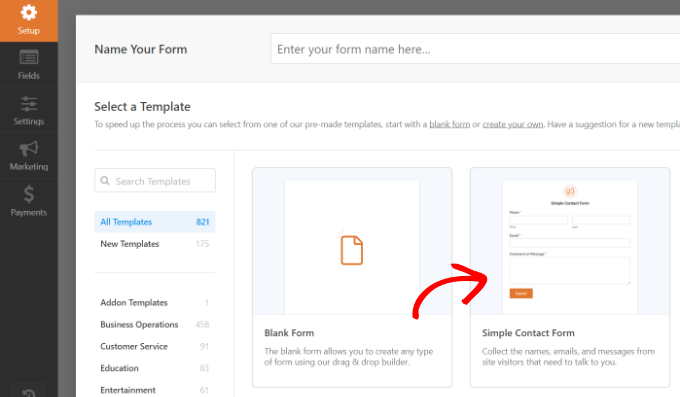
For this tutorial, we will pick the ‘Simple Contact Form‘ template.
Next, you will see the form builder page, where there are different options to customize your template.
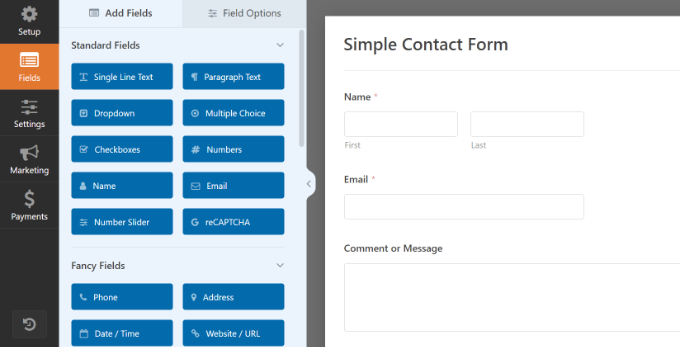
From here, you can add or remove form fields. To add a new field to your form, you can simply click on a form field from the left panel and drag it onto the form template.
Note: The Modern Style Dropdown and Number Slider fields are not compatible with Google AMP. Instead, you will need to use the Number and Classic Style Dropdown fields.
After that, you can configure the field options. Simply click on a field, and then Field Options will appear on the left.
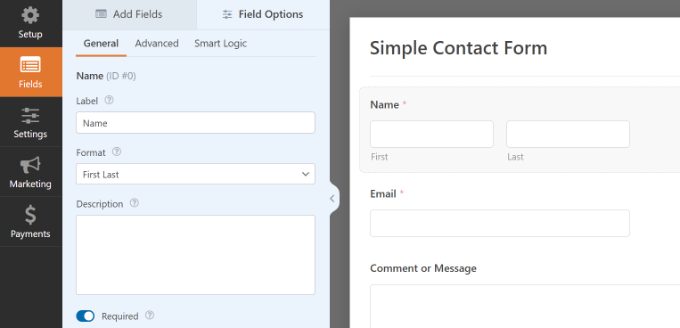
For instance, you can edit the label and format of a field, make it a required field, set up conditional logic, and more. Similarly, you can customize all the other fields.
After that, you can click on the ‘Settings’ tab to configure your form settings.
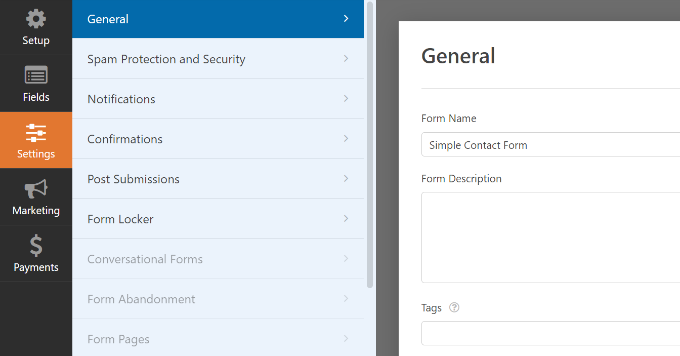
The ‘General’ settings allow you to change your form name, submit button text, submit button processing text, and more.
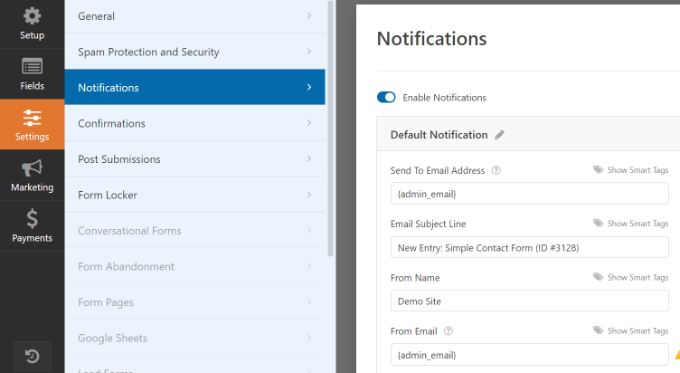
Next, you can click on the ‘Notifications’ tab to set up email notifications to notify you when a user completes the form.
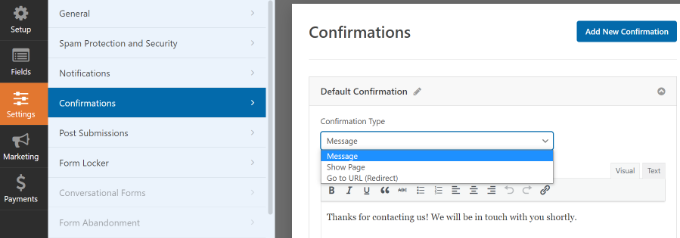
Next, you can click on the ‘Confirmation’ tab to set up a confirmation message to be shown when a user submits the form.
WPForms lets you show a message, show a page, or redirect users to a URL on form submission.
After the configuration is complete, you can save your form.
Step 4: Add Your AMP Form to a Page
Now that your WordPress form is ready, you can add it to a page.
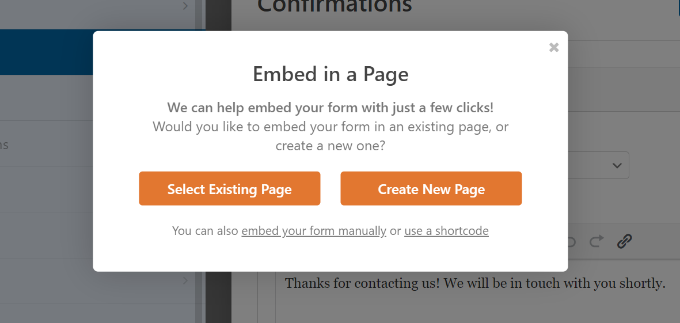
In the WPForms form builder, you will see an ‘Embed’ button at the top. Simply click on it to add your form to a new page or an existing one.

Next, a popup window will open, asking you to create a new page or choose an existing page.
We will select the ‘Create New Page’ option for this tutorial.
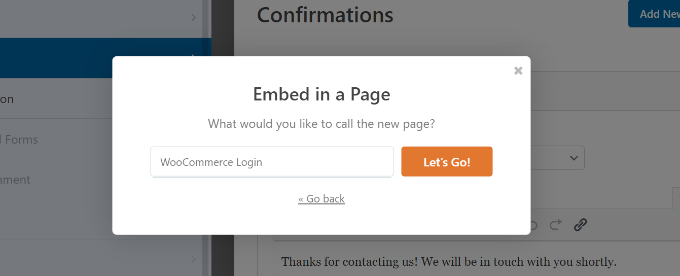
Next, you will need to enter a name for your new form page.
Once that’s done, simply click the ‘Let’s Go’ button.
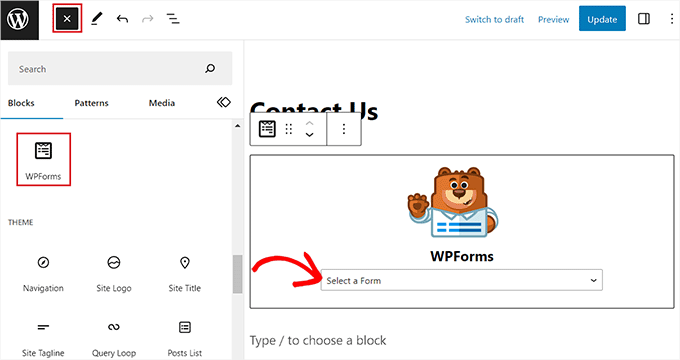
From here, you will see a preview of your AMP form in the content editor.
Alternatively, you can also use the WPForms block to add the form in the content editor. Simply select your AMP form from the dropdown menu.
Next, you can publish or update your page.
That’s all! You don’t need to configure anything else. The WPForms plugin will add full AMP support to your form now.
If you want to see how it looks, then you can open the page on your mobile phone. Or you can open the page on your desktop browser by adding /amp/ or /?amp at the end of your page URL, like this:
https://www.example.com/contact/?amp
Adding Google reCAPTCHA to Your AMP Form
By default, WPForms includes anti-spam settings to catch and block spam. Additionally, you can use Google reCAPTCHA to reduce spam submissions.
To use Google reCAPTCHA with your AMP forms, you need to register your site for Google reCAPTCHA v3 and get the Google API keys.
First, you will need to go to the Google reCAPTCHA website and click on the ‘v3 Admin Console’ button at the top right corner of the page.
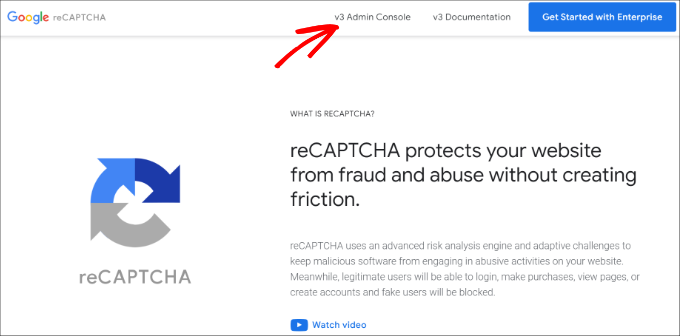
After that, you need to sign in with your Google account. Once done, you will see the ‘Register a new site’ page.
Next, you need to enter your website name in the Label field. Google AMP only supports reCAPTCHA v3, so you must choose the ‘Score based (v3)’ reCAPTCHA type option.
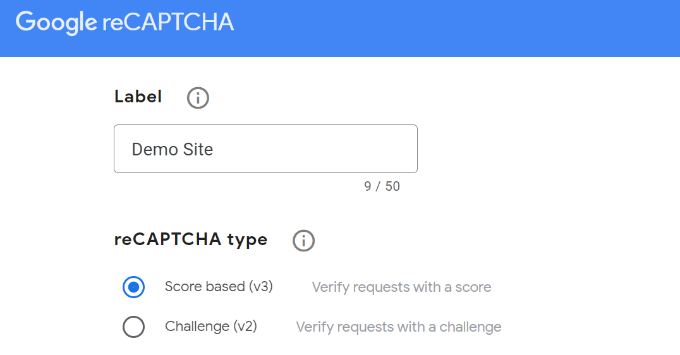
After that, enter your domain name (without https://www.) into the Domains field.
Next, click the ‘Submit’ button.

Next, you will see a success message along with the site key and the secret key to add reCAPTCHA to your site.
Simply copy these keys.
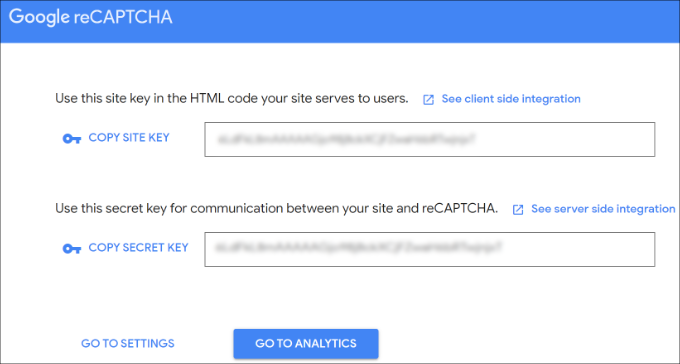
Now, you have the Google API keys to add reCAPTCHA to your forms. However, there is one more setting required to ensure AMP compatibility with the reCATCHA.
First, you will need to click on the ‘Go to Settings’ link.
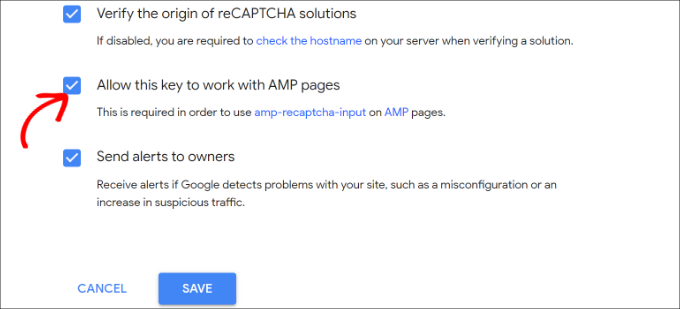
Next, you will see the reCAPTCHA settings again with the ‘Allow this key to work with AMP pages’ checkbox. Simply check the box and click on the ‘Save’ button below.
Now that you have Google API keys to add reCAPTCHA on AMP forms, you need to enter them in WPForms.
You can open the WPForms » Settings » CAPTCHA page in your WordPress dashboard.
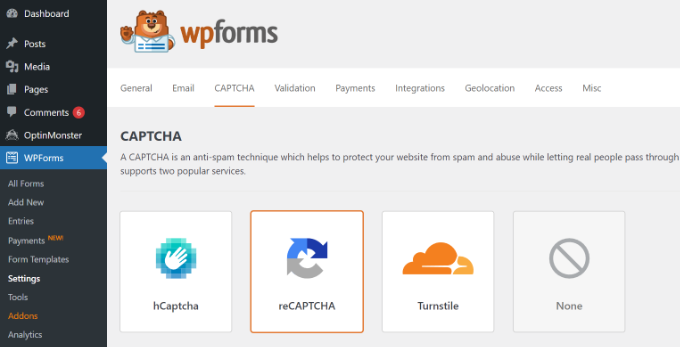
Next, you can scroll down and choose the ‘reCAPTCHA v3’ option.
After that, simply paste the site key and secret key. When you are done, just click on the ‘Save Settings’ button.
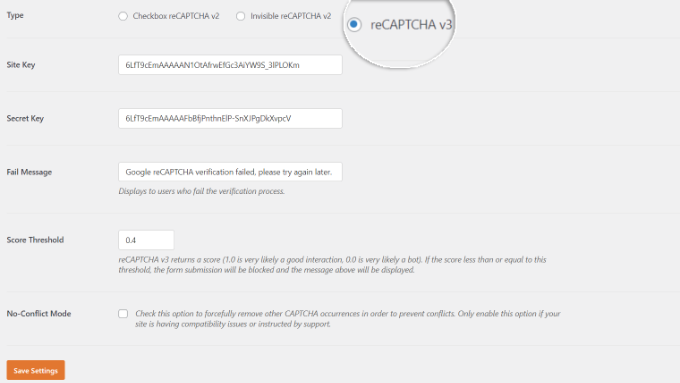
Now that Google reCAPTCHA is added to WPForms, you can enable it in your forms where needed.
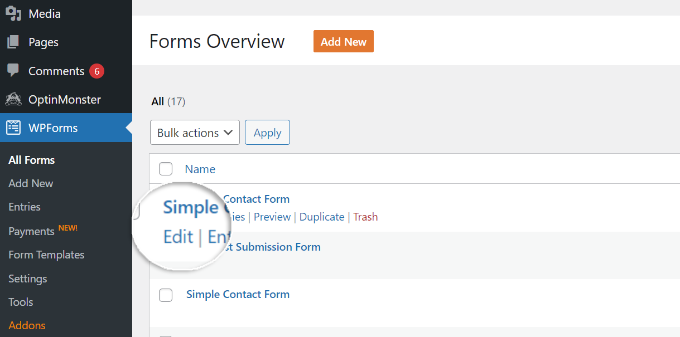
Go to WPForms » All Forms and select the form where you want to enable the reCAPTCHA. Simply click the ‘Edit’ button under the form name.
Once the form setup screen appears, click on the ‘Settings’ tab and select the ‘Spam Protection and Security’ tab.
From here, simply enable the Google v3 reCAPTCHA option.
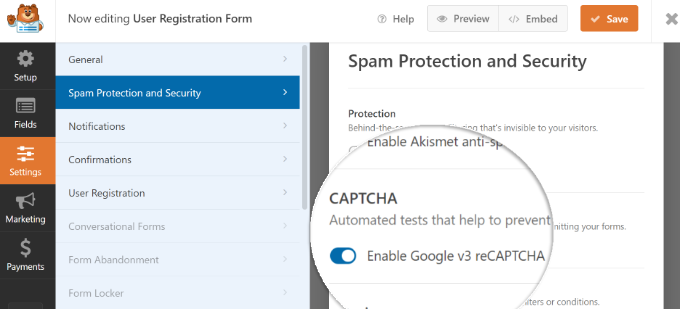
Once that’s done, save your form by clicking on the ‘Save’ button in the top right corner.
After that, you can revisit your contact page and see the AMP form with reCAPTCHA in action.
We hope this article helped you to learn how to create AMP forms in WordPress easily. You may also want to see our guide on how to create GDPR-compliant forms in WordPress and the best drag-and-drop page builder for WordPress.
If you liked this article, then please subscribe to our YouTube Channel for WordPress video tutorials. You can also find us on Twitter and Facebook.


Syed Balkhi says
Hey WPBeginner readers,
Did you know you can win exciting prizes by commenting on WPBeginner?
Every month, our top blog commenters will win HUGE rewards, including premium WordPress plugin licenses and cash prizes.
You can get more details about the contest from here.
Start sharing your thoughts below to stand a chance to win!
Jiří Vaněk says
That’s great news. I can finally use the potential of the paid WP Forms I have on the site (that is, besides being able to use it on all the sites I’ve done thanks to unlimited sites). Thank you for the detailed instructions on how to use WP Forms on websites with AMP.
Konrad says
Great info! For those on a budget, are there any good free alternatives to WPForms that offer AMP compatibility?
WPBeginner Support says
If we find one we would recommend we will be sure to share!
Admin
Adrian says
This article is a game-changer for anyone seeking to optimize their WordPress site for mobile performance with Accelerated Mobile Pages (AMP). The clear and concise explanation of how AMP impacts WordPress forms, and the subsequent guidance on creating AMP-friendly forms using WPForms, is incredibly valuable.
WPBeginner Support says
Glad you found it helpful!
Admin
Shafqat Khan says
Great tutorial! AMP forms are crucial for mobile performance, and your guide simplifies the process with WPForms. I appreciate the clear steps, especially for adding Google reCAPTCHA, which is essential for security. Your articles are always a valuable resource!
WPBeginner Support says
Glad you’ve found our content helpful!
Admin
Ralph says
Seems like it is good idea to do this if my site can be faster for mobile. I personally don’t like using my smartphone for reading websites, but from Google Analytcis i see my website went from 55-60% mobile users montly to 73-75% mobile users montly. Sometimes it is lower but it is inevitable trend that all bloggers should respect and adapt.
WPBeginner Support says
Glad you liked our recommendation
Admin
Aman says
Thanks WP Begginer, Helpful for my website and works completely well.
WPBeginner Support says
Glad to hear our guide could help!
Admin
faizan says
I learned information from WP Beginner and collected many things that can help me for creating best website
WPBeginner Support says
Glad to hear our guides have been helpful
Admin
Mikolaj says
Great article! It’s super helpful for anyone who wants to keep their WordPress site AMP-friendly while still having forms. WPForms looks like the way to go. Thanks for sharing!
WPBeginner Support says
Glad you found the post helpful!
Admin
Czarek says
This article is a valuable resource for anyone looking to optimize their WordPress site for mobile users while still maintaining the functionality of forms. It’s important to acknowledge that while Accelerated Mobile Pages (AMP) can significantly boost website speed, it often comes at the cost of removing certain features, including forms. The fact that this article addresses this issue by providing a solution is highly beneficial.
The recommendation to use WPForms for creating AMP-friendly forms is particularly noteworthy as it offers an easy and efficient method for ensuring your website remains user-friendly on mobile devices. This approach can help website owners strike a balance between speed and functionality, ensuring a positive user experience.
My question is: Are there any specific considerations or best practices to keep in mind when implementing AMP forms on a WordPress site using WPForms, especially in terms of form design, user experience, and potential impacts on SEO?
WPBeginner Support says
For AMP forms the main thing to keep in mind is ensuring that your users can use the form and there are not strange formatting issues when viewed.
Admin
Ronald says
What about user-submitted content forms (for posts or custom post types)? How about user registration/login forms? I know WP Forms has those features at premium costs, but do they still work with AMP?
WPBeginner Support says
Currently the AMP support is valid only for the basic contact form feature.
Admin
Irene says
This is nice. I’m so adding AMP and reCaptcha to my site as I’m already using wpforms lite. But I hope it doesn’t take up much resources.
Thanks WPbeginners. Following you has been one of the best decisions I made this year. God bless the day I found you.
WPBeginner Support says
Glad our guide could be helpful
Admin