


Want to write your own form markup instead of dragging fields around in a visual builder?
Good news: you don’t need to write any PHP to make that form work. You can let a lightweight plugin handle the processing while you write every tag yourself. Alternatively, you can build the form visually and drop custom HTML in exactly where you need it.
In this guide, we’ll show you how to create a custom HTML form that works in WordPress.
What Are HTML Forms and Why Create One?
An HTML form collects visitor information, like names, emails, and feedback, just like any other form on the web. What sets it apart is how it is built. Instead of relying on a heavy drag-and-drop visual editor, you build an HTML form with plain code. This means you type out the fields (like text boxes, checkboxes, and dropdowns) yourself.
People who use HTML forms over a drag-and-drop form builder usually do it to maximize their website’s performance. Plain HTML forms keep your web pages loading slightly faster. Beyond just speed, writing the code yourself gives you total design control. Instead of being boxed in by a builder’s rigid settings, you can customize the layout exactly to your needs.
Most WordPress users find that drag-and-drop form builder plugins offer the best user experience. You get full HTML customization without the hassle of manual server configuration.
Here’s everything we’ll cover in this guide:
Method 1: Adding HTML Forms in WordPress with a Plugin
🎖️ Best for: Developers and site managers who want full HTML control with a lightweight, performance-focused solution. The plugin emphasizes simplicity and speed over visual form builders.
You can add an HTML form to WordPress using a free form plugin like HTML Forms. This plugin manages the PHP and a tiny bit of JavaScript required to run an HTML form in WordPress, while still giving you total freedom to write the HTML yourself.
The free version covers everything in this tutorial, including sending email notifications and storing your submissions. Spam protection is free as well.
To get started, install the plugin on your WordPress website. If you need help, then follow our step-by-step guide on installing a WordPress plugin.
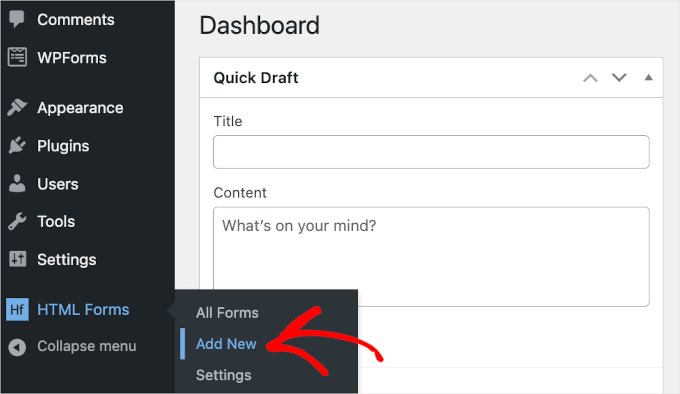
Upon activation, go to HTML Forms » Add New to start creating your form.
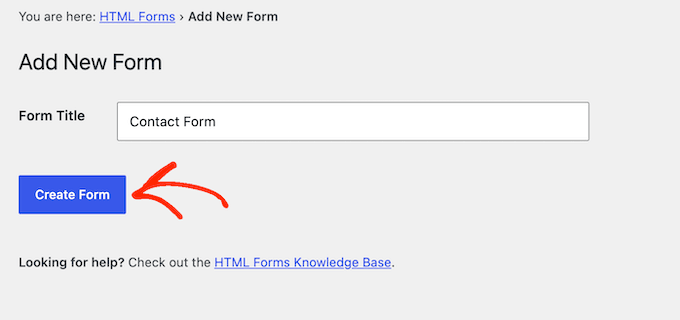
Type a name for your form into the ‘Form Title’ field. In this guide, we are building a simple contact form, so we named ours ‘Contact Form.’
Then, click the Create Form button.
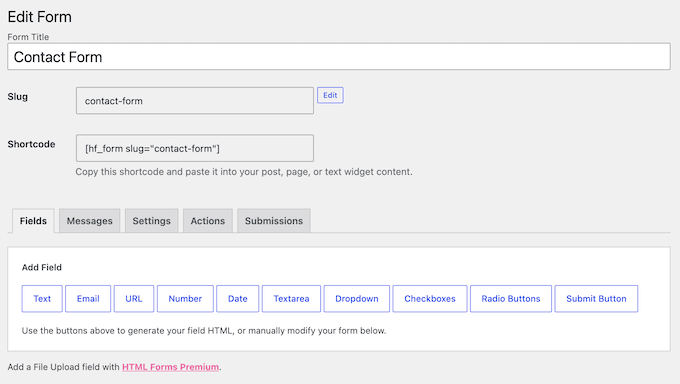
Once you do that, the ‘Edit Form’ page will appear, and you can start customizing your HTML form.
At the top of the page, you’ll see your form’s details, including the form title, slug, and shortcode. Below these details, you’ll find five tabs: ‘Fields,’ ‘Messages,’ ‘Settings,’ ‘Actions,’ and ‘Submissions.’
The ‘Fields’ tab holds ten buttons that generate your field code.
At the bottom of this tab, you’ll find a pre-built HTML form along with a preview.
The default form is pretty simple. It has 4 fields for users to type out their name, email address, a brief subject, and a message.
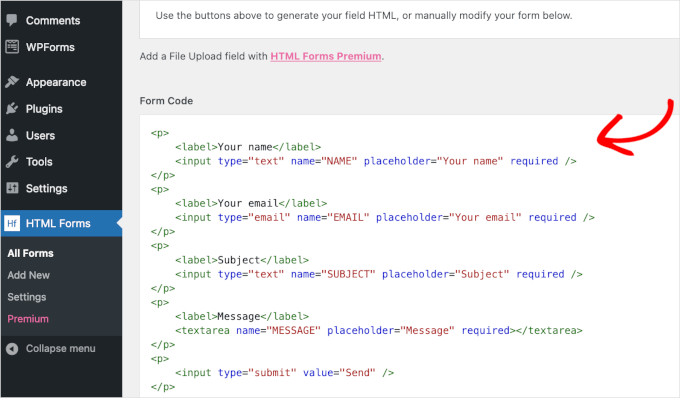
To add a new field, click the matching button right above the ‘Form Code’ box.
We’ll replace the Subject field with a dropdown field in this tutorial.
Go ahead and click ‘Dropdown’ to open its settings. Then, type your question into the ‘Field Label’ box and add one choice per enquiry type, such as ‘General question,’ ‘Sales,’ and ‘Support.’
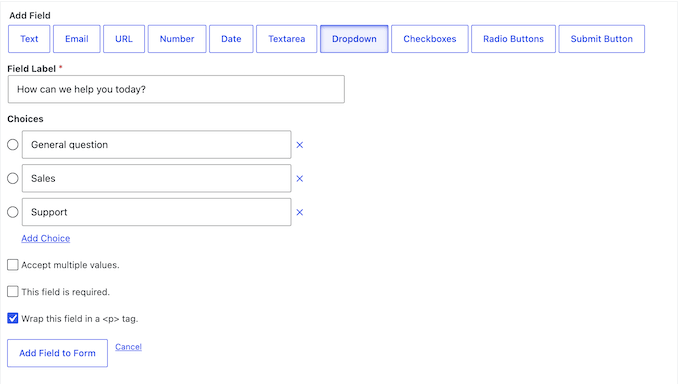
After entering this information, click ‘Add Field to Form.’
You will then see the new dropdown tag appear in the ‘Form Code’ box. Just scroll down to check out your updated markup.
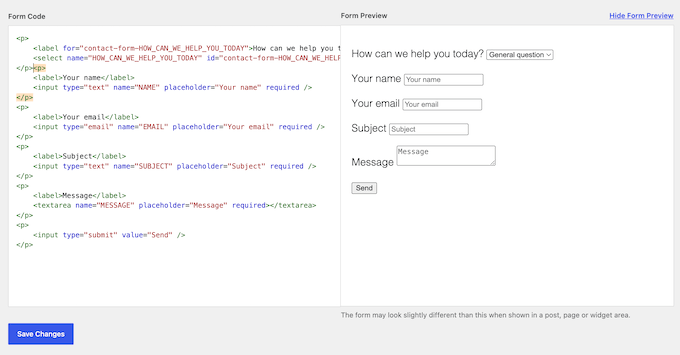
To make the form user-friendly, let’s place the dropdown field directly below the ‘Your email’ field. Since this plugin doesn’t have a drag-and-drop builder, you’ll need to cut the code from the code builder and paste it where you want to place it.
To remove the Subject field, delete the entire paragraph block containing the Subject field.
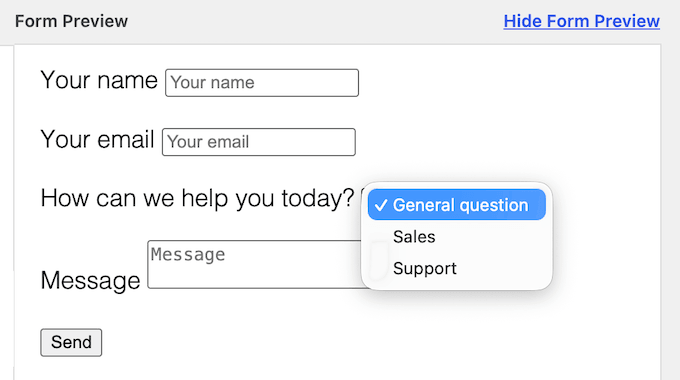
Once you’re done, you’ll want to check the ‘Form Preview’ panel.
If you can’t see it, then click the ‘Show Form Preview’ link.
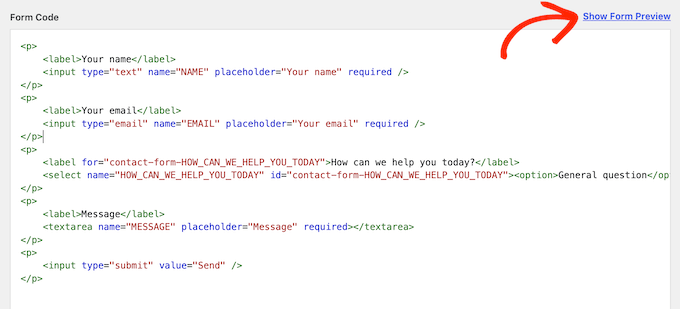
This live preview lets you confirm that your changes worked without breaking the layout.
You can quickly verify that the Subject field is gone and test that your new dropdown works properly.
Next, go ahead and click the blue ‘Save Changes’ button.
Now, you might want to check the form’s configuration. Go ahead and click the ‘Messages’ tab to see how HTML Forms configure the form submission confirmation messages.
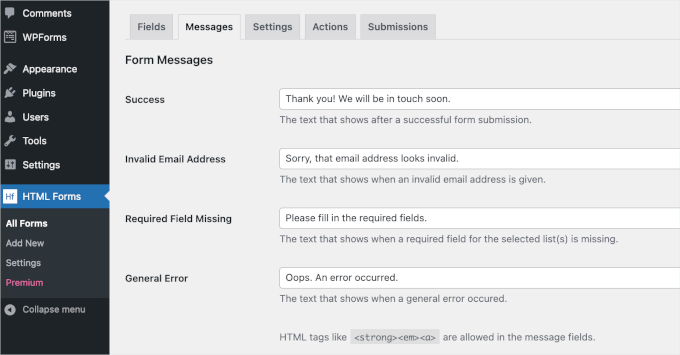
This tab lets you customize the confirmation messages that users will see.
If you’re happy with the default text, you can leave it. Otherwise, make your edits and then click Save Changes.
By default, a new form saves your entries to the database, but it will not email you when someone submits it.
To fix this, click the Actions tab. You will see a notice saying ‘No form actions configured for this form.’
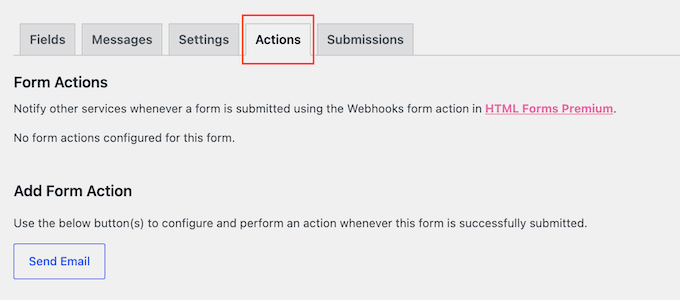
Go ahead and click ‘Send Email.’
The ‘From,’ ‘To,’ and ‘Message’ fields are all required. You can use the variable fields listed directly under the Message box to automatically insert information that the visitor typed into your form.
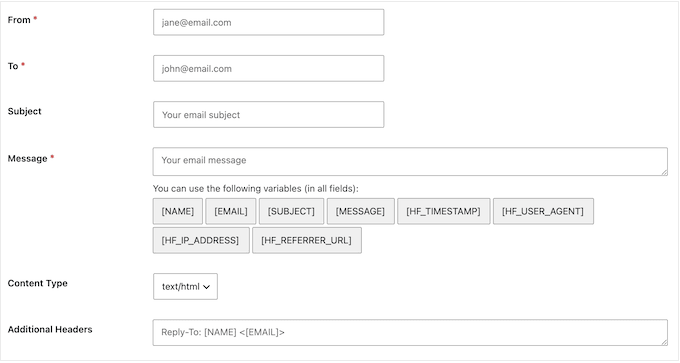
After filling those in, click ‘Save Changes.’ You’ll now receive an email every time someone submits your form.
Once everything is configured, all you need to do is publish your HTML form. Go to the page or post where you want to embed the form. Then, hover over the area where you want to insert the form and click the ‘+’ button.
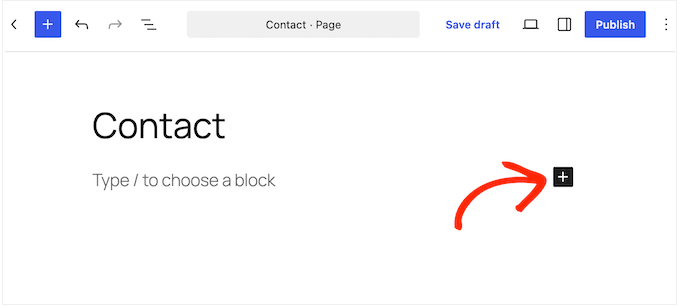
From here, start typing ‘HTML Forms’ into the search bar. When the right block appears, click to add it to your page or post.
Inside the HTML Forms block, click the dropdown menu and choose the form you want to display.
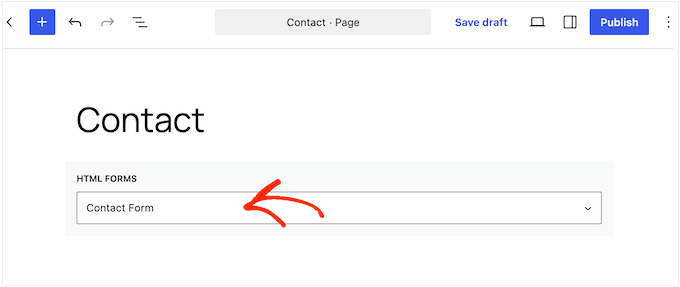
Once you’ve selected the form from the dropdown menu, click the ‘Update’ button.
Your contact form is now live. Here’s what it will look like to your visitors:
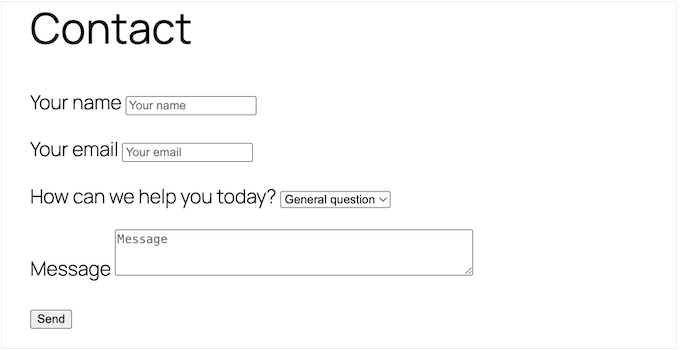
Before promoting the form anywhere, we recommend testing it yourself by submitting a sample entry. This is how you confirm the form is not just displaying, but actually delivering.
After submitting a test entry, go to HTML Forms » All Forms. Here, click your form’s ‘Submissions’ link.
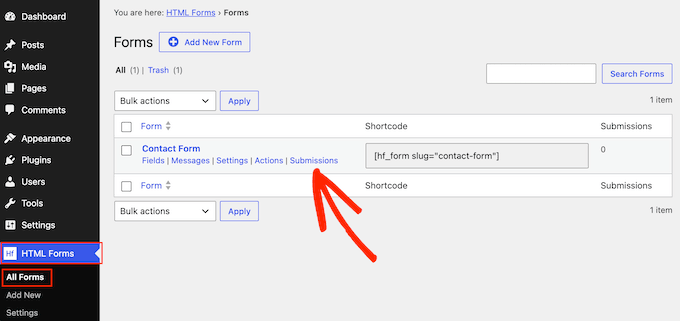
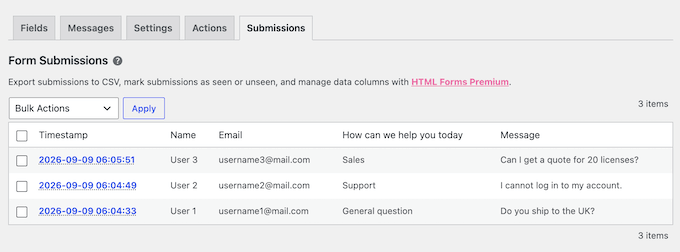
This shows all your form submissions. Your test entry will show up in the table, and you should also get a notification in your inbox.
The ‘Submissions’ table opens with a ‘Timestamp’ column telling you when the form was sent, followed by one column for each field.
Method 2: Adding Custom HTML to Forms With Drag & Drop
🎖️ Best for: Anyone who wants to build a form visually but still needs to drop specific HTML into it, such as a tooltip, a link, or a formatted note.
When it comes to creating forms, we recommend WPForms. It gives you a drag and drop builder while still letting you insert your own markup, so a link, a formatted note, or a tooltip lands exactly where you want it.
We use WPForms on our own websites for contact forms, lead generation, annual surveys, and more.
WPForms Lite is completely free, but the HTML field used in this method is a paid feature. It is available on the Basic plan ($39.60/year) and higher.
In this method, we’ll show you how to add HTML code snippets to customize your WordPress forms using WPForms.
To start, install and activate WPForms.
Once done, you can start creating forms and adding custom HTML. For this guide, we will show you how to add a simple tooltip to your contact form.
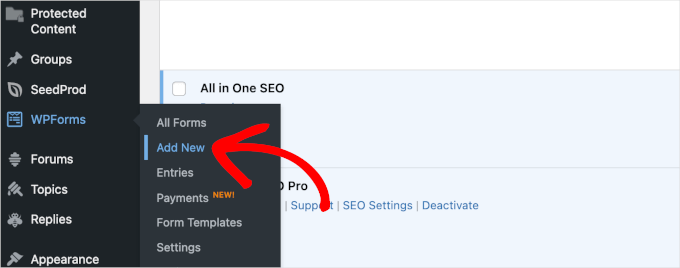
To get started, let’s create the contact form by going to WPForms » Add New.
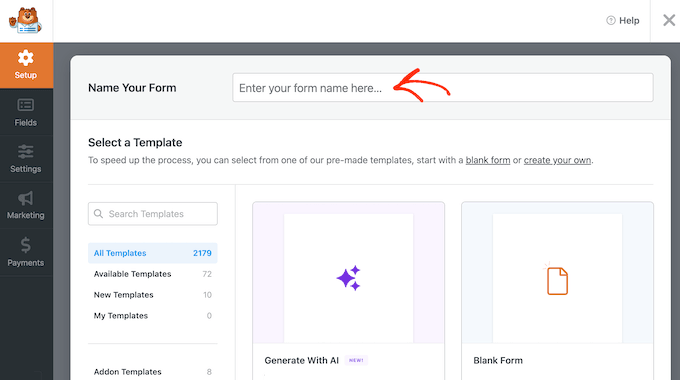
In the Setup panel, start by giving your form a name.
This name is for internal reference only, so you can use anything you want.
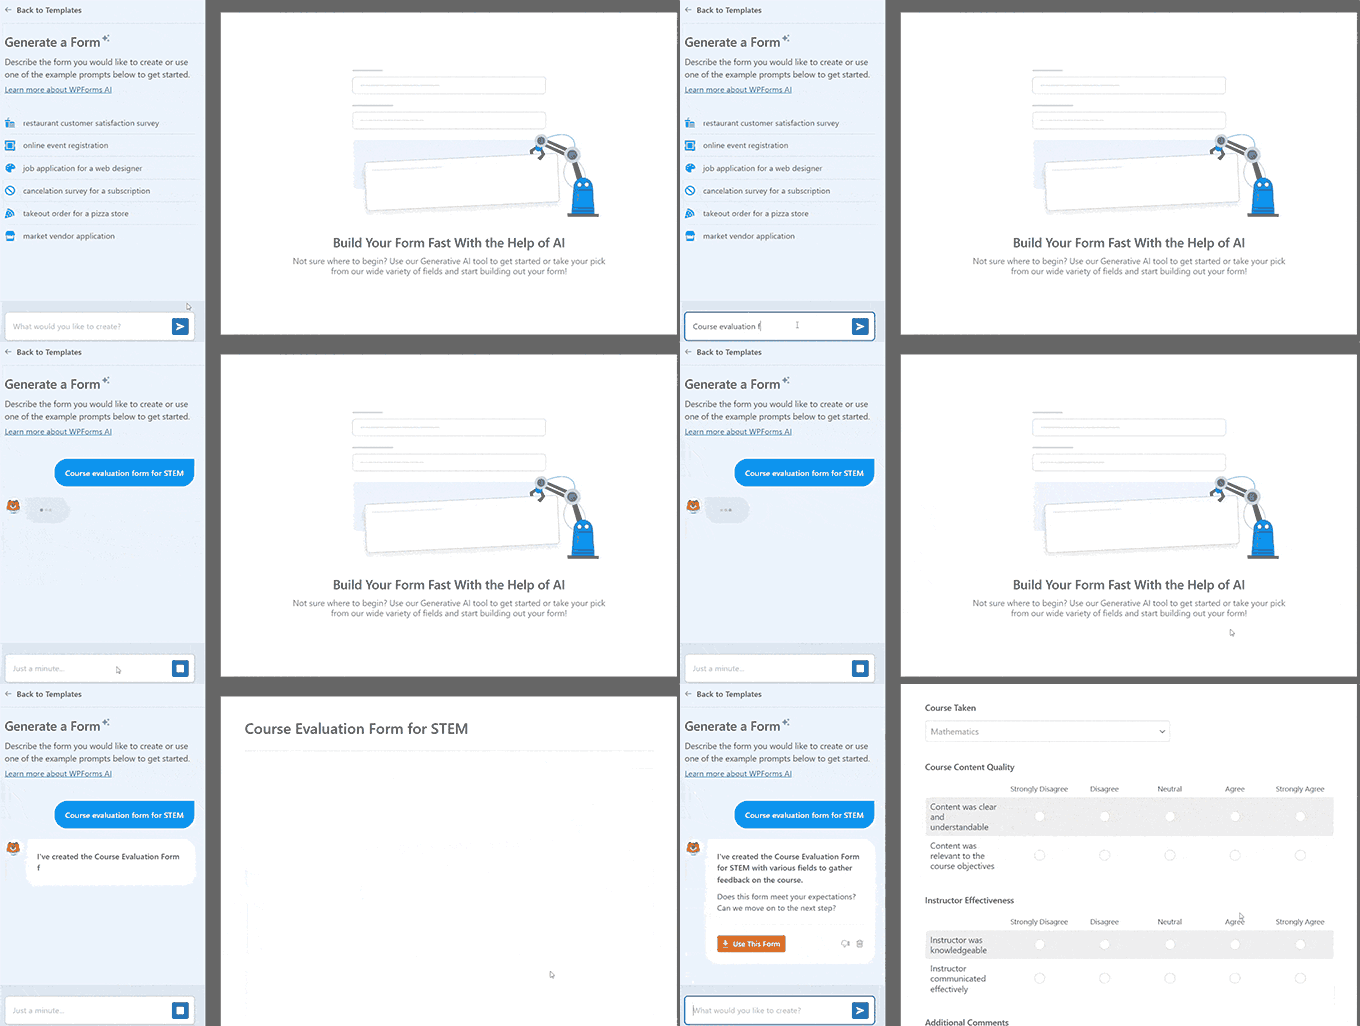
The next step is deciding how you want to build your form. With WPForms, you can start from a pre-made template, build from scratch, or describe what you need and let the AI form builder assemble it for you.
If you want to use the AI-powered builder, then simply enter a simple prompt. The AI will then create the form for you in a few seconds.
For this tutorial, we’ll use a pre-built template.
As there are 2,100+ form templates to choose from, you can use the search bar to filter them quickly. To do this, just type ‘Contact Form’ and wait for the search to complete.
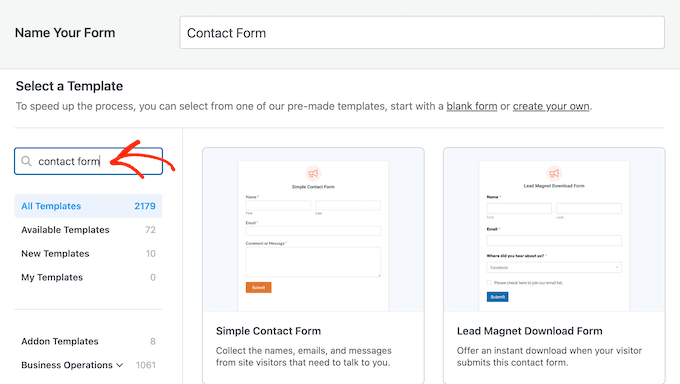
To take a closer look at a template, you can use the built-in preview feature. Simply hover over any form template and click ‘View Demo.’
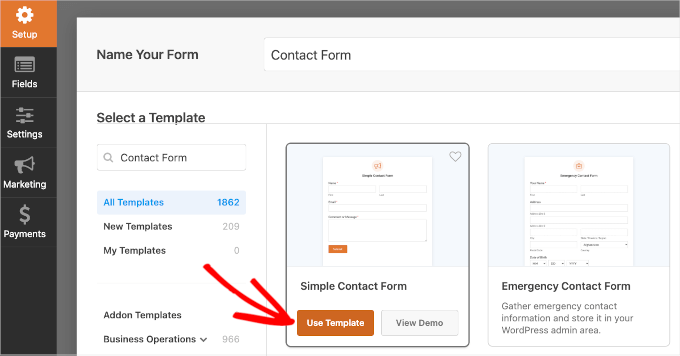
Once you’ve found the perfect contact form for your needs, hover over it once again and click ‘Use Template.’
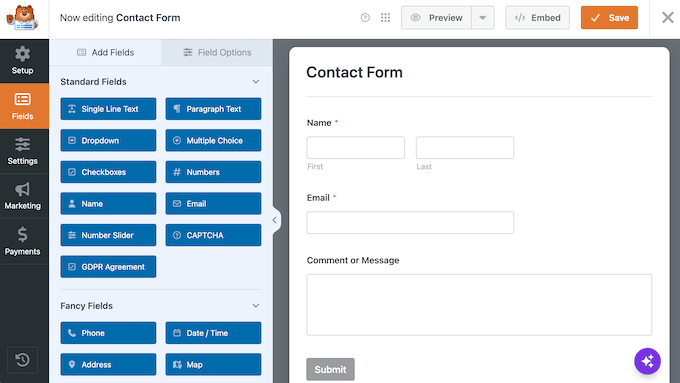
This will launch the form builder. You’ll see all the customization tools in the left panel, and a live preview on the right.
You can drag elements from the left-hand panel and drop them onto the live preview. You can also rearrange elements in the preview using drag and drop.
Scroll down the left panel to the Fancy Fields group, then drag and drop the HTML field directly onto your form.
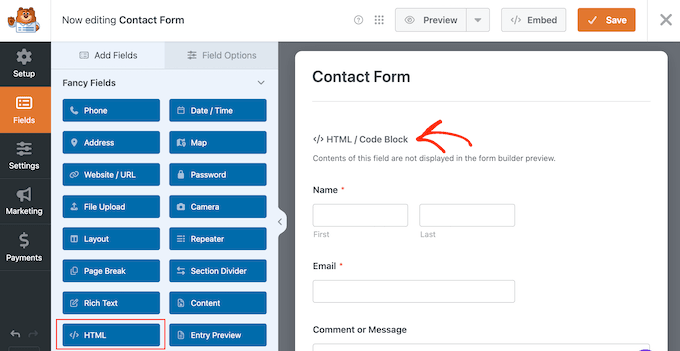
After adding the HTML field, click on it to open its customization options.
To start, type in a ‘Label’ to help you identify this field. This is just for your reference and isn’t shown to visitors so you can use anything you want. You can also leave the field empty.
Then, you’ll insert the custom HTML code into the ‘Code’ field.
To create a tooltip, you can use the <span> tag or simply copy the following code and paste it into the ‘Code’ field:
<span title="We have cool stuff to share every week. :)">Hi there! We have an email newsletter you might want to subscribe to. Let us know in the Comment or Message field, and we'll sign you up.</span>
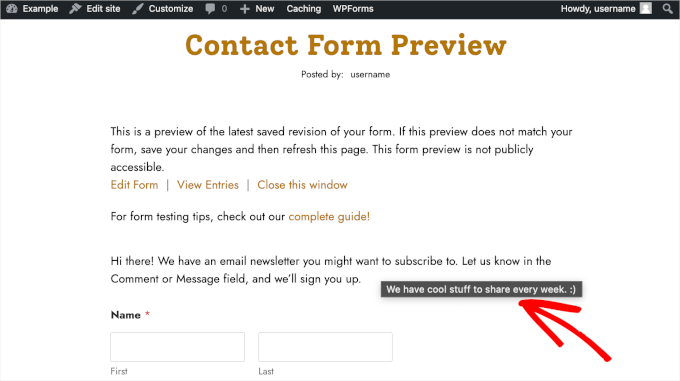
This is just sample code, so feel free to edit it to match your needs. The title="" part of the code is exactly what tells the web browser to create the hover pop-up effect, so you get the tooltip without adding any CSS to your site.
Note that WPForms doesn’t display the HTML code in the form builder preview. To test the tooltip, click ‘Preview.’
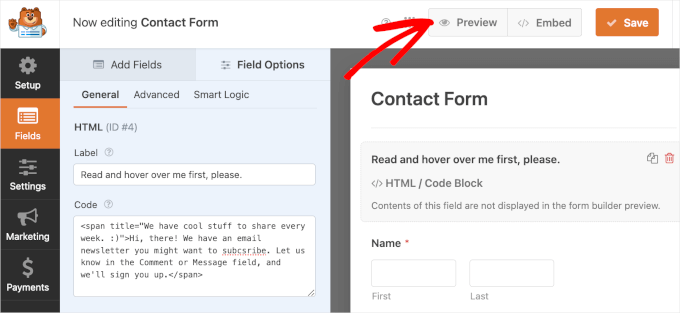
This will open a new tab.
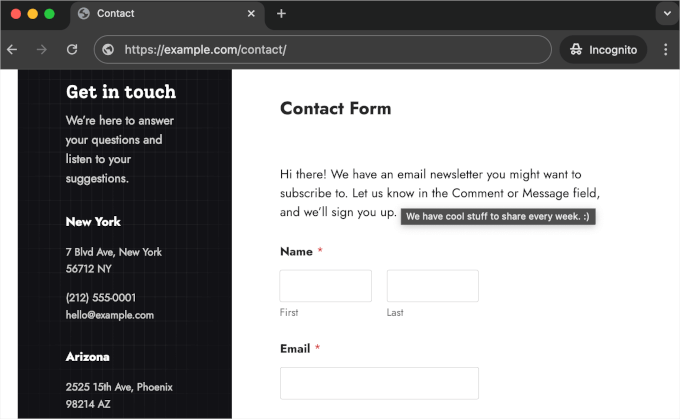
Here, you can test that the HTML code snippet for your tooltip works properly by hovering over the text. After a few moments, the tooltip should appear.
When you’re happy with the results, you can go back to the form builder to finalize your form.
WPForms automatically configures your notification and confirmation settings for you. However, if you want to customize them, select ‘Settings’ and then either ‘Notifications’ or ‘Confirmations.’
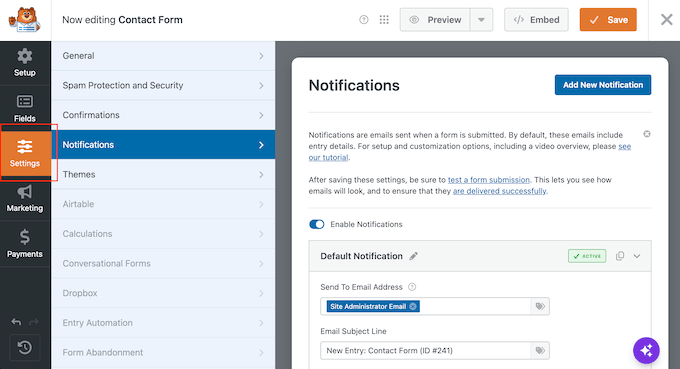
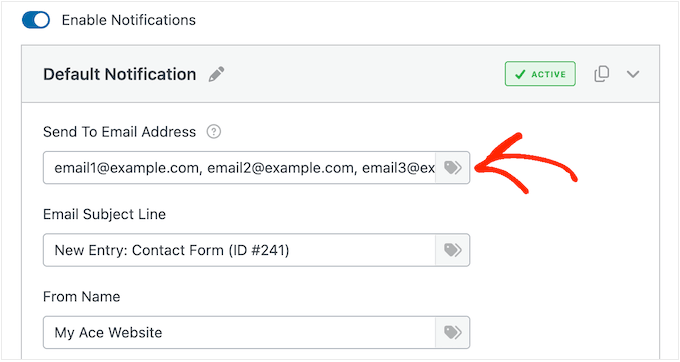
In the ‘Notifications’ section, you can add multiple recipients for your contact form submission.
To add multiple recipients, separate email addresses with commas, like email1@example.com, email2@example.com, email3@example.com.
Once you’ve customized your notifications and other settings, it’s time to publish and embed the WordPress form.
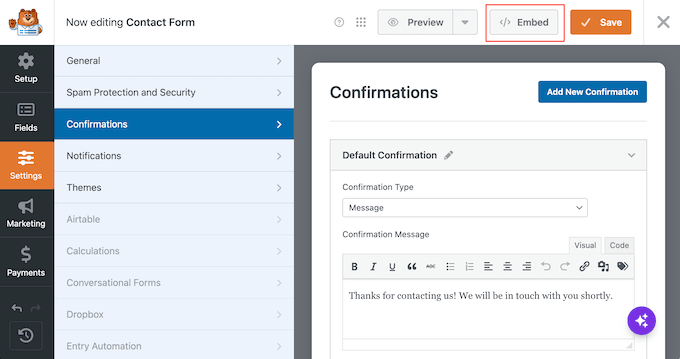
Go ahead and click the ‘Embed’ button in the top-right corner of the form builder.
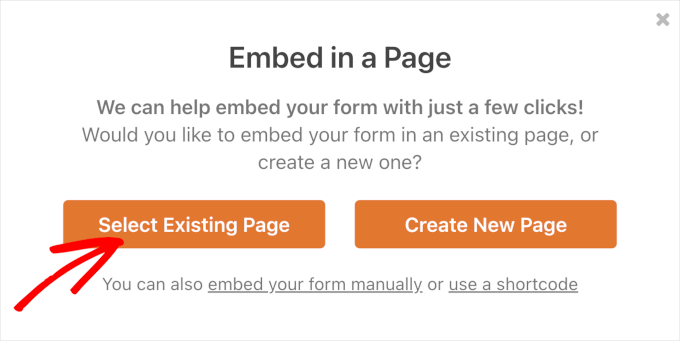
WPForms will then ask if you want to add the form to an existing page or a new page.
In this guide, we will choose ‘Select Existing Page’.
In the next pop-up window, choose a page from the list of available pages. After that, you can click ‘Let’s go!’ to open the block editor.
Now, hover over the area where you want to add the form and click the ‘+’ button. Then, go ahead and select the WPForms block.
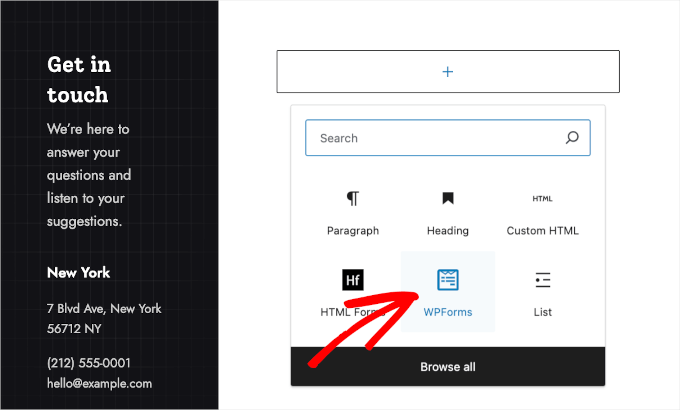
You can now choose the form you want to display, using the dropdown menu.
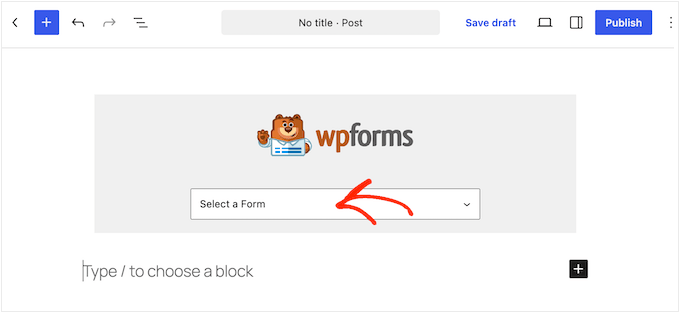
After selecting your form, WPForms will load it in the block editor.
When you’re happy with how everything is set up, click the ‘Update’ button.
And done! You’ve added custom HTML to your WPForms contact form and made it live on your WordPress website.
Before you send real visitors to the form, we recommend submitting a quick test entry to make sure everything works.
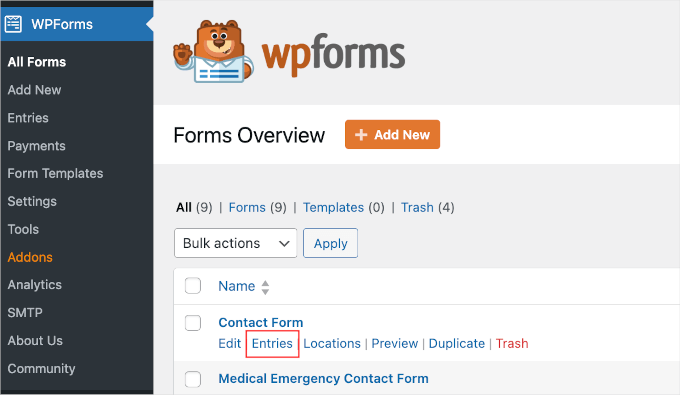
After submitting a test, go to WPForms » All Forms. Here, hover over your contact form and click ‘Entries’ when it appears.
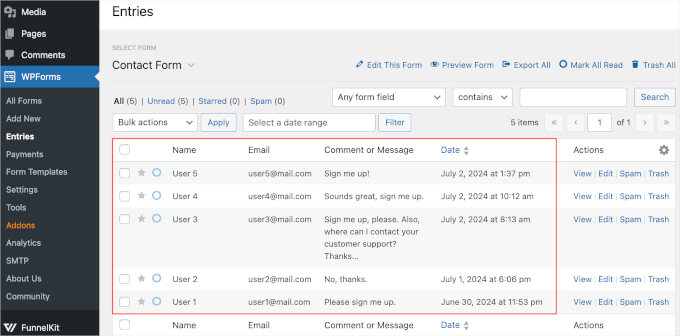
On the next screen, you’ll see all your form submissions.
The table displays every piece of information users submitted, along with the exact submission time.
FAQs: How to Add HTML Forms in WordPress
Why isn’t my HTML form working on WordPress?
Most likely, WordPress is displaying your form but not processing it. Simply pasting an HTML form into a page is not enough to make it work.
While the form may display correctly, WordPress doesn’t automatically process form submissions. Unlike a basic HTML site, there’s no built-in script to handle the data when someone clicks Submit.
To make the form functional, you’ll need to add custom PHP code to process submissions or use a plugin that handles this for you.
Can I still customize my forms if I use HTML?
Yes, absolutely. Using HTML gives you full control over how your form looks and functions. Just keep in mind that you’ll also be responsible for everything else, such as:
- Styling the form with your own CSS
- Adding validation, error messages, or conditional logic with custom code
- Making sure the form works properly on different devices and browsers
So yes, you have full flexibility, but also full responsibility.
Additional Resources: More WordPress Form Guides
We hope this article has helped you learn how to add HTML forms in WordPress. Next, you might want to check out our guides on:
- How to Export WordPress Form Entries to CSV and Excel
- How to Customize and Style Your WordPress Forms
- Best WordPress Contact Form Plugins
If you liked this article, then please subscribe to our YouTube Channel for WordPress video tutorials. You can also find us on Twitter and Facebook.




Jiří Vaněk
Since I use WP Forms, I like the second method using this plugin. I have some HTML codes for forms provided by AI for my purposes, and I was hesitant about whether to add them to the website. Initially, I considered using Elementor as the primary tool to insert the form on the site, but seeing that WP Forms handles the same function excellently, the problem is solved. I can use WP Forms without needing to install Elementor unnecessarily, saving me hassle, as well as space on the FTP and improving the website’s performance.
Moinuddin Waheed
I think using html forms through the wpforms is the logical choice as we have complete familiarity of the wpforms dashboard.
It becomes very easy to insert the code and then use it with the help of wpforms.
earlier it used to be herculean task of adding html forms code and actually using it in wordpress websites.
Jiří Vaněk
Yes, I have to agree that now it seems easy because I read this guide. However, before that, I tried adding forms using Elementor, and it wasn’t great because some things worked correctly and others didn’t. Using Elementor as a middleman wasn’t a good choice for me. Personally, I didn’t expect that I could use WP Forms for the same purposes because I thought of it as a finished solution that only creates forms and doesn’t allow you to add a pre-made HTML form. But you’re always surprised by what you don’t know. Otherwise, I completely agree. It used to be a really difficult task for me, but after trying WP Forms, it was reduced to a simple operation. I love this plugin.