GoogleドライブとWordPressメディアライブラリを統合することで、シームレスな方法でファイルを管理、保存し、サイトから直接アクセスすることができます。
ダッシュボードからGoogleドライブの画像をすべて表示でき、サーバースペースを節約できます。また、時間と労力の節約にもなります。さらに、Googleのパスワードを教えることなく、他のWordPressユーザーとファイルを共有するのに最適な方法です。
GoogleドライブとWordPressメディアライブラリを接続する最も簡単な方法を見つけるために、私たちはいくつかの方法を試し、様々なプラグインをテストしました。その過程で、いくつかのオプションは複雑すぎたり、重要な機能が欠けていたり、また他のオプションは私たちが必要とする信頼性や使いやすさを提供していないことがわかりました。
複数のソリューションを試した結果、Googleドライブとメディアライブラリをシンプルかつシームレスに接続できるソリューションが見つかりました。
この投稿では、GoogleドライブをWordPressのメディアライブラリに接続する方法を順を追って説明します。
なぜGoogleドライブをWordPressのメディアライブラリに接続するのか?
Googleドライブは最も人気のあるGoogleの無料ツールの1つで、画像を含むすべての種類のファイルを保存し、共有するのに最適な方法です。
定期的にGoogleドライブに画像をアップロードしている場合は、GoogleドライブアカウントをWordPressのメディアライブラリに接続することで、時間と労力を節約できます。
そうすれば、WordPressダッシュボードからGoogleドライブアカウント内の画像に直接アクセスできます。
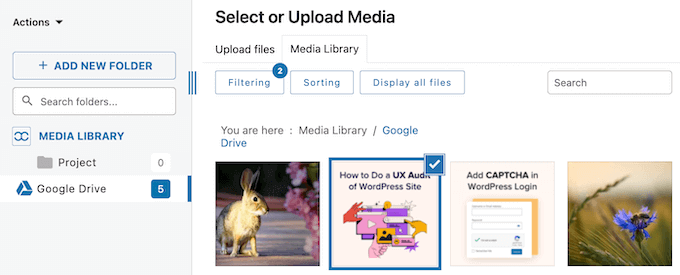
この統合により、ボタンをクリックするだけで、どのページや投稿にもGoogleドライブの画像を追加することができます。
複数投稿者のWordPressブログを運営したり、ゲストブログを受け入れたりしていますか?
WordPressのダッシュボードを他の人と共有している場合、GoogleドライブとWordPressを接続することで、Googleのパスワードを共有することなく画像やファイルを共有することができます。
これにより、Googleアカウントを安全に保ち、Googleドライブへのアクセスが不要になった人を簡単にロックできる。
それでは、GoogleドライブをWordPressのメディアライブラリに接続する方法を見てみよう。
GoogleドライブをWordPressのメディアライブラリに接続する方法
Google ドライブをWordPressに接続する最も簡単な方法は、JoomUnited WP Media Folder Cloud Addon Google ドライブ Integrationを使用することです。
このプラグインとアドオンを使えば、WordPressのメディアライブラリからGoogleドライブのファイルにアクセスできる。また、フォルダを作成し、Googleアカウント内のファイルを整理することができます。
さらに詳しく知りたい方は、WP Media Folderのレビューをご覧ください。
WP Media Folderプラグインのセットアップ
最初に行う必要があるのは、WP Media Folderプラグインをインストールして有効化することです。詳しくは、WordPressプラグインのインストール方法のステップバイステップガイドをご覧ください。
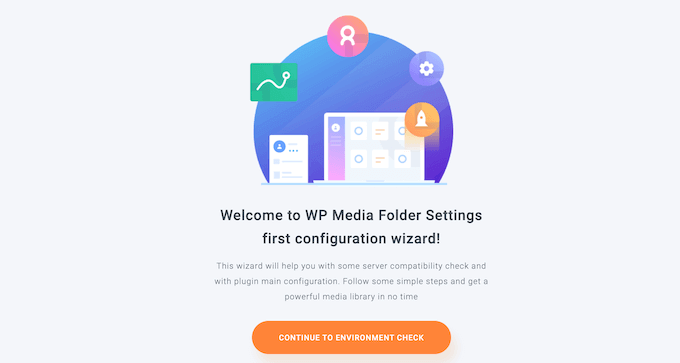
有効化すると、セットアップウィザードが表示されます。開始するには、「環境チェックに進む」ボタンをクリックしてください。
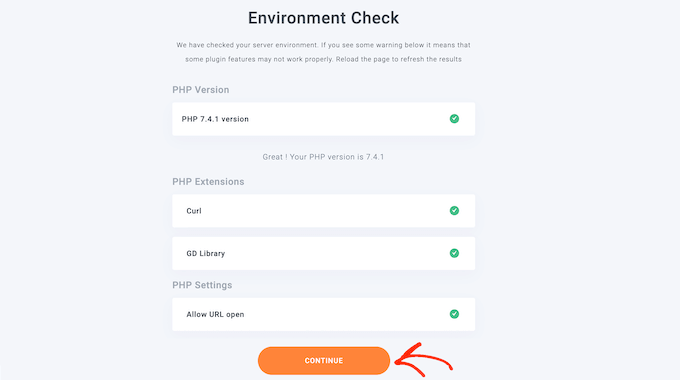
しばらくすると、WP Media FolderにPHPのバージョンや拡張機能など、WordPressの環境に関する情報が表示されます。
続行するには、「続行」ボタンをクリックします。
ギャラリーとライトボックス機能を無効化するかどうかを選択できるようになりました。
これらの機能により、WordPressメディアライブラリ内のフォルダーの作成、編集、削除が有効化されるので、有効にしておくことをお勧めします。
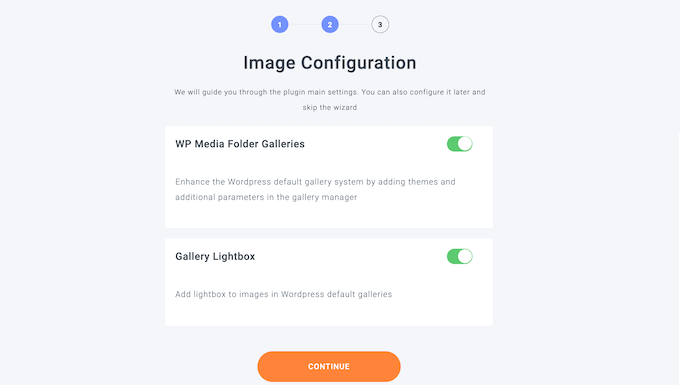
完了したら、「Continue」ボタンをクリックする。
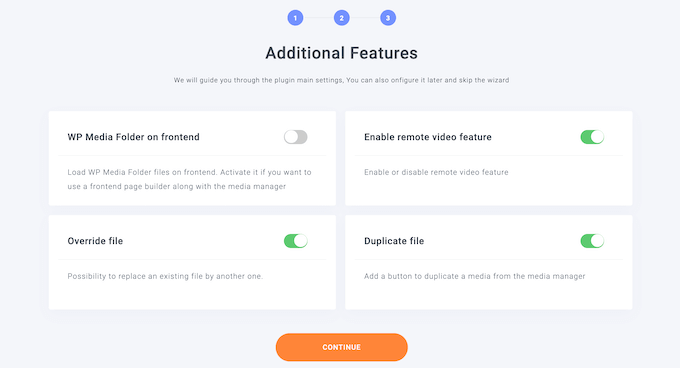
使用したい追加機能が表示されます。ほとんどのWordPressサイトでは初期設定で十分ですが、トグルを使って追加機能を有効化することができます。
例えば、WordPressページビルダーを使用している場合、「WP Media Folder on frontend」機能を有効化するとよいでしょう。
設定に問題がなければ、「Continue」をクリックします。
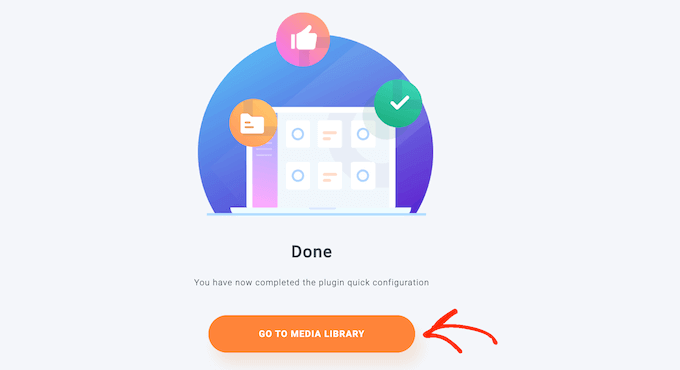
しばらくすると、以下のメッセージが表示されます:プラグインのクイック設定が完了しました。
準備ができたら、「メディアライブラリへ」ボタンをクリックします。
WP Media Folder Cloudアドオンのインストール
次に、WP Media Folder Cloud アドオンをインストールして有効化する必要があります。このアドオンは、WordPress プラグインをインストールするのと同じ方法でインストールできます。
WP Media Folderには自動コネクターがあり、Google Cloud Consoleでプロジェクトを作成することなく、WordPressとGoogleドライブを連携させることができます。そのため、自動コネクタを使用することをお勧めします。
しかし、コネクタを使用できない場合は、このガイドの最後に手動でGoogleドライブに接続する方法を紹介します。
GoogleドライブをWordPressのメディアライブラリに接続するには、設定 ” 一般に移動する必要があります。
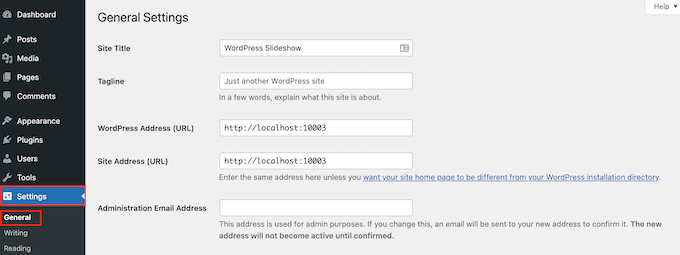
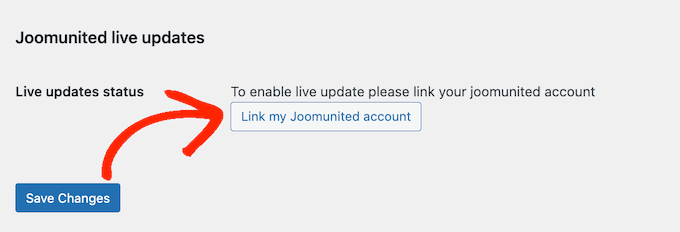
ここで、「Joomunitedライブ更新」セクションまでスクロールする。
次に、’Link my Joomunited account’をクリックします。
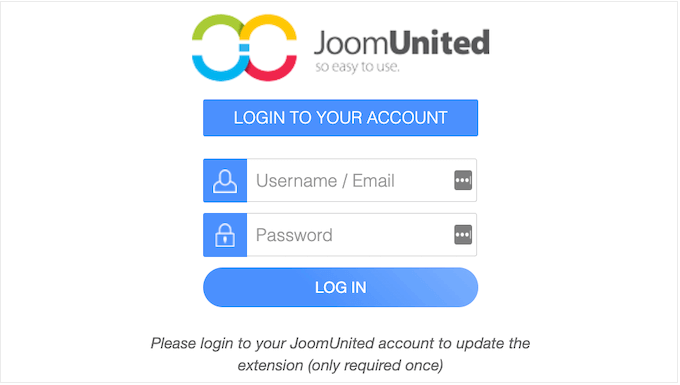
ポップアップが表示されたら、JoomUnitedアカウントのメールとパスワードを入力します。
その後、「ログイン」をクリックするだけです。
これで、GoogleドライブをWordPressブログに接続する準備が整いました。
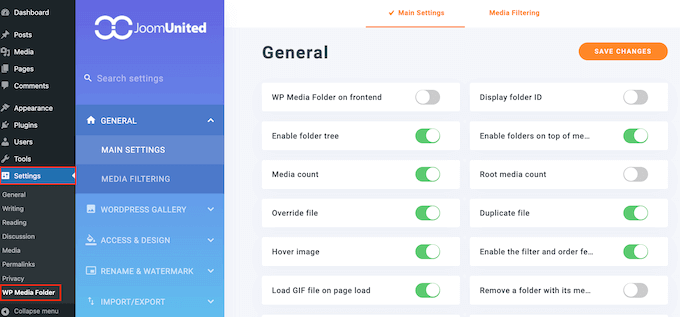
設定 ” WPメディアフォルダー“をクリックしてください。
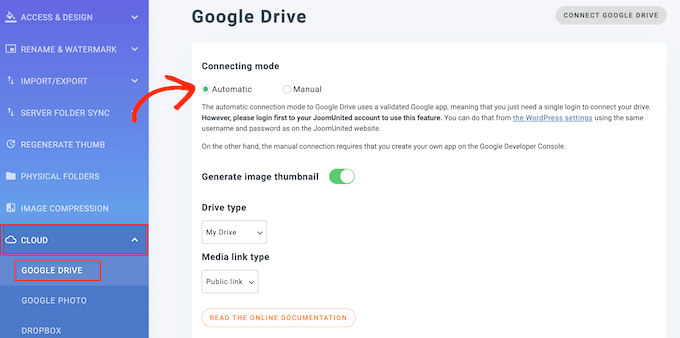
左側のメニューで「クラウド」と「Googleドライブ」を選択する。
ここで「自動」をクリックする。
Googleドライブを接続する」ボタンをクリックします。
Googleドライブの画像を整理する方法
Googleドライブに接続すると、WordPressのダッシュボードで直接ファイルにアクセスし、整理することができます。
メディア ” ライブラリに移動し、左側のメニューで新規Googleドライブオプションを選択するだけです。
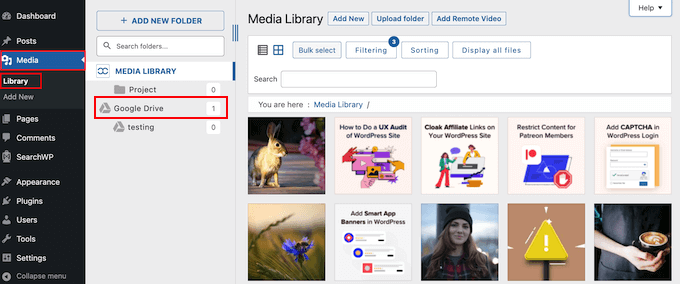
Googleドライブ内の画像をすべて閲覧できるようになりました。
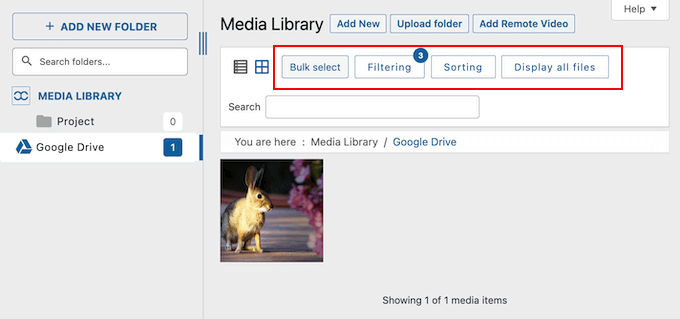
さらに、ツールバーのボタンの列を使用して、これらの画像をフィルターにかけたり、並べ替えたり、より多くのファイルタイプを表示することができます。
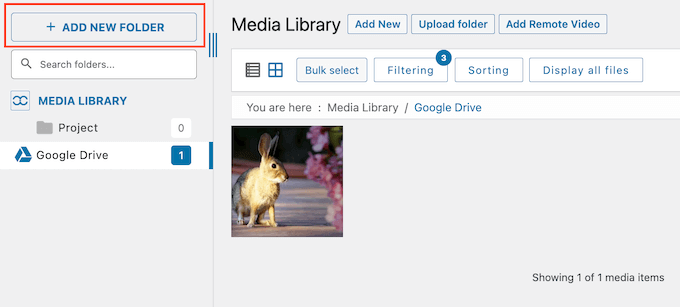
また、新しいフォルダーを作成して画像を管理することもできます。WordPressダッシュボードで行った変更は、接続されているGoogleドライブアカウントに自動的に同期されます。
こうすることで、ユーザーはGoogleアカウントに直接アクセスできなくても、画像を整理・管理することができる。
まず、「新規フォルダーの追加」ボタンをクリックして、新規フォルダーを作成します。
表示されるポップアップで、フォルダーの名前を入力します。
そして、『作成』をクリックするだけです。

これにより、Googleドライブの親フォルダーの下に新しいフォルダーが作成されます。
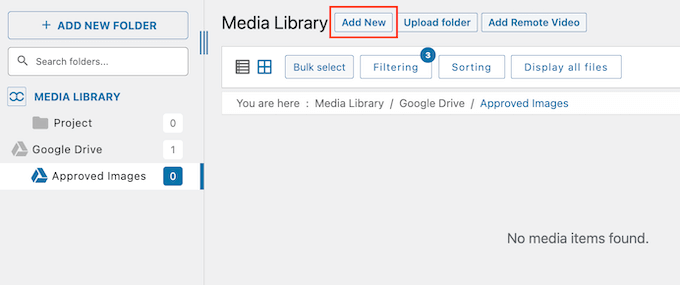
フォルダに画像を追加するには、「新規追加」ボタンをクリックし、ローカルコンピューターからファイルを選択します。この画像は、WordPressメディアライブラリとGoogleドライブアカウントの両方に追加されます。
WordPressサイトをしばらく運営している場合、すでにメディアライブラリにたくさんの画像が保存されているかもしれません。この場合、これらのファイルをGoogleアカウントにアップロードすることで、WordPressのコンテンツをGoogleドライブに簡単にバックアップすることができます。
メディアライブラリ」を選択します。
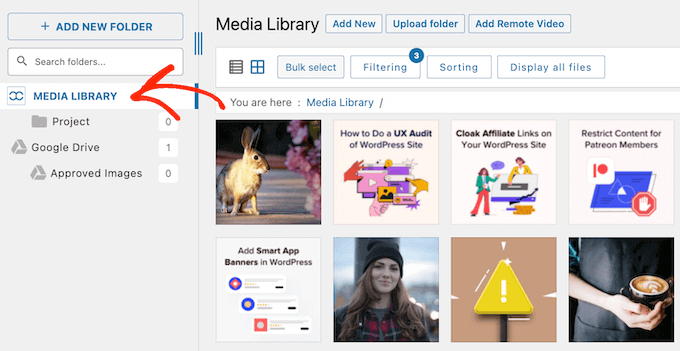
次に、Googleドライブにアップロードしたい画像を探します。
画像をGoogleドライブの親フォルダまたは作成したサブフォルダにドラッグ&ドロップすることができます。
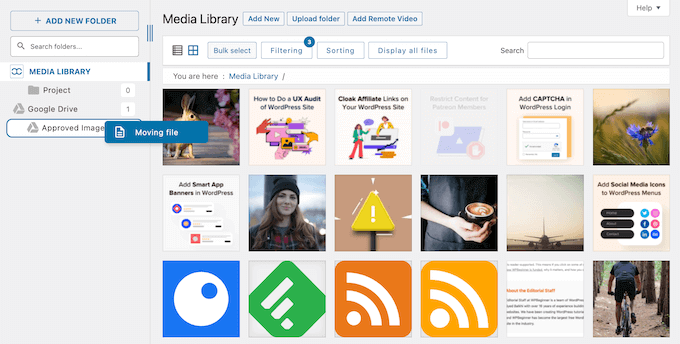
これらの手順を繰り返すだけで、メディアライブラリ内のWordPressファイルを整理することができます。
WordPressサイトにGoogleドライブの画像を追加する
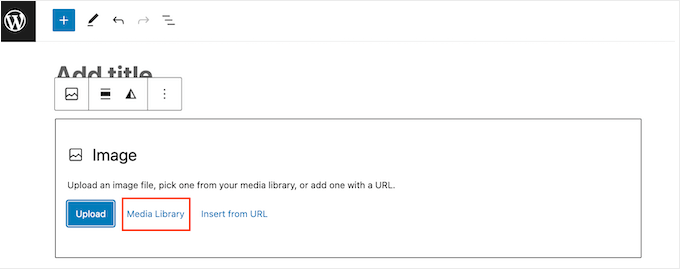
Googleドライブの画像をWordPressのページや投稿に簡単に追加できるようになりました。WordPressのコンテンツエディターでImageブロックを追加し、「メディアライブラリ」ボタンをクリックするだけです。
WordPressのメディアライブラリで、「Googleドライブ」を選択するか、任意のGoogleドライブフォルダーを選択します。
追加できるメディアファイルがすべて表示されます。
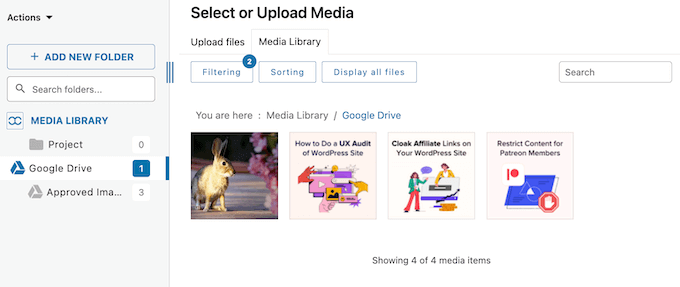
使いたいファイルをクリックするだけです。
これで、WordPressで画像を追加するのとまったく同じ方法で、画像のaltテキストを入力したり、キャプションを追加したりすることができる。
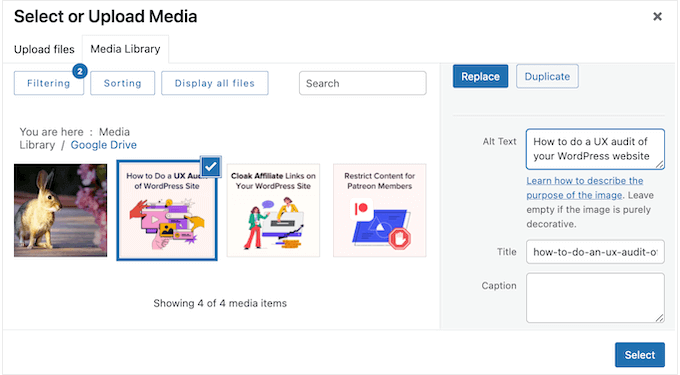
準備ができたら、「選択」ボタンをクリックしてください。WP Media FolderがWordPressのページや投稿に画像を追加します。
手動でGoogleドライブをWordPressメディアライブラリに接続する
WP Media Folderの自動コネクタを使用したくない場合は、Google Cloud ConsoleでGoogleドライブに手動で接続することができます。
Googleクラウドプロジェクトの作成
まずはGoogle Cloud Consoleにアクセスしてください。コンソールに初めてアクセスする場合は、利用規約に同意し、更新メールを受信するかどうかを選択する必要があります。
同意して続行」をクリックする。
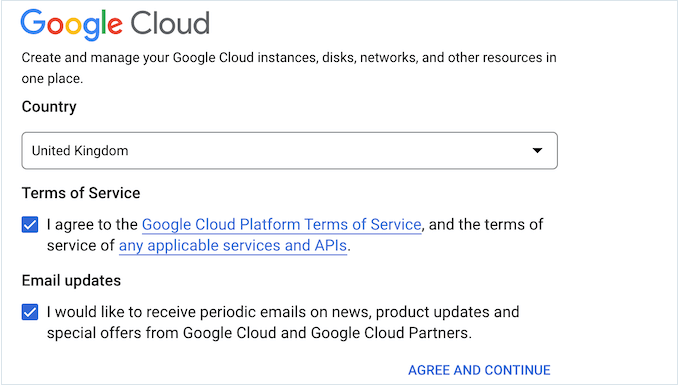
Google Cloud Consoleに移動します。
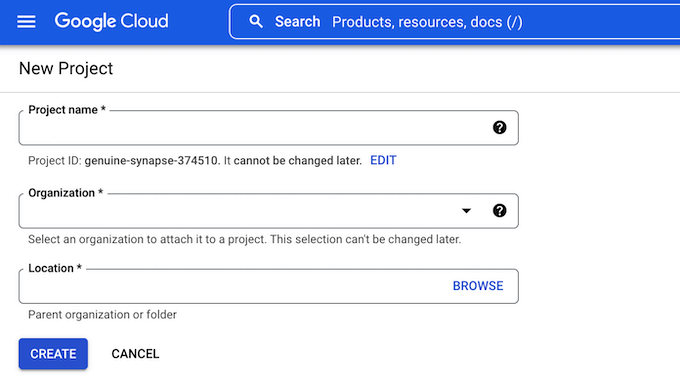
新規プロジェクトを作成する必要がありますので、「プロジェクトを選択」をクリックしてください。
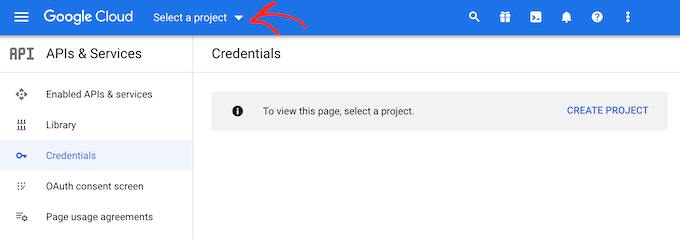
表示されるポップアップで「新規プロジェクト」を選択する。
プロジェクトの名前を入力します。これは参考のためなので、好きなものを使ってください。
この画面では、オプションの組織を追加し、Google Cloud Console がプロジェクトを作成する場所を変更することもできます。
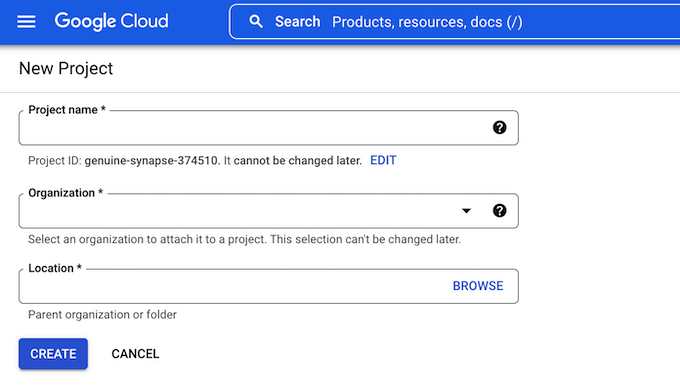
入力した情報に問題がなければ、「作成」をクリックします。
Google ドライブ APIを有効化する。
その後、左側のメニューから「Enabled APIs & Services」を選択し、「Enable APIs and Services」をクリックする。
この画面では、有効化できるすべてのAPIが表示されます。例えば、YouTube Data APIを有効化してYouTubeチャンネルの最新動画を表示したり、Calendar APIを使ってWordPressにGoogleカレンダーを追加したりできます。
Google ドライブとWordPressを接続するには、「Google Workspace」セクションまでスクロールし、「Google ドライブ API」をクリックする。
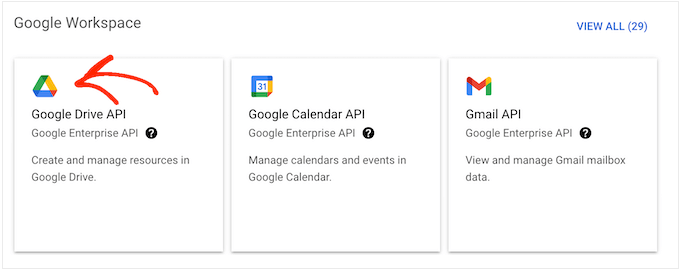
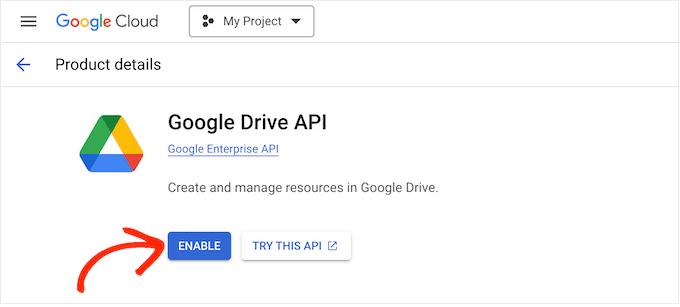
WordPressがGoogleドライブにアクセスする際に使用するキーを有効化する画面になります。
有効化』ボタンをクリックしてください。
OAuth 2.0クライアントIDの作成
左上のラインアイコンをクリックしてメニューを開く。
次に、’API & Services’を選択し、続いて’Credentials’を選択する。
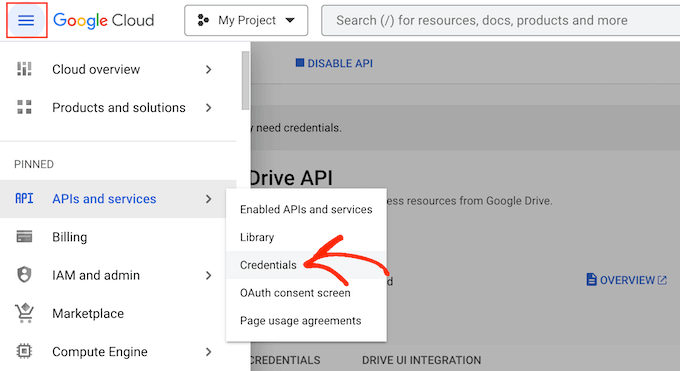
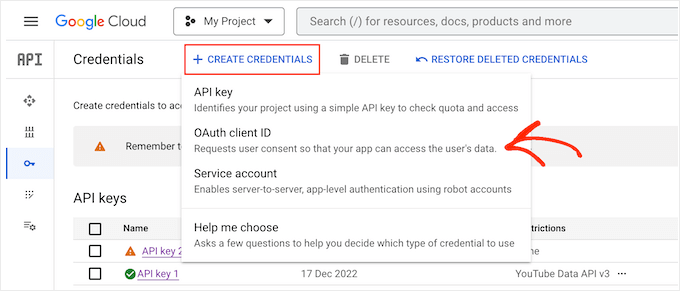
ここで、「Create Credentials」をクリックする必要があります。
ドロップダウンメニューで、「OAuthクライアントID」を選択する必要があります。
次の画面で「Configure Consent Screen」ボタンをクリックする。
内部アプリを作成するか外部アプリを作成するかを選択できます。内部’を選択した場合、組織内のG Suiteユーザーだけがアプリにアクセスできます。外部’を選択すると、Googleアカウントを持っている人なら誰でもアプリを利用できるようになります。
決定したら、「作成」をクリックします。
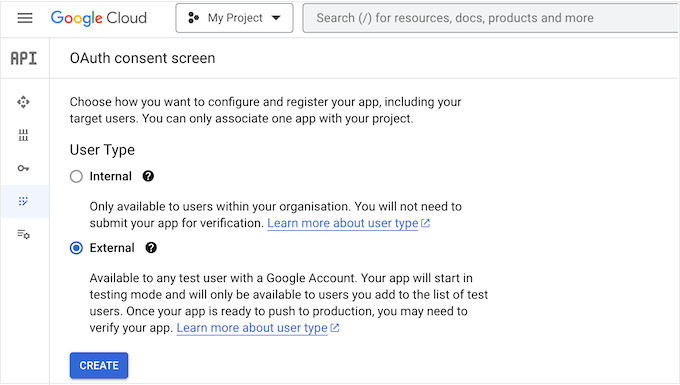
ここで、Googleアプリに関する情報を入力し、ビジネス用のメールアドレスを追加する必要があります。
また、アプリケーションを使用する予定のドメイン名を入力する必要があります。
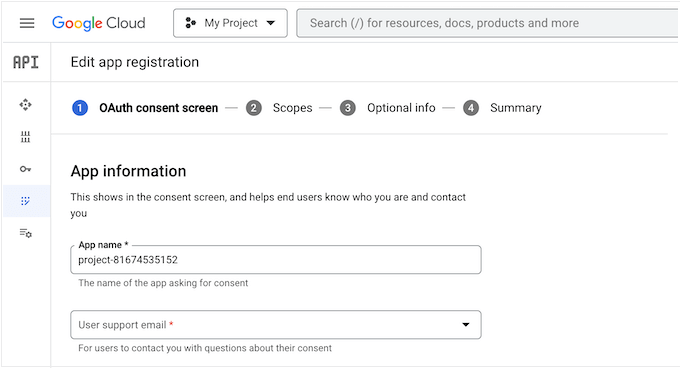
このフォームに記入後、「Save and Continue(保存して続行)」ボタンをクリックしてください。
スコープを追加することで、アプリがアクセスできるコンテンツや実行できるアクションを指定できるようになります。Googleドライブのスコープをすべて見るには、「スコープを追加または削除」ボタンをクリックしてください。
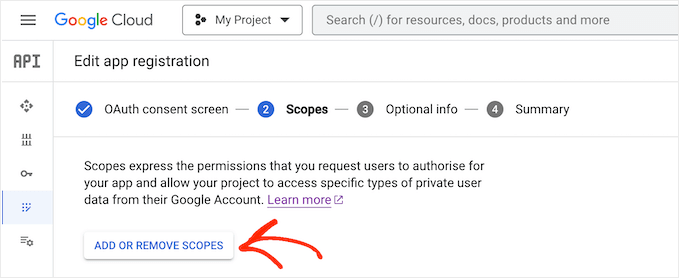
プロジェクトにスコープを追加するには、そのボックスにチェックを入れるだけです。
ただ、Googleはセンシティブとマークされたスコープをレビューすることに注意してください。
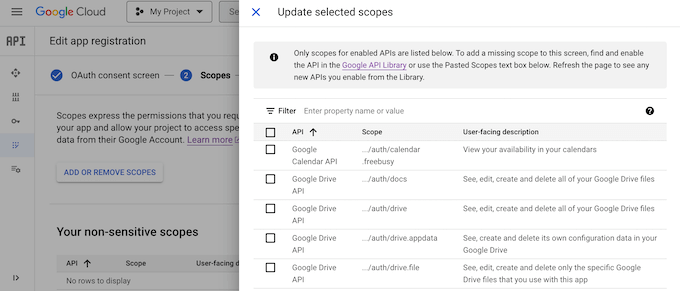
使用したいスコープをすべて追加したら、「更新」をクリックします。
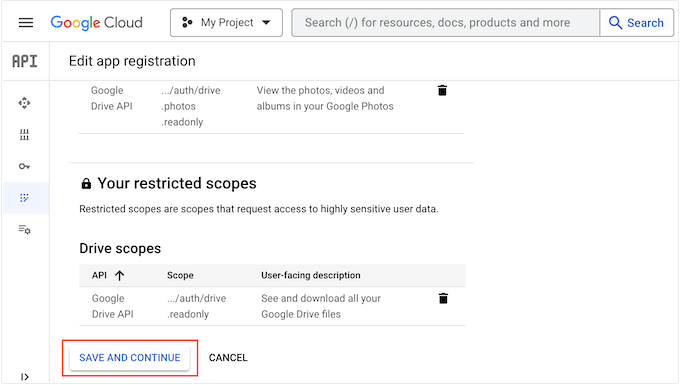
次の画面に移るには、「Save and continue」をクリックします。
この時点で、アプリケーションの使用方法など、アプリケーションに関する詳細情報を入力するとよいでしょう。
この設定はオプションですが、Googleがあなたのプロジェクトをより迅速に確認し、承認するのに役立つ場合があります。
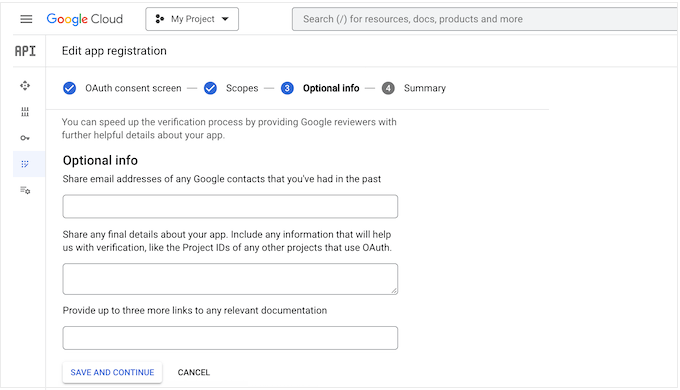
次に進む準備ができたら、「保存して続行」ボタンをクリックします。Googleが入力したすべての情報の要約を表示します。
次に、ラインアイコンをクリックしてメニューを開き、「OAuth同意画面」を選択します。
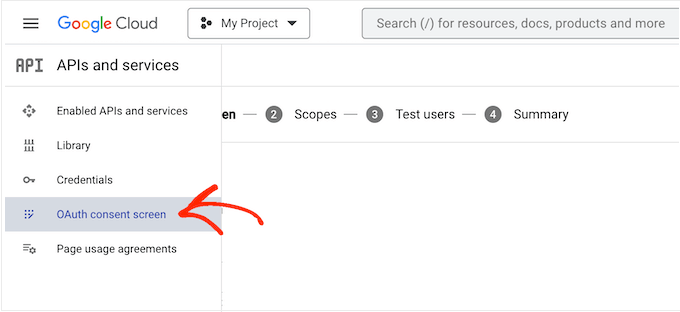
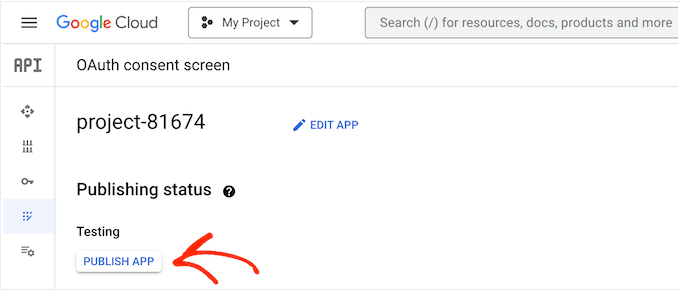
アプリが現在テスト・モードであることがわかります。
アプリを公開するには、「アプリを公開する」をクリックします。
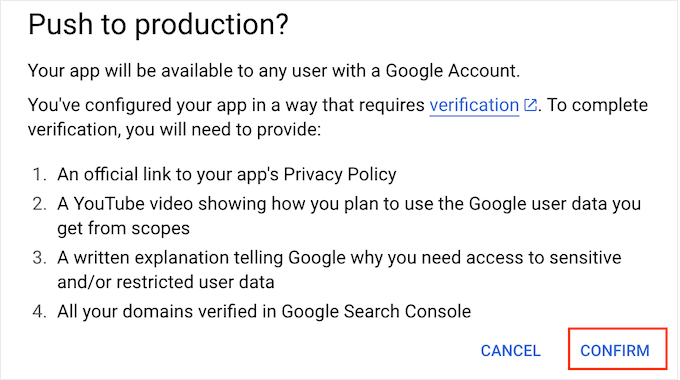
Google Cloud Console には、検証プロセスを通過するために必要な追加ステップに関する情報が表示されます。これには、プライバシー ポリシーへのリンクの追加やGoogle Search Console への WordPress サイトの追加が含まれます。
この情報を読んだら、「確認」ボタンをクリックしてください。
WordPressにクライアントIDとクライアントシークレットを追加する
これで、クライアントIDとシークレットキーを作成する準備ができた。
左側のメニューで「ログイン情報」を選択します。
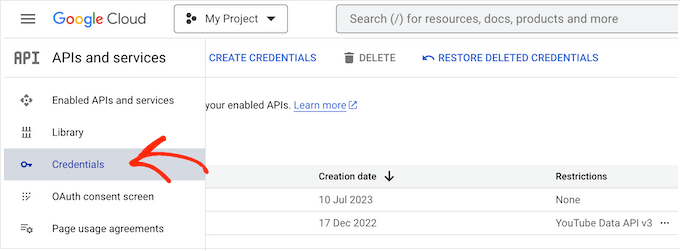
次に、「ログイン情報を作成」をクリックします。
表示されるドロップダウンで、「OAuthクライアントID」を選択する必要があります。
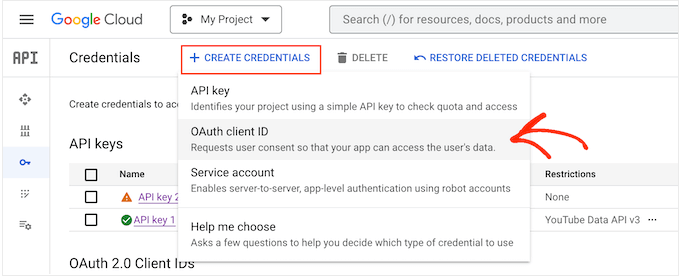
次の画面でドロップダウンメニューを開き、「Webアプリケーション」を選択します。
OAuth 2.0クライアントの名前を入力します。これは単なる参考なので、好きなものを使ってください。
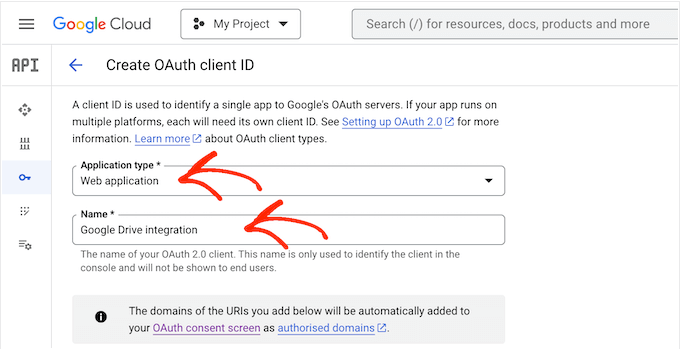
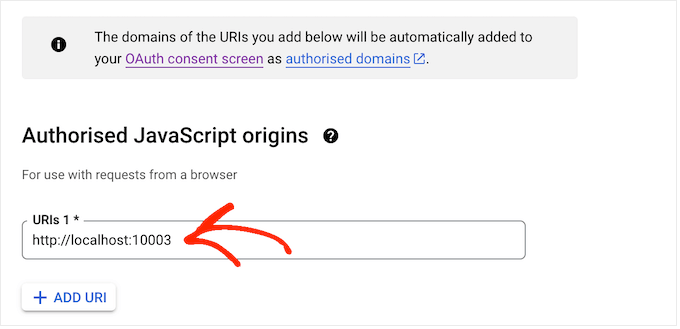
次に、「Authorized JavaScript origins」セクションまでスクロールする。
フィールドに、あなたのサイトのドメイン名を入力します。
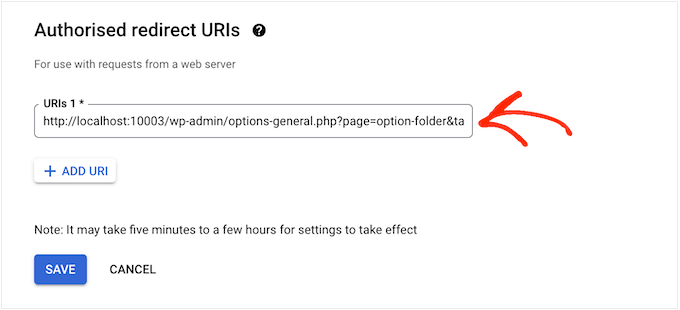
Authorised redirect URIs」に以下のURLを追加し、「https://your-domain.com」を自分のドメイン名に置き換えてください:
https://your-domain.com/wp-admin/options-general.php?page=option-folder&task=wpmf&function=wpmf_authenticated
その後、画面を一番下までスクロールし、「Create」をクリックする。
しばらくすると、GoogleがあなたのクライアントIDとクライアントシークレットをポップアップで表示します。この情報は必要になりますので、安全な場所にメモしておいてください。
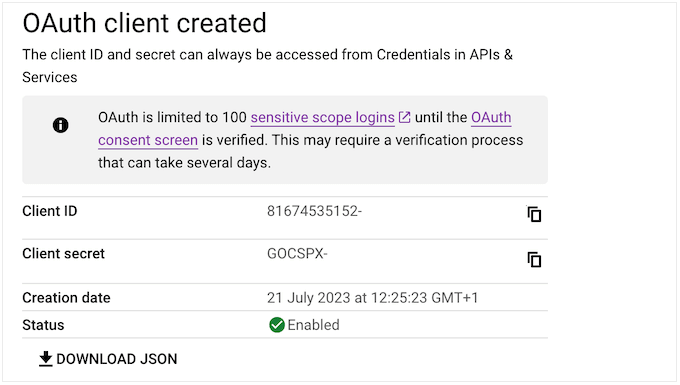
また、情報をJSONファイルとしてダウンロードすることもできる。
WordPressにクライアントIDとクライアントシークレットを追加するには、WordPressダッシュボードの設定 ” WPメディアフォルダに移動します。
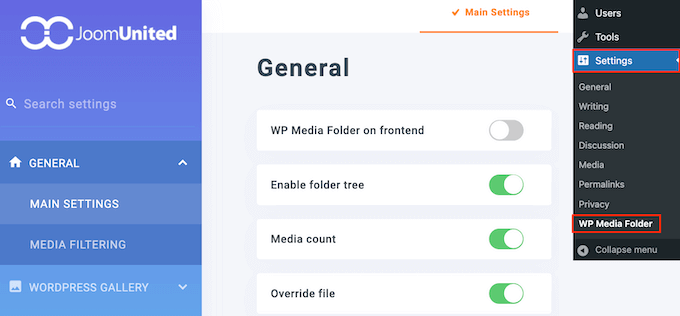
左側のメニューで「クラウド」を選択し、次に「Googleドライブ」を選択する。
次に、『マニュアル』を選択する必要がある。
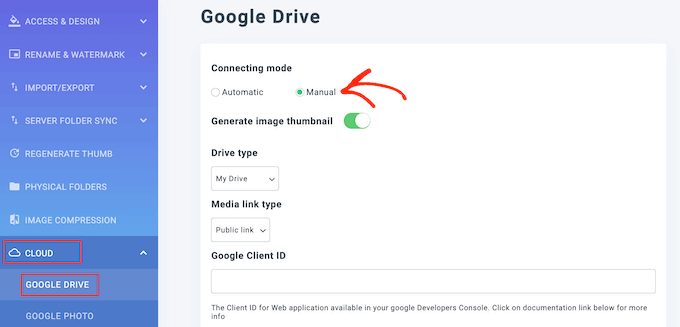
GoogleクライアントID’と’Googleクライアントシークレット’フィールドにクライアントIDとクライアントシークレットをペーストするだけです。
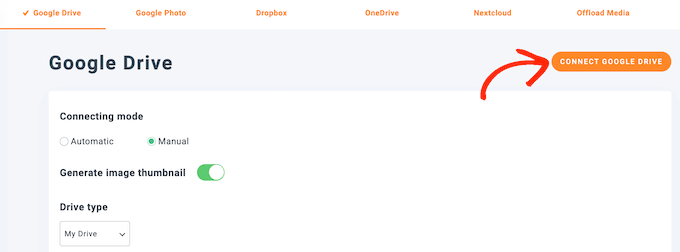
Google Driveに接続」をクリックします。
表示されるポップアップで、使用するGoogleドライブアカウントを選択します。
アプリがアクセスできるすべてのデータと実行できるタスクに関する情報が表示されます。アプリが要求している各権限の横にあるボックスをチェックするだけです。
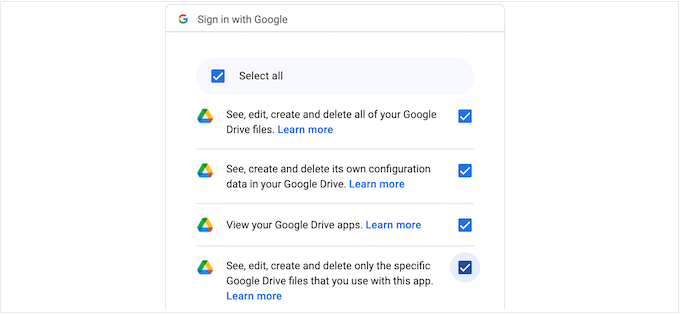
そして「Continue」をクリックする。
最後に「変更を保存」ボタンをクリックします。
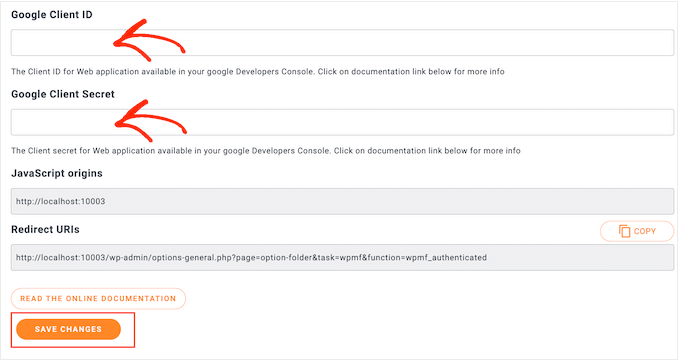
これで、GoogleドライブとWordPressメディアライブラリの接続は完了です。
ボーナス:GoogleドキュメントをWordPressにインポートする
Googleドライブとサイトを接続する以外に、GoogleドキュメントをWordPressにインポートすることもできます。
例えば、サイトでゲスト投稿を受け付けている場合、ユーザーがGoogleドキュメントで投稿を送信すると、ブロックエディターでコンテンツを直接コピー&ペーストすることはできません。
そうすると、不要なHTMLタグがたくさん出てきて、時には元の書式がすべて失われてしまうことさえある。
その場合、コンテンツをWordPressにコピー&ペーストするよりも、Google Docsファイルをインポートする方がはるかに簡単です。そのためには、人気の文法ツールであるGrammarlyを使うとよい。
このプラットフォームでアカウントを作成し、Googleドキュメントのコンテンツをエディターに貼り付けるだけだ。
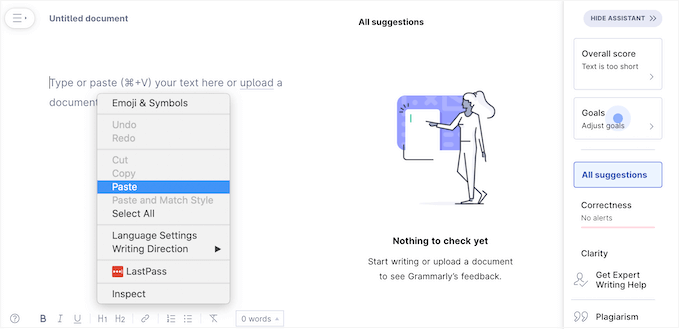
そうすると、コンテンツからすべてのHTMLタグが自動的に削除されます。これで、ブログ投稿をコピー&ペーストしてWordPressのブロックエディターに貼り付けることができ、HTMLタグのない適切なフォーマットで表示されるようになります。
詳しい手順については、GoogleドキュメントをWordPressに簡単にインポートする方法のチュートリアルをご覧ください。
この投稿が、GoogleドライブをWordPressのメディアライブラリに接続する方法のお役に立てば幸いです。また、WordPressデータベースのバックアップを手動で作成する方法や、WordPressに最適なDropboxプラグインをご紹介します。
If you liked this article, then please subscribe to our YouTube Channel for WordPress video tutorials. You can also find us on Twitter and Facebook.


Yinka
hi,
please is there a way to Link media from hard drive on computer with wp site, instead of uploading it to media library… thanks
WPBeginner Support
We do not have a recommended method for that at the moment as that would require your computer to send the images to anyone trying to view them on your site and if your computer is ever turned off they would no longer be able to see images on your site until it is turned back on.
Admin
sashi hari sulochan
i am using this plugin to embed videos in my wordpress website, how to hide the poput option of google drive
WPBeginner Support
For customizing the plugin, you would want to reach out to the plugin’s support and they should be able to assist you
Admin
Ted Keith
I get all the way through this and have the import from google button. Click on the button and sign in with google. Nothing happens, Just goes right back to the import from google button screen. Sigh… wish stuff just worked sometimes. That’s an hour wasted.
Gabriel
Same as below. I can import photos from Google Drive but it doesn’t upload properly, it shows a grey box. Images are not imported. What should I change? Thanks for your support
derred beh
after following the steps, I can import photos from Google Drive,
but the file size is just 962B, and when try to view them, I just see a black page, with the square box in it.
Looks like the images are not properly imported?
How to fix this?
Giwa
my clients newly design WordPress e-commerce site and he is selling eBook. can he use google drive as storage where the buyer can download the eBook after payment?
thisisyeeseul
I am using it but it’s still using WordPress storage.
i wonder, is it possible to use it without storing wordpress?
plz let me know! thanks!
Stephanie
I just tried to install the plugin and it crashed my entire site. Anything I click on gives me this error.
Parse error: syntax error, unexpected in /home/content/02/14034602/html/wp-content/plugins/external-media/plugins/Box.php on line 75
This error is the only thing showing on my site to the public right now.
HELP!
WPBeginner Support
Hi Stephanie,
Please uninstall the plugin. Here is how to deactivate plugins when not able to access WordPress admin area.
Admin
Kerry
Hi TARIQ, CAn you help me?
On the AOath consent screen..there is a place to click on your Gmail account …my husband’s keeps coming up and it’s not giving me any way to put in my address. This occurs right before “product name shown to users”. How will it know to access my Gmail account/photos.?
Courtney
This is not working. I uploaded the plugin and had to do a very complicated Developer setup on Google and WordPress setup. But it is does not do what I need. I need to be able to upload the photos out of my Google Photos into my WordPress.org site, period. This does not display all my updated photos and instead has my documents from years back. The few photos it does show import in as a Google code instead of a picture.
Please develop a simple Google Photos upload plug-in instead of this.
Arsyila Maulidia
Yes, nice info, i just apply on my web and succsesfully connect to google drive,
I’m arsyila
Great from Indonesia
Succses for wpbeginner
Tariq
Question,
Is this method will fit Google SEO requirements? I dont think so and this will reduce our score. (If it will work)
The correct way using google drive with ANY website is to have G-Suit account and point an Google website (Only available in G-Suite since last Aug, 31 2017) as a sub domain in your website. This way you will increase your score by hosting static content in CDN.
Good luck.
J. Nijhuis
This is not a CDN, it;s just an addon for directly browsing Google Drive images from within WP. The files are imported into your WP media library just like any other image you upload.
Mayank
Found an error, unable to work.
Uncaught TypeError: Cannot read property ‘add’ of undefined
at Object. (external-media-view.js:23)
Abdulaziz Alnasi
as you know that google offers Google photos service for free with unlimited storage, so what I think about is to store my images into google photos instead of having them on my host.
since I have shared hosting this method will decrease the load on my server.
so the question is: is (Google Drive) way will allow me to store my images into Google photos instead of google drive?
sachin
Google not giving permission for uplkoading iamges from drive
Tariq
No, Google give permission to host your image and call it from Google drive folder inside your website but ONLY if you are G-Suit member.
Virgo
With the plugin version 1.10.14 the callback url is changed from
example.com/index.php?external_media_plugin=GooglePickerAPI
to
example.com/index.php?external_media_plugin=GoogleDrive
And in the Google API Console you need to enable the Google Drive APi too!
Paresh Wadhwani
do the 2 mb file size limit applies while transfering files from google drive…..Please reply
galodu
Great plugin. Thanks a lot for through instructions. Everything is in place. Only issue I am facing is that the images are not properly imported to media library. Images are corrupted. Please let me know how to solve the issue.
Orestis Rovakis
That’s very informational and i will use it soon. But what brought me here waas the search for a way to transfer all my media filew to Google Drive so i can save space from my server. Does anyone know anyway to do that?
Dinil Abeygunawardane
This is great, but this imports files to WP!
Is there a way to display images on WP without importing them?
Tony
I totally agree. This is what brought me here too. A way to display images from a cloud storage service such as Dropbox or Google Drive without storing them into WordPress Media Library!
This would be totally useful. What about CDN’s, do they do that?
vikash
hi Tony
Do Know that how is it possible? please tell me in detail i really need this for my website. thank you
Tariq
This already Google drive offer it exactly in the way you ask but you need to be Google Suit member for 5$/m and they are giving you a real big benefit for this money, not only G-Drive, but much much more.