Avez-vous déjà essayé de redimmensionner une image pour l’agrandir, mais en perdant la qualité de l’image ?
Lorsque vous essayez d’agrandir une image, elle peut paraître floue et non professionnelle. Une image est composée de milliers de pixels, et lorsque vous augmentez sa taille, ces pixels deviennent visibles. Le résultat est une image terne et de mauvaise qualité.
Dans cet article, nous allons vous afficher comment redimmensionner des images pour les rendre plus grandes sans perdre en qualité.
Pourquoi les images perdent-elles de leur qualité lorsqu’elles sont agrandies ?
Le bitmap est le format d’image le plus couramment utilisé sur le web. Tous vos fichiers JPEG et PNG sont des fichiers d’images bitmap. Une image bitmap est composée de milliers de pixels. Si vous faites un zoom avant, vous pouvez voir ces pixels sous forme de carrés.

Chacun de ces pixels est associé à un emplacement corrigé sur l’image, d’où le nom de Bitmap.
La plupart des logiciels de modification d’image rétrécissent ou modifient ces pixels pour redimmensionner une image. Aucun de ces pixels n’est visible lorsque l’on redimmensionne une image à une taille inférieure. Principalement parce que ces pixels deviennent encore moins visibles.
En revanche, lorsque vous redimmensionnez une image dans WordPress pour la rendre plus grande, ces pixels agrandis deviennent plus visibles, ce qui donne à l’image un aspect flou et pixellisé.

La solution consiste à compenser chaque pixel agrandi pour qu’il corresponde aux propriétés du pixel le plus proche. Cette méthode est appelée interpolation fractale ou simplement fractale. Elle permet d’obtenir un bien meilleur résultat lorsqu’une image est agrandie à l’aide de cette technique.
Voyons comment utiliser les logiciels de modification d’image les plus courants pour votre site WordPress afin de redimmensionner les photos. Vous pouvez utiliser les liens ci-dessous pour passer à n’importe quelle méthode en un seul clic.
Méthode 1 : Agrandissement des images à l’aide de GIMP (gratuit)

GIMP est une alternative gratuite aux outils haut de gamme comme Adobe Photoshop et Affinity Photo. Il peut également être utilisé pour agrandir des images avec une perte de qualité minimale. Cependant, nous devons vous avertir que le résultat ne sera pas aussi bon que Perfect Redimmensionner, que nous vous afficherons dans la méthode 3 ci-dessous.
Tout d’abord, vous devez télécharger et installer le logiciel gratuit sur votre ordinateur. Il est disponible pour les appareils Mac et Windows.
Ensuite, ouvrez l’image que vous souhaitez redimmensionner dans Gimp et allez dans Image » Redimensionner l’image.
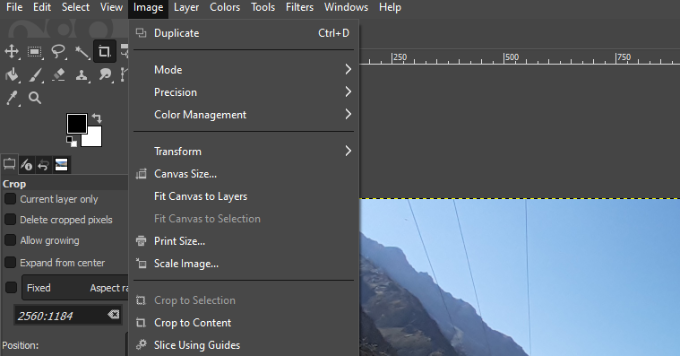
Saisissez ensuite la largeur et la hauteur pour définir les dimensions souhaitées.
Choisissez la méthode d’interpolation Cubique dans la section « Qualité » et cliquez sur le bouton « Redimensionner » lorsque vous avez terminé.
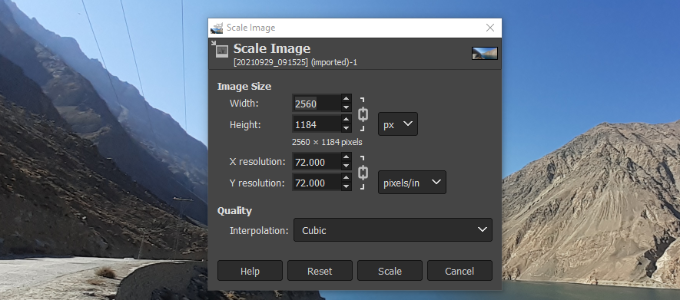
C’est tout, vous pouvez maintenant exporter l’image agrandie dans différents formats, comme PNGm JPEG, HTML, etc.
Méthode 2 : Agrandissement des images à l’aide d’Irfanview (gratuit)
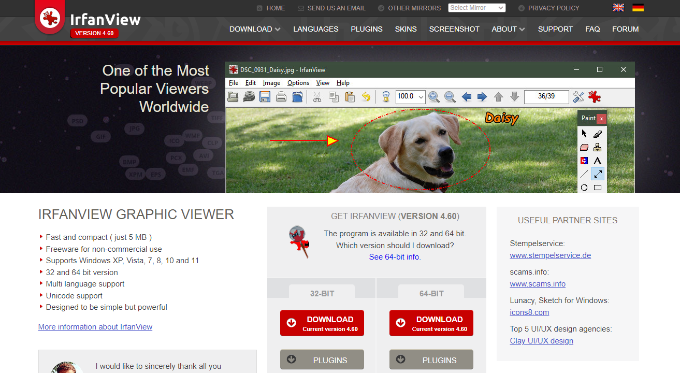
Irfanview est un programme de modification de photos compact et gratuit. Il est uniquement disponible pour les systèmes d’exploitation basés sur Windows et offre une manière plus intelligente de redimmensionner les images et de les rendre plus grandes.
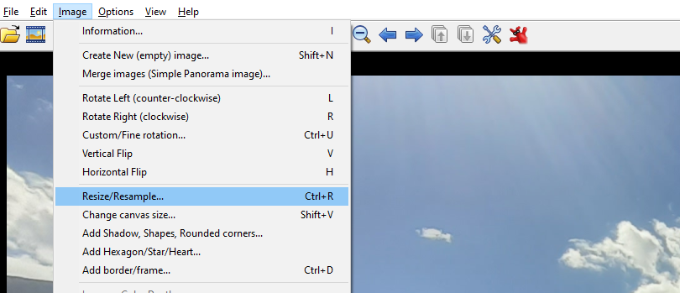
Il suffit d’ouvrir votre image dans Irfanview et d’aller dans Image » Redimmensionner/Rééchantillonner.
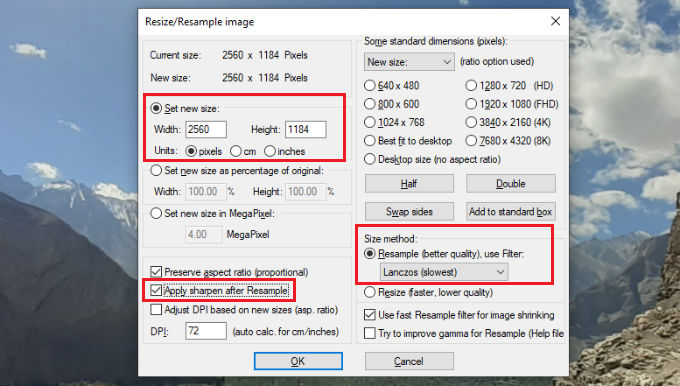
La fenêtre surgissante de redimmensionner l’image s’affiche. Tout d’abord, vous devez saisir la taille de l’image souhaitée dans le champ « Définir une nouvelle taille » en définissant la largeur et la hauteur.
Ensuite, vous devez sélectionner le rééchantillonnage dans la section « Méthode de taille ». Choisissez l’option « Lanczos (le plus lent) » dans le menu déroulant du filtre.
Dernier point, cochez la case à côté de « Appliquer la netteté après le rééchantillonnage » et cliquez sur le bouton OK lorsque vous avez terminé.
Irfanview redimensionne alors l’image, que vous pouvez ensuite enregistrer sur votre ordinateur.
Vous remarquerez peut-être que les outils gratuits ne redimensionnent pas très bien une image pour l’agrandir. Cependant, en ajustant la netteté et le contraste de l’image, vous pouvez agrandir les images et minimiser la perte de qualité au cours du processus.
Cela dit, vous pouvez également utiliser un outil de qualité supérieure pour vous assurer que l’image reste nette et claire lorsqu’elle est agrandie.
Méthode 3 : Agrandissement des images avec ON1 (Premium)
ON1 Resize IA, ou Perfect Resize comme il était connu auparavant, est un logiciel qui vous permet de redimmensionner vos images de manière intelligente. De plus, il offre une suite complète d’outils pour modifier les images.
Il est disponible en tant que logiciel autonome ainsi qu’en tant qu’extension pour Adobe Photoshop, Lightroom, Capture One et Apple Photos.
Le logiciel utilise l’intelligence artificielle pour aider à conserver vos images en haute résolution, même lorsque leur taille augmente ou que vous souhaitez zoomer sur une zone particulière.
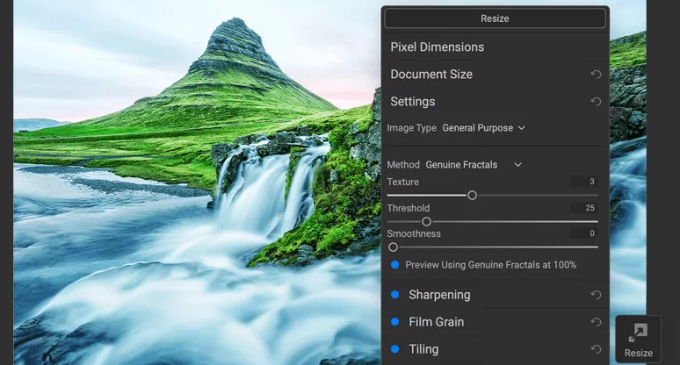
Le logiciel autonome ON1 Redimmensionner AL est disponible au prix de 69,99 $.
Nous espérons que cet article vous a aidé à apprendre comment redimmensionner des images pour les rendre plus grandes sans perdre en qualité. Vous pouvez également consulter notre guide sur WooCommerce rendu simple et comment choisir le meilleur logiciel de création de sites web.
If you liked this article, then please subscribe to our YouTube Channel for WordPress video tutorials. You can also find us on Twitter and Facebook.


Syed Balkhi says
Hey WPBeginner readers,
Did you know you can win exciting prizes by commenting on WPBeginner?
Every month, our top blog commenters will win HUGE rewards, including premium WordPress plugin licenses and cash prizes.
You can get more details about the contest from here.
Start sharing your thoughts below to stand a chance to win!
Shamsad says
For anyone seeing this in 2022, the gimp solution worked for me. The Sinc(Lanczos3) got replaced by NoHalo. Using this and scaling, I got to resize my png.
I always find quality solution in wpbeginner. Keep up the good work.
WPBeginner Support says
Thank you for sharing and glad our guide was helpful!
Administrateur
Dorki3 says
None of the above solutions helped me resize to the desired size and quality, i managed to resize the picture but the quality was very poor! thank you for the effort tho! found some nice picture software!
WPBeginner Support says
Sorry that you couldn’t solve the issue on your end but glad you liked our recommendations for tools
Administrateur
Giorgio says
Hi, with Gimp is perfect. But if I have lot of photos is there a solution for automate with gimp?
Thanks
Giorgio
WPBeginner Support says
Unless I hear otherwise, we don’t have an automation tool to work with Gimp like that at the moment.
Administrateur
Chris Campbell says
Unfortunately the instructions call for opening an image in PS and then selecting File > Automate >Perfect Resize, but there is no Perfect Resize option available. Not sure how an article this new is incorrect, but that what I’m seeing. Very frustrating now since the article encouraged me to spend $60.
WPBeginner Support says
There may have been an update to the option location. If you reach out to Perfect Resize’s support they should be able to let you know where the button is currently.
Administrateur
Jim Barker says
well the explanation of each item to use was great, except I tried to down load both free versions and neither one did anything to the picture I was trying to increase in size. it was wallet to 5×7. bummer
Peter says
Hello how do you make your mobile Nokia phone photos bigger to download on a shirt
Linto says
Thank you so much for this tutorial!!
Liene says
Thanks for this post. I haven’t heard about IrfanView, just now downloaded and it really does its job. Great. Thanks.
Melissa says
Hi!
I tried the perfect resize which I think is now called ON1, and I wasn’t able to resize from a 3 inch to an 8 inch without losing quality. I just wanted to ask you if you hay any idea why.
Thank you!
manish says
i great that i have founded the solution of my big and big problem.
i thank to the programmer of Irfanview and the web site designer.
thank a lot!!!!
Dufner says
I’ve used Perfect Resize software itself without Photoshop and it works better than just resizing with Photoshop without plugin. I did it at school where they had the license for the program. Never tried it in Photoshop with the Resize plugin, good to know! Thanks
anupama says
plz tell me what is hooks in wordpress? what is work of hooks ..
Safura Abbas says
Hi Team,
I am glad to have found my solution on this site. So very well explained and understood. Appreciate your help. I downloaded the trial version of ON1 software and my image that i was trying to enlarge for hours to print right on the paper went in vain until I found your blog. Kudos to Syed Balkhi and team for this informative site. Happy me
Thank you once again.
ashish says
nice tutorial awesome
Mike says
Thank you! Very useful
sedatbasman says
thank you for your help.
Rebecca Cunningham says
It works like magic! I’ve tried everything, and this is pure perfection. Thank you so very much.
DBlake says
Rebecca…which one did you use?
Tej says
Hey, I had taken a picture of some old photography but it’s looks worst. How I can increase its quality
Irineu says
I have used the extension Simple Image Resizer, Chrome, and have had good results. I’m from Brazil. Congratulations.
Rosie says
But it does not make images LARGER – which is the point of the article!
Anthony says
This is what i’ve been looking for. PS CC has limited options for retaining image size after merging it with several other layers. Thanks a lot!
May says
I’m using the Gimp resize (logo obtained but company wont resize) and it still is a resolution I cant use?
Dana says
Thank you! I have been looking for a resize plug in on photoshop!–Works great!!!!
Carol says
I have two questions:
1. I know next to nothing about photoshop, but I do use Lightroom 6 when editing images. Is there a way that is similar to the ways mentioned here to do the same in Lightroom?
2. In another article here on WPBeginner, someone commented that the days of lowering the photo resolution for a faster site are practically over. If so, what is the recommended mg size & dpi for most blog photos? (This is a photography blog site, so I want them to be as clear as possible.)
Thanks.
Rebecca Rose says
Hi and thank you for your site. I am a rank Beginner (to put it mildly) and found your site while searching the web for information on how to resize photos for Windows Movie Maker.
Right now I want to make Slide Show « movies » for the music I compose … but, those black panels on either side of the smaller photos that I use are a real turn-off! So, I am trying my best to learn what to do … I own Photo Shop – but sadly, as yet I have never used it. After reading the above comments, I think it’s time! Any other comments you have would be VERY welcome …
Richard Cunningham says
Here is a simple solution if you are challenged by loss of definition/blurring or over pixellation when you re-size an image. My problem was with a business card where I had an excellent large image in .jpg format but I could not figure out how to retain the definition quality when I reduced it using gimp.
Voila!
Assume that you have an excellent .jpg image which is A4 size and you want to reduce it to a business card size allowing for trim and bleed of 3.6 inches by 2.1 inches at 300 dpi. If you try to edit the file in Gimp, you will end up with unacceptable quality. I wasted hours!
Try this:
1. Open a new file using a 300 dpi template. Set the size parameters as you want them to be – 3.600 x 2.100.
2. Open the file you want to resize – in this case you want to downsize.
3. While in this file, hit Edit – Copy.
4. Go to the new file and hit Edit – Paste.
Check the image details and you will find that you have a perfectly defined reduced 3.6 inch by 2.1 inch image at 300 dpi !
Eshaan says
How do you make an image smaller than its original size without losing quality?
And I mean really small. In pixel units « 10×10 »
The answer to this question will mean a lot to me!
If possible please email me the answer at
Thank you!
Tom says
@Eshaan
The thing is, when reducing an image’s size, you have to lose pixels. An image of 100×100 pixels contains 10,000 different pixels, whilst an image of 10×10 only contains 100. This means shrinking a 100×100 image to 10×10 requires you drop 9900 pixels. When making an image larger, you are adding pixels, which is physically possible, unlike in shrinking
john jr. says
Hi I am trying to upload files to you but it is saying that the file size is too small.
How can I fix this so I can forward the pics I like.
joycebartley says
hi i am trying to download some pictures from my computer to a contest and they have to be smaller than 4mg unfortunately most of my pictures are a little above that …so how can i reduce the size of mg lower than 4?????? i hope there is an easy way to do it…..from now on should i take the picture with my cell ph up closer or farther away?????
Dan says
Whilst this offers some useful techniques, and some expensive ones. I personally don’t think that you should EVER size up an image. EVER!! I have worked in Print for years as well as web and this is just a big no no, or that’s how I was taught.
Size down, never up. This is one technique I will NEVER be taking on board. But thanks for the post.
Dave says
I agree with Dan. If you want the picture bigger, you need to get it from the source or retake it.
Joe Turner says
Dave, that’s really not very helpful. Obviously, I would think everyone understands they should retake it, if they could. People wouldn’t need to try to look at finding the « best » of all the imperfect ways of resizing if they could just retake a photo. But most of these photos are of events or at times and/or places that can’t be revisited and going back in time is not really an option, so retaking it is usually quite impossible. I think you should realize that most people looking to upsize didn’t think they were going to need to print the photo as large as they are now looking to go, but want the best results given the circumstances they find themselves in.
Mawande says
Thanks Joe
I was also shaking my head before your comment. Obviously people would rather do things right the first time, but circumstances and situation can change involuntarily and all people can do is make the best of those situations by coming up with work arounds.
Peggy Woods says
I must really spend some time learning how to operate the Photoshop I purchased some time ago. I generally just resize photos by using Picasa3 for cropping and such. Going to g+ this information. Thanks!
Nora says
I have only ever used Photshop to re-size images. But only to a certain extent. When you start with a low-rez image it can only be sized up to a certain extent. Open the file in Photshop, click on « image size, un-check « Resample image », then start adjusting the pixel size under width until you reach as close to 300dpi as possible. You will see the resolution # change as you mess with the pixel size. Once you have gotten to about 300dpi click « save ». The go back and re-check « Resample image ». Click « save » again. Done.
Leon Quinn says
Surely there is some way of doing this in Photoshop without a commercial plugin?
Darshan Gajara says
This is splendid stuff. Can you please suggest some free Photoshop plugins to simplify photo manipulation?
Mark Narusson says
Nice article thanks for sharing. You could also consider using Photoshop, make the image a smart object, enlarge the canvas then scale the image to fit. This isn’t perfect but it has got me out a fix on a few occasions.
Jim Massman says
A note for anyone who’s interested in editing pictures: Image formats generally used on the Web are based upon compression algorithms and you can get into trouble easily when editing those formats unless you edit a « lossless » copy. This is an old trick I’ve used for years after seeing some horrible results… simply save the first file in a non-compression file format such as « .tif »; edit that file to your hearts content, then « File Save As » in the .jpg or .png format.
Remember that every time you open, edit, then save a .jpg or .png file, whatever compression settings your graphics editing program has been set to will « recompress » that file. Most programs allow you to determine the compression rate, so it doesn’t hurt to set the default value to the least « loss » setting. The days of ‘needing’ to smash file sizes down for fast page loads are pretty much gone… but you may not know what the program defaults have been set to.
$0.02
Jim
_.- M -._ says
« The days of ‘needing’ to smash file sizes down for fast page loads are pretty much gone… »
That would depend upon your definition of ‘need’, as well as some rudimentary understanding of your target audience.
Is your target audience composed entirely of urban dwellers with access to fast broadband, who only visit your site while at home? Then, *maybe* that’s true.
If, on the other hand, you’re interested in reaching any rural audience at all, then you need to keep in mind that *25%* of the population of the rural US can’t get broad band access, and that 6% of the overall US population doesn’t have broadband access.
If you still say, « Oh, I don’t care about those 16 million potential visitors », then stop and look at it from the perspective of the mobile web. Does your visitor-base have smart phones? Do you want to support a mobile experience? (A little clue here, your answer should be ‘yes’.) Then guess again. You DO still ‘need’ to do image optimization to minimize the bandwidth requirements for your site.
If you’re a real professional in the business of providing content to users, then *YES* you need to care about the actual user experience for folks visiting your site. And, part of that *IS* still site optimization for speed.
Richard says
Guys, there is no way you can enlarge or shrink a pixel. Pixel size is relative. You can only add or subtract pixels.
Akash KB says
Very nice and useful tips for resizing images. Specially the ‘Perfect Resize’ Plugin for Photoshop. Resizing of images is a very common day to day activity of bloggers while adding photos to blog posts
Melissa Klotz says
I love this site and a lot of your posts have been very helpful. But I’m really scratching my head on this one. Maybe it’s my eyes, maybe my monitor, but I’m seeing very little difference between the « normal resize » and the other resizes. There are plenty of other resampling options in Photoshop. I don’t understand why you would buy a $150 photoshop plugin (extremely expensive for a plugin) or download free software to do something Photoshop is inherently capable of.