Do you want to change margins in WordPress?
Margins are one of the most important design elements that can significantly improve user experience and the aesthetic appeal of any design. They add spacing between elements so that your content is readable and everything is easily identifiable.
In this beginner’s guide, we’ll show you how to add and change margins in WordPress. We’ll show you various methods to change margins in different areas of your WordPress website.
What are Margins in WordPress and Web Design?
Margins are the space added around a web page or other elements inside a web page.
Think of a typical web page as an empty piece of paper. Margins are the white or blank space around the edges of the paper.
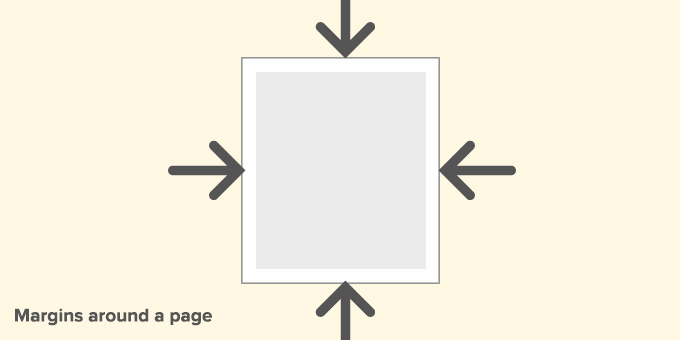
The purpose of using margins is to ensure that elements inside a web page don’t look squished together.
Similarly, margins can be used around different elements inside the page layout.
For instance, you can change margins around images so they are not too close to the text or add a margin to leave space between your content area and the sidebar.
In this article, we’re going to cover a lot of ground. Click the links below to jump to any section you’d like.
- What is the Difference Between Margin and Padding?
- Why You May Need to Add or Change Margins in WordPress?
- How to Add Margins in WordPress?
- Adding Margins in WordPress Using The Full Site Editor
- Adding Margins in The Block Editor
- Adding Margins in WordPress Using SeedProd
- Change Margins Using Thrive Architect
- Changing Margins in WordPress Using CSS Code
- Adding and Changing Margins Using Custom CSS in WordPress Theme
- Using Custom CSS to Change Margins in Site Editor
- Adding Margins with CSS in Theme Customizer
- Change Margins with Custom CSS Code Using WPCode
What is the Difference Between Margin and Padding?
Margin and padding are both used to add white space in web design. However, they are used very differently.
Margins add empty space outside an element, and padding adds empty space inside it.
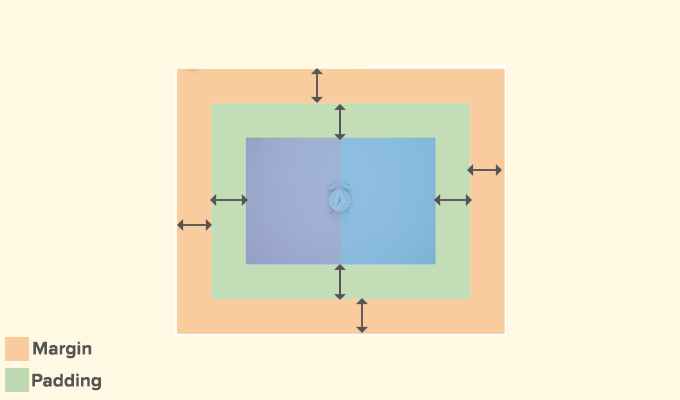
Margins are used to add space outside an element. They allow you to ensure there is plenty of space between elements on a web page.
Examples:
1. Adding margins to increase space between an image and text in an article.
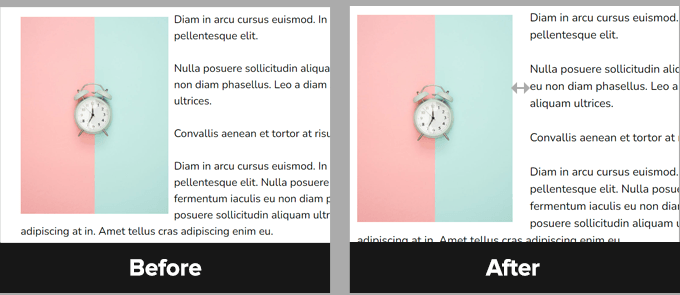
2. Adjusting margins to add space between sections, like the header and content area.
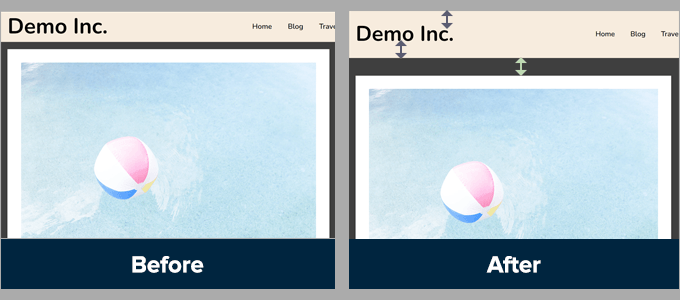
Padding, however, is used to add cushion space between content and the edges of a box or element.
Examples:
1. Adjusting padding to increase cushion space in your call-to-action buttons.

2. Increasing Padding in a Text Column
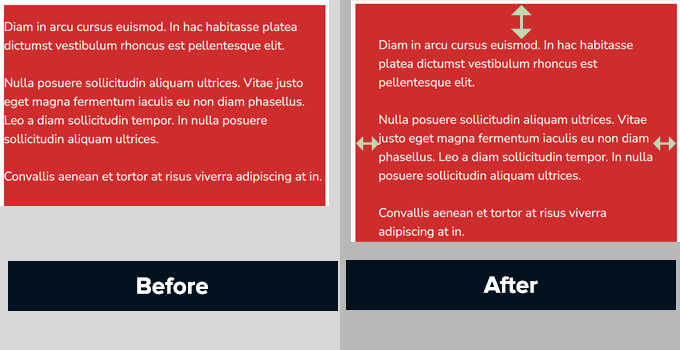
Both padding and margins are widely used in web design.
Using empty spaces adds breathing room to any design, which makes it more user-friendly and elegant.
Why You May Need to Add or Change Margins in WordPress?
Margins are a crucial aspect of web design. They make your website look pleasant and easy to use for your users.
WordPress themes handle the design aspect of your WordPress website. Most of them already do an excellent job of setting CSS rules to ensure plenty of white space using margins across your theme’s layout.

However, occasionally, you may need to add margins to adjust things.
For instance, you may not like the margin around your navigation menus or want to add more margin around your call-to-action buttons.
Similarly, you may sometimes feel that items are too close to each other or too far apart.
In that case, you will need to change margins in WordPress by yourself.
How to Add Margins in WordPress?
There are plenty of ways to add margins in WordPress.
Depending on where you want to add margin and the options available in your WordPress theme, you’ll need to choose a method that works for you.
Let’s start with the default built-in options in WordPress itself, as they are the easiest for beginners.
Adding Margins in WordPress Using The Full Site Editor
If you use a block-based theme with full site editor support, you can use the built-in site editor to change margins anywhere on your WordPress website.
First, you need to visit the Appearance » Editor to launch the site editor.
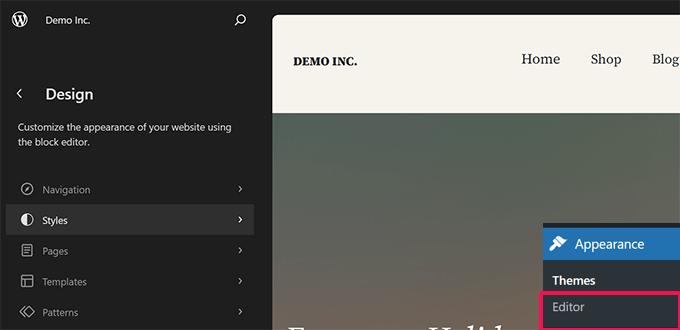
Once inside the site editor, click to choose a template from the left column or click anywhere on the preview window.
Next, click on the area or element where you want to change margins. In the right column, you will see the option to adjust margins under the Style tab.
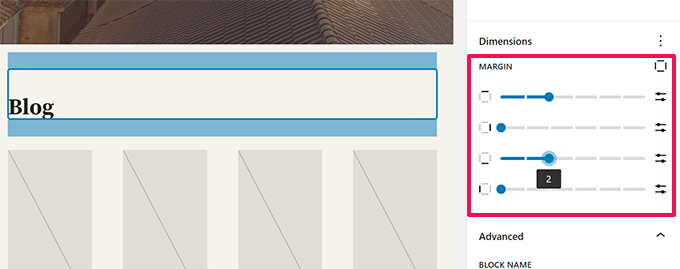
As you adjust the margins, the editor will highlight the margin area.
You can also choose to add margins to the top, bottom, right, or left side.
Note: The margin option may not be available for all blocks in the site editor. If you cannot see the margin option for an element, try an alternative method below.
Adding Margins in The Block Editor
If you are working on a blog post or a page, you will use the block editor.
Block editor in WordPress allows you to add and change margins for various blocks.
Simply click on the block where you want to add/adjust margins. Under the block settings, switch to the Style tab and scroll down to the Dimensions or Margins option.
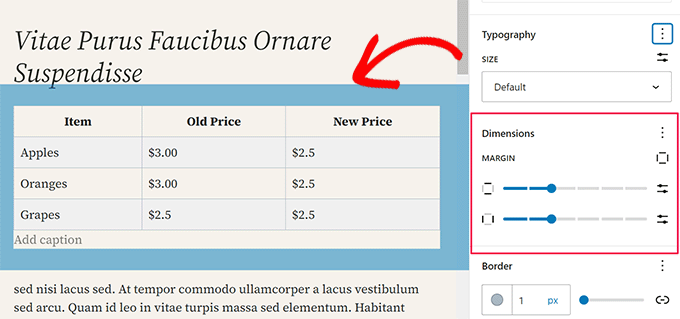
Note: The margin option may not be available for all blocks in the content editor. If you cannot see the margin option for an element, try an alternative method below.
Adding Margins in WordPress Using SeedProd
SeedProd is the best WordPress page builder plugin on the market. It allows you to create custom pages for your website easily. You can even use it to create a custom WordPress theme from scratch.

SeedProd’s intuitive drag-and-drop page builder allows you to adjust margins for any element inside the editor easily.
First, you need to install and activate the SeedProd plugin. For more details, see our tutorial on how to install a WordPress plugin.
Next, you need to visit the SeedProd » Landing Pages and then click on the Add New Landing Page button.
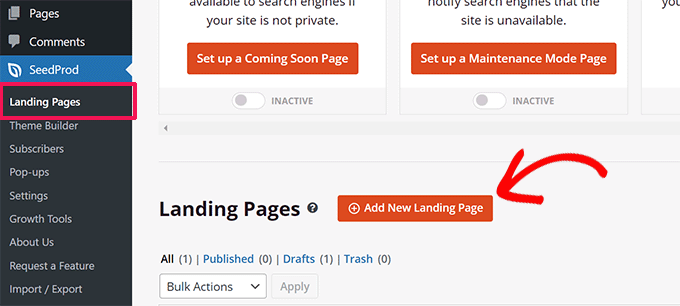
After that, you will be asked to choose a template for your page.
SeedProd comes with dozens of ready-made templates that you can use as a starting point, or you can start with a blank template.
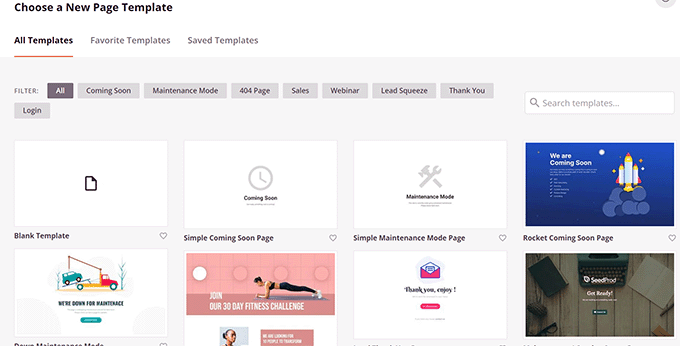
Click to choose your template, and then provide a name for your landing page.
This will launch SeedProd’s page builder.
You’ll see a live preview of your page on the right side. And elements you can add to your page in the left column.
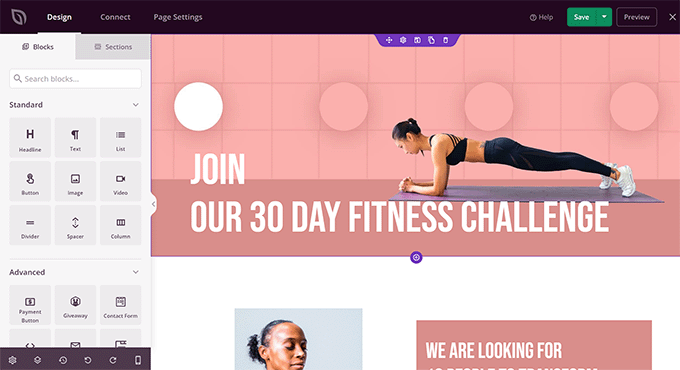
You can point and click on any item on the page to edit it.
Clicking on an element will select it, and you’ll see its options in the left column. From here, switch to the Advanced tab and click the Spacing option.
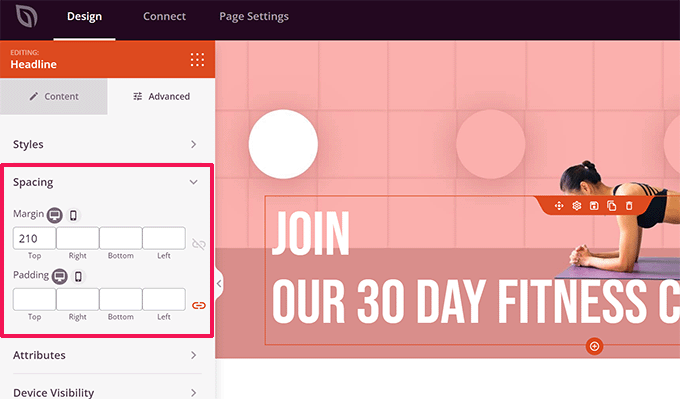
You can change margins and padding for the selected element from here.
Once you finish editing your page, don’t forget to click the Save and Publish button at the top right corner.
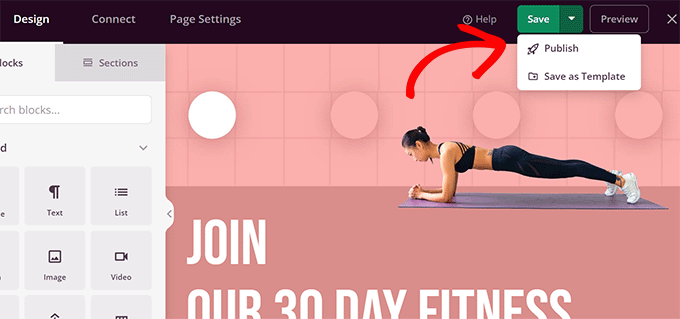
After that, you can visit your website to see the changes in action.
Change Margins Using Thrive Architect
Thrive Architect is one of the best WordPress page builder tools that lets you use a drag-and-drop interface to design WordPress pages.
It comes with over 300+ templates you can use as a starter point. Plus, you can also use it to edit your WordPress posts and pages, borrowing the layout and style of your existing WordPress theme.

To install Thrive Architect, you’ll first need to log into your account on the Thrive Themes website.
From there, you need to download and install the Thrive Product Manager plugin. For more details, see our tutorial on how to install a WordPress plugin.

Upon activation, you need to visit the Thrive Product Manager page.
Click the ‘Log into my account’ button to connect WordPress to your Thrive Themes account.
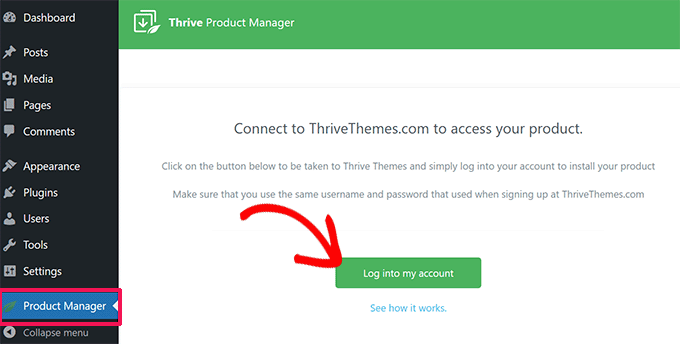
Once connected, you’ll see the list of available Thrive Themes products under your account.
Go ahead and click on the ‘Install Product’ checkbox under Thrive Architect, and then click on the ‘Install selected products’ button at the bottom.
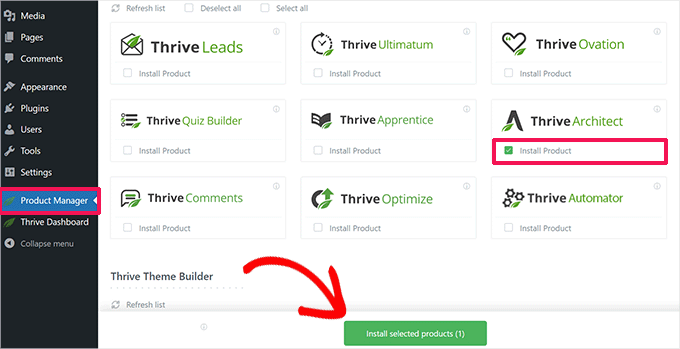
Thrive Product Manager will now install the Thrive Architect plugin for you.
After that, you can edit or create a new WordPress post or page and click on the Edit with Thrive Architect button.
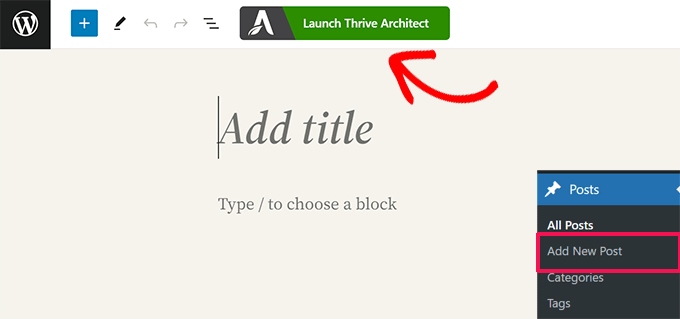
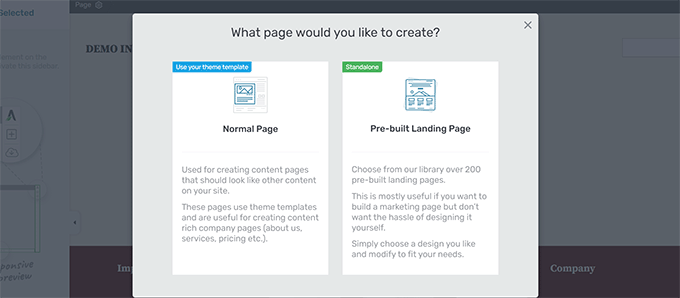
Thrive Architect will ask you to choose a template if it is a new page.
You can use your theme template to create a Normal Page or a Pre-built Landing Page template.
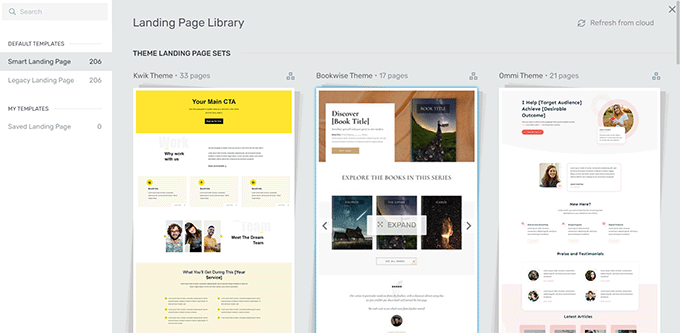
If you choose a Pre-built Landing Page option, then the plugin will show you a bunch of templates to choose from.
Simply click to select the one that resembles what you want to create.
Whether it is a normal page (using your theme’s styles) or a landing page, Thrive Architect’s page builder would have the same features.
You’ll see a live preview of your page with a toolbar on the right and a settings panel to the left.
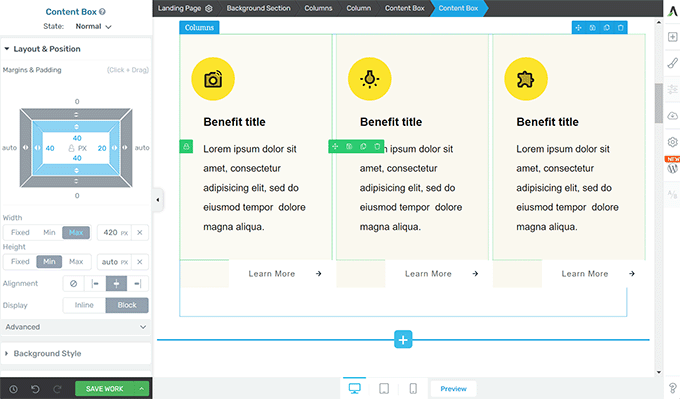
You can point on click on an element to select it. Or click on the add [+] button in the toolbar to add a new element.
Once you click to select and edit an element, its settings will appear in the left column.
From here, click the Layout & Position tab to change the margins and padding.
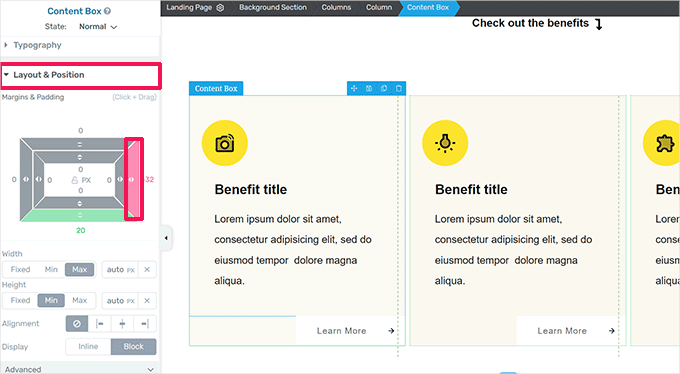
You’ll see a visual representation of margin and padding.
Take your mouse over to any side of the margin and drag the handle to increase or decrease the margin.
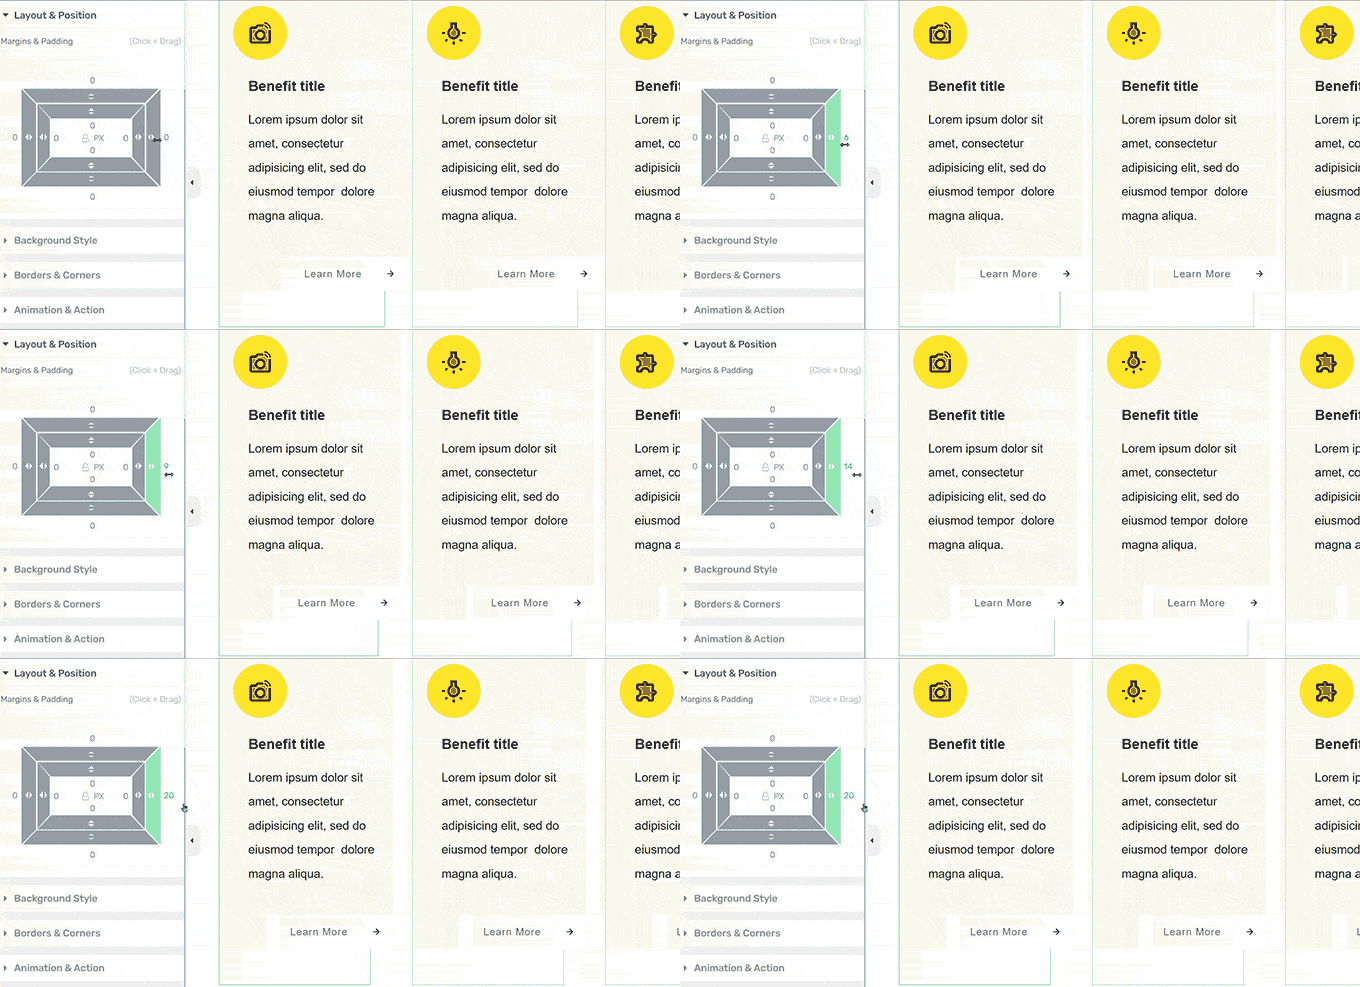
You can repeat the process to change margins on any of the four sides.
Once you are done, don’t forget to click on the Save Work button and then select Save and Exit to Post Editor option.
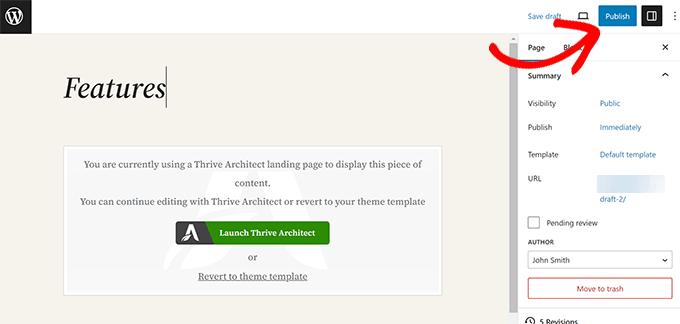
You can now click on the Publish or Save button to save your WordPress post or page.
Changing Margins in WordPress Using CSS Code
This method requires you to add CSS code to your WordPress theme. You’ll also need a very basic understanding of HTML and CSS.
However, this method gives you more flexibility as you can manually choose the area where you want to add or adjust the margins.
Adding and Changing Margins Using Custom CSS in WordPress Theme
WordPress allows you to save custom CSS in your WordPress theme options. However, depending on your WordPress theme, there are multiple ways to do that.
Before you add or change margins using CSS, you may need to find out which element you need to target with your CSS code.
For instance, if you want to change margins around the body of the page, then you can use the following code:
body {
margin:50px;
}
The easiest way to find which element to target is by using the Inspect tool in your browser.
Open your website in a new browser tab and take the mouse over to the element that you want to change margins around. After that, right and select Inspect from the browser menu.
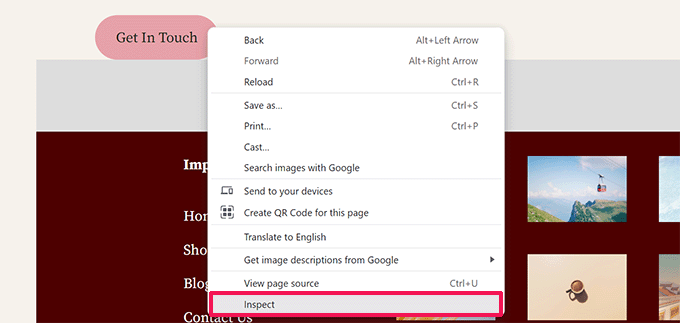
This will split your browser screen, and you will see the HTML code and CSS behind the page.
You can move your mouse over the code, and your browser will highlight the area affected by it.
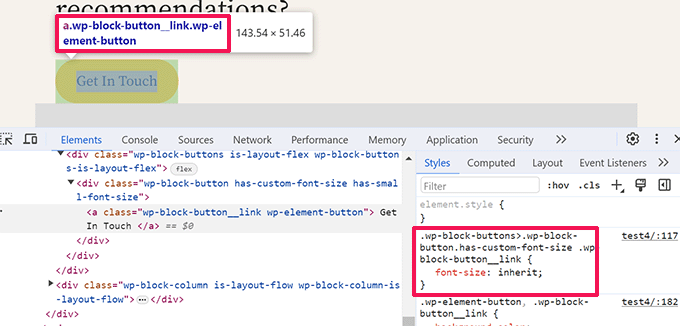
In the code, you can see the HTML element or CSS class you need to target with your custom CSS.
You can even try your margins here to preview how it will look.
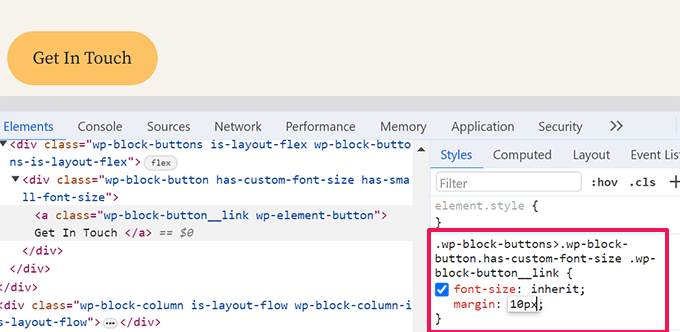
However, these changes are not saved in your theme and will disappear when you reload or close the browser tab.
Let’s go through different ways you can save this custom CSS in WordPress.
Using Custom CSS to Change Margins in Site Editor
If you are using a block theme with full site editor support. Then, here is how you can add custom CSS to your theme.
First, go to the Appearance » Editor page to launch the site editor and then switch to the Styles panel.
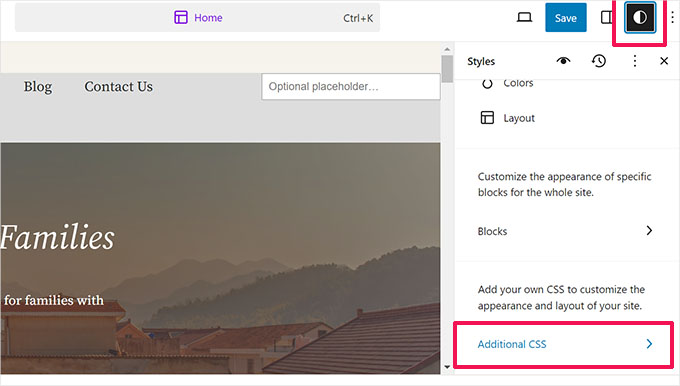
At the bottom of the Styles panel, click on the Additional CSS tab.
This will bring up a text editor where you can add your custom CSS code. Your CSS code will immediately apply, and you will be able to see the changes appear on screen.
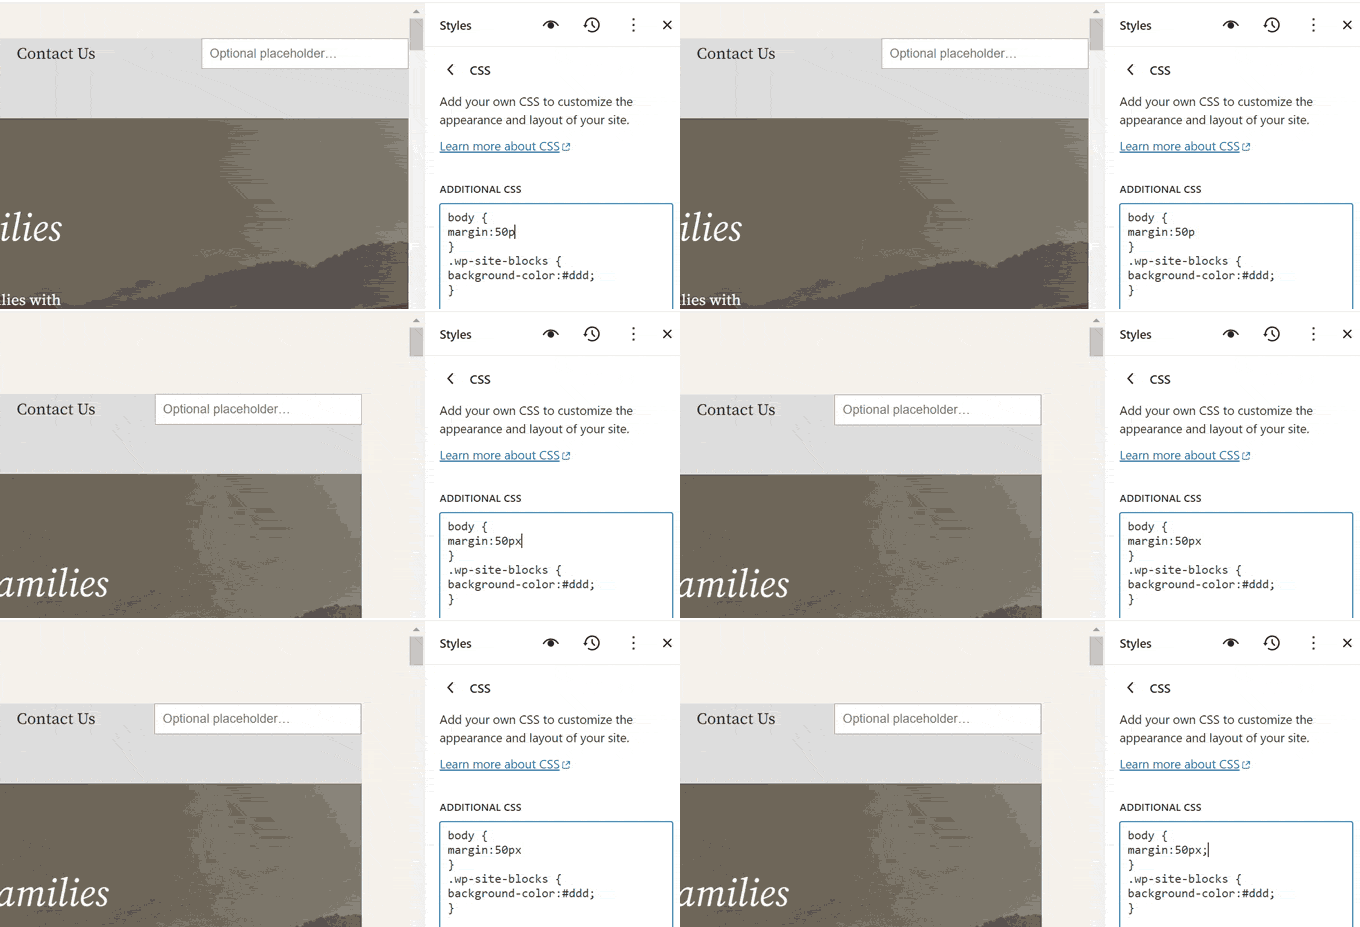
Once you are satisfied with the changes, don’t forget to click on the Save button to store your changes.
Adding Margins with CSS in Theme Customizer
If you are using a classic theme (without site editor support), then you can save your Custom CSS in the theme customizer.
Go to the Appearance » Customize page to launch the theme customizer.
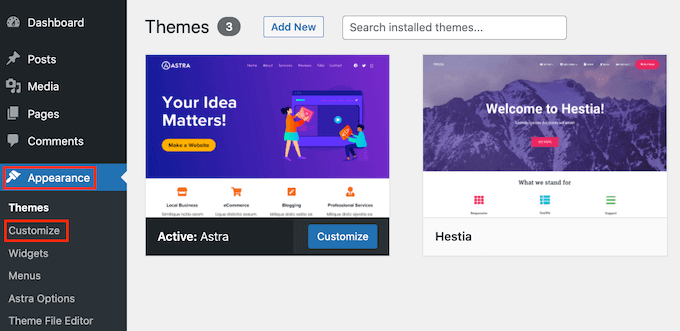
The customizer will show different options depending on your WordPress theme.
You need to click on the Additional CSS tab to expand it.
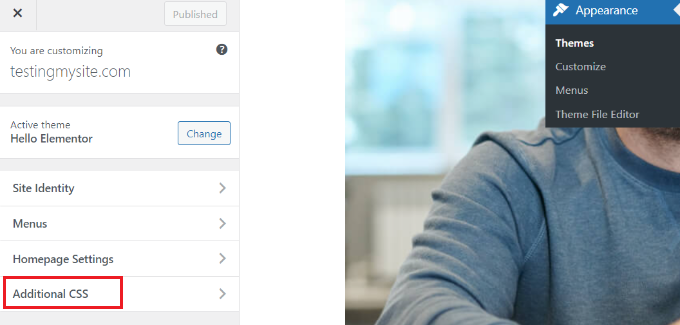
The tab will slide to show you a simple box where you can add your custom CSS.
As soon as you add a valid CSS rule, you will be able to see it applied on your website’s live preview pane.
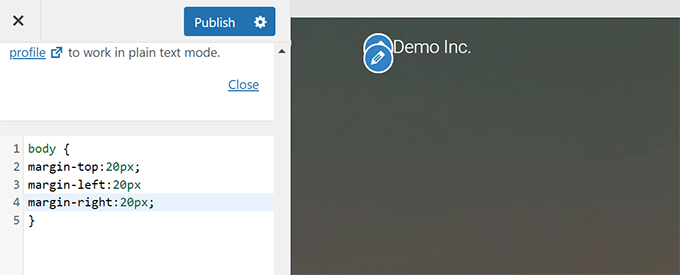
Once you are satisfied with the changes, click on the Publish button to store your changes.
Change Margins with Custom CSS Code Using WPCode
The easiest way to add Custom CSS code in WordPress is by using the WPCode plugin.
It is the best WordPress code snippets plugin that allows you to add any CSS/HTML/PHP/JavaScript code to your WordPress website without breaking it.

The advantage of using WPCode is that you won’t lose your CSS changes when switching your WordPress theme.
Note: There is also a free version of WPCode that you can use.
The first thing you need to do is install and activate the WPCode plugin. For more details, see our tutorial on how to install a WordPress plugin.
Upon activation, go to the Code Snippets » + Add New page.
Take the mouse over to the ‘Add Your Custom Code (New Snippet)’ option in the code snippets library, and click the ‘Use snippet’ button.
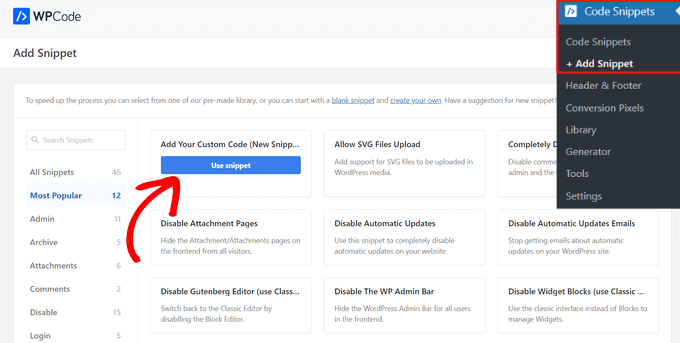
Next, at the top of the page, add a title for your custom CSS snippet. This can be anything that helps you identify the code.
After that, write down or paste your custom CSS into the ‘Code Preview’ box and set the ‘Code Type’ by choosing the ‘CSS Snippet’ option from the dropdown menu.
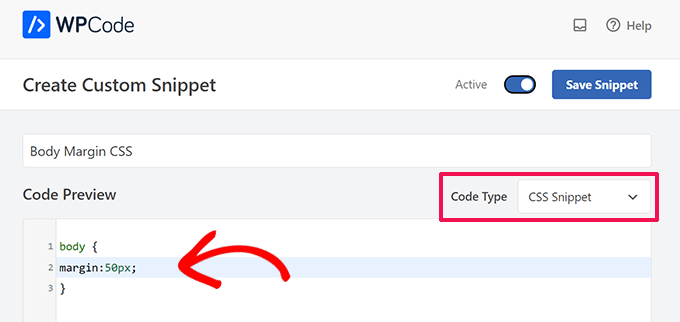
For instance, if you want to add or change the margins around the entire web page body, then you can use the following CSS code:
body {
margin:50px;
}
Next, scroll down to the ‘Insertion’ section and select the ‘Auto-Insert’ method to execute the code across your entire WordPress site.
If you only want to execute the code on certain pages or posts, you can choose the ‘Shortcode’ method.
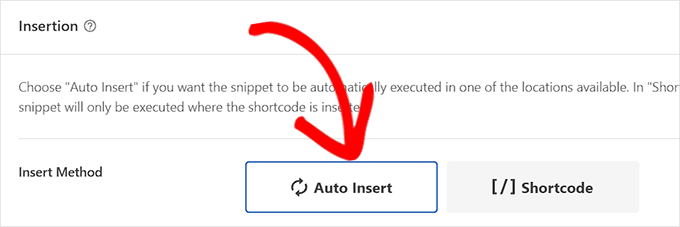
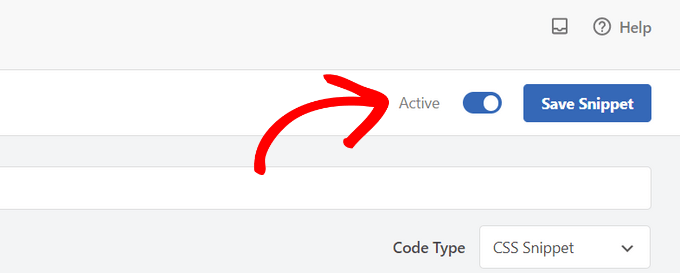
Now, you need to go back to the top of the page and toggle the switch to ‘Active’.
Finally, click on the ‘Save Snippet’ button to store your changes.
You can now visit your website to see your custom CSS in action.
We hope this article helped you learn how to add or change margins in WordPress. You may also want to see our complete WordPress theme development cheat sheet or take a look at our guide on customizing WordPress themes.
If you liked this article, then please subscribe to our YouTube Channel for WordPress video tutorials. You can also find us on Twitter and Facebook.


Syed Balkhi says
Hey WPBeginner readers,
Did you know you can win exciting prizes by commenting on WPBeginner?
Every month, our top blog commenters will win HUGE rewards, including premium WordPress plugin licenses and cash prizes.
You can get more details about the contest from here.
Start sharing your thoughts below to stand a chance to win!
Mrteesurez says
Although, I used WPcode before when it was WordPress header and footer.
If I use WPcode to add a particular code. Is changing a theme maybe for troubleshooting or any other things does not lost the code ??
WPBeginner Support says
Correct, using the plugin WPCode would mean that even if you change the theme the code would still be active.
Admin
Mrteesurez says
Whaooo.
This is good.
WPcode has been useful even before it is rebranded.
Thanks.
Jiří Vaněk says
I would like to ask one question about this topic. Is there a simple solution to have different borders for the desktop version and another for the mobile version for responsivity?
WPBeginner Support says
You could use WPCode to load the CSS on mobile
Admin
Jiří Vaněk says
Sure, so create two snippets and embed one for the desktop version and one for mobile. Okay
Mrteesurez says
You can also use Additional CSS on WP customizers. You can just write the css rule there for both Mobile and desktop and set their respective margins using CSS media query.
Jiří Vaněk says
You’re right. In the end I did exactly as you write. I set the CSS according to the display sizes. So now I have a separate CSS set for the desktop version and a separate CSS for the mobile version. Although it was difficult for me and I had to have AI help me, but now it works exactly according to my ideas and exactly as you describe Mr. Mrteesurez.
Mrteesurez says
You are welcome, Jirí.
Using CSS media query is easy but one can find it difficult if not familiar with CSS before but using AI will make it easier to get the code snippet and paste.
Glad that it worked.
Jodie Osborn says
Thanks for sharing all the different options. I needed the reminder that I’ll lose my custom CSS when I change my theme! Given I have WPCode, I’ll copy my code to a central place before I deactivate the theme.
WPBeginner Support says
Glad we could share a way to keep the code
Admin
Konrad says
Exploring various methods, especially with SeedProd and Thrive Architect, provides a tailored approach to design. Loving your beginners guides