
Update: We no longer recommend using FeedBurner because it’s a dying product full of bugs. Please read this article to see why you shouldn’t use FeedBurner and find out about the alternatives.
Every major blog is using FeedBurner to burn their RSS feeds because it is a free feature rich system that you cannot turn down. FeedBurner provides statistics, feed optimization option, feed publication option and much more. Integrating FeedBurner and Google Analytics is a must for every WordPress blog. In this article, we will show you how you can setup your WordPress blog feeds with FeedBurner and use it to help take your blog to the next level.
Why FeedBurner is Important for Bloggers?
FeedBurner is a free service that is loaded with options that you do not get with the default WordPress feed. Some of the features include:
- Statistics about your RSS Subscribers so you can analyze and optimize your blog posts.
- Give your users multiple options to subscribe such as Email, and other feed-readers (Netvibes, Google etc).
- Social Proof (Subscriber count)
- Option to customize your feeds such as modify post headings, branding and more.
- Option to ping various feed-reading services once you publish your posts.
- Integrate Google Adsense to monetize your RSS feeds.
- And more…
Just with the short list of features, you can see that it is a must have for all blogs. Now we can move onto setting up the FeedBurner Account.
Setting up Your FeedBurner for WordPress feeds
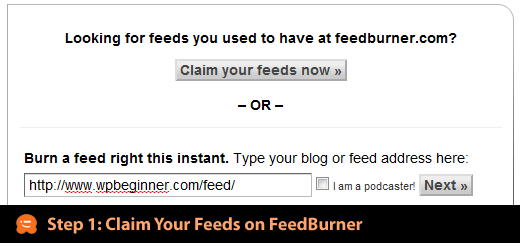
First you will need to have a Google account (any gmail account will work). Visit the feedburner service page to begin this process.
In the first step, you will type the link to your WordPress Blog Feed. If you have SEO Friendly WordPress URL Structure, then your feed link should be like yourdomain.com/feed/
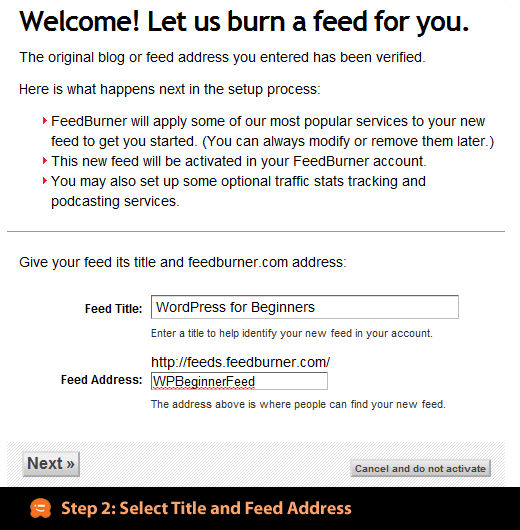
In step 2, you will choose the title of your Feed and the address of your feed. It is advised to keep the title of your feed the same as your blog. It is best to keep your feed address short and memorable.
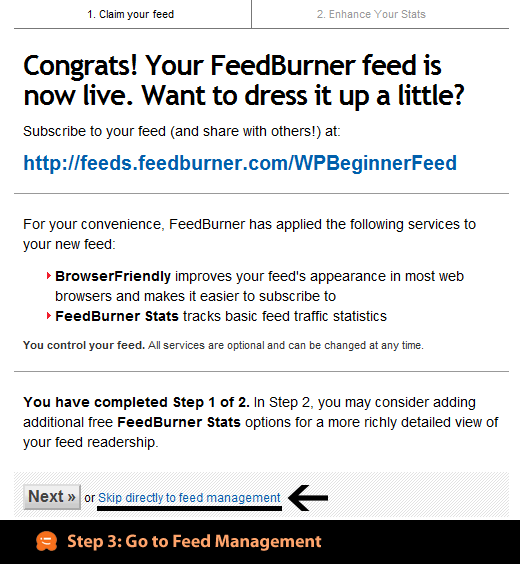
Technically your feeds are created, so you don’t need to follow the steps any more. Click on the Skip directly to Feed Management.
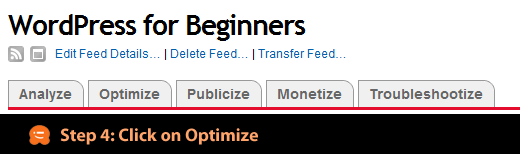
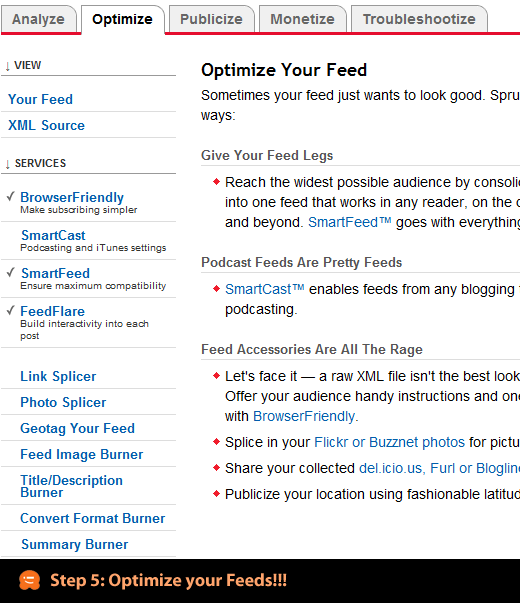
You will see a page with a link to tons of blogging platforms. Ignore all that as we will revisit them later in this article. Just cilck on the optimize tab that you see in the image below.
In step 5, we will work on optimizing your WordPress Blog Feed. You need to make sure that you haev Browser Friendly option activated, Smart Feed activated, and FeedFlare activated. You can activate other services if you want, but these 3 services are a must have. BrowserFriendly makes subscribing much simpler. SmartFeed ensures maximum compatibility with all feed reader applications. FeedFlare builds interactivity into posts by adding email this and other sharing options.
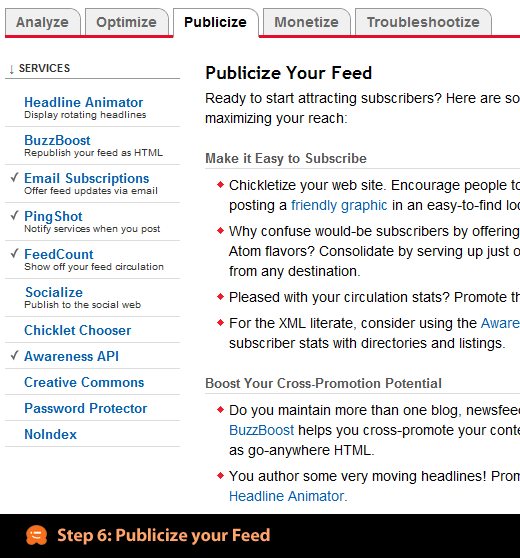
In step 6, we will take a look at all the publicize options for the feed. You need to allow Email Subscriptions on your site because there are users who prefer to get email updates rather than using Google reader. Pingshot must be activated because it notifies services when you post. Feedcount widget lets you show off your subscriber count. It is one of the best social proof methods. Awareness API comes handy if you are trying to list yourself on sites like BuySellAds because they can extract your subscriber count easily. There other snazzy options like Headline Animator, BuzzBoost that you can activate if you like.
Monetizing your feed is another good features of FeedBurner except it only allows you to use Google Adsense. So sign up with Google Adsense and follow their direction.

Once you have done all the above steps, you can click on the Analyze tab. Most likely you will see a screen like the one below because the stats are not recorded. Give it up to 24 hours and you will start seeing numbers there. Use the subscriber count, clicks and other useful data to improve your blog. See what your users like and don’t like with this stas, and then focus on the type of posts that your users like and enjoy.

Integrate FeedBurner into WordPress
Even though you have setup your feed with FeedBurner in the steps above, but you have not yet really integrated it with WordPress yet. First thing you want to do is stop diluting your feed and make it one. You need to create a redirect, so when users try to visit yourdomain.com/feed/ they are redirected to your feedburner feed page. This way you can keep track of the subscribers on your blog.
There is a plugin called FD FeedBurner which lets you create this redirect easily. You can also redirect your feeds using .htaccess file, but we will not be sharing that method because it is not something we recommend for beginners.
Most WordPress Themes are now coming with FeedBurner integration such as Headway Theme, Standard Theme, and others. If your theme is not compatible, then use the plugin above.
Add the Email Subscribe Box on your site
First visit Publicize » Email Subscriptions then copy and paste the code they give you in the template file that you like (mostly sidebar.php). Remember to customize the look of your email form, you would need to have prior knowledge of HTML and CSS.
If your blog does not have FeedBurner feeds, then get it right now.


")
")
Vanshita parmar
In my wordpress account when I added a feedburner as a widget. It’s not asking for feedburner ID . What should I do for this ? I haven install wp subscribe plug in and it’s showing error when someone subscribe on our website
WPBeginner Support
This is an older article, we would recommend taking a look at alternatives as we wrote about in the below article:
https://www.wpbeginner.com/opinion/stop-using-feedburner-move-to-feedburner-alternatives/
Admin
Bosko
Feedburner? This plugin has been closed as of April 12, 2018 and is not available for download. This closure is permanent.
WPBeginner Support
Thank you for your feedback, this article was last updated in 2014 which is why it is recommending Feedburner
Admin
Gimmy Dagar
Hi
I am using feedburner, The conformation link for all emails are going to the Promotion in Gmail. How can I set to Primary?
WPBeginner Support
For the moment, Gmail does not have a method for ensuring emails are not sent to the marketing tab.
Admin
Vinayak Patil
Hello, the plugin that you linked in this article for Feedburner is no longer available. Please correct it and provide us an alternative.
WPBeginner Support
Hi Vinayak,
We longer recommend using FeedBurner. Please see our article on FeedBurner Alternatives.
Admin
kalpana
You article was best.It gave me all my needs of information
Muhammad Muneeb
WP Beginner is Best It is solution to my all problems Thanks
francis
thanks for this post
Dennis
I want to have my own website
WPBeginner Support
Hi Dennis,
Please take a look at our beginner’s guide on how to start a blog or website.
Admin
suraj yadav
my feedburner is not show my blog completely
Noman Atif
Bro how to activate feedflare
Navaneethan
How to Setup Feed burner email subscription widget without any email verification
tatjana
thank you so much! It all worked out!
Caroline
Hi – thank you for the information. Question for you, if you don’t mind. I am trying to edit my email format for my subscribers. I changed my feeds to show only the title of the post and 100 words of content, that’s all (before I was sharing the entire blog post with photos, content, etc). I would like for it to show 1 photo from the blog post as well, but I am having the hardest time trying to figure out how to do this without having to share the entire post in the email. Are you able to help here?
Thank you so much!
Caroline
Pratik N Borkar
My feeds not update to latest post my feed shows 6 months old post any solution for this
this my site
Help is appreciated
Samual Ross
Thanks for sharing such great useful info. I have one question my original feed url is which shows some kind of error like “This page contains the following errors:
error on line 1 at column 37: Unsupported encoding UTF-7
Below is a rendering of the page up to the first error.” but my Google Feed burner works fine which is:
Can you please tell me what’s wrong with my original feed?
Thanks again.
WPBeginner Support
It seems like you are using UTF7 as your character encoding. Visit Settings » Reading, if you see Character encoding option on that page, then change it to utf8.
If you do not see it there, then you need to deactivate all your plugins and switch to a default theme. Check your feed, if this resolves the problem then probably one of the plugin or theme is the culprit.
If this does not solve it, then you need to change DB_charset in wp-config.php. Edit your wp-config.php file. if you have define( ‘DB_CHARSET’, ‘utf7’); then change it to define( ‘DB_CHARSET’, ‘utf8’); If you have neither of them, then add define( ‘DB_CHARSET’,’utf8′);
Admin
Naveen
Hello,
I have a job website..I want a plugin like email pop up when the site is opened and once the candidate enters the email id it must automatically open the feed burner link to subscribe..Can any one help me how to set up.
Simone Robinson Ross
Greetings,
I have a website and blog set up and have for two years. Unfortunately, the email used is not recognized. Is there a way to change email address associated with the Blog at this point?
I want to be able to connect with subscribers, and right now I have no idea who is seeing my Blog.
I need help fast
Thank you
M.
Hi there,
I moved my blog from weebly to wordpress and now my feedburner doesn’t work or recognize my RSS Feed address. I’ve been in touch with the WP theme people about the RSS address and my hosting company. No one seems to be helping, so I thought I’d try you.
I also opened up a Mail Chimp account based on reading your related article. That too does not recognized my RSS.
I’m starting to panic and my blog is not being sent to my subscribers. Can you help? I’d be forever grateful.
WPBeginner Support
We were able to access your RSS feed by simply adding /feed/ at the end of your URL.
http://www.example.com/feed/ Replace example.com with your own domain name and then use that URL in MailChimp.
Admin
Abhishek
Kindly update the monetization for feeds are available now
Abhishek
thank you very much Syed , this is the perfect post for setting up feed for my blog which was started 3 month ago. Since then i wasn’t able to start my feedburner .
jessica
Hello. I am looking for info on what is a better RSS feeder if Feed burner is no longer recommended?
Thanks so much
Jess
WPBeginner Support
See this article: Stop using FeedBurner – move to FeedBurner alternatives
Admin
Mohit
Hi, i just transferred my blog from blogger to wordpress. I installed a plugin for feedburner subscription. I gets a mail whenever someone subscribes to my website, but when i checked my feedburner email subscription list it doesn’t show any new subscriber..can anyone help me with it?
Mandy
Hi, I just moved a website from Blogger to WordPress.
Now Feedburner sends out not only the usual daily emails when a new post gets published. It also sends out summary emails every now and then with the last 8 articles in a list.
Feedburner was used on blogger already, so the feed didn’t change, the links are the same like before.
I think somehow FB thinks that all these posts are “new”. Any idea how to stop this?
Thanks!
Mandy
Yatin
I am a complete newbie in this blogging sphere. I need your help
I have activated the email subscription on feedburner. By mistake I deleted the feed in the beginning. At that time, I was able to see two subscribers. Then I re-activated the feed with the same name. My latest blog post were coming as it is , but no. of email subscriber are zero in feedburner account now. I am using genesis e-news extended plugin for my feedburner.
Aaditya Sharma
all steps i followed and active feed, but i can not find the option of monetize and awareness api
WPBeginner Staff
Yes, your feed will still be at the same URL. What you are doing, is displaying your blog posts on a custom page. This does not change the chronological order of your posts or feeds.
Techmaker
How can I find my feed address? My blog located on
Please help.
WPBeginner Staff
Your feed address can be found by simply adding feed after your website’s url like this:
http://www.example.com/feed
Techmaker
You gave me a general answer? I know it. It is in your article too. Thant’s why I sent you my blog URL. You have removed it on my first comment. That is bad. What I really want to know is my site is wordpress. But my blog is a page, but getting all the updates. I can’t even explain it. May be you can. This is where my blog is
WPBeginner Staff
We do not recommend our users to use Feedburner any more. Please take a look at stop using FeedBurner move to FeedBurner Alternatives
Firoz Hassan
Hi,
how to add email subscription like your one??
Steve
I recently changed just my Feedburner Title. Why it doesn’t update also in my Feedburner page but only in management settings?
itechaleart
Thank you so much i have successful setup feed burner on my site..
:). feeling happy.
WPBeginner Staff
Yes, they will continue to get updates as long as you don’t delete your FeedBurner feed.
Sofie Couwenbergh
I don’t use feedburner for email signups, but I still have some people who are subscribed to my rss feed through feedburner.
I use the feedburner feedsmith extend plugin for that.
If I delete that plugin, will those people still get my updates, or not?
Thanks
WPBeginner Staff
Check out our FeedBurner Alternatives guide
WPBeginner Staff
This is an old article. It is displayed here just for archival purposes. We do not recommend our users to use feedburner anymore.
Usman Arshad
Then what use?
Lietissimo
I am confused. You start your article with “We no longer recommend using FeedBurner because it’s a dying product full of bugs.” Then you finish with saying”If your blog does not have FeedBurner feeds, then get it right now.”
Which one?
Shanu Shetri
Thanks to wpbeginner.com.. this website is always helpful for me..
Fleur Glansbeek
Hi,
Tried to setup a feedburner link for my Wordpress website (http://gripopgewicht.com), but the following error appears (over and over again):
“Feed filesize is too large, you need to reduce its size in order for Feedburner to process it.”
But i can’t find out how to solve this problem, could you maybe help?
Best,
Fleur
Rafael Perez
My feedburner feed only publishes my podcasts posts but not my blog posts. What will happen if I change my original feed to allow both to be published? Remove the /category/podcast from original feed? Thanks
WPBeginner Staff
Then your users will get all your posts. However, you should consider that many of them may have signed up just for your podcast and they may not like receiving posts they didn’t sign up for.,
Troy Vayanos
Hello,
I have an existing feed set up and am trying to set up a second one for a new website. In ‘my feeds’ when I type in the new domain name in ‘burn a feed right this instant’ I get the following message. The URL does not appear to reference a valid XML file. We encountered the following problem: Error on line 153: The string “–” is not permitted within comments.
Is this because I have a new website where the wordpress theme is not set up yet and I only purchased the domain 24hrs ago?
Your help is appreciated.
Thanks
WPBeginner Support
If you have not installed WordPress on your new site yet, then feedburner will not be able to find a feed.
Admin
Pat
I can’t find a solution to my problem anywhere so I am trying here. My blog has around 8 thousand subscribers and as of April 4th subscribers are saying they are not recieving emails from feedburnner any more. I haven’t changed anything and I still get the email. Does anyone know what the problem could be?
Thank you
Pat
Khalid
I have heard Google has stopped supporting feedburner.
http://foliovision.com/support/fv-feedburner-replacement/requests-and-feedback/in-the-wordpress-plugin-repository-you-say-feedburner-is-shutting-down#post-1963
Eavan
Thanks! Very useful. I have one question. I’ve installed the plugin to redirect my feeds, but I’m not sure what to put in under “Redirect my feeds here:” form. What link goes there?
I’m very new to this. Thanks for your help!
Eavan
Never mind! Figured it out.
Sengerson
Is it possible to create a feed from a multisite? I’ve tried to search for plugins that would be able to do this pretty easily, and I’ve found it impossible.
Thanks!
Barry Friedman
Is it possible to publish a page on my WordPress site and have it *not* go out to my Feedburner? These are just some internal landing pages and I just discovered they are going to my RSS Subscribers. Thanks for any tips you have on this.
Thanks.
WPBeginner Support
Barry, Pages in WordPress do not appear in RSS feeds. Are you sure your pages are appearing in the feed? Are you using some plugin that adds pages or other custom post types into your main feed?
Admin
Rick Olsen
When I try to enter a new email on the Follow Button I get this error message. What do I do?
The feed does not have subscriptions by email enabled
Mark
Post images show as absolute links in my feedburner feed.
How to fix that? I have add feedburner feed to hotlink exception too.
Val Frania
I already have Feedburner set up on one of my blogs, but want to use it on another one. Do I start a new account for my new website? How does this work? When I go to Feedburner, it goes to my current account.
WPBeginner Support
Go to Feedburner, click on My Feeds and then enter the URL of your new blog under the option Burn a feed right this instant.
Admin
Mohammad Fazle Rabbi
Hi there thanks for fantastic tutorial. I am running a WordPress (woocomerce) based ecommerce site . but whenever I try to activate my feed by then it is showing below message
Received HTTP error: “Not Found” while fetching source feed.
I have also tried feed validator but not validating my feed. As well as I have tried with FD Feedburner and some other Feedburner plugins but not working. Is there any problem that my main page displaying as a static page with products. Because I don’t publish any post just adding product on static (front) page of my site. please tell me How to solve it? Kindly reply me soon.
Regards
Mohammad Fazle Rabbi
WPBeginner Support
Open the main page of your website and view its source. You will find your rss feed url on a line like this:
1-click Use in WordPress
Note that this link could be different, or may not be there. For example, people using WordPress SEO plugin sometimes accidentally turn off their RSS feeds. Try deactivating all your plugins and then reactivate them one by one, check your feed each time.
Admin
Mohammad Fazle Rabbi
I have found the feed according to your example but nothing is happening. Getting same message in feedburner.
“Received HTTP error: “Not Found” while fetching source feed.”
When I click on my fee from view source code then it is displaying a line at the top-
“This XML file does not appear to have any style information associated with it. The document tree is shown below.”
Mohammad Fazle Rabbi
Oh!!! it worked..my main feed address was
http://www.ibazaarbd.com/home/feed/
But I was trying with below feed address
http://www.ibazaarbd.com/feed/
Anyway thanks for your help. Wish you best of luck.
Mac
I have followed all the steps to set up my email subscription in feedburner for my website. But my subscribers are not getting any updates.please help..
Shoaib
Thank you so much for the article, I have completely configure the feed-burner on my site but subscriber list is not increasing on feedburner even after receiving confirmation email of new subscription, please advice
WPBeginner Support
Feedburner subscriber count can be showing delayed stats sometimes.
Admin