¿Quieres saber cómo hacer una edición básica de imágenes en el área de administrador de WordPress?
WordPress te permite recortar, girar, voltear y escalar el tamaño de las imágenes sin la ayuda de ningún editor de imágenes. Estas características resultan muy útiles cuando estás lejos de tu ordenador principal y subes imágenes sobre la marcha.
En este artículo, te mostraremos cómo utilizar fácilmente WordPress como un editor de imágenes básico que te permite recortar, rotar, escalar y voltear imágenes.
¿Por qué utilizar WordPress para la edición básica de imágenes?
El editor de imágenes integrado de WordPress es una forma muy práctica de editar imágenes para tu blog de WordPress. Ni siquiera necesitarás utilizar ningún software o plugin de WordPress adicional.
El editor de imágenes también ahorra mucho tiempo al permitir a los usuarios realizar correcciones y ajustes sencillos sin tener que ir y venir entre distintas herramientas.
Con WordPress, puedes recortar, girar, escalar, cambiar las dimensiones y voltear fácilmente tus imágenes desde la biblioteca de medios.
Por ejemplo, si desea recortar una imagen para quitarle el exceso de fondo, puede hacerlo fácilmente con el editor de imágenes de WordPress en lugar de comprar una herramienta cara para ello.
Dicho esto, vamos a ver cómo hacer fácilmente la edición básica de imágenes en su sitio de WordPress, paso a paso.
Tutorial en vídeo
Si no te gusta el vídeo o necesitas más instrucciones, sigue leyendo.
Cómo realizar una edición básica de imágenes en WordPress
En primer lugar, tendrá que subir una imagen a su biblioteca de medios de WordPress.
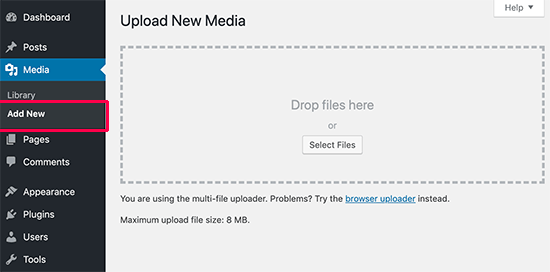
Puede añadir fácilmente una imagen utilizando el editor de bloques mientras escribe una entrada o visitando la página Medios ” Añadir nuevo desde la barra lateral del administrador de WordPress.
Desde aquí, haga clic en el botón “Seleccionar archivos” y suba un archivo de imagen desde su ordenador.
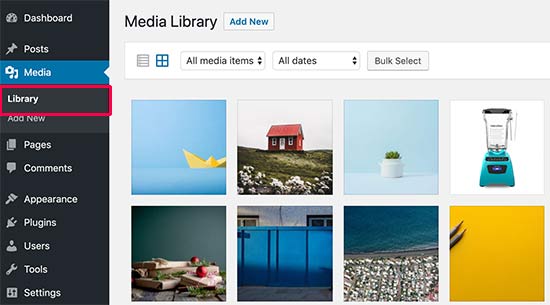
Una vez hecho esto, diríjase a la página Biblioteca ” de medios desde el escritorio de administrador de WordPress.
Aquí, todas las imágenes que haya subido a su sitio web de WordPress se mostrarán en la pantalla.
Ahora, tienes que localizar la imagen que acabas de subir y hacer clic en ella.
Se abrirá la imagen en una ventana emergente. Ahora verá los detalles de la imagen a la derecha y una vista previa de la imagen a la izquierda.
A partir de aquí, hay dos formas de abrir la imagen con el editor de imágenes incorporado de WordPress.
La primera opción es hacer clic en el botón “Editar imagen” situado bajo la vista previa de la imagen. Se abrirá el editor de imágenes dentro del mensaje / ventana emergente. La segunda opción es hacer clic en el enlace “Editar más detalles”.
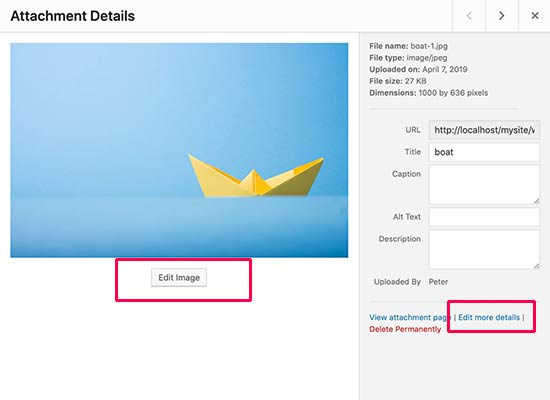
Al hacer clic en este enlace, accederá a la página Editar medios.
Desde aquí, tienes que hacer clic en el botón “Editar imagen” para abrir las herramientas básicas de edición de imágenes.
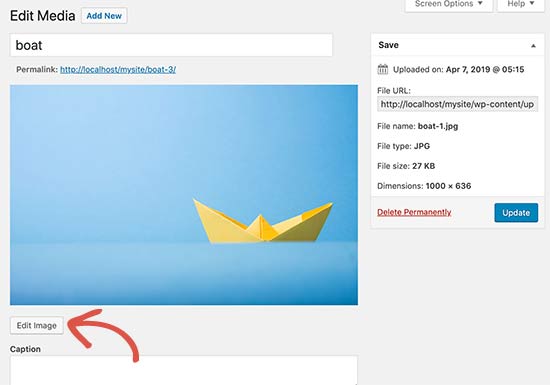
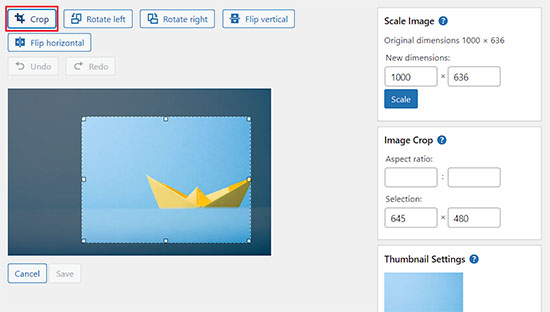
Una vez hecho esto, verás una barra de herramientas con algunos botones encima de tu imagen. En la columna de la derecha, también verás un montón de opciones para cambiar el tamaño de la imagen.
Ahora puedes utilizar fácilmente los botones de la parte superior para girar, voltear o recortar imágenes a tu gusto.
Por ejemplo, al hacer clic en el botón “Recortar”, puede seleccionar el área específica que desea recortar de la imagen original.

Además, puedes utilizar los botones “Girar a la izquierda” o “Girar a la derecha” para girar las imágenes en el sentido de las agujas del reloj o en sentido contrario.
Incluso puedes voltear tus imágenes horizontal o verticalmente según tu gusto utilizando diferentes botones.
También puedes utilizar los botones Deshacer/Rehacer para deshacer los cambios que no te gusten o rehacerlos para revertirlos.
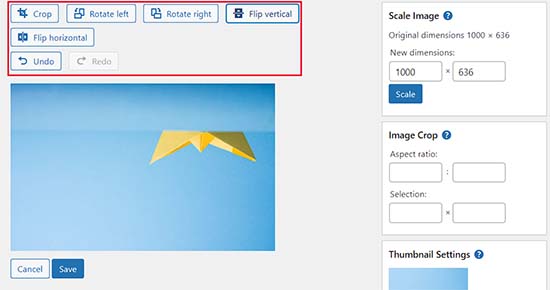
A continuación, si desea escalar la imagen, puede añadir fácilmente las dimensiones que desee en la caja meta “Escalar imagen” de la columna izquierda.
Recomendamos utilizar esta opción antes de recortar una imagen para mantener sus proporciones.
Tenga en cuenta que WordPress solo le permite reducir la escala de una imagen. Esto significa que no puede hacer sus imágenes más grandes de lo que ya son.
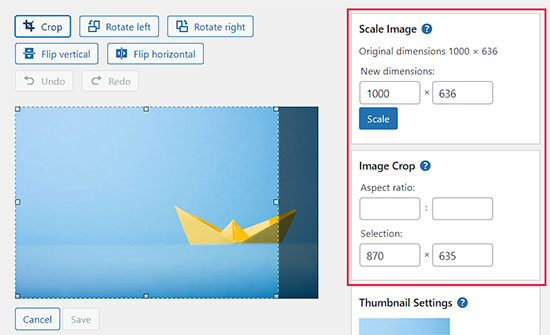
Después, también puedes utilizar la opción “Relación de aspecto” si quieres mantener intacta una determinada relación de aspecto para tu imagen. Esta característica solo funciona mientras estás recortando una imagen.
A continuación, también puede desplazarse hasta la sección “Ajustes de miniaturas”, en la columna de la izquierda, para elegir si desea aplicar estos cambios a todos los tamaños de imagen, sólo a la miniatura o a todos los tamaños de imagen excepto a la miniatura.
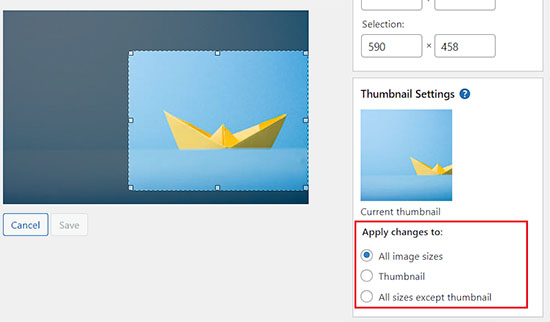
Cuando estés satisfecho con los cambios realizados, no olvides hacer clic en el botón “Guardar” para almacenar los cambios.
WordPress aplicará sus cambios a la imagen y creará una nueva copia en su servidor.
Cómo restaurar la imagen original después de editarla
Si no estás satisfecho con la imagen editada, puedes volver fácilmente a la versión original.
Abra de nuevo la página Editar medios de la imagen y, esta vez, observará que aparece una nueva caja meta denominada “Restaurar imagen original”.

Haz clic para ampliar la caja meta. Después de eso, haga clic en el botón ‘Restaurar imagen’.
WordPress restaurará tu imagen original y podrás editarla de nuevo o dejarla como está.
Bonus: Edición por lotes / en lotes de imágenes destacadas en WordPress
Además de editar las imágenes que añades a las entradas de tu blog, también puedes editar por lotes las imágenes destacadas de tu sitio WordPress.
Son las imágenes que se utilizan como miniaturas en tus entradas.

Por ejemplo, si quieres optimizar todas tus imágenes para SEO o estás cambiando la marca de tu sitio web y quieres que tus imágenes destacadas lo reflejen, entonces editar cada imagen consumirá mucha de tu energía y tiempo.
Sin embargo, editando por lotes / en lotes estas imágenes de características, puede garantizar un aspecto coherente para todas las imágenes, guardar o ahorrar tiempo y agilizar el proceso.
Puedes hacerlo fácilmente utilizando Imágenes destacadas rápidas. Para más detalles, consulte nuestro tutorial sobre cómo instalar un plugin de WordPress.
Una vez activado, visite la página “Imágenes destacadas” del escritorio de WordPress y elija la opción “Establecer la imagen seleccionada como nueva imagen destacada”.
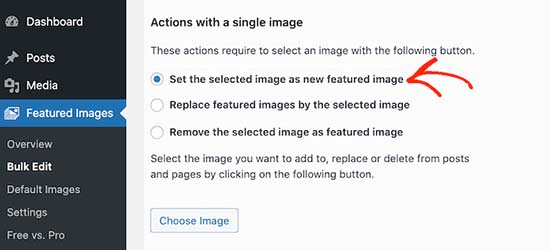
Una vez hecho esto, sólo tienes que subir la imagen que deseas utilizar como imagen destacada durante el proceso de edición por lotes / en lotes. A continuación, puedes editar esta imagen y añadir filtros para que los cambios se apliquen solo a imágenes específicas.
Para más detalles, consulte nuestro tutorial sobre cómo editar por lotes / en lotes las imágenes destacadas en WordPress.
Esperamos que este artículo te haya ayudado a aprender a realizar ediciones básicas de imágenes en el área de administrador de WordPress. Puede que también quieras ver nuestra guía para principiantes sobre cómo cambiar la altura y anchura de los bloques en las entradas de WordPress, y nuestra selección de los mejores temas de WordPress para fotógrafos.
If you liked this article, then please subscribe to our YouTube Channel for WordPress video tutorials. You can also find us on Twitter and Facebook.


Syed Balkhi says
Hey WPBeginner readers,
Did you know you can win exciting prizes by commenting on WPBeginner?
Every month, our top blog commenters will win HUGE rewards, including premium WordPress plugin licenses and cash prizes.
You can get more details about the contest from here.
Start sharing your thoughts below to stand a chance to win!
Jiří Vaněk says
Is it possible to crop an image into a circle in wordpress, or do I need a plugin for that? I’m talking about a photo of a team member, where the face should be like a picture in the wheel. Can wp do it, or do I have to edit the image externally and upload the already cropped ones?
WPBeginner Support says
To have the image in a circle it would normally be best to use an image editor to have it display how you want. Otherwise you would normally use CSS instead of image editing for what you want to achieve.
Administrador
Jiří Vaněk says
I understand, the CSS method didn’t occur to me, that’s why I solved it externally. CSS will be much faster for multiple images. Thank you for the advice.
Mrteesurez says
You can use page builder like Seedprod or elementor to create a circular images, even these page builder usually has default template for team that already showed the images in circular form or that can be easily customized.
Jiří Vaněk says
Hi Mrteesurez,
thank you for the advice. I use Elementor a lot so I will look into this feature. Because I need to create a portfolio of employees on one website, and circular images look much more elegant to me. I’ll definitely look into it.
Patrick says
I am a web designer, I have over 100 installs of wordpress over many different servers and NOT ONE of those installs does wordpress crop an image.
Its so frustrating to have to load photos in photoshop just to make a tiny change and then upload.
WPBeginner Support says
You may want to ensure you don’t have a specific theme or plugin across those sites that would be preventing you from using the crop tool
Administrador
TimGS says
I am using wordpress 4.9.5 on an IPad mini. When I go to scale an image all the selections work until I press the scale button; the image is cropped but I only get about 1/2 the width of the original crop selection. Anyone see this problem?
Justin says
Thanks for sharing! Just used the crop tool. Very handy!!
Steven Denger says
This does not work at all and is not in the least bit helpful. WordPress is the most horrid place to try to work with images. My featured images in my posts list pages are all cut – cropped out and only show a partial photo. I have tried all kinds of plugins that wp beginner has suggested and none of them work at all. I use the Awaken theme and the author will not respond to fix his worthless theme. The site that I am working on will have to be deleted because of wordpress being such a horrid cms to work with.
TimGS says
A year later, I am experiencing your problem on an iPad mini….but not on a PC
Zohaib says
Cropping function doesn’t work anymore.
Any plugin that can do image cropping in media library?
Peter Willianson says
I dont get that menu when i click edit image.. i am using bluehost.. i cant do anything to the images that are loading rotated 90 degrees.. fyi they not rotated when loaded to other sites.. this is specific to wordpress bluehost
amy says
There is no edit button on my end. Looks like I’m not the only one.
Linda Strader says
Does this work with the free version? I see NO options to edit photos, and all the ones I uploaded are rotated the wrong way.
Ra. says
Does nt work, anymore. It is just not there.
Matteo says
Hi,
when you scale an image from the media library, does it automatically reduce the quality of the image in every post/page where it was previously published or is it necessary to load it again in each single page to speed up the site?
Cheers
mike cooper says
Anyone had the issue when you rotate an image you get the following. ‘Could not load the preview image. Please reload the page and try again.’??
I have GD and ImageMagick installed..
flip works ok just not rotate and crop.
Craig Canapari says
I just discovered this yesterday. However, it seems to scale it on the fly as GTMetrix said that scaling images (that I had scaled using the tools above) was slowing down my page loading. I turned off Photon to be sure it wasn’t a cached image and also cleared my cache.
Jason says
I must admit, the editing of photographs is not very clear. I thought I had it all sorted and when I published it the image was huge and you only saw our eyes. I understand that the scale image has to be adjusted, but come on guys, we are all not up to speed with stuff like that. We want idiot proof editing and there are plenty on the market that do such. please have a look at it or you will lose this customer very quickly
Ron Strilaeff says
I’ve played with that edit feature, but cannot figure out how to get it to lock the aspect ratio. Let’s say I want a contributor to upload an image and then crop the part to show as the thumbnail before saving it. The numbers under “Image Crop -> Aspect Ratio” don’t seem to do anything and sometimes won’t let me enter any values. What are they for anyways?
Ed Power says
This crop does not work when I try to save the crop as thumbnail only – I want to show a cropped image as a thumbnail in a gallery page, and then show the full version when launched in the lightbox. Is this possible
IgorPureta says
Thanks for the good post. So far I figured out what you have written. What I can’t manage is following:
My featured image is 960×332 to fit into home page slider. When I crop the picture I want to save cropped part as thumbnail so I can include it in the post. That is all managed by WP itself. What I didn’t mange is to change thumbnail from default crop to the crop I selected. No matter how many times I have cropped, saved, deleted or whatever is possible I can’t complete it. Could you please, explain it. Thank you!
KreativTheme says
I already use a few times this feature, but today I learned a few more tricks. Thanks a lot for the great tut …
Roderick Dunne says
Nice feature – never noticed it.
One thing to ponder: Does it save an updated version of the file which is then referenced (i.e. if the edited pic is in a post)?
I’d just be concerned that page load times could be increased if an inserted image in a WP post needs to be dynamically cropped/edited for correct display on each users page request.
Otto says
@Roderick Dunne The final result replaces the existing image. It doesn’t need to perform those operations every time.
AnTo says
Well, it’s nice but if more functions can be provided for photo editing that would be amazing! However, it might consumes more web space or usage if it goes!
petebocken says
Crop has never worked for me. The Save button never works. It’s always grayed out. Actually in your post screenshot, the save button is also grayed out. Anyone else get crop to work?
Otto says
@petebocken The save button is greyed out because the selection is still being made. Make your selection, then click the “Crop” button in the upper right to confirm the selection. Then it will perform the crop and you can save the result.
BarryFuchs says
@Otto@petebocken
I had been confused by this, too, and though that crop either didn’t work on my installation or only worked for certain file types (ie jpg but not png). The process of selecting first and clicking “Crop” second seems opposite of other programs that I’ve used, such as Acrobat and Picasa. But, at least I know how to do it now!
Chris Howard says
Yeah, it’s ridiculous that I have google to find out how to do something that should be intuitive
Otto says
@petebocken Sorry, I meant upper left, of course.
Brad Dalton says
Only used it once but will probably have another go next time. Prefer using MS picture manager but nice tutorial. Pics look good
dunfalach says
@tonyjalicea When I see WP, my first thought is Wordperfect. #youmightbeanoldnerdif
tonyjalicea says
@dunfalach Well that’s a blast from the past.
Moe_NYC says
@tonyjalicea Whoa. How did I miss that? I had no clue. You think you know someone. WordPress, she’s so sexy!
tonyjalicea says
@Moe_NYC Indeed!
itravelwithlove says
@wpbeginner how to upload 2 or more photos at once in a New Post? Pls reply.
wpbeginner says
@itravelwithlove Just drag two photos or as many you want at once in the drag drop media uploader.
itravelwithlove says
@wpbeginner that’s what I do, but after that, I still need to upload it in my post one by one.
wpbeginner says
@itravelwithlove You mean insert it in your post one by one.. Yes because most of the time you insert images at different spots.
wpbeginner says
@itravelwithlove if you want to add all images one after another perhaps in a gallery format then u can do this: http://t.co/JOVHrsVQ
itravelwithlove says
@wpbeginner I was able to try that too. Thank you for the help!☺