
Die Verwaltung von Mediendateien in WordPress kann sich mit wachsender Website überwältigend anfühlen. Eine unordentliche Mediathek kann Ihre Website verlangsamen und einfache Aktualisierungen zeitaufwendig machen.
Wir haben vielen WordPress-Benutzern geholfen, ihre Websites aufzuräumen, und wir wissen, dass das Ändern Ihres Medien-Upload-Ortes mehr als nur Ordnung bedeutet.
Neben einer besseren Dateiorganisation kann diese Änderung Ihre Website beschleunigen, Backups vereinfachen, die Sicherheit erhöhen und sogar die Inhaltsbereitstellung verbessern.
In diesem Leitfaden zeigen wir Ihnen unsere effektive Methode zum Ändern der Speicherorte für WordPress-Medien-Uploads. Egal, ob Sie einen kleinen Blog oder eine geschäftliche Website mit vielen Mediendateien haben, Sie lernen, wie Sie dies richtig einrichten.
Warum den Standard-Medien-Upload-Speicherort ändern?
Wenn Sie Bilder, Videos oder andere Dateien auf Ihre WordPress-Website hochladen, werden diese in einem bestimmten Ordner auf Ihrem Server gespeichert.
Standardmäßig speichert WordPress alle Medien-Uploads im Verzeichnis /wp-content/uploads/, das Sie im Dateimanager Ihrer Website oder über einen FTP-Client finden.
In diesem Ordner finden Sie Unterordner für die verschiedenen Jahre und Monate. Zum Beispiel werden alle Dateien, die Sie im Januar 2024 hochgeladen haben, unter https://example.com/wp-content/uploads/2024/01/ gespeichert.

Diese Standardstruktur funktioniert gut für die meisten WordPress-Blogs und Websites. Manchmal möchten Sie jedoch ändern, wo WordPress Ihre Dateien speichert.
Sie könnten beispielsweise Bilder auf einer Subdomain hosten, da dies die Leistung Ihrer WordPress-Website beschleunigen kann.
Wenn Sie ein CDN verwenden, möchten Sie möglicherweise den Upload-Speicherort auf den Speicher des CDN ändern. Dies kann dazu beitragen, Ihre Mediendateien global zu verteilen und die Zugriffsgeschwindigkeit für Benutzer in verschiedenen geografischen Regionen zu verbessern.
Wenn Sie spezielle Organisationsanforderungen haben, wie z. B. die Kategorisierung von Mediendateien nach Projekt oder Typ, können Sie durch Ändern des Upload-Speicherorts eine Ordnerstruktur erstellen, die für Ihre Website besser geeignet ist.
In einer Staging-Umgebung möchten Sie möglicherweise auch den Upload-Speicherort ändern, um die primäre Mediathek nicht mit Testdateien zu überladen.
Das Verschieben von Mediendateien in einen dedizierten Ordner kann auch den Backup-Prozess beschleunigen. Wenn Sie Ihre Medien häufig sichern, kann das Speichern an einem separaten Ort diese Aufgabe schneller und effizienter machen.
Dennoch wollen wir uns Schritt für Schritt ansehen, wie Sie den Standard-Upload-Speicherort für Medien in WordPress ändern können. Sie können die folgenden Schnelllinks verwenden, um durch dieses Tutorial zu navigieren:
Schritt 1: Erstellen Sie einen neuen Upload-Ordner in Ihrem WordPress-Verzeichnis
Der erste Schritt ist die Erstellung eines neuen Ordners für den Upload Ihrer Dateien. Dazu können Sie entweder den Dateimanager Ihres Webhosters verwenden oder Ihre Website mit einem FTP-Client wie FileZilla verbinden.
Wenn Sie FTP noch nie verwendet haben, lesen Sie bitte unseren Leitfaden für Anfänger, wie Sie FTP zum Hochladen von Dateien in WordPress verwenden und wie Sie mit FTP viele Dateien in WordPress hochladen.
Für dieses Tutorial verwenden wir den Dateimanager von Bluehost, da er sehr einfach zu bedienen ist. Die Schritte sollten jedoch mehr oder weniger gleich sein, wenn Sie einen FTP-Client oder einen anderen WordPress-Hosting-Service verwenden.
Melden Sie sich zunächst in Ihrem Hosting-Dashboard an und navigieren Sie zum Tab „Websites“. Wählen Sie dann die Website aus, für die Sie den Ordner für Medien-Uploads ändern möchten, und klicken Sie auf „Einstellungen“.

Scrollen Sie auf dem nächsten Bildschirm nach unten zum Abschnitt „Schnelllinks“.
Klicken Sie dann auf „File Manager“. Bluehost zeigt Ihnen auch Ihren WordPress-Root-Ordner an, falls Sie ihn später benötigen.

Sie sollten sich jetzt im Dateimanager Ihrer eigenen Website befinden.
Öffnen Sie nun Ihren wp-content-Ordner. Klicken Sie dann oben auf „+ Ordner“.

Geben Sie Ihrem neuen Ordner als Nächstes einen Namen. Es kann etwas Einfaches wie „Dateien“ sein. Machen Sie sich eine Notiz des genauen Ordnernamens, da Sie ihn im nächsten Schritt benötigen werden.
Klicken Sie danach einfach auf die Schaltfläche „Neuen Ordner erstellen“.

Schritt 2: Code einfügen, um den Standard-Upload-Speicherort zu ändern
Als Nächstes müssen Sie einen Code-Schnipsel hinzufügen, der WordPress anweist, das Standard-Medienverzeichnis zu ändern.
💡 Profi-Tipp: Bevor Sie mit diesem Schritt fortfahren, empfehlen wir Ihnen, eine Sicherung Ihrer Website zu erstellen. Dies stellt sicher, dass Ihre Daten sicher sind, falls ein Fehler auftritt.
Für dieses Tutorial müssen Sie den benutzerdefinierten Code zur functions.php Datei Ihres Themes hinzufügen.
Das größte Problem ist, dass selbst ein kleiner Fehler im benutzerdefinierten Code-Snippet Ihre WordPress-Site beschädigen oder sogar unzugänglich machen kann. Außerdem verlieren Sie den gesamten benutzerdefinierten Code, wenn Sie das nächste Mal Ihr WordPress-Theme aktualisieren.
Aus diesem Grund empfehlen wir die Verwendung von WPCode. WPCode ist das beliebteste Code-Snippet-Plugin, mit dem Sie benutzerdefinierten CSS-, PHP-, HTML-Code und mehr hinzufügen können, ohne Ihre WordPress-Site zu gefährden.
Erfahren Sie mehr darüber, was das Plugin leisten kann, in diesem detaillierten WPCode-Testbericht.
Das erste, was Sie tun müssen, ist die Installation und Aktivierung des kostenlosen WPCode-Plugins auf Ihrer Website. Weitere Details finden Sie in unserem Schritt-für-Schritt-Leitfaden zur Installation eines WordPress-Plugins.
Gehen Sie nach der Aktivierung zu Code Snippets » Snippet hinzufügen in Ihrem WordPress-Dashboard.
Bewegen Sie auf diesem Bildschirm den Mauszeiger über „Benutzerdefinierten Code hinzufügen (Neuer Ausschnitt)“ und klicken Sie dann auf „Ausschnitt verwenden“, wenn er erscheint.

Geben Sie zunächst einen Titel für den Code-Schnipsel ein. Dies dient nur Ihrer Information, Sie können also alles verwenden, was Sie möchten.
Wenn das erledigt ist, öffnen Sie das Dropdown-Menü 'Code-Typ' und wählen Sie 'PHP-Snippet' als Ihren Code-Typ.

Sie können nun Folgendes in den Code-Editor einfügen:
define( 'UPLOADS', 'wp-content/'.'files' );
Der obige Ausschnitt ändert das Upload-Verzeichnis in wp-content/files, wie in unserem früheren Beispiel. Stellen Sie sicher, dass Sie es durch den gewünschten Speicherort ersetzen.
Scrollen Sie danach zum Feld „Einfügung“ und wählen Sie „Automatisch einfügen“, falls es nicht bereits ausgewählt ist. Sie können dann das Dropdown-Menü „Speicherort“ öffnen und „Überall ausführen“ wählen, um sicherzustellen, dass der Snippet auf Ihrer gesamten WordPress-Website aktiv ist.

Wenn Sie dies getan haben, scrollen Sie zum oberen Bildschirmrand und klicken Sie auf den Schalter 'Inaktiv', sodass 'Aktiv' angezeigt wird.
Sie können dann auf „Snippet speichern“ klicken, um den Code live zu schalten.

Schritt 3: Ändern Sie Ihre Medien-Upload-Einstellungen (Optional)
Nachdem Sie den Speicherort für Medien-Uploads geändert haben, möchten Sie vielleicht ändern, wie die Dateien in diesem neuen Ordner organisiert werden.
Standardmäßig speichert WordPress alle Mediendateien in Monats- und Jahresordnern. Wenn Sie es vorziehen, alle Dateien im selben Ordner zu speichern, gehen Sie zu Einstellungen » Medien.
Sie können nun das Kontrollkästchen „Meine Uploads organisieren…“ deaktivieren und auf „Änderungen speichern“ klicken.
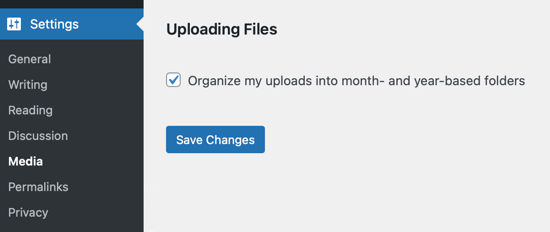
Jetzt lädt WordPress alle Ihre Mediendateien in denselben Ordner hoch. Um diese Dateien anzuzeigen, verbinden Sie sich einfach mit einem FTP-Client mit Ihrer Website und öffnen Sie dann den von Ihnen ausgewählten Ordner.
Bonus-Ressourcen: Verwaltung von WordPress-Medien
Suchen Sie nach weiteren Möglichkeiten, die Verwaltung Ihrer Medien in WordPress zu optimieren oder zu verbessern? Schauen Sie sich diese nützlichen Anleitungen an:
- Wie Sie Medien-Uploads von Benutzern in WordPress einfach organisieren
- Bilder und Mediendateien in WordPress umbenennen
- So bereinigen Sie Ihre WordPress-Mediathek (einfache Wege)
- So lagern Sie WordPress-Medien aus, um die Website-Geschwindigkeit zu verbessern
- So laden Sie Ihre gesamte WordPress-Mediathek herunter
- Wie man WordPress-Mediendateien per FTP in großen Mengen hochlädt
Wenn Ihnen dieser Artikel gefallen hat, abonnieren Sie bitte unseren YouTube-Kanal für WordPress-Video-Tutorials. Sie finden uns auch auf Twitter und Facebook.

")

")
Manu
Ist es notwendig oder besser, Mediendateien am Upload-Ort für Medien hochzuladen? Zum Beispiel ist der Standard-Upload-Ort für Medien wp-content/uploads/, aber ich möchte Audiodateien in /files1/ und /files2 usw. speichern. Ist das ein Problem?
Diese Audiodateien werden immer noch perfekt abgespielt, obwohl sie nicht in der Bibliothek erscheinen (aber das brauche ich nicht). Ich brauche nur eine kurze URL für QR-Codes auf Hörbüchern. Danke.
WPBeginner-Support
Es ist eine Frage der persönlichen Vorliebe, wo Sie Ihre Mediendateien speichern. Es gibt keinen spezifisch besseren Ort, und es ist in Ordnung, den Speicherort für Medien zu ändern.
Administrator
Arif Wali
Hallo,
Ich habe es erfolgreich geschafft. Wenn ich Dateien hochlade, zeigt das System den Fehler "Die hochgeladene Datei konnte nicht nach files verschoben werden". Könnten Sie mir bitte dabei helfen?
WPBeginner-Support
Der wahrscheinlichste Grund dafür ist, dass Ihre Dateiberechtigungen für den Ordner nicht richtig eingestellt sind. Schauen Sie sich unseren Artikel unten an, um mehr über die Einrichtung Ihrer Ordnerberechtigungen zu erfahren:
https://www.wpbeginner.com/beginners-guide/how-to-fix-file-and-folder-permissions-error-in-wordpress/
Administrator
arif wali
Vielen Dank
S.s. Brar
Zuerst einmal vielen Dank an euch. Ich habe eine Frage. Wenn ich das Standard-Upload-Verzeichnis ändere, was passiert mit den Medien/Dateien, die bereits im Standard-Upload-Verzeichnis hochgeladen wurden.
Um es klarer auszudrücken, wird dadurch etwas an meiner bereits funktionierenden Website kaputt gehen?
WPBeginner-Support
Wenn Sie die alten Medien nicht in den neuen Ordner verschieben, zeigen Ihre alten Medien kaputte Links an
Administrator
a
Hallo
Kann ich das Plugin danach entfernen?
WPBeginner-Support
Hallo,
Welches Plugin möchten Sie entfernen?
Administrator
dele
Bitte, ich habe den folgenden Fehler, der es mir nicht erlaubt, Bilder auf meiner Seite oder meinem Beitrag zu laden
UPLOAD
Fehler verwerfen
12742841_1155189411165548_8438395707068412258_n.jpg
Beim Hochladen ist ein Fehler aufgetreten. Bitte versuchen Sie es später erneut.
WPBeginner-Support
Sie können sich auf unseren Leitfaden beziehen, wie Sie Probleme beim Bild-Upload in WordPress beheben.
Administrator
muhammed
Ich möchte den Standard-Upload-Ordner auf ein anderes Hosting ändern.
Ich habe einige Plugins gefunden, aber sie ändern den "Standardordner!" nicht.
Meine Website läuft mit einem automatischen Plugin, das Bilder automatisch in den Standardordner hochlädt. Ich kann den Standardordner in meinem Webhost ändern, aber nicht zu einem anderen Server!
Was soll ich tun? Bitte helfen Sie mir.
dan
Du bist großartig.
Ben
Funktioniert diese Methode auch, wenn der Upload-Ordner an einen externen Speicherort geändert wird?
Fauzi
Danke fürs Teilen,
sehr hilfreich
Rio Bermano
Hallo, danke für dieses Tutorial.
Aber ich habe eine Frage.
ob es nach einem WordPress-Update wieder auf den Standard (wp-content/upload) zurückgesetzt wird?
Prost
Héctor Cabrera
Hallo Leute! Ihr solltet im Artikel erwähnen, dass der „define“-Code irgendwo _vor_ der Zeile „That’s all, stop editing! Happy blogging.“ platziert werden sollte. Andernfalls verursacht er bei einigen Benutzern Probleme (siehe für weitere Details).
Joe
Danke! Sie haben mir gerade etwa 10 Stunden Arbeit erspart!
H. T. Major
Die Tipps, die Sie geben, sind sehr nützlich… wie dieser! Bitte, wie „steigt man“ zwei Verzeichnisse zurück? Wenn ich zum Beispiel http://example.com/wp/wp-content/files habe, aber http://example.com/files möchte, funktioniert ( ‘UPLOADS’, ”.’files’ ) nicht, um dorthin zu gelangen. Das bringt mich zu http://example.com/wp/files.
Vielen Dank für jede Richtung, die mir hier jemand geben kann!
Miles
H.T. Major und alle anderen, die eine Struktur wie die folgende für WordPress haben:
WEB ROOT
– wp-content
— uploads
– wordpress_install_files
die Verwendung von define(‘UPLOADS’,’wp-content/uploads/’); funktioniert nicht, da sie den WordPress-Root als relativen Speicherort verwendet. Sie scheint keine absolute Pfadangabe etc. zu akzeptieren, sie hängt sie einfach an den WordPress-Root an.
Aber wenn Sie verwenden:
define(‘UPLOADS’,’..wp-content/uploads/’); das sollte so funktionieren, wie Sie es sich vorstellen. Ich habe eine Weile damit gekämpft, und das scheint den Trick zu tun.
Miles
Bearbeiten, um es ordentlich zu machen, entfernen Sie den Schrägstrich am Ende: define(‘UPLOADS’,’..wp-content/uploads’);
Dies geht zwei Schritte zurück, also aus Ihrem WordPress-Ordner heraus, vermutlich in das Web-Root-Verzeichnis und dann in einen Ordner wp-content/uploads.
Peter
Was ist, wenn ich den Upload so ändern möchte
Alt: /home/public_html/wp-content/uploads
neu: /home/new folder/uploads
Nico
Wie ändere ich den Ordner der Mediathek in 4.0?
WPBeginner-Mitarbeiter
Bitte schauen Sie sich diese Anleitung an:
So erstellen Sie ganz einfach einen responsiven WordPress-Slider mit Soliloquy
WPBeginner-Mitarbeiter
Ja, das ist möglich. Der beste Weg ist die Nutzung eines CDN-Dienstes. Dies bietet eine bessere Redundanz und macht Ihre Website schneller.
Wenn Sie jedoch nur das Medien-Upload-Verzeichnis ändern möchten und die Geschwindigkeit keine Rolle spielt, sollten Sie sich wp-ftp-media-library ansehen.
Sandeep
Danke. Ich habe einige Recherchen zu CDN durchgeführt, aber ich habe festgestellt, dass es nur Bilder zwischenspeichert, um sie von einem entfernten Standort zu liefern, der dem Benutzer am nächsten ist. Ich möchte nur auf einen anderen Server hochladen, daher könnte die zweite Option für mich funktionieren.
Da ich jedoch das Gefühl habe, dass FTP nicht wirklich sicher ist, haben Sie eine Lösung, wie ich ein anderes Protokoll wie HTTP/HTTPS oder Rsync verwenden kann, um dasselbe zu tun (ich frage mich, ob WP dies unterstützt).
Sandeep
Ist es möglich, den Upload-Speicherort auf einen anderen Remote-Server zu definieren?
Somesh
Ich möchte eine andere Subdomain verwenden, wie verschiebe und ändere ich den Pfad zu dieser Subdomain-Adresse?
HasaN
ich ändere meinen Upload-Pfad
aber meine alten Featured-Image- und Medienlinks werden jetzt auf den neuen Pfad geändert und sind kaputt!
Ich möchte nur, dass die Links und der Pfad der neuen Medien, die hochgeladen werden, zum neuen Pfad geändert werden
ali es
Hallo. Wie ändere ich die Adresse für den Upload von Medien auf den Server? Ich spreche kein Englisch und habe den Text mit Google Translate übersetzt. Bitte helfen Sie mir.
Danke
Jovin
Wenn ich das Upload-Verzeichnis ändere. Sollte ich alle meine vorherigen Uploads in das neue Verzeichnis verschieben?
WPBeginner-Support
Stellen Sie zunächst sicher, dass Sie Ihr vorhandenes Upload-Verzeichnis sichern, bevor Sie den Standard-Medien-Upload-Speicherort in WordPress ändern. Sie können Ihr altes Upload-Verzeichnis so belassen, wie es ist, damit ältere Medien auf Ihrer Website nicht kaputt gehen. Wenn Sie das ältere Medien-Upload-Verzeichnis jedoch überhaupt nicht mehr verwenden möchten, sollten Sie wissen, dass Medienpfade in Ihren Beiträgen, Seiten und Widgets hartcodierte URLs sind, sodass sie sich nicht von selbst ändern. Sie können versuchen, externe Bilder zu importieren und Ihre Website auf defekte Links zu überprüfen, um sicherzustellen, dass alle Bilder auf Ihrer Website korrekt angezeigt werden.
Administrator
Jovin
Danke für die Antwort
Arvind Bhardwaj
Danke,
Funktionierte perfekt in WP 3.5.1
Travis
Entschuldigen Sie den Kommentar, etwas spät. Dies ist der einzige Artikel, den ich finden konnte, der dies für die neueren WP-Installationen (3.6.1) behandelt. Bei allen anderen geht es um den misc-Ordner. Jedenfalls habe ich die Schritte befolgt und es funktioniert, aber die Bilder sind kaputt. Ich arbeite nur mit ein paar Bildern, daher ist es keine große Sache, sie neu hochzuladen.
Ich gehe also davon aus, dass ich einen neuen Ordner „media“ (mein Pfad) erstellen muss. Würde das unter uploads gehen oder uploads ersetzen? Die URL, die ich suche, ist http://mydomain/media/image.png. Ich kann es nicht herausfinden.
Jede Hilfe für jeden wird sehr geschätzt
WPBeginner-Support
Sie müssen den Upload-Pfad in der Datei wp-config.php wie folgt definieren:
define( 'UPLOADS', ''.'media' );Administrator
K.Adam White
Wie viele andere Kommentatoren wollte ich meine Medien-Uploads im selben Verzeichnis wie meine WordPress-Installation speichern, z. B. um WordPress in „mydomain.com/wp/“ und meine Medien in „mydomain.com/uploads/“ zu haben. Ich konnte dies in WordPress 3.5 zum Laufen bringen, indem ich Folgendes zu functions.php meines Themes (oder zu einem Plugin) hinzugefügt habe:
if ( empty( $upload_path ) || ‘wp-content/uploads’ == $upload_path ) { update_option( ‘upload_path’, untrailingslashit( str_replace( ‘backend’, ‘files’, ABSPATH ) ) ); update_option( ‘upload_url_path’, home_url( ‘/files’ ) ); }
Hoffentlich wird das in einer zukünftigen Version von WordPress einfacher!
K.Adam White
Update: Ersetzen Sie im obigen Beispiel „backend“ durch „wp“ (oder wo auch immer Ihr WordPress installiert ist)
David Paul
Obwohl dies auf den ersten Blick zu funktionieren scheint, warum würden Sie nicht einfach 1 Zeile zu Ihrer wp-config-Datei hinzufügen? Es scheint viel zusätzliche Arbeit für das gleiche Ergebnis zu sein, das dieser Beitrag präsentiert…
Das Hinzufügen von define(‘UPLOADS’,’directory’); ist so viel einfacher.
Yury Tilis
Denn in wp-includes/functions.php haben Sie die folgenden 2 Szenarien:
Wenn kein bestimmtes Upload-Verzeichnis angegeben ist:
$dir = WP_CONTENT_DIR . ‘/uploads’;
Wenn UPLOADS definiert ist:
$dir = ABSPATH . UPLOADS;
Das Problem hier, das offensichtlich sein sollte, ist, dass ABSPATH != WP_CONTENT_DIR ist. Wenn Sie WordPress in einem Verzeichnis installiert haben und mit WP_SITEURL darauf verweisen, aber ein anderes Verzeichnis für wp-content mit WP_CONTENT_DIR angeben, ergibt UPLOADS plötzlich keinen Sinn mehr, und eine einfache Umbenennung des Ordners ist ohne den obigen Hack oder einen ähnlichen unmöglich.
Derek Lapp erklärt es hier gut:
nate
Ich gehe das vielleicht komplett falsch an, aber ich benutze eine Multisite-Installation, um die Websites meiner Kunden zu entwickeln... Da ich den Code-Editor im WP-Backend benutze, möchte ich auch den Bild-Uploader verwenden, um Bilder für CSS hochzuladen...
Welches ich habe ein tolles Starter-Theme erstellt, das ich für Widget-Inhalte in der Seitenleiste verwende und Bilder für bestimmte Bereiche wie Logo-Platz und sogar für Hintergrundbilder hochgeladen habe – eine "faule" Methode, um Bilder auf den Server zu bekommen.
Ich wollte relative Pfade in meinem CSS verwenden, falls ich die Website/das Theme verschiebe oder Domainnamen ändere, und ich wollte nicht den normalen Pfad wp-content/blog23/files verwenden, der der Standardpfad für den Bild-Uploader ist...
Für 1 befindet sich dies außerhalb meines Themes und ich möchte einfach background: url ('images/filename.png') in meinem CSS mit Bildern verwenden, die ich über den WP-Bild-Uploader hochlade, damit meine Links/Bilder nicht kaputt gehen, wenn mein Theme verschoben wird, und dann plane ich, nach dem Live-Schalten der Website den Upload-Pfad zurück auf wp-content/blog23/files zu ändern.
Ich denke nur, das würde mir das Leben leichter machen, und natürlich übersehe ich wahrscheinlich etwas oder bin faul, aber ich verspreche, das bin ich nicht – ich bin neu hier… : )
Ich habe den Upload-Pfad in den Website-Einstellungen geändert, aber es hat sich nichts geändert? Es wird immer noch in den Blog-Dateipfad hochgeladen?
Nico
Ich kann das (wie aus einem anderen Teil dieses Threads kopiert) nicht zum Laufen bringen:
define(‘UPLOADS’, ‘files’);
Es ist in meiner wp-config.php.
Ich möchte meine Bilder in example.com/img
Jede Hilfe wird geschätzt.
Warum, oh warum machen sie sich überhaupt die Mühe, Dinge wie diese zu ändern. Es war SO eine nützliche Funktion.
Nico
Das Problem wurde gelöst. Als ich den Code von dieser Seite kopierte, waren die Anführungszeichen von der „schicken“ Sorte. Als ich sie einfach machte, funktionierte der Code.
Danke dafür.
Nico
Das ist die Art von Änderung, die Softwareentwickler vornehmen, wenn sie den Bezug zu ihren Benutzern verlieren.
Die Erklärung, die ich zum Entfernen dieser Option gelesen habe, ist, dass nur wenige Leute sie benutzt haben und sie die Benutzeroberfläche übersichtlicher macht. Was für ein Unsinn.
Josef
Ich möchte, dass der Pfad meiner Dateien example.com/files ist
Nur um das Backend polierter zu gestalten und die Tatsache zu verbergen, dass ich WordPress benutze.
Meine Frage ist, ob ich in Zukunft Probleme haben werde, wenn ich diese Methode anwende? Nächste WordPress-Updates oder Umzug der Website zu einem anderen Host... usw?
Ist es gefährlich?
Redaktion
Jedes Mal, wenn Sie sich entscheiden, Dinge anders zu machen als im Kern, übernehmen Sie die Verantwortung und die Risiken für die zukünftige Kompatibilität.
Administrator
Josef
Ich verstehe das zu 100%.
Aber ich möchte eine Antwort auf meine Frage, ich wäre dankbar.
Redaktion
Ihre Frage war, ob Sie Probleme haben werden, und unsere Antwort darauf war, dass wir das beantworten. Wir wissen es nicht, weil sich so viele Dinge ändern können, aber wenn Sie Probleme haben, sind Sie dafür verantwortlich.
Dan A.
@Josef
Updates haben meine Seiten, die diese Methode verwenden, nie beeinträchtigt. Wenn Sie den Hoster wechseln, stellen Sie einfach sicher, dass das in Ihrer Konfigurationsdatei angegebene Verzeichnis mit dem Verzeichnis, das die tatsächlichen Dateien enthält, übereinstimmt, und Sie werden keine Probleme haben.
Ich habe einmal den Hoster gewechselt & beschlossen, mein Upload-Verzeichnis umzubenennen… Nachdem ich die Bilder in das neue Verzeichnis verschoben hatte, waren alle Links zu den Bildern & Dateien mit dem alten Verzeichnisnamen defekt. Es war mühsam, in die Datenbank zu gehen und die Pfade der defekten Links zu aktualisieren.
Bleiben Sie einfach konsistent.
James
Hallo,
Frage, wie kann ich das Upload-Verzeichnis pro Benutzer anpassen?
Gibt es dafür ein Plugin, das diese Anforderungen erfüllt?
Danke!
Papa Schlumpf
Profi-Tipp: Sie müssen leere Zeichenfolgen keinen leeren Zeichenfolgen voranstellen.
define(‘UPLOADS’, ”.’files’);
sollte sein:
define(‘UPLOADS’, ‘files’);
Der Wordpress-Quellcode ist ohnehin schon schrottig genug.
Facu
Vielen Dank! Das war sehr hilfreich für mich
Connie
Ich habe bemerkt, dass nach dem Upgrade auf 3.5.1 der Media-Uploader überhaupt nicht funktionierte. (Funktioniert immer noch nicht)
außerdem scheinen einige Plugins die konventionelle „wp-content/uploads“ anstelle von Konstanten oder Einstellungen zu verwenden…
das ist wirklich ein Problem, ich kann den Media Uploader nicht benutzen....
Connie
Ich habe die Konstante zu wp-config hinzugefügt. Der Medien-Upload wird in den definierten Ordner hochgeladen, aber die Medien-Eingabe beim Bearbeiten eines Beitrags funktioniert überhaupt nicht, ist leer, keine Reaktion beim Klicken...
Was für eine Frechheit…
Matteo
vielleicht ist Ihr Server Windows, besser ein Linux
Redaktion
Sie werden mit Plugins immer Probleme bekommen, wenn Sie das tun. Diese Option ist nicht für durchschnittliche Benutzer gedacht. Wenn Sie sie verwenden, müssen Sie einen guten Grund dafür haben.
Administrator
Mattia Frigeri
Bin ich der Einzige, der denkt, dass vielleicht der „upload“-Ordner in Ordnung ist, aber die beste Organisation weder Jahre noch Monate sein sollte, sondern der Slug des Beitrags/der Seite, in dem/der die Datei enthalten ist? Nicht der Titel, sondern der Slug! Das könnte zwar Probleme mit einem einzelnen Bild verursachen, das in 2 Beiträgen/Seiten verwendet wird. Aber ich verwende ein Bild nie an 2 verschiedenen Stellen...
RVOLA
Hallo, ich habe ein kleines Plugin für die neuen Funktionen von WordPress 3.5 geschrieben.
Sie können die Domain oder Subdomain direkt ändern
http://wordpress.org/extend/plugins/wp-original-media-path/
FragaGeddon
Danke, das funktioniert gut!
Chaitanya
Bitte helfen Sie…
Ich bin mit dem Standard-Upload-Ordner einverstanden, aber ich kann keine Datei in diesem Ordner hochladen, ohne dessen Berechtigung auf 777 zu setzen. Aber ich denke, das könnte gefährlich sein. Gibt es eine Möglichkeit, das zu umgehen?
Redaktion
Sprechen Sie mit Ihrem Server-Administrator.
Administrator
fred
lol nett, du klingst wie der MS-Technik-Support, der dem Administrator sagt, er solle mit seinem Administrator sprechen, als Antwort auf das Problem
Redaktion
Der Benutzer hat Angst, die Berechtigungen auf 777 zu ändern. Wir haben keine Kontrolle über ihre Server und wissen auch nicht, ob der Benutzer dies tut. Daher bin ich mir nicht sicher, wie genau Sie uns helfen möchten.
Samarn
Anders ausgedrückt, Sie können diese URL /wp-admin/options.php verwenden, um den Pfad des Upload-Verzeichnisses zu ändern. Suchen Sie dann nach upload_path, um den Pfad Ihres Upload-Verzeichnisses einzugeben. Standardmäßig ist es wp-content/uploads. Sie können es in wp-content/files für Verzeichnisdateien unter wp-content ändern. Oder Sie können es in files für Verzeichnisdateien auf derselben Ebene wie wp-content ändern.
Wenn Sie Medien in einer Subdomain speichern möchten. Sie müssen die URL Ihrer Subdomain in upload_url_path eingeben und dann Ihre Subdomain auf den Pfad des Upload-Verzeichnisses oben verweisen.
Nachdem Sie dies geändert haben. Sie müssen den alten Verzeichnisnamen in den neuen Verzeichnisnamen umbenennen oder alle Dateien und Verzeichnisse im alten Verzeichnis in das neue Verzeichnis verschieben. Wenn Sie das nicht tun. Dateien werden nicht gefunden.
hoffe, das ist nützlich und entschuldigen Sie mein Englisch.
Chris
Danke, das war sehr, sehr hilfreich.
Dave
Sie *könnten* das tun, es wird funktionieren, aber Sie verändern eine Kerndatei. Dies birgt ein großes Potenzial, dass es bei der Aktualisierung von WP kaputt geht. Es ist besser, die wp-config-Datei wie hier vorgeschlagen zu ändern, da sie bei einer Aktualisierung NICHT angefasst wird.
A.K.
Dumme Änderung! Ich habe sogar den Ordner in etwas wie /images/… geändert.
John
Ich dachte, ich wäre hier auf der richtigen Spur. Ich habe eine WP-Installation mit 12 Websites. Sie ist brandneu. Eine der Websites ist einwandfrei, aber bei den anderen können wir die hochgeladenen Bilder/Dokumente nicht anzeigen lassen. Sie werden in einem Ordner referenziert, der nicht existiert. Anstatt all das hier zu tippen, können Sie den Thread bei WordPress unter http://wordpress.org/support/topic/pictures-do-not-display-3?replies=5 lesen. Der Thread ist eingeschlafen, aber ich brauche dringend Hilfe und jede Hilfe wäre willkommen.
Henry
Genau wie oben, ich habe versucht, 3.5 auf ein paar neue Websites zu installieren, und was auch immer ich tue, ich kann nicht zu einer Subdomain wechseln. Weiß jemand, wie man den Medien-Upload auf eine Subdomain ändert?
Ed
Danke fürs Posten. Ich glaube aber, ich verpasse etwas, denn ich möchte Ihr Beispiel verwenden, um Bilder in ein Stammverzeichnis hinzuzufügen, Beispiel: „http://mydomain/images“
Und basierend auf Ihrem Beispiel gebe ich es so ein:
define ( ‘UPLOADS’, ‘http://mydomain/images’ ‘.’files’ );
Das Problem ist, dass meine Medien jetzt die Adresse „http://otherdomain/http://mydomain/images“ anzeigen, also bleiben die Medien im Grunde auf der aktuellen Domain und werden nicht außerhalb der Domain in ein Stammverzeichnis verschoben.
Hoffentlich habe ich mich verständlich ausgedrückt. Irgendwelche Ratschläge?
Jaybe
Was Sie getan haben, stimmt nicht mit dem bereitgestellten Beispiel überein. Das bereitgestellte Beispiel setzt nur den Verzeichnisspeicherort/-pfad, nicht die URI.
Sie schließen das Schema (http://) ein, was nicht angemessen ist und außerdem Dinge kaputt macht, wenn Sie das Upload-Verzeichnis/-Speicherort konfigurieren.
Sie möchten vermutlich auch die URI für Uploads definieren.
Andere in den Kommentaren scheinen dasselbe zu fragen.
— z. B. Wie lade ich Uploads/Medien von einer Subdomain hoch und bediene sie?
Beachten Sie, dass es zwei Speicherortangaben für Uploads/Medien gibt:
1. Upload-Verzeichnis/Speicherort.
2. URI.
Das Uploads-Verzeichnis/der Upload-Speicherort kann wie folgt als Konstante angegeben werden:
define( ‘UPLOADS’, ”.’files’ );
Dies würde das Hochladen und Referenzieren von Dateien über die Standarddomäne wie folgt ermöglichen:
(Beispiel) http://domain.tld/files
Dies legt nur den Verzeichnispfad/Speicherort fest, NICHT die Sub-/Domain.
2. URI
Die URI ist die vollständige URL/der vollständige Pfad, um auf Uploads zuzugreifen, vorangestellt der UPLOADS-Konstante (siehe #1 oben).
Dies ist leider und seltsamerweise nicht als Konstante definierbar. Es kann jedoch über einen Filter (wp_upload_dir) gesetzt oder durch direkte Bearbeitung des Datenbanktabelleneintrags geändert werden.
Der Speicherort des Datenbanktabelleneintrags ist wie folgt:
Datenbank/ wp_options/ upload_url_path
* Hinweis: Durch Bearbeiten von upload_path und/oder upload_path_url in der Datenbank aktivieren Sie die Benutzeroberfläche für die Verwaltung dieser Felder wie zuvor über den Bereich WordPress Admin/ Media/ Uploading Files wieder.
Für diejenigen, die Medien über eine Sub-/andere Domain hosten möchten, können Sie upload_url_path wie folgt ändern:
Datenbank/ wp_options/ upload_url_path:
(Beispiel) http://mycdn.mydomain.tld
Selbstverständlich müssen Sie Ihren Webserver entsprechend konfigurieren, um die Sub-/Domain korrekt auf den entsprechenden Speicherort/Verzeichnis zu verweisen, von dem aus bedient werden soll.
Ich hoffe, das hilft.
Julie Olson-Rachlin
Jaybe — DANKE. DIR.
Ich hatte damit nie Probleme – bis heute.
Frieden!
Hamza
und was, wenn ich Medien in einer Subdomain speichern möchte?
evan
Ich habe die gleiche Frage
Eddy
Danke. Ihr Tutorial ist sehr hilfreich.
chrismccoy
toller Beitrag, die Definition ist nicht stark dokumentiert, daher ist es großartig, dass jemand darüber postet. Ich hatte ein paar Kunden, die ihre Uploads in /pics und /images hatten, daher war dies über 3.5 ohne die Definition für neue Installationen nicht machbar.
Rhea
Hallo. Danke dafür. Aber ich brauche die Bilder außerhalb meiner WordPress-Seite gespeichert.
z.B.:
public_html/site /// das ist meine WordPress-Seite
public_html/media /// hier möchte ich alle Bilder stattdessen speichern.
TIA
Pietro Gregorini
Ich würde gerne dasselbe wissen, ob es möglich ist, den Upload-Ordner AUSSERHALB des WordPress-Stamms zu platzieren.
Sam Ward
Sie müssen den weiter oben erwähnten upload_url_path ändern, aber das beinhaltet die Änderung einer der WordPress-Kern-Dateien.
Es gibt ein schönes Plugin, das nur wenige Beiträge weiter oben gepostet wurde und das alles für Sie erledigt.
Sie können das Plugin deinstallieren, sobald Sie Ihre Änderungen vorgenommen haben.
Saurabh
und was, wenn ich Medien in einer Subdomain speichern möchte?
Carlos Varela
Sie können in Ihrer wp-config einen Medienhost definieren
define (‘MEDIA_HOST’, ‘http://media.yourdomain.com’);
Maarten
Ich bin mit dieser Änderung nicht wirklich zufrieden, da mein WordPress ein Subdomain verwendet, um die hochgeladenen Medien bereitzustellen. Dies funktioniert nach dem Upgrade immer noch, ist aber für neue Blogs nicht mehr verfügbar.
Ohne die beiden Felder zur Festlegung des Upload-Verzeichnisses und des Download-Pfads kann ich sie nur von derselben Domain wie WP bereitstellen und nicht von einer Cookieless-Domain, wie ich es möchte.
Jaybe
Man kann sowohl Pfad als auch URI über die entsprechenden Datenbankeinträge festlegen.
Es ist nicht so elegant wie die Verwendung einer Konstante define, aber es ist genauso einfach und zugänglich für die meisten, die erwägen, solche Einstellungen zu ändern.
Sheik Yerbouti
Meine Website ist komplett https. Jedes von mir ausprobierte Slideshow-Plugin fügt die angegebene URL für das Bild ein, um es anzuzeigen. Das Problem ist, dass jede Seite, die eine Slideshow verwendet, als unsicherer Inhalt gemeldet wird. Es scheint keine Möglichkeit zu geben, die URL in der/den Slideshow(s) oder auf den Mediaseiten zu bearbeiten. Wie bearbeite ich eine URL, um Slideshows sicher zu machen?
Sheik Yerbouti
Versuchen Sie WP Original Media Path. Dieses Plugin ändert den Pfad und alle vorhandenen Dateipfade auf einmal.