
La gestion des fichiers multimédias dans WordPress peut sembler décourageante à mesure que votre site se développe. Une bibliothèque multimédia désordonnée peut ralentir votre site et rendre les mises à jour simples chronophages.
Nous avons aidé de nombreux utilisateurs de WordPress à nettoyer leurs sites Web, et nous savons que le changement de l'emplacement de téléchargement de vos médias va au-delà de la simple organisation.
Outre une meilleure organisation des fichiers, ce changement peut accélérer votre site Web, simplifier les sauvegardes, améliorer la sécurité et même optimiser la diffusion du contenu.
Dans ce guide, nous vous montrerons notre méthode efficace pour changer les emplacements de téléchargement des médias WordPress. Que vous ayez un petit blog ou un site d'entreprise avec de nombreux fichiers multimédias, vous apprendrez comment le configurer correctement.
Pourquoi changer l'emplacement par défaut de téléchargement des médias ?
Lorsque vous téléchargez des images, des vidéos ou d’autres fichiers sur votre site WordPress, ils sont stockés dans un dossier spécifique sur votre serveur.
Par défaut, WordPress enregistre tous les téléchargements de médias dans le répertoire /wp-content/uploads/, que vous pouvez trouver dans le gestionnaire de fichiers de votre site Web ou via un client FTP.
À l'intérieur de ce dossier, vous trouverez des sous-dossiers pour les différentes années et mois. Par exemple, tous les fichiers que vous avez téléchargés en janvier 2024 seront stockés dans https://example.com/wp-content/uploads/2024/01/.

Cette structure par défaut fonctionne bien pour la plupart des blogs et sites WordPress. Cependant, il peut arriver que vous souhaitiez modifier l’emplacement de stockage de vos fichiers par WordPress.
Par exemple, vous pourriez héberger des images sur un sous-domaine, car cela peut accélérer les performances de votre WordPress.
Si vous utilisez un CDN, vous pourriez vouloir modifier l’emplacement de téléchargement pour qu’il pointe vers le stockage du CDN. Cela peut aider à distribuer vos fichiers multimédias globalement, améliorant la vitesse d’accès pour les utilisateurs dans différentes zones géographiques.
Si vous avez des besoins organisationnels spécifiques, tels que la catégorisation des fichiers multimédias par projet ou par type, la modification de l’emplacement de téléchargement vous permet de créer une structure de dossiers qui fonctionne mieux pour votre site.
De plus, dans un environnement de staging, vous pourriez vouloir modifier l'emplacement de téléchargement pour éviter d'encombrer la bibliothèque multimédia principale avec des fichiers de test.
Déplacer les fichiers multimédias vers un dossier dédié peut également accélérer le processus de sauvegarde. Si vous sauvegardez fréquemment vos médias, les avoir dans un emplacement séparé peut rendre cette tâche plus rapide et plus efficace.
Cela dit, examinons comment modifier l'emplacement de téléchargement des médias par défaut dans WordPress, étape par étape. Vous pouvez utiliser les liens rapides ci-dessous pour naviguer dans ce tutoriel :
Étape 1 : Créez un nouveau dossier de téléchargement dans votre répertoire WordPress
La première étape consiste à créer un nouveau dossier pour télécharger vos fichiers. Pour ce faire, vous pouvez soit utiliser le gestionnaire de fichiers de votre hébergeur, soit connecter votre site à un client FTP tel que FileZilla.
Si vous n’avez jamais utilisé FTP auparavant, consultez notre guide pour débutants sur comment utiliser FTP pour télécharger des fichiers vers WordPress et comment télécharger des fichiers en masse vers WordPress en utilisant FTP.
Pour ce tutoriel, nous utiliserons le gestionnaire de fichiers de Bluehost, car il est très facile à utiliser. Cela dit, les étapes devraient être plus ou moins les mêmes si vous utilisez un client FTP ou un autre service d’hébergement WordPress.
Tout d'abord, connectez-vous à votre tableau de bord d'hébergement et accédez à l'onglet « Sites Web ». Ensuite, sélectionnez le site Web dont vous souhaitez modifier le dossier de téléchargement des médias et cliquez sur « Paramètres ».

Sur l'écran suivant, faites défiler jusqu'à la section « Liens rapides ».
Ensuite, cliquez sur « Gestionnaire de fichiers ». Bluehost vous montre également votre dossier racine WordPress au cas où vous en auriez besoin plus tard.

Vous devriez maintenant être dans le gestionnaire de fichiers de votre propre site Web.
Maintenant, ouvrez votre dossier wp-content. Ensuite, cliquez sur « + Dossier » en haut.

Ensuite, donnez un nom à votre nouveau dossier. Il peut s'agir de quelque chose de simple comme « fichiers ». Notez le nom exact du dossier, car vous en aurez besoin à l'étape suivante.
Après cela, cliquez simplement sur le bouton « Créer un nouveau dossier ».

Étape 2 : Insérez le code pour modifier l'emplacement de téléchargement par défaut
Ensuite, vous devrez ajouter un extrait de code qui indique à WordPress de modifier le répertoire multimédia par défaut.
💡 Astuce de pro : Avant de continuer cette étape, nous vous recommandons de créer une sauvegarde de votre site web. Cela garantit que vos données sont en sécurité en cas d’erreur.
Pour ce tutoriel, vous devrez ajouter le code personnalisé au fichier functions.php de votre thème.
Le plus gros problème est qu’une petite erreur dans l’extrait de code personnalisé peut planter votre site WordPress, voire le rendre inaccessible. De plus, vous perdrez tout le code personnalisé la prochaine fois que vous mettez à jour votre thème WordPress.
Pour cette raison, nous recommandons d’utiliser WPCode. WPCode est le plugin d’extraits de code le plus populaire qui vous permet d’ajouter du CSS, PHP, HTML personnalisé, et plus encore sans mettre votre site WordPress en danger.
Apprenez-en davantage sur ce que le plugin peut faire dans cette critique détaillée de WPCode.
La première chose à faire est d’installer et d’activer le plugin gratuit WPCode sur votre site web. Pour plus de détails, consultez notre guide étape par étape sur comment installer un plugin WordPress.
Après l'activation, allez dans Snippets de code » Ajouter un snippet dans votre tableau de bord WordPress.
Sur cet écran, survolez « Ajouter votre code personnalisé (Nouveau snippet) » avec votre souris, puis cliquez sur « Utiliser le snippet » lorsqu'il apparaît.

Pour commencer, tapez un titre pour le snippet de code. Ceci est juste pour votre référence, vous pouvez donc utiliser ce que vous voulez.
Une fois cela fait, ouvrez le menu déroulant « Type de code » et choisissez « Snippet PHP » comme type de code.

Vous pouvez maintenant coller ce qui suit dans l'éditeur de code :
define( 'UPLOADS', 'wp-content/'.'files' );
Le snippet ci-dessus modifie le répertoire de téléchargement en wp-content/files, comme dans notre exemple précédent. Assurez-vous de le remplacer par l'emplacement que vous souhaitez utiliser.
Après cela, faites défiler jusqu'à la boîte « Insertion » et sélectionnez « Insertion automatique » si ce n'est pas déjà sélectionné. Vous pouvez ensuite ouvrir le menu déroulant « Emplacement » et choisir « Exécuter partout » pour vous assurer que le snippet est actif sur l'ensemble de votre site web WordPress.

Une fois cela fait, faites défiler jusqu'en haut de l'écran et cliquez sur le bouton « Inactif » pour qu'il affiche « Actif ».
Vous pouvez ensuite cliquer sur « Enregistrer le fragment » pour rendre le code actif.

Étape 3 : Modifiez vos paramètres de téléchargement des médias (facultatif)
Maintenant que vous avez modifié l'emplacement de téléversement des médias, vous voudrez peut-être modifier la façon dont les fichiers sont organisés dans ce nouveau dossier.
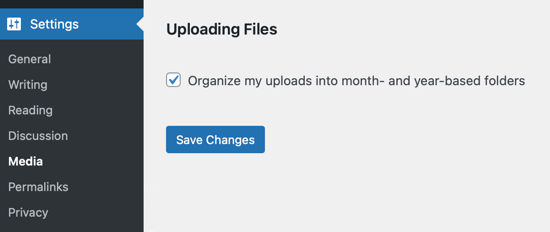
Par défaut, WordPress stocke tous les fichiers multimédias dans des dossiers mois et année. Si vous préférez enregistrer tous les fichiers dans le même dossier, allez dans Paramètres » Médias.
Vous pouvez maintenant décocher la case « Organiser mes téléversements... » et cliquer sur « Enregistrer les modifications ».
Désormais, WordPress téléversera tous vos fichiers multimédias dans le même dossier. Pour voir ces fichiers, connectez-vous simplement à votre site à l'aide d'un client FTP, puis ouvrez le dossier que vous avez sélectionné.
Ressources bonus : Gestion des médias WordPress
Vous cherchez d'autres moyens de rationaliser ou d'améliorer la façon dont vous gérez les médias dans WordPress ? Consultez ces guides utiles :
- Comment organiser facilement les téléversements de médias par utilisateur dans WordPress
- Comment renommer les images et les fichiers multimédias dans WordPress
- Comment nettoyer votre médiathèque WordPress (méthodes faciles)
- Comment décharger les médias WordPress pour améliorer la vitesse du site web
- Comment télécharger toute votre médiathèque WordPress
- Comment téléverser en masse des fichiers multimédias WordPress via FTP
Si vous avez aimé cet article, abonnez-vous à notre Chaîne YouTube pour des tutoriels vidéo WordPress. Vous pouvez également nous trouver sur Twitter et Facebook.

")

")
Manu
Est-il nécessaire ou préférable de télécharger les fichiers multimédias dans l'emplacement de téléchargement des médias ? Par exemple, l'emplacement par défaut pour le téléchargement des médias est wp-content/uploads/ mais je veux placer les fichiers audio dans /files1/ et /files2 etc. Est-ce un problème ?
Ces fichiers audio seront toujours lus parfaitement bien qu'ils n'apparaissent pas dans la bibliothèque (mais je n'en ai pas besoin). J'ai juste besoin d'une URL courte pour les codes QR sur les livres audio. Merci.
Support WPBeginner
C'est une question de préférence personnelle quant à l'emplacement de vos fichiers multimédias, il n'y a pas d'emplacement spécifiquement meilleur et il est tout à fait acceptable de changer l'emplacement des médias.
Admin
Arif Wali
Bonjour,
Je l'ai fait avec succès. Lorsque je télécharge des fichiers, le système affiche l'erreur « Le fichier téléchargé n'a pas pu être déplacé vers les fichiers ». Pourriez-vous m'aider à ce sujet ?
Support WPBeginner
La raison la plus probable est que les permissions de votre fichier ne sont pas correctement définies pour le dossier. Vous voudrez consulter notre article ci-dessous pour en savoir plus sur la configuration des permissions de votre dossier :
https://www.wpbeginner.com/beginners-guide/how-to-fix-file-and-folder-permissions-error-in-wordpress/
Admin
arif wali
Merci beaucoup
S.s. Brar
Tout d'abord, merci à vous. J'ai une question. Lorsque je change le répertoire de téléchargement par défaut, qu'advient-il des médias/fichiers déjà téléchargés dans le répertoire de téléchargement par défaut.
Pour être plus clair, cela va-t-il casser quelque chose sur mon site déjà fonctionnel ?
Support WPBeginner
À moins que vous ne déplaciez les anciens médias vers le nouveau dossier, vos anciens médias afficheront des liens brisés.
Admin
a
Bonjour
Puis-je supprimer le plugin après cela ?
Support WPBeginner
Bonjour,
Quel plugin voulez-vous supprimer ?
Admin
dele
s'il vous plaît, j'ai l'erreur ci-dessous qui ne me permet pas de charger des images sur ma page ou mon article
UPLOADING
Ignorer les erreurs
12742841_1155189411165548_8438395707068412258_n.jpg
Une erreur s'est produite lors du téléchargement. Veuillez réessayer plus tard.
Support WPBeginner
Vous pouvez vous référer à notre guide sur la façon de résoudre les problèmes de téléchargement d’images dans WordPress.
Admin
muhammed
i want to change the default upload folder to another hosting.
i found some plugins but they dont change the “default folder !”.
my website is running with an automatic plugin that uploads pictures automaticly to the default folder. i can change the default folder in my webhost but not to another server !
what should i do ? plz help me
dan
Tu es incroyable.
Ben
Cette méthode fonctionne-t-elle aussi lorsque l'on change le dossier de téléchargement vers un emplacement externe ?
Fauzi
merci pour le partage,,,
très utile
Rio Bermano
Salut, merci pour ce tutoriel.
Mais j'ai une question.
est-ce qu'il reviendra à la valeur par défaut (wp-content/upload) à nouveau lors d'une mise à jour de WordPress ?
Santé
Héctor Cabrera
Salut tout le monde ! Vous devriez mentionner dans l'article que le code « define » doit être placé quelque part _avant_ la ligne « That’s all, stop editing! Happy blogging. ». Sinon, cela causera des problèmes à certains utilisateurs (voir pour plus de détails).
Joe
Merci ! Tu m'as vraiment fait économiser environ 10 heures de travail !
H. T. Major
Les conseils que vous donnez sont très utiles… comme celui-ci ! S'il vous plaît, comment "remonter" deux répertoires ? Par exemple, si j'ai http://example.com/wp/wp-content/files mais que je veux http://example.com/files, ( ‘UPLOADS’, ”.’files’ ) ne fonctionne pas pour y arriver. Cela m'amène à http://example.com/wp/files.
Merci beaucoup pour toute aide que quelqu'un ici pourra apporter !
Miles
H.T. Major et toute autre personne qui a une structure comme celle-ci pour WordPress :
WEB ROOT
– wp-content
— uploads
– wordpress_install_files
utiliser define(‘UPLOADS’,’wp-content/uploads/’); ne fonctionnera pas car il utilise la racine de WordPress comme emplacement relatif. Il ne semble pas vraiment accepter de chemin absolu, etc., il l'ajoute simplement à la racine de WordPress.
Mais si vous utilisez :
define(‘UPLOADS’,’..wp-content/uploads/’); cela devrait fonctionner comme vous le souhaitez. J'ai lutté avec ça pendant un moment et cela semble faire l'affaire.
Miles
Modifier, pour être propre, supprimez la barre oblique finale : define(‘UPLOADS’,’..wp-content/uploads’);
Cela vous ramènera deux étapes en arrière, donc hors de votre dossier wordpress, vraisemblablement à la racine du web, puis dans un dossier wp-content/uploads.
Peter
Et si je veux changer le téléchargement comme ceci
Ancien : /home/public_html/wp-content/uploads
Nouveau : /home/nouveau dossier/uploads
Nico
Comment changer le dossier de la médiathèque sur la version 4.0 ?
L'équipe de WPBeginner
Veuillez consulter ce guide :
Comment créer facilement un slider WordPress responsive avec Soliloquy
L'équipe de WPBeginner
Oui, c'est possible. La meilleure façon est d'utiliser un service CDN. Cela offre une meilleure redondance et rend votre site Web plus rapide.
Cependant, si vous voulez juste changer le répertoire de téléchargement des médias et que la vitesse n'est pas votre préoccupation, alors vous devriez regarder wp-ftp-media-library.
Sandeep
Thnx. I did some research on CDN but I found that it just caches the images to serve from a remote location that is the nearest to the user. I just want to upload to a different server hence, the second option may work for me.
But as I feel FTP may not be really secure, do you tend to have a solution as how I can use any other protocol such as HTTP/HTTPS or Rsync to do the same(I wonder if WP supports this).
Sandeep
Est-il possible de définir l'emplacement de téléchargement sur un autre serveur distant ?
Somesh
Je veux utiliser un sous-domaine différent, comment déplacer et changer le chemin vers cette adresse de sous-domaine
HasaN
i change my upload path
but my old featured image and media links are now change to new path and broken !
i want just links and path of new media that upload being change to new path
ali es
hi . how change address upload media to server.I do not speak English and I have translated the text with Google Translate., Please guide me
Thanks
Jovin
Si je change le répertoire de téléchargement, dois-je déplacer tous mes téléchargements précédents vers le nouveau répertoire ?
Support WPBeginner
Tout d'abord, assurez-vous de sauvegarder votre répertoire de téléchargement existant avant de changer l'emplacement par défaut des téléchargements de médias dans WordPress. Vous pouvez laisser votre ancien répertoire de téléchargements tel quel afin que les anciens médias de votre site ne soient pas cassés. Cependant, si vous ne voulez pas utiliser l'ancien répertoire de téléchargements de médias du tout, alors vous devriez savoir que les emplacements des médias dans vos articles, pages, widgets sont des URL codées en dur, donc ils ne changeront pas d'eux-mêmes. Vous pouvez essayer d'importer des images externes et vérifier votre site pour les liens brisés afin de vous assurer que toutes les images de votre site apparaissent correctement.
Admin
Jovin
Merci pour la réponse
Arvind Bhardwaj
Thanks,
Worked perfect in WP 3.5.1
Travis
Désolé pour le commentaire, un peu tardif. C'est le seul article que j'ai pu trouver qui aborde ce sujet pour les nouvelles installations de wp (3.6.1). Tous les autres parlent du dossier misc. Quoi qu'il en soit, j'ai suivi les étapes et ça fonctionne, mais les images sont cassées. Je ne travaille qu'avec quelques images, donc ce n'est pas un gros problème de les retélécharger.
Donc, je suppose que je dois créer un nouveau dossier "media" (mon chemin). Serait-ce sous uploads ou pour remplacer uploads ? L'URL que je recherche est http://mydomain/media/image.png. Je n'arrive pas à comprendre.
Toute aide est grandement appréciée
Support WPBeginner
vous devez définir le chemin de téléversement dans le fichier wp-config.php comme ceci :
define( 'UPLOADS', ''.'media' );Admin
K.Adam White
Comme beaucoup d'autres commentateurs, je cherchais un moyen de stocker mes téléversements de médias dans le même répertoire que mon installation WordPress, par exemple, pour avoir WordPress dans « mydomain.com/wp/ » et mes médias dans « mydomain.com/uploads/ ». J'ai réussi à faire fonctionner cela dans WordPress 3.5 en ajoutant ce qui suit au fichier functions.php de mon thème (ou à un plugin) :
if ( empty( $upload_path ) || ‘wp-content/uploads’ == $upload_path ) {
update_option( ‘upload_path’, untrailingslashit( str_replace( ‘backend’, ‘files’, ABSPATH ) ) );
update_option( ‘upload_url_path’, home_url( ‘/files’ ) );
}
J'espère que cela deviendra plus facile dans une future version de WordPress !
K.Adam White
Mise à jour : Dans l'exemple ci-dessus, remplacez « backend » par « wp » (ou l'endroit où votre WordPress est installé)
David Paul
Bien que cela semble fonctionner juste en y regardant, pourquoi n'ajouteriez-vous pas simplement 1 ligne à votre fichier wp-config au lieu de cela ? Cela semble être beaucoup de travail supplémentaire pour le même résultat que ce que présente cet article…
Ajouter define(‘UPLOADS’,’directory’); est tellement plus facile.
Yury Tilis
Parce que dans wp-includes/functions.php, vous avez les 2 scénarios suivants :
Si aucun répertoire de téléversement particulier n'est spécifié :
$dir = WP_CONTENT_DIR . ‘/uploads’
Si UPLOADS est défini :
$dir = ABSPATH . UPLOADS;
Le problème ici, qui devrait être évident, est que ABSPATH != WP_CONTENT_DIR à chaque fois. Si vous avez WordPress installé dans un répertoire et que vous y faites référence avec WP_SITEURL, mais que vous spécifiez un répertoire différent pour wp-content avec WP_CONTENT_DIR, alors UPLOADS n'a plus de sens, et un simple renommage de dossier devient impossible sans le hack ci-dessus ou un similaire.
Derek Lapp l'explique bien ici :
nate
Je m'y prends peut-être complètement mal, mais j'utilise une installation multisite pour développer les sites de mes clients… Comme j'utilise l'éditeur de code dans le backend de WP, j'aime aussi utiliser l'outil d'importation d'images pour importer des images pour le CSS…
Dans lequel j'ai créé un thème de démarrage génial que j'utilise pour le contenu des widgets de la barre latérale et les images importées pour certaines zones comme l'emplacement du logo et même pour les images d'arrière-plan – une façon « paresseuse » d'envoyer des images sur le serveur..
Je voulais utiliser des chemins relatifs dans mon CSS au cas où je déplacerais le site/thème ou changerais de nom de domaine et je ne voulais pas utiliser le chemin normal wp-content/blog23/files qui est le chemin par défaut de l'outil d'importation d'images…
Pour 1, cela se trouve en dehors de mon thème et j'aimerais simplement utiliser background: url ('images/filename.png') dans mon CSS avec les images que j'importe via l'outil d'importation d'images de WP afin que lorsque mon thème se déplace, mes liens/images ne se cassent pas, puis je prévois de « changer le chemin d'importation pour revenir à wp-content/blog23/files une fois que le site est prêt à être mis en ligne »
Je pense juste que cela me faciliterait la vie et bien sûr, je néglige probablement quelque chose ou je suis paresseux, mais je vous promets que non – je suis nouveau dans ce domaine… : )
J'ai changé le chemin d'upload dans les paramètres du site mais rien n'a changé ? il télécharge toujours dans le chemin des fichiers du blog ?
Nico
Je n'arrive pas à faire fonctionner ceci (tel que copié d'ailleurs dans ce fil) :
define(‘UPLOADS’, ‘files’);
C'est dans mon wp-config.php.
Je veux mes images dans exemple.com/img
Toute aide est appréciée.
Pourquoi diable prennent-ils la peine de changer des choses comme ça. C'était une fonctionnalité TELLEMENT utile.
Nico
J'ai résolu le problème. Lorsque j'ai copié le code de cette page, les guillemets étaient du type « fantaisiste ». Lorsque je les ai rendus simples, le code a fonctionné.
Merci pour cela.
Nico
C'est le genre de changement que les développeurs de logiciels font lorsqu'ils perdent le contact avec leurs utilisateurs.
L'explication que j'ai lue pour supprimer cette option est que peu de gens l'utilisaient, et que cela rend l'interface utilisateur plus propre. Quelle absurdité.
Josef
Je veux que le chemin de mes fichiers soit exemple.com/files
Juste pour rendre le back-end plus soigné et cacher le fait que j'utilise WordPress.
Ma question est, vais-je rencontrer des problèmes si j'applique cette méthode à l'avenir ? Les prochaines mises à jour de WordPress ou le déplacement du site vers un autre hébergeur… etc ?
Est-ce dangereux ?
Personnel éditorial
Chaque fois que vous décidez de faire les choses différemment de la manière dont elles sont faites dans le cœur, vous assumez la responsabilité et les risques de compatibilité future.
Admin
Josef
Je comprends à 100%.
Mais je veux une réponse à ma question, je vous serai reconnaissant.
Personnel éditorial
Votre question était de savoir si vous alliez rencontrer des problèmes, et notre réponse y répondait. Nous ne savons pas car beaucoup de choses peuvent changer, mais si vous rencontrez des problèmes, alors vous en êtes responsable.
Dan A.
@Josef
Les mises à jour n'ont jamais affecté mes sites utilisant cette méthode. Si vous changez d'hébergeur, assurez-vous simplement que le répertoire que vous avez spécifié dans votre fichier de configuration reste cohérent avec le répertoire contenant les fichiers réels et vous n'aurez aucun problème.
J'ai changé d'hébergeur une fois et j'ai décidé de renommer mon répertoire de téléchargement... Après avoir déplacé les images dans le nouveau répertoire, j'ai eu des liens brisés vers toutes les images et fichiers avec l'ancien nom de répertoire. C'était une corvée d'aller dans la base de données et de mettre à jour les chemins des liens brisés.
Restez simplement cohérent.
James
Bonjour,
Question, comment puis-je personnaliser le répertoire de téléchargement par utilisateur ?
Existe-t-il un plugin disponible pour cette exigence ?
Merci !
Papa Smurf
Astuce de pro : vous n’avez pas besoin de préfixer les chaînes vides aux chaînes.
define(‘UPLOADS’, ”.’files’);
devrait être :
define(‘UPLOADS’, ‘files’);
Le code source de Wordpress est déjà assez bancal comme ça....
Facu
Merci beaucoup ! C'était très utile pour moi
Connie
J'ai remarqué qu'après la mise à niveau vers 3.5.1, l'outil de téléchargement de médias ne fonctionnait pas du tout. (Ne fonctionne toujours pas)
de plus, certains plugins semblent utiliser la convention « wp-content/uploads » au lieu de constantes ou de paramètres...
c'est vraiment un problème, je ne peux pas utiliser l'outil de téléchargement de médias....
Connie
J'ai ajouté la constante à wp-config. le téléchargement de médias télécharge dans le dossier défini, mais la saisie de médias lors de la modification d'un article ne fonctionne pas du tout, elle est vide, aucune réaction lors du clic...
quelle audace...
Matteo
peut-être que votre serveur est sous Windows, mieux vaut un Linux
Personnel éditorial
Vous rencontrerez toujours des problèmes avec les plugins lorsque vous faites cela. Cette option n'est pas destinée aux utilisateurs moyens. Lorsque vous l'utilisez, vous devez avoir une raison suffisante pour le faire.
Admin
Mattia Frigeri
Suis-je le seul à penser que peut-être le dossier « upload » est bien, mais que la meilleure organisation ne devrait être ni par années ni par mois, mais par le slug de l'article/de la page dans lequel le fichier est contenu ? Pas le titre, mais le slug ! Cela pourrait peut-être créer des problèmes avec une seule image utilisée dans 2 articles/pages. Mais je n'utilise jamais une image à 2 endroits différents...
RVOLA
Bonjour, j'ai écrit un petit plugin pour les nouvelles fonctionnalités de WordPress 3.5.
Vous pouvez modifier directement le domaine ou le sous-domaine
http://wordpress.org/extend/plugins/wp-original-media-path/
FragaGeddon
Merci, ça marche bien !
Chaitanya
Please Help…
I am okay with the default upload folder, but I am unable to upload any file in that folder without setting its permission to 777. But I feel it could be dangerous. Is there any way around?
Personnel éditorial
Parlez-en à votre administrateur système.
Admin
fred
lol sympa, vous ressemblez au support technique de MS disant à l'admin de parler à son admin comme réponse au problème
Personnel éditorial
L'utilisateur a peur de changer les permissions à 777. Nous n'avons aucun contrôle sur leurs serveurs, et nous ne savons pas si l'utilisateur en a non plus. Donc, nous ne sommes pas sûrs de la manière exacte dont vous aimeriez que nous aidions.
Samarn
Autrement, vous pouvez utiliser cette URL /wp-admin/options.php pour changer le chemin du répertoire de téléchargement. Ensuite, trouvez upload_path pour y saisir le chemin de votre répertoire de téléchargement. Par défaut, c'est wp-content/uploads. Vous pouvez le changer en wp-content/files pour les fichiers du répertoire sous wp-content. Ou vous pouvez le changer en files pour les fichiers du répertoire au même niveau que wp-content.
Si vous voulez stocker des médias dans un sous-domaine. Vous devez saisir l'URL de votre sous-domaine dans upload_url_path, puis pointer votre sous-domaine vers le chemin du répertoire de téléchargement ci-dessus.
Après avoir changé cela. Vous devez renommer l'ancien nom de répertoire en nouveau nom de répertoire ou déplacer tous les fichiers et répertoires de l'ancien répertoire vers le nouveau. Sinon, les fichiers ne seront pas trouvés.
j'espère que c'est utile et désolé pour mon anglais.
Chris
Merci, c'était très très utile.
Dave
Vous *POURRIEZ* faire cela, cela fonctionnera, mais vous modifiez un fichier principal. Cela a un grand potentiel de casser lors de la mise à jour de WP. Il est préférable de modifier le fichier wp-config comme suggéré ici car il n'est PAS touché lors d'une mise à jour.
A.K.
Changement stupide ! J'ai même changé le dossier pour quelque chose comme /images/…
John
Je pensais avoir trouvé quelque chose ici. J'ai une configuration WP avec 12 sites. C'est tout neuf. L'un des sites est parfait, mais sur les autres, nous n'arrivons pas à faire apparaître les images/documents téléchargés. Ils sont référencés dans un dossier qui n'existe pas. Plutôt que de tout taper ici, vous pouvez lire le fil sur WordPress à http://wordpress.org/support/topic/pictures-do-not-display-3?replies=5. Le fil est devenu froid, mais j'ai désespérément besoin d'aide et toute aide serait appréciée.
Henry
Idem que ci-dessus, j'ai essayé d'installer 3.5 sur quelques nouveaux sites et quoi que je fasse, je ne peux pas passer à un sous-domaine. Encore une fois, quelqu'un sait comment changer le téléchargement de médias vers un sous-domaine ?
Ed
Merci pour votre publication. Je pense que je rate quelque chose car je veux utiliser votre exemple pour ajouter des images à un répertoire racine, exemple : « http://mondomaine/images »
Et en me basant sur votre exemple, ce que je fais, c'est de le saisir comme ceci :
define ( ‘UPLOADS’, ‘http://mydomain/images’ ‘.’files’ );
Le problème, c'est que mes médias affichent maintenant l'adresse comme « http://autre-domaine/http://mon-domaine/images », donc en gros, les médias restent sur le domaine actuel et ne sont pas déplacés en dehors du domaine vers un répertoire racine.
J'espère que j'ai été clair. Des conseils ?
Jaybe
Ce que vous avez fait n'est pas conforme à l'exemple fourni. L'exemple fourni définit uniquement l'emplacement/le chemin du répertoire, pas l'URI.
Vous incluez le schéma (http://) ce qui n'est pas approprié, et de plus, casse les choses, lors de la configuration du répertoire/emplacement des téléchargements.
Vous souhaitez, vraisemblablement, également définir l'URI pour les téléchargements.
D'autres dans les commentaires semblent poser la même question.
— par exemple, Comment télécharger et servir des téléchargements/médias à partir d'un sous-domaine ?
Notez qu'il y a deux spécifications d'emplacement pour les téléchargements/médias :
1. Répertoire/emplacement des téléchargements.
2. URI.
Le répertoire/emplacement des téléchargements peut être spécifié comme une constante comme suit :
define( ‘UPLOADS’, ”.’files’ );
Cela permettrait de télécharger et de référencer des fichiers, via le domaine par défaut, comme suit :
(exemple) http://domain.tld/files
Cela ne définit que le chemin/l'emplacement du répertoire, PAS le sous-domaine.
2. URI
L'URI est l'URL/le chemin complet pour accéder aux téléchargements, préfixé à la constante UPLOADS (n° 1 ci-dessus).
Ceci, malheureusement, et étrangement, n'est pas disponible pour être défini comme une constante. Cependant, il peut être défini via un filtre (wp_upload_dir), ou en modifiant directement l'entrée de la table de la base de données.
L'emplacement de l'entrée de la table de la base de données est le suivant :
Base de données/ wp_options/ upload_url_path
* Notez qu'en modifiant upload_path et/ou upload_path_url dans la base de données, vous réactiverez l'interface utilisateur front-end pour gérer ces champs à l'avenir, comme avant, via la section WordPress Admin/ Media/ Uploading Files.
Pour ceux qui souhaitent héberger des médias via un sous-domaine/un autre domaine, vous pourriez modifier upload_url_path de manière similaire à ce qui suit :
database/ wp_options/ upload_url_path:
(exemple) http://mycdn.mydomain.tld
Bien sûr, vous devrez configurer votre ou vos serveurs web pour qu'ils pointent correctement le sous-domaine/domaine vers l'emplacement/répertoire correspondant à servir.
J'espère que cela vous aide.
Julie Olson-Rachlin
Jaybe — MERCI. BEAUCOUP.
Je n'ai jamais eu de problèmes avec ça – jusqu'à aujourd'hui.
Paix !
Hamza
et si je veux mettre des médias dans un sous-domaine ?
evan
J'ai la même question
Eddy
Merci. Votre tutoriel est très utile..
chrismccoy
excellent article, la définition n'est pas très bien documentée, c'est donc formidable que quelqu'un en parle, j'avais quelques clients qui avaient leurs téléchargements dans /pics et /images, donc ce n'était pas faisable via 3.5 sans la définition pour les nouvelles installations.
Rhea
Salut. Merci pour ça. Mais j'ai besoin que les images soient enregistrées en dehors de mon site WordPress..
par ex.
public_html/site /// this is my wordpress site
public_html/media /// this is where i want to save all images instead.
Merci d'avance
Pietro Gregorini
J'aimerais savoir la même chose, si il est possible de mettre le dossier de téléchargement EN DEHORS de la racine de WordPress.
Sam Ward
Vous devez changer le upload_url_path qui a été mentionné plus haut, mais cela implique de modifier un des fichiers principaux de WordPress.
Il y a un bon plugin posté quelques articles plus haut qui fera tout pour vous.
Vous pouvez désinstaller le plugin une fois que vous avez apporté vos modifications.
Saurabh
et si je veux mettre des médias dans un sous-domaine ?
Carlos Varela
Vous pouvez définir dans votre wp-config un hôte média
define (‘MEDIA_HOST’, ‘http://media.yourdomain.com’);
Maarten
Je ne suis pas vraiment satisfait de ce changement car mon WordPress utilise un sous-domaine pour servir les médias téléchargés. Cela fonctionne toujours après la mise à niveau, mais ce n'est plus disponible sur les nouveaux blogs..
Sans les deux champs pour définir le répertoire de téléchargement et le chemin de téléchargement, je ne peux les servir que depuis le même domaine que WP, et non un domaine sans cookies comme je le souhaite.
Jaybe
On peut toujours définir le chemin et l'URI via leurs entrées de base de données respectives.
Ce n'est pas aussi élégant que d'utiliser une constante define, mais c'est tout aussi facile et accessible pour la plupart de ceux qui envisagent de modifier de tels paramètres.
Sheik Yerbouti
Mon site est entièrement https. Tous les plugins de diaporama que j'ai essayés insèrent l'URL fournie à l'image pour l'afficher. Le problème est que toute page qui utilise un diaporama est signalée comme contenant du contenu non sécurisé. Il semble qu'il n'y ait aucun moyen de modifier l'URL dans le(s) diaporama(s) ou sur les pages Média. Comment puis-je modifier une URL pour rendre les diaporamas sécurisés ?
Sheik Yerbouti
Essayez WP Original Media Path. Ce plugin modifiera le chemin et tous les chemins de fichiers existants en un seul coup.