Suchen Sie nach Möglichkeiten, Ihre WordPress-Website und Ihre Social-Media-Konten zu automatisieren?
Durch die Automatisierung können Sie Ihre WordPress-Blogbeiträge oder -Updates automatisch auf Plattformen wie Facebook, Twitter, LinkedIn, Instagram und anderen teilen.
In diesem Artikel zeigen wir Ihnen, wie Sie WordPress und soziale Medien mit IFTTT, Zapier und Uncanny Automator ganz einfach automatisieren können.
Warum WordPress und soziale Medien automatisieren?
Durch die Automatisierung Ihrer WordPress-Website und Ihrer Social-Media-Konten entfällt die Notwendigkeit, Inhalte auf diesen Plattformen manuell zu teilen.
Sie können ganz einfach die Veröffentlichung von Beiträgen auf verschiedenen Social Media-Plattformen gleichzeitig planen, ohne dass Sie sich anmelden und die Beiträge einzeln freigeben müssen.
Wenn Sie beispielsweise eine wichtige Ankündigung auf Ihrer Website zu machen haben, können Sie WordPress und die sozialen Medien automatisieren, so dass die Ankündigung auf allen sozialen Plattformen zu einem geplanten Zeitpunkt live geschaltet wird.
Das spart Zeit und Mühe, fördert Ihre Präsenz in den sozialen Medien und kann die Sichtbarkeit Ihrer Website erhöhen.
Darüber hinaus kann die Automatisierung von WordPress mit sozialen Medien auch die Suchmaschinenoptimierung (SEO) Ihrer Website verbessern, indem Social Media-Signale wie Likes, Shares und Kommentare erhöht werden.
Sehen wir uns also an, wie Sie WordPress mit Hilfe von IFTT, Zapier und Uncanny Automator ganz einfach mit sozialen Medien automatisieren können.
Methode 1: Automatisierung von WordPress und sozialen Medien mit IFTTT (kostenlos)
IFTTT (If This Then That) ist ein kostenloser Webdienst, der Benutzern hilft, webbasierte Aufgaben zu automatisieren. Er verwendet Applets, um zwei oder mehr Apps und Geräte zu verbinden.
Sie können zum Beispiel ein Twitter-Applet verwenden, um Ihr Twitter-Konto mit Ihrer WordPress-Website zu verbinden.
Wenn Sie nach einer kostenlosen Möglichkeit suchen, soziale Medien und WordPress zu automatisieren, dann ist diese Methode genau das Richtige für Sie.
Ein IFTTT-Konto erstellen
Um Ihre WordPress-Website und Ihre sozialen Medien zu automatisieren, müssen Sie ein Konto bei IFTTT erstellen.
Zuerst müssen Sie die IFTTT-Webseite besuchen und auf die Schaltfläche „Get Started“ in der oberen rechten Ecke des Bildschirms klicken.
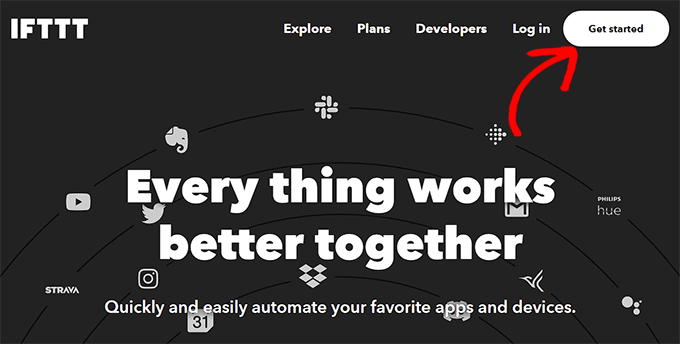
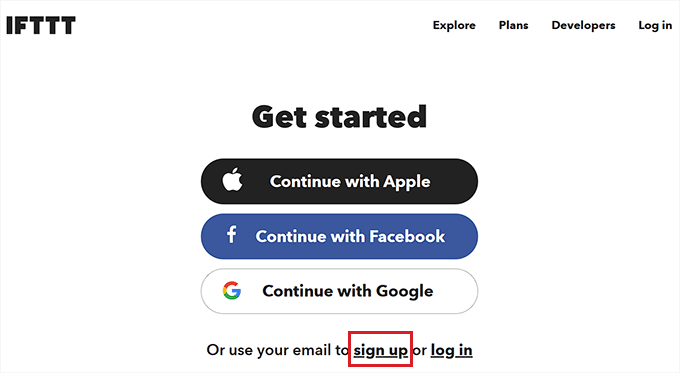
Dadurch werden Sie auf eine neue Seite weitergeleitet, auf der Sie auf den Link „Anmelden“ klicken müssen.
Geben Sie anschließend Ihre E-Mail-Anmeldedaten ein, um ein Konto bei IFTTT zu erstellen.
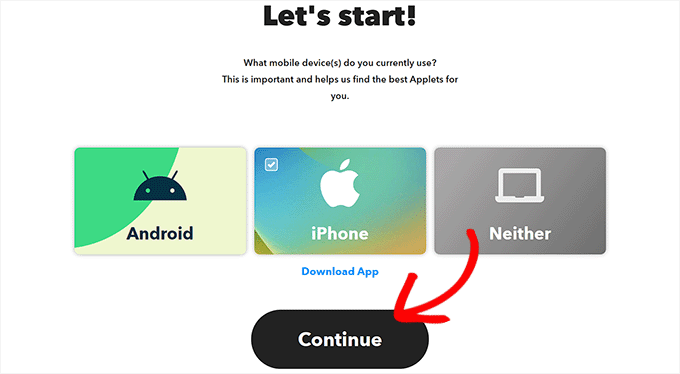
Sobald Sie dies getan haben, wird die Seite „Let’s Start“ angezeigt, auf der Sie den Typ des von Ihnen verwendeten Mobilgeräts auswählen müssen.
Wählen Sie einfach eine Option aus und klicken Sie auf die Schaltfläche „Weiter“.
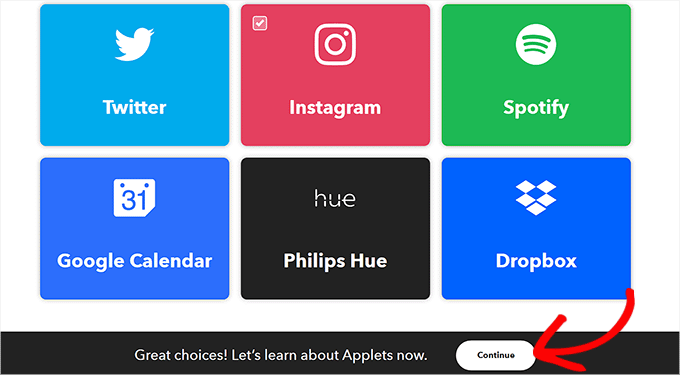
Danach müssen Sie die sozialen Plattformen auswählen, die Sie häufig nutzen, um Ihre „Erkunden“-Seite besser anpassen zu können.
Sobald Sie fertig sind, klicken Sie auf die Schaltfläche „Weiter“, um fortzufahren.
Einrichten eines IFTTT-Applets
Nachdem Sie Ihr Konto eingerichtet haben, werden Sie auf die Seite „Erkunden“ weitergeleitet, wo Sie ein für Sie geeignetes Applet auswählen können.
In diesem Lernprogramm werden wir WordPress und Facebook automatisieren.
Klicken Sie dazu in der Liste auf das Applet „WordPress to FB Page“.
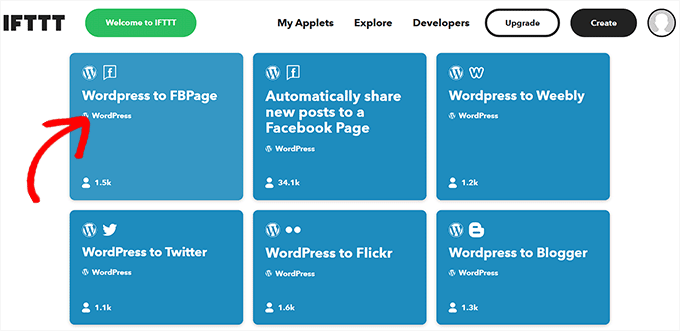
Sie werden nun zum Bildschirm „WordPress zu FB-Seite“ weitergeleitet.
Als nächstes schalten Sie einfach den Schalter „Verbinden“ ein.
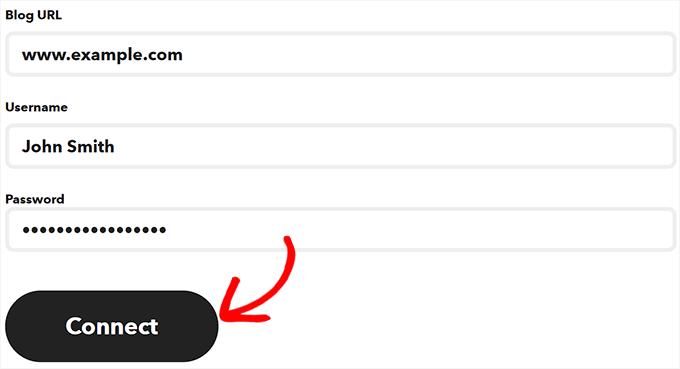
Dies führt Sie zu einer neuen Seite, auf der Sie die URL Ihres WordPress-Blogs, Ihren Benutzernamen und Ihr Passwort eingeben müssen.
Sobald Sie fertig sind, klicken Sie auf die Schaltfläche „Verbinden“, um WordPress mit IFTTT zu integrieren.
Nachdem Ihre WordPress-Website verbunden ist, werden Sie zum Bildschirm „WordPress zu FBPage“ weitergeleitet.
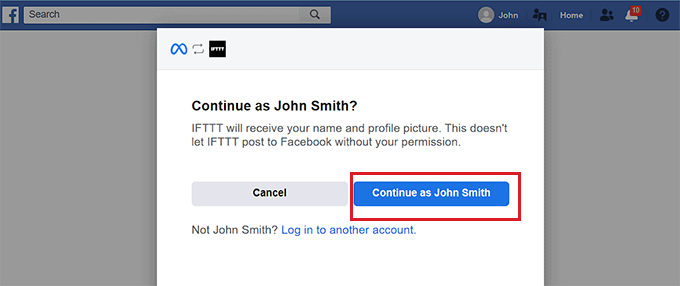
Schalten Sie hier einfach den Schalter „Verbinden“ erneut um. Dadurch werden Sie zur Facebook-Plattform weitergeleitet, wo Sie die Erlaubnis erteilen müssen, Ihr Facebook-Konto mit IFTTT zu verbinden.
Klicken Sie einfach auf die Schaltfläche „Weiter“, wenn Sie sicher sind.
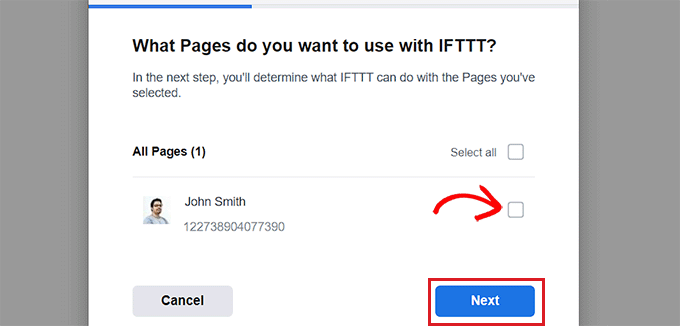
Sie werden dann nach den Seiten gefragt, die Sie mit IFTTT verbinden möchten. Wählen Sie die Facebook-Seite aus, auf der Sie Ihre WordPress-Blogbeiträge teilen möchten.
Klicken Sie anschließend auf die Schaltfläche „Weiter“.
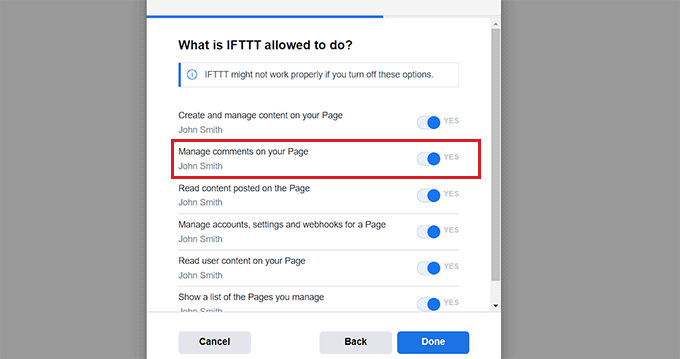
Als nächstes wählen Sie einfach alle Aktionen aus, die IFTTT auf Ihrer Facebook-Seite durchführen darf.
Wenn Sie zum Beispiel möchten, dass IFTTT die Kommentare auf Ihrer Seite verwaltet, schalten Sie den Schalter neben der Option auf „Ja“ um. Klicken Sie dann einfach auf „Fertig“.
Sie sehen nun den Bildschirm „WordPress to FBPage“, wo der Schalter anzeigt, dass Ihre WordPress-Website und Ihre Facebook-Seiten verbunden sind.
Von hier aus klicken Sie einfach auf die Schaltfläche „Einstellungen“ oben.
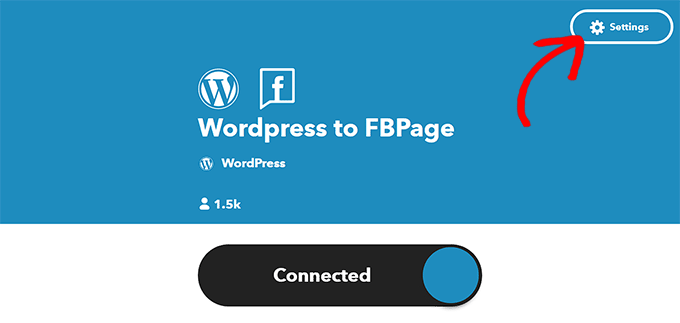
Sie werden nun zur Seite „Erstellen“ weitergeleitet.
Einrichten von „Wenn dies“ und „Dann das
Hier können Sie die Aktionen konfigurieren, die IFTTT auf Ihrer Facebook-Seite ausführen soll, wenn etwas auf Ihrer WordPress-Website passiert.
Klicken Sie auf die Schaltfläche „Hinzufügen“ neben der Option „Wenn dies“.
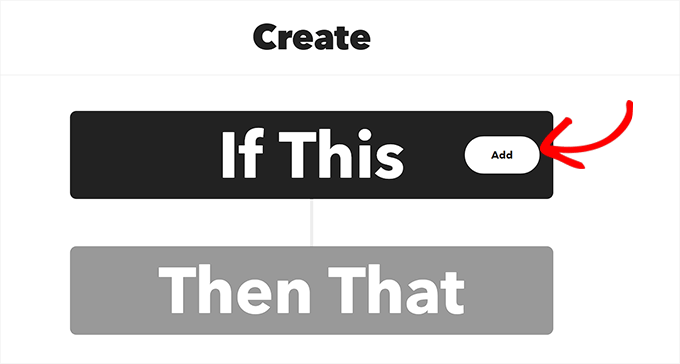
Als Nächstes wählen Sie einfach WordPress als Dienst auf der Seite „Dienst auswählen“.
Daraufhin werden Sie auf die Seite „Auslöser auswählen“ weitergeleitet. Wählen Sie hier einfach aus, wann der Auslöser ausgelöst werden soll. Dieser Auslöser wird IFTTT alarmieren, wenn eine Aktion auf Ihrer Website stattfindet.
Wenn Sie zum Beispiel möchten, dass ein Auslöser jedes Mal ausgelöst wird, wenn Sie einen neuen Beitrag hinzufügen, wählen Sie einfach diese Option.
Sie können auch Ihren eigenen Auslöser erstellen. Klicken Sie dazu einfach auf die Schaltfläche „Auslöser erstellen“.
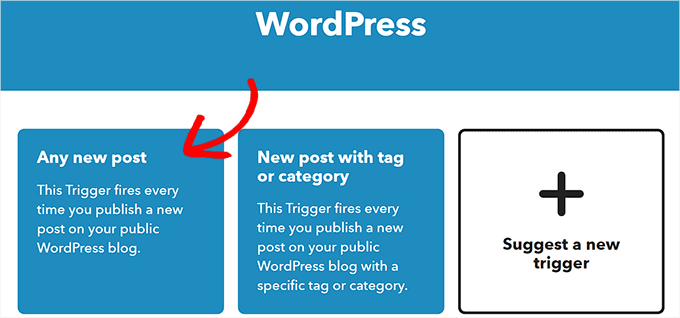
Jetzt, wo der Auslöser fertig ist, werden Sie auf die Seite „Erstellen“ weitergeleitet.
Klicken Sie nun auf die Schaltfläche „Hinzufügen“ neben der Option „Dann das“.
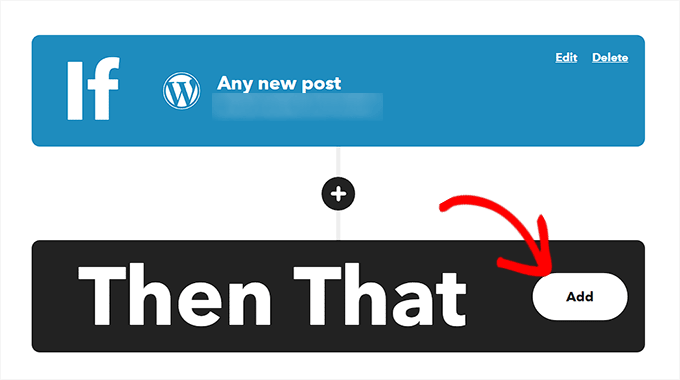
Als Nächstes wählen Sie einfach „Facebook-Seiten“ auf der Seite „Dienst auswählen“.
Sie müssen nun eine Aktion auswählen. Das ist das, was IFTTT auf Ihrer Facebook-Seite tun wird, wenn eine bestimmte Aktion auf Ihrer WordPress-Website stattfindet.
Sie können IFTTT zum Beispiel anweisen, den Link zu einem WordPress-Post auf Ihrer Facebook-Seite zu teilen, sobald ein neuer Post auf Ihrer Website veröffentlicht wurde.
Klicken Sie anschließend auf die Schaltfläche „Aktion erstellen“.
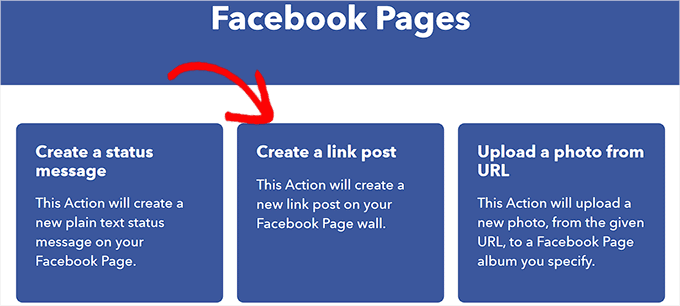
Sobald Sie eine IFTTT-Aktion erfolgreich erstellt haben, wird die Seite „Erstellen“ angezeigt.
Klicken Sie auf die Schaltfläche „Speichern“, um Ihre Einstellungen zu speichern.
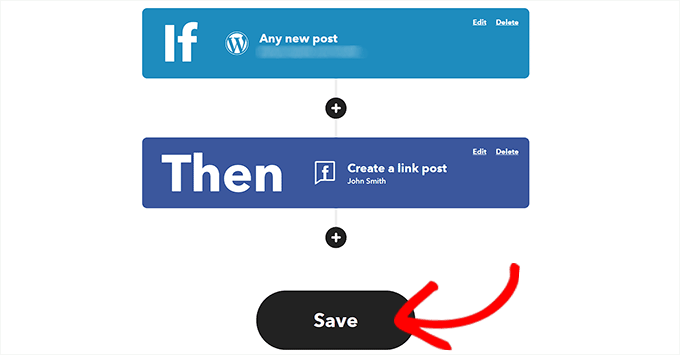
Sie haben nun erfolgreich WordPress und Facebook mit IFTTT automatisiert.
Methode 2: Verwenden Sie Zapier zur Automatisierung von WordPress und Social Media
Wenn Sie soziale Medien und WordPress mithilfe von Zapier automatisieren möchten, dann ist diese Methode genau das Richtige für Sie.
Zapier ist ein Cloud-basiertes Automatisierungstool, mit dem Benutzer verschiedene Webanwendungen wie Gmail, Trello, Slack, Facebook, Twitter und andere verbinden können.
Außerdem bietet es eine Bibliothek mit vorgefertigten Automatisierungsabläufen, den so genannten „Zaps“, die Sie weiter an Ihre Bedürfnisse anpassen können.
Zapier einrichten
Um WordPress und soziale Medien zu automatisieren, müssen Sie zunächst das Zapier for WordPress-Plugin auf Ihrer Website installieren und aktivieren. Weitere Anweisungen finden Sie in unserer Schritt-für-Schritt-Anleitung für die Installation eines WordPress-Plugins.
Danach müssen Sie die Zapier-Website besuchen und auf die Schaltfläche „Anmelden“ in der oberen rechten Ecke des Bildschirms klicken, um ein Konto zu erstellen.
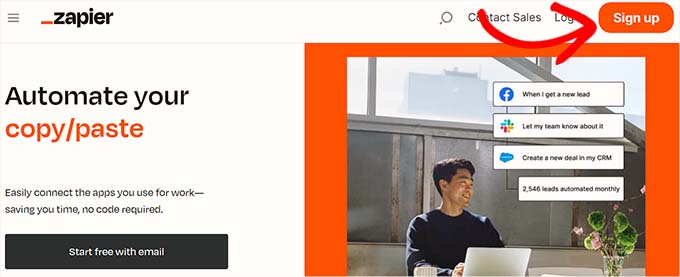
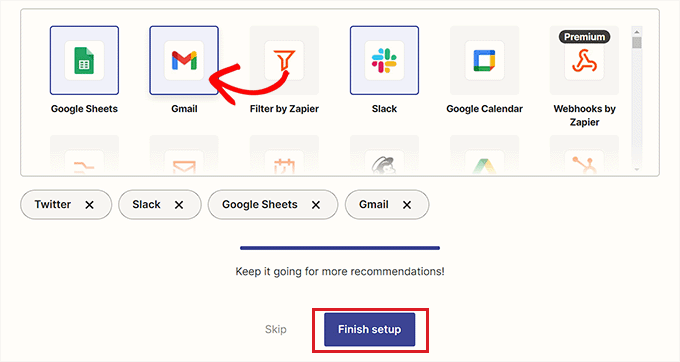
Sobald Sie die Anmeldedaten eingegeben haben, wird die Seite „Welche Anwendungen verwenden Sie“ angezeigt.
Wählen Sie hier einfach die von Ihnen verwendeten Anwendungen aus und klicken Sie auf die Schaltfläche „Einrichtung beenden“. Zumindest müssen Sie WordPress und die sozialen Medienplattformen auswählen, die Sie mit Ihrer Website verbinden möchten.
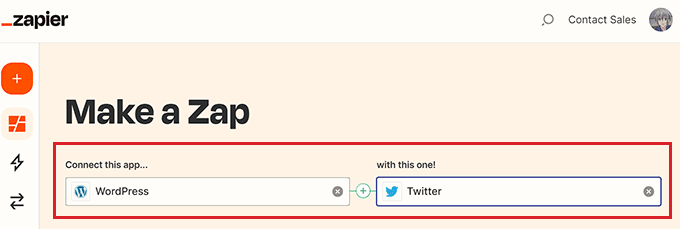
Sie werden nun zu Ihrem Zapier-Dashboard weitergeleitet. Suchen Sie hier einfach nach WordPress und fügen Sie es unter der Option „Diese App verbinden…“ hinzu.
Als Nächstes fügen Sie die soziale Medienplattform, die Sie mit WordPress verbinden möchten, unter der Option „Mit dieser!“ hinzu.
In diesem Lernprogramm werden wir WordPress mit Twitter verbinden.
Einen Zapfen machen
Als nächstes müssen Sie einen Auslöser für WordPress aus dem Dropdown-Menü auswählen. Wenn eine bestimmte Aktion auf Ihrer WordPress-Website stattfindet, weist dieser Auslöser Zapier an, eine Aktion auf Twitter durchzuführen.
Danach wählen Sie die Aktion, die Zapier ausführen soll, aus dem Dropdown-Menü „Dann mach das!“ aus.
Wenn Sie z. B. jedes Mal einen Tweet erstellen möchten, wenn Sie einen neuen Beitrag in WordPress veröffentlichen, müssen Sie diese Optionen auswählen.
Sobald Sie fertig sind, klicken Sie auf die Schaltfläche „Ausprobieren“, um einen Zap zu erstellen.

Verbinden Sie Ihre WordPress-Website und Ihr Twitter-Konto mit Zapier
Als nächstes wird der Zapier-Editor angezeigt.
Sie müssen die Registerkarte „WordPress-Trigger“ erweitern und dann auf die Schaltfläche „Anmelden“ klicken, um WordPress und Zapier zu verbinden.
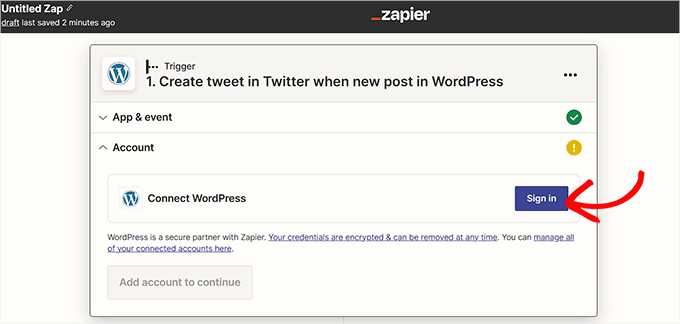
Daraufhin wird die Seite „Konto verbinden“ in einem neuen Fenster geöffnet.
Geben Sie den Benutzernamen, das Passwort und die URL Ihrer WordPress-Website ein. Klicken Sie anschließend auf die Schaltfläche „Ja, weiter zu WordPress“, um fortzufahren.
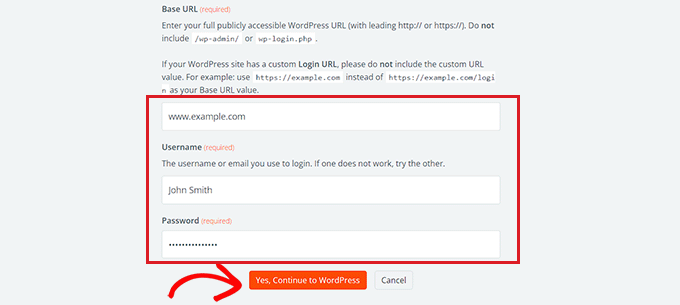
Sobald Ihre WordPress-Website verbunden ist, erweitern Sie die Registerkarte Twitter und klicken Sie auf die Schaltfläche „Anmelden“.
Es wird wieder die Seite „Konto verbinden“ angezeigt, auf der Sie Zapier die Erlaubnis erteilen müssen, sich mit Ihrem Twitter-Konto zu verbinden.
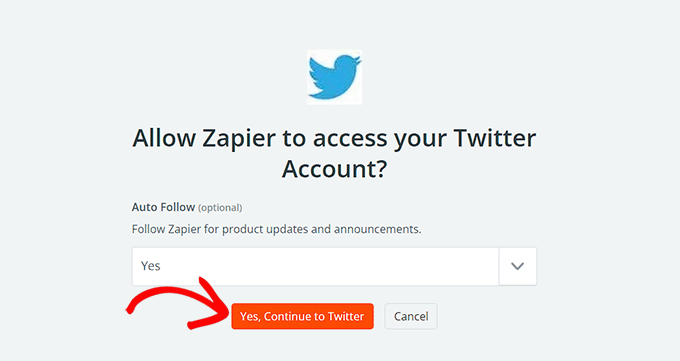
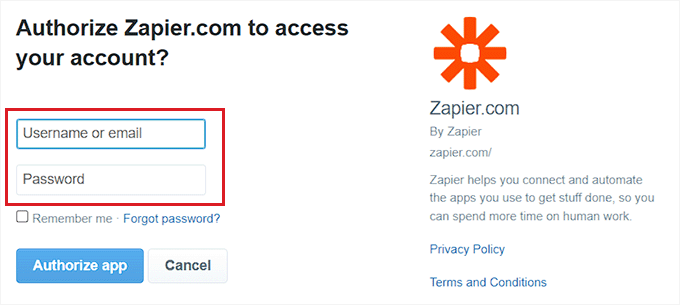
Geben Sie einfach den Benutzernamen und das Passwort für Ihr Twitter-Konto ein und klicken Sie auf die Schaltfläche „App autorisieren“.
Zapier wird nun Ihr Twitter-Konto mit Ihrer WordPress-Website verbinden.
Personalisieren Sie Ihren Zap
Wählen Sie dann im Dropdown-Menü „Nachricht“ den Inhalt des Tweets aus, der bei jeder Veröffentlichung eines neuen Artikels gepostet werden soll.
Wenn Sie z. B. den Link zum Beitrag, das Datum und den Namen des Autors in den Tweet einfügen möchten, wählen Sie diese Optionen einfach aus dem Dropdown-Menü.
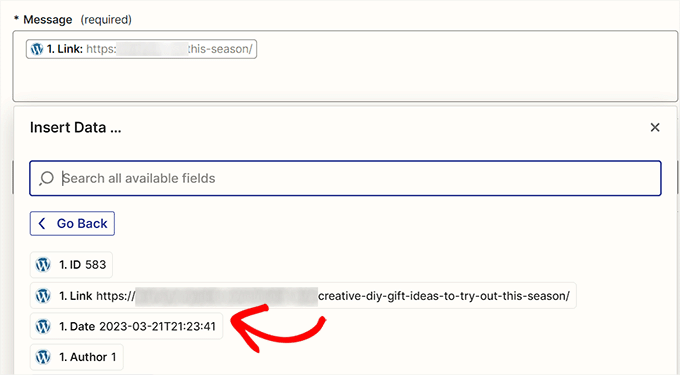
Klicken Sie anschließend auf die Schaltfläche „Weiter“, um fortzufahren.
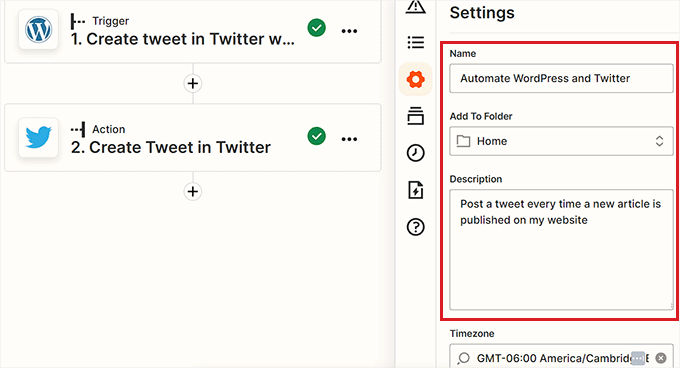
Wechseln Sie dann in der linken Seitenleiste zur Registerkarte „Einstellungen“. Beginnen Sie mit der Eingabe eines Namens für den von Ihnen erstellten Zap.
Geben Sie dann eine Beschreibung ein und wählen Sie eine Zeitzone für den Zap.
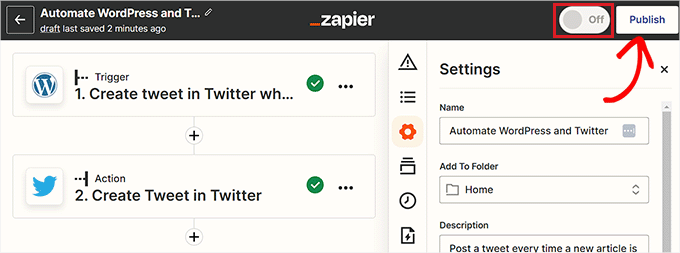
Schalten Sie schließlich den Schalter oben auf „Ein“ und klicken Sie dann auf die Schaltfläche „Veröffentlichen“, um Ihren Zap zu erstellen und zu aktivieren.
Sie haben nun WordPress und Twitter erfolgreich automatisiert.
Verwandt: Siehe unsere Liste der besten WordPress Zapier-Plugins.
Methode 3: Automatisieren von WordPress und Social Media mit Uncanny Automator (empfohlen)
Uncanny Automator einrichten
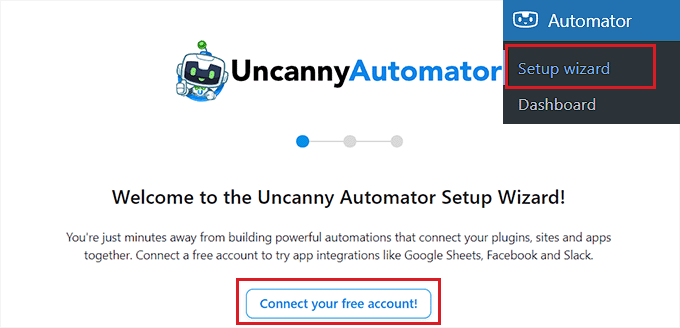
Daraufhin wird die Seite „Anmelden“ in einem neuen Fenster geöffnet.
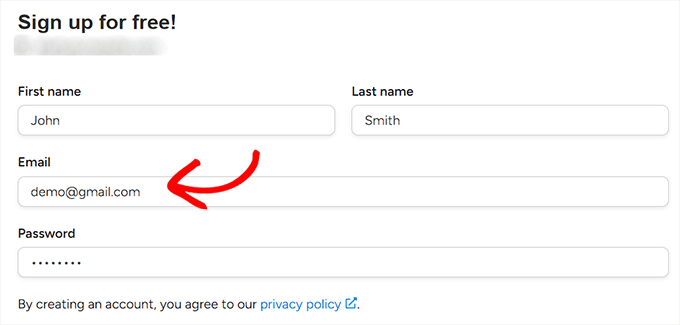
Geben Sie hier einfach Ihre Anmeldedaten ein, um ein kostenloses Uncanny Automator-Konto zu erstellen, und klicken Sie dann auf die Schaltfläche „Anmelden“ am unteren Rand.
Wählen Sie einen Uncanny Automator-Auslöser
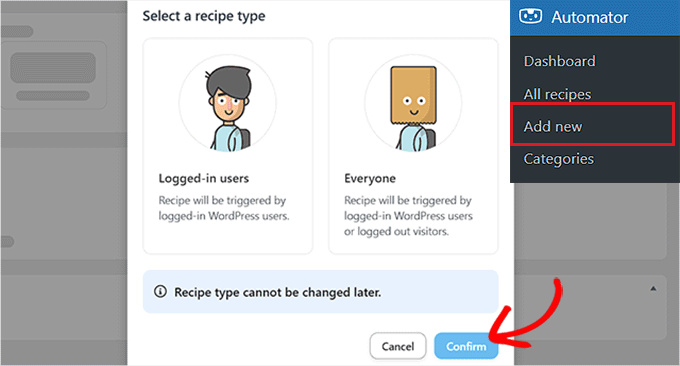
Rufen Sie als Nächstes die Seite Automator “ Neu hinzufügen in der WordPress-Admin-Seitenleiste auf. Automator wird Sie fragen, ob das Rezept, das Sie erstellen möchten, nur von angemeldeten Benutzern oder von allen Besuchern Ihrer Website ausgelöst werden soll.
Klicken Sie nach der Auswahl einer Option auf die Schaltfläche „Bestätigen“.
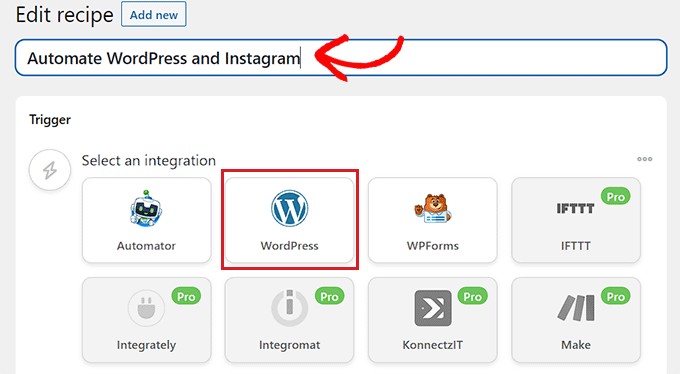
Danach können Sie damit beginnen, einen Titel für das Rezept hinzuzufügen. Wenn Sie zum Beispiel WordPress und Instagram automatisieren möchten, können Sie das als Rezeptname verwenden.
Als Nächstes wählen Sie einfach die Option „WordPress“ im Abschnitt „Auslöser“.
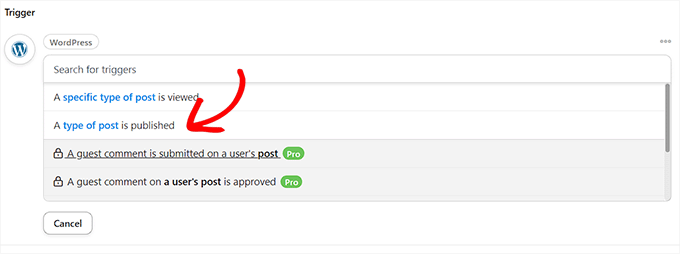
Nun müssen Sie einen Auslöser für WordPress auswählen.
Wenn Sie beispielsweise möchten, dass ein Instagram-Beitrag jedes Mal live geschaltet wird, wenn Sie einen neuen WordPress-Beitrag veröffentlichen, wählen Sie im Dropdown-Menü die Option ‚Ein Beitragstyp wird veröffentlicht‘.
Verbinden Sie Uncanny Automator mit Instagram
Nachdem Sie einen Auslöser ausgewählt haben, klicken Sie auf die Schaltfläche „Aktion hinzufügen“, um die Liste der Integrationen zu öffnen.
In diesem Lernprogramm werden wir WordPress und Instagram automatisieren.
Wählen Sie nun die Option „Instagram“ aus der Liste aus.
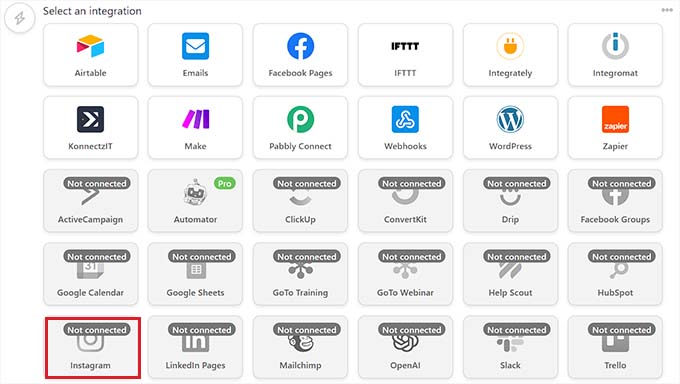
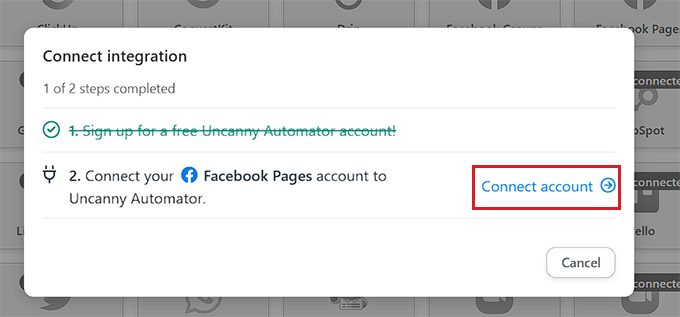
Auf Ihrem Bildschirm wird nun ein Popup-Fenster angezeigt.
Denken Sie daran, dass Sie nur ein Instagram-Geschäftskonto verbinden können, das bereits mit einer Facebook-Seite verknüpft ist. Sie können auch keine Verbindung zu einem persönlichen Instagram-Konto herstellen.
Klicken Sie nun auf den Link „Konto verbinden“, um Instagram mit Uncanny Automator zu integrieren.
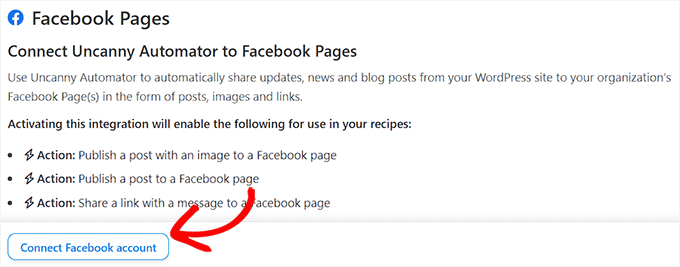
Daraufhin wird die Seite „Konto verbinden“ in einem neuen Fenster geöffnet.
Klicken Sie hier einfach auf die Schaltfläche „Facebook-Konto verbinden“, um fortzufahren.
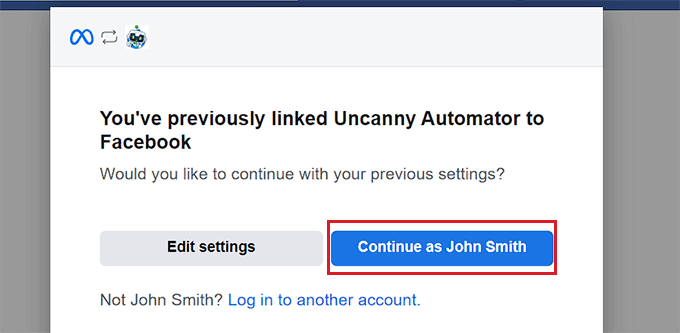
Sie werden nun auf die Facebook-Website weitergeleitet, wo Sie Ihre Anmeldedaten eingeben müssen. Sie werden gefragt, ob Sie mit der gleichen ID fortfahren möchten.
Klicken Sie einfach auf die Schaltfläche „Weiter“, um Facebook mit Uncanny Automator zu verbinden.
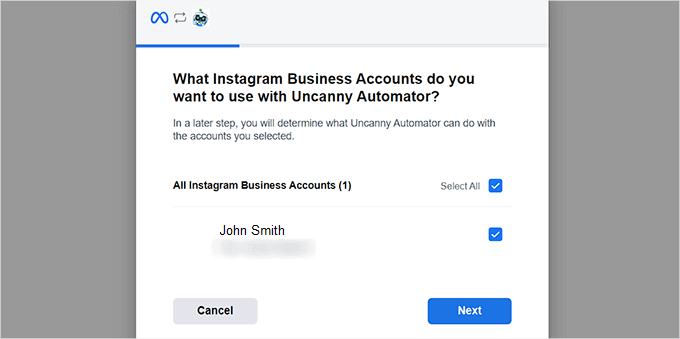
Als Nächstes müssen Sie das geschäftliche Instagram-Konto auswählen, das mit Ihrem Facebook-Konto verknüpft ist.
Klicken Sie dann auf die Schaltfläche „Weiter“, um fortzufahren.
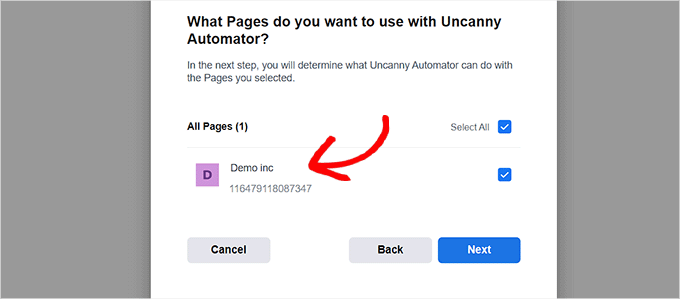
Danach müssen Sie eine Facebook-Seite auswählen. Wählen Sie einfach eine aus und klicken Sie auf die Schaltfläche „Weiter“.
Achten Sie darauf, dass Sie die Seite auswählen, die mit Ihrem Instagram-Geschäftskonto verbunden ist. Andernfalls wird der Vorgang nicht funktionieren.
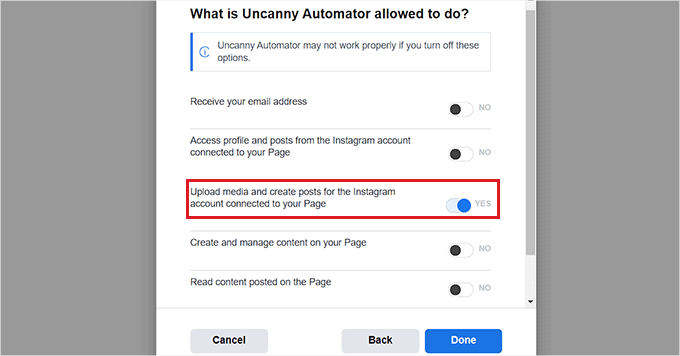
Sie müssen dann alle Aktionen auswählen, die Uncanny Automator auf Ihrer Instagram-Seite durchführen darf.
Wenn Sie dem Programm beispielsweise die Erlaubnis erteilen möchten, Beiträge auf Ihrem Instagram-Konto zu erstellen, schalten Sie einfach den Schalter neben dieser Option um.
Klicken Sie nun auf die Schaltfläche „Fertig“.
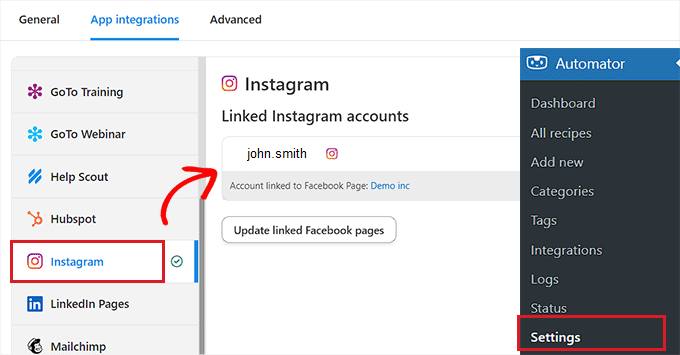
Sie werden nun auf die Seite Automator “ Einstellungen in Ihrem WordPress-Admin-Dashboard weitergeleitet. Wechseln Sie dort zur Registerkarte „Instagram“ in der linken Spalte.
Hier sehen Sie das Instagram-Geschäftskonto, das mit Ihrer Facebook-Seite verbunden ist.
Hinweis: Wenn das Instagram-Konto nicht auf dem Bildschirm angezeigt wird, bedeutet dies, dass etwas schief gelaufen ist und Sie den Vorgang noch einmal durchführen müssen.
Sie können dieses Fenster nun verlassen und auf die Seite „Integration verbinden“ gehen, wo Sie erneut auf den Link „Konto verbinden“ klicken. Dadurch wird Instagram mit Uncanny Automator und Ihrer WordPress-Website integriert.
Wählen Sie eine Uncanny Automator Aktion
Nun ist es an der Zeit, die Aktion auszuwählen, die Uncanny Automator auf Instagram ausführen soll, wenn etwas auf Ihrer WordPress-Website passiert.
Wenn Sie beispielsweise jedes Mal ein Foto auf Instagram veröffentlichen möchten, wenn ein Artikel online geht, wählen Sie die Option „Ein Foto auf einem Instagram Business-Konto veröffentlichen“.

Als Nächstes geben Sie die URL oder die ID der Mediathek des Fotos ein, das Sie auf Instagram veröffentlichen möchten.
Sie können die Foto-URL jedes Mal, wenn Sie einen neuen WordPress-Beitrag veröffentlichen, über das WordPress-Dashboard ändern.
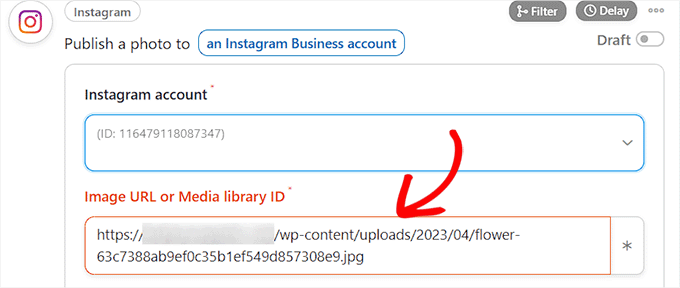
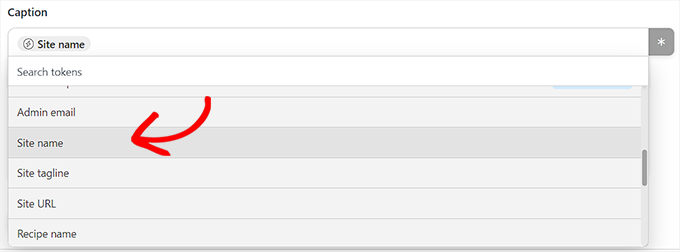
Als Nächstes müssen Sie eine Beschriftung entwerfen, die zusammen mit Ihren Beiträgen veröffentlicht wird. Wählen Sie einfach die gewünschten Optionen aus dem Dropdown-Menü aus.
Sie können einen Standortnamen, eine E-Mail-Adresse, eine Website-URL, ein Datum und mehr aus der Liste der Optionen hinzufügen.
Wenn Sie fertig sind, klicken Sie auf die Schaltfläche „Speichern“, um die Änderungen zu speichern.
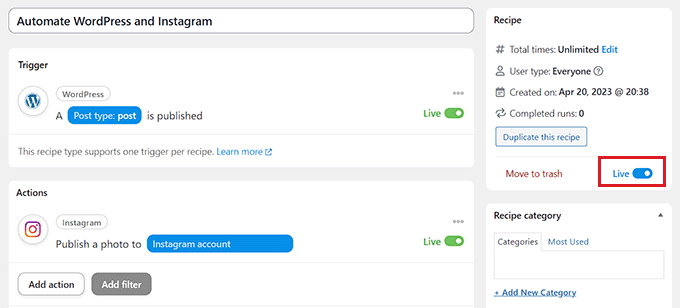
Gehen Sie schließlich zum Abschnitt „Rezept“ in der rechten Ecke des Bildschirms und schalten Sie den Schalter auf „Live“ um.
Sie haben nun WordPress und Instagram erfolgreich automatisiert.
Wir hoffen, dass dieser Artikel Ihnen geholfen hat, zu lernen, wie Sie WordPress und Social-Media-Plattformen mit IFTTT, Zapier und Uncanny Automator automatisieren können. Vielleicht interessieren Sie sich auch für unser Tutorial über das Versenden automatisierter E-Mails in WordPress und unsere Top-Tipps für die besten Marketing-Automatisierungstools für kleine Unternehmen.
Wenn Ihnen dieser Artikel gefallen hat, dann abonnieren Sie bitte unseren YouTube-Kanal für WordPress-Videotutorials. Sie können uns auch auf Twitter und Facebook finden.


Syed Balkhi says
Hey WPBeginner readers,
Did you know you can win exciting prizes by commenting on WPBeginner?
Every month, our top blog commenters will win HUGE rewards, including premium WordPress plugin licenses and cash prizes.
You can get more details about the contest from here.
Start sharing your thoughts below to stand a chance to win!
Mrteesurez says
Website Automation is worth give an attention. It helps one automation and share website contents to your different social handles, this will save your time and energy.
Can this also work for custom post type ??
WPBeginner Support says
It can, you would want to ensure you include the custom post type in an RSS feed for IFTTT to be able to see it.
Admin
THANKGOD JONATHAN says
I have been using free Zapier to automate my social media post but today I have get an alternative.
I will need to try IFTTT. Base on this tutorial as I see it will be easier to use than Zapier.
Moinuddin Waheed says
This is so powerful and easy to use in yet free. IFTTT is hands down the best social media automator free plugin to use.
Others are paid options and are of course worth having but for beginners who are just starting out and have a tight budget, this ifttt is the best option to go with to automate the social media posts and pages.
Matthew Carney says
I have set everything up but I want ifttt to pull posts from a categorie but when i use the link „https://domain.name/local-news/feed/“ it doesn’t pull but if i ask it to pull site wide „https://domain.name/feed/“ it pulls everything. im so confused i dont know why it wont work
Andrew B. says
Ok so just the normal site URL mysitename.com nothing special like the link to the backend for it to log in correct? Im new to all this stuff only had website for just over a month. Thanks again for your time and assistance.
WPBeginner Support says
Unless it asks for a specific URL then you would go to your primary site URL
Admin
Andrew B. says
Awesome thank you for the help greatly appreciated.
Andrew B. says
I have a bluehost wordpress website. I just created my if this then that account. I want to connect my website blog to post on social media.
It said to enter the blog URL. So i used mysitename.com/blog/ and it said it was not a valid blog URL.
What other URL would it be if not my site name/blog?
WPBeginner Support says
IFTTT would normally need the URL for your site and not the blog page of your site.
Admin
Emmanuel Ajayi says
NIce one. Thank you.
WPBeginner Support says
You’re welcome
Admin
Jen says
Hi,
Is there a way to set up IFTT with a third party plugin? For instance my calendar plugin. Everytime I Post, I would like for it to post to my socials .Just like it does for my WordPress Posts currently.
Thanks!
WPBeginner Support says
You would want to check with that plugin’s support for if it has the ability to work with IFTTT
Admin
Chinecherem Somto says
this is great! i have searched for this for a long time, thanks to WPBeginner
WPBeginner Support says
You’re welcome, glad our article could help
Admin
Rohit Singh says
Hello admin.
I’ve read this article but i wanted to know that i own a website but whenever i am checking the seo stats it’s showing me that social count 0. How to increase the social count. Kindly reply me please.
WPBeginner Support says
Your users may not be sharing your content yet, you can add social icons on your site using one of the plugins in: https://www.wpbeginner.com/plugins/best-social-media-plugins-for-wordpress/
if you do not have shares currently.
Admin
Terri Scheffler says
I set up IFTTT to post my WordPress blog entries to the FB page. It works great, and was so easy to do!
One problem. The ‚logo‘ appearing with each post comes from my WP page. It’s far too big, and gets truncated, and looks stupid. I went into the media library, created a thumbnail on my ‚logo‘ graphic, and hoped it would pick that up instead. It didn’t.
Is there any way I can get IFTTT to pick up the thumbnail graphic instead of the larger one that appears at the top of the blog? Please be gentle, I am a newbie. But I have gotten so much good info from this site, appreciate it!
marc says
why do the wordpress apps in ifttt not post the featured image from the wordpress post in the social media you chose. I have so many posts that will post to lnkedin or facebook but do not post the image along with it. Am I doing something wrong?
Simran says
Thank you for the tips. It took a while for the ifttt to work for my wordpress but Finally it did.
Tom says
Does anyone know how to post a bunch of already published wordpress posts on facebook ?
I have a lot of old posts on a blog that I would like to gradually post on FB (with a pace of 2-5 a day).
Daretoeatapeach says
Though ITTT has many services the problem is few of them are detailed enough to be useful. For example, there’s no way to tell it which of my Tumblr blogs to post to, nor can I have it send only certain categories to Tumblr, so the Tumblr option is useless, even though I’ve been seeking a solution to send my posts to Tumblr. Every other time I try to use ITTT I find the lack of detailed options for the services they provide doesn’t meet my needs.
Sadiq Ali Baloch says
Hello
please tell me
how to connect twitter accounts to my f.b pages?
Benson says
Very terrible to connect self hosted WordPress blog with IFTTT. And suggestion will be greatly appreciated. Only WordPress.com is connecting. Ah! My head is heavy.
markwoff says
Trying to use IFTTT to push WP posts to tumblr. I get ‚external image/image not found‘ message on tumblr. How might I fix this? Thanks in advance…
Ann Murugi says
I have a blog,when i try sharing my links on twitter it states‘ the site might be automated‘
How can i fix this?
Katia says
thanks! very helpful!
Tony says
Thank you so much for this post. I’ve heard that plugins for auto sharing to social media can slow down a WordPress site pretty badly, so this is way better. IFTTT is brilliant, and the video combined with the instructions were extremely helpful.
WPBeginner Staff says
It actually depends on what CMS or software the other website is using to publish content.
poonam says
This is really a awesome article but my question is how can I automatically post to some non wordpress sites every time I publish a new blog post in my wordpress site. Is that possible to do. Its really helpful for me if you will write about this. thanks
Marco Miomac says
How to post old WordPress posts to twitter using IFTTT?
Fabula says
Hej there.
I am using the IFTTT now for some time. Thanks for telling me that this exists! =)
But I have a problem, when it comes to posting images on Facebook or Twitter from my WordPress-Blog. I always have a featured image set for my posts, but if I want to create an image post on the social media, it always tells me there that the image does not exit.. Is there a trick to make it work?
I even tried making my blog post an image post, but that did not work either.
And can I adjust the recipes so that I just type in what he should show, or is that limited to what they give me (For example what I want to post in my posts, like imageURL and so on)
Thanks for the help!
WPBeginner Staff says
You will enter your website’s url in IFTTTT
http://www.example.com
IFTTT will still get your blog feed. Make sure you have activated Twitter channel and given IFTTT permission to tweet on your behalf. After that try publishing a post and then come back to IFTTT and manually run the recipe. See if it shows you any error.
darkhorse85 says
I can’t activate my WordPress BLOG as a channel:
[On IFTTT.com]
When I attempt activate WordPress posts as channel from my blog URL „mywebsite.co.uk/blog“ it will not work.
IFTTT.com activate on WordPress posts as channel by typing „mywebsite.co.uk“ it does indeed activate (but does not tansfer the posts from my blog page to Twitter).
Please
let me know I know if you have good idea what going wrong here thanks.
WPBeginner Staff says
Seems like your site is setup with a static front page and a separate page for blog posts. In cases like this, your blog’s URL is still the root domain not the blog page. Sometimes it may take IFTTT a while to get your new post and tweet it. You can also try running a recipe manually and see if it triggers the action or shows any error.
You will also need to activate the Twitter channel and give IFTTT permission to post on your behalf.
darkhorse85 says
Yes I do have a mutli-page site where my blog is not the font page. My front page is my Home page should be a static page and page named Blog should be categorised as a blog.
I must admit I don’t fully follow what it is you are saying and am unsure where to go from here.
Q1: What address should enter use activate and use my WP blog?
Q2: How would I run a recipe „manually“
Please kindly advise. Thanks
Adam Kaan says
I had a nightmare for weeks trying to resolve this problem in the end I found out to use my feed to set it up. For example mine is put whatever your site url is and then add forward slash feed try and use that address to set it up on ifttt
Sheridan says
Hi really cool post !
is it possible for IFTTT to make a bitly link (shotend link) under the sent post, so the readers come back to my site, or does this tool do such a thing – maybe I just have to make the bitly link (shotend link) in my WP POST before letting IFTTT send to the social platforms – somebody know if I am right or wrong?
thanks for answering !
Sheridan
Tim Buttle says
I’ve recently created a ‚recipe‘ on IFTTT that means whenever I retweet, it comes up on the blog on my WordPress site. However if I click on the link that comes up on WordPress, it doesn’t take me to the original Twitter feed (rather to a sub-page on my WordPress site). How can I get the link to take me from my site back to Twitter?
Might be a stupid question, and many thanks for any help! Tim.
Lav Singh says
How to post old WordPress posts to twitter using IFTTT? (Twitter account created after publishing some WordPress posts)
toddbot says
I recently set up ifttt to post to wordpress whenever I load a video to youtube. Is there a way to build the short code [publicize off] into the recipe so it will not post to the other sites I have linked to wordpress?
Pundi says
I almost pull my hair with my wp plugin.. thank you for this article. I have to join IFTTT
Robin Rico says
I just discovered this little gem of a site. Love it! One recipe I used was fb fan page to wordpress. I have a client who prefers to post everything in fb vs. her blog. Problem solved!!
Joanne Marcinek says
Great post. Thank you.
I love IFTTT but I am trying to use it with a WordPress.com blog that I have marked as private (using it as a personal journal). However, I would like to access the RSS via IFTTT for backup.
I am getting this error when I try to link to the blog RSS: Not a valid feed url, missing feed title
Do you think this is because the blog is marked private? Or is there something else going wrong? (I tried your suggestion to enable XML-RPC, but I don’t see that option in my settings.
Thank you!
Editorial Staff says
Yes it is because your blog is set to private.
Admin
B says
Then why does it ask for the WordPress username and password. Privacy settings shouldn’t matter…
darkhorse85 says
Acutally I think it may just be because you version of WordPress has XML-RPC automatically enabled. Google search this to check: „WordPress (enter the version you use)“ followed by „XML-RPC automatically enabled“ and see what
comes up!
I use WordPress 4.0 on a wordpress.org site and that solved my
XML-RPC dilema.
Mattia says
When I try to connect WordPress to IFTTT it says:
Live channel fields value is not a valid WordPress url
Unable to verify WordPress credentials. Please try again.
Am I missing something? Thanks
Dan Deeble says
It doesn’t seem to work with my wordpress.com blog, unless of course I am doing something completely retarded.
Can anyone verify this please?
Thanks
Dan
Editorial Staff says
It should work fine. You can also use the RSS method.
Admin
Julien Maury says
Thanks a lot for making my blogging life easier !
Zimbrul says
This is quite cool. The backup to Dropbox or Google drive is good but my question is: how the backup of any post looks like? I think I should try for myself, shouldn’t I.
The problem (at least until recently) was for the Facebook to work nicely with WordPress and grab the featured image or the image in the post as well as the excerpt. I wonder how this service pulls out the excerpt and the post image?
Editorial Staff says
If you have the proper og: tags defined, then Facebook will pull the image. As for per post backup, it stores the post as PDF.
Admin
Tom Hermans says
The other way around it’s even more useful, that it fetches yr social media blurbs, and archive them in YOUR own space. WordPress is all about owning and controlling your own content, and that way you can preserve, bundle, and display all yr tweets, fb status updates etc. in one centrally managed hub.
For a personal blog, it doesn’t get any more personal than that.
Editorial Staff says
Totally agreed. It pulls from RSS, FB, Twitter, and all sorts of places.
Admin
Charles says
I use IFTTT to auto tweet and facebook all my new posts on my blog. It’s good, but my only complaint is that it only activates once every 30 minutes.
Manveet Singh says
I already use IFTTT with Google Drive to backup my blog posts, and it works amazingly.
There’s only one thing that I have been trying to find a solution though. When I update an already published post, how to get a backup of that! Still trying to figure out
Shea Bunge says
At this time, IFTTT does not support Google+, and therefore your „WordPress to Google+“ recipe suggestion is invalid.
Birgit says
This is really AWESOME, wow! Thanks for that great tip!
I wonder whether it’s possible to replace the good old feedburner mail subscription with IFTTT?
I’ve only found the possibility, to create a receipe at IFTTT to send my/any feed to my (!) e-mail address. But how to offer the own blog visitors the possibility for a mail subscription to get the newest posts (as in normal RSS)? Isn’t that possible with IFTTT or has anybody another suggestion?
Editorial Staff says
No that is not possible with IFTTT. You would have to use a service like MailChimp or Aweber.
Admin
Shea Bunge says
While email subscriptions are not possible with IFTTT, you can use the Jetpack Email Subscriptions plugin.
Lawrence says
For Twitter, Facebook, LinkedIn, and Tumbler, I’ve found that Jetpack’s Publicize tool has worked very well.
I had been using IFTTT for all of the above and switched over to Jetpack.
Editorial Staff says
Yes, there are cool plugins in WordPress that can do the job as well. But if you are only going to use Jetpack for that feature, then you might as well just use IFTTT. Again, Jetpack offers a lot more that everyone might not need/want.
Admin
zimbrul says
I heard that Jetpack is quite „heavy“ on a WordPress site…
Matt Litherland says
I have literally skim read this, and it looks great. I’m hoping when i get time later tonight to read it fully that it fulfils what im after. Posting blog posts to facebook or twitter automatically is something i’ve wanted to build into my themes for a while