¿Desea trasladar un sitio web de WordPress a un servidor local en su ordenador?
Instalar WordPress en su ordenador (servidor local) le permite aprender WordPress fácilmente y probar cosas. Al mover un sitio de WordPress en vivo a un servidor local, que le permite experimentar con los mismos datos que su sitio en vivo.
En este artículo, le mostraremos cómo mover fácilmente un sitio WordPress activo a un servidor local sin romper nada.
¿Por qué y quién querría mover un sitio WordPress a un servidor local?
Si ha estado ejecutando un sitio web WordPress durante algún tiempo, es posible que desee probar nuevos temas o un plugin. Sin embargo, hacer esto en un sitio web en vivo puede resultar en una mala experiencia de usuario para sus usuarios.
Para evitar esto, muchos usuarios crean una copia de su sitio web de WordPress en un servidor local para probar nuevos temas, plugins, o hacer pruebas de desarrollo.
Esto le permite establecer su tema con todo su contenido y probar todas las características sin preocuparse de romper su sitio. Muchos usuarios copian su sitio en un servidor local para practicar sus conocimientos de WordPress y de código con los datos reales del sitio.
Aunque puedes hacer todas las pruebas con contenido ficticio en WordPress, los datos del sitio real te dan una mejor representación visual de cómo aparecerán estos cambios en tu sitio en vivo.
Preparativos para trasladar un sitio local a un servidor local
En primer lugar, debe asegurarse de realizar siempre una copia de seguridad de su sitio web WordPress. Hay varios plugins de copia de seguridad de WordPress que puede utilizar.
En segundo lugar, necesitas instalar un entorno de servidor local en tu ordenador. Puedes usar WAMP para Windows y MAMP para Mac. Una vez que hayas establecido el entorno, necesitas crear una nueva base de datos usando phpMyAdmin.
Simplemente visite la siguiente URL en su navegador para iniciar phpMyAdmin.
http://localhost/phpmyadmin/
http://localhost:8080/phpmyadmin/
Desde aquí tienes que hacer clic en la pestaña ‘Bases de datos’ y crear una nueva base de datos. Necesitarás esta base de datos para descomprimir los datos de tu sitio.
Ahora está listo para mover su sitio WordPress al servidor local.
Método 1. Trasladar un sitio WordPress activo a un servidor local usando plugin
Este método es más fácil y recomendado para todos los usuarios.
Lo primero que debe hacer es instalar y activar el plugin Duplicator. Para más detalles, consulte nuestra guía paso a paso sobre cómo instalar un plugin de WordPress.
Duplicator le permite crear fácilmente un paquete duplicado de todo su sitio web. Se puede utilizar para mover su sitio de WordPress a una nueva ubicación, y también se puede utilizar como una copia de seguridad plugin.
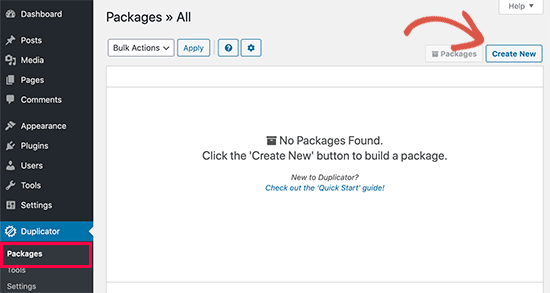
Al activarlo, el plugin añade un nuevo elemento / artículo de menú “Duplicator” en la barra lateral del administrador de WordPress. Al hacer clic en él, accederá a la pantalla de paquetes del plugin.
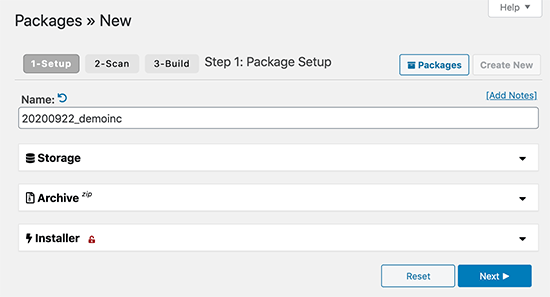
Para crear un nuevo paquete, debe hacer clic en el botón crear nuevo paquete. Duplicator iniciará el asistente de paquetes, y deberá hacer clic en el botón Siguiente para continuar.
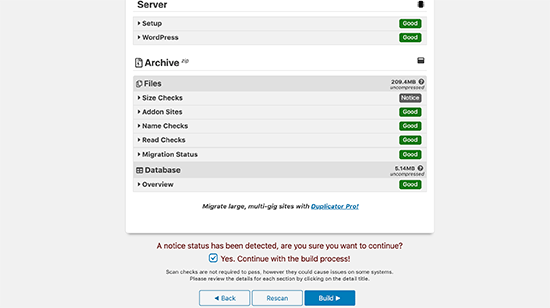
El plugin analizará su sitio web y realizará algunas comprobaciones en segundo plano. A continuación, le mostrará un resumen de esas comprobaciones. Si todo parece correcto, haz clic en el botón “Crear” para continuar.
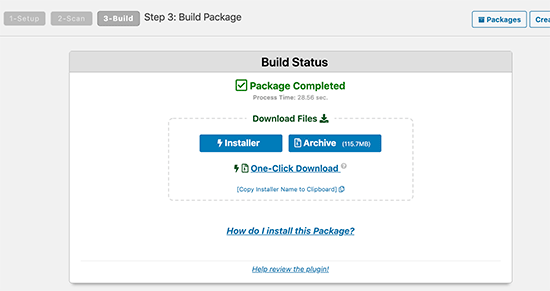
Duplicator creará el paquete de su sitio web.
Una vez terminado, verá un archivo zip que contiene todos los datos de su sitio web, y un archivo de instalación. Debe descargar ambos archivos en su ordenador.
Ahora está listo para descomprimir e instalar estos archivos en su servidor local.
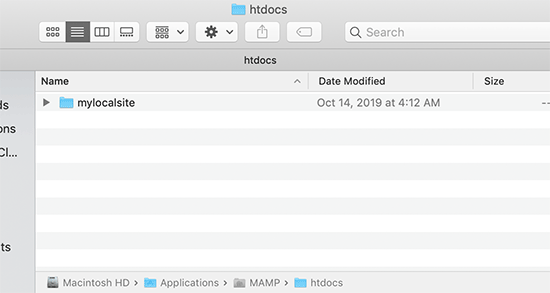
En primer lugar, debe crear una nueva carpeta en la carpeta raíz de su servidor local. Esta es la carpeta donde su servidor local almacena todos los sitios web.
Por ejemplo, si estás usando MAMP, entonces será la carpeta /Applications/MAMP/htdocs/. Alternativamente, si está utilizando WAMP, entonces sería la carpeta C:\wamp\www\.
Dentro de esta carpeta, puede crear nuevas carpetas para cada nuevo sitio web que desee importar o crear en su servidor local.
A continuación, abra la carpeta que ha creado para su sitio web local y copie y pegue tanto el archivo zip como el script de instalación que ha descargado anteriormente.
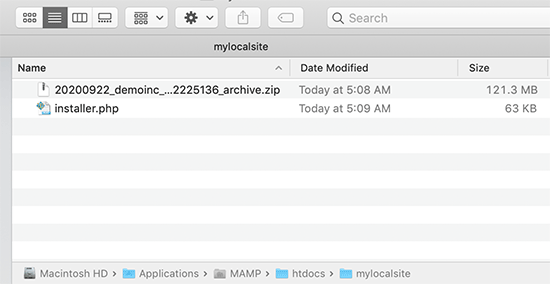
Para ejecutar la instalación, debe abrir el script installer.php en su navegador / explorador web.
Por ejemplo, si ha pegado ambos archivos en la carpeta /mylocalsite/, podrá acceder a ellos desde su navegador visitando http://localhost/mylocalsite/installer.php.
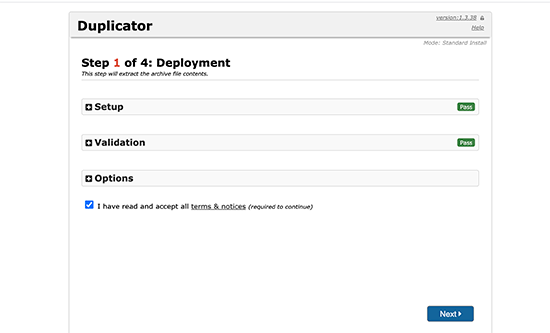
Ahora verá el script de instalación de Duplicator así:
Haga clic en el botón Siguiente para continuar.
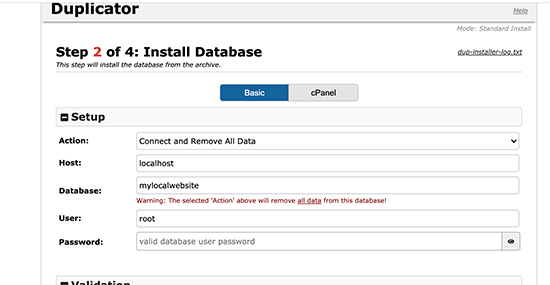
Duplicator descomprimirá el archivo zip y le pedirá que introduzca la información de la base de datos de su sitio local. Esta es la base de datos que creó anteriormente.
El nombre del servidor es casi siempre localhost y el nombre de usuario es root. En la mayoría de los casos, la instalación de su servidor local no establece una contraseña para root, por lo que puede dejarla en blanco.
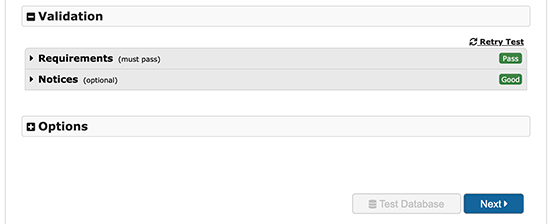
En la parte inferior de la página, verás un botón “Probar base de datos” que puedes utilizar para asegurarte de que la información de tu base de datos es correcta.
Si todo parece correcto, haz clic en el botón “Siguiente” para continuar.
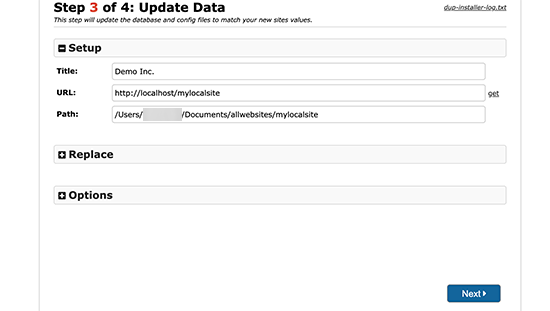
Duplicator importará su base de datos de WordPress. Después, te pedirá que vuelvas a comprobar la información del nuevo sitio web que ha detectado automáticamente.
Haga clic en el botón Siguiente para continuar.
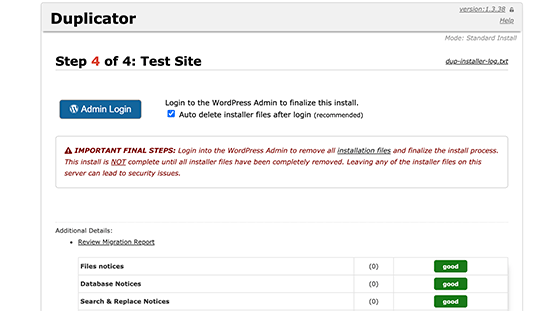
Duplicator finalizará la configuración y le mostrará un botón para acceder a su sitio local. Utilizará el mismo nombre de usuario y contraseña de WordPress que utiliza en su sitio activo.
Eso es todo, usted ha movido correctamente su sitio en vivo al servidor local.
Método 2. Mover manualmente un sitio WordPress activo a un servidor local
En caso de que el plugin no funcione para usted, siempre puede mover manualmente su sitio en vivo a un servidor local. Lo primero que debe hacer es una copia de seguridad manual de su sitio web desde su cuenta de alojamiento WordPress.
Paso 1. Exporte la base de datos de WordPress de su sitio activo
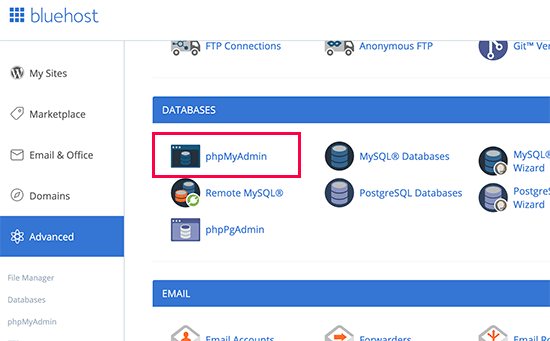
Para exportar la base de datos de WordPress de su sitio, debe acceder a su escritorio de cPanel y hacer clic en phpMyAdmin.
Nota: Estamos mostrando capturas de pantalla del Escritorio de Bluehost.
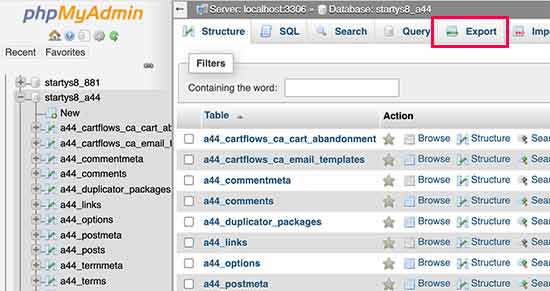
Dentro de phpMyAdmin, es necesario seleccionar la base de datos que desea exportar y luego haga clic en la pestaña de exportación en la parte superior.
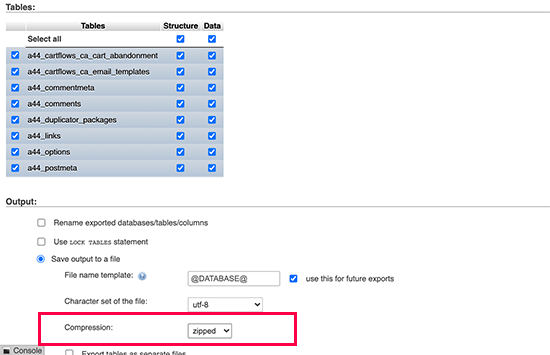
phpMyAdmin le pedirá que elija un método de exportación rápido o personalizado. Recomendamos utilizar el método personalizado y elegir zip como método de compresión.
A veces los plugins de WordPress pueden crear sus propias tablas dentro de su base de datos de WordPress. Si ya no está usando ese plugin, entonces el método personalizado le permite excluir esas tablas.
Deje el resto de las opciones como están y haga clic en el botón Ir para descargar la copia de seguridad de su base de datos en formato zip.
PhpMyAdmin descargará su archivo de base de datos. Para más detalles, vea nuestro tutorial sobre cómo hacer una copia de seguridad de su base de datos de WordPress manualmente.
Paso 2. Descargar todos los archivos de WordPress Descargue todos sus archivos de WordPress
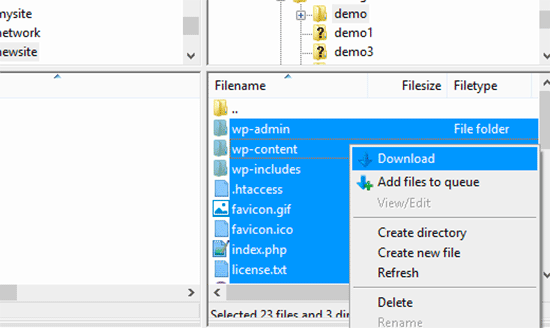
El siguiente paso es descargar los archivos de WordPress. Para ello, debe conectarse a su sitio de WordPress mediante un cliente FTP.
Una vez conectado, seleccione todos los archivos de WordPress y descárguelos en su ordenador.
Paso 3. Importe sus archivos de WordPress y la base de datos al servidor local
Después de descargar sus archivos de WordPress, necesita crear una carpeta en su servidor local donde desea importar el sitio local.
Si usted está usando WAMP entonces usted querrá crear una carpeta dentro de la carpeta C:\wamp\www\ para su sitio local. Los usuarios de MAMP tendrían que crear una carpeta en /Applications/MAMP/htdocs/ carpeta.
Después de eso, simplemente copie y pegue sus archivos de WordPress en la nueva carpeta.
Lo siguiente es importar la base de datos de WordPress. Simplemente abra phpMyAdmin en su servidor local visitando la siguiente URL:
http://localhost/phpmyadmin/
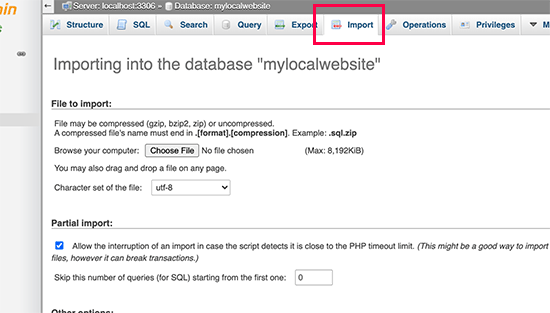
Como ya ha creado la base de datos anteriormente, ahora tiene que seleccionarla y, a continuación, hacer clic en la pestaña Importar de la parte superior.
Haga clic en el botón “Seleccionar archivo” para seleccionar y subir el archivo de exportación de la base de datos que descargó en el primer paso. A continuación, haga clic en el botón “Ir” situado en la parte inferior de la página.
PhpMyAdmin descomprimirá e importará tu base de datos de WordPress.
Ahora que su base de datos está establecida, necesita actualizar las URLs dentro de su base de datos de WordPress que hacen referencia a su sitio.
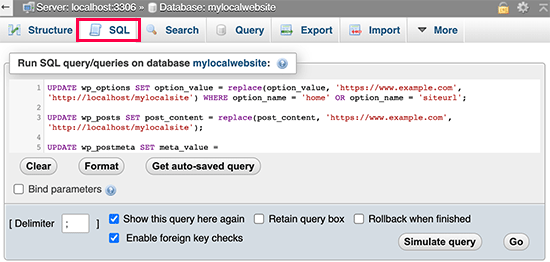
Para ello, ejecute una consulta SQL en phpMyAdmin. Asegúrese de haber seleccionado la base de datos de su sitio local y luego haga clic en SQL.
En la pantalla SQL de phpMyAdmin copie y pegue este código, asegúrese de sustituir example.com por la URL de su sitio y http://localhost/mylocalsite por la URL del servidor local de su sitio.
UPDATE wp_options SET option_value = replace(option_value, 'https://www.example.com', 'http://localhost/mylocalsite') WHERE option_name = 'home' OR option_name = 'siteurl';

UPDATE wp_posts SET post_content = replace(post_content, 'https://www.example.com', 'http://localhost/mylocalsite');

UPDATE wp_postmeta SET meta_value = replace(meta_value,'https://www.example.com','http://localhost/mylocalsite');
Esta consulta reemplazará las referencias a la URL de su sitio desde la base de datos y la reemplazará con la URL del servidor local.
Paso 4. Actualice el archivo wp-config.phpActualización del archivo wp-config.php
El último paso es actualizar el archivo wp-config.php de su sitio local. Este archivo contiene ajustes de WordPress, incluyendo cómo conectarse a su base de datos de WordPress.
Simplemente vaya a la carpeta donde instaló WordPress en su servidor local y abra el archivo wp-config.php en un editor de texto como el Bloc de notas.
Sustituya el nombre de la base de datos por el que creó en phpMyAdmin en su host local.
Después de eso, reemplace el nombre de usuario de la base de datos con su nombre de usuario MySQL local, por lo general es la raíz. Si ha establecido una contraseña para el usuario root de MySQL en su host local, introdúzcala. De lo contrario, déjelo vacío y guarde los cambios.
/** The name of the database for WordPress */
define('DB_NAME', 'database_name_here');

/** MySQL database username */
define('DB_USER', 'username_here');

/** MySQL database password */
define('DB_PASSWORD', 'password_here');
Ahora puede visitar su sitio local en una ventana del navegador introduciendo la URL así:
http://localhost/mylocalsite/
Sustituya ‘mylocalsite’ por el nombre de la carpeta donde ha copiado los archivos de WordPress.
Eso es todo, su sitio de WordPress en vivo ya está copiado en su servidor local.
Esperamos que este artículo le haya ayudado a aprender cómo mover fácilmente un sitio WordPress activo a un servidor local. Puede que también quieras ver nuestra guía sobre cómo crear fácilmente un sitio de pruebas para WordPress, o cómo mover un sitio WordPress de un servidor local a un sitio activo.
Si te ha gustado este artículo, suscríbete a nuestro canal de YouTube para ver tutoriales en vídeo sobre WordPress. También puedes encontrarnos en Twitter y Facebook.




Syed Balkhi says
Hey WPBeginner readers,
Did you know you can win exciting prizes by commenting on WPBeginner?
Every month, our top blog commenters will win HUGE rewards, including premium WordPress plugin licenses and cash prizes.
You can get more details about the contest from here.
Start sharing your thoughts below to stand a chance to win!
Joseph says
Hi, just came across this tutorial today, I found out about some of the steps from other tutorials, but my problem is with the SQL Query. I get the error # MySQL returned an empty result set (i.e. zero rows). I followed all your steps about changing site names etc but cant work this one out and so obviously i cant then connect to the local site. I used the Duplicator before on another site but it wont work so good on this one because of all the images on my photo site, ie timeout issues. Kinda going around in circles here, so help would be good.
Thanks,
Joseph
Yarina says
Joseph, check that the table prefix on the SQL tables you are working with are the same. I had this issue before when I didn’t realize that the theme I was copying from had a non typical prefix (wp_extra-text instead of just wp_). When you create the new db on phpMyAdmin, make sure that the prefix matches that of the old db. Hope this helps!
Alan OldStudent says
I tried using Duplicator, and that worked with one minor glitch. So then I dropped the database and tried the manual method. All steps proceeded well until it came time to import. I recreated the database and went to import. Afterwards, I got this error message: “#1064 – You have an error in your SQL syntax; check the manual that corresponds to your MySQL server version for the right syntax to use near ‘default’, ‘This is the default profile, used when no profile is specified.’, ‘a:’ at line 7”
To me that looks like gobbledygook. Do you have any idea what went wrong and how I can do the import manually?
Regards,
Alan
WPBeginner Support says
This could be a syntax error or conflict caused by using different versions of MySQL. To solve this, when exporting your database choose the same MySQL version as your local install. Also make sure that you are using the same character set for both database tables.
Administrador
Em Cloney says
Just a quick thing I noticed: the Duplicator file is called “installer.php” rather than “install.php”.
Ben says
I noticed the same thing. Great article, though. So glad I heard about this plugin from you guys.
wpva says
Hi I decided to do it manually
I created a database for my WordPress site on my local server and tried to import the database that I downloaded before to my computer but im getting this error message:
SQL query:
—
— Database: `aguilar_jmln1`
—
— ——————————————————–
—
— Table structure for table `gm_AnythingPopup`
—
CREATE TABLE IF NOT EXISTS `gm_AnythingPopup` (
`pop_id` int(11) NOT NULL,
`pop_width` int(11) NOT NULL DEFAULT ‘380’,
`pop_height` int(11) NOT NULL DEFAULT ‘260’,
`pop_headercolor` varchar(10) NOT NULL DEFAULT ‘#4D4D4D’,
`pop_bordercolor` varchar(10) NOT NULL DEFAULT ‘#4D4D4D’,
`pop_header_fontcolor` varchar(10) NOT NULL DEFAULT ‘#FFFFFF’,
`pop_title` varchar(1024) NOT NULL DEFAULT ‘Anything Popup’,
`pop_content` text CHARACTER SET utf8 COLLATE utf8_bin NOT NULL,
`pop_caption` varchar(2024) NOT NULL DEFAULT ‘Click to open popup’
) ENGINE=MyISAM AUTO_INCREMENT=2 DEFAULT CHARSET=utf8;
MySQL said:
#1046 – Aucune base n’a été sélectionnée
Kin says
It is saying that no database was selected.
Yeah I got that as well.
You need to make sure that you clicked on a database before hitting the ‘import”, if not the admin tool will try to import the .sql file on nothing!!
TMo says
Wonderful tutorial on how to manually go through this process. Thank you for the clear directions and photos!
Shane Levine says
Hi, is Duplicator an acceptable method for keeping a backup website? I have been using BackWPup but it looks like Duplicator also allows you to create a backup…
Dennis Crayon says
Hi I am not sure if I just got lucky but I was able to download and setup the local version quickly. The only problem I am having is that I have to set permalinks to default which is fine locally will I be able to set them back to post name later when I push the whole thing live? Thanks just getting this far is great
WPBeginner Staff says
Yes, you can change permalinks after putting your site live.
Felix says
Dennis, I am new to wordpress but I have so far learnt key configuration issues. Could you lease hel on changing permalinks from default to post name?
Iftikhar Raja says
Just an observation to share.
If you choose custom structure as permalink, it might not work. The work around is to chose default permalink and save the changes. It worked for me after several hours of head scratching
Hope it helps
Mario says
If you’re using WAMP you need to turn on mod_rewrite to enable custom permalinks.
Click Wamp -> Apache -> Apache Modules -> rewrite_module
WPBeginner Staff says
It is usually enabled by default.
isboleas says
Perfect! I did it manually just in wp-config.php must change and the line
/** MySQL hostname */
define(‘DB_HOST’, ‘127.0.0.1 ‘);
With ip appear in phpmyadmin in left up corner.
Anindyo Yudhistiro says
I’ve followed all the steps, but I still can’t see my database in my local wp. I still only have Hello World post.
I’ve imported it, change all the url’s, and many row has already affected.
Keith Davis says
I used the manual method but the SQL query wouldn’t work for me.
I had to go into the wp-options and change url in siteurl and home table and then all was fine.
Keith Davis says
Hi guys
The Duplicator method looks good.
Do you know how much free disc space you need to create the packages?
Nana says
Any ideas why it gives me a “Welcome to the famous five-minute install” screen?
WPBeginner Staff says
It is possible that your WordPress URL and Site URL are set to localhost/xammp. If you can access the admin area go to settings and set it to your WordPress install directory.
Je says
I checked and it’s definitely not set to that. It is so strange!
Je says
I figured it out. It was the W3 cache in the htaccess file causing problems. Thanks for you help and for this awesome tutorial!
Jen says
Great tutorial, I did everything exactly like you said….I thought it was working until I tried to change the theme and it wouldn’t change. Then I started trying to navigate to other pages and it took me to localhost/xammp. Everytime. Any ideas?
dion says
Hi. I did all of this(using the manual option, but when I click on any option, ie login or one of the menu options, I get “the requested URL … was not found on this server”
wagster says
If you copy the SQL query straight off the screen above, you will get the line numbers as well, which will throw an error like the above. Click ‘View source’ and copy the clean code from there.
MrDev says
Thanks for this article. I tried the manual route of moving a WordPress site to localhost, however my stylesheets are not loading. For some reason the ‘href’ is not being set on all my stylesheets. Any idea what might be going on?
WPBeginner Staff says
We would feel more confident recommending BackupBuddy for backups.
NikkiC4lyf says
Would you recommend using the Duplicator plugin for doing backups as well as moving sites?
Kin Tatsu says
Great tutorial! The problem I’m having is when I login to to wp-admin with the same login and password I used for my live site I get “ERROR: Invalid username. Lost your password?” The username and password are correct for the live site but incorrect for the localhost site. I tried to retrieve password with my email address but it says that my email address is not registered. Any ideas?
pbr says
I have only one word about this steps…AAWWEESSOOMMEE!!!!
StefsterNYC says
Did you check your Prefixes?
pels says
got same error
StefsterNYC says
You may have missed a table or something. Do a search for the old prefix. Also make sure you’re using a fresh new WP-CONFIG. I find that sometimes that messes things up.
StefsterNYC says
Sorry for the delay Mark. Not sure I understand your question. Hopefully I can answer something here.
If you started with a config file and it originally started with the wp_ and you didn’t use a custom one you’ll be fine. Just remember the config has to match the DB. If you worked locally and are migrating everything to a live site and you use the same DB and same Config that you worked locally with everything should be fine. Just remember to change Username, Password and Hostname.
The key here to remember here is Prefixes. So many people teach you how to do this and that but they miss the one thing that can mess it all up for you. And that is the Prefix.
And User Roles, if missed can cause a major headache when adding Admins manually. So be careful when changing and working with prefixes. They are absolutely a great way to tighten up WP sites. I highly recommend using a custom prefix always. dbh_234_ something like that is a great way to protect your site(s).
WPBeginner Staff says
If your live site’s mysql host is not localhost, then you need to change it to localhost. You may also need to change the database name to the database on your local computer. Same goes for DB username which is usually root on local servers, and db password which is usually blank.
Mark says
Hi just to be clear the password in the config.php file should be the same as the one you use for myphpadmin? because that seems to work for me?
StefsterNYC says
Great tutorial. I believe one thing was missed. Prefix. For those of you that use a prefix in the config, make sure when you query the db you change the wp for the query to your prefix. Otherwise your query won’t reset the urls correctly.
Mark says
If I have a local install and I move the database live, the prefix will remain the same correct? Do I need to do anything?
Cypherinfo says
Error 404: Object not found: The requested URL was not found on this server. The link on the referring page seems to be wrong or outdated. Please inform the author of that page about the error.
If you think this is a server error, please contact the webmaster.
” I followed all of the steps you wrote.
Sophie says
These instructions are exactly what I needed. Thank you!!!
However, I seem to have encountered a problem…
When updating the URLs in my database for those of the local server, it returns a #1064 – error in your SQL syntax near line 3. Could you possibly suggest a solution?
Would I need to include the port number when updating the http://localhost/ part of the code?
Please Help!!
Vtin says
One more newbie trouble here! Sorry for the inconvenience.
Of course, I think I’ve done everything correctly (probably not). When I try to access the site via localhost, in the screen appears the index.php file line by line, instead of loading it.
Any ideas?
W says
This was fantastic. Super quick and worked exactly as intended.
Paul Sahota says
Can you please show how to move a live wordpress site to local using backup buddy on mac using MAMP. I have tried multiple times but it does not work for me. I can easily do the opposite.
thanks
Jeremy says
After transferring the live site to my local server (wamp), I navigate to the destination in browser and get a “Not Found” wordpress error. The site’s navigation loads though and when clicked it takes me to the live site. Am I missing something rudimentary?
Kin says
I am getting the same thing. I followed all the steps. Then came back to check again, but the error remains. I am seeing that a couple of people above had the same problem as well. Any idea guys of why this is happening?
Sinuhe says
Thank you!!! I just finished moving my site and a subdomain to a new hosting service and it worked like a charm. I am no techie, actually I am philosopher I really appreciate you taking the time to explain this info in detail.
Sam says
Hey, I did everything the same way you said in manual method.
after setup,
I can see homepage of my website on local server.
But when I try to navigate to other page, I get following error:
“Not Found: the requested URL /test/logistics was not found on this server.”
Please help
Bill says
I just ran into the same issue. I went into site/wp-admin. Then went to Setting > Permalinks and just clicked Save Changes. It updated something and all of my links work.
Look at that! My first contribution to the community.
Isabela Santos says
thank you! But I had to disable it for it to work…
Mark says
Brilliant!
John says
Awesome. Worked great! Thanks for posting this.
Natalia says
Hi,
I followed your tutorial on doing it manually to the T, but I still get an error message. I am pulling my hair, here…
I’m pretty new to WP and I still have to figure out how to actually enter the new content and modify the files… but I can’t even get it to work locally
This is the message I get:
“Error establishing a database connection”
Which I don’t understand, because I did everything as you said in your tutorial.
Help, please!!
Natalia says
Tried it all over again a second time and still same error message… I’m going crazy
Natalia says
I even tried in a remote server and I got the same error message. I don’t know what I’m doing wrong… there must be a path somewhere that I’m forgetting about and it’s just not reading the right db…
Someone, please, help!!
WPBeginner Support says
Natalia, the most common cause for this error is incorrect database information. On your live site, you need to edit your wp-config.php file. Make sure that the database information in this file matches the database you have created for your live site.
Administrador
Kathi Kostiuk says
Thank you, your site is super helpful. New to WP, inherited a site, got it localhost so I can learn/test. When trying to ‘upload’ a pic, get this: C:/wamp/www/testsite/wp-content/uploads. Is its parent directory writable by the server? No errors shown in phpMyAdmin, permissions on folders, users look right. Could you possibly direct me to a solution? Have looked everywhere I can think of. Thanks.
WPBeginner Support says
When you moved the site to localhost, did you change the siteurl and homeurl options? If you didn’t then you need to add these two lines to your
wp-config.phpfiledefine('WP_HOME','http://localhost/yoursite'); define('WP_SITEURL','http://localhost/yoursite');1-click Use in WordPress
Administrador
Kathi Kostiuk says
Thank you, will do that.
Julie Rondeau says
Hi,
Great tutorials! Thank you, however i keep getting an “Unknown” Error code 0 from the Duplicator Plugin when trying to create the packages. Is there any other way you could recommend? Any help would be really appreciated.
Thank you so much,
Best from Paris.
J.
WPBeginner Support says
You can also manually backup your localhost site and restore it on live server.
Administrador
Rehan says
Best tutorial ever!!
Ashley says
Hi! Thank you so much for your great tutorials! Everything worked out great, but I when I was supposed to “resave permalinks” it wouldn’t let me login. I got that fixed and I am logged in now, but where do I go to resave them now that I don’t have that pop up? I’m assuming this is why when I try to click on posts it gives me a “not found page” ? Thanks in advance!
WPBeginner Support says
You can save permalinks from Settings » Permalinks.
Administrador
Jesse says
Can I ask how you fixed the login problem? I’m getting the same issue.
Yarina says
Hi! This all worked great until I had to login to the wp dashboard, my login didn’t work and even after changing it manually in the users table, I couldn’t log in, any ideas…?
Angela says
Thank You! I’ve been trying to do this for some time now. I’ve watch several YouTube videos but could not get it to work correctly. This was so easy….the best thing ever. Again thanks!
Ivan says
Hi,
I followed your instructions to the letter (and sing lol), but was not successful. I think it has something to do with WP installation. I have not installed it, just copied it.
Brett Golding says
Didn’t work for me just ended up with a blank white home page after I ran the program. Re tried 3 times.
WPBeginner Support says
Checkout how to resolve white screen of death issue.
Administrador
Jason Moore says
Thank you! This is was too easy!
ron says
Hi, I’m trying to do exactly this, but I get a 500 Internal Server Error right after I put the database details and hit the Run Deployment button, I get the progress animation and after about 10 or 15 seconds I get the error.
I was looking at the error logs located at C:\wamp\logs and I could only find this line that seemed somewhat relevant: “Invalid command ‘RewriteOptions’, perhaps misspelled or defined by a module not included in the server configuration”.
I’ve successfully used duplicator in the past, but going from webserver to another webserver.
Any ideas?
WPBeginner Support says
Please take a look at our guide on how to fix 500 internal server error in WordPress.
Administrador
Usama Noman says
Thanks, seems like this is a tutorial posted upon my request Thanks guys you are doing good.
WPBeginner Support says
Yes it is Usama. Thank you for suggesting it to us.
Administrador
Jamie Mannion says
Good guide, but I think you missed the part where you update wp-config.php with the new database details – name is the new name, username is ‘root’ and password is empty.
I tried it manually and it all looks good but the links take me to the WAMP server configuration page, even though the URLs are updated – can’t figure it out. I can get the home page and admin, but that’s it. Cheers!
WPBeginner Support says
Thanks for pointing out updating wp-config.php thing. We have updated the article.
As for your redirection issue. Try deleting .htaccess file from wordpress installation on your localserver.
Administrador
Jamie Mannion says
Awesome, thanks! I removed the .htaccess, then visited the permalinks option page and saved and now we’re good! I should admit, the only reason I knew about the wp-config.php settings is because I’ve read your previous articles. Keep up the great work!
Kin says
I put a question earlier today, but this worked out for me great.
Thank you.
Shahraar Khan says
I do this manually. Just zip the files from the server and download it… export the database and replace all the links in my text editor. just a 5 min work.. But anyhow your tutorial is also a very good alternative.