Es ist ärgerlich, wenn eine Seite versehentlich geschlossen wird, ohne dass ein Kommentar abgegeben wurde, oder wenn ein Formular nur halb ausgefüllt ist. Kürzlich fragte uns einer unserer Nutzer, ob es möglich sei, seinen Lesern ein Popup zur Bestätigung der Navigation anzuzeigen.
Dieses winzig kleine Popup-Fenster warnt die Nutzer und verhindert, dass sie versehentlich halb ausgefüllte und nicht abgeschickte Formulare hinterlassen. Es ist eine gute Möglichkeit, die Benutzerfreundlichkeit zu verbessern und zu verhindern, dass Besucher etwas von Grund auf neu beginnen müssen.
In diesem Artikel zeigen wir Ihnen, wie Sie das Navigations-Popup für WordPress-Formulare anzeigen können.

Was ist ein Popup zur Navigationsbestätigung?
Nehmen wir an, ein Benutzer schreibt einen Kommentar in Ihrem Blog. Er hat bereits einige Zeilen geschrieben, aber er wird abgelenkt und vergisst, den Kommentar abzuschicken. Wenn sie nun ihren Browser schließen, geht der Kommentar verloren.
Das Popup-Fenster zur Bestätigung der Navigation gibt ihnen die Möglichkeit, ihren Kommentar zu beenden.
Sie können diese Funktion auf dem Bildschirm des WordPress-Beitragseditors in Aktion sehen. Wenn Sie nicht gespeicherte Änderungen haben und versuchen, die Seite zu verlassen oder den Browser zu schließen, wird ein Warn-Popup angezeigt.
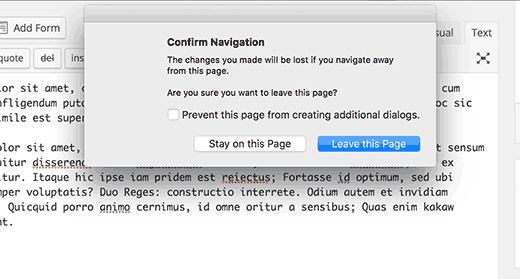
Sehen wir uns an, wie wir diese Warnfunktion zu WordPress-Kommentaren und anderen Formularen auf Ihrer Website hinzufügen können:
Popup zur Navigationsbestätigung für nicht abgeschickte Formulare in WordPress anzeigen
Für dieses Tutorial werden wir ein benutzerdefiniertes Plugin erstellen, aber keine Sorge, Sie können das Plugin auch am Ende des Tutorials herunterladen und auf Ihrer Website installieren.
Um den Code besser zu verstehen, bitten wir Sie jedoch, Ihr eigenes Plugin zu erstellen. Sie können dies zunächst auf einer lokalen Installation oder einer Staging-Site tun.
Fangen wir an.
Zunächst müssen Sie einen neuen Ordner auf Ihrem Computer erstellen und ihn confirm-leaving nennen. Innerhalb des Ordners confirm-leaving müssen Sie einen weiteren Ordner erstellen und ihn js nennen.
Öffnen Sie nun einen einfachen Texteditor wie Notepad und erstellen Sie eine neue Datei. Fügen Sie darin einfach den folgenden Code ein:
[php]
<?php
/**
* Confirm Leaving
* Plugin Name: Confirm Leaving
* Plugin URI: https://www.wpbeginner.com
* Description: This plugin shows a warning to users when try they forget to hit submit button on a comment form.
* Version: 1.0.0
* Author: WPBeginner
* Author URI: https://www.wpbeginner.com
* License: GPL-2.0+
* License URI: http://www.gnu.org/licenses/gpl-2.0.txt
*/
function wpb_confirm_leaving_js() {
wp_enqueue_script( 'Confirm Leaving', plugins_url( 'js/confirm-leaving.js', __FILE__ ), array('jquery'), '1.0.0', true );
}
add_action('wp_enqueue_scripts', 'wpb_confirm_leaving_js');
[/php]Diese PHP-Funktion fügt einfach eine JavaScript-Datei in das Frontend Ihrer Website ein.
Speichern Sie diese Datei confirm-leaving.php im Hauptordner confirm-leaving.
Nun müssen wir die JavaScript-Datei erstellen, die das Plugin lädt.
Erstellen Sie eine neue Datei und fügen Sie diesen Code ein:
[javascript]
jQuery(document).ready(function($) {
$(document).ready(function() {
needToConfirm = false;
window.onbeforeunload = askConfirm;
});
function askConfirm() {
if (needToConfirm) {
// Put your custom message here
return "Your unsaved data will be lost.";
}
}
$("#commentform").change(function() {
needToConfirm = true;
});
})
[/javascript]Dieser JavaScript-Code erkennt, ob der Benutzer nicht gespeicherte Änderungen im Kommentarformular vorgenommen hat. Wenn ein Benutzer versucht, die Seite zu verlassen oder das Fenster zu schließen, wird ein Warn-Popup angezeigt.
Sie müssen diese Datei unter dem Namen confirm-leaving.js im Ordner js speichern.
Nachdem Sie beide Dateien gespeichert haben, sollte Ihre Ordnerstruktur wie folgt aussehen:

Nun müssen Sie mit einem FTP-Client eine Verbindung zu Ihrer WordPress-Website herstellen. Sehen Sie sich unsere Anleitung zum Hochladen von WordPress-Dateien mit FTP an.
Sobald die Verbindung hergestellt ist, müssen Sie den Ordner confirm-leaving in den Ordner /wp-contents/plugins/ auf Ihrer Website hochladen.
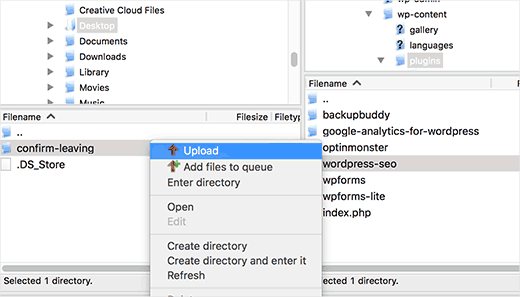
Danach müssen Sie sich in den WordPress-Administrationsbereich einloggen und die Seite des Plugins besuchen.
Suchen Sie das Plugin ‚Confirm Leaving‘ in der Liste der installierten Plugins und klicken Sie auf den Link ‚aktivieren‘ darunter.
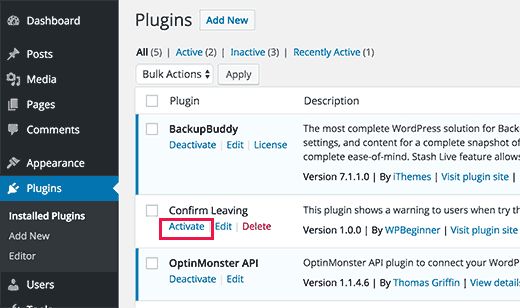
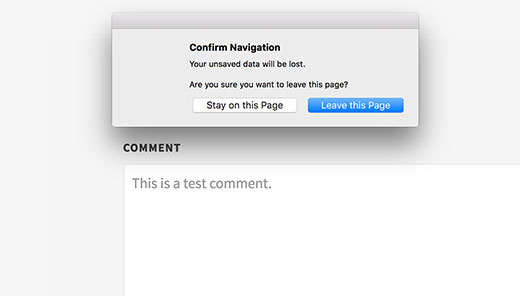
Das war’s schon. Sie können nun einen beliebigen Beitrag auf Ihrer Website besuchen, einen Text in ein beliebiges Feld des Kommentarformulars schreiben und dann versuchen, die Seite zu verlassen, ohne sie abzuschicken.
Es erscheint ein Popup-Fenster, das Sie darauf hinweist, dass Sie im Begriff sind, eine Seite mit nicht gespeicherten Änderungen zu verlassen.
Hinzufügen der Warnung zu anderen Formularen in WordPress
Sie können dieselbe Code-Basis verwenden, um beliebige Formulare auf Ihrer WordPress-Website anzusprechen. Hier zeigen wir Ihnen ein Beispiel für die Verwendung für ein Kontaktformular.
In diesem Beispiel verwenden wir das WPForms-Plugin, um ein Kontaktformular zu erstellen. Die Anweisungen sind die gleichen, wenn Sie ein anderes Kontaktformular-Plugin auf Ihrer Website verwenden.
Gehen Sie zu der Seite, auf der Sie Ihr Kontaktformular eingefügt haben. Fahren Sie mit der Maus über das erste Feld Ihres Kontaktformulars, klicken Sie mit der rechten Maustaste und wählen Sie dann im Browsermenü „Prüfen“.
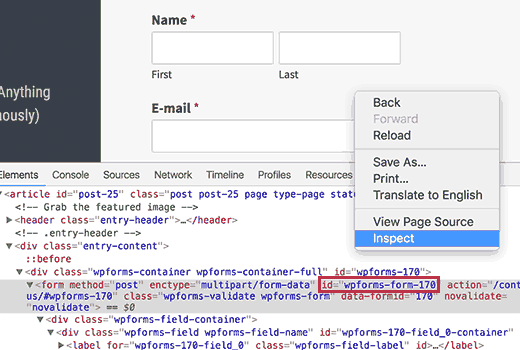
Suchen Sie die Zeile, die mit dem <form>-Tag beginnt. In dem Formular-Tag finden Sie das Attribut ID.
In diesem Beispiel lautet die ID unseres Formulars wpforms-form-170. Sie müssen das Attribut ID kopieren.
Bearbeiten Sie nun die Datei confirm-leaving.js und fügen Sie das Attribut ID nach #commentform hinzu.
Trennen Sie #commentform durch ein Komma von der ID Ihres Formulars. Sie müssen auch ein #-Zeichen als Präfix zum ID-Attribut Ihres Formulars hinzufügen.
Ihr Code sieht nun wie folgt aus:
[javascript]
jQuery(document).ready(function($) {
$(document).ready(function() {
needToConfirm = false;
window.onbeforeunload = askConfirm;
});
function askConfirm() {
if (needToConfirm) {
// Put your custom message here
return "Your unsaved data will be lost.";
}
}
$("#commentform,#wpforms-form-170").change(function() {
needToConfirm = true;
});
})
[/javascript]Speichern Sie Ihre Änderungen und laden Sie die Datei wieder auf Ihre Website hoch.
Jetzt können Sie einen beliebigen Text in ein beliebiges Feld Ihres Kontaktformulars eingeben und dann versuchen, die Seite zu verlassen, ohne das Formular abzuschicken. Es erscheint ein Popup-Fenster mit einer Warnung, dass die Änderungen nicht gespeichert wurden.
Sie können das Plugin zum Bestätigen des Verlassens hier herunterladen. Es zielt nur auf das Kommentarformular ab, aber Sie können das Plugin gerne bearbeiten, um andere Formulare anzusprechen.
Das war’s. Wir hoffen, dass dieser Artikel Ihnen geholfen hat, das Navigations-Popup für WordPress-Formulare zu bestätigen. Vielleicht möchten Sie auch einen Blick auf unsere WordPress-Plugins und -Tools für Business-Websites werfen oder unseren ultimativen Leitfaden lesen, wie Sie Ihren Blog-Traffic erhöhen können.
Wenn Ihnen dieser Artikel gefallen hat, dann abonnieren Sie bitte unseren YouTube-Kanal für WordPress-Videotutorials. Sie können uns auch auf Twitter und Facebook finden.


Syed Balkhi says
Hey WPBeginner readers,
Did you know you can win exciting prizes by commenting on WPBeginner?
Every month, our top blog commenters will win HUGE rewards, including premium WordPress plugin licenses and cash prizes.
You can get more details about the contest from here.
Start sharing your thoughts below to stand a chance to win!
Igor says
Tried to use your code in bbpress forum. Unfortunately no popup message appears after user dose not post his comment. Tried all variations of changing id in JS file but still nothing appears.
Bob Garrett says
Further to my previous query I have now tried using the form’s parent div id and modified the code. This almost works but…
The text shown by the pop-up is not the text entered in the code.
Even if the form is completed and submit hit, then going to another page still results in the warning.
How can I resolve this?
Tom Kelley says
Have tried this vvvvv to no avail. Working with Gravity Forms. All else works well, but the warning still comes up when hitting the submit button on a completed form. Any advice?
WPBeginner Support
Nov 27, 2016 at 6:52 am
Hi Bonnie,
We tested the plugin with WPForms and it worked. You will need to edit the confirm-leaving.js file and replace #commentform with the wpforms container div id. Typically it is wpforms-12 where 12 is the ID of your form. You can also see it using the inspect element tool in your browser.
Bonnie Ramthun says
I’m still trying to figure out how to make sure the popup DOESN’T appear when the user presses the „Submit“ button. The confirm leaving popup shouldn’t appear if the user has entered all the information required, but this code makes it pop up every time.
I would so appreciate the help, if there is a solution available.
Swayam Dhawan says
I Need the same function when someone navigate from particular page in website and while click on stay , they must navigate to home page of the website.
waiting for the response.
Bonnie Ramthun says
I am so happy for your wonderful confirm navigation code! I need it desperately because many of my clients users can’t get it through their head that they need to press the „Submit“ button on the form.
The code works perfectly, except for one problem. When I press the „Submit“ button on my WPForms form, the confirm navigation code pops up. I would like the „confirm navigation“ to happen only when the user doesn’t press the „Submit“ button. I can’t figure out how to do this. Can you help?
WPBeginner Support says
Hi Bonnie,
We tested the plugin with WPForms and it worked. You will need to edit the confirm-leaving.js file and replace #commentform with the wpforms container div id. Typically it is wpforms-12 where 12 is the ID of your form. You can also see it using the inspect element tool in your browser.
Admin
Will C says
I have two separate multi-page gravity forms on my site. When this plugin is active, I get a confirmation popup when clicking „Next Step“ on one of the forms (undesired), but not the other. Are you aware of any issues with gravity forms and „window.onbeforeunload“? Thanks
Nipa Sarker says
Having same issues with buddy press create group steps.
Nipa Sarker says
I ma using the code for buddy-press multi step create group from.It is working fine except while clicking on the next step button or save button it is showing the same alert.
I ma using the form id „#create-group-form“ instead of the #commentform
Luis Zarza says
Hi, nice post!
It helped a lot. But your solution won’t work while logged in. It only works for users that fill in the form and are logged out. I need it also to work for logged in users, please!
Could you provide a solution for that?
Thanks.
Luis Zarza says
Sorry, it does actually works when you create the plugin. At first I did it only throwing the JS to the page I wanted without creating the plugin, because I didn’t want the script to be loaded on all the pages of my site.
Alain Aubry says
Hi
Contact Form 7 does not use an ID in their form, how can I make this work?
WPBeginner Support says
Contact Form 7 uses an ID with all the forms. The line that contains form ID will look something like this:
1-click Use in WordPress
In this example, the form’s ID attribute is
wpcf7-f85-p11-o1. Hope this helps.Admin
Betty L Van Fossen says
I have two problems. One I get these pop up in my mail all the time,q it’s aggravating. I’m 89 in yrs.therefore a little short on patience and I start using my pointer to fast hitting other things, so I get myself in lots of problems. Two –guess(I know) I have to many cookies they say. What are the cookies –how do I eleminate them? What do you mean subscribe without commenting. I prefer the e-mail. O.K..to personal and meaningful conversation.
Betty L Van Fossen says
Does Pop Ups work the same for e-mail as WordPress for removing?
WPBeginner Support says
We are not sure what you mean. Can you please explain?
Admin
Betty L Van Fossen says
Safari said I could not get in cause I had to many cookies. In the meantime I was on my e-mail and the pop ups came on, while on my e-mail they are always popping up. I got on google and asked for help on cookies and pop ups and gave me lots to choose from. Now word press got in here, what is word press. I’m not going to write a book,just NEED HELP. Answer by e-mail. I’m turning you off now I’m really tired now.
Betty L Van Fossen says
I will wait for your reply in my e-mail as I’m tired so will turn off now.