Chiudere accidentalmente una pagina senza inviare il proprio commento o con un modulo compilato a metà è fastidioso. Recentemente, uno dei nostri utenti ci ha chiesto se fosse possibile mostrare ai lettori un popup di conferma della navigazione.
Questo piccolo popup avvisa gli utenti e impedisce loro di lasciare accidentalmente moduli non compilati e non inviati. È un buon modo per migliorare l’esperienza dell’utente ed evitare che i visitatori debbano ricominciare da capo.
In questo articolo vi mostreremo come mostrare il popup di conferma della navigazione per i moduli di WordPress.

Che cos’è un popup di conferma della navigazione?
Supponiamo che un utente stia scrivendo un commento sul vostro blog. Ha già scritto un bel po’ di righe, ma si distrae e dimentica di inviare i commenti. Ora, se chiude il browser, il commento andrà perso.
Il popup di conferma della navigazione dà loro la possibilità di terminare il commento.
È possibile vedere questa funzione in azione nella schermata dell’editor di post di WordPress. Se le modifiche non sono state salvate e si tenta di lasciare la pagina o di chiudere il browser, verrà visualizzato un popup di avviso.
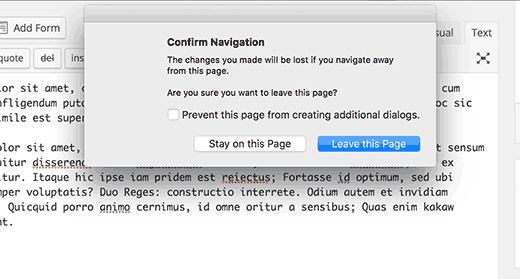
Vediamo come aggiungere questa funzione di avviso ai commenti di WordPress e ad altri moduli del vostro sito:
Mostrare il popup di conferma della navigazione per i moduli non inviati in WordPress
Per questa esercitazione, creeremo un plugin personalizzato, ma non preoccupatevi, potete anche scaricare il plugin alla fine di questa esercitazione per installarlo sul vostro sito web.
Tuttavia, per una migliore comprensione del codice, vi chiediamo di provare a creare il vostro plugin. Potete farlo prima su un’installazione locale o su un sito di staging.
Cominciamo.
Per prima cosa, è necessario creare una nuova cartella sul computer e chiamarla confirm-leaving. All’interno della cartella confirm-leaving, è necessario creare un’altra cartella e chiamarla js.
Ora aprite un editor di testo semplice come Notepad e create un nuovo file. All’interno, incollate semplicemente il seguente codice:
[php]
<?php
/**
* Confirm Leaving
* Plugin Name: Confirm Leaving
* Plugin URI: https://www.wpbeginner.com
* Description: This plugin shows a warning to users when try they forget to hit submit button on a comment form.
* Version: 1.0.0
* Author: WPBeginner
* Author URI: https://www.wpbeginner.com
* License: GPL-2.0+
* License URI: http://www.gnu.org/licenses/gpl-2.0.txt
*/
function wpb_confirm_leaving_js() {
wp_enqueue_script( 'Confirm Leaving', plugins_url( 'js/confirm-leaving.js', __FILE__ ), array('jquery'), '1.0.0', true );
}
add_action('wp_enqueue_scripts', 'wpb_confirm_leaving_js');
[/php]Questa funzione PHP aggiunge semplicemente un file JavaScript al front-end del vostro sito web.
Salvare il file confirm-leaving.php all’interno della cartella principale confirm-leaving.
Ora dobbiamo creare il file JavaScript che questo plugin sta caricando.
Creare un nuovo file e incollarvi questo codice:
[javascript]
jQuery(document).ready(function($) {
$(document).ready(function() {
needToConfirm = false;
window.onbeforeunload = askConfirm;
});
function askConfirm() {
if (needToConfirm) {
// Put your custom message here
return "Your unsaved data will be lost.";
}
}
$("#commentform").change(function() {
needToConfirm = true;
});
})
[/javascript]Questo codice JavaScript rileva se l’utente ha effettuato modifiche non salvate nel modulo dei commenti. Se l’utente tenta di abbandonare la pagina o di chiudere la finestra, viene visualizzato un popup di avviso.
È necessario salvare questo file come confirm-leaving.js all’interno della cartella js.
Dopo aver salvato entrambi i file, la struttura delle cartelle dovrebbe apparire così:

A questo punto, è necessario collegarsi al sito WordPress utilizzando un client FTP. Consultate la nostra guida su come utilizzare FTP per caricare i file di WordPress.
Una volta collegati, è necessario caricare la cartella confirm-leaving in /wp-contents/plugins/ la cartella del proprio sito web.
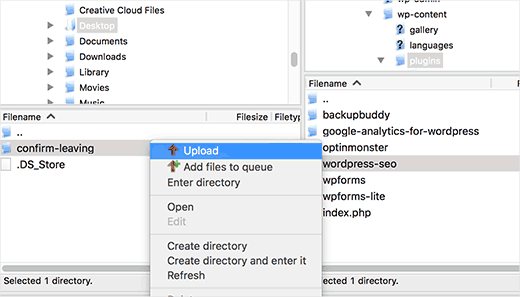
Successivamente, è necessario accedere all’area di amministrazione di WordPress e visitare la pagina del plugin.
Individuare il plugin “Confirm Leaving” nell’elenco dei plugin installati e fare clic sul link “activate” sotto di esso.
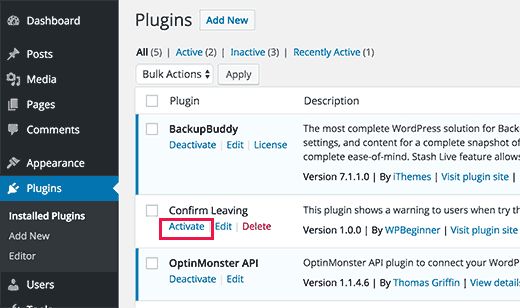
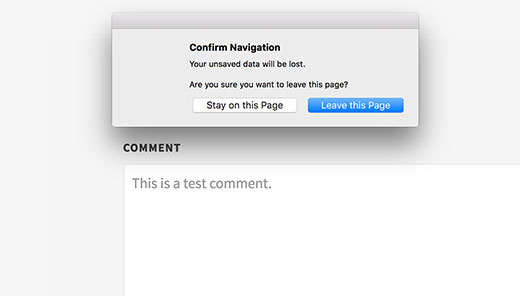
Questo è tutto. Ora potete visitare un qualsiasi post del vostro sito web, scrivere un testo in un qualsiasi campo del modulo di commento e poi provare a lasciare la pagina senza inviare il messaggio.
Verrà visualizzato un popup che avverte che si sta per lasciare una pagina con modifiche non salvate.
Aggiunta dell’avviso ad altri moduli in WordPress
È possibile utilizzare la stessa base di codice per indirizzare qualsiasi modulo del vostro sito WordPress. Qui vi mostriamo un esempio di utilizzo per indirizzare un modulo di contatto.
In questo esempio, utilizziamo il plugin WPForms per creare un modulo di contatto. Le istruzioni sono le stesse anche se si utilizza un altro plugin per i moduli di contatto sul proprio sito web.
Andate alla pagina in cui avete aggiunto il modulo di contatto. Passare il mouse sul primo campo del modulo di contatto, fare clic con il tasto destro del mouse e selezionare “Ispeziona” dal menu del browser.
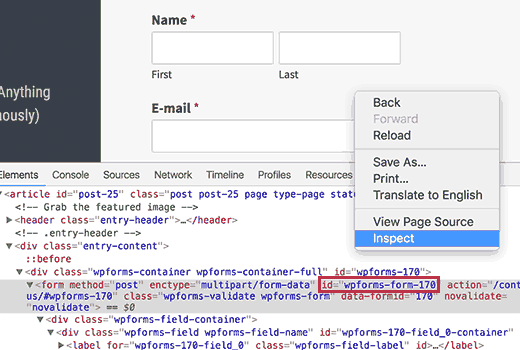
Individuare la riga che inizia con il tag <form>. Nel tag form, si trova l’attributo ID.
In questo esempio, l’ID del nostro modulo è wpforms-form-170. È necessario copiare l’attributo ID.
Ora modificare il file confirm-leaving.js e aggiungere l’attributo ID dopo #commentform.
Assicurarsi di separare #commentform dall’ID del modulo con una virgola. È inoltre necessario aggiungere un segno # come prefisso all’attributo ID del modulo.
Il codice sarà ora simile a questo:
[javascript]
jQuery(document).ready(function($) {
$(document).ready(function() {
needToConfirm = false;
window.onbeforeunload = askConfirm;
});
function askConfirm() {
if (needToConfirm) {
// Put your custom message here
return "Your unsaved data will be lost.";
}
}
$("#commentform,#wpforms-form-170").change(function() {
needToConfirm = true;
});
})
[/javascript]Salvate le modifiche e caricate il file sul vostro sito web.
Ora è possibile inserire qualsiasi testo in qualsiasi campo del modulo di contatto e poi provare a lasciare la pagina senza inviare il modulo. Verrà visualizzato un popup con l’avviso che le modifiche non sono state salvate.
È possibile scaricare il plugin di conferma della partenza qui. Si rivolge solo al modulo dei commenti, ma si può modificare il plugin per indirizzare altri moduli.
Questo è tutto; speriamo che questo articolo vi abbia aiutato a mostrare il popup di navigazione di conferma per i moduli di WordPress. Potreste anche voler dare un’occhiata ai nostri plugin e strumenti WordPress indispensabili per i siti aziendali o leggere la nostra guida definitiva su come aumentare il traffico del vostro blog.
Se questo articolo vi è piaciuto, iscrivetevi al nostro canale YouTube per le esercitazioni video su WordPress. Potete trovarci anche su Twitter e Facebook.


Syed Balkhi says
Hey WPBeginner readers,
Did you know you can win exciting prizes by commenting on WPBeginner?
Every month, our top blog commenters will win HUGE rewards, including premium WordPress plugin licenses and cash prizes.
You can get more details about the contest from here.
Start sharing your thoughts below to stand a chance to win!
Igor says
Tried to use your code in bbpress forum. Unfortunately no popup message appears after user dose not post his comment. Tried all variations of changing id in JS file but still nothing appears.
Bob Garrett says
Further to my previous query I have now tried using the form’s parent div id and modified the code. This almost works but…
The text shown by the pop-up is not the text entered in the code.
Even if the form is completed and submit hit, then going to another page still results in the warning.
How can I resolve this?
Tom Kelley says
Have tried this vvvvv to no avail. Working with Gravity Forms. All else works well, but the warning still comes up when hitting the submit button on a completed form. Any advice?
WPBeginner Support
Nov 27, 2016 at 6:52 am
Hi Bonnie,
We tested the plugin with WPForms and it worked. You will need to edit the confirm-leaving.js file and replace #commentform with the wpforms container div id. Typically it is wpforms-12 where 12 is the ID of your form. You can also see it using the inspect element tool in your browser.
Bonnie Ramthun says
I’m still trying to figure out how to make sure the popup DOESN’T appear when the user presses the “Submit” button. The confirm leaving popup shouldn’t appear if the user has entered all the information required, but this code makes it pop up every time.
I would so appreciate the help, if there is a solution available.
Swayam Dhawan says
I Need the same function when someone navigate from particular page in website and while click on stay , they must navigate to home page of the website.
waiting for the response.
Bonnie Ramthun says
I am so happy for your wonderful confirm navigation code! I need it desperately because many of my clients users can’t get it through their head that they need to press the “Submit” button on the form.
The code works perfectly, except for one problem. When I press the “Submit” button on my WPForms form, the confirm navigation code pops up. I would like the “confirm navigation” to happen only when the user doesn’t press the “Submit” button. I can’t figure out how to do this. Can you help?
WPBeginner Support says
Hi Bonnie,
We tested the plugin with WPForms and it worked. You will need to edit the confirm-leaving.js file and replace #commentform with the wpforms container div id. Typically it is wpforms-12 where 12 is the ID of your form. You can also see it using the inspect element tool in your browser.
Admin
Will C says
I have two separate multi-page gravity forms on my site. When this plugin is active, I get a confirmation popup when clicking “Next Step” on one of the forms (undesired), but not the other. Are you aware of any issues with gravity forms and “window.onbeforeunload”? Thanks
Nipa Sarker says
Having same issues with buddy press create group steps.
Nipa Sarker says
I ma using the code for buddy-press multi step create group from.It is working fine except while clicking on the next step button or save button it is showing the same alert.
I ma using the form id “#create-group-form” instead of the #commentform
Luis Zarza says
Hi, nice post!
It helped a lot. But your solution won’t work while logged in. It only works for users that fill in the form and are logged out. I need it also to work for logged in users, please!
Could you provide a solution for that?
Thanks.
Luis Zarza says
Sorry, it does actually works when you create the plugin. At first I did it only throwing the JS to the page I wanted without creating the plugin, because I didn’t want the script to be loaded on all the pages of my site.
Alain Aubry says
Hi
Contact Form 7 does not use an ID in their form, how can I make this work?
WPBeginner Support says
Contact Form 7 uses an ID with all the forms. The line that contains form ID will look something like this:
1-click Use in WordPress
In this example, the form’s ID attribute is
wpcf7-f85-p11-o1. Hope this helps.Admin
Betty L Van Fossen says
I have two problems. One I get these pop up in my mail all the time,q it’s aggravating. I’m 89 in yrs.therefore a little short on patience and I start using my pointer to fast hitting other things, so I get myself in lots of problems. Two –guess(I know) I have to many cookies they say. What are the cookies –how do I eleminate them? What do you mean subscribe without commenting. I prefer the e-mail. O.K..to personal and meaningful conversation.
Betty L Van Fossen says
Does Pop Ups work the same for e-mail as WordPress for removing?
WPBeginner Support says
We are not sure what you mean. Can you please explain?
Admin
Betty L Van Fossen says
Safari said I could not get in cause I had to many cookies. In the meantime I was on my e-mail and the pop ups came on, while on my e-mail they are always popping up. I got on google and asked for help on cookies and pop ups and gave me lots to choose from. Now word press got in here, what is word press. I’m not going to write a book,just NEED HELP. Answer by e-mail. I’m turning you off now I’m really tired now.
Betty L Van Fossen says
I will wait for your reply in my e-mail as I’m tired so will turn off now.