Möchten Sie Google Web Fonts in Ihr WordPress-Theme integrieren?
Mit Google Fonts können Sie auf Ihrer WordPress-Website ganz einfach schöne Webfonts verwenden. Sie können damit die Typografie, die Benutzerfreundlichkeit und die Ästhetik Ihrer Website verbessern.
In diesem Artikel erfahren Sie, wie Sie Google Web Fonts richtig in WordPress-Themes einfügen.
Hier ist ein kurzer Überblick über die Themen, die wir in diesem Leitfaden behandeln werden.
- Finding the Best Google Fonts for Your WordPress Theme
- Method 1. Adding Google Fonts to Your Theme Using Plugin
- Method 2. Adding Google Web Fonts to Your Theme's Header
- Method 3. Add Google Fonts in Theme's Stylesheet
- Method 4. Properly Enqueue Google Fonts in WordPress
- Bonus Section: How Web Fonts Affect WordPress Speed
Finden Sie die besten Google-Schriftarten für Ihr WordPress-Theme
Als Erstes müssen Sie die Google-Schriftarten finden, die Ihnen gefallen. Besuchen Sie einfach die Google Fonts-Website und durchsuchen Sie die Bibliothek.
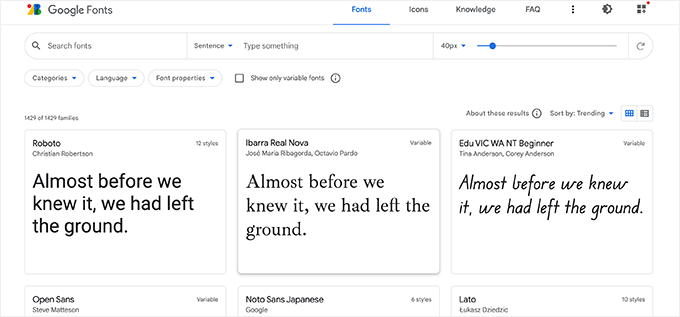
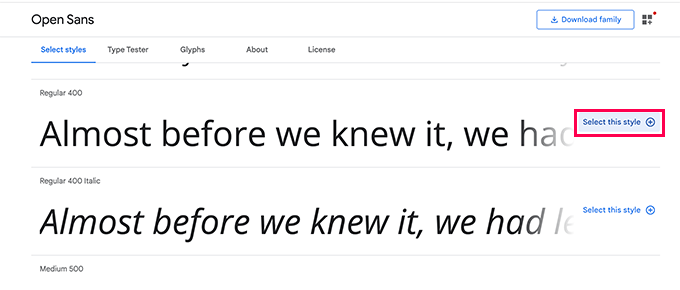
Wenn Sie eine websichere Schriftart gefunden haben, die Ihnen gefällt, klicken Sie sie an, um die verschiedenen verfügbaren Stile anzuzeigen.
Sie können die Stile auswählen, die Sie auf Ihrer Website verwenden möchten.
Klicken Sie anschließend auf die Schaltfläche „Ausgewählte Familien anzeigen“, wodurch sich eine Seitenleiste öffnet.
Hier finden Sie die Gebrauchsanweisung unter dem Abschnitt „Verwendung im Web“.
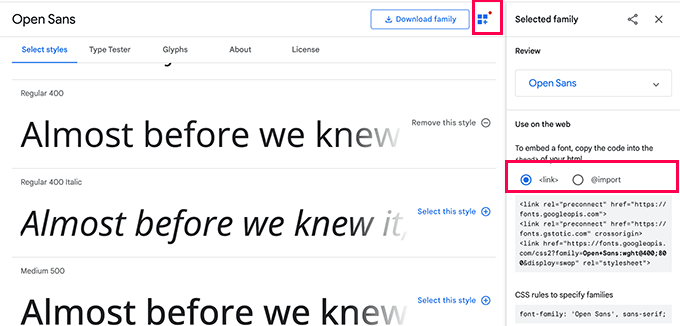
Sie werden sehen, dass es zwei verschiedene Registerkarten zum Hinzufügen der Schriftart zu Ihrer Website gibt
Die erste ist die Link-Methode, die die empfohlene Standardmethode zum Hinzufügen von Webschriften ist.
Die zweite Registerkarte verwendet die @import CSS-Methode, mit der Sie die Schriftarten über Ihr CSS-Stylesheet laden können.
Wir werden Ihnen zeigen, wie Sie jede dieser Methoden anwenden können und welche Vor- und Nachteile sie haben.
Hinweis: Für einige dieser Methoden müssen Sie die Dateien Ihres WordPress-Themes bearbeiten. Dies können Sie tun, indem Sie sich mit einem FTP-Client oder der Dateimanager-App in Ihrem Hosting-Kontrollpanel mit Ihrer Website verbinden.
Sobald Sie verbunden sind, müssen Sie den Ordner /wp-content/themes/Ihr-Theme-Name/ besuchen. Dort finden Sie die Themadateien, die Sie für dieses Tutorial möglicherweise bearbeiten müssen.

Weitere Einzelheiten finden Sie in unserem Tutorial zum Kopieren und Einfügen von Code-Snippets in WordPress.
Methode 1. Hinzufügen von Google Fonts zu Ihrem Theme mittels Plugin
Bei dieser Methode wird ein WordPress-Plugin zum Laden von Google Fonts verwendet.
Zunächst müssen Sie das Fonts-Plugin installieren und aktivieren. Weitere Einzelheiten finden Sie in unserer Schritt-für-Schritt-Anleitung zur Installation eines WordPress-Plugins.
Nach der Aktivierung müssen Sie die Seite Erscheinungsbild “ Anpassen aufrufen, um den Theme-Customizer zu starten. Hier sehen Sie die neue Registerkarte Fonts Plugin.
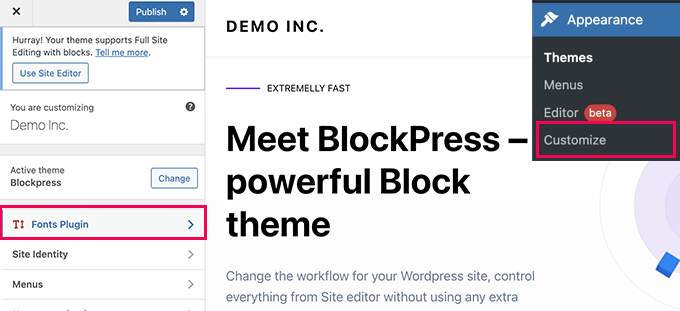
Wenn Sie darauf klicken, werden Ihnen Plugin-Optionen angezeigt.
Sie können Google Fonts für verschiedene Bereiche Ihrer Website verwenden.
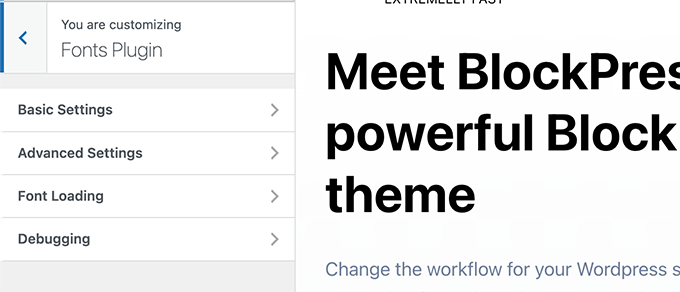
Alternativ dazu können Sie auch einfach eine Schriftart für Ihr WordPress-Theme laden.
Wechseln Sie einfach zur Registerkarte Erweiterte Einstellungen “ Nur Schriftarten laden.
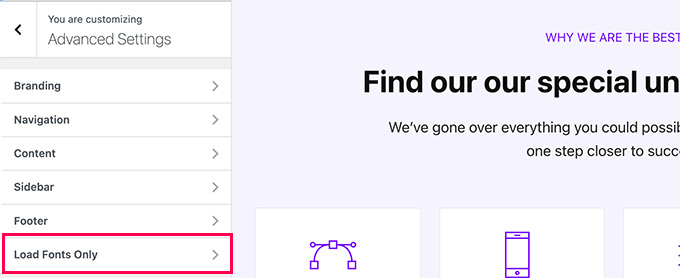
Hier können Sie Google Fonts auswählen, die Sie für Ihr WordPress-Theme laden möchten.
Geben Sie einfach den Namen der Schriftart ein und wählen Sie sie aus.

Wenn Sie fertig sind, vergessen Sie nicht, auf die Schaltfläche Veröffentlichen zu klicken, um Ihre Änderungen zu speichern.
Wenn Sie nun die erweiterten Funktionen des Plugins verwendet haben, um Schriftarten für verschiedene Bereiche Ihrer Website zuzuweisen, werden diese automatisch funktionieren.
Wenn Sie sich hingegen dafür entschieden haben, nur Schriftarten zu laden, dann müssen Sie dafür eigene CSS-Regeln hinzufügen. So würden Sie zum Beispiel eine Schriftart für das Absatzelement auf Ihrer gesamten Website laden.
p {
font-family: 'Open Sans', sans-serif;
}
Methode 2. Hinzufügen von Google Web Fonts zur Kopfzeile Ihres Themes
Diese Methode ist der einfachste Weg, um Google Fonts direkt zu Ihrem WordPress-Theme hinzuzufügen.
Bearbeiten Sie einfach die Datei header.php für Ihr WordPress-Theme oder Child-Theme. Kopieren Sie danach den Link-Code und fügen Sie ihn vor dem Link-Code Ihres WordPress-Theme-Stylesheets ein.
So würde es aussehen:
<link rel="preconnect" href="https://fonts.googleapis.com">
<link rel="preconnect" href="https://fonts.gstatic.com" crossorigin>
<link href="https://fonts.googleapis.com/css2?family=Open+Sans:wght@400;800&display=swap" rel="stylesheet">
<link rel="stylesheet" type="text/css" href="YOUR THEME STYLESHEET" media="screen">
Grundsätzlich besteht das Ziel darin, die Anforderung der Schriftart so früh wie möglich zu stellen. Dies ermöglicht es dem Browser des Benutzers, die Schriftarten herunterzuladen, bevor die Seite gerendert wird.
Danach können Sie die Schriftart in der CSS-Datei Ihres Themas verwenden:
h1 {
    font-family: 'Open Sans',  sans- serif;
}
Methode 3. Google Fonts im Stylesheet des Themes hinzufügen
Bei dieser Methode importieren wir das CSS der Schriftart in die Haupt-CSS-Datei unseres WordPress-Themes.
Bearbeiten Sie einfach die Datei style.css im Stammordner Ihres WordPress-Themes und fügen Sie den Code aus der Registerkarte „@import“ an den Anfang der CSS-Datei.
@import url('https://fonts.googleapis.com/css2?family=Open+Sans:wght@400;800&display=swap');
So sah es in der style.css-Datei unserer Demo-Website aus.

Wichtig: Stellen Sie sicher, dass Sie die @import-Zeile am Anfang Ihrer CSS-Datei hinzufügen.
Methode 4. Google-Schriftarten in WordPress richtig einreihen
Bei den ersten beiden Methoden, die wir bereits erwähnt haben, müssen Sie die Schriftarten direkt hinzufügen, indem Sie Ihre WordPress-Theme-Dateien bearbeiten.
Dies funktioniert gut, wenn Sie ein Child-Theme verwenden, um alle Ihre Änderungen vorzunehmen.
Wenn Sie hingegen diese Änderungen am Hauptthema vornehmen, gehen sie bei der nächsten Aktualisierung des Themas verloren.
Eine einfachere Lösung besteht darin, programmatisch einen Code hinzuzufügen, der automatisch Google-Schriftarten für Ihr WordPress-Theme lädt, um diese zu verwenden.
Dazu müssen Sie einen benutzerdefinierten Codeschnipsel zu einem Site-spezifischen Plugin hinzufügen oder ein Plugin für benutzerdefinierten Code verwenden. Weitere Informationen finden Sie in unserem Tutorial über das Hinzufügen von benutzerdefiniertem Code in WordPress.
Fügen Sie einfach das folgende Code-Snippet in Ihre WordPress-Website ein.
function wpb_add_google_fonts() {

wp_enqueue_style( 'wpb-google-fonts', 'https://fonts.googleapis.com/css?family=Open+Sans:300italic,400italic,700italic,400,700,300', false );
}

add_action( 'wp_enqueue_scripts', 'wpb_add_google_fonts' );
Hinweis: Vergessen Sie nicht, die URL durch die URL der Google-Schriftarten zu ersetzen, die Sie hinzufügen möchten.
Das war’s. WordPress verwendet nun die Link-Methode, um die von Ihnen hinzugefügten Google Fonts automatisch abzurufen.
Sie können dies bestätigen, indem Sie den Quellcode Ihrer Website einsehen. Dort sehen Sie, dass Ihr Google-Schriftarten-Stylesheet in der Fußzeile Ihrer Website hinzugefügt wurde.

Bonus-Abschnitt: Wie Web Fonts die Geschwindigkeit von WordPress beeinflussen
Google-Schriften werden extrem schnell geladen, da sie über das riesige CDN-Netzwerk von Google mit Serverstandorten rund um den Globus bereitgestellt werden.
Da diese Schriftarten von Millionen von Websites verwendet werden, ist die Wahrscheinlichkeit groß, dass die Nutzer sie bereits im Cache ihres Browsers gespeichert haben.
Dadurch wird ihre Auswirkung auf die Geschwindigkeit Ihrer Website verringert. Sie können diese Auswirkungen weiter verringern, indem Sie nur eine oder zwei Webschriften in Ihrem Design verwenden.
Weitere Tipps finden Sie in unserem vollständigen Leitfaden zu Leistung und Geschwindigkeit von WordPress für Anfänger.
Wir hoffen, dass diese Anleitung Ihnen geholfen hat zu lernen, wie Sie Google Web Fonts ganz einfach zu Ihrem WordPress-Theme hinzufügen können. Vielleicht interessieren Sie sich auch für unsere Anleitung zur Erstellung eines benutzerdefinierten WordPress-Themes von Grund auf ohne Programmierung und unsere Liste der besten kostenlosen Website-Hosting-Dienste.
Wenn Ihnen dieser Artikel gefallen hat, dann abonnieren Sie bitte unseren YouTube-Kanal für WordPress-Videotutorials. Sie können uns auch auf Twitter und Facebook finden.


Syed Balkhi says
Hey WPBeginner readers,
Did you know you can win exciting prizes by commenting on WPBeginner?
Every month, our top blog commenters will win HUGE rewards, including premium WordPress plugin licenses and cash prizes.
You can get more details about the contest from here.
Start sharing your thoughts below to stand a chance to win!
Armando says
I noticed that this video/instructions are dated 2015 and the screenshots, etc. are different. When I tried to embed the Google Fonts code in my header.php file as shown, it threw an error. So I’m thinking maybe this tutorial needs to be updated? Not sure, but… Thanks.
WPBeginner Support says
Thank you for your feedback, we’ll be sure to take a look into updating this article when able.
Admin
Wout says
Thanks for the article! Please replace http: in fonts.googleapis.com/css… with https: in the function to enqueue Google Fonts to enable an encrypted link to googleapis.com…
WPBeginner Support says
Thanks for pointing this out, we will be sure to update the links as soon as we are able
Admin
Sofia says
I’m pretty sure it’s 2017 why we even have to learn all this :“((
charles says
Is this still the right way to do it?
Renee says
I got the font to show up but can’t figure out how to get it bold.
Here’s an example of what i did in the css
font-family:“Open Sans“, sans-serif;
font-weight:bold;
in the link i added to my header.php i added this:
i tried subbing 700 for bold but no luck…
any ideas?
thanks in advance
Isaac Anderson says
Make sure you check your desired font-weights on Google fonts after selecting them in the „customize“ tab.
Louis says
Works perfect! Thx.
josh says
Huh? Wtf does any of this mean? How do I make it so that I can just add a google font in my post or page?
Shubham Kumar says
What do you think about importing Google web Fonts using JavaScript asynchronously as mentioned over here :
Thanks
Shubham
Jordan says
One quick question – I looked up the code reference for wp_enqueue_style(). Its first argument is a string that denotes the name of the stylesheet. In your example, you use ‚wpb-google-fonts‘ for the first argument. How can I tell what to put here for my site?
pete rome says
where do I paste stuff in the header exactly? always see that but people never explain exactly where it is.
Carla DeLauder says
What does ‚false‘ do in this function? Other enqueued functions don’t include it.
Thank you.
Kev says
that’s the argument for header or footer. Since best practice is to put [almost] all scripts in the header it defaults to ‚true‘ => footer, whereas ‚false‘ would mean the NOT in the footer, but in the header instead.
Unfortunately, font scripts stop everything else from loading, so putting them in the header sucks a litlte bit, which is why this article talks about making sure you’re only including the fonts you’ll actually use. On the flip side, putting them in the footer can cause default fonts like arial to load momentarily on your screen during painting until the webfont gets loaded. It’s a horrible caveat, but it is what it is.
A practice I’m working into my workflow is to conditionally load fonts based on their usage in the site. For example, maybe „bold“ is only used in h2’s and h3’s in blog post templates (single.php), then I’ll write a conditional enqueue for the bold script to only be enqueued when on single.php template.
Hope that helps.
Kev says
Also, to note.
By „bold“ above, I meant a specific bold version of a font family. <= just a head's up.
Kenneth John Odle says
As of WordPress 3.3, wp_print_styles is deprecated.
Bram says
Yeah, you should update this article.
WPBeginner Support says
Updated.
Admin
WPBeginner Support says
We have updated the article, it now shows how to add Google fonts using the proper
wp_enqueue_stylefunction and wp_enqueue_scripts action hook.Admin
isak says
How do you enque two font families via functions.php?
April says
I’m using the Punch Fonts plugin to add google fonts but I am not sure how to just get only heading 1 for the desired font. I don’t need this font for headings 2-6 so I only want to use the google font for heading one. How do I write that in the parameter?
Currently I’m using: Oleo+Script+Swash+Caps:400
Melissa says
Well, if anyone is stuck, there is also this plugin called Easy Google Fonts. Very helpful.
Melissa says
Hello,
I have tried all three methods but neither of them took effect completely. It seems that it only applies to certain elements and not to others that I specified with that font in the style sheet
When I use the Element Inspector for the element where my Google Font is not applied, this is what I see:
#site-title {
font-family: \’Questrial\‘, Helvetica, Arial, sans-serif;
What do these mean \\ around my font? I mean, it looks like it is indicating an error but I can’t figure out what I am doing wrong? What could it be? Some code overriding mine, with higher priority? but where? how? Arghhhh it’s driving me nuts
Ali Sajjad says
Dear Editorial, i want to add all google web fonts in this site, and then want to use in my means,
but i dont want to use too many links in header file. any other way?
WPBeginner Support says
Only add the fonts that you want to use.
Admin
Anurag says
So, I have got a blog ( http://www.goingtechy.com/ ). The problem I am having is that I want to optimize css delivery of the Google font that my site uses already. So, the site already have Google fonts. How can I optimize it?
Samantha says
Thank you so much for this post! For someone who has no formal html/css training, I was impressed with the simplicity of this post.
Tanisha says
So easy and go it to work perfectly. Thanks for this.
Greg says
Hi there,
Using Genesis and the Parallax Pro theme…
But a newb to things like php etc
I added this code to the fuctions.php file as you insctructed:
add_action( ‚genesis_meta‘, ‚wpb_add_google_fonts‘, 5);
function wpb_add_google_fonts() {
echo “;
}
The headers that use the font above remain unchanged.
Questions:
1. Am I right in assuming that the code above is the only thing that I add?
2. Where exactly should the code be added – at the beginning or end of fuctions.php?
2. Is there anything missing from the code?
3. Should I be adding something to the style.css file?
Appreciate your help
Regards
Greg
WPBeginner Support says
Greg, seems alright to us. We think WordPress probably omitted the part from your code where you echoed font link. Yes you will need to use CSS to set style rules for selectors where you want to use your Google font.
Admin
Tony Porto says
None of the above is good enough, we all know „wp_enqueue_style( ‚google-font‘)“ is the „technically correct way to call a script, but in this case your <header will end up like this;
FONT 1:
FONT 2:
FONT 3:
FONT 4:
No Good, it needs to be like this:
Akmal says
Where should i paste the above code? I could not find the last line of code anywhere in my header.php file? Can you please tell me step-wise?
Thanks.
WPBeginner Support says
In your header.php file you will find
</head>you can paste this code any where before this tag.Admin
Sarah says
Tried re-typing the following, and still nothing is changing;
/* Import Fonts
———————————————————— */
add_action( ‘genesis_meta’, ‘wpb_add_google_fonts’, 5);
function wpb_add_google_fonts () {
echo ‘’;
}
/* Defaults
It worked the first time. I’m so confused!
Thanks for your help.
Sarah says
Hi,
I was so proud of myself for copying the code and changing the font which, I found too large for my site. When I tried to change it to something else, I must have mixed something up, and only one font style continues to show, even when I play about with the codes. Feeling like a dunce now – I don’t talk tech. Can anyone help me? I’ve done it with and without the numbers in case they’re not actually part of it. Thanks. This is the latest that I entered…..
/* Import Fonts
———————————————————— */
1 add_action( ‚genesis_meta‘, ‚wpb_add_google_fonts‘, 5);
2
3 function wpb_add_google_fonts() {
4 echo “;
5 }
/* Defaults
———————————————————— */
WPBeginner Support says
we hope you did not enter the numbers with the code Or did you?
Admin
Sarah says
No numbers, but I am missing something this time around. This is exactly what I have in my table;
add_action( ‚genesis_meta‘, ‚wpb_add_google_fonts‘, 5);
function wpb_add_google_fonts() {
echo “;
}
Sarah says
It seems the code worked…..on one computer. It hasn’t taken on two others that I use.
Can you please suggest why that might be the case?
Thanks so much
Karissa Skirmont says
How can you use multiple Google Fonts in the functions.php ?
I had this:
//* Enqueue Google fonts
add_action( 'wp_enqueue_scripts', 'executive_google_fonts' );
function executive_google_fonts() {
	wp_enqueue_style( 'google-font', '//fonts.googleapis.com/css?family=Open+Sans:400italic,700italic,400,700', array(), CHILD_THEME_VERSION );
	wp_enqueue_style( 'google-font', '//fonts.googleapis.com/css?family=Dancing+Script:400italic,700italic,400,700', array(), CHILD_THEME_VERSION );
}
But the Dancing Script wasn’t showing up font on my second computer or iPhone or tablet.
I removed the Open Sans and it started working.
WPBeginner Support says
@Karissa, the first argument in wp_enqueue_style function is the handle for the style script you are loading. Try this code instead:
//* Enqueue Google fonts add_action( 'wp_enqueue_scripts', 'executive_google_fonts' ); function executive_google_fonts() { wp_enqueue_style( 'google-font', '//fonts.googleapis.com/css?family=Open+Sans:400italic,700italic,400,700', array(), 20131111 ); wp_enqueue_style( 'google-font-2', '//fonts.googleapis.com/css?family=Dancing+Script:400italic,700italic,400,700', array(), 20131111 ); }1-click Use in WordPress
Admin
Karissa Skirmont says
Nevermind, I figured out that I needed to use a link like this:
‚//fonts.googleapis.com/css?family=Euphoria+Script|Rouge+Script|Montez|Federo|Great+Vibes|Clicker+Script|Dancing+Script:400,700|Satisfy|Ruthie|Rochester|Open+Sans|Open+Sans+Condensed:300‘
Karissa Skirmont says
Ahh I see, I replied above before refreshing the page and seeing your reply.
By using the link Google gives when you have multiple fonts selected, it produces it like that and you can more easily try out different fonts live on site.
Chaitanya says
Thank you so much!! Whenever I need any WordPress help, I come directly to wpbeginner as I know I would find a best solution here. You guys don’t know how much you have helped beginners like me, Appreciate you support
Long Live WPBeginner…
Cheers,
Chaitanya
Jenny says
Meh, I like using the import. Less work for me ‚cause I’m lazy~
pete rome says
yeah way too much work on each method here and there shouldn’t be a need to add anything to the style sheet find a plugin
Jimmy Reynolds says
A you mean the nerd way
mzilverberg says
Something I missed here were the conditional comments to make Google’s webfonts work in IE8 and below if you request more than one font weight. For example:
<link href=”http://fonts.googleapis.com/css?family=Cabin:400,700″ rel=”stylesheet” type=”text/css” />That’s why I created a function for loading fonts: https://github.com/mzilverberg/LoadGoogleWebfonts
My script also places the appropriate fallback urls within a conditional comment.
With a few lines of code you could also make this work in functions.php in your WordPress theme.
Greg says
What about adding Google Fonts to the admin side?
Editorial Staff says
Why would you want to add Google Fonts to the admin side?
Admin
Bruce Smith says
To maintain WYSIWYG in the admin content editor. So that I see the same font face in the admin editor as on my web site.
Dan Merhar says
I was actually wondering how to do the same thing (and this is the first result that popped up on Google).
I know plug-ins exist to add Google Webfonts functionality to the WYSIWYG editor, but they bog it down like crazy. I’m going to look into it further and see if there’s an easy way to add a font or two.
Marleen says
Thanx a lot for sharing, I’m really happy with this. I’m a Genesis user and started using @import because it’s alraedy being done in the stylesheet. Feel much better about this solution.
Happy 2013!
jeff says
In your code do I replace „YOUR THEME STYLESHEET“ with something??
mine is STYLE.CSS, or does it need to be a URL ??
thanks,
Jeff
Editorial Staff says
Yes, you need to insert your theme’s style.css path there.
Admin
Charles says
This is what I use…..
Add this to your theme’s functions.php file:
/*----------------------------------*/
/* Load CSS Files
/*----------------------------------*/
	if(!function_exists('load_theme_styles'))
	{
		function load_theme_styles()
		{
			if (!is_admin()) {

				$cssURL = get_template_directory_uri().'/css/';
				$fontURL = 'http://fonts.googleapis.com/css?family=Lora|Oswald';

				// Registering New Styles
				wp_register_style('googleFont', $fontURL);
				wp_register_style('style', $cssURL.'/style.css', 'googleFont', '1.0', 'screen');
				wp_register_style('print', $cssURL.'/print.css', 'googleFont', '1.0', 'print');

				// Enqueing Styles
				wp_enqueue_style('googleFont');
				wp_enqueue_style('style');
				wp_enqueue_style('print');

			}
		}
	}
	add_action('wp_enqueue_style', 'load_theme_styles');
What do you think about this?
Chris Reynolds says
This is the CORRECT way to add Google fonts. Always use wp_register_style/wp_enqueue_style
David says
Better still add a conditional comment to serve the fonts separately for IE 7 and 8:
From here:
http://www.smashingmagazine.com/2012/07/11/avoiding-faux-weights-styles-google-web-fonts/
Bryan Nickson says
Nice tuts. I had wanted something like this..Kudos!!
Peter says
What about the JS option, is that a faster option Or the one is the better?. Thanks
Editorial Staff says
The method in this one is by far the most recommended one.
Admin
QLStudio says
In your answer you don’t enqueue the css – is that really the best way to add it?
Chris says
Great article! I think it would be pretty cool if wordpress, by default, had Google Fonts included into it, but this seems easy enough. Thanks for explaining!
Editorial Staff says
Google Fonts are great, but not everyone uses it (considering the amount of folks who use WordPress). WordPress has a 95% rule. If the feature would not satisfy 95% of the audience, then it is usually falls in the plugins category. However, sometimes exceptions are made. We can assure you that the Core WP team, will not make this into an exception though
Admin
Aaron Crow says
You rock man! Just what I was looking for! Thanks for putting up this post… I searched forever trying to find something about adding this to my theme. Glad I stumbled across your page.
Anderson Curry says
Great post and even if their is a plug-in to do this, it’s always better to learn the non – plugin way also.
Brad says
So obviously you dont accept using the several Google font plugins. I am going to have to revisit my css files in that case.
sadhu says
i dont understand the second part which is adding font to the genesis add action thing.. is that another method to add in google web font?
and i know we dont have to incld all styles of the font, but the recommended method, which is http://fonts.googleapis.com/css?family=Lora|Oswald
just for instance, what if i only want bold style for lora and light style for oswald, then how to combine the font styles?
thanks
Editorial Staff says
The second part is for Genesis Users ONLY. If you are not using the Genesis Theme Framework, then you don’t need that part. To combine styles like you want, here is how you do it:
http://fonts.googleapis.com/css?family=Oswald:300|Lora:700
Admin
Anton says
What should I do if I want to use @font-face in Genesis Framework like you showed here with the Google Webfonts, are there any solution for that.
I’ve been searching all day since my fonts loads incredibly slow!
Cheers
Gautam Doddamani says
great tutorial…i actually use the wp google fonts plugin…would you recommend that plugin or doing the manual way as described above..which is efficient performance wise?
Editorial Staff says
Haven’t tried that plugin. But we almost try to avoid plugins of that sort because it can be done easier with theme files.
Admin
Gautam Doddamani says
sweet…thanks will edit my theme instead of using a plugin
Pippin says
Avoiding the google fonts plugin because it is a plugin is not a good reason at all. Using the plugin actually provides you with much more flexibility than including it in your theme, especially if you ever choose to change themes.
Editorial Staff says
As far as I’m concerned, fonts in most cases are considered stylistic elements thus theme based, and they usually change when you switch to a different theme.
Siddanth Adiga says
Superb post I was looking for this only i was trying my hands with css and fontface .I ll try this one too thanks
Konstantin Kovshenin says
The „Right“ way would be to use the wp_enqueue_style function Here’s some more thoughts: http://kovshenin.com/2012/on-wordpress-theme-frameworks/
Editorial Staff says
Konstantin, I totally agree with you. wp_enqueue_style function should always be used. That is what I tried doing first as suggested by Nathan Rice, in StudioPress’s article about Google Fonts. Except Google clearly states, that the font styles should be loaded before anything else. Using wp_enqueue_style and then printing them using wp_print_styles, this was printing the item after the main stylesheet was already loaded. That was the reason why I had to hook into genesis_meta() hook. Anyways, totally agree with your thoughts on your article.
Admin
Japh says
I’m a little late to this, but I wanted to mention that you could still use
wp_enqueue_style, just set the priority higher so that they are loaded firstBob R says
Great tutorial. One observation though: first image in the article was meant to show the @import tab, wasn’t it?
Editorial Staff says
No it wasn’t suppose to show that.
Admin