


Selling tickets through a marketplace means paying a service fee on every ticket and sending your buyers away from your website to complete their purchase.
You can sell tickets from your own WordPress site instead. With the free WordPress plugin, you can handle the ticket page, the payment, and the attendee list. That means you can keep more of every ticket sale instead of losing money to marketplace fees.
In this article, we’ll show you how to sell event tickets on WordPress, and what each free option costs you per order so you can pick the right one for your events.

Which Method Should You Use?
All the options below let you sell tickets without buying a plugin up front.
The right choice depends on what you need: a full event calendar, a simple way to host a single event, or a solution that works with the calendar plugin you already use.
| Pick | Best For | Pricing |
|---|---|---|
| Sugar Calendar Lite | Events on a calendar, with paid or free tickets | Free, with a 3% fee per order. The fee stops on Plus at $99.50 per year |
| WPForms Lite | A one-off event with a ticket or registration form, and no calendar | Free, with a 3% fee per order. The fee stops on Pro at $199.50 per year |
| Event Tickets | Sites that already run The Events Calendar | Free, with a 2% fee on ticket sales. Bundles start at $259 per year |
Every free plugin in our table charges a per-order fee. This is the plugin developer’s own cut, and it gets added on top of your standard Stripe processing fee. Upgrading to the plan named in the table removes that extra cut, bringing your costs back to standard processor rates.
Third-party marketplaces work differently. For example, Eventbrite charges a 3.7% + $1.79 service fee per ticket plus 2.9% for payment processing. Your attendees also complete their checkout on Eventbrite’s platform rather than your site.
With those options in mind, let’s take a closer look at each method. You can use the links below to jump ahead:
Method 1: Sell Event Tickets With an Event Calendar Plugin
If you host multiple events, then Sugar Calendar is the option we’d recommend starting with. It displays your schedule on an interactive calendar and lets you sell tickets directly from your WordPress site without needing additional plugins.
The free version has everything you need, though it adds a 3% service fee on top of Stripe’s processing rates. We’ll cover how to remove that charge at the end of this section.
Before accepting payments, make sure your site is secured with SSL. If your site doesn’t have an SSL certificate installed, live payments will fail.
Step 1: Install Sugar Calendar Lite
First, you’ll need to install and activate the free Sugar Calendar Lite plugin. If you need step-by-step instructions, see our guide on how to install a WordPress plugin.
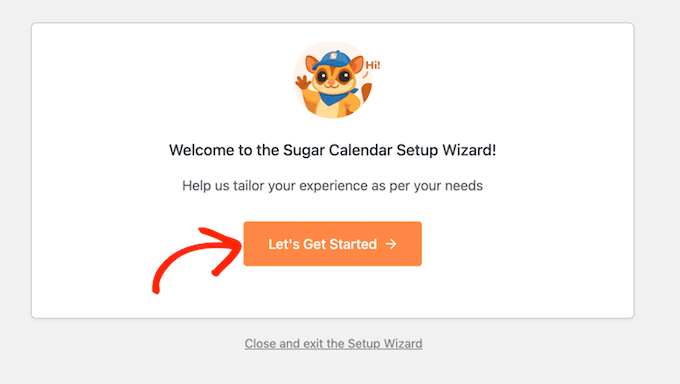
Upon activation, Sugar Calendar opens a setup wizard that asks you a few questions. You can skip it, since every setting it covers can also be configured later if needed in your WordPress dashboard.
Step 2: Connect Your Stripe Account
Next, go to Events » Settings in your WordPress dashboard and click the Payments tab.
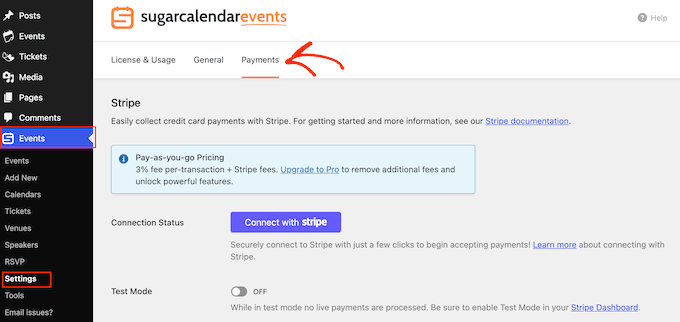
Here, click ‘Connect with Stripe’.
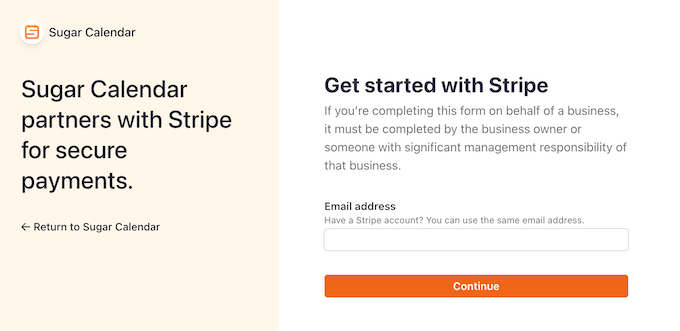
This opens the Stripe Connect authentication process, which links your site directly to your Stripe account so ticket sales go straight into your bank account rather than through a third-party.
Step 3: Create Your Event and Turn On Tickets
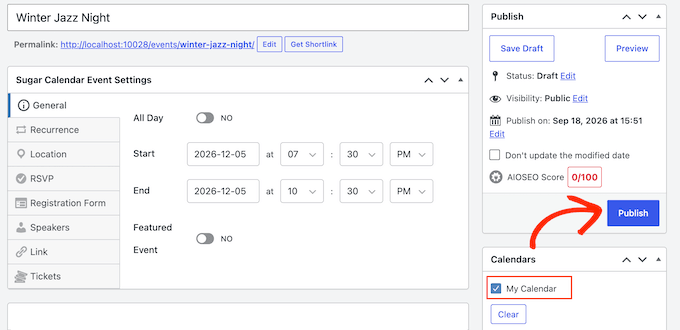
Next, go to Events » Add New to create your event. Enter an event title at the top, then set your start date, end date, and times in the fields below.
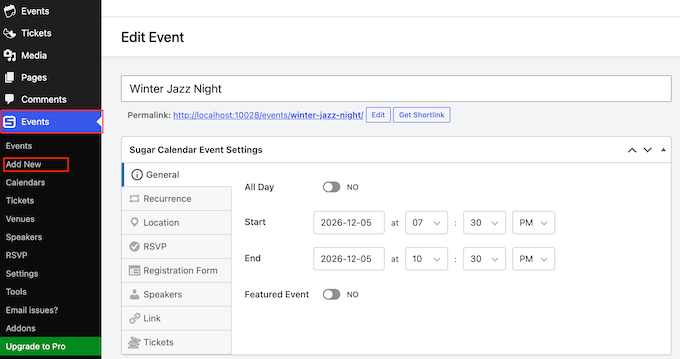
Switch to the Tickets tab on the left side of the Sugar Calendar panel and turn on the Tickets toggle. This displays fields for Price and Limit Capacity.
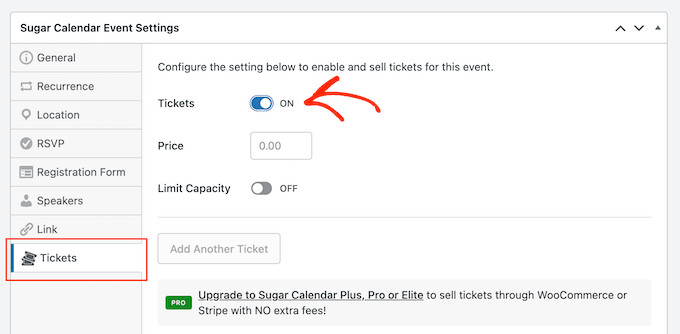
For free events, set the price to $0. Sugar Calendar will still collect attendee names and emails at checkout to generate unique tickets and build your guest list.
After entering all this information, click ‘Publish.’ Sugar Calendar adds the event to its default calendar, named ‘My Calendar,’ which is all a single event needs. If you want to sort different types of events into separate color-coded calendars, you can go to Events » Calendars and click ‘Add Calendar.’
To build a complete schedule, repeat these steps for each event. For a complete look at the various layout and styling choices, see our guide on how to create a simple event calendar with Sugar Calendar.
If you host scheduled classes or weekly meetups, you will need the paid version of Sugar Calendar to manage these recurring events. To set those up, see our guide on creating recurring events in WordPress.
Step 4: Put the Calendar on a Page
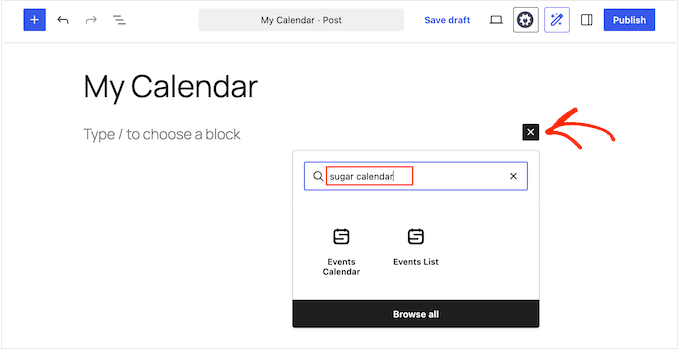
With your event published, open the page or post where you want to show the calendar and click the + icon to add a new block.
Type ‘Sugar Calendar’ in the search box and then select Events Calendar when it appears.
In the block settings sidebar on the right, use the Calendars dropdown menu to select which calendars you want this block to display.
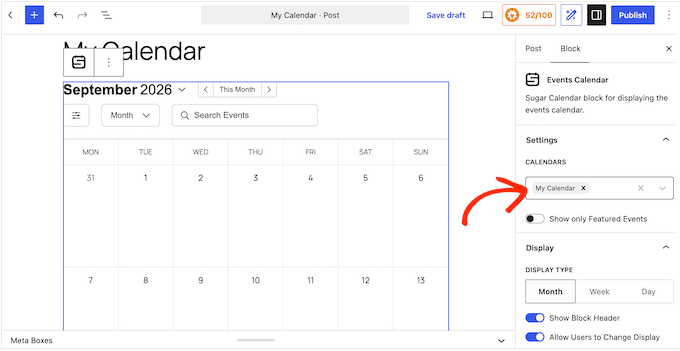
Once you are happy with the layout, click Publish or Update to make your calendar live.
To test your setup, visit the published calendar page on your live site and click your new event listing. This takes you to the individual event page, where visitors see the ticket price and a Buy Tickets button.
Step 5: Find Your Attendees and Export the List
Every sale shows up under Events » Tickets in your dashboard.
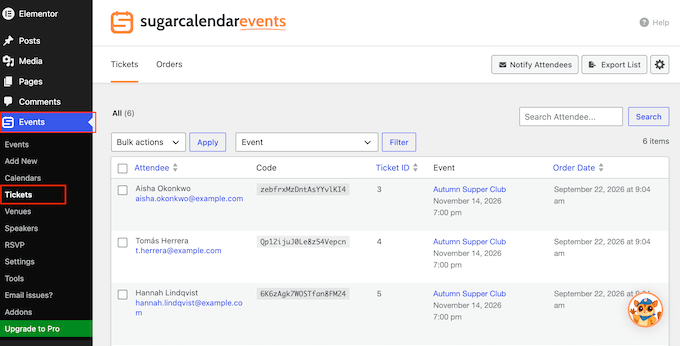
The ‘Tickets’ tab lists each attendee with their email address underneath their name, followed by the ticket code, the event, and the order date.
To generate a door list or email export, go to Events » Tools and select the Export tab.
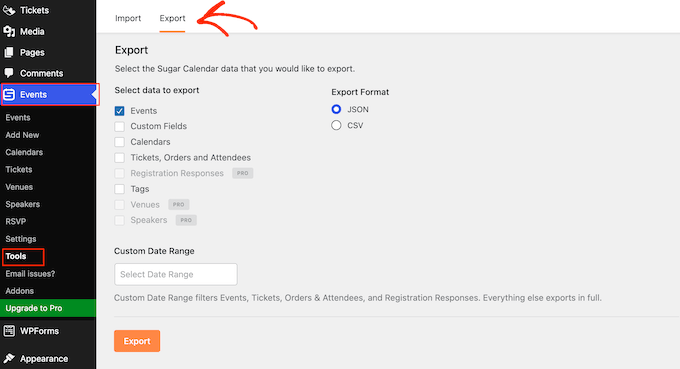
Select the data types and date range you want to include, choose either CSV or JSON format, and click Export.
If you need early bird pricing, VIP tier options, full WooCommerce checkout integration, or zero per-order platform fees, you can upgrade to the Event Ticketing add-on (included in the Sugar Calendar Plus plan starting at $99.50 per year).
Already Using The Events Calendar?
If you already use The Events Calendar, you do not need to install a new calendar plugin to sell tickets. You can simply add its free companion plugin, Event Tickets, to enable sales directly on your existing event pages.
Its built-in checkout, Tickets Commerce, takes payments through Stripe, PayPal, or Square. Event Tickets applies its 2% fee to Stripe and Square orders on top of what the processor charges, and an Event Tickets Plus subscription removes it.
The problem is that upgrading gets expensive quickly, with paid plans starting at $259 per year. WooCommerce checkout, QR code check-in, and custom attendee registration fields all need the Pro plan ($399 per year).
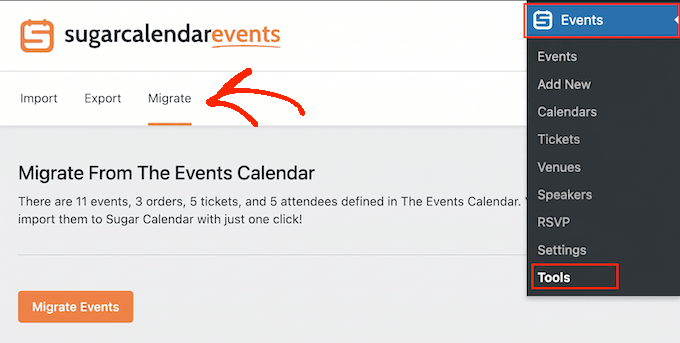
If you prefer to use Method 1 instead, migrating from The Events Calendar to Sugar Calendar is straightforward. Sugar Calendar includes a built-in migration tool that imports your existing events in just a few clicks.
Method 2: Sell Event Tickets With a Form Plugin
If you are only hosting a single event, a full calendar setup adds unnecessary complexity. A streamlined payment form is much faster to build, and WPForms lets you collect attendee details and ticket payments simultaneously.
WPForms Lite works with Stripe right out of the box, so you don’t need a paid plan to start accepting payments.
The downside is that WPForms adds a 3% transaction fee on top of your payment processor’s standard rates. If you want to remove that 3% fee, you’ll need to upgrade to WPForms Pro ($199.50 per year) or higher.
Step 1: Install WPForms Lite and Connect Stripe
First, you’ll need to install and activate the free WPForms Lite plugin.
Then, go to WPForms » Settings in your WordPress dashboard and select the Payments tab.
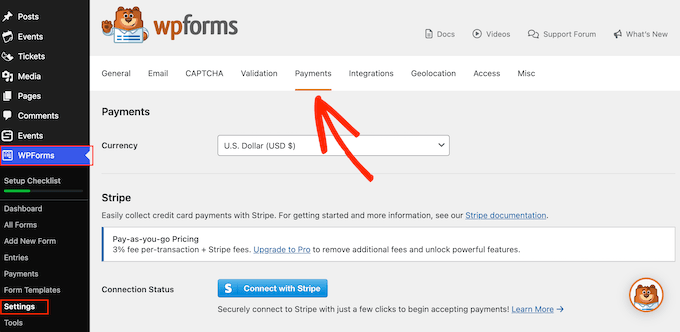
Click ‘Connect with Stripe’ to start the Stripe Connect setup and link your Stripe account directly to your site.
Step 2: Build the Ticket Form
Next, go to WPForms » Add New to build your registration form. Start by entering a clear, descriptive title for your form.
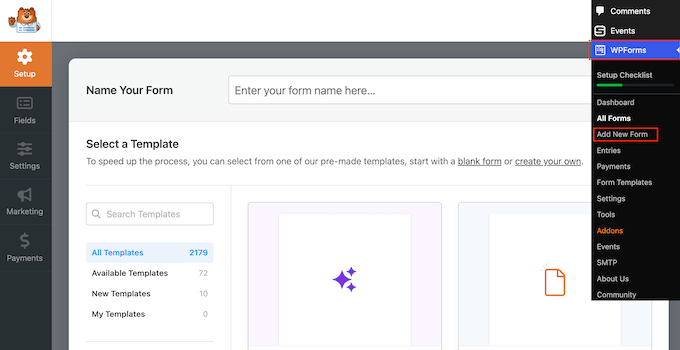
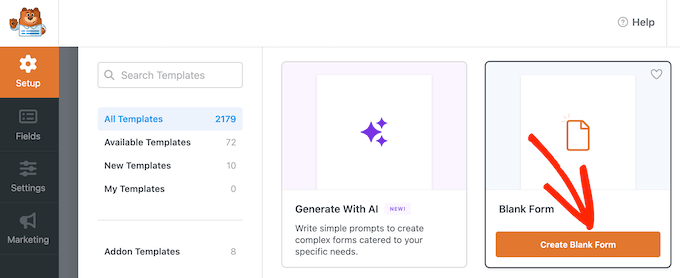
Since the event templates require a paid upgrade, we’ll start from scratch using the free fields.
Hover over Blank Form and click Create Blank Form when it appears.
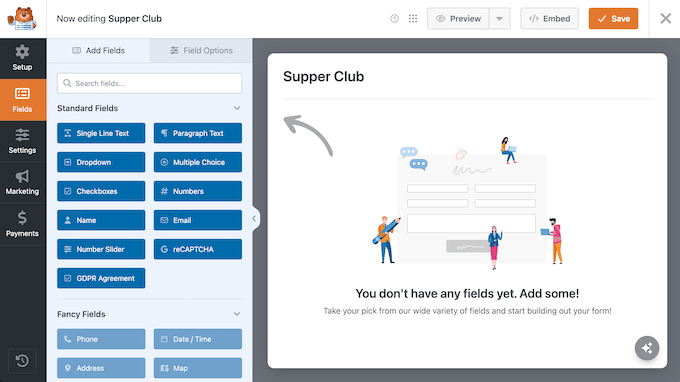
This opens the WPForms editor.
The right side of the screen shows your live form preview, while the left sidebar lists available form fields.
Drag and drop the following fields onto your form preview in order:
- Name: Captures the ticket holder’s full name.
- Email: Sends order confirmations and gives Stripe the customer email it requires.
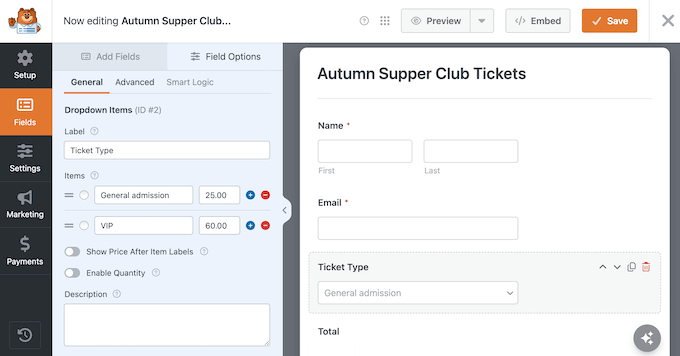
- Dropdown Items: Lists your available ticket tiers and prices.
- Total: Displays the calculated order total before attendees enter their payment details.
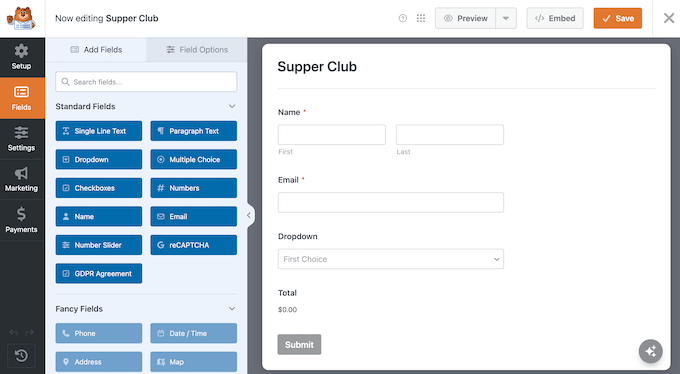
Next, click the Dropdown Items field in your live preview to edit its properties in the left sidebar. Customize the choice options to match your event tiers, such as General Admission or VIP.
Then, assign unique pricing to each of these ticket tiers.
Step 3: Switch the Payments On
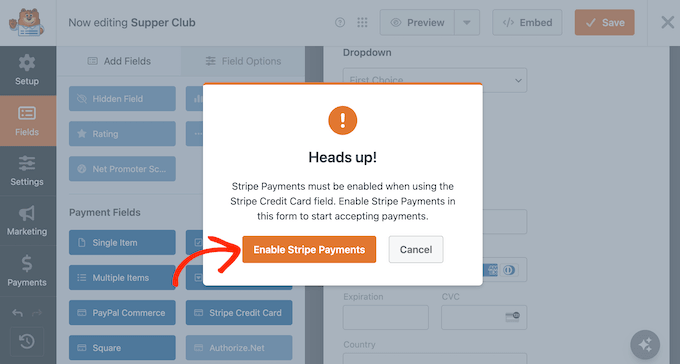
With that done, find the Stripe Credit Card field in the left sidebar and drag it onto your live form preview.
If a setup prompt appears, click Enable Stripe Payments to go directly to Payments » Stripe.
On this screen, toggle the ‘Enable one-time payments’ switch to the active position.
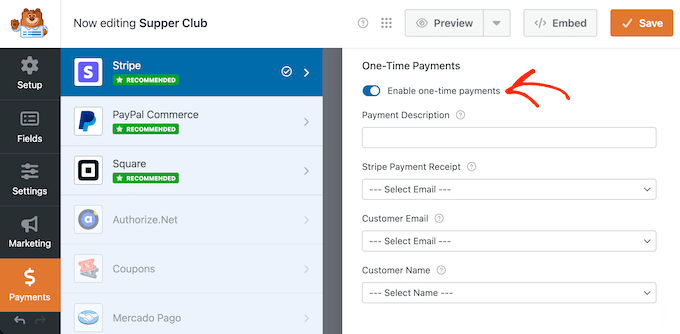
You can then use the Customer Email dropdown menu to select your form’s Email field, and use the Customer Name dropdown to select your Name field.
Finally, you must enable AJAX form submissions for credit card processing to work correctly. To do this, go to Settings » General and click to expand the Advanced section.
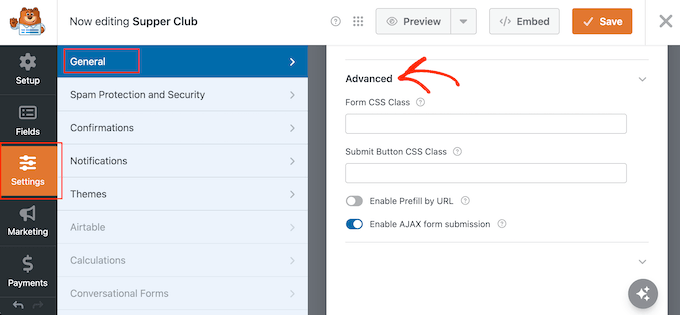
Then, check the box for ‘Enable AJAX form submission.’ With that done, click Save at the top of the builder to save your settings.
Step 4: Embed the Form and Test the Form
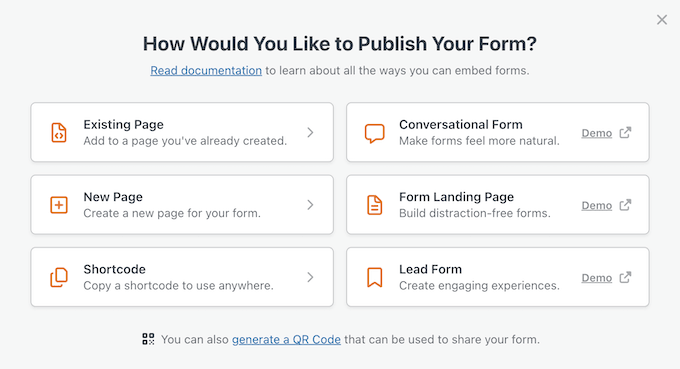
To place the form on your site, click the Embed button at the top of the form builder.
Then, either choose an existing page or create a new one, and WPForms will automatically insert the form block onto that page.
After publishing the page, visit it on your live site to see the finished ticket form. Selecting a ticket tier updates the calculated total, and the card entry fields should appear directly underneath.
If you see error messages in place of the credit card fields, here is what they mean:
- Credit Card field is disabled, Stripe keys are missing: Your site isn’t fully connected to Stripe yet. Double-check your setup in Step 1.
- This page is insecure: Your page is missing an SSL certificate. Make sure your site URL starts with HTTPS before taking live payments. If you need help fixing this, see our guide on how to fix SSL errors in WordPress.
For instructions on configuring custom confirmation messages, automated emails, and overall page design, see our full guide on how to create an event registration page in WordPress.
We hope this article helped you learn how to sell event tickets using WordPress. You may also want to see our guides on how to show upcoming events in WordPress and how to run members only events in WordPress.
If you liked this article, then please subscribe to our YouTube Channel for WordPress video tutorials. You can also find us on Twitter and Facebook.




Have a question or suggestion? Please leave a comment to start the discussion.