Vous souhaitez installer et configurer W3 Total Cache sur votre site WordPress ?
W3 Total Cache est une extension de mise en cache WordPress populaire qui vous aide à améliorer la vitesse et les performances de votre site. Les plugins de mise en cache peuvent aider à retenir les utilisateurs/utilisatrices et à réduire les taux de rebond, ce qui peut aider le référencement et augmenter les conversions.
Dans ce guide pour débutants, nous allons vous afficher comment installer et configurer facilement W3 Total Cache sur votre site WordPress.
Note de l’éditeur : Nous n’utilisons plus W3 Total Cache sur notre site et sommes passés à WP Rocket qui est une extension de mise en cache premium. W3 Total Cache reste une excellente solution qui fonctionne bien.
Qu’est-ce que W3 Total Cache ?
W3 Total Cache est l’une des meilleures extensions de mise en cache WordPress qui vous permet d’améliorer facilement les performances et la vitesse de WordPress.
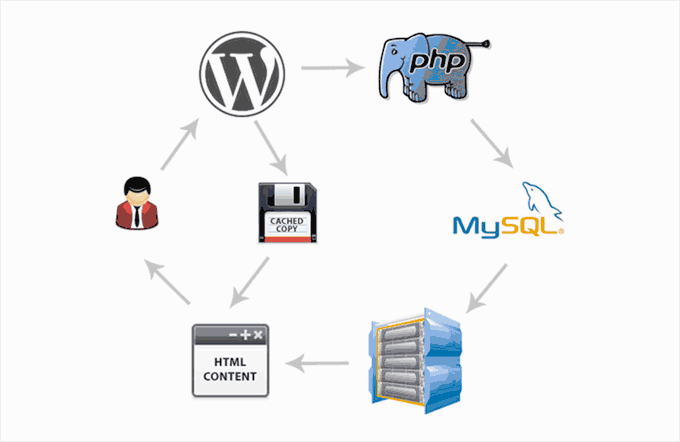
Par défaut, WordPress utilise PHP pour générer dynamiquement chaque page de votre site lorsqu’elle est demandée par un compte.
PHP est un langage de programmation côté serveur. Cela signifie que chaque demande des utilisateurs/utilisatrices augmente la charge de votre serveur. Cela affecte les performances de votre site, l’expérience de l’utilisateur et le référencement.
Les plugins de mise en cache WordPress vous aident à réduire ce problème en passant à PHP et en servant une copie en cache de votre page web.
Il vous permet également de connecter facilement votre site à un CDN (réseau de distribution de contenu) afin d’améliorer encore les performances de votre site.
Programme d’installation de W3 Total Cache dans WordPress
Avant d’installer le plugin W3 Total Cache dans WordPress, vous devez vous assurer que vous avez désactivé toute autre extension de mise en cache sur votre site. Cela vous aidera à enregistrer les ressources du serveur et à éviter tout conflit d’extension.
Ensuite, vous pouvez installer et activer l’extension W3 Total Cache. Pour plus de détails, consultez notre guide étape par étape sur l’installation d’une extension WordPress.
Une fois activé, W3 Total Cache ajoutera un nouvel élément de menu libellé Performance à votre colonne latérale d’administration WordPress. En cliquant dessus, vous lancerez l’assistant de configuration du plugin.
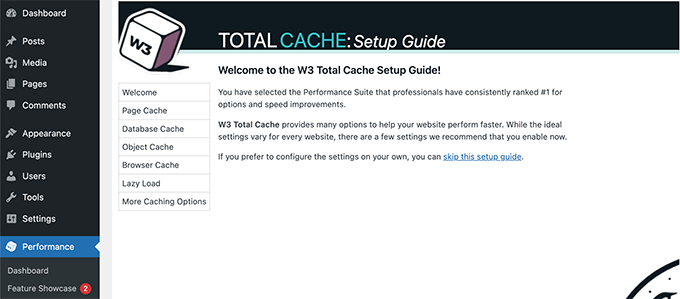
Il suffit de cliquer sur le bouton « Suivant » pour continuer.
Il vous sera d’abord demandé d’activer la mise en cache de la page. Cliquez sur le bouton Tester le cache de la page pour continuer.
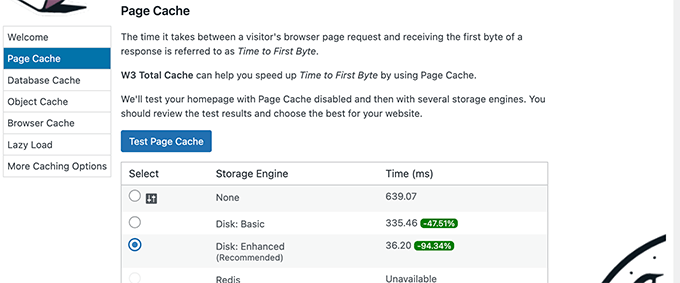
W3 Total Cache vous affichera différentes options de moteur de stockage. Vous devez choisir celui qui vous fait gagner le plus de temps. En général, il s’agit de l’option « Disk : Amélioré » pour la plupart des plateformes d’hébergement mutualisé.
Cliquez sur le bouton Suivant pour continuer.
Vous avez maintenant la faculté de tester la mise en cache de la base de données. Nous vous recommandons de choisir Aucun. Pour la plupart des sites de petite ou moyenne taille, votre serveur MySQL sera en mesure de récupérer les données plus rapidement que le cache de la base de données.
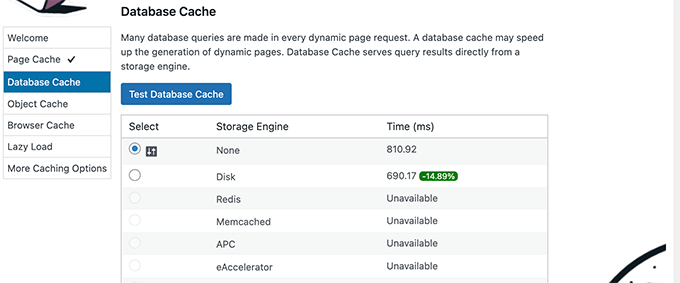
Cliquez sur le bouton Suivant pour passer à l’étape suivante.
Vous accéderez ainsi à la section Mise en cache d’objets. La mise en cache d’objets permet à W3 Total Cache de stocker les requêtes de base de données pour les pages dynamiques et de les réutiliser pour améliorer les performances.
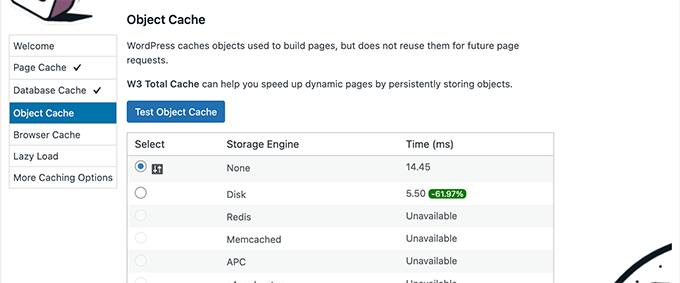
Si le résultat du test affiche une différence d’à peine quelques millisecondes, vous pouvez choisir Aucune.
Cliquez sur le bouton suivant pour continuer.
Ensuite, cliquez sur le bouton Tester le cache du navigateur, puis sélectionnez l’option « Activé » sous les résultats du test.
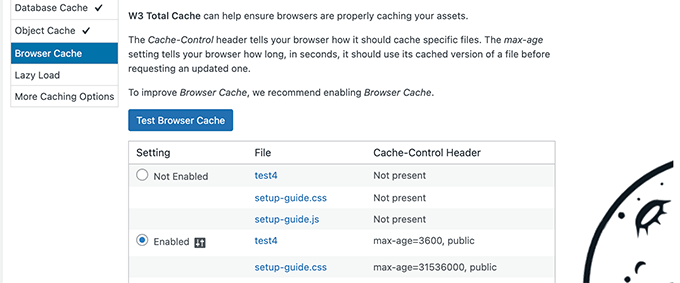
Cette option demande au navigateur de l’utilisateur de stocker une copie de la page web pour une durée limitée. Le chargement d’une page à partir de la mise en cache d’un navigateur est beaucoup plus rapide que le chargement à partir de la mise en cache de votre serveur web.
Cliquez sur le bouton suivant pour passer à l’étape suivante.
Dernier point, l’assistant de configuration vous demandera d’activer le chargement paresseux pour les images.
WordPress est désormais doté d’une fonction intégrée de chargement paresseux des images. Cependant, certains navigateurs plus anciens peuvent ne pas avoir de support pour cette fonctionnalité.
W3 Total Cache utilise JavaScript pour ajouter un chargement paresseux pour les images, ce qui peut être encore plus rapide et plus efficace.
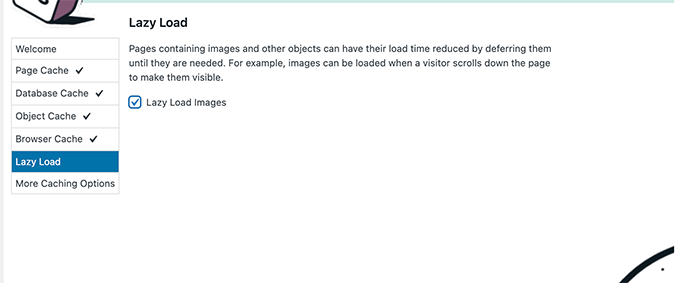
Ensuite, cliquez sur le bouton Suivant pour terminer l’assistant de configuration et voir le tableau de bord de W3 Total Cache.
Options de mise en cache avancées dans W3 Total Cache
Les réglages de base conviennent à la plupart des sites. Cependant, il existe de nombreuses options avancées que vous pouvez configurer pour améliorer encore les performances.
Passons en revue les plus importantes d’entre elles.
Minification de JavaScript et CSS dans W3 Total Cache
Le terme « minifier » est utilisé pour décrire une méthode qui permet de réduire la taille des fichiers de votre site. Pour ce faire, il retire les espaces blancs, les lignes et les caractères inutiles du code source.
Note: La réduction des fichiers JS et CSS peut potentiellement endommager votre site. Si vous l’activez et que votre site n’a pas l’air correct, désactivez simplement ces options.
W3 Total Cache vous permet de minifier facilement le code source JavaScript, CSS et HTML. Cependant, nous recommandons de minifier uniquement les fichiers JavaScript et CSS.
Il suffit de se rendre sur la page Performance » Minify et de défiler jusqu’à la section JS.
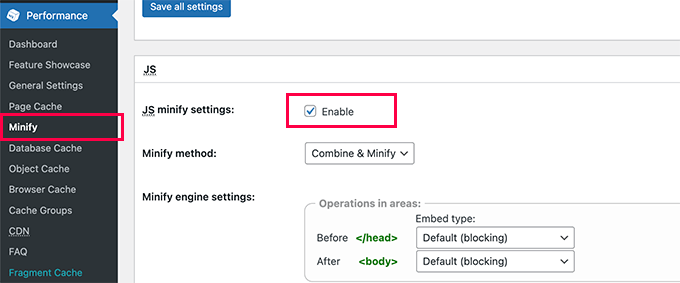
Cochez la case située à côté de « JS minify settings » pour l’activer.
Défilez maintenant jusqu’à la section CSS et activez les réglages de minification CSS de la même manière.
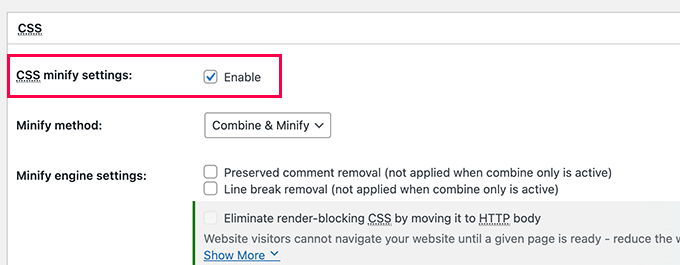
N’oubliez pas de cliquer sur le bouton Enregistrer tous les réglages pour stocker vos réglages.
Pour d’autres méthodes, consultez notre guide sur la façon de minifier les fichiers JavaScript et CSS dans WordPress.
Activer le support CDN dans W3 Total Cache
Les réseaux de distribution de contenu (CDN) vous aident à améliorer les performances de votre site en diffusant des fichiers statiques tels que des images, des feuilles de style CSS et du JavaScript à partir d’un réseau mondial de serveurs.
Cela permet de réduire la charge sur le serveur de votre hébergeur WordPress et d’améliorer la vitesse de chargement des pages.
W3 Total Cache est livré avec un support intégré pour diverses plateformes CDN.
Nous recommandons d’utiliser Bunny.net qui est la meilleure solution CDN sur le marché. C’est ce que nous utilisons pour notre site OptinMonster.
Tout d’abord, vous devez vous inscrire pour obtenir un compte Bunny.net. Après l’inscription, vous devez créer une Zone Pull pour votre site.
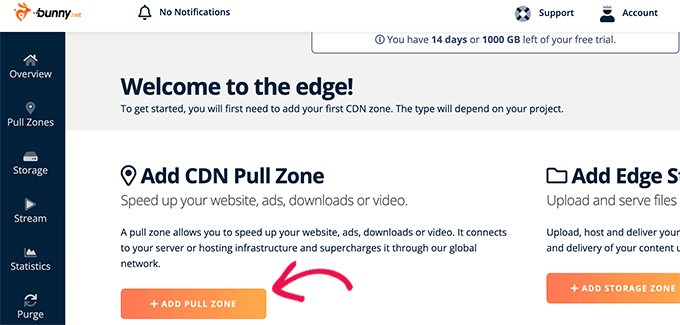
Une zone pull ajoute un nom d’hôte au CDN de Bunny.net. Ce nom d’hôte est ensuite utilisé pour servir les fichiers statiques de votre site.
Ajoutez un nom pour votre zone pull et indiquez ensuite le nom de domaine de votre site.
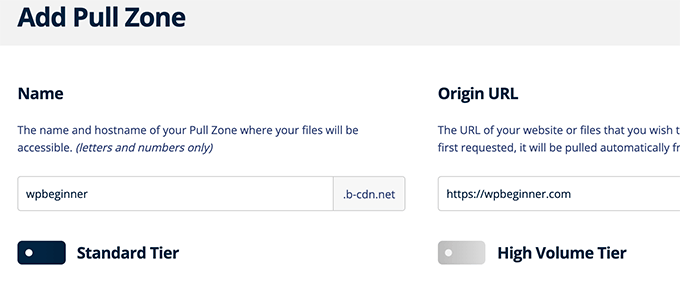
Après avoir ajouté la pullzone, vous devez vous rendre sur la page Performance » Réglages généraux.
Ensuite, défilez vers le bas jusqu’à la section CDN.
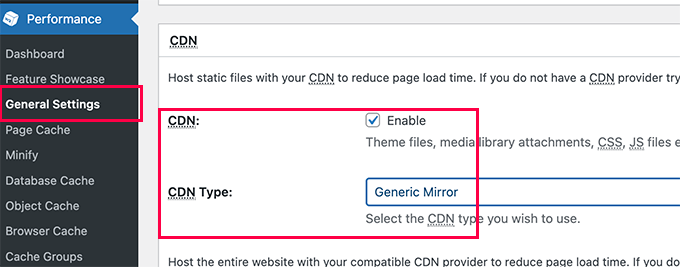
Cochez la case Activer en regard de l’option CDN et choisissez Miroir générique en regard de l’option Type de CDN.
N’oubliez pas de cliquer sur le bouton Enregistrer toutes les modifications pour stocker vos réglages.
Ensuite, vous devez visiter la page Performance » CDN et défiler jusqu’à la section Configuration : Objets.
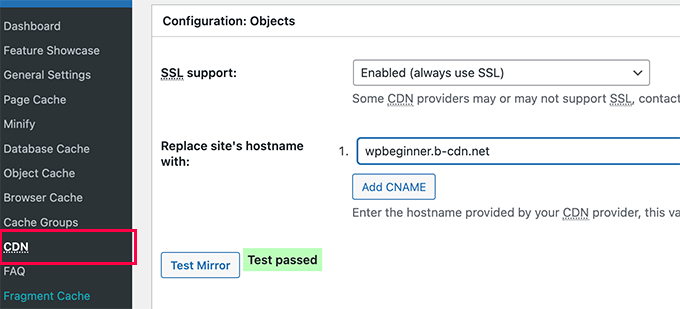
À partir de là, vous devez ajouter le nom d’hôte que vous avez créé plus tôt pour votre pullzone et cliquer sur le bouton tester le miroir.
W3 Total Cache vérifiera la disponibilité de votre nom d’hôte et affichera le message Test Passed en cas de réussite.
Vous pouvez maintenant cliquer sur le bouton Enregistrer toutes les modifications pour stocker vos réglages.
W3 Total Cache va maintenant commencer à servir vos ressources statiques à partir du serveur CDN.
W3 Total Cache fonctionne également très bien avec le CDN gratuit de Cloudflare. Version, vous pouvez également l’utiliser avec Sucuri qui est le meilleur service de pare-feu de site avec service CDN intégré.
Dépannage des problèmes liés à W3 Total Cache
Une fois que vous avez configuré W3 Total Cache correctement, il devrait fonctionner de manière transparente en arrière-plan pour améliorer la vitesse de WordPress et booster les performances.
Il peut arriver que vous ne voyiez pas immédiatement les modifications que vous avez apportées à votre site ou qu’une extension ne fonctionne pas correctement.
La raison la plus fréquente de ces problèmes est que vous voyez probablement une ancienne version en cache de votre site.
Ce problème peut être facilement corrigé en vidant le cache de WordPress.
Il vous suffit de cliquer sur le menu Performance en haut de la page, puis de sélectionner l’option Purger tout cache. W3 Total Cache effacera tous les contenus mis en cache sur votre site.
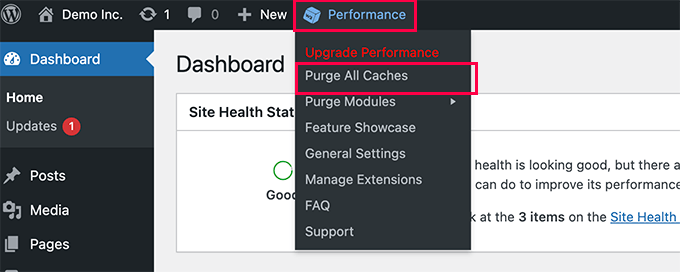
Si vous voyez toujours l’ancienne version de votre site, essayez également de mettre en cache votre navigateur.
Nous espérons que cet article vous a aidé à installer et à configurer W3 Total Cache sur WordPress. Vous pouvez également consulter notre guide complet de sécurité WordPress pour les débutants afin de renforcer la sécurité de votre site web, ou nos choix d’experts des meilleurs services d’hébergement WordPress pour accélérer encore plus votre site.
Si vous avez aimé cet article, veuillez alors vous abonner à notre chaîne YouTube pour obtenir des tutoriels vidéo sur WordPress. Vous pouvez également nous trouver sur Twitter et Facebook.


Syed Balkhi says
Hey WPBeginner readers,
Did you know you can win exciting prizes by commenting on WPBeginner?
Every month, our top blog commenters will win HUGE rewards, including premium WordPress plugin licenses and cash prizes.
You can get more details about the contest from here.
Start sharing your thoughts below to stand a chance to win!
Francis says
Good and Quality tutorial
thanks Syed Balkhi.
this really helped me
Raj singh says
I have an issue with this plugin , when I trying to update this plugin it failed and after fails when I Refresh my wordpress site .
It says under maintenance come back after few hours.
So I leave and came back after few hours but after few hours when I try to open my site .
It’s Totally blank , Nothing is show on my Site.
Only white page comes when I Try to open.
So now what should I do ?
Please help me…
Derek C says
Thank you so much! I was about to go pay an extra $15 a month for cloud based hosting because my blog had gotten so slow at times it was unbearable! I had setup W3 Total Cache and just enabled everything.
I didn’t recognize it until going through your guide, but this was the main reason my dashboard and WP console was taking FOREVER to do anything. Sometimes I would wait 20-30 seconds just to create or save a post. Now it is like 2-3 seconds at the max. Also, my site loads even faster with a lot of that junk turned off.
I am on a shared hosting plan, and I guess all of the caching was actually bottlenecking the CPU or something…. Anyhow, thanks for such a useful guide!
Huu says
Thanks Bro! ^^
Pronob says
thanks a lot for this article.i was searching for this.
Amit says
Dear sir,
I use your guide with w3 total cache but facing the issue of rendering CSS file. This is link of my blog How its work
Can I use Cloudfare with subdomain CDN ? Is it speed up loading time?
Rahul Rampal says
Hi, I have a problem with My yoast sitemaps not rendering. A blank screen appears when I click it. My question is should I include or exclude Sitemap.xsl file in custom file settings in CDN?
Kindly advice.
Dinuka says
What is ‘server response time’? And how to reduce it?
Mody Star says
Hello , I’m using w3 Total Cache on multisite wordpress … I want to exclude certain site from being excluded
mysite.com/ms/
mysite.com/ms/2/
mysite.com/ms/3/
mysite.com/ms/4/
mysite.com/ms/5/
mysite.com/ms/6/
I want to exclude the whole mysite.com/ms/4/ site from being cached
and what about exclude caching of certain plugin on mysite.com/ms/5/
Help me Please
Utkarsh says
I did the settings of W3 total cache plugin and the favicon of my website stopped appearing. Can you please check it
Jon says
I downloaded plugin and now its loading slower.
Each time I test in pingdom the % faster than other sites decreases.
Its only a 1 page site at this time.
Ian Smith says
I recently set up W3 Total Cache with the Rackspace Cloud Files CDN. It all works, but I had expected the media files in the wp-content/uploads folder to only be posted in the CDN rather than on the server. Instead, media uploads now go to both the CDN AND the wp-content/uploads folder. Is this what is supposed to happen? It seemed unnecessarily redundant to me.
WPBeginner Support says
Yes, but the images on your server are stored so that you can end using CDN service anytime you want, or move to another service, or to create backup using WordPress backup plugins. However, your visitors will be served images from the closest CDN server instead of your site.
Administrateur
Himanshu Grewal says
MAXCDN is free ir not??
WPBeginner Support says
No it is a paid service.
Administrateur
Ian says
Hi,
Are you still using maxcdn on this site? I’m trying to decide between maxcdn and keycdn. I noticed this post was from a few years ago and wondered if your thoughts about maxcdn are still the same?
Thanks
WPBeginner Support says
Yes, we still use and recommend MaxCDN.
Administrateur
Bart Percy says
Superb site you have here but I was wondering if you knew of any forums that cover the same topics discussed in this article? I’d really like to be a part of group where I can get feedback from other knowledgeable individuals that share the same interest. If you have any suggestions, please let me know. Bless you!
ROSANNA says
Hi ! I installed yesterday Super Cache because it seemed easier to configure than W3 Total Cache but this morning my site was very very very slow… So I decided to follow your tutorial step by step and change plugins.
So, the first step was to deactivate the first plugin, so I clicked deactivate Super Cache and my whole site crashed !!! I get this message : 503 SERVICE UNAVAILABLE no server is available to handle this request.
I don’t know what to do. Can you help ?
Anant says
Minify via disk is currently disabled
I tried to check the box and when I save after the refresh, it’s disable. enabling it 100 times over still results in an unchecked box, and the message “Minify via disk is currently disabled. Anyone know how to fix that ?
Thank you
Reply
TJ says
Thank your this tutorial. I have used it for a couple of my sites.
One thing, which might be a « duh » situation… But, I had my site in « Maintenance Mode » using SeedProd’s Coming Soon Pro. I did not see the CDN in front of the image urls until I turned off maintenance mode. Then, when I turned it back on again, they were gone again.
Just in case someone needs this information
Rahul says
hi there, thanks for making this post for wp beginners. i’m also using wp total cache plugin for . could you help me or check my website what is problem in this becasie i’m not getting hits pls help me a humble request to u
thanks
Jewel says
Hello,
I appreciate so much, your posts. They have helped me learn a bit about setting up my website. However, this particular post led me to check a bunch of boxes under »Performance » Browser Cache » that took me from faster than 91% down to faster than 71% on speed. I had checked them just as you have in your picture above. I unchecked all your suggested boxes and got back to 84%. (on Pingdom) This was the only change I made. I don’t understand why it made things slower, or why I couldn’t get back to my original speed. If you could explain this I would appreciate it. Thanks.
WPBeginner Support says
A lot of reasons can show you conflicting results when you are expecting something different. For example, you may have forgotten to save plugin settings, your server is particularly under heavy traffic at that time. Make sure you enable gzip compression as we have shown above, then test.
Administrateur
sojib says
I am not using this cace plugin anymore. Using now wpfc two of my site. simple and faster then other plugins.
Tea says
Thanks for the tutorial…really helpful
However my website is slower then before.
I also have these performance issue « Remove query strings from static resources ».
I haven’t enabled database caching and Minify as per your insutrctions as yet…also don’t have CDN service.
before my website was faster.
Any thoughts?
Thanks
Tea
WPBeginner Support says
How are you checking your website speed and performance? We recommend testing with pingdom using different locations. If it is still slow, then try resetting the plugin and follow the setup instructions again.
Administrateur
Tea says
yes using pingdom to test and speed is 2.55s…I think we can do better
All my performance scores are 100 or 95 the lowest, but the « Remove query strings from static resources » is at 12.
Any suggestions?
Many thanks
Tea
Lifa says
This has to be one of the best if not the best WordPress learning sites ever! Detailed and very easy to understand modules. Thank you for all your hard researched work.
Penelope says
THANK YOU FOR MAKING THIS! I’m EXTREMELY cautions on the plugins I install from horror stories. I’ve also heard horror stories about this very plug in. Therefore, I research as much as I can: tutorials, forums, reviews, troubleshooting etc. I am going to follow your tutorial exactly. My server says my site is too large, 500kb, and needs to be gzipped. [sigh] Another plugin to search.
Helpful note: You may have a downloadable instructions on your site somewhere & I am not see it. But It would be helpful if I could download to print OR this was print friendly. you have have link but I am not seeing it.
–Penny
Keami says
When I check the box for enable for page cache and click save all setting it doesn’t stay checked. Help please?
reza says
Please Inform That if Enable Object Cache is checked may cause very slow or accessible admin panel after some times as happened to me and i have to disable object cache and after that i have no problem with this Great plugin
TnX for your tutorial too
deepa tiwari says
Thanks for sharing . I tried to install W3 total cache showing Error not Available for you. How to fix it. Please help me
Manu says
i always come back for W3 Super Cache settings after messing-up with the plugin and i never back or restore its settings because i know where to look for it.
Thanks Wpbeginner for this awesome tutorial.
tracey sharp says
Many thanks for this really detailed step by step guide. I’ve installed google adsense along with a couple of other plug ins and my load time seems to have almost ground to a halt. I’ve installed Total Cache which has helped a little but I’m not sure what to do next. I’ll keep looking!
Hasnain Abid Khanzada says
I have one question that as we know that when we open any new website then browser cache it so then why we need any plugin for improving cache performance?
Muhammad Imran says
Hello WPB team,
I have connect MAxCDN by following all the guidlines as suggested in the article. But after some days my 99% images de-indexed in Google. Please is there any tutorial to FIX this? Will be very thankful to you for the help.
Thanks
Tristian says
Hi,
I do have one question, when static pages are created for example you have 200 pages and just installed and set up W3 cache. So now when static pages will be created for all those 200 sites.
Do you have to load it manually every site by site in your browser ? I understand that this action takes some time so when exactly those sites are created ( static copies on a disk) ?
Ali Emami says
Hi
When I Click on “Specify it here” link, W3 Total Cache does not take me to the CDN page
I go to this address:
http://example.com/#configuration
What should I do?
Help me please
Thank You
WPBeginner Support says
Please contact W3 Total Cache support
Administrateur
Nabeel says
This page is at 91 score on pingdom
WPBeginner Support says
Yes it is, thanks for noticing.
Administrateur
Sacha says
Thank you! I was having a lot of trouble with this plugin and now I have it working perfectly!
Abhishek says
Hi team,
Awaiting the update for this post, I use Cloudflare (free) with wordpress and my GTMetrix results are now anything but good. The blog I need help with is:
Thanks!
Sandy says
I installed the W3 plugin and it works great alone, however when I setup and account with a CDN my whole site slowed down to less than half the speed. From 2 seconds to sometimes 6 seconds on average.
I think the CDN part is of no value if you have a good host server. Digital Ocean has very good performance alone.
Best
Palla Sridhar says
How do I use Cloudflare with W3TC. Is there no support for it.
Morgan Cole says
I also need integration with Cloudflare. Please Help!
Lynne Adams says
I have used this tutorial every time I install the W3 Total Cache plugin with no problem. This time I went a step further in your tutorial and under Performance » Browser Cache page for more settings I checked the ones you recommend. When testing the site on PageSpeedGrader I get an error that reads
DataTables warning: table id=recommendations – Cannot reinitialise DataTable. For mor information about this error, please see .
Is this something to be concerned with?
Debbie Bridge says
Just wondering does it matter if your site is a wordpress.com rather than a wordpress.org for this plugin?
WPBeginner Support says
You cannot install plugins on WordPress.com. Please see our guide on the difference between WordPress.com vs WordPress.org.
Administrateur
Lyheang IBell says
W3 Total Cache error:It appears Minify URL rewriting is not working. Please verify that the server configuration allows .htaccess
Unfortunately minification will not function without custom rewrite rules. Please ask your server administrator for assistance. Also refer to the install page for the rules for your server.
Technical info ?
Julian says
I think this post needs an update.
D says
I like how people ask questions and the author never replies. Are you guys in the business or helping people or link bait in order to sell/ »recommend » paid plugins and such?
Just answer people’s questions a little and the rest of the web won’t think of you as poorly.
WPBeginner Support says
We try our best to provide help and advice. However, sometimes questions fall out of our site’s scope. Please see our guide on how to properly ask for WordPress support and get it.
Administrateur
Arsalan Mughal says
I am using Godaddy’s wordpress managed hosting on . I want to install W3 Cache plugin because of so many options in it. But the button for W3 Cache « Install Now » is disabled and show « This plugin is not allowed in our system… ». I talked to Godaddy support team but they said you need not to worry about any cache plugin and you can’t install W3 Cache as there is also a tool option « Flush Cache » in wordpress bar.
So, i just want to know from you, is there any possibility that i can be able to install W3 Cache plugin? If not, Is there really no need of Cache plugin in WP managed hosting by godaddy.
Can you guide briefly?
Thanks
WPBeginner Support says
Managed hosting providers sometimes use their own caching systems and optimize their servers for optimal performance. Sometimes they may block plugins that they believe will cause conflicts with their servers. If your host is blocking a plugin then it is best not to use that plugin or move to a host that supports your desired plugin.
Administrateur
Kate says
Hi there! Hoping you can help. Yesterday I downloaded the plugin & followed your instructions. I haven’t done anything about CDN yet. (FYI The plugin seems to look a bit different to your video screenshots… More fields are prepopulated). Anyway, whilst the site is faster (yay!) I noticed this morning that my new post which published today isn’t appearing on my homepage ( which all new posts usually do). It’s just appearing in it’s nominated page. I wondered if you knew what the issue might be? Is something ticked in the plugin which shouldn’t be?
Thanks, Kate
Adam Thomas says
Wow, followed the video instructions and my website used to be « 70% slower than all websites ». It’s now « 61% FASTER than all websites tested » on Pingdom.
Thanks a bunch for the video. Everyone says use W3 Total Cache but I never knew how to actually set it up. I was getting really frustrated at my 10+ seconds loading time.
Now down to 2.49 seconds. Not perfect but much better considering this is the only thing I’ve done to try to improve speed.
Thanks again!
WPBeginner Staff says
Please contact MaxCDN support.
Mathieu says
Hi and thanks for another very well written article. This website is definitely becoming a reference for me.
I was about to signup on MaxCDN and follow all the steps when I realise that my hosting provider doesn’t allow me to edit the DNS. It isn’t one of your recommended hosting providers for wordpress and I start to understand now why
Anyway, I talked to my hosting provider and its suggestion was to add a subdomain service to my hosting. This optional subdomain service includes DNS configuration. So assuming my website is http://www.website.com, I could add a subdomain like example.website.com with DNS options.
Now the question is: would it work the same way? Or MaxCDN needs to create the subdomains itself? Also, considering that my website would still run on the main domain and not on the subdomain. So I would activate that subdomain just to be able to edit DNS really.
I hope that I explained myself clear enough, I admit that this is still a little bit complicated for me to understand.
Thanks.
Richelle says
Hi! I’ve been trying to get W3 Total Cache to work forever, but I’m always having issues. I followed all your instructions above, and right now it says:
New Relic is not running correctly. The plugin has detected the following issues:
PHP module is not enabled.
PHP agent is not enabled.
API Key is invalid.
Account ID is not configured.
Application ID is not configured. Enter/Select application name.
License key could not be detected.
A configuration issue prevents CDN from working: The « Authorization key » and « Replace default hostname with » field(s) cannot be empty.You need to select / create a pull zone. Specify it here.
I honestly have no idea what all this stuff is and how to fix it…
stooni says
show where there are linked, check the File Rigts!
—- stooni