Nuestros lectores nos piden a menudo que les ayudemos a resolver problemas relacionados con las limitaciones de subida de archivos. Este sencillo ajuste del sitio web puede tener efectos inesperados en su sitio.
Por ejemplo, a veces un límite bajo de tamaño de archivos subidos puede impedirte subir archivos con el cargador de medios o instalar plugins y temas de WordPress más grandes. Esto puede ser muy frustrante, especialmente cuando no estás seguro de cómo cambiar el límite.
En este artículo, le mostraremos cómo aumentar fácilmente el tamaño máximo de subida de archivos en WordPress para corregir esos problemas.
¿Por qué aumentar el tamaño máximo de subida de archivos en WordPress?
Tu proveedor de alojamiento de WordPress establecerá por defecto un tamaño máximo de subida de archivos cuando accedas e instales WordPress. Tu proveedor de alojamiento define este límite, que suele oscilar entre 2 MB y 500 MB.
Para la mayoría de los propietarios de sitios web en WordPress, este límite será más que suficiente.
Sin embargo, hay ocasiones en las que necesitará aumentar este límite para no encontrarse con errores de subida.
Por ejemplo:
- Tienes un sitio web de fotografía y necesitas subir imágenes grandes.
- Su porfolio de diseño o fotografía tiene imágenes grandes.
- Quieres instalar un tema o plugin de WordPress más grande.
- Quieres vender productos digitales como libros electrónicos, fotos, vídeos, etc.
- Actualiza regularmente el contenido y añade audio, fotos y mucho más.
Dicho esto, vamos a mostrarle cómo puede aumentar el tamaño máximo de subida de archivos en su sitio WordPress.
Nota: Ten en cuenta que mostrar muchos archivos grandes en tu sitio web puede ralentizar seriamente su velocidad y rendimiento. Por eso, normalmente recomendamos no subir nunca vídeos a WordPress.
Dado que la mayoría de los usuarios tienen diferentes configuraciones de alojamiento de WordPress, cubriremos lo siguiente:
- How to Check Your Maximum File Upload Size Limit in WordPress
- Method 1: Contact Your WordPress Hosting Provider
- Method 2: Create or Edit an Existing php.ini file
- Method 3: Add Code to Your WordPress Theme functions.php File
- Method 4: Add Code to Your .htaccess File
- Method 5: Use a WordPress Plugin to Increase File Upload Size
Tutorial en vídeo
Si prefiere instrucciones escritas, siga leyendo.
Cómo comprobar el límite de tamaño máximo de subida de archivos en WordPress
WordPress mostrará automáticamente el límite de tamaño máximo de subida de archivos cuando esté subiendo imágenes u otros medios.
Para comprobarlo, simplemente vaya a Medios ” Añadir nuevo en su panel de administrador de WordPress, y verá el límite de tamaño máximo de subida de archivos para su sitio WordPress.
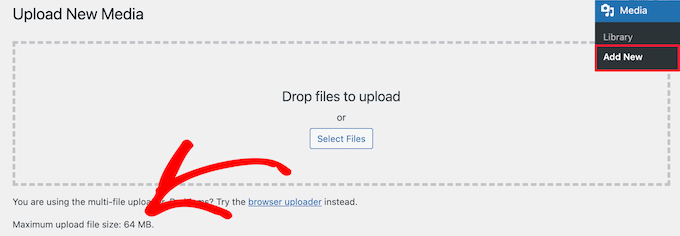
Ahora que ya sabe cómo encontrar el límite de tamaño, vamos a mostrarle cómo aumentar el tamaño máximo de subida en WordPress.
Método 1: Póngase en contacto con su proveedor de alojamiento de WordPress
Una de las formas más sencillas de aumentar el tamaño máximo de subida de archivos en WordPress es ponerse en contacto con su proveedor de alojamiento de WordPress.
Se trata de una tarea relativamente sencilla para su equipo de atención al cliente y puede realizarse en un par de minutos.
Para los principiantes, esto puede ser mucho más fácil que añadir código a WordPress y editar los archivos del servidor.
Sólo tienes que ir al sitio web de tu proveedor de alojamiento, como Bluehost, y acceder.
A continuación, haga clic en el icono “Chat” situado en la parte inferior de la pantalla. A continuación, puede solicitar al personal de soporte que aumente el tamaño de subida de archivos en su sitio de WordPress.
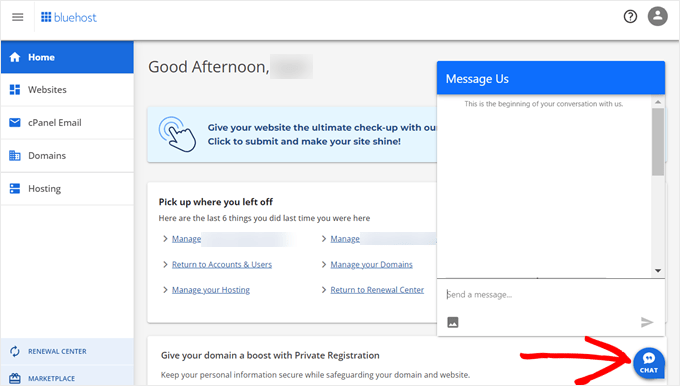
También puede contactar con el soporte desde el Escritorio de su cuenta de alojamiento.
Método 2: Crear o editar un archivo php.ini existente
Otra forma de aumentar el tamaño máximo de subida de archivos es creando o editando un archivo llamado php.ini. Este archivo controla una gran cantidad de ajustes para su entorno de alojamiento de WordPress.
La mayoría de los proveedores de alojamiento de WordPress, como Bluehost, disponen de un cPanel fácil de usar que te ayudará a gestionar tu sitio web.
Si tu alojamiento web tiene un Escritorio cPanel, entonces puedes aumentar el tamaño de subida de archivos a través de las herramientas integradas.
Nota: Lo siguiente es del cPanel de Bluehost. Sin embargo, la mayoría de los proveedores de alojamiento compartido tendrán pasos similares.
Encontrará un botón cPanel en la parte inferior de la pestaña Alojamiento en Bluehost.
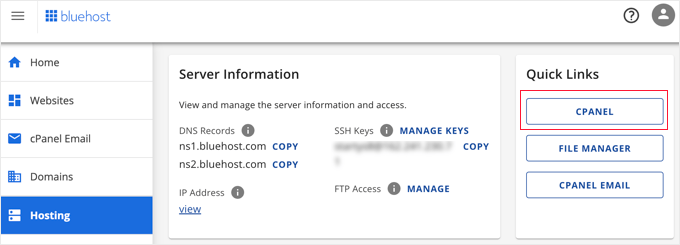
Al hacer clic en este botón se abrirá su Escritorio de cPanel.
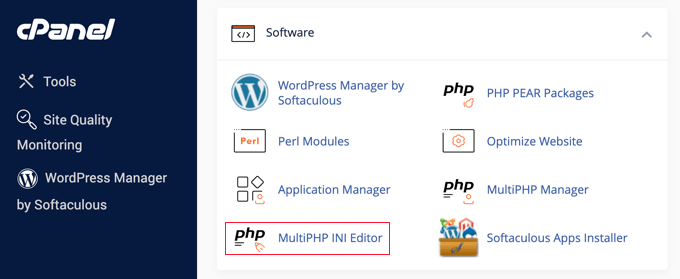
Ahora tienes que desplazarte hasta la sección Software y hacer clic en ‘MultiPHP INI Editor’.
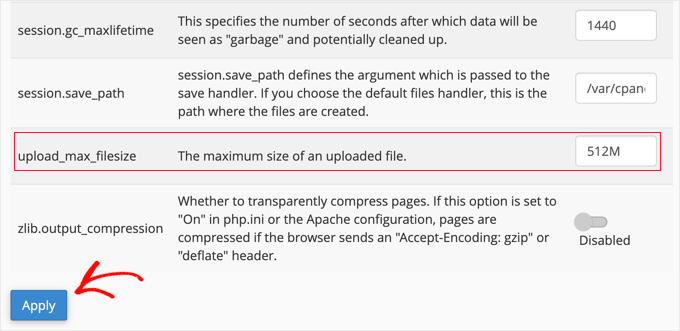
A continuación, desplácese hasta la sección “upload_max_filesize” e introduzca un nuevo tamaño máximo de archivo en la casilla.
A continuación, haga clic en el botón “Aplicar”.
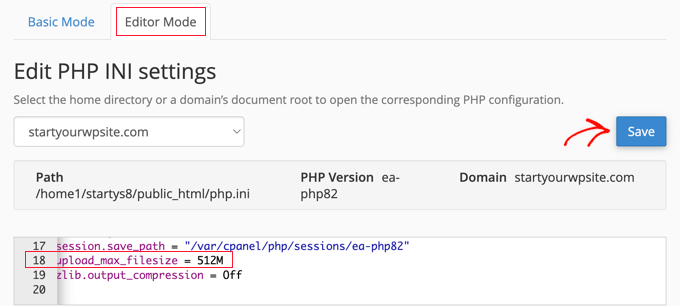
También puede hacer clic en la pestaña del menú “Modo editor” y, a continuación, modificar el tamaño máximo de subida de archivos directamente en el editor.
Tienes que editar la sección ‘upload_max_filesize’ para aumentar el tamaño de subida de tus archivos.
Cuando hayas terminado, sólo tienes que hacer clic en el botón “Guardar”.
Editar php.ini añadiendo código
Si su proveedor de alojamiento actual no ofrece la opción de cPanel, tendrá que editar este archivo manualmente.
Para ello, puede utilizar un cliente FTP o la opción de gestión de archivos de su panel de control de alojamiento de WordPress.
Si utiliza alojamiento compartido, es posible que no vea el archivo php.ini en el directorio de su alojamiento. Si no lo ves, simplemente crea un archivo llamado php.ini y súbelo a tu carpeta raíz.
A continuación, añada el siguiente fragmento de código al archivo:
upload_max_filesize = 256M
post_max_size = 256M
max_execution_time = 300
Puedes modificar el límite de ‘256M’ al tamaño de archivo que necesites para tu blog de WordPress.
Método 3: Añadir código al archivo functions.php de su tema de WordPress
Este método consiste en añadir código al archivo functions. php de su tema de WordPress.
En lugar de editar el archivo directamente, recomendamos usar WPCode. Es el mejor plugin de fragmentos de código que te permite añadir código a tu sitio web sin romperlo.
Si no lo ha hecho antes, consulte nuestra guía para principiantes sobre cómo añadir código personalizado en WordPress.
En primer lugar, debe instalar el plugin gratuito WPCode. Para más detalles, consulta nuestra guía paso a paso sobre cómo instalar un plugin de WordPress.
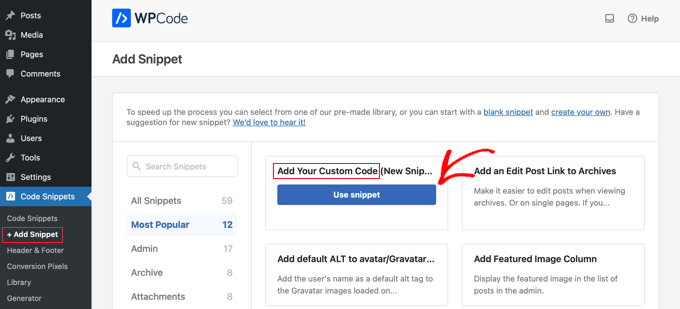
Una vez activado, deberá ir a Fragmentos de código ” + Añadir fragmento. Deberá pasar el cursor por encima de la opción “Añadir su código personalizado” y, a continuación, hacer clic en el botón “Usar fragmento”.
En la siguiente pantalla, debe dar un nombre a su nuevo fragmento de código y cambiar el tipo de código a “Fragmento PHP”.
A continuación, puede copiar y pegar el siguiente fragmento de código en ‘Vista previa del código’. Asegúrate de cambiar ‘256M’ por el tamaño máximo de archivo que necesites:
@ini_set( 'upload_max_size' , '256M' );
@ini_set( 'post_max_size', '256M');
@ini_set( 'max_execution_time', '300' );
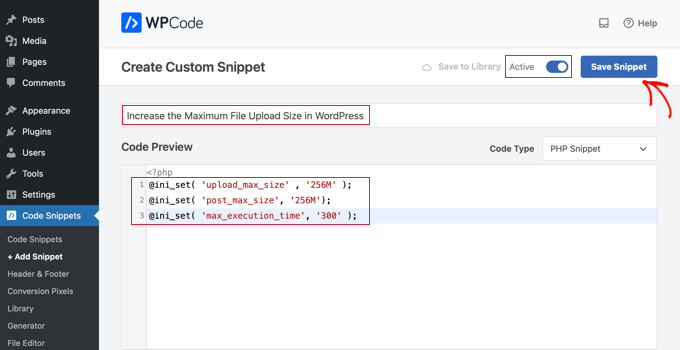
Por último, cambie el conmutador de la parte superior a “Activo” y, a continuación, haga clic en el botón “Guardar fragmento de código”. El código se ejecutará en su sitio web.
Método 4: Añadir código a su archivo .htaccess
Otra forma de aumentar el tamaño máximo de archivo es modificando el archivo .htaccess. Este archivo controla los ajustes de configuración de alto nivel de su sitio web.
Para ello, debe acceder al servidor de su sitio web a través de FTP. Si no ha hecho esto antes, consulte nuestra guía sobre cómo usar FTP para subir archivos a WordPress para principiantes.
A continuación, localice el archivo .htaccess en la carpeta raíz de su sitio web.

Si no puedes encontrar tu archivo .htaccess, entonces podría estar oculto por tu gestor de archivos o cliente FTP. Para obtener más información, consulte nuestra guía sobre por qué no puede encontrar el archivo .htaccess en su sitio de WordPress.
A continuación, debe añadir el siguiente fragmento de código a su archivo .htaccess:
php_value upload_max_filesize 256M
php_value post_max_size 256M
php_value max_execution_time 300
php_value max_input_time 300
Para aumentar aún más el tamaño máximo de subida de archivos, sólo tiene que cambiar ’64M’ por el tamaño que necesite.
Método 5: Utilizar un plugin de WordPress para aumentar el tamaño de la subida de archivos
Otra forma de aumentar el límite máximo de subida de archivos es usando el plugin WP Increase Upload Filesize. Si no te sientes cómodo añadiendo código a WordPress, entonces esta podría ser una buena opción para ti.
Lo primero que tienes que hacer es instalar y activar el plugin. Para más detalles, consulte nuestra guía sobre cómo instalar un plugin de WordPress.
Una vez activado, vaya a Medios ” Aumentar límite de subida en su panel de administrador de WordPress.
Esto le lleva a una pantalla en la que puede seleccionar un nuevo tamaño de archivo subido en el desplegable “Elegir tamaño máximo de archivo subido”.
A continuación, haz clic en el botón “Guardar cambios”.

Nota: El tamaño máximo de subida de archivos lo establece tu proveedor de alojamiento. Si necesita un límite de tamaño de archivo superior al que aparece en el desplegable, deberá ponerse en contacto con su proveedor de alojamiento y solicitar un aumento del límite.
Esperamos que este artículo te haya ayudado a aumentar el tamaño máximo de subida de archivos en WordPress. Puede que también quieras ver nuestra guía práctica sobre cómo elegir el mejor maquetador de sitios web y nuestra selección experta de las mejores aplicaciones de números de teléfono virtuales para empresas con opciones gratuitas.
If you liked this article, then please subscribe to our YouTube Channel for WordPress video tutorials. You can also find us on Twitter and Facebook.


Syed Balkhi says
Hey WPBeginner readers,
Did you know you can win exciting prizes by commenting on WPBeginner?
Every month, our top blog commenters will win HUGE rewards, including premium WordPress plugin licenses and cash prizes.
You can get more details about the contest from here.
Start sharing your thoughts below to stand a chance to win!
Manish says
I am unable to import my blogger exported xml file to wordpress.
My blogger imported xml file size is 24 mb.
Please solve this problem, i shall be thankful to you.
Hashim says
3. htaccess Method worked for me.
Thanks
John says
Has anyone ever told you that the copy and paste YOUR code all throughout your site always has the:
1: code
2: code
3: code
So it’s a bit of a edit to get it to work right when a simple copy/paste would be stressfree for your readers! Just sayin…
John Delaney says
Create php.ini file and place it in wp-admin folder, not the root. Fixes it every time.
Michael Kelley says
Thanks! This is the only thing that worked for me. Worth noting, I already had a php5.ini file in there w/ the same code, it did nothing. A tad confusing.
Mudassar says
htaccess worked
Robert says
After 2 hours of frustration, the htaccess method mentioned here worked out for my local environment.
Thank you very much.
Robin says
I change my .htaccess and put
php_value memory_limit 2G
php_value upload_max_filesize 2G
php_value post_max_size 2G
php_value max_execution_time 99999
php_value max_input_time 99999
when I go for upload a fine it shows 2GB but when I upload any file that larger then 128MB it shows HTTP error. Need help please.
Thanks
Zain Zaheer says
Set max limit to 128M instead of 2G
Robin says
I add on my .htaccess
php_value memory_limit 2G
php_value upload_max_filesize 2G
php_value post_max_size 2G
php_value max_execution_time 99999
php_value max_input_time 99999
and it shows 2GB but when I upload larger then 128M file it gives me HTTP error. can anyone help me please.
Thanks
Elisabeth Parker says
I DO NOT recommend putting that code in the Theme Functions file. I tried it and it completely blew up my site. And if you don’t know how to use FTP or the File manager to change the Functions file BACK, you’ll be very unhappy. I haven’t tried the other options but if I find something that works I’ll let you know
kennedy Odhiambo says
Hello Elisabeth,ive tried it and it has also blown up my site,i cant acces it…may i please know how you fixed it?
Caki says
Just contacted godaddy. I am using cpanel hosting through them. He added a file .user.ini in the public/html file with the following:
memory_limit = 128M
max_execution_time = 300
post_max_size = 128M
upload_max_filesize = 256M
razib ahmed says
thank you so much! it,s working for me
Tino says
I’m with Axxess and this also worked for me!
Mukhiiii says
You made my day!
Thanks
Paul Vijay says
Thanks a lots this Worked for me . I too use Godaddy Hosting, Still the Template fails to load from Online database can u help
Bob says
do you name it .user.ini or user.ini ??
Jesse says
This method worked for me! Thank you so much for sharing!!!
Craig says
in the .htaccess solution, where in the file do you enter the code, i put it at the end and got a 500 error?
Cornelius says
I heard as an alternative you could just directly upload via the ftp cpanel, but when I do that the PDF does not show up in my WP media dashboard?
WPBeginner Support says
Hi Cornelius,
You can upload a PDF file but yes you are right it will not be visible in the Media library on your WordPress site. To see a file in the media library and be able to easily add it, you would need to upload it using the built in media uploader.
Administrador
Christopher Eller says
You can upload anything via FTP/SFTP and then add it to the database using a plugin like Add From Server.
Nitus says
This worked for me (as nothing else would):
– Open wp-config.php
– At the very bottom add this line:
define(‘WP_MEMORY_LIMIT’, ‘128M’);
– Save (and upload your file)
Maja says
So i’m not a developer so i dont feel like messing with php and some functional stuff.
i found from a post above php settings and all is set right, max file size is 30MB so i’m confused why i still can’t upload media bigger than 5mb.
is there a wordpress thing that i’m missing
i didn’t find anywhere place to change that,
Niall Flynn says
If you are using cPanel most of the time you edit via the PHP Version settings, you can check if you are on 5.6 or 7.0 and edit all the settings via cpanel. For me this is the only way my host has all the others locked down, but its real handy and there are simple ways to enable PHP modules and tweak any setting.
yaser says
Thanks.
This is what finally worked for me:
In wp-config, before wp-settings:
define( ‘WP_MEMORY_LIMIT’, ‘256M’ );
define( ‘WP_MAX_MEMORY_LIMIT’, ‘256M’ );
ini_set( ‘memory_limit’, ‘256M’ );
In .htaccess:
php_value memory_limit 256M
php_value upload_max_filesize 64M
php_value post_max_size 64M
php_value max_execution_time 300
php_value max_input_time 300
mohammad says
thanks man you made my day it worked
Evan Olsen says
This worked for me! Thank you!
Rudrax says
Thanks Friend It Worked!
Yna Capumpue says
How do you get to the wp-config? I mean where do you input the code itself? Thanks.
maneesh naithani says
made my day. thank you man.
Rahadian says
Thank you for this valuable post, .htaccess method works for me
Abhishek says
Thanx a lot php.ini option works thanx a lot
Sean says
Hello
I am building a woocommerce store for selling audio files. Some of my files are over 100MB so uploading straight from wordpress wont work. What I am trying to do is Upload the file to cpanel and than post that link in the downloadable product on WP. But I dont know how to do it. I view the file in cpanel and copy that link but that just takes the person to cpanel login. I dont know hot to get the link of my file in cpanel so others can download it when they buy a product?
Do you have a tutorial on this?
or can you help?
Thanks
Ian says
You would need to look more into this because you would need security for that file url, generally the file url is accessible to everything and therefore can be downloaded without making a purchase.
Larry Scott says
The second suggestion of creating a php.ini file works like a charm.
john says
Absolutely DO NOT try to enter that code into the Theme Functions file!!!!! Now I am getting error messages and can’t get to the dashboard for my site. I won’t DARE try any of their other suggestions.
WPBeginner Support says
Hi John,
You can easily edit your functions.php file using an FTP client to undo the changes you made.
Administrador
Fred Preston says
Thanks. the .htaccess version worked for me. I just had to remember to show hidden files in my cpanel file manager.
John says
Just wanted to say thanks. I’ve been able to solve three wordpress related issues in one day, all with help from this website. Kudos on the good work.
WPBeginner Support says
Thanks John Don’t forget to join us on Twitter for more WordPress tips and tutorials.
Administrador
Shameer says
Very HelpFull
David says
Thanks.
The php.ini edits helped. I had to make sure to also up the post_max size as well. I failed to edit this on first update, and nothing changed. Edit all parameters and presto. Thanks again!
Alyse says
Is there a specific place to add it in the theme functions file? The beginning? The end?
Shambo says
Modifying .htaccess file worked for me. Thanks a lot..
Celal Erdogdu says
It works, thank you.
WPBeginner Support says
You are welcome
Administrador
Bentham says
Thank you so much ,option one gave me a hint
Mohsin says
.htaccess method worked for me. Thanks for this article.
Aswani Somarajan says
It was great. Very helpful! Had to upload a theme, used the second method. added a ner php.ini file and the theme is installed. Thanks a lot
John says
Thanks for helping
making the changes in the .htaccess method made the website crash
however changing the php.ini file worked for me.
Don says
or try another method like mine,
on cpanel > click the “select php version” > then click “switch to php options” > find the “upload_max_filesize” then change it whatever you want.
Aoun says
Thanks…… Its very helpful and working perfectly
Jose says
Thnxs dude, you saved my job
Md Robiul Islam says
Thanks you so much… for your comment I fix my issue after try long time.. thanks a lot…..
Miaka says
The methods in the article didnt work for me but this did! Thank you so so much, Don! Article author, hope you could edit this method as one of the solutions in your article!
DAVID says
@DON Thank you!
Rudi says
Thank you so much, I used the htaccess Method and it’s worked for me.
bob hildegard says
‘upload_max_size’ is not a php.ini variable name. it’s ‘upload_max_filesize’. that’s stated wrong in solution 1
Eric says
First thing I tried was modifying the .htaccess file. Worked for me!
sumit says
thanks a ton , u saved me
Reza says
htaccess option returns a 500 Internal Server error when reloading my website and wp admin
kashyapkumbhani says
sir i Tried all But my Xml File Not Imported Please Help me:) thank u
Trevor says
I tried your first suggestion, and apparently threw some bad code into the functions.php file and now I have lost access to my website’s dashboard, the actual website cannot be accessed by anyone, and the problem is obviously not solved.
WPBeginner Support says
Please see our guide on what to do when you are locked out of the admin area.
Administrador
Aakarshit says
None of then worked ; (
Even contacted the hosting provider, no reply from them ; (
frizzy lee says
thanks .. the htacess method worked for me too .. thumbs up bro
Okie Wardoyo says
Hi, where i should put that code to my .htaccess file.
I have tried put this code to my htaccess file but it always 500 internal server error when i open my live site.
# BEGIN WordPress
RewriteEngine On
RewriteBase /
RewriteRule ^index\.php$ – [L]
RewriteCond %{REQUEST_FILENAME} !-f
RewriteCond %{REQUEST_FILENAME} !-d
RewriteRule . /index.php [L]
php_value max_input_vars 5000
php_value max_execution_time 300
php_value post_max_size 50M
# END WordPress
John Jones says
Try this:
php_value upload_max_filesize 50M
php_value post_max_size 50M
php_value max_execution_time 300
php_value max_input_time 300
Jitender Singh says
.htaccess works nicely.
subodeep ray says
thanks .htaccess works smoothly
Bukunmi says
Where exactly do I put those codes in my Theme function? because i’m kind of lost
Galuh Prasetyawan says
in Appearance -> editor, find function.php
Eóin Kilroy says
Right, but where exactly in the function file?
Manas Mitra says
Hi,
I have used the first method of adding code to child theme functions.php file, but it does not have the desired effect. In localhost, the limit is 3 MB and in shared server, the limit is 32 MB. Any idea why it is happening so?
Thanks.
Bouguezzi says
the .htaccess modification methode worked with me thx a lot
WPBeginner Support says
Glad you found it useful. Make sure you follow us Facebook to get more WordPress tips.
Administrador
cathy belyea says
i have followed this even contacted my host increased my uploads to 64mb however in wordpress it still only allows 8mb.
any other suggestions please help.
Guillermo says
Same problem for wordpress 3.9 / 4 version and having a look to Chrome console or firefox I saw an error 413 of NGINX when uploading
Maybe this thread can help to nginx users