Möchten Sie die 2-Schritt-Verifizierung von Google Authenticator zu Ihrer WordPress-Website hinzufügen?
Passwörter allein reichen nicht aus, um Hacker und unbefugte Nutzer abzuwehren. Zum Glück kann die 2-Schritt-Verifizierung von Google Authenticator eine zusätzliche Sicherheitsebene für Ihre Website schaffen.
In diesem Artikel zeigen wir Ihnen, wie Sie mit der Google Authenticator-App eine 2-Schritt-Verifizierung auf Ihrer WordPress-Website hinzufügen können.
Was ist die Google Authenticator App, und warum brauchen Sie sie für Ihre WordPress-Website?
Die Google Authenticator-App ist eine mobile Anwendung, die jedes Mal, wenn Sie sich bei einer Drittanbieter-App oder Website wie WordPress anmelden, eine zweite Authentifizierungsebene hinzufügt.
Leider können Passwörter manchmal geknackt werden. Wenn Sie auf zahlreichen Websites dasselbe Kennwort verwenden, bringt ein Sicherheitsleck auf einer Website Ihre anderen Konten in Gefahr. Oft sind die Leute faul und ändern ihre Passwörter nicht, selbst wenn sie eine E-Mail über eine Sicherheitslücke auf einer großen Website erhalten.
Nun, die 2-Schritt-Verifizierung ist die Lösung für genau das. Selbst wenn der Hacker Ihren WordPress-Benutzernamen und Ihr Passwort kennt, kann er nicht auf Ihre WordPress-Website zugreifen, es sei denn, er hat einen zeitlich begrenzten, zufälligen Sicherheitscode (der von Google Authenticator bereitgestellt wird).
Da Ihr Blog direkt mit Ihrem mobilen Gerät verbunden ist, sind Sie die einzige Person, die den einmaligen Code für jede Anmeldung abrufen kann. Der Code läuft aus Sicherheitsgründen nach einer kurzen Zeit ab.
Die Google Authenticator-App ist nur ein Beispiel für eine mobile Anwendung, die eine Zwei-Faktor-Authentifizierung (2FA) für verschiedene Online-Konten und -Dienste bietet.
Es generiert zeitbasierte Einmalpasswörter (TOTPs), die als zweiter Faktor für die Authentifizierung bei der Anmeldung bei einem Konto dienen.
Wenn Sie immer noch nicht von der Bedeutung der WordPress-Sicherheit überzeugt sind, dann sollten Sie sich ansehen, wie das digitale Leben eines Wired.com-Autors zerstört wurde.
Nachdem wir diese Geschichte gelesen hatten, haben wir die 2-Schritt-Authentifizierung für unsere Google-Konten und die meisten anderen Dienste, die diese Funktion anbieten, gleich mit an Bord genommen. Wenn Sie so sicherheitsbewusst sind wie wir und Ihnen Ihr Blog wichtig ist, sollten Sie diesen Tipp befolgen, um die Sicherheit Ihres WordPress zu verbessern.
Hinweis: Google Authenticator funktioniert nur auf iOS-, Android-, Windows Phone-, webOS-, PalmOS- und BlackBerry-Geräten. Mit anderen Worten: Sie benötigen Ihr Smartphone, um sich bei Ihrer Website anzumelden.
Um Ihre Sicherheit weiter zu verbessern, empfehlen wir, auch andere Methoden in Betracht zu ziehen. Software wie 1Password kann Ihnen beispielsweise dabei helfen, Ihre Passwörter an einem Ort zu verwalten und sicherzustellen, dass sie stark genug sind, um potenziellen Hackern zu widerstehen.
Kommen wir nun zur Anleitung, wie Sie die 2-Schritt-Verifizierung von Google Authenticator zu Ihrer WordPress-Website hinzufügen können.
Wie man Google Authenticator in WordPress hinzufügt
Als Erstes müssen Sie die Google Authenticator-App auf Ihrem Telefon installieren. In dieser Anleitung verwenden wir die iOS-Terminologie, aber der Vorgang ist auch für andere Geräte ähnlich.
Schritt 1: Installieren Sie die Google Authenticator App auf Ihrem mobilen Gerät
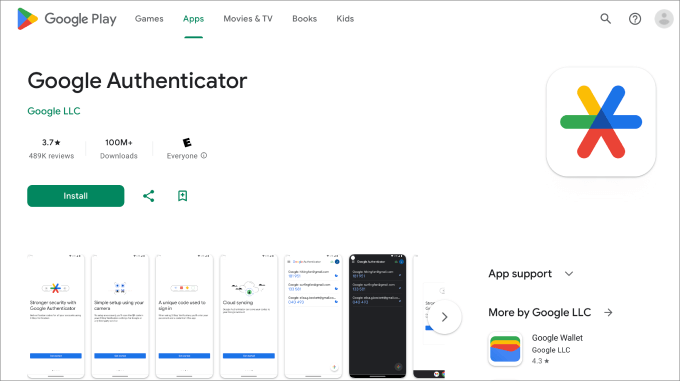
Besuchen Sie den App Store, suchen Sie nach „Google Authenticator“ und klicken Sie dann auf „Installieren“ für die Anwendung.
Kehren wir nun zu Ihrem WordPress-Dashboard zurück.
Schritt 2: Installieren Sie das Google Authenticator Plugin von MiniOrange
Installieren und aktivieren Sie das Google Authenticator-Plugin von MiniOrange. Weitere Details finden Sie in unserer Schritt-für-Schritt-Anleitung für die Installation eines WordPress-Plugins.
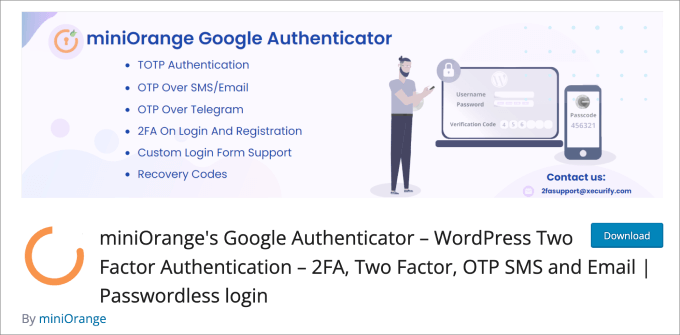
Dies ist ein kostenloses WordPress-Plugin, mit dem Sie Ihre Website vor unbefugtem Zugriff schützen können. Jedes Mal, wenn Sie sich bei WordPress anmelden, werden Sie aufgefordert, den einmaligen Passcode der Google Authenticator-App einzugeben, um Ihre Identität zu überprüfen.
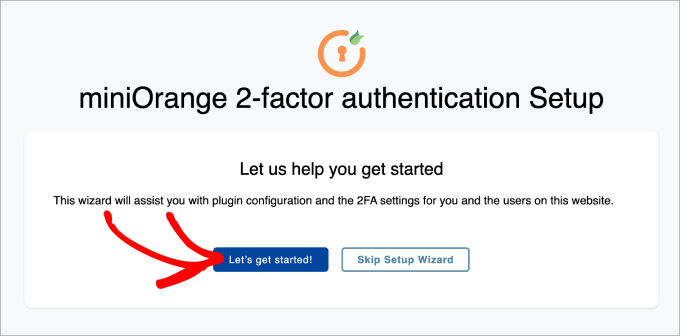
Nachdem Sie das Plugin aktiviert haben, werden Sie zu einem Einrichtungsassistenten weitergeleitet. Folgen Sie einfach dem Prozess, um Ihre Google Authenticator-Zwei-Faktor-Authentifizierung in WordPress einzurichten.
Schritt 3: Vervollständigen Sie den Einrichtungsassistenten
Klicken Sie zunächst auf die Schaltfläche „Los geht’s!“.
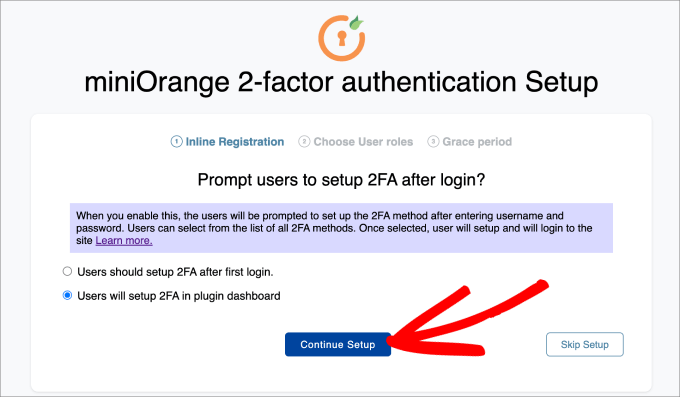
Als Nächstes werden Sie gefragt, ob Sie 2FA nach Ihrer ersten Anmeldung oder im Dashboard des Plugins einrichten möchten. Beide Methoden sind in Ordnung.
Klicken Sie auf „Einrichtung fortsetzen“.
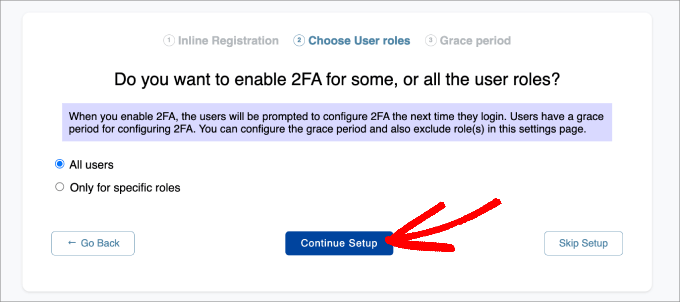
Im nächsten Schritt wählen Sie aus, für wen die 2FA gelten soll. Sie können entweder alle Benutzer auswählen, um maximale Sicherheit zu gewährleisten, oder sie nur für bestimmte Benutzerrollen gelten lassen.
Klicken Sie dann auf „Einrichtung fortsetzen“.
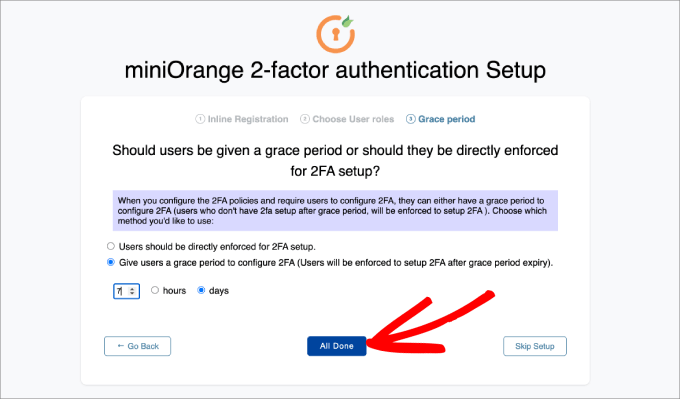
Schließlich werden Sie gefragt, ob Sie die 2FA sofort erzwingen oder den Benutzern eine Schonfrist einräumen möchten.
Wenn Sie den Nutzern eine Nachfrist einräumen möchten, können Sie den Zeitraum in Stunden und Tagen angeben. Klicken Sie anschließend auf „Erledigt“.
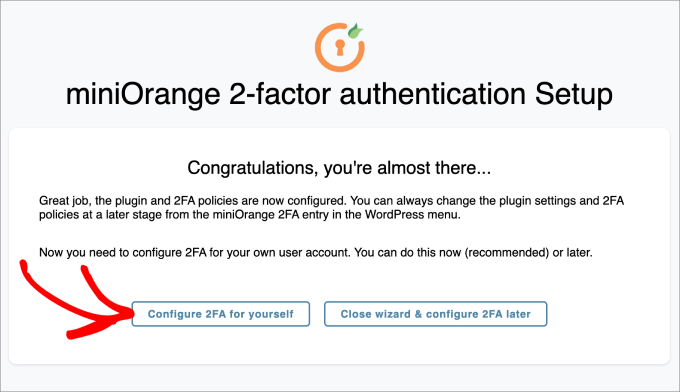
Nachdem Sie den Einrichtungsvorgang abgeschlossen haben, können Sie entscheiden, ob Sie 2FA jetzt oder später für sich selbst einrichten möchten.
Klicken Sie auf die Schaltfläche „2FA für sich selbst konfigurieren“.
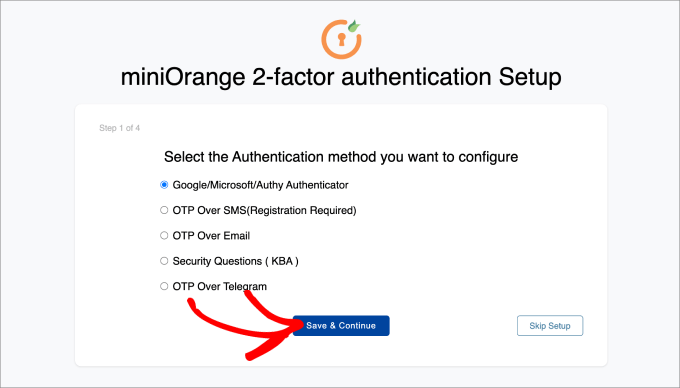
Hier werden Sie aufgefordert, die Methode der 2-Faktor-Authentifizierung einzugeben, die Sie zu Ihrer WordPress-Website hinzufügen möchten.
Für dieses Tutorial werden wir „Google/Microsoft/Authy Authenticator“ wählen. Klicken Sie dann einfach auf die Schaltfläche „Speichern & Weiter“.
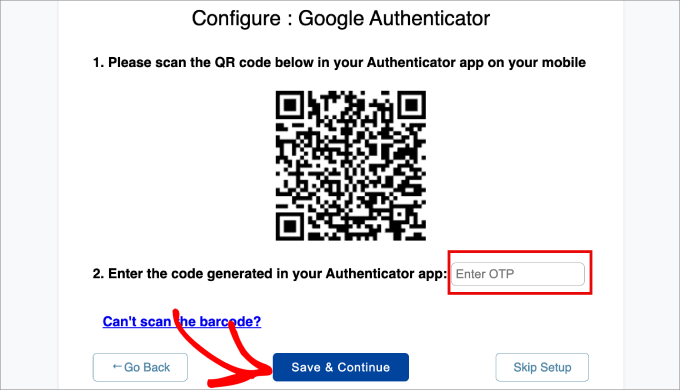
Als Nächstes werden Sie aufgefordert, den Barcode auf dem Bildschirm zu scannen. Das heißt, Sie müssen die Google Authenticator-App auf Ihrem Telefon aufrufen und den angezeigten Barcode scannen.
Klicken Sie in der Google Authenticator-App auf Ihrem Mobilgerät auf das „+“-Symbol am unteren Rand und wählen Sie dann „QR-Code scannen“. Richten Sie dann die Kamera Ihres Telefons auf den Bildschirm Ihres Computers, um den Barcode zu scannen.
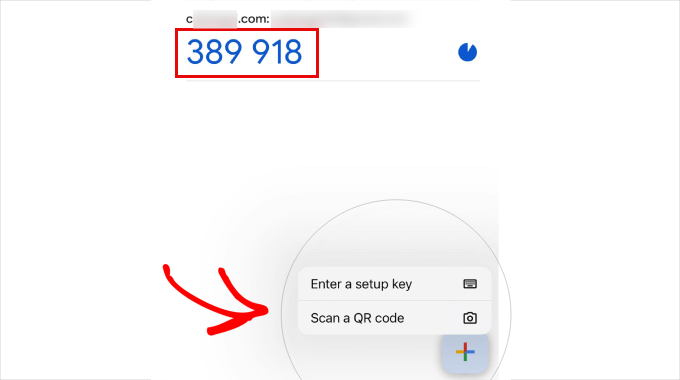
Von hier aus wird ein einmaliger Passcode (OTP) auf Ihrem mobilen Gerät angezeigt.
Geben Sie das in Schritt 2 auf Ihrem Computer ein. Von dort aus können Sie auf „Speichern & Weiter“ klicken.
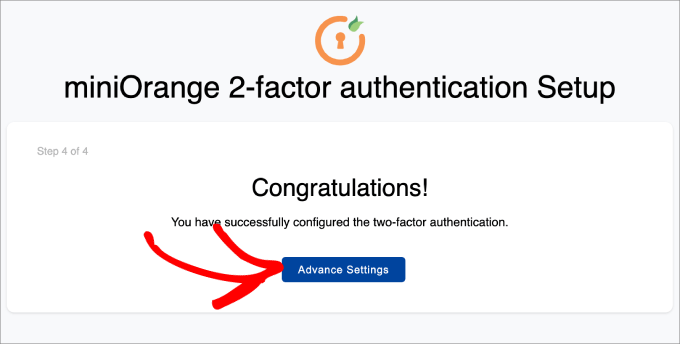
Sie sollten nun eine Meldung erhalten, dass Sie die Zwei-Faktor-Authentifizierung erfolgreich konfiguriert haben.
Wählen Sie einfach „Erweiterte Einstellungen“.
Schritt 4: Sicherheitsfragen hinzufügen
Zusätzlich zur 2-Faktor-Authentifizierung mit Google Authenticator möchten Sie wahrscheinlich auch Sicherheitsfragen hinzufügen.
Wenn Sie nicht auf Ihre Google Authenticator-App zugreifen können, können Sie sich trotzdem bei Ihrer WordPress-Website anmelden, wenn Sie die Sicherheitsfragen beantworten, die Sie für sich selbst eingerichtet haben.
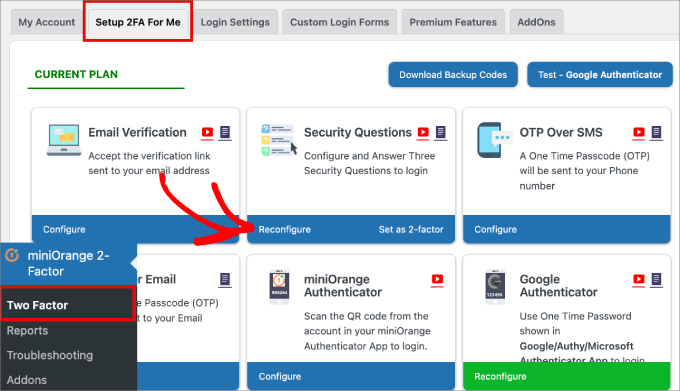
Rufen Sie die Seite Mini Orange 2-Factor “ Two Factor in Ihrem WordPress-Admin-Dashboard auf. Suchen Sie dann auf der Registerkarte „2FA für mich einrichten“ die Methode „Sicherheitsfragen“ und klicken Sie auf „Neu konfigurieren“.
Beachten Sie, dass Sie auch andere Arten von Zwei-Faktor-Authentifizierungsmethoden einrichten können, z. B. E-Mail-Verifizierung, OTP über SMS, OTP über E-Mail, OTP über Telegram und sogar Duo Authenticator.
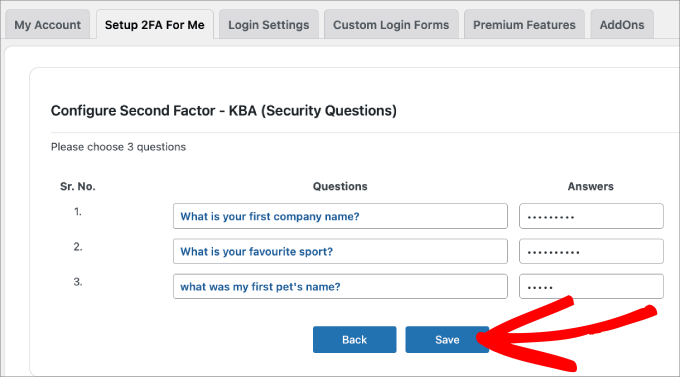
Als Nächstes können Sie bis zu drei Sicherheitsfragen auswählen. Zwei davon können Sie aus einem Dropdown-Menü auswählen, und die dritte ist eine benutzerdefinierte Frage, die Sie sich selbst ausdenken können.
Geben Sie dann die Antwort für jede dieser Fragen ein und klicken Sie auf die Schaltfläche „Speichern“.
Schritt 5: Testen Sie es selbst
Sobald alles eingerichtet ist, können Sie es selbst ausprobieren.
Melden Sie sich einfach von Ihrem WordPress-Dashboard ab und versuchen Sie, sich erneut anzumelden.
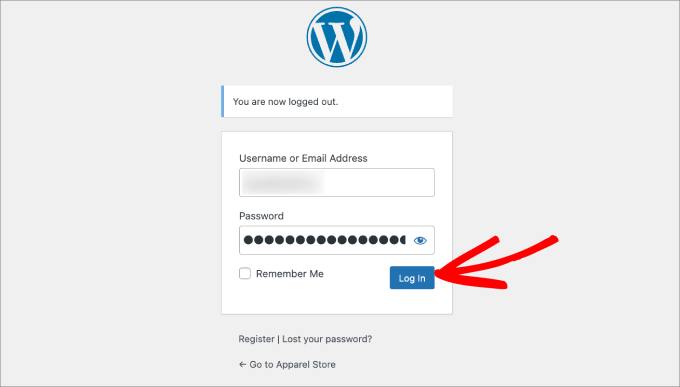
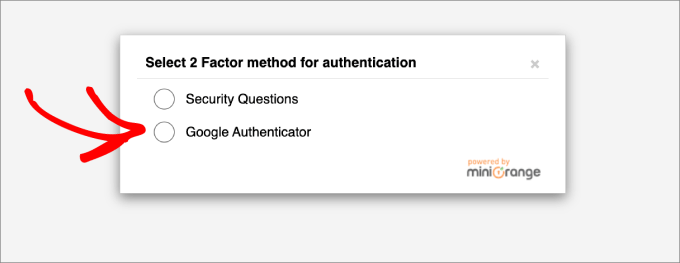
Sie werden nun zu einer Seite weitergeleitet, auf der Sie entweder Sicherheitsfragen beantworten oder den Google Authenticator verwenden können, um Ihren einmaligen Passcode einzugeben.
Wählen Sie nun die Option „Google Authenticator“.
Auf diesem Bildschirm werden Sie aufgefordert, Ihr OTP aus Ihrer Google Authenticator-App einzugeben.
Geben Sie den Code ein und klicken Sie dann auf „Validieren“.
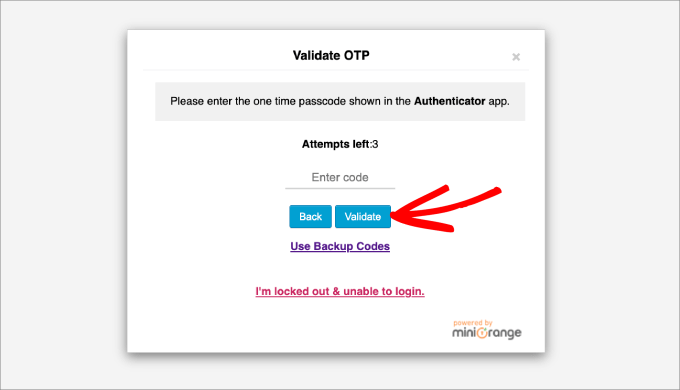
Nun landen Sie wieder wie gewohnt in Ihrem WordPress-Administrations-Dashboard.
Schließlich empfehlen wir allen, die 2-Schritt-Verifizierung für ihre Google-Konten zu aktivieren. Sie können dies auch mit Google Authenticator konfigurieren, wie in dieser Anleitung gezeigt.
Wir hoffen, dass dieser Artikel Ihnen geholfen hat, die Google Authenticator 2-Schritt-Verifizierung zu Ihrer WordPress-Website hinzuzufügen. Vielleicht möchten Sie auch unseren Artikel über die häufigsten WordPress-Fehler und deren Behebung oder unseren ultimativen Leitfaden zur Steigerung der Geschwindigkeit und Leistung von WordPress lesen.
Wenn Ihnen dieser Artikel gefallen hat, dann abonnieren Sie bitte unseren YouTube-Kanal für WordPress-Videotutorials. Sie können uns auch auf Twitter und Facebook finden.


Syed Balkhi says
Hey WPBeginner readers,
Did you know you can win exciting prizes by commenting on WPBeginner?
Every month, our top blog commenters will win HUGE rewards, including premium WordPress plugin licenses and cash prizes.
You can get more details about the contest from here.
Start sharing your thoughts below to stand a chance to win!
David says
I just tried this and it locked me out of my website. The codes weren’t working. How can I remove this authenticator and get my site back. Pls help
WPBeginner Support says
You can deactivate the plugin following our guide below:
https://www.wpbeginner.com/beginners-guide/how-to-easily-deactivate-wordpress-plugins/
Admin
ANOOP VAISH says
what have to do if mobile lost please discribe
WPBeginner Support says
Hi Anoop,
In that case you will have to deactivate WordPress plugins via FTP to login.
Admin
yasir khan saqlaini says
i am using this feature but i want to know how will i get google authenticator code while login wp dashbord.
WPBeginner Support says
Hello Yasir,
You will get Google Authenticator code inside the app you installed on your phone.
Admin
Danny D says
I’m surprised that nobody has mentioned Clef. This is the best 2-factor authentication for WordPress (and a lot of other websites as well). No passwords involved after initial setup. They have iOS and Android apps as well as chrome extensions to help with the setup. Works like a charm for me.
Sacha says
I agree – I absolutely love Clef. It makes things so easy and secure.
rohit says
Message To Syed Balkhi,
Well Fake GURUs Try to hack my website 100 Times a day Finally I have started using Google Authenticator and I change my Password every 10 days. I appreciate Your skills Thanks a lot.
Akhil K A says
Hi.
The plugin is compatible up to WP 3.8.8
Can I install on the latest version?
Thanks.
WPBeginner Support says
Yes you can. Please see, Should you install plugins not tested with your WordPress version.
Admin
Erick Perez says
you guys don’t use this on your own website, how come?
handi priyono says
Hello dude,, thanks for help me by writting this useful post.
this post very help me to prevent hacker to login to my web. thanks !!
WPBeginner Staff says
Please contact WordPress.com support.
WPBeginner Staff says
You can deactivate the plugin using an FTP client. See our guide on how to disable all plugins using FTP without wp-admin access.
Kavitha Krishnan says
I am using the WP.com hosting. So this option will not work for me.
Kavitha Krishnan says
Hi, I have uninstalled the Google app by mistake now i am unable to login to WP. i requested the account recovery also nothing worked. Is there any solution for my issue.
Sriram says
Hi,
What if I have a custom login page? How can I integrate this plugin in my custom login page?
Lorena Dennison says
I have my wordpress blog set up to receive a SMS code to log in… well my cell phone is shut off and can’t get the SMS Code…. so how can I log in and take that SMS off my blog?
WPBeginner Support says
You can’t unless you disable the plugin used to enable this two step authentication.
Admin
Kamran Abdul Aziz says
Aha, Google Authenticator & Authy they always works for me,
However is there any option where we can force users to use 2 Step verification?
Am not allowing my users to access the Backend, Their profile & everything is limited to front end only.
I don’t want them to access their backend & Setup 2 step.
Any solutions?
Brenda says
I installed the two-step google authenticator, both the app and the plugin. I updated the app and now all of the sudden I can’t generate a verification code, and therefore have not been able to login to my WordPress. I have no idea what „login using FTP“ or who my webmaster is. I signed up for a free worpress account because I wanted to start a little blog and now it appears to me I have to be a computer wizard to do something so basic, which is login!! Can you please help? And explain it to me like I’m a third grader. I don’t have the tech savviness you all do.
Thank you in advance
WPBeginner Support says
You mentioned that you have a free WordPress account. Does your blog address has wordpress.com in it? If that’s the case, then this tutorial is not for you. You need to contact WordPress.com support for assistance.
Admin
Zulfa Permata Suri says
I have set up two-step authentication for my wordpress blog. Suddenly I cant log-in it said the authentication code that i type is invalid and now I am locked out of my wordpress account.
Help me please, I want to use my wordpress but I cant log-in T.T
Editorial Staff says
Login to WordPress using FTP and delete the plugin.
Admin
Alyson says
Hi – I lost my phone with my google authenticator on it and now I can’t get into my site. I don’t know how to log in using ftp ..
HELP?
Thanks!
Editorial Staff says
Contact your webhosting provider. They’re the only one who have your FTP access and can help delete the plugin.
Cara Isaacs says
Hey,
I recently set up two-step authentication for my wordpress blog. Downloaded the google app and it all worked fine with log-in. Then changed the name of my blog and accidentally deleted the google authenticator app and now I am locked out of my wordpress account as it asks for the code yet I cannot generate a code because I can’t access my account to get the key.
I hope you can help.. PLEASE!
Editorial Staff says
Use FTP to delete the plugin.
Admin
Cara says
Thanks for your reply. I just downloaded the ftp software except it can’t seem to connect to the server. Looks like I will be starting a new blog…
Editorial Staff says
Hey Cara. Starting a new blog is not a good solution. Please get in touch with your hosting provider or send us an email. We can help you restore this and get it sorted out.
Everett Patterson says
Well I did some research and found that the hosting time may be different than the phone time and may cause issues with the codes.
I was able to log in to my Cpanel and delete the plugin. I still want to use it though so I added it back in and used the relaxed mode this time. Seems to be working now.
Thanks for this post, very helpful.
Everett Patterson says
Uh Oh. I locked myself out of my site.
Here’s what I did:
Added the plugin to my blog
Activated it, but didn’t check the „Active“ box
Added authenticator to my android
Scanned the QR code
Checked „Active“ box
Signed out
My phone gives me a new code every minute, but none of them work. What now?
Austin says
I did this too…. I logged into my host via FTP and deleted the Google Authenticator plugin.
Then I went through the process again and the plugin/app combo worked like a charm!
Hope you’re able to get back into your site (if you haven’t already).
Maria Muir says
I installed the plugin, followed the simple steps and have now been locked out of my site. I also have the failed attempt log in plugin which has blocked me for 3 failed attempts so now have to wait. I did put in the correct details and authentication code, I tripled checked the installation and settings, all are correct. So why can’t I log back in?
Editorial Staff says
Run this plugin in the relaxed mode.
Admin
Chris Burbridge says
It does concern me that when you install the plugin, you have to activate it user by user. That doesn’t make sense to me. Wouldn’t an administrator want to have it work for all users, otherwise there are holes in the net?
I have been trying this one, which is really great — http://wordpress.org/extend/plugins/duo-wordpress/ — there’s a free option, and it works similarly. It is very slick, with a smart phone.
Editorial Staff says
The reason why Google Authenticator requires each user to enable it themselves is because they have to connect their device with it. Google Authenticator is a great solution if you don’t like paying for a service. We are using it on our site. All we did was send an email to all users and ask them to turn it on.
Yes it requires a little bit of extra work, but it is surely worth it for a small company like ours. If you have hundreds of people in your team, then it would be worth to automate it with a service like the one you linked.
Admin
Michael says
This works great with Limit Login Attempts plug in. Great security feature if your blog does not have SSL capabilities.
yatin says
i love your site very helpful
what if Google authenticator app got uninstalled by mistake !!!!
after that how can i login in my wordpress site ?
Editorial Staff says
Delete the plugin. Then re-do the process.
Admin
Gerard says
Good article, good plugin and good subject
Love Authenticator app.
Kind regards,
Gerard.
Umer Rock says
Buy Syed bro it is not linked to google account ? then why you used google athenticator word , i think it is kind of 2 step verification system only,
Editorial Staff says
If you read the post carefully, you will see that the app this plugin uses is called Google Authenticator. Without using that application this would not work. If you actually follow the tutorial and download the application, then you will see that application is made by Google Inc.
Admin
Hadley says
I was able to successfully set up the Google Authenticator app for myself as an admin on my site, but was not able to set it up successfully for an editor on the same site. On the other user’s profile settings under Google Authenticator, the only options are to hide the Authenticator settings or make the user active with Google Authenticator. There aren’t the same options to type in a site description or view a secret code. After installing the app successfully to the other user’s phone, she was not able to sign in to the site and I’m wondering if this is due to the profile settings. Any advice?
Editorial Staff says
Interesting. It is probably best to contact the plugin author and see what the issue could be.
Admin
Ahmad Awais says
Putting our login authentication in hands of a 3rd party plugin?
Not more than 5k Downloads! What about its authenticity? Are you using it yourself #justcurious.
I am happy with .htpaswrd file.
Should we trust this code?
Except this a nice plugin for sure.
Editorial Staff says
The plugin has low downloads because not many people have jumped on board with this 2-step verification method. If you are happy with .htpaswd, then good for you. Yes, we are using it on our site along with all the other security measures.
Admin
Dilawer Pirzada says
Buzz! After my great efforts on securing WordPress blog from spammers and hackers, I myself today found a great plugin to stop hackers!
Thanks for the plugin!
Santel Phin says
Hi,
I have completed the setup and it works great. But do I have possibility to choose how to the verification code.
I did the same setup for my Google account, but it send via SMS in stead. And I do prefer this mode as well if it is possible.
But I don’t see any setting to chose send via SMS. Hope you can give me an idea if it is possible or not.
Thanks
Editorial Staff says
No the SMS option is not available. Mainly because for that you need a sending service which blogs are not equipped with. There is another plugin called „2-step verification“ that has the option to email the code. But no SMS.
Admin
Navneet Singh says
Plugin looking simple and POWERFUL.!!
Saad says
This Will Be Useful For Stopping Brute Force
Geoffrey Gordon says
Thanks Syed
WordPress security has always been a big issue in general, so the more educated people are regarding WordPress security the better. This is especially important as people see WordPress as a quick way to get a website up and running. Then one day without warning BANG their website is down by some hacker.
Busy checking out the Google authentication plugin for WordPress, looks good. I have ask though with all the security plugin’s installed on ones blog plus other plugins it tends to slow down the website. Sometimes its better to code what a plugin can do straight into your blog, rather than keep adding another plugin.
Editorial Staff says
This plugin works in the backend, so it will not have an impact on your site’s load time on the front-end.
Admin
Landfoci says
Good plugin. Thanks your share