Volete aggiungere la verifica in due passaggi di Google Authenticator al vostro sito WordPress?
Le password da sole non bastano a tenere lontani gli hacker e gli utenti non autorizzati. Fortunatamente, l’utilizzo della verifica in due passaggi di Google Authenticator può aggiungere un ulteriore livello di sicurezza al vostro sito web.
In questo articolo vi mostreremo come aggiungere la verifica in due passaggi al vostro sito WordPress utilizzando l’applicazione Google Authenticator.
Cos’è l’app Google Authenticator e perché ne avete bisogno per il vostro sito WordPress?
L’app Google Authenticator è un’applicazione mobile che aggiunge un secondo livello di autenticazione ogni volta che si accede a un’app o a un sito web di terze parti, come WordPress.
Purtroppo, a volte le password possono essere violate. Se utilizzate la stessa password su numerosi siti web, una falla nella sicurezza di uno di essi mette in pericolo gli altri account. Spesso le persone sono pigre e non cambiano le loro password anche dopo aver ricevuto un’e-mail su una compromissione della sicurezza di un sito importante.
La verifica in due passaggi è la soluzione giusta per questo. Anche se l’hacker conosce il nome utente e la password di WordPress, non sarà in grado di accedere al vostro sito web WordPress a meno che non disponga di un codice di sicurezza casuale limitato nel tempo (fornito da Google Authenticator).
Poiché il vostro blog è collegato direttamente al vostro dispositivo mobile, sarete l’unica persona ad avere accesso al codice unico per ogni login. Il codice scade in breve tempo per motivi di sicurezza.
L’applicazione Google Authenticator è solo un esempio di applicazione mobile che fornisce l’autenticazione a due fattori (2FA) per vari account e servizi online.
Genera password monouso a tempo (TOTP) che servono come secondo fattore di autenticazione quando si accede a un account.
Se non siete ancora convinti dell’importanza della sicurezza di WordPress, allora dovreste vedere come è stata distrutta la vita digitale di uno degli autori di Wired.com.
Dopo aver letto questa storia, siamo saliti a bordo con l’autenticazione in due passaggi per i nostri account Google e per la maggior parte degli altri servizi che offrono questa funzione. Se siete attenti alla sicurezza come noi e tenete al vostro blog, allora dovreste seguire questo suggerimento per migliorare la sicurezza di WordPress.
Nota: Google Authenticator funziona solo su dispositivi iOS, Android, Windows Phone, webOS, PalmOS e BlackBerry. In altre parole, è necessario lo smartphone per accedere al sito web.
Per migliorare ulteriormente la vostra sicurezza, vi consigliamo di considerare anche altri metodi. Ad esempio, un software come 1Password può aiutarvi a gestire le vostre password in un unico posto e a garantire che siano abbastanza forti da resistere a potenziali hacker.
Detto questo, passiamo al tutorial su come aggiungere la verifica in due passaggi di Google Authenticator al vostro sito WordPress.
Come aggiungere Google Authenticator a WordPress
La prima cosa da fare è installare l’app Google Authenticator sul telefono. Per questo tutorial utilizzeremo la terminologia iOS, ma la procedura è simile anche per altri dispositivi.
Passo 1: installare l’applicazione Google Authenticator sul dispositivo mobile
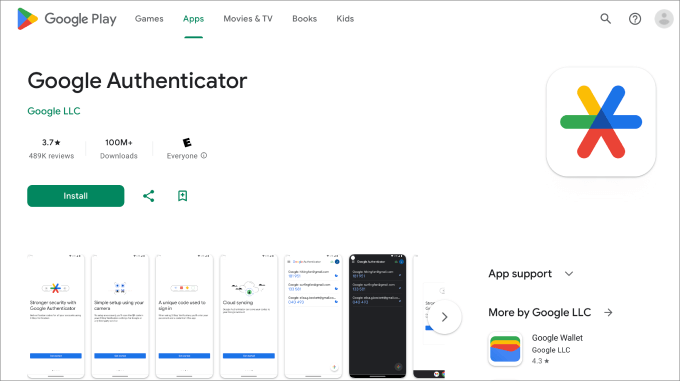
Visitate l’App Store, cercate “Google Authenticator” e fate clic su “Installa” per l’applicazione.
Ora torniamo alla dashboard di WordPress.
Passo 2: installare il plugin Google Authenticator di MiniOrange
Procedete all’installazione e all’attivazione del plugin Google Authenticator di MiniOrange. Per maggiori dettagli, potete consultare la nostra guida passo-passo su come installare un plugin di WordPress.
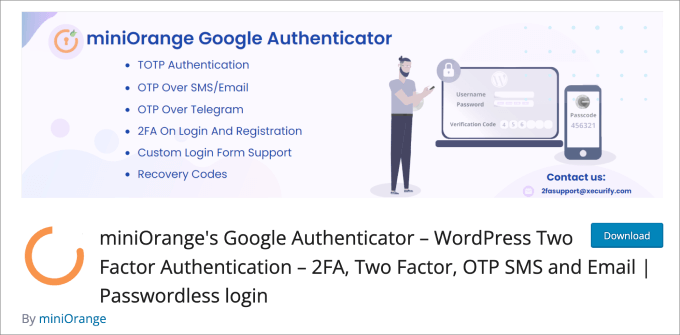
È un plugin gratuito per WordPress che aiuta a proteggere il vostro sito da accessi non autorizzati. Ogni volta che accedete a WordPress, vi verrà chiesto di inserire il codice di accesso unico dell’app Google Authenticator per verificare la vostra identità.
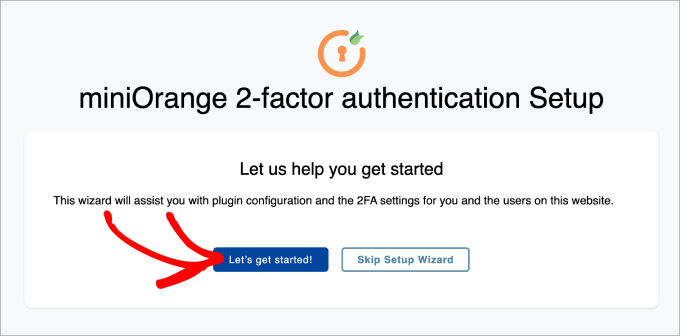
Dopo aver attivato il plugin, si aprirà una procedura di configurazione guidata. Seguite la procedura per impostare l’autenticazione a due fattori di Google Authenticator in WordPress.
Passo 3: completare l’installazione guidata
Iniziate facendo clic sul pulsante “Cominciamo!
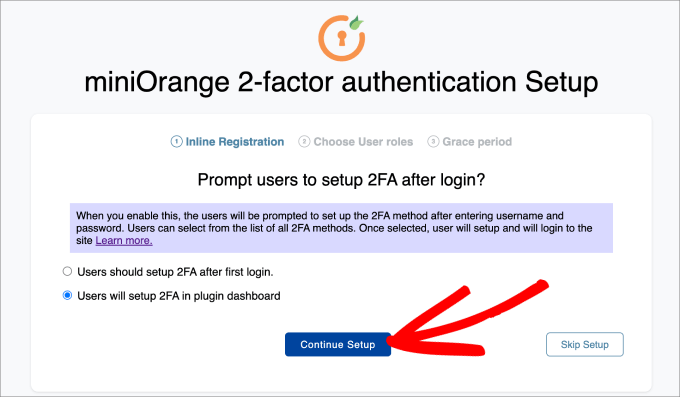
Successivamente, vi verrà chiesto se volete impostare la 2FA dopo il primo accesso o all’interno della dashboard del plugin. Entrambi i metodi vanno bene.
Fare clic su “Continua la configurazione”.
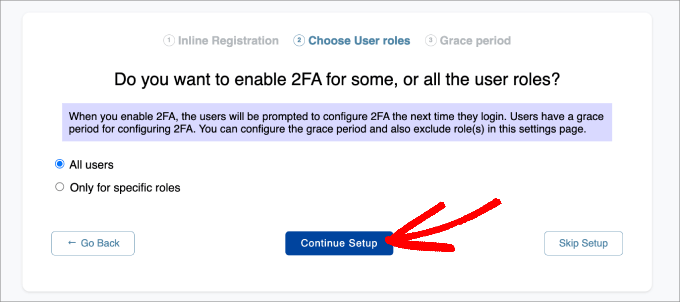
Il passo successivo è quello di scegliere a chi applicare la 2FA. Si possono selezionare tutti gli utenti per ottenere la massima sicurezza, oppure si può applicare solo a determinati ruoli utente.
Quindi premere “Continua configurazione”.
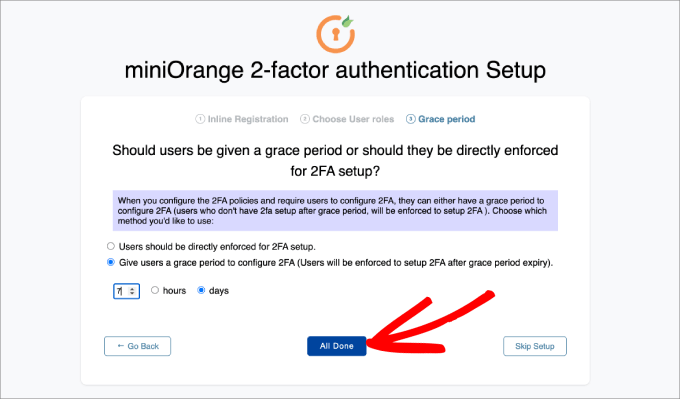
Infine, vi verrà chiesto se volete applicare direttamente la 2FA immediatamente o se volete concedere agli utenti un periodo di tolleranza.
Se si sceglie di concedere agli utenti un periodo di tolleranza, è possibile selezionare la durata in ore e giorni. Una volta completata l’operazione, fare clic su “Tutto fatto”.
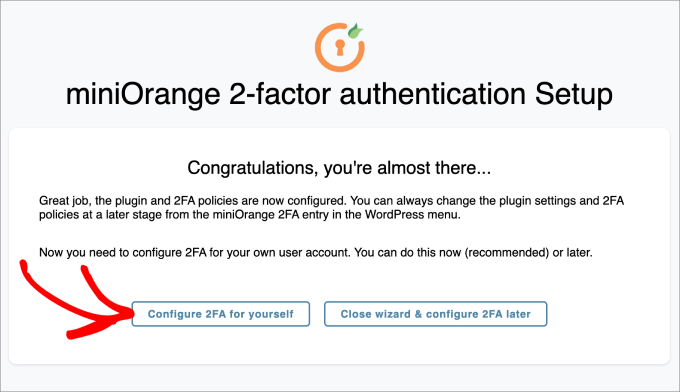
Una volta terminato il processo di configurazione, si può decidere se impostare la 2FA per se stessi ora o in seguito.
Procedete con il pulsante “Configura 2FA per te stesso”.
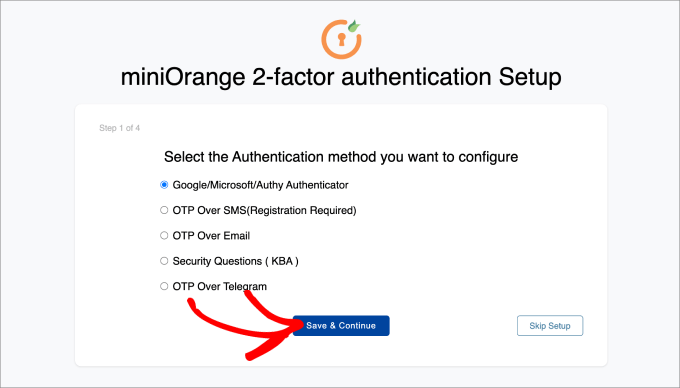
Da qui, vi verrà chiesto di inserire il metodo di autenticazione a due fattori che desiderate aggiungere al vostro sito WordPress.
Per questa esercitazione, sceglieremo “Google/Microsoft/Authy Authenticator”. Quindi, premere il pulsante “Salva e continua”.
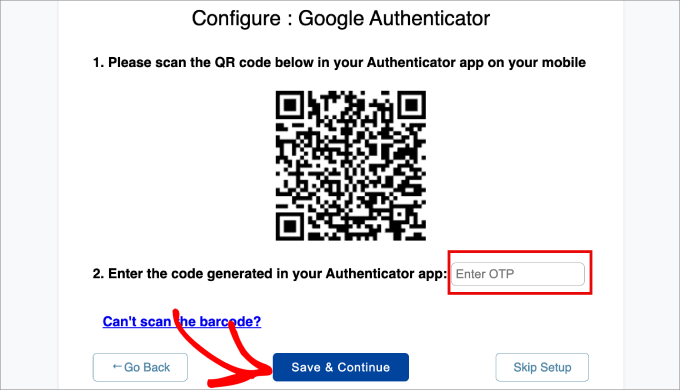
Successivamente, vi verrà chiesto di scansionare il codice a barre sullo schermo. Ciò significa che dovrete richiamare l’app Google Authenticator sul vostro telefono e scansionare il codice a barre visualizzato.
Nell’app Google Authenticator sul dispositivo mobile, premere l’icona “+” in basso e selezionare “Scansiona un codice QR”. Quindi, puntate la fotocamera del telefono sullo schermo del computer per scansionare il codice a barre.
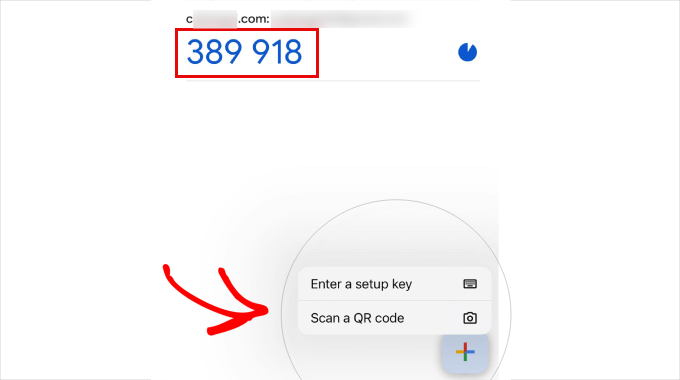
Da qui, sul dispositivo mobile apparirà un codice di accesso unico (OTP).
Digitate questo dato nel passo 2 del vostro computer. Da qui, potete fare clic su “Salva e continua”.
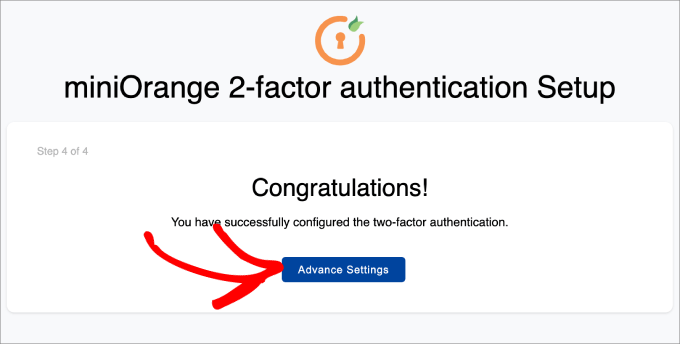
Ora si dovrebbe ricevere un messaggio che indica che l’autenticazione a due fattori è stata configurata con successo.
È sufficiente selezionare “Impostazioni avanzate”.
Passo 4: Aggiungere le domande di sicurezza
Oltre ad aggiungere l’autenticazione a due fattori di Google Authenticator, probabilmente si desidera aggiungere anche le domande di sicurezza.
Se non riuscite ad accedere all’app Google Authenticator, potete comunque accedere al vostro sito WordPress rispondendo alle domande di sicurezza che avete impostato per voi.
Dovrete andare alla pagina Mini Orange 2-Factor ” Two Factor nella vostra dashboard di amministrazione di WordPress. Quindi, nella scheda Setup 2FA For Me (Configura 2FA per me), trovare il metodo Security Questions (Domande di sicurezza) e fare clic su “Reconfigure” (Riconfigura).
Tenete presente che potete impostare anche altri tipi di metodi di autenticazione a due fattori, come la verifica via e-mail, OTP via SMS, OTP via e-mail, OTP via Telegram e persino Duo Authenticator.
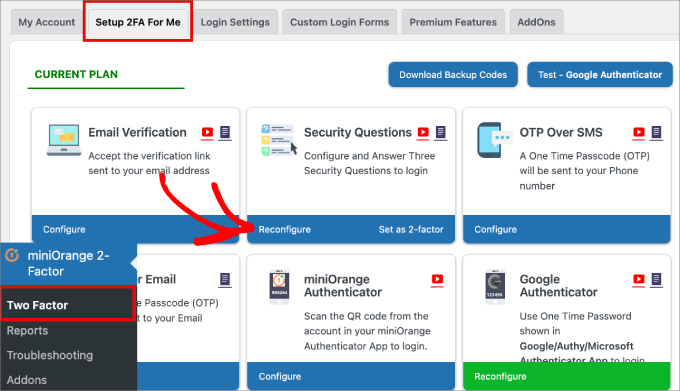
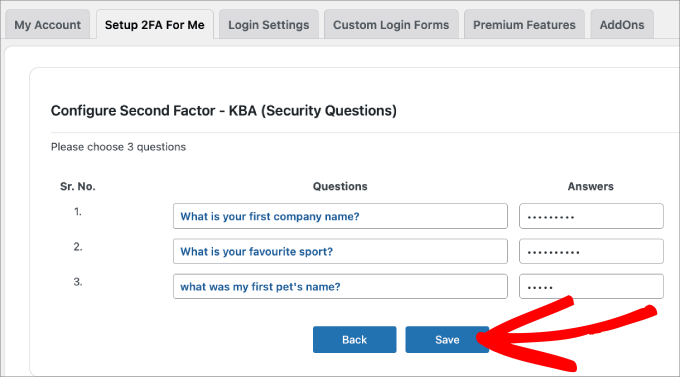
Successivamente, sarà possibile selezionare fino a tre domande di sicurezza. Due di esse possono essere selezionate da un menu a tendina, mentre la terza sarà una domanda personalizzata che potrete inventare da soli.
Quindi, digitate la risposta per ciascuno di essi e premete il pulsante “Salva”.
Fase 5: Testate voi stessi
Una volta che tutto è stato configurato, è possibile testarlo da soli.
È sufficiente uscire dalla dashboard di WordPress e provare a rientrare.
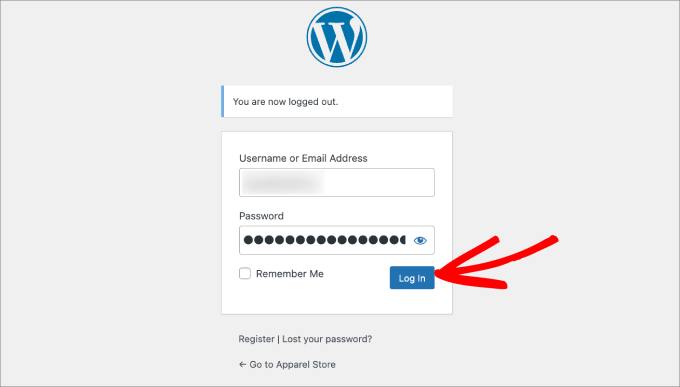
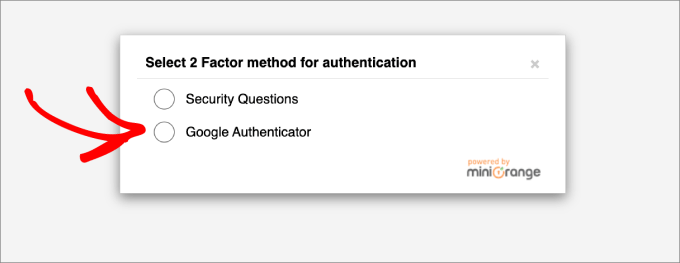
A questo punto si accede a una pagina in cui è possibile rispondere alle domande di sicurezza o utilizzare Google Authenticator per inserire il codice di accesso unico.
Selezionate l’opzione “Autenticatore Google”.
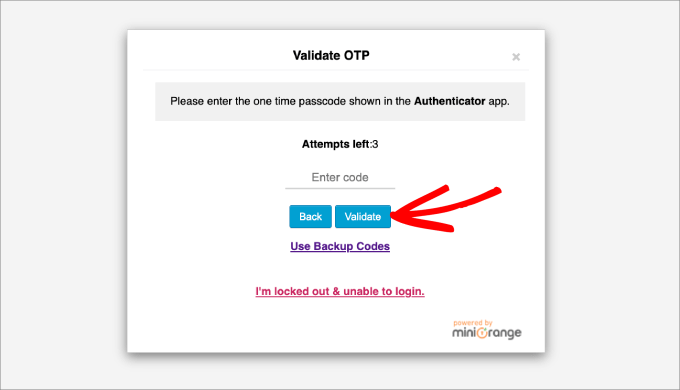
In questa schermata, vi verrà chiesto di inserire l’OTP dall’app Google Authenticator.
Digitare il codice e fare clic su “Convalida”.
A questo punto, tornerete nella vostra dashboard di amministrazione di WordPress, come al solito.
Infine, consigliamo a tutti di attivare la verifica in due passaggi sui propri account Google. È possibile configurarla anche con Google Authenticator, come illustrato in questa esercitazione.
Speriamo che questo articolo vi abbia aiutato ad aggiungere la verifica in due passaggi di Google Authenticator al vostro sito web WordPress. Potreste anche dare un’occhiata al nostro articolo sugli errori più comuni di WordPress e su come risolverli o alla nostra guida definitiva per aumentare la velocità e le prestazioni di WordPress.
Se questo articolo vi è piaciuto, iscrivetevi al nostro canale YouTube per le esercitazioni video su WordPress. Potete trovarci anche su Twitter e Facebook.


Syed Balkhi says
Hey WPBeginner readers,
Did you know you can win exciting prizes by commenting on WPBeginner?
Every month, our top blog commenters will win HUGE rewards, including premium WordPress plugin licenses and cash prizes.
You can get more details about the contest from here.
Start sharing your thoughts below to stand a chance to win!
David says
I just tried this and it locked me out of my website. The codes weren’t working. How can I remove this authenticator and get my site back. Pls help
WPBeginner Support says
You can deactivate the plugin following our guide below:
https://www.wpbeginner.com/beginners-guide/how-to-easily-deactivate-wordpress-plugins/
Admin
ANOOP VAISH says
what have to do if mobile lost please discribe
WPBeginner Support says
Hi Anoop,
In that case you will have to deactivate WordPress plugins via FTP to login.
Admin
yasir khan saqlaini says
i am using this feature but i want to know how will i get google authenticator code while login wp dashbord.
WPBeginner Support says
Hello Yasir,
You will get Google Authenticator code inside the app you installed on your phone.
Admin
Danny D says
I’m surprised that nobody has mentioned Clef. This is the best 2-factor authentication for WordPress (and a lot of other websites as well). No passwords involved after initial setup. They have iOS and Android apps as well as chrome extensions to help with the setup. Works like a charm for me.
Sacha says
I agree – I absolutely love Clef. It makes things so easy and secure.
rohit says
Message To Syed Balkhi,
Well Fake GURUs Try to hack my website 100 Times a day Finally I have started using Google Authenticator and I change my Password every 10 days. I appreciate Your skills Thanks a lot.
Akhil K A says
Hi.
The plugin is compatible up to WP 3.8.8
Can I install on the latest version?
Thanks.
WPBeginner Support says
Yes you can. Please see, Should you install plugins not tested with your WordPress version.
Admin
Erick Perez says
you guys don’t use this on your own website, how come?
handi priyono says
Hello dude,, thanks for help me by writting this useful post.
this post very help me to prevent hacker to login to my web. thanks !!
WPBeginner Staff says
Please contact WordPress.com support.
WPBeginner Staff says
You can deactivate the plugin using an FTP client. See our guide on how to disable all plugins using FTP without wp-admin access.
Kavitha Krishnan says
I am using the WP.com hosting. So this option will not work for me.
Kavitha Krishnan says
Hi, I have uninstalled the Google app by mistake now i am unable to login to WP. i requested the account recovery also nothing worked. Is there any solution for my issue.
Sriram says
Hi,
What if I have a custom login page? How can I integrate this plugin in my custom login page?
Lorena Dennison says
I have my wordpress blog set up to receive a SMS code to log in… well my cell phone is shut off and can’t get the SMS Code…. so how can I log in and take that SMS off my blog?
WPBeginner Support says
You can’t unless you disable the plugin used to enable this two step authentication.
Admin
Kamran Abdul Aziz says
Aha, Google Authenticator & Authy they always works for me,
However is there any option where we can force users to use 2 Step verification?
Am not allowing my users to access the Backend, Their profile & everything is limited to front end only.
I don’t want them to access their backend & Setup 2 step.
Any solutions?
Brenda says
I installed the two-step google authenticator, both the app and the plugin. I updated the app and now all of the sudden I can’t generate a verification code, and therefore have not been able to login to my WordPress. I have no idea what “login using FTP” or who my webmaster is. I signed up for a free worpress account because I wanted to start a little blog and now it appears to me I have to be a computer wizard to do something so basic, which is login!! Can you please help? And explain it to me like I’m a third grader. I don’t have the tech savviness you all do.
Thank you in advance
WPBeginner Support says
You mentioned that you have a free WordPress account. Does your blog address has wordpress.com in it? If that’s the case, then this tutorial is not for you. You need to contact WordPress.com support for assistance.
Admin
Zulfa Permata Suri says
I have set up two-step authentication for my wordpress blog. Suddenly I cant log-in it said the authentication code that i type is invalid and now I am locked out of my wordpress account.
Help me please, I want to use my wordpress but I cant log-in T.T
Editorial Staff says
Login to WordPress using FTP and delete the plugin.
Admin
Alyson says
Hi – I lost my phone with my google authenticator on it and now I can’t get into my site. I don’t know how to log in using ftp ..
HELP?
Thanks!
Editorial Staff says
Contact your webhosting provider. They’re the only one who have your FTP access and can help delete the plugin.
Cara Isaacs says
Hey,
I recently set up two-step authentication for my wordpress blog. Downloaded the google app and it all worked fine with log-in. Then changed the name of my blog and accidentally deleted the google authenticator app and now I am locked out of my wordpress account as it asks for the code yet I cannot generate a code because I can’t access my account to get the key.
I hope you can help.. PLEASE!
Editorial Staff says
Use FTP to delete the plugin.
Admin
Cara says
Thanks for your reply. I just downloaded the ftp software except it can’t seem to connect to the server. Looks like I will be starting a new blog…
Editorial Staff says
Hey Cara. Starting a new blog is not a good solution. Please get in touch with your hosting provider or send us an email. We can help you restore this and get it sorted out.
Everett Patterson says
Well I did some research and found that the hosting time may be different than the phone time and may cause issues with the codes.
I was able to log in to my Cpanel and delete the plugin. I still want to use it though so I added it back in and used the relaxed mode this time. Seems to be working now.
Thanks for this post, very helpful.
Everett Patterson says
Uh Oh. I locked myself out of my site.
Here’s what I did:
Added the plugin to my blog
Activated it, but didn’t check the “Active” box
Added authenticator to my android
Scanned the QR code
Checked “Active” box
Signed out
My phone gives me a new code every minute, but none of them work. What now?
Austin says
I did this too…. I logged into my host via FTP and deleted the Google Authenticator plugin.
Then I went through the process again and the plugin/app combo worked like a charm!
Hope you’re able to get back into your site (if you haven’t already).
Maria Muir says
I installed the plugin, followed the simple steps and have now been locked out of my site. I also have the failed attempt log in plugin which has blocked me for 3 failed attempts so now have to wait. I did put in the correct details and authentication code, I tripled checked the installation and settings, all are correct. So why can’t I log back in?
Editorial Staff says
Run this plugin in the relaxed mode.
Admin
Chris Burbridge says
It does concern me that when you install the plugin, you have to activate it user by user. That doesn’t make sense to me. Wouldn’t an administrator want to have it work for all users, otherwise there are holes in the net?
I have been trying this one, which is really great — http://wordpress.org/extend/plugins/duo-wordpress/ — there’s a free option, and it works similarly. It is very slick, with a smart phone.
Editorial Staff says
The reason why Google Authenticator requires each user to enable it themselves is because they have to connect their device with it. Google Authenticator is a great solution if you don’t like paying for a service. We are using it on our site. All we did was send an email to all users and ask them to turn it on.
Yes it requires a little bit of extra work, but it is surely worth it for a small company like ours. If you have hundreds of people in your team, then it would be worth to automate it with a service like the one you linked.
Admin
Michael says
This works great with Limit Login Attempts plug in. Great security feature if your blog does not have SSL capabilities.
yatin says
i love your site very helpful
what if Google authenticator app got uninstalled by mistake !!!!
after that how can i login in my wordpress site ?
Editorial Staff says
Delete the plugin. Then re-do the process.
Admin
Gerard says
Good article, good plugin and good subject
Love Authenticator app.
Kind regards,
Gerard.
Umer Rock says
Buy Syed bro it is not linked to google account ? then why you used google athenticator word , i think it is kind of 2 step verification system only,
Editorial Staff says
If you read the post carefully, you will see that the app this plugin uses is called Google Authenticator. Without using that application this would not work. If you actually follow the tutorial and download the application, then you will see that application is made by Google Inc.
Admin
Hadley says
I was able to successfully set up the Google Authenticator app for myself as an admin on my site, but was not able to set it up successfully for an editor on the same site. On the other user’s profile settings under Google Authenticator, the only options are to hide the Authenticator settings or make the user active with Google Authenticator. There aren’t the same options to type in a site description or view a secret code. After installing the app successfully to the other user’s phone, she was not able to sign in to the site and I’m wondering if this is due to the profile settings. Any advice?
Editorial Staff says
Interesting. It is probably best to contact the plugin author and see what the issue could be.
Admin
Ahmad Awais says
Putting our login authentication in hands of a 3rd party plugin?
Not more than 5k Downloads! What about its authenticity? Are you using it yourself #justcurious.
I am happy with .htpaswrd file.
Should we trust this code?
Except this a nice plugin for sure.
Editorial Staff says
The plugin has low downloads because not many people have jumped on board with this 2-step verification method. If you are happy with .htpaswd, then good for you. Yes, we are using it on our site along with all the other security measures.
Admin
Dilawer Pirzada says
Buzz! After my great efforts on securing WordPress blog from spammers and hackers, I myself today found a great plugin to stop hackers!
Thanks for the plugin!
Santel Phin says
Hi,
I have completed the setup and it works great. But do I have possibility to choose how to the verification code.
I did the same setup for my Google account, but it send via SMS in stead. And I do prefer this mode as well if it is possible.
But I don’t see any setting to chose send via SMS. Hope you can give me an idea if it is possible or not.
Thanks
Editorial Staff says
No the SMS option is not available. Mainly because for that you need a sending service which blogs are not equipped with. There is another plugin called “2-step verification” that has the option to email the code. But no SMS.
Admin
Navneet Singh says
Plugin looking simple and POWERFUL.!!
Saad says
This Will Be Useful For Stopping Brute Force
Geoffrey Gordon says
Thanks Syed
WordPress security has always been a big issue in general, so the more educated people are regarding WordPress security the better. This is especially important as people see WordPress as a quick way to get a website up and running. Then one day without warning BANG their website is down by some hacker.
Busy checking out the Google authentication plugin for WordPress, looks good. I have ask though with all the security plugin’s installed on ones blog plus other plugins it tends to slow down the website. Sometimes its better to code what a plugin can do straight into your blog, rather than keep adding another plugin.
Editorial Staff says
This plugin works in the backend, so it will not have an impact on your site’s load time on the front-end.
Admin
Landfoci says
Good plugin. Thanks your share