WordPressの組織力をさらに高めたいですか?カスタムタクソノミーにカスタムメタフィールドを追加してみてください。
カスタムタクソノミーを使えば、カテゴリーやタグを超えてコンテンツを整理することができます。カスタムメタフィールドの出番です。
この投稿では、WordPressのカスタムタクソノミーにメタ情報を追加する方法を紹介します。

カスタムタクソノミーにカスタムメタフィールドを追加するタイミングは?
WordPressサイトで新規コンテンツを作成する場合、カテゴリーとタグの2つの初期設定タクソノミーを使って整理することができます。
サイトによっては、カスタムタクソノミーが有効な場合があります。カスタムタクソノミーを使用することで、コンテンツをさらに分類することができます。
例えば、書評を投稿するサイトでは、訪問者が興味のある書評をすぐに見つけられるように、「テーマ」と「投稿者」というタクソノミーが追加できる。
詳しくは、WordPressでカスタムタクソノミーを作成する方法をご覧ください。
各タクソノミーは初期設定では、名前、スラッグ、親(階層化されている場合)、説明の3つか4つのフィールドしか持っていません。
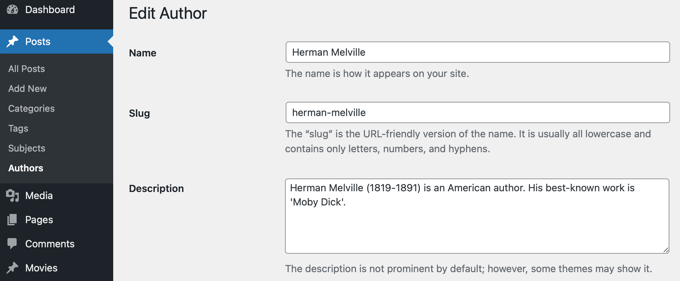
タクソノミーをよりよく記述するために、追加のフィールドを追加することが有用な場合があります。例えば、’authors’タクソノミーに’year of birth’フィールドを追加することができます。
ということで、WordPressのカスタムタクソノミーにカスタムメタフィールドを追加する方法をご紹介します。
ステップ1:WordPressのカスタムタクソノミーにカスタムメタフィールドを追加する
まず、Advanced Custom Fieldsプラグインをインストールして有効化する必要があります。さらに詳しく知りたい方は、WordPressプラグインのインストール方法のステップバイステップガイドをご覧ください。
次に、カスタムフィールド ” 新規追加ページに移動します。ここで1つ以上の新規フィールドを含むフィールドグループを追加できます。
フィールドグループにタイトルをつけるよう求められますが、これはタクソノミーを追加または編集するときに新規フィールドと一緒に表示されます。このチュートリアルでは、投稿者タクソノミーにカスタムフィールドを追加したいので、フィールドグループの名前を’Author Details’とします。
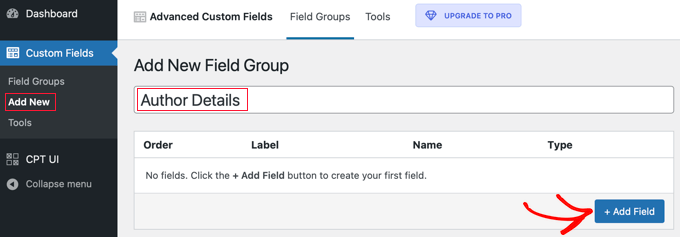
そうしたら、「+ Add Field」ボタンをクリックしてフィールドを追加してください。新規フィールドの詳細を入力するための新しいフォームが外観表示されます。
フィールド・ラベルを入力すると、フィールド名が自動的に作成されます。チュートリアルの後半でこのフィールド名を使う必要があるので、メモしておいてください。
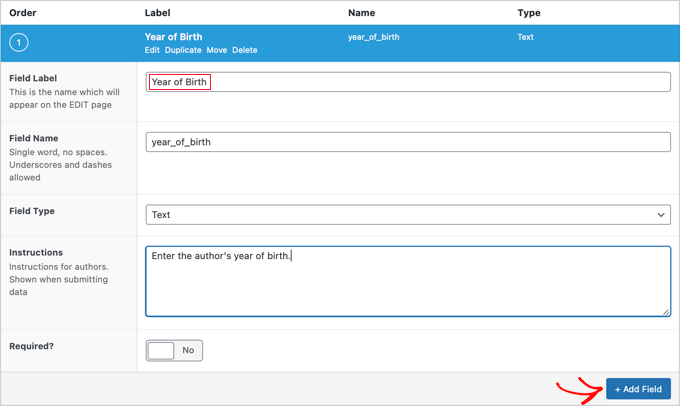
次に、フィールドタイプ、フォームに入力する投稿者への指示、このフィールドが必須かどうかなど、フィールドのその他の詳細を入力します。スクリーンショットに表示されていないオプションには、初期設定テキスト、プレースホルダーテキスト、文字数制限などがあります。
2つ目のフィールドを追加したい場合は、「+ Add Field」ボタンをクリックし、このプロセスを繰り返してください。そうでなければ、単に「場所」セクションまでスクロールダウンしてください。
ここで、新規フィールドを表示する場所を記述するルールを作成することができます。最初のドロップダウンメニューから’タクソノミー’を選択し、真ん中のフィールドは’is equal to’のままにしておきます。最後に、最後のフィールドに正しいカスタムタクソノミーを選択します。このチュートリアルでは、’投稿者’を選択します。

このフィールドを別のタクソノミーに追加したい場合は、「ルールグループの追加」ボタンをクリックして、ステップを繰り返すことができます。
次に、ページ上のその他の設定を調整します。ここでは初期設定のままにします。設定が終わったら、ページを一番上までスクロールし、「公開する」ボタンをクリックしてください。

WordPressのカスタムタクソノミーにカスタムメタフィールドを追加できました。しかし、まだやることがあります。
ステップ 2: 新規カスタマイザーフィールドへのデータ追加
タクソノミーには新しいフィールドがありますが、まだデータは入っていません。今、その作業に時間をかけるべきです。
この例では、各投稿者の生年を入力する必要があります。そのためには、投稿日 “投稿者に移動し、編集したい投稿者の名前をクリックする必要があります。

その後、新しいフィールドにデータを入力することができる。この場合、投稿者の生年を入力します。更新」ボタンをクリックして、新しいデータを保存することを忘れないでください。
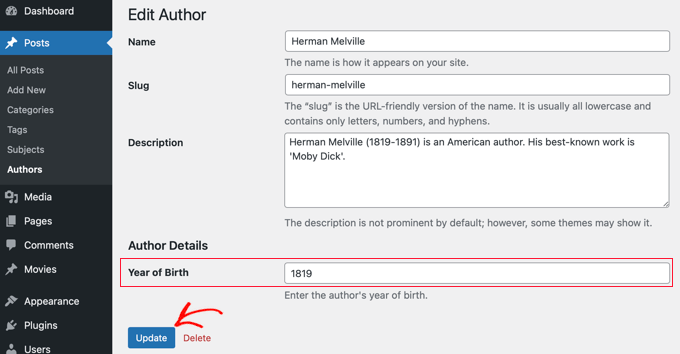
カスタムタクソノミーにデータを追加するには、サイト上で同じ手順に従ってください。
設定が終わっても、まだ1ステップ残っています。WordPressの管理エリアにログイン中はカスタムフィールドを見ることができますが、サイトの訪問者には見えません。カスタムタクソノミーのアーカイブページにフィールドを追加する必要があります。
ステップ 3: カスタムメタフィールドをタクソノミーアーカイブページに表示する
このステップでは、テーマファイルにコードを追加する必要があります。コードを追加したことがない場合は、WordPressにウェブからスニペットを貼り付ける方法についての初心者ガイドを参照してください。
まず最初に行う必要があるのは、テーマのフォルダーの中に入り、タクソノミーのアーカイブファイルを探すことです。タクソノミーアーカイブファイルはtaxonomy-YOURTAXONOMYNAME.phpのような名前を持っています。
例えば、’authors’というカスタムタクソノミーを持つ場合、taxonomy-authors.phpというファイルを探す必要があります。
そのファイルが見つからない場合は、archive.phpを探してください。そのファイルの複製を作成し、上記のように名前を付ける必要があります。
注:もしあなたのテーマがarchive.phpを含んでいない場合、おそらくWordPressテーマフレームワークを使用しており、手動でタクソノミーアーカイブを作成する必要があります。アーカイブファイルの作成方法を学ぶための良い出発点は、WordPressでカスタムアーカイブページを作成する方法のガイドです。
タクソノミー・アーカイブのループの直前に以下のコードを追加する必要がある:
<?php

// get the current taxonomy term
$term = get_queried_object();

// get the taxonomy meta field
$taxonomymetafield = get_field('FIELDNAME', $term);

// display the taxonomy meta field
echo $taxonomymetafield;

?>
FIELDNAME」を上記で作成した実際のフィールド名に置き換える必要があることに注意してください。覚えておいてください。
この例では、フィールド名は’year_of_birth’です。訪問者がフィールドの意味を理解できるように説明も追加します。そこで、タクソノミーアーカイブファイルtaxonomy-authors.phpに以下のコードを追加します:
<?php

// get the current taxonomy term
$term = get_queried_object();

// get the taxonomy meta field
$taxonomymetafield = get_field('year_of_birth', $term);

// display the taxonomy meta field
echo "Year of birth: ";
echo $taxonomymetafield;

?>
デモサイトでテストしてみたところ、こんな感じでした:
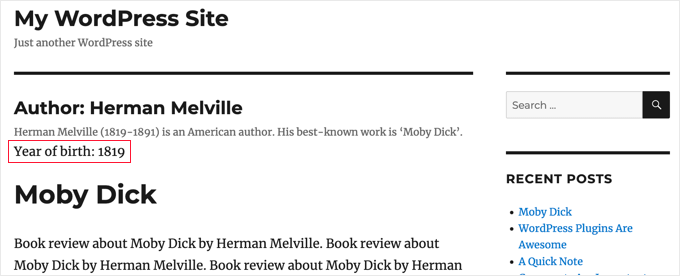
このチュートリアルで、WordPressのカスタムタクソノミーにカスタムメタフィールドを追加する方法を学んでいただけたら幸いです。また、WordPress でキーワードとメタ情報を追加する方法や、サイトを成長させるために必要なプラグインのリストもご覧ください。
If you liked this article, then please subscribe to our YouTube Channel for WordPress video tutorials. You can also find us on Twitter and Facebook.


Tarek Anandan
If you can’t your data to display and you’re using a recent version of WordPress, use get_term_meta() instead of get_tax_meta().
Subin
here’s my code:
$config = array(
‘id’ => ‘tax_meta_box’, // meta box id, unique per meta box
‘title’ => ‘Tax Meta Box’, // meta box title
‘pages’ => array(‘category’), // taxonomy name, accept categories, post_tag and custom taxonomies
‘context’ => ‘normal’, // where the meta box appear: normal (default), advanced, side; optional
‘fields’ => array(), // list of meta fields (can be added by field arrays)
‘local_images’ => false, // Use local or hosted images (meta box images for add/remove)
‘use_with_theme’ => get_template_directory_uri() . ‘/Tax-Meta-Class/Tax-meta-class’
);
/*
* Initiate your meta box
*/
$my_meta = new Tax_Meta_Class($config);
//Image field
$my_meta->addImage(‘image_field’,array(‘name’=> __(‘My Image ‘,’tax-meta’)));
$my_meta->Finish();
———————————————————————————————————————–
term_id;
$saved_data = get_tax_meta($term_id,’image_field’,true);
echo ”;
echo $term_id; // Echoes ‘1’ which is the category ID
echo $saved_data; // Doesn’t show anything . Wonder Why!!
exit;
?>
James Dower
I’m also having issues getting the path for an uploaded image. It just echos:
Array
…text fields are fine.
I’m using:
$prefix = ‘ttp_’;
$my_meta->addImage($prefix.’logo_id’,array(‘name’=> __(‘Logo’,’tax-meta’)));
And on the taxonomy.php page:
$logo = get_tax_meta($term->term_id, ttp_logo_id);
Can anyone help please? I’ve been at this for HOURS!
James Dower
…and is anyone please able to explain how to echo repeater fields?!
James Dower
For all those struggling to get this to read out, I found a stray apostrophe in there, this works for me:
$data = get_tax_meta($term->term_id, ba_text_field_id);
echo $data;
siva
Hi Team very very thank you…..
Ketan
Hi,
I am activate plugin. but i don’t show where i can add custom taxonomy filed in admin side. please replay me.
Thanks,
Ketan.
Francisco
Thanks a lot this has been very useful!!!!
I displayer correclty a text field using this code:
//Get the correct taxonomy ID by slug
$term = get_term_by( ‘slug’, get_query_var( ‘term’ ), get_query_var( ‘taxonomy’ ) );
//Get Taxonomy Meta
$saved_data = get_tax_meta($term->term_id,’ba_text_field_id’);
echo $saved_data;
BUT I need to display an image too, I’m using this php code in my template:
//Get the correct taxonomy ID by slug
$term = get_term_by( ‘slug’, get_query_var( ‘term’ ), get_query_var( ‘taxonomy’ ) );
//Get Taxonomy Meta
$saved_data = get_tax_meta($term->term_id,’ba_image_field_id’);
echo $saved_data;
But it doesn’t display anything!
It just shows a single word “array”
What could be wrong?
David Beastall
Thanks for that, the tutorial seems incomplete imo.
Hemanta Chakladar
I’m also searching for that.
Hemanta Chakladar
I’m stuck.
I can see meta data option in wordpress category and not in my custom taxonomy. Where can I add this option to add custom meta in my custom taxonomy ? Where that is defined ?
Marco Panichi
How to add a multiple checkbox in order to select one or more users?
Ankur
Hi Marco, Did you get any answer on it? I am also looking for the same functionality.
Joe Chow
thanks a lot.I can see there are bunch of fields showed at the post category. However, I just want to know how to make the code to be used for woocommerce product category only.
Can anyone give a tip?
Joe
How would you get the taxonomy information on a custom page template instead of a taxonomy.php page?
Jason Gateman
Thanks for this tutorial! How do I get the meta to show on a custom post page I have created as opposed to just the taxonomy page?
AD
Hi Guys,
For those who are having issues with displaying the content that is saved. Use the prefix in front of the key.
//Get Taxonomy Meta
$saved_data = get_tax_meta($term->term_id,’text_field_id’);
echo $saved_data;
That should be ba_text_field_id (Given that the prefix is ba_) .
Hope this helps cheers.
Dan
I wanted to second this comment, as it can be quite puzzling to figure out why the example doesn’t work. If you look in the “Tax meta class” file you will see at the top that Ohad defines a $prefix variable that is appended to each save function.
So in order to get the result to echo out, you need to include the prefix. You can set the prefix to anything you want, including “”. I have no idea what “ba_” stands for, but that is what is in there by default.
The example should read:
$saved_data = get_tax_meta($term->term_id,’ba_text_field_id’);
Chris
Thanks a lot! Works great. You saved me a lot of time coding.
Ante
Ok, I’m stuck.
//Get the correct taxonomy ID by slug
$term = get_term_by( ‘slug’, get_query_var( ‘term’ ), get_query_var( ‘taxonomy’ ) );
//Get Taxonomy Meta
$saved_data = get_tax_meta($term->term_id,’text_field_id’);
echo $saved_data;
So ‘taxonomy’ is my custom taxonomy, let’s say ‘project_clients’
‘text_field_id’ is the id of input field, it’s $prefix.’text_area’…
What’s ‘term’ ?????
Steve
Ante,
Have you had any progress with this??
I’m wondering the same question – poured over so many comments and pages talking about this, but cannot find a resolution. Any help would be appreciated if you have found the answer.
Simply adding the following to my taxonomy.php file is not working:
//Get the correct taxonomy ID by slug
$term = get_term_by( ‘slug’, get_query_var( ‘term’ ), get_query_var( ‘taxonomy’ ) );
//Get Taxonomy Meta
$saved_data = get_tax_meta($term->term_id,’text_field_id’);
echo $saved_data;
fp-admin
I am trying to add whatever I put in the WYSIWYG to the front end of the website. I honestly have no clue what I’m doing but this is my code so far:
term_id,’wysiwyg_field_id’);
?>
<a href="”>
ELiane
Hi,
I used the plugin but I can get the code on my Taxonomy.php.
I Use this code to display the field
term_id,’text_field_id’);
echo $saved_data;
?>
Do I have to do something else?
Thanks
WPBeginner Support
yes if you have followed all instructions as described above, then it should work.
Admin
Tejas Deshmukh
Hello, Specially Thanks for this Idea. This plugin is working superb. I have added three extra fields in Perticular Term add, edit option. but when i create category in it at that term at that time I can’t store value for that extra three fields. So any suggestion for that?
alexut
But how do I get the data out of the archive page? you should add this also as this is a common request.
Kisshomaru
Brilliant! You have no ideea how much time I spent looking for a way to add “quantities” to “products”. This not being a commerce site, it was cumbersome to have a food post tied to an Ingredients taxonomy and not to be able to modify the number of cucumbers for each post.
Thank You!
Mike Jackson
Hi – I’m having trouble getting this to work. I have the data fields visible in my custom taxonomy but I cannot call the data in my brand-description.php using the php code you pasted at the bottom of your article. It doesn’t show an error, it just doesn’t work.
I’d really appreciate some further explanation with this if you have the time.
Thanks
Mike Jackson
This is quite a find! Been trying to solve this for a few weeks. Any idea how to add the new fields to the columns?
Mike Jackson
I’m also having trouble outputting anything on the page. I have this code applied and data in the fields but nothing showing on the site
term_id,’textarea_field_id’);
echo $saved_data;
?>
Editorial Staff
This code works on taxonomy archive page. If it is not displaying then chances are that the code is not able to get the taxonomy ID. At least that would be my guess.
-Syed
Admin
FJ
Well, this sounds nice and did the trick on the categories but for any reason, it didn’t on a custom taxonomy of mine. Did I miss something ? Is there a hook somewhere I didn’t look at ?
Anyway thanks a lot for those enlightening on Ohad’s work. I hanged around it wondering how on earth I could use it properly. I’m just the do-it-yourself type, not a real developper, I’m sure you’ll have understood already.
Thanks again.
Editorial Staff
In line 24 of example-usage.php, you should be able to specify your custom taxonomy.
Admin
Ben
To clarify – Line 24 of taxonomy-fields.php
‘pages’ => array(‘category’), // taxonomy name, accept categories, post_tag and custom taxonomies
CHANGE the XXX to whatever your custom taxonomy is called
‘pages’ => array(‘xxxxx’), // taxonomy name, accept categories, post_tag and custom taxonomies
Kobbe
@ Editor please forgive me, How do i output a text field
Editorial Staff
You have to use the PHP code that we shared. Make sure to change the field name to the one that you have.
Admin
Kobbe
Thanks editor i really appreciate for the reply, This is how class-usage-demo.php – http://pastebin.com/ctZPeS0w
This is what i’m doing but not displaying/outputting anything what am i doing wrong..? and is it possible to display the code (if possible) anywhere in my theme…Thanks
Editorial Staff
The code you have is simply setting up the admin side of things. To display the code, look at the PHP code that we have shared in the article. You have to use that in your taxonomy archive file.
gaurav kaushik
its cool..
but where it save the data…? in postmeta table or it create a new table?
Editorial Staff
It does it in the options table.
Admin
Gaurav Kaushik
can we change the backend of this plugin..i mean we want to create a termmeta table (meta_id,term_id,meta_key,meta_value) ..and save the taxonomy meta here…or connect it with this plugin? http://wordpress.org/extend/plugins/simple-term-meta/
Jim
Cool stuff. I will implement this on our blog in the future.
Michelle
Oh thanks you so much, I’ve been wondering how to identify tags as being English or Spanish for my bilingual site – this helps enormously
Jaime
I actually just finished coding up custom fields for a custom taxonomy for a project I’m working on. I love the flexibility – will certainly check out the plugin for future projects!
Editorial Staff
Yes that is the best part about it. We love stumbling onto libraries like this one which makes the life of developers much easier.
Admin